Killing Floor 2

Killing Floor 2

139 ratings
In-depth Berserker Guide.
By @TheyCallMePinCushion
Hello again & welcome to yet another guide by I, El Cerealous Killus.

This guide is on how to be a good solo & team player while on Berserker. This guide will focus mainly on Hell on Earth but will be useful to all difficulties as it is highly focused on giving you the knowledge in hopes for you to gain the skills to succeed on Hell on Earth.

Good luck to you all and hopefully this guide helps new & old players learn new things.
   
Award
Favorite
Favorited
Unfavorite
Introduction.
Welcome to another of my guides for Killing Floor 2.

Everybody knows who the Berserker is, "The guy that steals all the kills off you". "The guy who is too OP". "The class that ruins the game on multiplayer for others".

These are just a few of the comments I see on nearly all guides on the Steam Community page, well I'm here to make a guide for this so called "OP" class, i'm also here to give different ways for you as the Berserker to be useful to your team & not just yourself. So with all that said kick back, relax and enjoy learning about everybody's favourite class, "the Berserker".

Killing Floor 2 is a VERY tough game so I completely understand & I also remember my very first few days in the killing field as things are different, very different infact from Killing Floor 1.

First up before I begin.
This guide is constantly evolving so always check back here for new things, secondly this guide is not 100% garanteed to bring you success. Killing Floor 2 is all about making mistakes and learning from them by practicing. This game REQUIRES (especially when playing on higher difficulties) for you to learn how your enemies react to you, what makes them dangerous & how to avoid those dangers in order to dispatch them quickly, efficiently & without taking any risks.

Guide Rules:
With every one of my guides there are rules for the community to follow.
  • Everyone has a right to speak, if you do not like what somebody else has to say, take your mean comments elsewhere. Your hateful comments will be removed if not buried under all the good comments.

  • Community input is highly encouraged just remember the above rule!
Other cool things for you to check out (If you like this guide):
  • I host a Killing Floor 2 server, this server is located in Sydney, Australia.
    While I am accepting of all nationalities, races, genders, etc, I will warn you that if you have high ping your experience will not be optimal, I also reserve the right to kick/ban you if you are causing ANY problems while on my server or to my community base.

    Server IP 1# Whitelist: 119.252.190.147:7877
    Server IP 2# Whitelist/Blacklist: 119.252.190.147:7077
    NOTE: Both Servers are Hell on Earth!

  • Like our servers or my guide? Join our Official Steam Community: https://steamproxy.net/groups/Procrastination_Zone
Come talk to me in person on the servers or join the group and get in on all the juicy tidbits before others.

Lastly if you like this guide give it a thumbs up and a favourite so that I can help other people! This means more publicity for me & more helpful community members.
Changelogs.
Keep an eye out here so you can check out anything new which I may have updated!

22/11/2015 - Initial release.
  • Nothing new, initial release date.
26/11/2015 - Changes:
  • Added a new boss to the Boss Section.
    Information is limited but I've added all the information I can.
30/11/2015 - Changes:
  • Updated ZED's Section with new layout. Low, Moderate & High Threats.
    Each of the ZED's are now placed in their respective category dependent on their preceived threat level.
  • Updated all weapons in each of the weapons sections with their damage types.
  • Updates all ZED's with their attacking damage types.
  • Updated all ZED's with their damage type resistances.
  • Updated all ZED's with their damage type weaknesses.
2/12/2015:
  • Fixed up some missing details in the Block skill in the "How the Skill Tree Works" section of the guide.
    Thanks to Thrakmor for the correction.
11/12/2015 - Changes:
  • Updated perk screenshots to the latest build version.
  • Fixed some missing information.
13/12/2015 - Changes:
  • New ZED Files released on the Stalker, this has been added to the guide in the Additional Enemies section.
18/12/2015 - Changes:
  • A new ZED Files was released & I have added it to the additional enemies section.
A Berserkers Overview: What Makes a Berserker?
The Berserker *AYNK


The Killing Floor 2 Berserker once was something to laugh at, but now the Berserker is not a laughing matter. With the capability to knockdown enemies & withstand brutal beatings the Berserker is top dog on the killing floor.

What makes the Berserker:
Above is the Berserkers passive stats, all these stats are constant & keep you alive on the battlefield. They also help you to keep the ZED's off your team.
  • Perk Weapon Damage = 50% more damage at 25.
  • Melee Attack Speed = 10% faster at 25.
  • Melee Movement Speed = 25% faster movement with melee weapon drawn at 25.
  • Damage Resistance = 25% more damage reduction at 25.
  • Night Vision for those dark spots on the map.
  • Clot grabbing resistance. (Because you're a slick SOB.)

Including the skills in the Perk Tree, you can see that the Berserker is now pretty much the equivelent of what the Medic is:


Tier 1: Unlocks at Level 5.
Poison Resistance: You gain a 40% resistance to poisonous attacks & effects.

Sonic Resistance: You gain a 40% resistance to Sonic attacks from Sirens.


Tier 2: Unlocks at Level 10.
Vampire: You will gain 3 points of health from every ZED kill with any On-Perk Berserker weapon.

Fortitude: Give yourself an edge on the competition by bumping up your maximum health to 175.

Tier 3: Unlocks at Level 15.
Furious Defender: Want to deal more damage and swing faster? Well now you can, give yourself 20% more damage with all your Melee weapons & swing 10% faster with them as well.

Block: More of a defender type? How about giving yourself a bigger reason to block. Blocking attacks gives you a bonus where you'll do 50% more damage to ZED's that you manage to block.

Tier 4: Unlocks at Level 20.
Parry: Enjoy being a defender still? How about giving yourself another reason to be defensive. You'll get a 15% increase in attack speed & 30% more damage using light attacks for 4 seconds with your Melee weapons if you manage to block & parry a ZED.

Smash: Instead of defending yourself how about you get close and personal with your enemies & hit them hard. Your hard hits now do another 100% damage ontop of your (level)% damage, you also have a 50% chance to knock down all ZED's with head hits even Hans.

Tier 5: Unlocks at Level 25. (Effects are only available in ZED Time).
ZED Time - Spartan: Apparently Berserkers are not affected by real-time. During ZED Time you move at real-time speed, unfortunately your weapons still are affected by real-time but you can swing 50% faster as a Spartan! Did i forget to mention that parrys will also knockdown ZED's?

ZED Time - Menace: Still moving in real-time get seriously aggressive! All your attacks in ZED Time will cause ZED's to get stunned if you hit them in the head but not only that, you'll also have a 100% increase in stumble power as well!

So with all the information right in front of you, you're free to make your decisions on what you'd like to use, however for the purposes of this guide and for the higher difficulties I am going to recommend the setup for you so that you can ensure you're 100% effective throughout the match.

Recommended Setup:
Tier 1: Sonic Resistance.
Tier 2: Fortitude.
Tier 3: Furious Defender.
Tier 4: Smash.
Tier 5: Doesn't matter too much, you can choose which you prefer.
How the Skill Tree works.


Poison Resistance:
You gain a 40% resistance to poisonous attacks & effects.

For the times when a Medic isn't present & you really don't want to take poison damage from Bloats & Hans. This skill is certainly useful when you're playing on Solo or when you're playing in the earlier waves.


Sonic Resistance:
You gain a 40% resistance to Sonic attacks from Sirens.

This perk is more useful after wave 2 as wave 3 is when you start getting Siren spawns. We all know how bad Sirens are.


Vampire:
You will gain 4 points of health from every ZED kill with any On-Perk Berserker weapon.

The term *perk* weapon varies when we're talking about what the game thinks but i'm here to elaborate on that. You will gain 3 HP from any kills with all weapons that are Berserker class weapons.

Note: This does not count for the 9MM Berreta handgun or the Katana. Killing ZED's with these weapons does not give you any health regeneration.

You will also be capped at 100 health while using Vampire, this gives you a very big disadvantage at the later waves when Scrakes & Fleshpounds show up. I recommend only using Vampire during earlier waves & if you're a very competent Berserker who know how to survive.

Video:


Fortitude:
Give yourself an edge on the competition by bumping up your maximum health to 175.

Your base health is now boosted to 175% so enjoy that extra 75 Health, just remember that you can and will die if you are careless.


Note: You will not regenerate health by killing enemies in Fortitude, you are at the mercy of the Medic with this skill active.


Furious Defender:
Want to deal more damage and swing faster? Well now you can, give yourself 20% more damage with all your Melee weapons & swing 10% faster with them as well.

A base damage & speed increase is a lot better, at least personally for me than a chance to have increased damage as it's always there for you when you need it.


Block:
More of a defender type? How about giving yourself a bigger reason to block. Blocking attacks gives you a bonus where you'll do 50% more damage to ZED's that you manage to block.

Blocking an attack gives you a chance to score a 50% increase of damage, this can be useful sure but you also lose the 10% faster attack speed, it's kinda a win/lose situation. It all depends on your play style.

Note: The Block skill will only activate when you block an attack, if you parry the skill does not active. It's visually represented by a red trail left after you swing your weapon, it's pretty hard to see and can be easily missed.

Parry:
Enjoy being a defender still? How about giving yourself another reason to be defensive. You'll get a 15% increase in attack speed & 30% more damage using light attacks for 4 seconds with your Melee weapons if you manage to block & parry a ZED.

Parrying ZED attacks gives you an increase in attack speed and damage for 4 seconds, this is visually noticable when activate as you'll see an outline around your weapon.

Video:


Smash:
Instead of defending yourself how about you get close and personal with your enemies & hit them hard. Your hard hits now do another 100% damage ontop of your level% damage, you also have a 50% chance to knock down all ZED's with head hits even Hans.

Smash is a constant ability which is always active and always useful. The chance to knock down an enemy for 5 seconds can save lives and also gives you 5 seconds of free damage time before you need to run away from larger ZED's. It's sorta a no brainer don't you think? Considering it also works on Hans.

Video:


ZED Time - Spartan:
Apparently Berserkers are not affected by real-time. During ZED Time you move at real-time speed, unfortunately your weapons still are affected by real-time but you can swing 50% faster as a Spartan! Did i forget to mention that parrys will also knockdown ZED's?

Faster swing speeds in ZED Time + the parry knockdown is nice, there's no doubt about it. The ability to swing faster means you can deal more damage in ZED Time to enemies before they have a chance to swing at you, with a Commando chaining the ZED Time longer this can be a really good thing for a Berserker to have.

Video:


ZED Time - Menace:
Still moving in real-time get seriously aggressive! All your strong attacks in ZED Time will cause ZED's to get stunned if you hit them in the head but not only that, you'll also have a 100% increase in stumble power as well!

Having the ability to deal out serious damage and also a garenteed stun is also fantastic to have, of course the cost of this is that you lose your swinging speed and it really does slow you down. If you have 2 Berserkers on the team 1 with Menace and 1 with Spartan you can easily hold off both larger and weaker ZED's while the Commando chains together some serious ZED time for you to kill off the ZED's before they even deal damage.

Have the Spartan Berserker kill off the trash and let the Menace take on the bigger ZED's and you'll easily be a force to wreckon with.

Video:
The Berserkers Arsenal. (On-Perk)
As the Berserker you have a rather small selection of weapons to choose from, (for now). This consists of a selection of close range weaponary & a small choice of ranged weaponary.

A Berserkers Arsenal:

Lawn Mower Blade (On-Perk Knife):


Price: Spawned with.
Weight: 0 blocks.
Damage: Low - Moderate. (Changes as you level.)
Damage Types: Slash.
Speed: Slow - Very Fast. (Changes as you level.)
Class Specific? (Vampire Capatible): Yes.

100% DIY scalping, taking literally just a bit off the top is almost out of the question.

The Knife is the fastest melee weapon in the Berserkers arsenal and is one of the best weapons to dispatch a Clot or Stalker, it has low damage but is easily balanced out by how fast you can swing it. If you're needing to make death quick then you should be using this weapon.

9MM Beretta Sidearm:


Weapon Cost: £110 (also spawned with.)
Ammo Cost: £10 magazine - £140 fill.
Magazine Capacity: 15 rounds.
Backup Capacity: 195 rounds.
Total Capacity: 210 rounds - 14 clips.
Weight: 0 - 1 with duals.
Damage: Low.
Damage Types: Projectile.
Range: Moderate.
Fire Rate: Moderate - Fast.
Class Specific? (Vampire Capatible): No.

The 9MM Beretta is the standard sidearm for all classes & will give experience to the class you are currently playing on.

Crovel:


Weapon Cost: £200
Weight: 4 Blocks.
Damage: Low - Moderate.
Damage Types: Slash & Blunt.
Range: Close.
Swing Speed: Moderate - Fast.
Class Specific? (Vampire Capatible): Yes.

The all purpose Crovel is a good tool to have on the battlefield, want to get into a door that is locked? It has got you covered. Want to dig a hole? It has got you covered. Want to crack some poor saps skull open? Crovel has got you covered son! This tool is effective for dealing with *trash mobs.

Vlad the Impailer:


Weapon Cost: £650.
Ammo Cost: £25 a clip - £225 fill.
Magazine Capacity: 42 nails.
Backup Capacity: 336 nails.
Total Capacity: 378 total nails - 9 clips.
Weight: 6 Blocks.
Damage: Moderate.
Damage Types: Projectile & Piercing.
Range: Far.
Fire Speed: Fast.
Firing Modes: Singe Shot - 7 Nail Shotgun.
Class Specific? (Vampire Capatible): Yes.

"Vlad is our friendly Russian friend. He keeps the ZED's at bay and keeps the walls and floors held together on the battlefield. If ever you are in need of a friend, just call on Vlad."

Vlad has rather high damage, very good range in single fire mode & good riqochetting to hit multiple targets at once, even if you miss them you're bound to get more than 1. Vlad is extremely useful if you're using the Vampire perk.

ZweiHander:


Weapon Cost: £1000.
Weight: 6 Blocks.
Damage: High + Knockdown.
Damage Types: Slash & Blunt.
Range: Moderate.
Swing Speed: Slow - Moderate. (Changes as you level.)
Class Specific? (Vampire Capatible): Yes.

"The "ZweiHander" translated from German is Two Hander. It's a Claymore sword, used back in the medevil times to carve a nice big hole in the victims that are stupid enough to stand infront of it."

While the Claymore is a very slow weapon it's highly damaging & causes knockdown on all of the ZED's you hit with it. The main issue is that it won't always knock enemies down & the ones that it does knock down it will just make really angry.

Pulverizer:


Weapon Cost: £1100.
Ammo Cost: £50 a clip - £350 fill.
Magazine Capacity: 5 shells.
Backup Capacity: 30 shells.
Total Capacity: 35 total shells - 7 clips.
Weight: 6 Blocks.
Damage: Moderate - High. + Explosive Damage.
Damage Types: Blunt & Explosives.
Range: Moderate.
Swing Speed: Slow - Fast. (Changes as you level.)
Class Specific? (Vampire Capatible): Yes.

The Pulverizer is a modified Sledge Hammer which deals out heavy damage, this modified pounder has HE Shotgun rounds in an attached magazine on the side, which when you strike the plunger detonates the explosive that soon makes chunks of the ZED's fly. If you want to be a good Medic you should carry around the Pulverizer & the HM-Tech Assault Rifle, this will make you a force to be reckoned with.

Eviscerator:


Weapon Cost: £1500.
Saw Blade Cost: £100 a clip - £500 fill.
Petrolium Cost: £10 a litre - £250 fill.
Magazine Capacity: 5 Saw Blades & 250 Petrol.
Backup Capacity: 30 Blades.
Total Capacity: 35 Blades total nails - 250 Petrol.
Weight: 10 Blocks.
Damage: High.
Damage Types: Slash & Projectile.
Range: Far.
Fire Speed: Fast.
Firing Modes: Saw Blade Launcher - Chainsaw Blade Melee.
Class Specific? (Vampire Capatible): Yes.

"If the Eviscerator is good for 1 thing, it's good at evicerating it's oppenents. You'll be making soup pretty quickly."

Jokes aside, this weapon is alright when you're using Vampire, otherwise it's nothing fantastic. It's a muckup of the Killing Floor 1 Buzzsaw Bow and the Chainsaw. It could have been as powerful as both of those combined but in the end it feels like you can spend your money on something better. Your movement speed is impacted severly while equiped & is not really worth paying £1500 for when you can get the Claymore and deal more damage + knockdown the enemies.
The Berserkers Arsenal. (EMP Grenade)
This is going to be a little bit different than my other guides as the Berserkers grenade requires some pretty thorough explain on how it works.

Electro Magnetic Pulse Grenade (EMP):


Price: £50 each - £250 fill.
Damage: Low.
Damage Type: Electricity.
Range: Moderate.
Special Traits: EMP's slow ZED's down, cause them to panic & stop attack, decreases the ZED's defenses and makes them take more damage, stops them from being able to use special attacks such as Sirens screaming and Husks napalm cannon.
Class Specific? (Vampire Capatible): No.

The EMP grenade is a less damaging grenade than all of the other perk grenades however, the idea of it isn't to cause damage it's to stop ZED's from being a threat by eliminating their ability to be dangerous. The way it does that is by disabling ZED's core abilities which make them a threat.

These abilities are:
  • Cysts: Stops the Cyst from attacking you, it also disables their ability to grab you & run.

  • Clots: Stops the Clot from attacking you, it also disables their ability to grab you & run.

  • Slashers: Stops the Slasher from attacking you for a short time, it also disables their ability to grab you & run.

  • Gorefasts: Stops Gorefasts from being able to attack you for a short time, it disables their ability to do their *AOE attacks and stops them from being able to charge at you.

  • Bloats: Stops Bloats from attacking you for a short time, disables their ability to vomit and charge at players.

  • Stalkers: Stops Stalkers from attacking you for a short time, disables their ability to cloak and move as fast.

  • Crawlers: Stops Crawlers from attacking you for a short time, disables their ability to lunge, jump & move fast after you.

  • Sirens: Stops Sirens from attacking you as often, disables their ability to scream for a short time but they will attempt to bite and scratch you on occasions.

  • Husks: Stops Husks from being able to attack you as often, disables their ability to use the Napalm Cannon on you, stops them from running and using their suicide ability.

  • Scrakes: Stops Scrakes from attacking you as often, slows down a Scrakes attacking speed, stops them from being able to do their *AOE attacks, slicing chainsaw move & from doing their running raging for a short time but doesn't stop them all together.

  • Fleshpounds: Stops Fleshpounds from being able to attack you as often, stops them from being able to do their *AOE attacks, stops them from doing their charge blocking attacks which shields their core and head, stops them from doing their running charge for a short time & stop their rage they will not remain aggressive after the affliction fades unless they're 1 of the 5 remaining ZED's for the wave.

  • Hans: Stops Hans from being able to use ranged attacks as often, stops Hans from running as fast.

Weaker ZED's become afflicted easier than stronger ZED's do but it's more crucial to your success to save those EMP's for when you really need them. Here's the amount of EMP's required to afflict each ZED.

  • Cyst: 1 EMP to afflict, Lasts for 5 seconds & takes another 5 seconds to become afflicted again.

  • Clot: 1 EMP to afflict, Lasts for 5 seconds & takes another 5 seconds to become afflicted again.

  • Slasher: 1 EMP to afflict, Lasts for 5 seconds & takes another 5 seconds to become afflicted again.

  • Gorefast: 1 EMP to afflict, Lasts for 5 seconds & takes another 5 seconds to become afflicted again.

  • Bloat: 1 EMP to afflict, Lasts for 5 seconds & takes another 5 seconds to become afflicted again.

  • Stalker: 1 EMP to afflict, Lasts for 5 seconds & takes another 5 seconds to become afflicted again.

  • Crawler: 1 EMP to afflict, Lasts for 5 seconds & takes another 5 seconds to become afflicted again.

  • Husk: 2 EMP's to afflict, Lasts for 5 seconds & takes another 5 seconds to become afflicted again.

  • Siren: 2 EMP's to afflict, Lasts for 5 seconds & takes another 5 seconds to become afflicted again.

  • Scrake: 2 EMP's to afflict, Lasts for 5 seconds & takes another 5 seconds to become afflicted again.

  • Fleshpound: 2 EMP's to afflict, Lasts for 3 seconds & takes another 10 seconds to become afflicted again.

  • Hans: 6 EMP's to afflict, Lasts for 3 seconds & takes another 30 seconds to become afflicted again.

As you can see the afflictions & affliction times are different for each of the ZED's. Some last longer than others & other ZED's require more EMP's to become afflicated.

Video:
The Berserkers Arsenal. (Off-Perk)
Medic Weaponry:
HM-Tech 101 Medic Handgun:


Weapon Cost: £200
Ammo Cost: £10 magazine - £160 fill.
Magazine Capacity: 15 rounds.
Backup Capacity: 225 rounds.
Total Capacity: 240 rounds - 16 magazines.
Weight: 1 Block.
Damage: Low.
Range: Moderate.
Fire Rate: Moderate - Fast.
Dart Regeneration: 15 seconds - Slow.
Dart Usage: 50% per dart - total 2 darts.

The HM-Tech 101 Medic Handgun is standard equipment for all Medics and will be given to the player on spawn, this special Handgun is designed by Horzine and will not only heal your teammates with it's specially designed darts but will also cure the enemy too, with special 9MM bullet holes.

HM-Tech 201 Medic Sub-Machinegun:


Weapon Cost: £650
Ammo Cost: £15 magazine - £135 fill.
Magazine Capacity: 30 rounds.
Backup Capacity: 330 rounds.
Total Capacity: 360 rounds - 12 magazines.
Weight: 3 Blocks.
Damage: Low - Moderate.
Range: Close - Moderate.
Fire Rate: Fast.
Dart Regeneration: 15 seconds - Slow.
Dart Usage: 40% per dart - total 2 darts.

The HM-Tech 201 Medic SMG is a tier 2 firearm for the Medic, it is designed by Horzine for use in the field, with a high rate of fire but moderate to low damage it's a cheap and also lighter alternative to the Tier 3 weapons if you want to carry around a more suitable firearm. As with the other HM-Tech weapons it will heal your teammates as well as cure the enemy.

HM-Tech Medic 301 Shotgun:


Weapon Cost: £1100.
Ammo Cost: £30 magazine - £180 fill.
Magazine Capacity: 10 shells.
Backup Capacity: 50 shells.
Total Capacity: 60 shells - 6 magazines.
Weight: 6 Blocks.
Damage: Moderate - High.
Range: Close - Moderate.
Fire Rate: Fast.
Dart Regeneration: 12 seconds - Moderate.
Dart Usage: 40% per dart - total 3 darts.

The HM-Tech 301 Medic Shotgun is a tier 3 firearm for the Medic, it is designed by Horzine for use on the field, with a moderate - high rate of fire and moderate - high damage to boot it's one of the best weapons for the Medic to carry around out on the battlefield. As with all the other HM-Tech weapons it's perfect for healing your team with fast regenerating darts and good ZED handling capabilities. If you can't have the Assault Rifle take this bad boy.

HM-Tech 401 Medic Assault Rifle:


Weapon Cost: £1500
Ammo Cost: £20 magazine - £220 fill.
Magazine Capacity: 30 rounds.
Backup Capacity: 300 rounds.
Total Capacity: 330 rounds - 11 magazines.
Weight: 7 Blocks.
Damage: Very High.
Range: Moderate - Far.
Fire Rate: Moderate.
Dart Regeneration: 10 seconds - Fast.
Dart Usage: 30% per dart - total 4 darts.

The HM-Tech 401 Medic Assault Rifle is the optimal choice for a Medic in the killing field. This tier 3 weapon is designed to keep you and your teammates alive at all times in the battle, with its lightening fast regeneration and its high firepower this is the weapon you want when the sh*t hits the fan. As with all HM-Tech weapons this will not only heal but cure the ZED's.

Other Class Weaponary:
MB500 Pump Action Shotgun:


Weapon Cost: £200
Ammo Cost: £40 a box of 8 - £240 fill.
Magazine Capacity: 7 shells in the tube magazine & 1 in the chamber.
Backup Capacity: 40 shells backup.
Total Capacity: 48 shells.
Weight: 5 Blocks.
Damage: Moderate.
Damage Type: Projectile & Piercing.
Fire Rate: Moderate.
Range: Close.

The MB500 Pump Action 12 Gauge Shotgun is a good early wave weapon, perfect for clearing paths and not costing you a dime to run around with, (since it spawns around the map frequently with ammo boxes). Got a ZED problem? Call the MB500 Shotgun. As an added bonus the Suppressor attached to the muzzle will not only stop the ZED's seeing the muzzleflash of death but your ears will be pleased with hearing the sounds of those fantastic chambering shells and the click of the pump slide.

Side by Side 12 Gauge Shotgun (Hunting Shotgun):


Weapon Cost: £650
Ammo Cost: £10 for box of 8 - £240 fill.
Chamber Capacity: 2 shell. (1 in each chamber.)
Backup Capacity: 46 shells backup.
[bTotal Capacity:[/b] 48 shells.
Weight: 4 Blocks.
Damage: Moderate - High.
Damage Type: Projectile & Piercing.
Range: Close.
Fire Rate: Fast.

The classic Double Barreled, Side by Side, Hunting Shotgun used worldwide by game hunters for generations. This beast will knock down any ZED's in a large 90 degree radius in front of you and almost always instant kill them as well. It is not only highly damaging but cheap & lightweight so if you're looking for a good off-perk weapon then look no further because this beast has you covered.

Dragon's Breath Trenchgun:


Weapon Cost: £650
Ammo Cost: £30 a box of 6 - £230 fill.
Magazine Capacity: 5 in the tube magazine & 1 in the chamber.
Backup Capacity: 40 shells backup.
Total Capacity: 48 shells.
Weight: 6 Blocks.
Damage: Moderate - High.
Damage Type: Projectile & Fire.
Range: Close.
Fire Rate: Moderate.

The Trenchgun was a favourite during the first World War for clearing out the trenchs on the battlefield, (hence the name Trenchgun). It was also great for clearing out bunkers and such in Vietnam, hell it's just an all round great collectors gun as well. Combined it with Dragon's Breath, it's not only old & nice to look at but it's also a great party starter. "You'll be burning down the house in no time."

AK-12 Assault Rifle:


Weapon Cost: £1100
Ammo Cost: £25 magazine - £200 fill.
Magazine Capacity: 30 rounds.
Backup Capacity: 210 rounds.
Total Capacity: 240 rounds - 8 magazines.
Weight: 6 Blocks.
Damage: Moderate - High.
Damage Type: Projectile.
Range: Close - Moderate.
Fire Rate: Slow - Moderate.

The classic Russian assault rifle that everybody has at least heard of, Automatic Kalashnikov high firepower, moderate speed but kicks like a bull on steroids, if you want precision make sure you're firing in bursts or with single fire mode.

SCAR-H Assault Rifle:


Weapon Cost: £1500
Ammo Cost: £30 magazine - £450 fill.
Magazine Capacity: 20 rounds.
Backup Capacity: 280 rounds.
Total Capacity: 300 bullets - 15 magazines.
Weight: 6 Blocks.
Damage: Moderate - High.
Damage Type: Projectile.
Range: Moderate - Far.
Fire Rate: Moderate - Fast.

The SCAR-H Assault Rifle, a very highly praised firearm & so it should be, this weapon is not only accurate, damaging and lightweight, it's nice to look at as well. If you want damage, range and fire rate, this is a more expensive alternative to the AK-12.
The Berserker Arsenal. (Off-Perk) Continued.
AA12 Full-Automatic Assault Shotgun:


Weapon Cost: £1700.
Ammo Cost: £100 clip - £400 fill.
Magazine Capacity: 20 in the drum magazine.
Backup Capacity: 60 shells backup.
Total Capacity: 80 shells - 4 drum magazines.
Weight: 10 Blocks.
Damage: High - Very High.
Damage Type: Projectile & Piercing.
Fire Rate: Moderate - Fast.
Range: Close - Moderate.

Ok now ♥♥♥♥ just got really serious, if you want to maximize your damage output then you're going to want the mother of all firearms, the AA12 Full-Auto Assault Shotgun is your 1 stop shop for power, accuracy, damage & fire rate. No questions to asked and no alternatives.

Microwave Gun?!:


Weapon Cost: £1500
Ammo Cost: £75 for 25 charges - £300 fill.
Charge Capacity: 100 charges.
Ammo Capacity: 300 backup charges.
Total Capacity: 400 charges - 4 batteries.
Weight: 9 Blocks.
Damage: Very High.
Damage Type: Microwaves & Fire.
Fire Rate: Fast.
Range: Close - Moderate.

The Microwave Gun is a very.... unique? Weapon that is sorta here nor there in terms of explaination. It's a weapon that's certainly uncommon & not very well known about nor seen too often. I guess Horzine had someone on the weapon development team who cooked their lunch a few minutes too long in the mircrowave and thought that they could put their bad cooking skills to some good use on the battle field.
Suggested Loadouts.
In this section i'm going to go over a few of the different loadouts you can select from.
Knowing Your Enemies. (Low Threats)
Clots:
In Killing Floor 2 there are 3 variations to the Clot.

Each of the Clot variations have slightly different abilities & attack styles but all are equally versed in damage and general attack styles.

Under Developed Clot (Cyst):


Danger Level: Low - Moderate.
Attack Styles: Close ranged melee & close ranged lunging & grappling.
Attack Speed: Very Slow - Slow.
Attacking Damage Types: Slash.
Damage Type Resistances: Microwaves - 0.5.
Damage Type Weaknesses: Exceptionally weak to almost everything.
Movement Speed: Very Slow - Slow.
Defensive Maneuvers: Side dodging & falling over on occasions.
Enemy Rating: Overall Weak.

The Cyst is the under developed variant of the standard Clot. The Cyst is clearly unready for production and was brought out of the cloaning station way too early. The Cyst is the slowest variant of the Clot production line & is the weakest version of the lot. The Cyst is generally slow, not very attractive & is usually the easiest to kill due to the fact it's normally moving the slowest.

Just be careful because just like the other 2 variants it can grab onto you, try not to run ahead too far otherwise you'll find yourself getting swarmed by multiple Cysts at once.

Common Clot:


Danger Level: Low - Moderate.
Attack Styles: Close ranged melee & close ranged lunging & grappling.
Attack Speed: Slow - Moderate.
Attacking Damage Types: Slash.
Damage Type Resistances: Microwaves - 0.5.
Damage Type Weaknesses: Exceptionally weak to almost everything.
Movement Speed: Slow - Moderate.
Defensive Maneuvers: Side dodging and ducking.
Enemy Rating: Weak - Low Threat.

The Clot is the standard variant of the 3 variants, it's the middle ground of Clots, not slow, not fast, not very dangerous but at the same time more of a threat than the Cyst. The Clot just like the Cyst will often lag behind the other ZED's but has the potential just like the rest to gang up on you in packs and cause you a lot of trouble if you get swarmed. Don't get caught in a Clot Swarm and you shouldn't have too much trouble but getting swamped and you might find yourself in a lot of trouble.

Agitated Clot (Slasher):


Danger Level: Moderate.
Attack Styles: Close ranged melee, jump dive & slash & grappling.
Attack Speed: Moderate - Fast.
Attacking Damage Types: Slash.
Damage Type Resistances: Microwaves - 0.5.
Damage Type Weaknesses: Exceptionally weak to almost everything.
Movement Speed: Moderate - Fast.
Defensive Maneuvers: Jump diving, dodge roll, side step & duck.
Enemy Rating: Low - Moderate Threat.

The Slasher variant of the Clot is by far the most dangerous Clot variant, this deliberately creepy, fast moving maniac on 2 legs will cause you a lot of trouble, think of the regular Clot but now on steroids and out for your head on a pike. Yep that's the Slasher in a nutshell. Let the Slasher near you and you'll surely have a lot of trouble at hand, he's fast, will grapple you very easily and most of all will throw multiple attacks at you all in the short time they're on your trail. Take out these ones pretty quickly if you don't want to take a lot of damage.

Stalker:


Danger Level: Moderate.
Attack Styles: Close ranged melee. close ranged lunge.
Attack Speed: Moderate - Fast.
Attacking Damage Types: Slash.
Damage Type Resistances: Poison - 0.5 & Microwaves - 0.5.
Damage Type Weaknesses: No marginal weaknesses.
Movement Speed: Moderate - Fast.
Defensive Maneuvers: Cloaking technology, spinning dodges, cartwheels, summer salts, etc.
Enemy Rating: Weak but dangerous.

The Stalker is a humanoid female that can go invisible at will, she will often sneak up behind or in front of you and block your bullets or get in your way while you're trying to make a quick escape through a door or window. Although very weak it's not her physical strength and damage that makes her a tough opponent, it is because of her cloaking technology she is a very annoying opponent to deal with as they can appear from anywhere at anytime without you even being aware of their presence, so keep an ear open for the noises they make. The biggest threat they pose is blocking your grenades and causing you to blow up from your own explosives.

Damage Scaling Note:
Assumption damage scale:
  • 2.0 - 200% = Double.
  • 1.5 - 150% = Average damage and a half.
  • 1.0 - 100% = Standard damage.
  • 0.5 - 50% = Half damage than normal.
Knowing Your Enemies. (Moderate Threats)
Bloat:


Danger Level: Low - Moderate.
Attack Styles: Close ranged melee & close ranged spew attack.
Attack Speed: Slow.
Attacking Damage Types: Slash & Poison.
Damage Type Resistances: Projectiles - 0.5, Explosives - 0.5, Poison - 0.5, Blunt - 0.5.
Damage Type Weaknesses: Exceptionally weak to Fire, Slash, Pierce.
Movement Speed: Slow.
Defensive Maneuvers: The Bloat will try to move out of the way of incoming attacks on occasions. (Very unsuccessfully)
Enemy Rating: Low - Moderate Threat.

The Bloat is big & fat, easy to hit target with no strings attached. The only real threat of the Bloat is their spew attack & the fact that they often block doors and windows which are your escape routes. Keep these big boys at a distance and you won't have too many problems, in fact more often than not the Bloat will help you take out the *trash mobs with it's spew attack.

Gorefast:


Danger Level: High.
Attack Styles: Close range melee, lunging slash, dive jump slash helicopter *AOE blade swing.
Attack Speed: Fast.
Attacking Damage Types: Slash.
Damage Type Resistances: No marginal resistances.
Damage Type Weaknesses: No marginal weaknesses.
Movement Speed: Slow - Fast
Defensive Maneuvers: Jumping dodge, side slide.
Enemy Rating: Moderate - High Threat.

The Gorefast is a big red skinless humanoid composed of muscle tissue & bone. They're a vicious brood that will start calmly walking towards you, only to run and lunge at you when they get close enough to their intended target. Take them out at a distance before they become a bigger threat.

Crawler:


Danger Level: Moderate - High.
Attack Styles: Close ranged melee & moderate distance lunging.
Attack Speed: Fast - Very Fast.
Attacking Damage Types: Slash.
Damage Type Resistances: Slash - 0.5 & Microwaves - 0.5.
Damage Type Weaknesses: Projectile - 2.0, Poison - 2.0, Blunt - 2.0.
Movement Speed: Fast - *Sanic. ( Reference. )
Defensive Maneuvers: Jumping dodge, side slide, rolling dodge.
Enemy Rating: Weak but not to be underestimated!

The Crawler, (although it is only a small little bug), is a pest and like all pests these things need to be eradicated instantly, 2 shots to the body or 1 shot to the head is enough to send them packing on all difficulties. 1 good way to deal with them is with a Flamethrower or you could just use an Assault Rifle, you can also melee them but it is not recommended because of the packs they spawn in. (Up to 6 Crawlers will spawn in 1 group). "Still don't think we have a pest problem?"

Damage Scaling Note:
Assumption damage scale:
  • 2.0 - 200% = Double.
  • 1.5 - 150% = Average damage and a half.
  • 1.0 - 100% = Standard damage.
  • 0.5 - 50% = Half damage than normal.
Knowing Your Enemies. (High Threats)
Husk:


Danger Level: CODE RED!
Attack Styles: Close range melee, long range napalm launcher, close range deep fry & suicidal low health rage.
Attack Speed: Moderate - Fast.
Attacking Damage Types: Fire, Slash, Explosive.
Damage Type Resistances: Fire - 0.5.
Damage Type Weaknesses: No marginal weaknesses.
Movement Speed: Moderate - Very Fast.
Defensive Maneuvers: Side step dodge, side stumble.
Enemy Rating: CODE RED! Take out ASAP.

The Husk is easily the most annoying enemy, Husks tend to be very much like Sirens & will hide behind the bigger ZED's and avoid your line of sight to stay alive, while they're hiding behind the enemies they tend to enrage them by burning them with their napalm cannon. These things will be the first of any enemy to enrage a Scrake or Fleshpound so try to target them as soon as you see them.

Siren:


Danger Level: CODE RED!
Attack Styles: Armour avoiding long range scream, close range biting and slashing.
Attack Speed: Fast.

Movement Speed: Moderate - Fast.
Defensive Maneuvers: Hiding behind other ZED's to avoid detection, forever bouncing head.
Enemy Rating: Relatively weak but CODE RED! Attack on sight.
Attacking Damage Types: Sonic & Slash.
Damage Type Resistances: No marginal resistances.
Damage Type Weaknesses: Explosives - 2.0.
The Siren is far from the pretty little princess she'd like you to believe, she always enjoyed singing & quite frankly Horzine found a way to make her pitch perfect tone become even clearer, by adding artificial megaphones into her voicebox. Now she can be the lead singer and have all the boys heads exploding from her perfect tone. "Ok i kid, really, serious. Shut her up before she screams."

Scrake:


Danger Level: CODE RED!
Attack Styles: Side swipe chainsaw, lunging chainsaw, forward quick thrust chainsaw, LOW HEALTH FURY!
Attack Speed: Very Fast.
Attacking Damage Types: Slash.
Damage Type Resistances: Explosives - 0.5 & Slash - 0.5.
Damage Type Weaknesses: Microwaves - 2.0 & RPG Projectile Impact - 4.0.
Movement Speed: Moderate - Very Fast.
Defensive Maneuvers: Dodging side step, lunging jump & stumbling steps.
Enemy Rating: CODE BLACK! Shoot to kill ONLY.

Ok so we all have those days, somebody pisses you off, you want to take a chainsaw to their head. We've all been there & we've all wanted to do that, however the Scrake takes this a little too seriously and has gone the extra 10 kilometers that nobody else wanted to risk. He's a big lumbering tower of fury, pi*s him off and that'll be the last thing you do.

How Do I Deal With A Scrake?
The best way to deal with a Scrake is NOT TO PANIC! Too often do i see people panic when they rage a Scrake or see a raged one lumbering towards them. Ok yeah it's scary but if you panic you WILL make mistakes & often you cannot recover from them.

Rule 1: DO NOT ATTACK A SCRAKE WITHOUT YOUR TEAMMATES OR UNLESS YOU ARE RULE 2!
Rule 2: DO NOT ATTACK A SCRAKE UNLESS YOU KNOW HOW TO DEAL WITH IT!
Rule 3: DO NOT ATTACK A SCRAKE UNTIL YOU ARE A SAFE DISTANCE FROM ANY OTHER ZED'S OR IT IS THE LAST ZED.
Rule 4: DO NOT GRENADE A SCRAKE WITH ANY FORM OF EXPLOSIVE OR MEDIC GRENADE!
Rule 5: Take your time dispatching Scrakes 1 at a time with your team, get your team to run excess Scrakes around the map while you and a few of the other team members take on the target Scrake 1 at a time.
And most importantly: Do not under any circumstances attack a Scrake that is chasing after you or your teammates unless it is raged already. The only time you should ever attack a Scrake is when you plan to kill it on the spot!

EVEN if they're getting swamped, if you're so inclined to help your teammate shoot the *trash that are attacking them, if they're going to die pi*sing off the Scrake won't help them or your team when it's bellowing down on you all in its raged state.

Fleshpound:


Danger Level: High Threat.
Attack Styles: Jumping lunge, ground pound smash, potato masher, upward thrust, enraged running smash, etc.
Attack Speed: Very Fast.
Attacking Damage Types: Smash & Slash.
Damage Type Resistances: Resistant to most damage types - 0.5. (Except weaknesses)
Damage Type Weaknesses: Explosives - 1.5, Piercing - 1.5, Microwaves - 1.0.
Movement Speed: Moderate - Very Fast.
Defensive Maneuvers: Side stepping dodge, jumping lunge.
Enemy Rating: CODE BLACK!

This abomination is Horzines biggest and baddest enemy there is in the game, however just because it is a towering hulk of a monster this does not mean it is the hardest of the enemies, in-fact it might shock you to know that the Fleshpound is the easier of the bigger ZED's to kill due to the fact it can easily be outrun & be killed without taking any damage, just don't let him mash your potatoes ok? He'll make a bloody mess.

How Do I Deal With A Fleshpound?
To be perfectly honest there are quite a few really easy ways to deal with a Fleshpound and in almost all cases you won't need to risk your life or take much damage (if any at all).

Way 1: The best way to deal with a Fleshpound is to simply outrun them and stay ahead of them, keep a wall between you and them then just let loose with 1 of your weapons on his head. If all goes well you can take his head clean off and reduce your ammo waste on their other spoungier body parts.

Update: Fleshpounds as of recent patches will continue to be angry and chase you down in their raged state. Keep on running ahead of them but don't be afraid to take a hit to save yourself or team from the constantly lumbering Fleshpound.

Way 2: This is a more multiplayer technique but you can get a melee weapon of any kind and parry block each of the Fleshpounds attacks (Keep in mind smaller melee weapons don't deduct as much damage, so parry with bigger weapons like the Pulverizer.) This will cause the Fleshpound to only deal small amounts of damage at a time, while your team lets loose on the Fleshpound and drops it very quickly. (Don't forget to medic grenade yourself!)

Note: This technique requires you to have good timing & melee skills, if you're not good at timing your blocks you CAN and WILL die very easily and very quickly so start practicing.

Other Ways:
There's some other ways of dealing with Fleshpounds and Scrakes of the 2 above mentioned ways don't work for you.

  • Hunting Shotgun technique.
  • AA12 spam.
  • Shooting the metal parts on all ZED's bodies does double damage or cancels out their attacks. (Make use of the chest plates in the Fleshpound as it does double damage and has a chance to cancel their rage.)

    Damage Scaling Note:
    Assumption damage scale:
    • 4.0 - 400% = Quadriple Damage.
    • 3.0 - 300% = Triple Damage.
    • 2.0 - 200% = Double Damage.
    • 1.5 - 150% = Average damage and a half.
    • 1.0 - 100% = Standard damage.
    • 0.5 - 50% = Half damage than normal.
More Indepth Enemy Readings. (Additional Section)
My overview of the enemies is pretty explainitory however i didn't cover everything about them just the need to know basics. Perhaps you want to know more about the enemies?

Lieutenant Skittles has kindly allowed me to link his informative write ups on the ZED's, check them out here:

Cyst:
http://steamproxy.net/sharedfiles/filedetails/?id=471616000

Clot:
http://steamproxy.net/sharedfiles/filedetails/?id=526046603

Slasher:
http://steamproxy.net/sharedfiles/filedetails/?id=537146694

Gorefast:
http://steamproxy.net/sharedfiles/filedetails/?id=545857763

Bloat:
http://steamproxy.net/sharedfiles/filedetails/?id=546426759

Crawler:
http://steamproxy.net/sharedfiles/filedetails/?id=546430444

Stalker:
http://steamproxy.net/sharedfiles/filedetails/?id=546431342

Husk::
http://steamproxy.net/sharedfiles/filedetails/?id=546433065&preview=true
Enemy Hints.
Useful Tips & Tricks to know on the Killing Floor.

We all by now know the basics of what each enemy does and how they react to the player but there's a lot more that you will learn as you play the game. Here are a few useful tips & some good things to know while you're here.

  • Each enemy has its strengths and it's weaknesses. (Try to learn what enemies are strong and weak to each of the classes & their weapons.)
Note: Most of these are discussed in the enemy sections above.
  • The last remaining 5 enemies of the wave all become agitated and enraged shortly after the sixth ZED is killed. Leaving a Scrake or Fleshpound alive during the last 5 ZED's means that they WILL NOT stop raging, this can be the death of your team if you're not strong enough to take them on. So make sure you only leave ZED's you know you & your team can handle alive passed 6.
Tip: Don't EVER leave a Fleshpound alive passed the last 5 ZED's, this is almost certainly game over for your team if you have a never calming Fleshpound running around the map.
  • All enemies can be parried, if you have good timing & lots of practise you can parry enemies strong attacks and reduce your damage.
Tip: Just because you can parry doesn't mean you always should, enemies have a certain time when you cannot parry their attacks. You can tell when the attacks are unable to be parried by the orange glow around the attacking enemies weapon or claws.
Boss Section.
In this section i'm going to go over the Bosses, their attacks and attack styles, weaknesses & their strengths.

Hans Volter:


Hans Volter is a 100 year old, crazy Nazi scientist who is being kept alive on Horzine designed life support system strapped to his back. This old geezer is capable of causing a ruckus among your team if they're not working together or if you're not coordinating correctly as a team in general, the key to success is working together to take him down.

Attack Styles:
  • Close ranged melee.
  • Long ranged machine guns.
  • Any range gas grenades.
  • Any range explosive grenades.
  • Close range AOE gas bomb. (Requires multiple targets surrounding Hans).
  • Low health vitality draining to regenerate health per phase.
Stage Variations:
Hans has 4 stage variations, each stage he gets more aggressive and his attacks get stronger, he also gets new attack styles and more frequently throws grenades.
  • Green (Starting phase): Hans is slow, he only has gas, explosives, close lunge, he has his AOE but it's his melee varient & his MKB machine guns in this phase.
  • Yellow (First drain): Hans is a bit stronger, he will use grenades more often and gains the ability to use a charging & slashing melee attack, he also starts to use his gas AOE.
  • Orange (Second drain): Hans becomes a lot more aggressive, he now throws grenades a lot more often, he will also not stop chasing you down, his lunging attacks go a lot longer and he becomes a much larger threat when he's chasing you down dealing a lot of damage and becoming a lot less likely to be parryable.
  • Red (Final drain): Hans is now at his strongest, yet at this phase he's also at his weakest since he will constantly throw his grenades at moving targets making him a standing bullet sponge. Hans will also become so aggressive as to constantly attempt to target 1 player until death, unless the player gets far enough away as to lose his attention.
Strengths:
  • Long range is 1 of Han's strengths.
  • Close range can also be a strength if you're not on guard.
  • His grenades are a strength, however his explosives are his biggest strength as the gas can easily be tanked by a person that has been vaccinated.
  • The chase before and during his draining of a player are also strong points for Hans as he is shielded and takes very little damage during this phase.
Weaknesses:
  • Getting in close and personal with melee.
  • 1 person confusing him by tanking him.
  • Players hiding behind walls and doors is a weakness to Hans as you can avoid his grenades.

The Patriarch:


Kevin Clamely or The Patriarch as he is more commonly known as, is the crazy scientist who was working on creating the "perfect super soldiers" (or more commonly known as the ZED's) to fight in the wars with unmatched powers, crazy strength and unbeatable odds they were meant to win any war, however that war wasn't meant to be what it is now.

Kevin knew he would be condemned for his work so he did the only thing he could think of, he turned himself into one of them. Kevin knew his children would never leave his side or hate him like the other disgusting humans would. Kevin is Horzine, he is innovation, he is death.


Note: The next part is all speculation for the most part and abilities which were avaliable back in Killing Floor 1. Tripwire has stated that most of the Patriarchs attacks have remained mostly the same except for innovations and some new attacks yet to be released.

Attack Styles:
  • Close ranged melee attacks.
  • Long to medium range Rocket Launcher.
  • Any range Minigun.
  • Close range AOE claw attacks. (Requires multiple targets surrounding the Patriarch).
  • Low health cloak & retreat to heal himself.

Stage Variations:
The Patriarch has 4 stage variations as he did in Killing Floor. Each of his stages require him to retreat and attempt to heal himself & each stage will make him stronger and give him new attacks. If he manages to heal himself he will let out a loud shreak of agony, after which he will cloak and persue his targets again for another attempt of killing them.

Note:
No information released about stages as of yet. We can expect each stage to increase his chance of charging a player, cloaking ability will be used more frequently as he heals, using his Rocket Launcher & Minigun more often.

Strengths:
  • Close range is one of the Patriarch's strengths as his melee attacks are fast and very damaging.
  • The ability to cloak is one of the Patriarchs strengths.
  • His Rocket Launcher & Minigun are strengths to a degree as they make him effective at all distances.
  • His ability to run fast is his main strength as he can catch up to fleeing victims with ease.
Weaknesses:
  • The Patriarch was weak to explosives in Killing Floor so as an assumption he will be weak to explosives in Killing Floor 2.
  • Melee is also another weakness to the Patriarch as he mainly targets the berserker and ignores the other players.
  • During his healing phase where he is attempting to run away, unlike Hans he's very weak and his only defense is his cloaking technology.
Strategies for Hans.
How Do I Effectively Deal With Hans?
There are a few different options to deal with Hans, first lets start with Solo and work our way to multiplayer.

Dealing with Hans in Solo:
The best way to kill Hans on any difficulty solo is by keeping close to him but at the same time keeping some form of large object between you and him so you can avoid his explosives, gas & machine guns, you can do this very easily as any class but it works best as a Medic due to the movement speed bonus you get and the fast healing and armour regeneration skills.

Keeping an object or wall between you and Hans as well as pumping into him with an AA12 will quickly drain him of his life and have him changing phases every 30 seconds. 15 AA12 shells on Solo in Hell on Earth is enough to have him change phases so long as all the pellets hit him. Whenever you take damage run circles around the wall or object and refill your health and armour, you want to make sure you are at 200 health at all times otherwise you will die quickly. If you're desperately low on health run through tight doors and corridors while tossing grenades on the path you plan to take, this can stun Hans with an EMP and stop him from being able to run, but you need to remember to shut doors behind you so you can slow Hans down enough to get hit by the EMP.

To kill Hans very fast on any difficulty during a solo game, I recommend this loadout:

Crovel:


AA12 Automatic Assault Shotgun:


Dealing with Hans in Multiplayer:
There are more options to do it in Multiplayer, there's the way you do it solo by using the confusion method. The other option is to kite him around the map and tackle him at a distance if you're not bold enough to get up close and personal, however you will need to pick an indoor route in order to close doors to slow him down otherwise he will catch up to you.

Option 1 (Tanking): You can tank Hans on multiplayer if you're a Berserker or a Medic. It's recommended that you as the Berserker do the tanking however, with a 6 player team on Hell on Earth you will want a minimum of 2 Medics and at least 1 Berserker, 2 Berserkers is recommended but with 2 GOOD and high level Medics they can keep 1 Berserker alive.

If the Berserker/Berserkers die during the tank it's possible for 1 of the Medics, (If you have more than 1), to take over the tank and become the primary target. The largest problems you'll have now is that you will take a lot more damage and be down 1 healer this can be crucial to success since 2 people healing is always stronger than 1.

The biggest difference now is that his health is a lot higher & that he will occasionally figure out a path to another one of your teammates which can cause this method to be a lot slower since he will run away after the targeted teammate.

Loadouts choices for Tanking method:

Loadout 1 (Tanker & Healer):
Medic Assault Rifle:


Claymore (ZweiHander):


Loadout 2 (Tanker or Runner):
Claymore (ZweiHander):


Trench Gun:


Loadout 3 (Damage Dealer Only.):
AA12:


Crovel:


Loadout 4 (Offensive & Defensive Tanker):
Trench Gun:


Medic Pistol:


Pulverizer:


Beating Hans on Multiplayer Option 1 (Video):


Beating Hans on Multiplayer Option 2: (Kiting Hans)
This option is less recommended but sometimes the only option is to run, if you have to run as i said above just make sure you take routes through buildings (THIS IS HIGHLY UNSAFE AND CAN RESULT IN A SANDWICH) If you get caught in a sandwich make use of your medic grenades to get you out of it and keep running and closing doors behind you.

It's just that simple really, run around, use doors and hide behind walls to avoid his guns or grenades, make use of windows as quick escape routes if you have to get out of there in a hurry and break course.

Loadouts:
You have significantly less options for loadout choices if you plan to kite since you'll want only long ranged weapons, the community will suggest some other good choices for weapons.

Loadout 1:
Claymore (ZweiHander):


Medic Assault Rifle:


Loadout 2:
Medic Assault Rifle:


Pulverizer:


Loadout 3:
AA12:


Crovel:


Loadout 4:
Trench Gun:


Medic Pistol:


Pulverizer:


Beating Hans on Multiplayer Option 2 (Video):
Boss Hints & Tips.
Useful hints & tips for all the bosses of Killing Floor 2:

The bosses of Killing Floor 2 can be tricky & will require a lot of play time to fully understand but each boss has its strengths & also its weaknesses.

Here's a few things you might find useful to know about them:

Tips & Tricks for Hans.
  • Hans has 4 phases he goes through & 3 heals, 1 for each of his stages until his final phase. Be aware of when he's going to change from 1 phase to the next.
Note: When Hans changes phases he's highly armoured & your bullets deal hardly any damage to him, it's best to let him grab 1 of your team in order to quickly dispatch of him. Remember to stick close to the person who is grabbed and heal them.
  • When Hans is in his healing stage he will only throw smoke grenades. You can (if you wish to kill him slowly but avoid a lot of the other harder stuff in his further phases), shoot him during these and be 100% safe so long as you move away from him after his animation finishes otherwise he will grab you and heal.
Note: This is really slow in multiplayer and it's not recommended, but is possible.
  • During each of Hans healing phases after he has finished healing, he will throw grenades. These grenades remain the same each game & it's useful to learn which to run from and which to tank through.
    The grenades each phase are:
  • First heal is explosives, not many but enough to take out your squad if you're not spread out a bit.
  • Second heal is gas, the gas grenades don't deal all that much damage & 2 Medics can easily out heal the damage it deals to a player with resistance to it. Don't bother running away from these grenades.
  • Final heal is explosives, this time however Hans throws out a lot of explosives and it's highly recommended that you don't stand around when they detonate as it can & will wipe the team out if you're not a good distance away.

  • Hans can be taken down very quickly from a well organized and highly skilled team of players (even on Hell on Earth). Hans takes a considerably high amount of damage from AA12 bullets to the metal part of his chest.
Note: If you want him dead quickly aim for his chest as a Support and let him have it.
  • There's a very short 3 second gap after Hans has finished his draining phase where he is open to taking some serious damage before he can attack or throw his grenades.
Note: Knowing this is a huge bonus as you can deal an incredible amount of damage before he even has a chance to attack you and if your team is good enough you can completely avoid him throwing any grenades during the start of the next phase. Be aware that there's also a delay from when his shield goes down after the draining process so wait a second before letting rip.
Tips & Tricks to Keeping Yourself Alive.
As the Berserker it's your job to keep the ZED's off your team, but hey sometimes you have got to look out for number 1 and that is you! So how do you keep yourself alive?

The answer to that is quite simple really, if it comes down to it and you're the last one alive:

  • While running utilize the lul periods where nothing is attacking you and is trying to catch up to you to inject yourself with your Syringe. Utilize your EMP grenades when you need to get away from groups of larger ZED's, the EMP's will stop them from running after you.

    NOTE: Every amount of damage you take in Killing Floor affects your overall movement speed and you will become slower so never let yourself get low on health. At 50% your movement speed becomes affected and is noticeable, at 25% you become a limping target and are moving at your slowest, so make sure you don't get this low!

  • Your EMP grenades don't deal a lot of damage but they do stop ZED's from being able to run, they also stop ZED's from being able to do special attacks such as disabling Sirens from screaming & Husks from shooting their napalm cannons, not only this but they also cause ZED's to take increased damage while shocked. If you need some breathing room or you want to stop a raged FP, throw an EMP at them and hope they get stunned.

  • Swamped by Clots, Crawlers or Stalkers? Cut a gap in them and keep moving, the moment you get trapped you're easy prey for the rest of the horde! Don't get yourself cornered & never EMP your feet. EMP's deal 50 damage if you're standing ontop of them or 20 damage if you're not right ontop of them. It's not worth the risk of death.

  • Run out of ammunition for your weapons? Supply runs are important, never forget about the ammo drops around the map. They might be scarce but they're important to keeping you alive. Ignore the ZED's and find some ammo or you'll surely die.

  • Last one alive? Utilize your teammates guns that are lying on the ground, they can save your life and as a bonus if you've got spare time to grab your teammates weapons from their spot of death they will thank you for taking them to the trader so it saves them precious seconds at the trader!

  • You're a Berserker running around with the Fortitude skill? 200 health is a lot of health and nice to have BUT this doesn't make you invincible. Don't ever fool yourself with this, a careless Berserker will end up dead. Only take things you know you can safely take & if you're unsure then DON'T RISK IT!

  • Is there a raged Scrake on you? DON'T WORRY AND DON'T PANIC! While you're a Berserker you can outrun the Scrake no problems. Remember to keep healing yourself and only take them once you're a good distance ahead of other ZED's. It's important that you parry his attacks when you are about to take the Scrake on as to keep your health high so you don't die. (Remember there's no Medic in solo.)
Tips & Tricks to Keeping Your Team Alive.
Playing online? Cooperate with your team to increase your chance of success.

  • You are a Berserker, it's your job to keep the enemies off the team. Don't be afraid to get into the thick of things and start dusting some freaks.

  • Things getting hairy at the camp spot? Don't just run off and leave your team to die unless you know 100% that things aren't going to get better. Remember that you're what's standing between your team and the ZED's.

  • Never run off by yourself as a Berserker. You're what keeps your team alive by getting the attention of the ZED's off the others. The only time you should be alone by yourself is if you're using a legitimate stratergy to help your team or if they're all dead.

  • As temping as it is to heal yourself online DON'T UNLESS YOU ABSOLUTELY HAVE TO! Healing yourself is slow, you are wasting valuable healing time which is more effective on your teammates. Each time you are healed by a teammate or heal a teammate you and your teammate will gain money, experience and the healers syringe is only deducted by half so healing is faster this way and better effective on others.

  • As a Berserker the Medic is your life line. If there's more than 1 Medic and you're not camping or you're *filtering for your team make sure you take the spare Medic with you. A Medic & a Berserker together are a very strong team.

  • Is another Berserker or Medic *tanking for your team? Make sure you're attempting to keep them alive, either by healing them or by attacking the enemy from behind. (If a Medic is tanking, you should take over their tanking position so they can heal you.)

  • Your EMP grenades don't deal a lot of damage but they do stop ZED's from being able to run, they also stop ZED's from being able to do special attacks such as disabling Sirens from screaming & Husks from shooting their napalm cannons, not only this but they also cause ZED's to take increased damage while shocked. If you need some breathing room or you want to stop a raged FP, throw an EMP at them and try to stun them.

  • Is your whole team grouped up together? This is a perfect opportunity for your Medic to get a group heal going. Always be aware of where your Medics are and what they're doing.

  • Run out of ammunition for your weapons? Supply runs are important, never forget about the ammo drops around the map or, perhaps one of your team mates has a weapon they don't mind sharing with you. It's important to help each other out.

  • Last one alive? Utilize your teammates guns that are lying on the ground, they can save your life and as a bonus if you've got spare time to grab your teammates weapons from their spot of death they will thank you for taking them to the trader so it saves them precious seconds at the trader!

  • Is there a raged Scrake on you? DON'T WORRY AND DON'T PANIC! While you're a Berserker you can outrun the Scrake no problems. Remember to rely on your Medic to keep healing you and only take them once you're a good distance ahead of other ZED's. It's important that you parry his attacks when you are about to take the Scrake on as to keep your health high so you don't die. (If your Medic is dead refer to the above section.)
Video Explainations & How To Section!
Anything that requires explained in the Tips and Tricks section will be in video form!

Note: Some of the videos move really quickly but i had to keep them short as to reduce upload times on my slow internet. (Sorry about that.) If you miss some of the text you should pause the video and give it a good read as this stuff is important!

Damage to Movement Speed Explaination:


Note: Damage is not the only factor that will reduce your movement speed. What's in your inventory as well as the weapon you're currently holding in your hand at the time are also factors that affect your movement speed .


I'm All About That Parry, No Trouble:


A bit of a tutorial on how to parry incoming attacks. Nothing quite like trying for yourself, however hopefully this'll make it easier to learn the timing & how parrying affects you and the enemies.


Throwing it all together for a playthrough:


So you think you've mastered it? Time to put it all together and play the game. Good luck folks.
Important Phrases or Abreviations.
Throughout the guide you may have noticed asterisks ( * ) next to words or phrases. These are to signal things which might be unfamiliar to you. Anything with an asterisk next to it will be placed here and the definition will be next to it.

Tank:
A person or player who takes all the damage in-order to avoid mass death to the team.

AYNK:
All You Need to Know!

Trash:
Trash mobs are lower threat enemies, Husks, Sirens & Crawlers are also called trash specimens in-game. The general term in Killing Floor for "trash" is anything that is not a Scrake or Fleshpound.

AOE:
Area of Effect is the term given to any attack which does splash damage over a greater area. This means anything that explodes or spins in circles in order to cause damage to multiple targets.

Sanic:
Sanic is the "meme" given to a silly looking Sonic character, it's frequently used to over exaggerate something which is silly or stupid.

DOT:
DOT is short for "Damage Over Time". It means the damage an enemy or player will take over a short or long period of time from non-direct contact.

Filtering:
Filtering is a term for a legitimate stratergy often used by the better players on the server. Filtering is when a player runs away from the main group at the camp spot to another spot and takes some of the ZED's off of the main group.

Note:You can tell if a player is filtering or not by if they're still communicating with the main group.
Tip:If you're going to filter don't be a wan*ker and leave them for dead. Remember your job is to help out the team not to be an idiot and leave them to die.
Conclusion & Credits.
Credits:
Guide Created By: [TPZ] Cereal Killer

Copyright Stuff:
This guide is written by myself in the entirety, you MAY copy sections of this guide such as the weapons & enemy sections HOWEVER you must give me and my guides a recommendation in your own guide please!

I'm happy for you to use sections of my guide but don't take my work and pass it off as your own, a lot of care, love and detail goes into my guides and I am passionate about helping the community of my favourite games so please be respectful of that at least!

A simple shout out with my name: [TPZ] Cereal Killer and a url link to my guide where you took the information from will be sufficient.

Acknowledgements:
My guide uses referencing from:
Killing Floor Wiki: http://www.kf-wiki.com/wiki/Main_Page
Killing Floor 2 Wiki: http://wiki.tripwireinteractive.com/index.php?title=Killing_Floor_2
Killing Floor 2 Stats Spreadsheet: https://docs.google.com/spreadsheets/d/1GDpg2mN1l_86U_RaDug0glFx8cZCuErwxZLiBKl9SyY/edit#gid=2068776317

Other than that the rest of my guide is of my own personal experiences, screenshots, videos and anecdotes.

Huge Thanks to Tripwire Interactive for the sequel, you guys rock!

Community Credits:
Thanks to all those who helped me & corrected any of my mistakes (below here):

  • Lieutenant Skittles: For allowing me to link their ZED files.
  • Thraknor: Sending in corrections for the Block skill.
Further Reading.
This section is for the rest of my guides which you may or may not wish to read:

Killing Floor 1 Guides:


Killing Floor 2 Guides:
26 Comments
nonno_anselmo 17 Feb, 2016 @ 3:24am 
nois
@TheyCallMePinCushion  [author] 16 Feb, 2016 @ 3:11pm 
Thanks for the point outs of what I missed Alessandro, I haven't been playing Killing Floor 2 recently, it has been at least a month since I booted it up to be completely honest. This is the main reason that I have not updated my guides since Decemeber.

I've fixed up all the things you mentioned in your comment.
nonno_anselmo 16 Feb, 2016 @ 2:00am 
hey there, i've noticed you might have made some errors and wanted to point them out so you can correct them in your zerker guide! 1. You should update the overview section because Fortitude does not cap you at 200 but at 175, this is pointed out later but i noticed you forgot to change it there! 2. On the "How do i deal with a fleshpound" 2nd Way section you wrote "kid" instead of "kind"
@TheyCallMePinCushion  [author] 19 Dec, 2015 @ 12:30pm 
@Extemp. Solo vs Multiplayer is a whole different level of difficulty. Most of the time it's not the extra damage that gets you killed but the team you're playing with if they don't work together.

Lately since the new content update it doesn't matter what team you play with everything feels like it's stacked against you.

Atm I really cannot recommend playing Hell on Earth on multiplayer because the classes just don't do enough damage or healing against 6 player opponents, so your information is rather good for people to know.

Thanks for the input.
exTerminator 19 Dec, 2015 @ 9:59am 
Nice guide! I can clarify from experience that, you can safely use pulverizer to dispatch large mobs without more of a fuss, e.g. 3 explosive hits from pulverizer can kill a fleshpound on HoE easily, on lvls 20+ I believe, whereas scrake takes 4 to even 5 hits. That is solo playing however therefore this information is rather useless when talking about multiplayer but I thought I might add it regardless.
@TheyCallMePinCushion  [author] 10 Dec, 2015 @ 2:17pm 
@Piotto97

I'm glad the guide helped you learn some new things, I hope that you become a better Berserker with even more practise, if you keep the practise up my hopes will become a reality. Good luck with it!
Piotto97 7 Dec, 2015 @ 12:43am 
I learned a lot of tricks from it. Just started playing berserker and I love it so far, but I hope I'll improve a lot thanks to you. You da real MVP ^_^
@TheyCallMePinCushion  [author] 4 Dec, 2015 @ 5:39pm 
EpicWindow. Thanks for the suggestion, i've done a bit of what you have asked but i haven't done it all.

When I get some time I may update it a lot further. I just haven't had a lot of time lately.
Epicwindow+- 4 Dec, 2015 @ 7:56am 
like if you can keep the unesscary comments on the weapon/zed ex:siren the guide would be much better

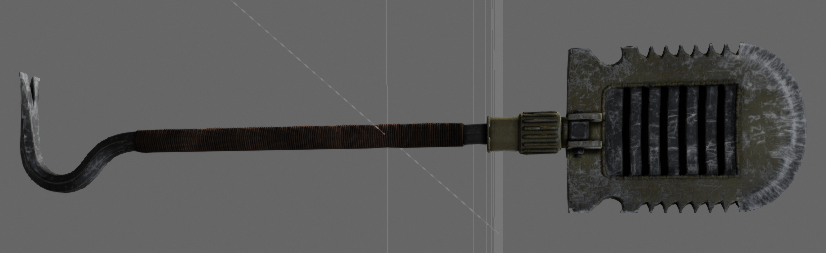
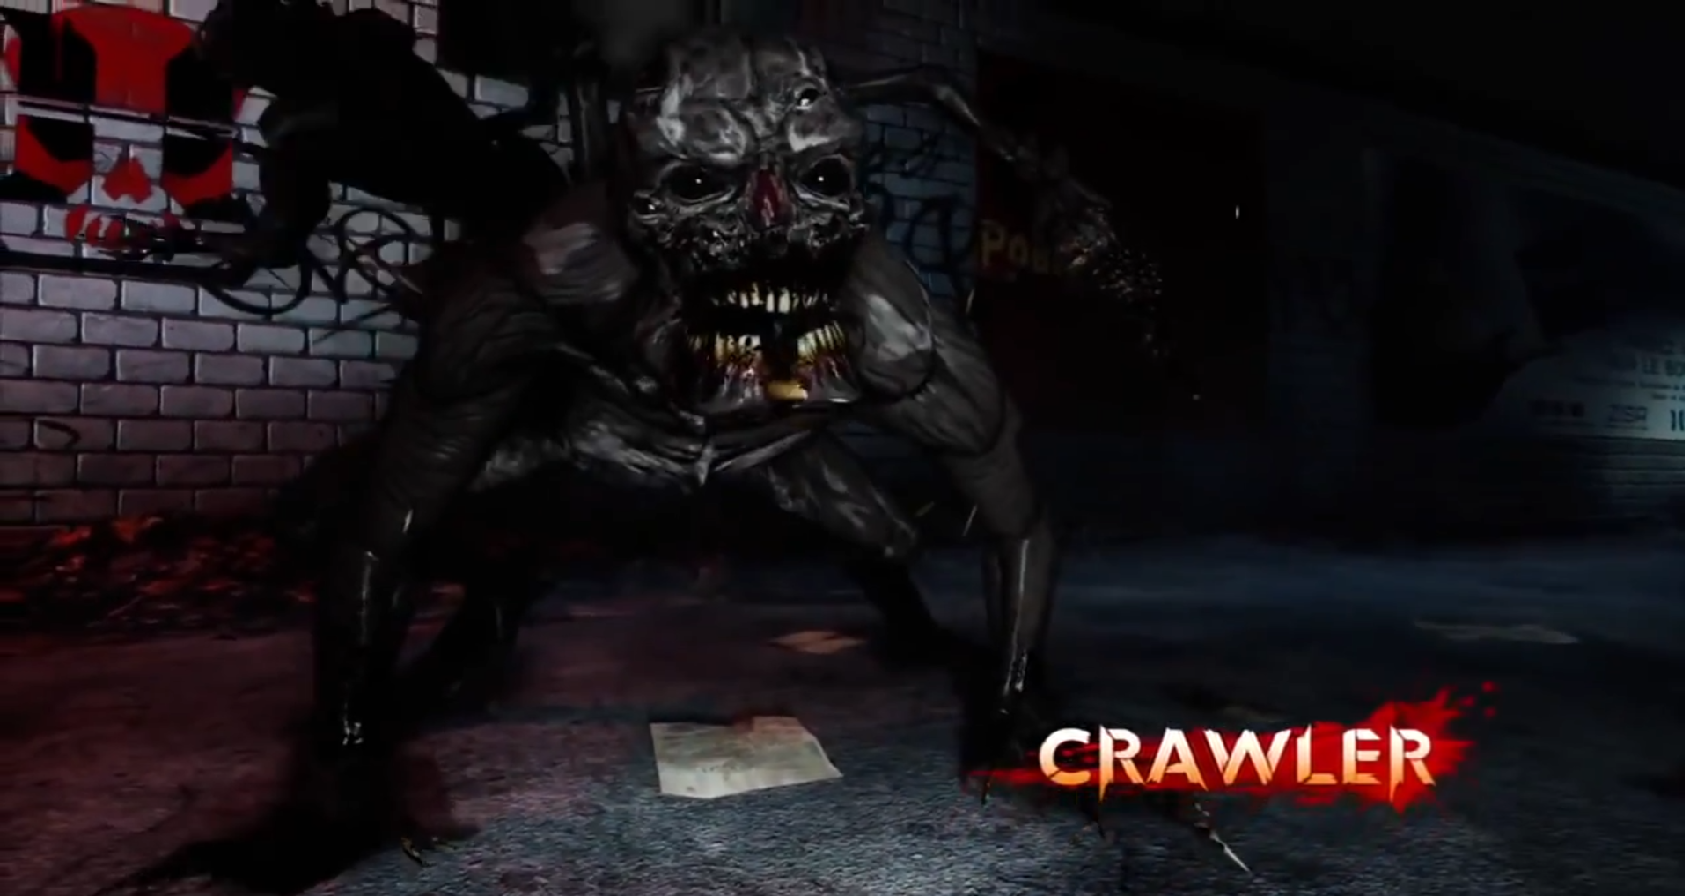
you should probably also talk about different damage type as shovel can do both slash and bludgeon damage whichi bludegon is very effective on crawlers

moreover the guide talked a lot about different on/off perk weapons but there isnt a suggested loadouts section

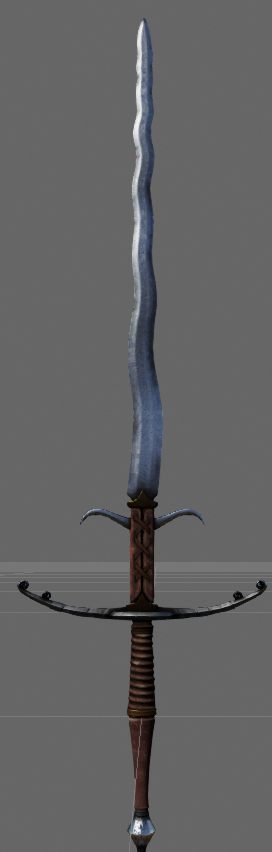
the boss loadout section i think hat zerk should just tank the boss with zewihander and sell other weapons for dosh for teammates
@TheyCallMePinCushion  [author] 1 Dec, 2015 @ 2:41pm 
Thanks Thrakmor.

I'll look into this and see what I can also dig up. You might be right though, think I've seen it once or twice while I was using it but never really took much notice.

I've updated the guide and added your name to the credits.