Killing Floor

Killing Floor

164 ratings
An Indepth Guide to Hell on Earth Berserking. (Solo & Multi)
By @TheyCallMePinCushion and 2 collaborators
A guide to help (New or Old) people complete and earn achievements on Killing Floors hardest difficutly: Hell on Earth.

Indepth, Step by Step, Inventory Hints, etc.
   
Award
Favorite
Favorited
Unfavorite
Introduction.
First let me start by saying, Thank you for reading this guide it is my first guide for the community and i hope it is of some assistance to New & Old players from around the globe.

As this is my first guide for the community you need to understand a few things.

1: Let me guess "OMG not another Berserker Guide!" Yes i know there's a lot of these guides out there but, bare with me here as my guide goes indepth with certain things other guides do not.

2: This is very much going to be a work in progress, things may change from time to time and when they do change they'll be for the better.

3: This guide will be regularly updated when we have the time and patients to write it, please don't spam the comments for updates they'll come when they come.

4: I myself and anyone else who works on this guide is by no means a "Pro" at Hell on Earth we all makes mistakes from time to time as that's what Humans do. We just have a great understanding of how all the game mechanics work as we've played for a long time.

5: I own a Killing Floor server if you wish to join us you can find me @ 119.252.190.147:7707. The server is located in: Sydney Australia. We generally play Hell on Earth. All are welcome but be aware of high ping if you're connecting international.

Note: This server is ALWAYS Administrated and people caught doing wrong by Admins will be punished accordingly, don't argue with Admins and always play nice and fair.

6: Enjoy the Guide and please if you have something to add contact us.
Required Skills.
As this is Hell on Earth, the hardest difficulty you'll need Minimum Level 5 Berserker or a great deal of skill as Berserker, a bare minimum of Level 4 Berserker IS REQUIRED!!! to even stand a chance.

Important Note: Level 4 Berserker is being seriously generous, most servers won't allow anyone below 5 to join.

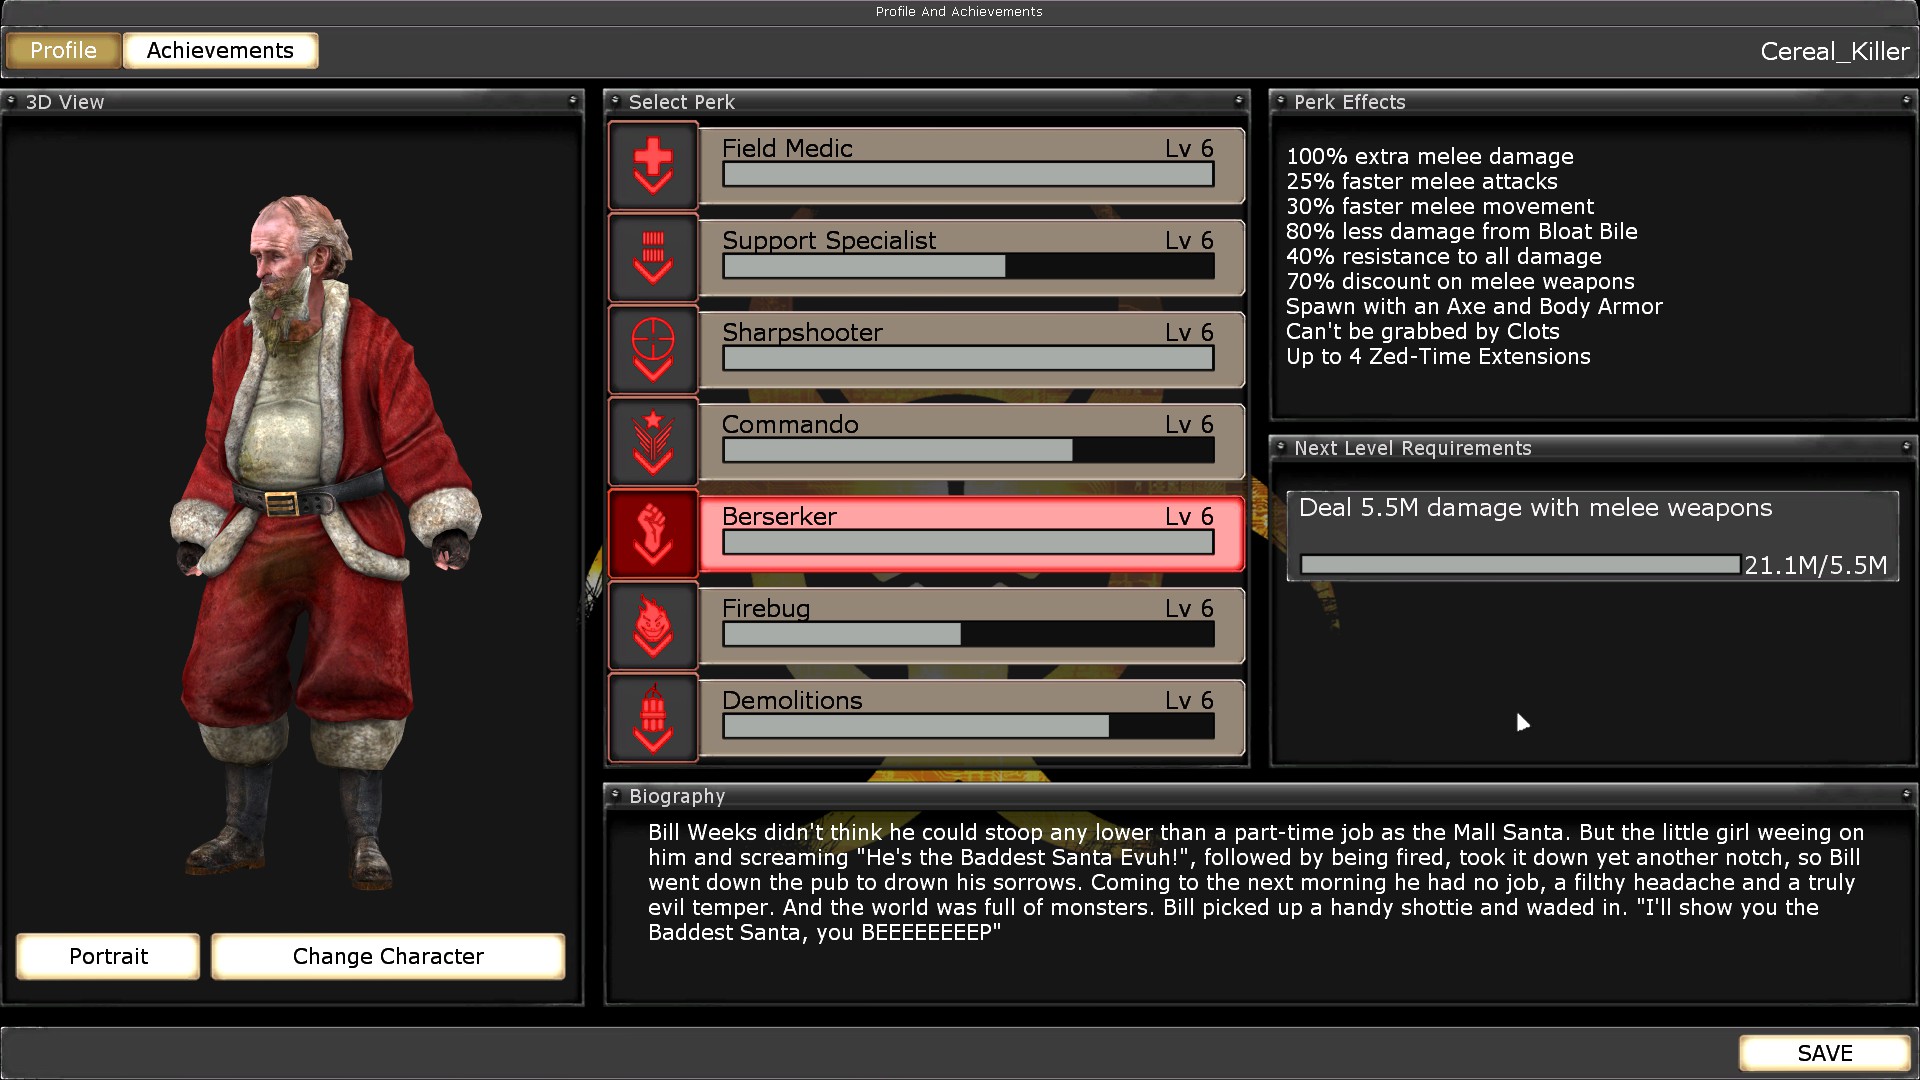
Let's take a look at why Berserker is a great skill and why you should get it to Level 6:


Effects at Level 6 Berserker:


As you can clearly see you're basically a walking, talking, ass kicking machine at Level 6 and you should be proud of your accomplishment.
Equipment.
Alright so here we're going to discuss what equipment we can use to keep us alive and what we can use it for.

I will upload video's further into the Guide so you can understand how to use the weapons correctly.

Most of these weapons will be used at some point during your game until you've gotten a good feel of which class you specialize in.

Combat Knife:


Weight: 0
Damage: Minimal
Speed: Moderate - Fast
Range: Very Close
Price: Spawn = Free

Clearly this is not the first choice of a weapon any Berserker past 4 will pick to use on any difficulty, however it is not impossible for you to use it through to Waves 5 if you want to save money and be really fast on your feet. Just remember to always head slash otherwise you could end up dead in a heart beat.

Fire Axe:

Weight: 5
Damage: Moderate - High
Speed: Realitivly Slow
Range: Close
Price: Base = 1000 deduct 100 per level for price range.

The first weapon on the list is the Fireaxe it's pretty heavy and that's a bit of a problem BUT it is one of the few weapons that will stun a scrake with ease or dispatch of a Fleshpound. So long as it is used correctly.

Claymore Sword:

Weight: 6
Damage: High
Speed: Slow
Range: Moderate
Price: 3000 = Base, deduct 300 per level for price

The Claymore Sword is another one of the few weapons a Berserker has that can stun a Scrake or dispatch of a Fleshpound without too much hassle.

Imporant Note:This is a heavy weapon and will encoumber you more than the the Axe.

Dwarf Axe:

Weight: 6
Damage: Very High
Speed: Slow - Moderate
Range: Close - Moderate
Price: Base = 3000, deduct 300 per level for price

The Dwarf Axe is also another choice for the more heavy Berserker, with it's crazy knockback abilty when you learn how to use this correclty you can avoid taking damage from a Raging Scrake or Fleshpound and also stop the team from taking any damage in the process.

Important Note: As above this is also a very heavy weapon if you carry this it doesn't leave you much options for a backup weapon.

Katana:

Weight: 3
Damage: Moderate
Speed: Fast
Range: Close
Price: Base = 2000, deduct 200 per level for price.

This melee weapon is one of any Berserkers favourite, it's ultra fast, ultra sharp and ultra deadly HOWEVER! it's practically useless on Suicidal & Hell on Earth, it does not stun and or flinch more that once on a Scrake or Fleshpound unless you hit them in the back. But it's very useful for taking out the Trash.

Scythe:

Weight: 6
Damage Moderate - High
Speed: Slow - Moderate
Distance: Moderate
Price: Base = 2500 | Level 0 = 2250, deduct 250 per level

A weapon for death himself comes in 2 size, Extra Large or Death but you know what they say 1 size fits all.

Note: As it's capable to stun a Scrake with it's secondary which it is recommended for them, however it will rage a Fleshpound with it's secondary so it's not recommended to use it against a Fleshpound, choose your targets wisely.

9MM Pistol:

Weight: Single = 0 | Dual = 4
Damage: Low - Moderate
Speed: Moderate - Fast
Range: Moderate
Ammo Price: 10 Per Clip | Full = 160 x2 for Duals
Dual Price: 150

One of the 2 weapons you're stuck with in the beginning of any match is this weapon, it's practially useless, the only times you ever use it is to take out troublesome trash such as Gorefasts, Clots & most importantly Crawlers ALWAYS use it on Crawlers unless you absolutely cannot change in time.

MK 23:

Weight: Single = 2 | Dual = 4
Damage: Moderate - High
Speed: Moderate - Fast
Range: Moderate - Far
Ammo Price: 16 per clip | Full = 192 x 2 for duals
Price: 500
Dual Price: 1000

The Mark 23 is a great backup weapon for the Light Berserker and should be concidered if you're carrying around any weapon that allows space for a Spare Pistol, accurate, powerful, deadly good choice.

44 Magnum:

Weight: Single = 2 | Dual = 4
Damage: High
Speed: Moderate - Fast
Range: Far
Ammo Price: 13 per clip | Full = 277 x2 for duals
Price: 450
Dual Price: 900

Another excellent choice for a Light Berserker is the 44 Magnum, it only has 6 shots though so be willing to take a few hits if you forget to Reload, but it's got more power than the Mark 23 if you prefer that.

Flare Revolver:

Weight: Single 2 | Dual 4
Damage: High - Very High
Speed: Moderate - Fast
Range: Far
Ammo Price: 13 Per Clip | Full = 277
Price: 500
Dual Price: 1000

The Flare Revolver is a great choice of weapon for the Berserker to carry around if you like to deal out some serious damage over time, it can light the ZED's on fire and cause them burn damage which works well against Fleshpounds as they won't rage as fast while they are burning.

Note: Scrakes will always rage when they get low on health so this weapon is not the best choice if you want to avoid taking damage on the run.

Hand Cannon:

Weight: 4
Damage: High - Very High
Speed: Moderate
Range: Very Far
Ammo Price: 15 per clip | Full = 180
Price: 500
Dual Price: 1000

This deadly monster of a weapon is an amasing choice for the Light Berserker who chooses power over speed, it's Powerful as madness and it's got 8 Shots so you have room to miss a few shots, 1 shot to the head will take out most Trash.

Lever Action Rifle:

Weight: 6
Damage: Moderate - High
Speed: Very Fast
Range:Very Far
Ammo Price: 20 Per Magazine | 160 Full
Price: 200

The Lever Action Rifle is a good weapon for taking out the Trash, such as, Sirens, Husks & Gorefasts at a distance, it's very fast to fire and it carrys 10 shots in the chamber which makes it a very useful weapon.

M79 Grenade Launcher:

Weight: 4
Damage: High
Speed: Average
Range: Far
Ammo Price: 10 per peice | 240 Full
Price: 1250

The M79 Grenade Launcher is an explosive device (No brainer right) clearly as an explosive device you need to handle with care because it can make mush of anything within the explosive radius, in laymens terms this means "BOOM DEAD!" well sorta, just aim and shoot you'll be fine so long as a Stalker isn't sneaking in close.
Loadouts.
Now that we've gone over the appropriate weapons to use and how they're good at their jobs lets now go over what loadouts you should concider buying before going into battle.

REMEMBER!!! this is Hell on Earth we are talking about we don't have time to muck around in the shop, we need to be in and out before we even get a chance to say RUN FOR ET! Choose a loadout and stick to it, don't change weapons throughout the game or you'll end up wasting more money and time that you don't have.

Experiement on Solo before joining an online match as you've got all the time in the world on Solo than when you're playing with others.

LOADOUTS:

There's 2 Options for you depending on your style of play.

Light Berserker: The Light Berserker prefers to be agile on his feet and carry only what is required for them to dispatch of the baddies when required.

As a Light Berserker you'll spend more time on the side lines cutting through the trash and keeping the team alive by distracting the small ones.

Heavy Berserker: The Heavy Berserker prefer to carry lots of guns and to take on the big game when the time is right.

As the Heavy Berserker you'll spend all your time in the front of the group aggitating the larger mobs and taking the brunt of the force from them so that the rest of the team can focus on barricades and or running away.

A MEDIC IS REQUIRED FOR THIS CLASS TO BE 100% EFFECTIVE.

So which ever your choice here's some options for you, lets begin with Light Berserker.

Light Berseker:

Loadout 1:
Fireaxe:


44 Magnum:


Buzzsaw:


Loadout 2:
Katana:


Handcannon:


Buzzsaw:


Loadout 3:
Katana:


44 Magnum:


Buzzsaw:


Loadout 4:
Katana:


Dual Hand Cannons:

Important Note: Remember to always keep on the move as you'll be more suseptible to damage from the bigger foes than any of the others and if you get crowded then you'll have to rely on what little you have.


Loadout: 5

Axe:


Flare Revolver:


Buzzsaw Bow:


Loadout 6:

Katana:


Flare Revolver:


Buzzsaw Bow:


Heavy Berserker: Now that the Light Stuffs out of the way we can focus on the Brute here's where ♥♥♥♥ get's real and men are seperated from children.

It is very important to remember here than you will not have spare room for a pistol on this class. So you have to rely on your Melee Weapon most of the time and the Buzzsaw to stun Scrakes.


Loadout 1:
Claymore:


Buzzsaw:


Loadout 2:
Dwarf Axe:


Buzzsaw:


Loadout 3:
Fire Axe:


Claymore:


Loadout 4:


Fire Axe:


Lever Action Rifle:


Loadout 7:

Crossbow:


Axe:


Loadout 8:

Claymore:


Trenchgun:


Loadout 9:
Claymore:


Flare Revolver:


Zed Eradication Device MKII:


Knowing Your Enemies & Picking Targets.
In this Section we're going to focus on what enemies are in the game and how we can and should deal with them.

We'll start with the easier enemies and the ones that are less of a threat then we'll move up to the bigger and harder enemies which you should focus your efforts on removing straight away.

Low Threat Level:
Take out these enemies after you deal with the more moderate enemies first, you'll need to leave as many of this trash as you can to avoid getting all the bigger nasties spawning.

Clots:

Rarity: Common
Health: Low
Damage Type: Claw, Melee.
Damage: Low.
Danger Level: Moderate.

Clots are small agile but slow and weak, 1 good slash to the head will stop them in their tracks, they are plentiful though, keep this in mind as they can grab you and hold you still while the other groupies gang you and you'll never know what happened till to late. Keep them at a distance if you wish to stay alive.

WARNING: On Suicidal and Hell on Earth if you get grabbed you cannot jump to escape a Clots grasp keep this in mind if you are playing another class other than Berserker.

Bloat:

Rarity: Common
Health: Low - Moderate
Damage Type: Melee, Vomit
Damage: Low - Moderate
Danger Level: Low

The Bloat is a slow ugly sun of a gun, he really poses no threat and is really just a space filler and a bullet sponge, make sure you aim for the head and take him out there first so he can't get his juices all over you.

A well placed Hand Cannon shot can knock his noggin off without explosion or a slash from a Melee weapon to the head can pop him in no time, watch out for the fatty juices!

Stalker:

Rarity: Uncommon
Health: Low
Damage Type: Melee
Damage: Low - Moderate
Danger Level: Low

The stalker may look cute and cuddley in her half nude state but don't be fooled her claws will rip through that Kevlar if you give her the satisfaction of a hug. She often goes invisible until she's right ontop of you and then she'll uncloak to gut you, keep your eyes focused for her.

WARNING: Always keep on the move around her if you stop she'll rip your chest cavity wide open, she's always invisible until she's close enough to gut you but her downfall is that she always has to stop to claw, which makes her an easy target to avoid and kill.

Moderate Danger:
Take out first if possible as these nasties have a bad temper and often are the first to kill.

Crawler:
Rarity: Common
Health: Low
Damage Type: Frustration, Melee
Damage: Moderate - High
Danger Level: Above Moderate - High

"EWW A BUG, Someone step on it!" Well if that wasn't obvious enough this is a bug and you know what bugs are, a pain in the ass they need to be dealt with straight away.

WARNING: These little nasties are very annoying you are advised to use Pistol on them to avoid losing a lot of health and armor, These things jump so beware of how close you allow them to get, 3 - 4 good headshots with the 9MM is enough to drop them for good.

Gorefast:

Rarity: Common
Health: Moderate
Damage Type: Melee
Damage: High
Danger Level: Moderate - High

The Gorefast is a common pain in the rear, he's slow and easy to kill, unless he gets close and then he'll charge, it's best to shoot this guy in the head before he has a chance to charge.

WARNING: It's advised to just run away and wait for them to get close otherwise you'll be swarmed or worse they'll get you while you are running.

Husk:

Rarity: Way Too Common
Health: Moderate
Damage Type: Melee, Ranged Fire.
Damage: High
Danger Level: Moderate - High

This one is a no brainer Unless you're a Level 6 Firebug this thing is going to make your daily stroll in the park a living napalm nightmare. These things rain Hellfire from their Husk Cannon non stop on Hell on Earth.

WARNING: The Husk constantly fires Napalm at you from his Cannon, DO NOT UNDER ANY CIRCUMSTANCE stop running while they're chasing you and always jump when they fire at you as you can dodge it's attacks. Try and take him out first with a well placed Headshot from any of your weapons or if you can take him out with a Melee swip to the head

High Threat Level:
Ok well if you've made it to this part of the guide then you know what's coming next, nothing but pain and suffering here we go.

Siren:

Rarity: Uncommon:
Health: Moderate
Damage Type: Bite, Scream.
Damage: Very High (Avoids Armor)
Danger Level: VERY HIGH!

This nasty lady tried to be a singer once, guess the audiences heads exploded from the awesomeness of her voice cause she won first prize in the "SHUT THE F UP" awards. Make sure you have a doctor handy as you'll need one after she's finished her solo.

WARNING: As much as the Siren is uncommon when she's around she should be THE FIRST nasty you take out at all costs, she's the one that gives you the most trouble and she's also the one that'll wipe you out in a second if given the chance. Her screams blur your screen and shake it around which puts your aim off so just swing like mad and hope you hit something.

Scrake:

Rarity: Rare
Health: High
Damage Type: Melee
Damage: Very High
Danger Level: High - Very high

Alright if his blood stained Butcher uniform didn't give it away this guy means business, and OMG is that a Chainsaw he's got on his arm? No chance pal that's dealth right there, F***ING RUN!!!!

WARNING: The first chance this guy gets to swing that Chainsaw around in the air and near your body will be the last chance you have at surviving his vicious encounter.

BEWARE: Very Important that you remember when the Scrake gets low on health he will charge at you, this is one of the best stratergies to get him away from the crowd and to finish him off before he has a chance to corner you.

Stratergy:
For a Scrake it is important that you have a Melee Weapon that stuns such as: The Fireaxe or Claymore, Secondary Attack to the head and stand still chopping away while he's stunned.
Your team should cover you while you're doing this and if you're Soloing you should break the crowd before attempting to kill him.

UNDER NO CIRCUMSTANCES PANIC!!!! If you panic and run away while he's sawing you then you'll end up dead alot faster just keep chopping until he dies it'll save you your life trust me.

Fleshpound:

Rarity: Very Rare
Health: Very High
Damage Type: Melee
Damage: Ultra High
Danger Level: High

Well it's come to this some damn punk with grinders for hands? Jeez what next, Clowns with Maces? Oh... Wait....Damn, Well the simple thing here is to remember rule number 1, RUN FOR ET!

WARNING: Even though these things are very dangerous and should most certainly be delt with cautiously, as they get angry very easily, you only need to know their weakness to be able to kill them fast and easily.

Stratergy: With a Fleshpound there's 2 things you need to know and they are as follows:

1: So long as you stay out of their sight you can avoid getting them angry, any chance you get to break their LOS you damn well better take it.

2: Do only small amounts of damage at 5 second intervals, A Handcannon is sufficent enough to take out a Fleshpound without even getting it angry once or to melee lock him and keep on Secondary to the head with the Fire Axe or Claymore.
The How Too's of Survival on Hell on Earth Berserkering.
In this section i will place all the Video's of how to deal with a Scrake and or Fleshpound correctly and quickly without taking too much damage. I will also place a small how to in writing so you can learn from watching.

Yes this wasn't done on Hell on Earth it's clearly not that hard but it works exactly the same in any difficulty just with less risk.

Bloopers at the bottom.

Cereal's Section:
--------------------------------------------------------------------------------------------------------------------------
Scrake + Axe Dispatch:


Stand still and just keep hitting it's head with Secondary Attack, rely on your team mates to remove the trash and cover you while you're hard at it. If you cannot trust your team you shouldn't be playing Hell on Earth.


Fleshpound + Claymore Dispatch:


Same thing as a Scrake only this time you need to make sure you're constantly moving backwards and take advantage of jumping to dodge the Fleshpounds arm swings.


Scrake + Claymore Dispatch:


Same as the axe only slower and more damage.

Fleshpound + Axe Dispatch:


Same as above ^

Fleshpound + Buzzsaw:


Note: 1 shot from the Buzzsaw Bow is enough to enrage a Fleshpound on any difficulty make each shot count Headshots only, and ensure you have enough room to run without getting cornered. NEVER SHOOT A FLESHPOUND WITH A BUZZSAW BOW UNLESS THE INTENTION IS TO KILL!

Scrake + Buzzsaw


Note: 1 shot from the Buzzsaw Bow is enough to stun & enrage a Scrake on any difficulty make each shot count, and ensure you have enough room to run without getting cornered. NEVER SHOOT A SCRAKE WITH A BUZZSAW BOW UNLESS THE INTENTION IS TO STUN & KILL AT THE SAME MOMENT!

Miffy showing us what's up!


Just some fun stuff:

Chainsaw Irony:


Pete shows us some bitter Scrake Irony.


The what not to do's of Hell on Earth!


Knifeing a Scrake is srs bznz guyz

Pete's Section:
--------------------------------------------------------------------------------------------------------------------------

Claymore Vs Fleshpound:


Dealing with a Fleshpound on 6 Player Hell on Earth Solo.
The Do's and Don't's before we begin.
This section it to recap on the DO's and DON'T'S before we begin playing Hell on Earth, Solo or Multiplayer it's pretty much the same.

DO'S:
  • Remember that just because Berserker is the easiest skill for completing Hell on Earth it also has tones of downfalls as well.

  • Always Keep on the move don't stop for anything.

  • Bind a Quick Heal Key: Set input x getweapon syringe | onrelease SwitchToLastWeapon | onrelease quickheal (Where x is the key you wish to bind) Remember to hold the button for a second so it will quick heal.

  • Stick with a Loadout from the list above or make up your own loadout and post it to us.

  • Save money as much as possible only buy what you need when you need it.

  • [CO-OP] Nominate 1 trustworthy Medic as the bank and give them most if not all of the money it can mean the difference between lots of money and nothing

  • [CO-OP] Keep close to your team mates don't stray away because you could be the first one to die.

  • [CO-OP] Protect the weaker members of the squad such as Sharpshooter, Firebug, etc you can take a beating, they cannot.

  • [CO-OP] It is important that you work out a plan for your survival if things go south listen to your team.

  • Practise your Kiting Skills on Scrakes & Fleshpounds as when you get behind them you can take them out faster.

DON'T'S:
  • Do not stop for anything if you stop you die period.

  • Do not Grenade Fleshpounds and Scrakes that could be the last mistake you make especially on Solo.

  • Try to limit your typing ingame while the wave is active as this is often how you die on Hell on Earth.

  • Do not go against your team you need to work together listen to each other and follow the more senior players with the 6's or who has played more hours.

  • [CO-OP] DO NOT ATTACK A SCRAKE OR FLESHPOUND THAT ANOTHER PLAYER IS DEALING WITH, unless it is 100% absotively ♥♥♥♥♥♥♥♥ impossible for them to do it alone and they are almost dead! THIS IS IMPORTANT TO SURVIVAL!!!

  • [CO-OP] Do not horde money for yourself you need to care and share if you want to survive this.

More may be added to this list in the future so keep on checking back here often.
Beginning the Onslaught. (Solo)
Alright so you've got no friends? You're Friends are all in hybernation? Away? Whatever the reason the rules are simple, don't stand there with your finger in your mouth MOVE OR DIE!

To begin with you should start playing Solo until you can take on the waves by yourself once you've got the hang on Solo you can move onto Multiplayer because it's alot harder than you'd think.

BEGINNING:

Make sure you're ready for pain choose your Character and Select Berserker as your Perk. (If you've got lower than 5 Berserker this is a good time to just grind your Perk to level 5)

Secondary to the head with the Combat Knife is enough to send them packing with ease on Solo, just make sure you don't miss, and always remember the all important rule is: keeping on the move, take em out one at a time when they get close.

After the first few waves you'll have saved up enough to purchase a Buzzsaw Bow and a backup weapon depending on your style, Light or Heavy.

Try to save as much money as you can in Solo as you're the only source of income and you'll need it all for Buzzsaw Blades & for the last wave to spam Pipes as a Demo.

Use the Scrake & Fleshpound method like you would online but don't get crowded you only have yourself to rely on in Solo so take precautions to ensure you don't lose control of the situation, if you have to rage them do so to get them seperated.

FINAL WAVE:

For the Patriarch Wave try and find the most compact corner of the map whether it's a doorway or an Alley way where you can drop at least 6 Pipes which will be enough to insta gib the Patriarch on Solo, make sure you hide and don't let him Rocket the Pipes or it's GG.

That's basically all there is to say about Solo, don't make any mistakes cause you'll have to start again.

Most maps from back 2011 will require you to complete them on Long game length to unlock the achievements, however maps from 2012 onward can be unlocked on Short length if you wish for an easier achievement.

Throwing it all together for a demonstartion:

Co-operative Onslaught!
This is where things become really hard you need to focus efforts as a team to win this, don't try and be a hero cause you'll either find yourself kicked or dead.

So you've gotten used to Solo? Good you're going to find things a little more challenging, and by a little i mean a ♥♥♥♥ load more challenging.

Each Player = another 2X the ZED's and 2x the health so with 6 Players you'll have 8x the enemies & health bonus. up to 300+ by the last wave.

Things you will need:
  • A good team
  • Lots of luck
  • Lots of Level 5 - 6 players with plenty of know how
  • Lots of time to spare (Each wave can last up to a good 20 minutes and a game can last up to 2 hours depending how the team plays)

Things you won't need:
  • A smart ass attitude (Listen to your team and don't be a hero)
  • Wasting Money (Money is a precious thing in Hell on Earth and you need to ensure you have lots of it for later.)
  • Soloists: These people pride themselves of getting as many kills as possible, you'll want them gone as soon as possible.
  • Low Level's who think they're too good.

BEGINNING:
Wait for your team to be ready before hitting the ready up button, work out your classes before you start the game, it's a good idea to have at least 1 Medic and 2 Berserkers for Hell on Earth, then you'll want to work out a Demo, Firebug, Sharpshooter or Support Specialist so you have some nice variety in the classes.

Remember to use Secondary to the head for a quick kill on Multiplayer it may not always instant kill on the lower specimens that it did on Solo as per each player they get more health.

After the first wave your team should have saved up enough to purchase weapons for themselves and hopefully spare some cash for you or the other classes in need, but if you're wanting lots of money you can always do the Hand Cannon trick or Flarepistol Trick.

Try to save as much money as you can as you'll need it all for Buzzsaw Blades & for the last wave to spam Pipes as a Demo.

Use the Scrake & Fleshpound method and rely on your team to cover you while you take them out, remember if you have to rage them to get them away from the crowd you should do this as it can sometimes be a life saver.

Your team should ALWAYS cover you while you're dealing with a Scrake or Fleshpound as you're the easiest and less expensive way of dealing with them.

FINAL WAVE:

For the Patriarch Wave try and get most of your team as a demo and juts Spam pipes, you can also be a Sharpshooter and you'll most certainly need a Medic, Berserkers can do it with a team of players but it is not recommended unless you can Melee lock him or dodge his attacks.

If you have enough pipes placed and you want an easy win, your team should leave the best player alive and the rest should Spectate, this can save you from dying and losing the achievement you've worked so hard to get. (You can still unlock achievements Spectating)

GOOD LUCK!
Tips & Tricks.
In this section we're going to place some hints tricks and tips to help you complete Hell on Earth easier.

DODGING:

Jumping:
Simple really jump out of the attacking ZED's reach by pressing your jump key and moving away nothing more to say, timed correctly you can often avoid damage you'd normally take if you don't jump.

Running:
Keeping on the run from a raging Fleshpound you can sometimes keep away from him if he's far enough away until he calms down, this can be really hard as it requires a large map and lots of corners.

Fleshpound Note:
If a Fleshpound is charging at you DO NOT PANIC, dealing too much damage to a raging Fleshpound can cause a chain reaction of rages WHICH are almost impossible to end.
(Unless you are below 80 Health you've got nothing to worry about as you'll still have at least 35 health remaining after a Fleshpound beating, which is more than enough to run away and heal.)

Scrake Note:
If a Scrake is charging at you DO NOT PANC, turn around and keep on back pedaling until he's close enough to stun, once you stun him just keep on hacking at his head until it comes off.

MONEY MAKING:

NOTE: As of December 2013, this is no longer as useful as it once was, it's still possible but the gain is no longer insane and hence there's not much point using this method.

Hand Cannon Trick:
The Hand Cannon trick is the easiest and cheapest way to make money on CO-OP one team mate goes Sharpshooter, they then buy Dual Hand Cannons & drop them, while the other team mate sells them and tosses the cash they make to the buyer, you can end up with enough money to last you the whole game and then some if this is done right.

Flare Pistol Trick:
The Flare Pistol trick is the same as the Hand Cannon trick only as a Firebug instead of a Sharpshooter. Same rules apply buyer drops the weapons and seller tosses the cash to the buyer to ensure maximum profit.
Legend.
In here you'll find all the terms of each name i used throughout this guide and or ingame.

Trash: Trash is the General name used to signfy all the lesser specimens.
Clot, Gorefast, Bloat, Stalker, Crawler, Siren, Husk.

LOS: LOS is a shortened term for "Line of Sight"

Secondary: This should be fairly obvious what i'm using it for but incase it's not, Secondary is a term used to say use your Alternate Fire attack.

Handy: Handy is a term used for Hand Cannon.

Buzz: Buzz is just short for Buzzsaw Bow.

L.A.R: L.A.R is short for Lever Action Rifle.

Rage: If not obvious enough Rage is short for angering something, (EG: That Fleshpound is charging.)
Credits.
Guide Created By:
Cereal Killer

Video Stars:
Cereal Killer
MiffyXx
[0_Coy] P_3T_3R
Falidus Prime


Special Thanks:
[0_Coy] P_3T_3R: For helping with the Video's and for inspiring me to make this guide.

MiffyXx: For being an unexpected star and helping with the video's.

Tripwire Interactive: For making this fantastic game years of fun and a tone of support makes this game stand above many other titles of the same type.
Further Reading.
This section is for all my other guides which you may or may not wish to read:

Medic Guide: http://steamproxy.net/sharedfiles/filedetails/?id=165303376

Commando Guide: http://steamproxy.net/sharedfiles/filedetails/?id=168227257
56 Comments
@TheyCallMePinCushion  [author] 29 Dec, 2023 @ 12:17pm 
Hi Conqueror.

Absolutely this guide is super old and probably a little outdated at this point but I believe most of the information is still relevant as the game has not been updated in a long time. Thanks for your input though, it's good to see and hear there's an active community still playing the game after all these years!
Daegon 27 Dec, 2023 @ 1:08am 
I see now the guide is quite old... there's still a lot of people playing
Daegon 27 Dec, 2023 @ 1:06am 
I'm far from the most experienced zerk but I usually go for:

Katana + Dwarfs Axe + Dual Flare Revolvers
Regrettable Acts in 1 Step 14 Dec, 2016 @ 5:18pm 
Still on hard, but getting up there.
@TheyCallMePinCushion  [author] 14 Dec, 2016 @ 5:13pm 
No worries, hope you got enough information from this guide!
Regrettable Acts in 1 Step 14 Dec, 2016 @ 8:16am 
Thanks mate, appreciate it!
Jaytal 6 Jan, 2016 @ 6:25pm 
You should edit the clot description to make it note that bezerkers cannot be grabbed by them.
@TheyCallMePinCushion  [author] 6 Jun, 2015 @ 6:09pm 
I see you failed to notice the date of this guide, and it's not just "another" Berserker guide it's a guide that has helped a lot of people by the looks of things, with over 100 posititive ratings and 4 stars it can't be so bad.
Blaze Cummer 6 Jun, 2015 @ 5:20am 
omfg not another zerker guide...
Captain Norrec 11 Jan, 2015 @ 7:28am 
One thing that bothers me about this guide. It says in the coop section that every player makes a 2x bonus to enemy hp and numbers, when in reality its only incremental. Because a FP with 8x the health would be way too OP.