Solasta: Crown of the Magister

Solasta: Crown of the Magister

80 ratings
Dungeon Maker - User Manual (v1.0.22)
By Myzzrym
Come and learn how to master the Dungeon Maker Tool with the official User Manual written by the Tactical Adventures crew.
4
2
3
   
Award
Favorite
Favorited
Unfavorite
Introduction
Hey there folks!

The Dungeon Maker is a tool available directly inside Solasta: Crown of the Magister, which you can use to create new "User Locations" - think custom maps or dungeons. It requires no additional downloads or anything, simply launch the game and the Dungeon Maker will be there!

Keep in mind that the tool is currently in Beta. As such, it is still missing quite a few features that we plan to add later on (for instance, we're aiming to implement a quest system, merchants, more environnements and the like).
Changelog
1.3.25 Changelog
  • Added Custom Dungeon to Custom Campaign Conversion Guide
1.0.22 Changelog
  • Added the possibility to add an image to the Steam Workshop Dungeon
1.0.15 Changelog
  • Added 3 new environments: Stronghold, Lava Caves, Elven Palace
  • Wall props: You can now break larger rooms into smaller ones by adding walls inside your rooms
  • Activator Gadgets: Allows you to trigger gadgets from a distance, read the guide below
  • Additional Gadget settings: Doors & chests can now hard locked (no lockpicking possible) and assigned a Key Item to open it automatically, torches can be unlit / lit, etc etc...
  • Lore Gadgets now have options to select how / where to display the text
  • New pushable block / falling chandelier gadget
  • Huge and Gargantuan monsters are now available (and we added a lot of Medium & Large monsters to the Dungeon Maker)
  • Added editor features such as moving the whole dungeon at once (ctrl+arrows) and show/hide light, activators & shortcuts
  • Added cheat codes when using the "Playtest" button to check your dungeon.
Converting a Custom Dungeon into a Custom Campaign
Custom Dungeons are not playable in Multiplayer - but fear not, it's very simple to convert them into Custom Campaigns and re-upload them on Steam Workshop!
  1. Click on Dungeon Maker
  2. In the Campaigns Tab (selected by default), click on New Campaign at the bottom
  3. Fill the Campaign Settings on the left
  4. Click on the right window (Embedded Content) and scroll to the top
  5. Under "Locations", click on Import
  6. Select your Custom Dungeon
  7. Click on your Custom Dungeon and click on "Set Start"
  8. Click Save (top left), and then Close
  9. Click on your new Campaign and click Browse Files
  10. Add a .png file with the same name as the Campaign in the folder (which will be the thumbnail of your Custom Campaign in the Steam Workshop)
  11. Go back to Solasta, click on your new Campaign and click Publish
Quickstart Guide
  • Open the Dungeon Maker
  • Click on "Create New Location"
  • Put down the general information of your Dungeon, such as the Dungeon Title and Description
  • Drag and drop rooms into the editor to create the layout of your dungeon
  • Add props to decorate your dungeon
  • Add gadgets to make your dungeon interesting - gadgets are everything that your party can interact with, such as doors, monsters, treasure chests, traps...
  • Make sure you add at least one entrance and one exit!
  • You can link multiple dungeons by making your exit point towards another dungeon.
  • Save and done! Dungeon is ready play and / or share (the dungeon can be found in "Browse Files", it's a simple .json file)
  • If you want to play other people's dungeons, simply put their .json files next to your own (click "Browse files" to open it), or if you're on Steam simply click Browse Workshop and find dungeons you like there.
  • If you are on Steam, you can also upload your dungeon to the Steam Workshop very easily by clicking on the "Publish" button
How to Upload an Image to your Steam Workshop Dungeon
Simply have a .PNG image in the Custom Dungeon Folder (you can simply click "Browse Files" to open it) with the same name as the Dungeon you're uploading before you click on "Publish". If you already published your Dungeon but you forgot to add an image before, just add the image and click on "Publish" again - it will simply update your dungeon with the image.

Below is an example of how your Custom Dungeon Folder should look like.
Main Menu - Dungeon Maker
General Settings
  • (4) Version Number is something you should use to indicate whenever you update your dungeon. Usually it goes like:
  • 0.x means the Dungeon is still being worked on and is not ready (example: 0.1, 0.2...)
  • 1.0 means the Dungeon is ready to be played
  • Going from 1.0 to 1.x (such as 1.1, 1.2...) usually means you fixed or tweaked something, for example a wall wasn't placed correctly or you forgot to place a monster
  • Going from 1.x to 2.0 usually means you reworked and significantly changed the dungeon, for example you added several new rooms or completely changed most of the encounters.
  • (5) Min / Max level allows you to prevent players from going into your Dungeon with Characters that are too low / too high level. For example, a Dungeon with a level 2 - 4 range will not display level 1 or level 5+ characters in the character selection screen when trying to launch your Dungeon. However, once the party is inside they can absolutely keep leveling up - a character that levels up to level 5 won't suddenly get booted from the Dungeon.
  • (6) Environment will affect how the floor / walls look like, as well as the type of decorations available.
  • (7) Size affects the size of the grid, you'll be able to place more rooms if the grid is larger
  • (8) Visual Mood affects the lighting / color / fog of the dungeon.
  • (9) Your choice of ambient music track will play during exploration - during encounters, combat music will automatically replace it
Rooms Menu
  • (1) Closes the Dungeon Maker and return to the main menu - but make sure you save before that!
  • (2) The Undo button will revert your last change, up to the last 10 changes. Also works with ctrl+Z
  • (3) The Save button, your best friend. Also works with ctrl+S
  • (4) Opens the General Settings (previous screen with all the general information, such as dungeon title and description)
  • (5) Show / Hide the lights, activator links and shortcuts.
  • (6) Playtest your dungeon - launches your dungeon immediately with a premade party of level 1 characters. Mostly used to check the layout, not the encounters. You must save your dungeon before being able to playtest it!
  • (7) Your dungeon minimap and all the dungeons it is linked to via the exit gadgets
  • (8) List of Empty Rooms available, simply click on one to select it and place it onto the grid
  • (9) List of Pre-Furnished Rooms made by the developers to give new creators examples, simply click on one to select it and place it onto the grid
  • (10) List of Shortcuts, the most important being "R" to rotate the room or prop currently selected
Props Menu
  • (4) List of all available props. Props are elements that characters can't interact with, such as statues, walls, candelabra and such. They can be use for lighting, blocking passage or simply decoration.
  • (5) Lighting props are any prop that will generate light, and will appear with a flame symbol on the editor. These lighting sources can't be extinguished and will be lit by default.
  • (6) Regular props are any prop that is here to decorate / block passage, and can be placed anywhere as long as they are within a single room. Those props can't be placed at the edge of a room and / or overlapping two different rooms
  • (7) Wall props can only be placed at the edge of a room, usually to block unused exits. The "Wall with a Crawl Hole" allows the party to go through the wall (other wall props will block the party).
  • (8) Attached to wall props are props that can only be placed on top of a wall - for example wall sconces or chains. Take care to properly rotate these props so that they appear on the wall instead of being stuck inside it.
Gadgets Menu (1/2)
  • (1) Interactive Torches are torches on the wall that you can light / extinguish yourself. You can set them to lit / unlit after placing them (unlit by default)
  • (2) Double Door. You can set these to be locked (unlocked by default) and adjust the DC, or even "Hard Lock" them (meaning they can't be lockpicked). Keep in mind that if the party fails to open it they won't be able to try again - so always have alternative paths ready (or only lock doors to non-essential rooms). You can also select a "Key Item" that will automatically unlock the door if the party has it in their inventory.
  • (3) Hidden Door. You have to set the Perception DC for your party to notice that there is a secret passage (10 by default)
  • (4) Monster (L). Once placed, click on it to select from the list of large monsters available from Solasta. You can also group that monster with other monsters by clicking the "Encounter Group" button and putting the same number for all of them. Long story short, if one monster in "Encounter Group 1" enters combat with the party, all the other monsters in "Encounter Group 1" will join the fight, even if they're on the other side of the room. Monster gadget are "Auto-Spawn" by default (meaning the monsters will appear when the party gets close enough), but that option can be removed if you want to trigger the monster spawn manually with an activator gadget (see below)
  • (5) Monster (M). Same as above, but will show a list of medium monsters available from Solasta.
  • (6) Treasure Chest. This gadget has a lot of different settings:
  • Clicking "Explicit Items" will allow you to select specific items from the entire list of item database.
  • Otherwise, it will allow you to set a randomly generated loot based on CR levels
  • You can set the chest to be locked, and set the lock DC (same with doors, you can also hard lock and/or add a key item to open the chest automatically with it)
  • You can set the chest to be trapped, and set the perception and disarm DC, as well as the trap type, the saving throw DC and the additional damage dice should you want to scale up the damage of the trap.
  • (7) Virtual Loot. Similar to a chest, but can only be placed on a prop (such as a statue, or a bench) - think of it like hidden loot.
  • (8) Trap. You have to select the trap type, the saving throw DC, the perception and disarm DC, as well as additional damage dice if you want to increase its damage. Note that traps currently don't have VFX, we'll be adding that in a future update.
  • (9) Lore Area. You can type a text that will appear when a character steps on that area. The Lore Area AoE can be adjusted, and you can choose to play it only once or every time someone steps into the area. There are multiple format available to change where / how the text appears.
  • (10) Virtual Lore. Same as above, but has to be placed on a prop (such as a statue, or a column). The message will appear when a character interacts with a prop.
  • (11) Dungeon Entrance. At least one is necessary for your Dungeon to be playable. By default, your party will appear at Dungeon Entrance Index 0 - you can create multiple entrances with different Indexes, in order to link multiple Entrance / Exits (Exit 1 goes to Entrance 1, Exit 2 goes to Entrance 2, etc etc)
  • (12) Dungeon Exit. If the Exit doesn't point to another Dungeon, having the party walk on it will end the run - otherwise it will load the next dungeon and teleport you to the linked entrance with the same number.
Gadget Menu (2/2)
  • (1) Pushable Block. Can only be pushed in the direction shown by the arrow (you can rotate it)
  • (2) Mana Lamp. Simple gadget that the user can activate / deactivate by interacting with it to make light.
  • (3) Huge Monster Spawner
  • (4) Gargantuan Monster Spawner
  • (5) Falling Chandelier. Currently missing any settings to adjust damage dealt, will be added in a future update.
  • (6) Activated Lore. Lore that only activates when triggered by an Activator (see below)
  • (7) Plate Activator. Stepping on it will activate the gadget(s) that it is linked to.
  • (8) Button Activator. Interacting with it will activate the gadget(s) that it is linked to.
  • (9) Area Activator. Moving into the area will activate the gadget(s) that it is linked to
  • (10) Entry Activator. Automatically activate the gadget(s) that it is linked to when the party enters the dungeon through the selected entrance.
Activator Guide


Activators are a whole new range of gadgets which allow you to "program" certain behaviors. An activator is a "trigger" that activates another gadget (or several other gadgets). For example, you can place a button activator to activate (open) a door which would otherwise be locked.


As you can link an activator to multiple gadgets, in the example above you could also link the button to an activated lore gadget to say something like "You hear a loud sound, that must have been the door!" when you press it - both opening the door and showing the text at the same time.

The different operations available to activators are:
  • Activate: the target gadget(s) is opened / triggered, etc
  • Deactivate: the target gadget is closed. For now this is relevant for doors only
  • Activate symmetrical: the target is opened / closed in a loop when the activator is toggled. For example with Activate Symmetrical setting on a plate activator, stepping on the plate opens the door, but releasing it closes the door again.
  • Enable: "Turn on" another activator (note: activators are enabled by default)
  • Disable: "Turn off" another activator - see example below
  • Enable symmetrical: Turn on/off another activator.


In this example, we have a pressure plate that opens the door when stepped on - but the door slams shut as soon as you step away from the pressure plate. This means the party is forced to leave a member behind... or does it? With the button activator on the other side of the door set to "Disable" the plate activator, pressing it will stop the pressure plate from working. Meaning if the door was open at that moment, the door will remain open - allowing for the last party member to go through.
Monster Gadget
Entrance / Exit Gadget
Troubleshooting Guide

How do I share the dungeons I created?
You can access your custom dungeon folder by simply clicking the in-game "Browse Files" button[www.solasta-game.com] in the Dungeon Maker menu. The folder can also be manually found there: "C:User[YourUserName]AppDataLocalLowTactical AdventuresSolastaUserContentLocations". Whenever you create a map in the Dungeon Maker, the game will create a .json file containing all the information with the same name there.

On Steam, you just need to click on "Publish" to upload your dungeon to Steam Workshop.

Where do I share the dungeons I created?
On Steam, simply use Steam Workshop. Otherwise, you could always drop by good ol' NexusMod[www.nexusmods.com] where many other mods are already available (reminder: mods are community driven, Tactical Adventures has no control over them and cannot guarantee that they work properly).

How do I play a dungeon I just downloaded?
Simply copy paste the .json file into you custom dungeon folder, that you can either access by clicking the in-game "Browse Files" button in the Dungeon Maker menu, or manually opening "C:\User\[YourUserName]\AppData\LocalLow\Tactical Adventures\Solasta\UserContent\Locations". The new dungeon should then appear in-game in the Dungeon Maker list.

On Steam, subscribing to a Dungeon on Steam Workshop should automatically download it in the proper place.

I have a question about the Dungeon Maker!
Drop a comment here, and if you still have questions feel free to swing by our Discord server and head to the #dm-tool-chat channel![discord.gg]

Will you update for the Dungeon Maker in the future?
Of course! You might have noticed the Dungeon Maker is still lacking quite a few features, and that's because the Dungeon Maker will still be in beta when we release the full 1.0 version of Solasta (we've got to make sure we wrap up the main campaign properly first). There are tons of things we want to add later - quest systems, dialogs, merchants, more environments... Make sure you tell us what you'd like to see first!

Why can't I play XYZ dungeon?
Make sure you check out the little (✔️) next to the dungeon in the Dungeon Maker! Often it will tell you what's wrong. Here are the two most common reasons:
  • The Dungeon is missing an entrance
  • The Dungeon contains copyrighted terms from Wizards of the Coast
16 Comments
Beef 13 Jul, 2023 @ 7:18am 
Might be worth mentioning that the button to create a new campaign doesn't show up the game is in "controller mode". On the Steam deck, if I go to Dungeon Maker on the menu using the joystick and A button, there's no new campaign button. If I back out to the main menu and click the Dungeon Maker menu item with the virtual mouse, the interface changes slightly and the new campaign button is there. Might just be a bug too.
taranwalker 4 Jun, 2023 @ 7:38pm 
Will this guide be updated with ‘new’ stuff like quests and dialogue?
killsender inc 28 May, 2023 @ 1:11pm 
play ma map i mad on pc on xbox help
blob 4 May, 2022 @ 9:15pm 
I guess more specifically I am curious if there is a way to make cutscene or to start a dialog when the team reaches a certain place?
I tried connecting an area activator to a virtual dialog but that doesn't work.
blob 4 May, 2022 @ 8:51pm 
Is there a plan to add more to the guide to cover making quests and dialogues? Thanks!
vel 17 Sep, 2021 @ 9:59am 
For those looking for more tips on DM or how to play custom adventures, check out the guides by Silverquick, BlackguardRogue, and Vincto:

https://steamproxy.net/sharedfiles/filedetails/?id=2599618737
shinukiishinukii 27 Aug, 2021 @ 6:51am 
4. Show whether the building can be used as a shelter. This is because I found that some buildings that should be shelters placed inside the scene did not function, so after the test, I deleted all the buildings and replaced them with other things

5. Display the lighting range. I don’t know if this is a bug, but it’s obvious that the lighting provided by the candlestick and the torch seems to be different, causing the battle scene to appear to be light, but in fact everyone is in a "no light" environment ???

The above is a Google translation, please forgive me for grammar errors.
shinukiishinukii 27 Aug, 2021 @ 6:51am 
I hope dungeon maker can add a few small features

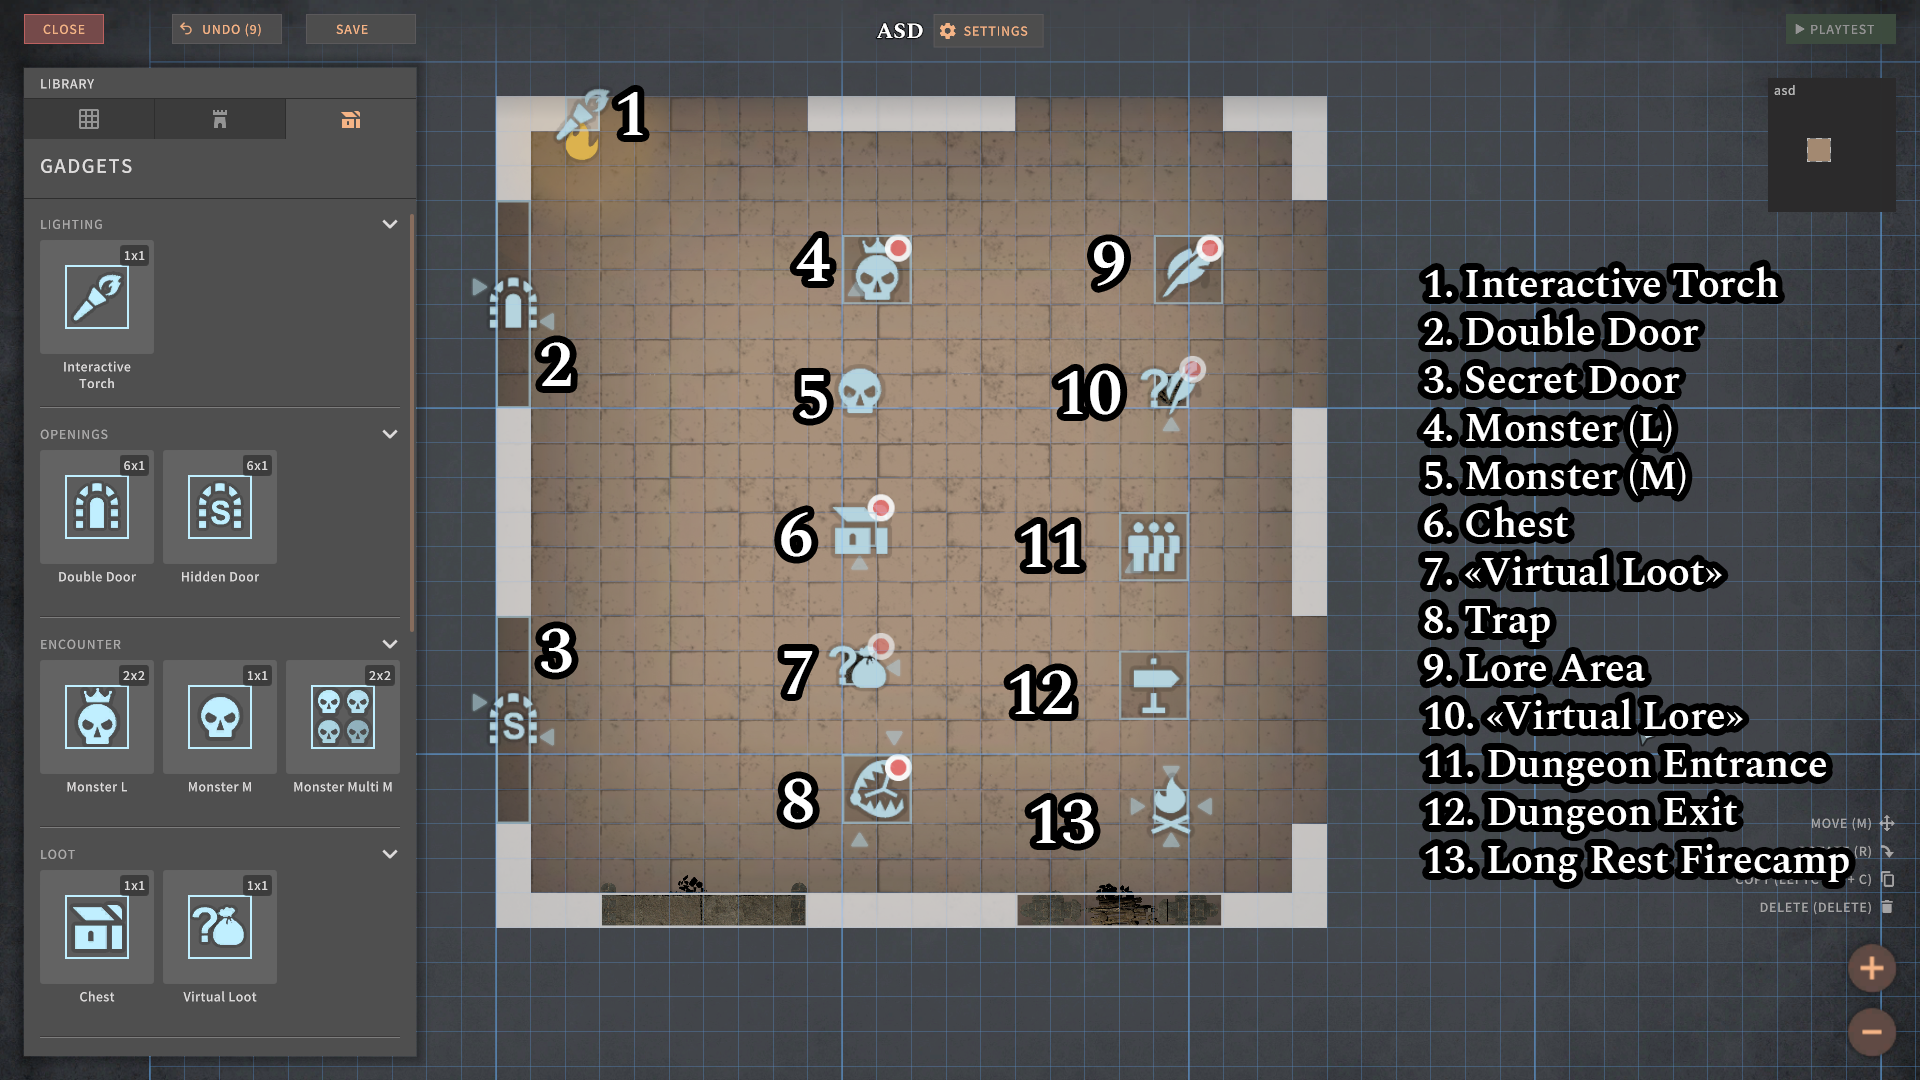
1. The labels of loot should be more subdivided. Arrows and weapons should be separated instead of using the same label. Strange items should be subdivided into necklaces, rings, boots, helmets, etc.

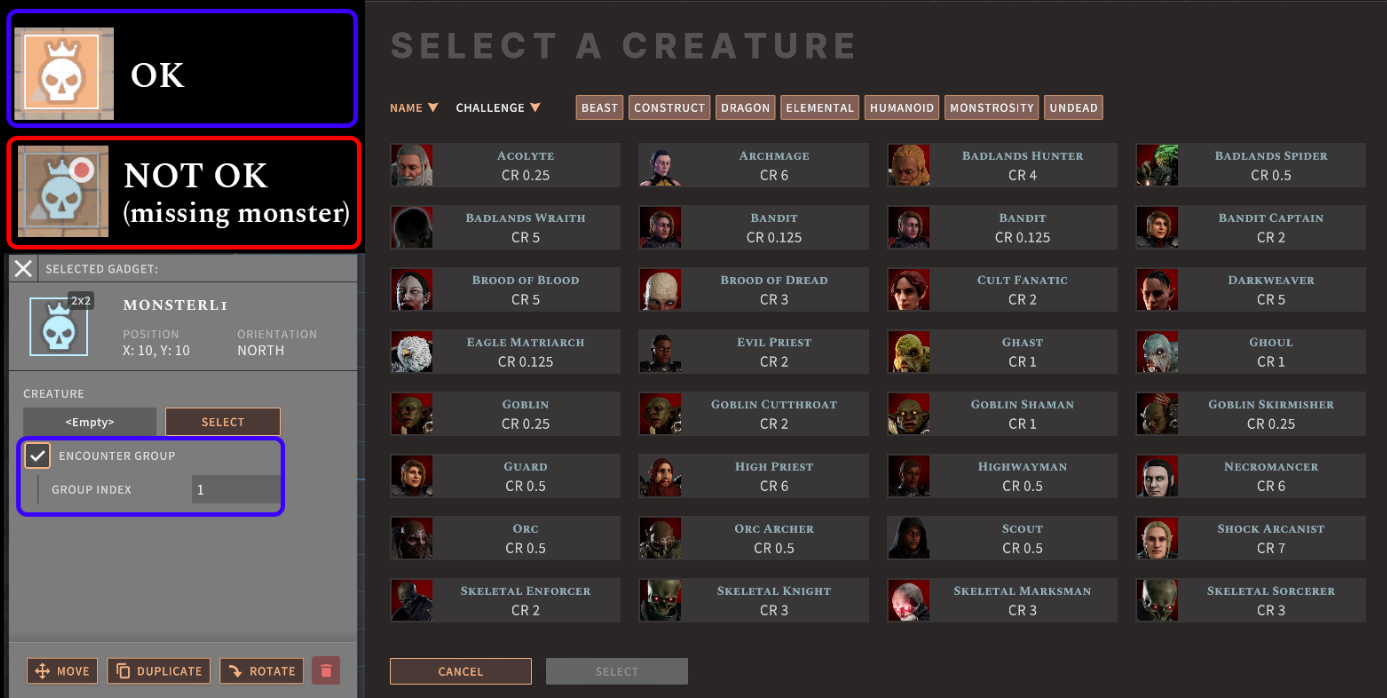
2. Shows the total experience value of monsters in a room, CR does not represent the difficulty and upgrade requirements of the game, because under the same CR, the total CR of the low-level monster group is 8 (1X8, 1600XP) or (2X4, 1800XP), and A single high-level monster has a CR of 8 (3900XP), and the experience points provided by the two are very different.

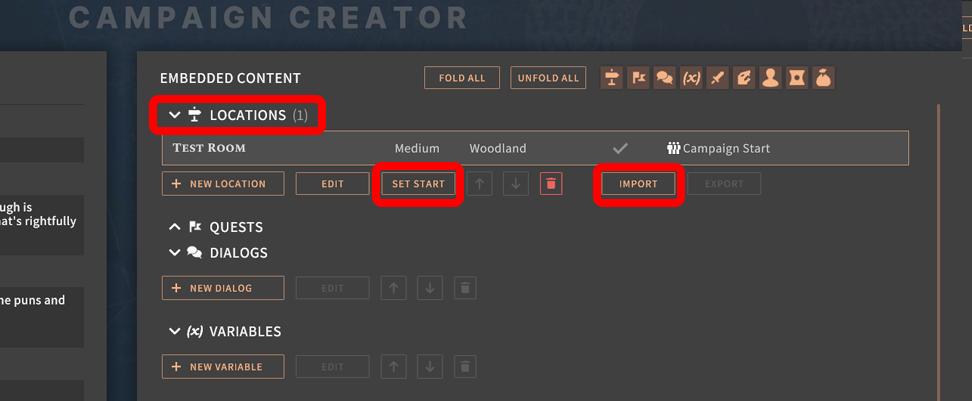
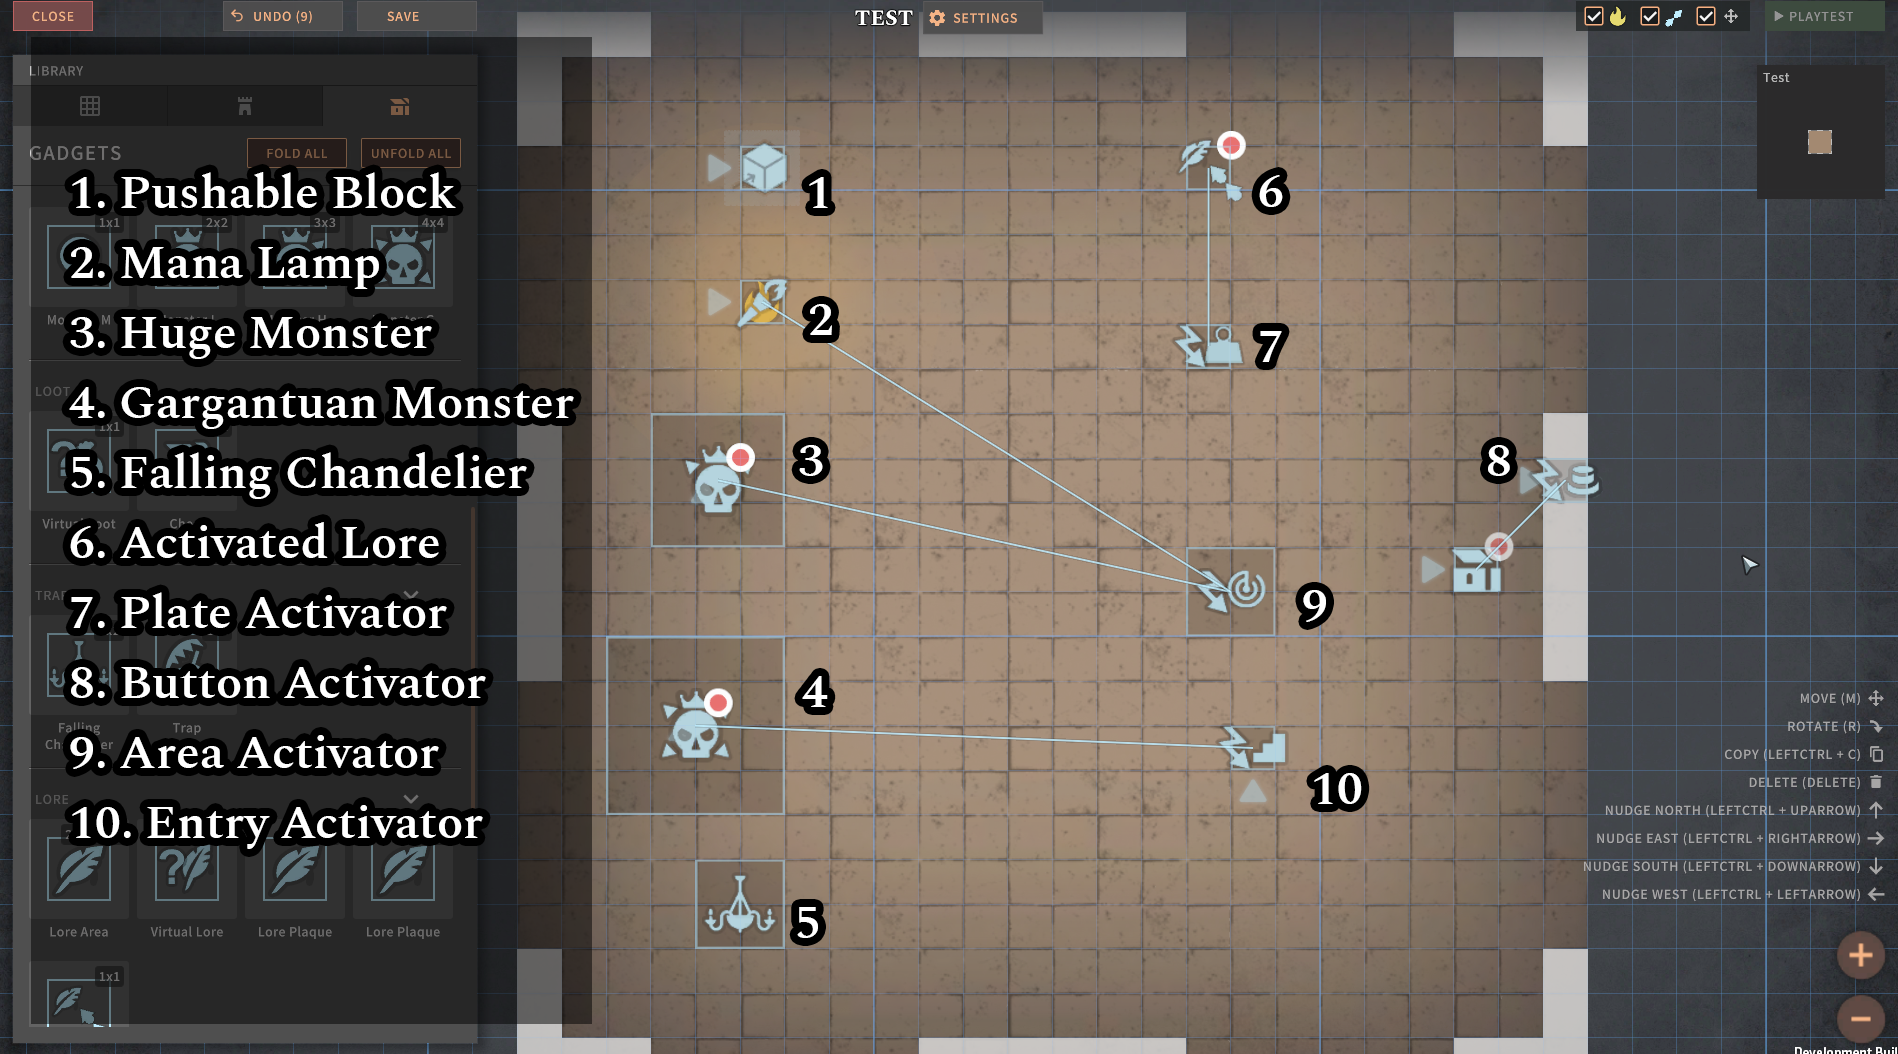
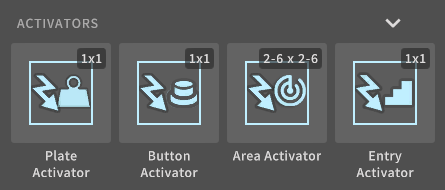
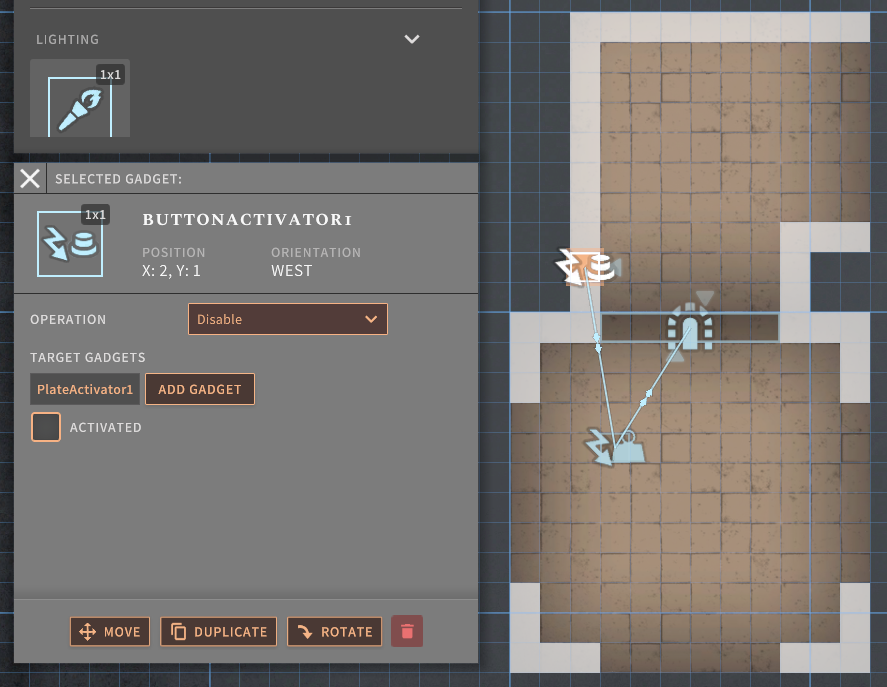
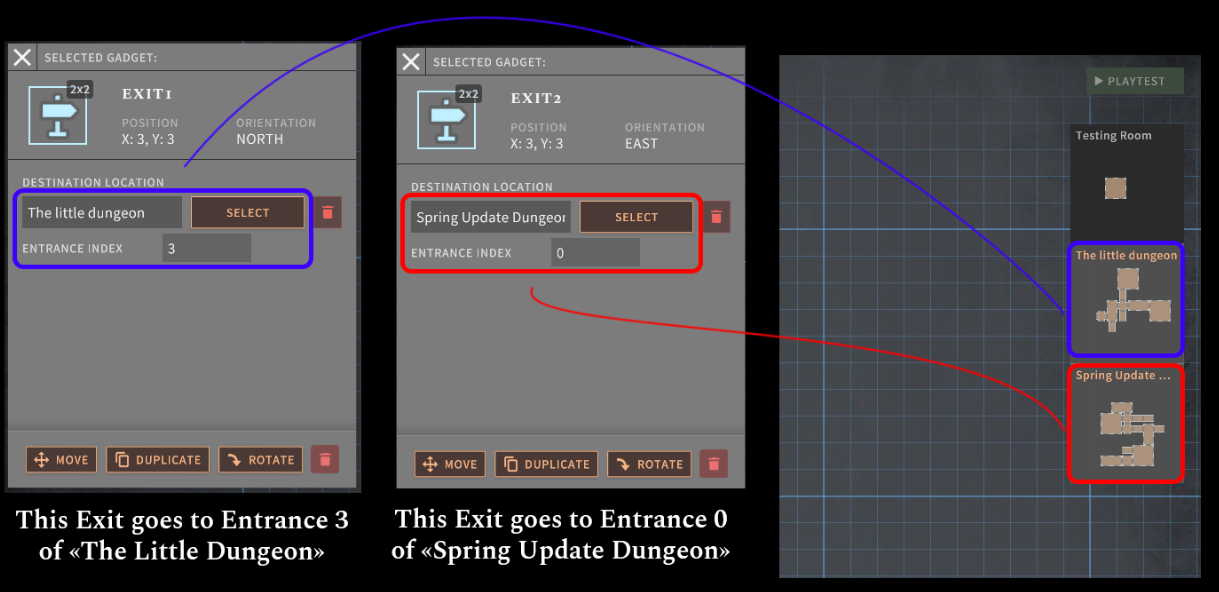
3. Show the operation between the activators. For example, a section activator cannot activate another section activator. I have to test the creation process before I know it. This is a waste of time.
CoolLew 29 Jul, 2021 @ 3:57am 
I opened it via MS Word, and fixed it, works great now, thanks!
Myzzrym  [author] 29 Jul, 2021 @ 1:25am 
Sure, when you go to the Dungeon Maker tab in-game, there is a button called "Browse Folder" or something like that.

Click on it, it will open the folder with all the custom dungeons. Open the dungeon file (which should be something like TheDungeonName.json) and find "publishedItemid" inside, then replace the number next to it to 0.