DARK SOULS™ II: Scholar of the First Sin

DARK SOULS™ II: Scholar of the First Sin

301 ratings
A new player's guide to DS2 by a Souls neophyte
By Yal
Are you new to DS2 and Souls in general? Are you wondering whether you're ready for this steep challenge? Are you desperately trying to figure out how to survive? Then this guide is the for you! As a very recent fan of the Souls series, I should hopefully still have an outsider's perspective... but I've done three runs of DS2 so far, so I sorta know what I talk about. Hopefully.
4
2
5
8
3
2
   
Award
Favorite
Favorited
Unfavorite
Introduction
Dark Souls has become more or less synonymous with "brutal difficulty" today, and people compare anything they can't beat with the series. However, a lot of people haven't played any of the games in the series, and their legendary impossibility is an exaggeration - Dark Souls difficulty is very fair, and even though the games are hard, it is very rarely the game's fault when something goes awry. The games are all about risk versus reward, and paying attention to your surroundings often reward you with hidden items, sniping spots that trivializes encounters, and spotting ambushes before the enemies get a chance to swarm you. Don't expect to steamroll through DS2; a vital part of the experience is learning about enemy patterns, about the grounds you fight on, and about your own wits and weapons.

When you finally beat the final boss of DS2, you will have transformed into a much stronger player than when you started out. Your dedication and determination will have tempered you, made you more careful, more adaptive, more precise. Coming to this realization is... kinda hard to describe, actually, but the gist of the whole thing is that you'll be forced to grow as a gamer and as a person while playing a Souls game, and any achievement you accomplish will give you a true sense of satisfaction; like you actually achieved something rather than just experienced a clump of content.

This probably sounds discouraging, but long story short: every time you die, you will get better at the game, even if you don't realize it. Just don't give up and you'll eventually get through the entire game.

Don't be afraid to look up wikis and such - both lore and instructions in DS2 are obscure, and if you don't enjoy detective work, there's no reason to get stuck just because you don't know where to go next.

DS2 is a really open-ended game as well. You can tackle a great number of areas in more or less any order, and if you get stuck in one place, you can just try your luck elsewhere. Almost half the bosses are optional, although beating the bosses reward you with large amount of souls, unique items, and sometimes other benefits as well such as saving NPCs providing services. There are a lot of different gameplay styles ("character builds" and "equipment loadouts") that are more or less equally viable, although some are easier to use than others and all of them have situational strengths and weaknesses.

DS2 is more accessible than other games in the series: you get greater numbers of souls to level up with, there's always a new place to check out if you're stuck somewhere, and the more colorful worlds offer both variation and a more inviting world to check out. If you don't have any previous experience with a Souls game, DS2 is definitely the game for you.
How to set up your controls (keyboard/mouse)
Once you are past the intro scene, you will end up in Things Betwixt, the game's tutorial area. This is one of the few areas in this game where you're not in mortal peril, so feel free to mess around with the controls until you're comfortable.

If you've got a controller, you'll probably be fine with the default controls. If you're on a keyboard/mouse layout, however, mess around with the controls until you're satisfied with the keyboard mapping and know how to move around and stuff. You might want to disable Double Click Detection in the settings, it will make your single-clicks have a delay that makes normal attacks feel unresponsive. (This setting will need to be turned off every time you boot the game up, be aware of that)

My layout for the most important stuff is as follows, and I'd recommend something similar:
  • WASD to move around.
  • Q to switch weapons in right hand.
  • Left-click for weak attack with right hand.
  • Right-click for weak attack with left hand.
  • E to interact.
  • R to use item (mnemonic: Recovery)
  • F to double-hand weapons (mnemonic: Force)
  • Tab to lock on to enemies.
  • Space to dodge/dash.
  • C to jump.
  • V and B for strong attacks.
  • Scroll mouse wheel up/down to change spells/items, respectively.
  • Tap mouse wheel to switch weapon in left hand.

It might seem counter-intuitive to have LMB for your right hand and vice versa, but if you have your main weapon in your right hand, it feels more natural to use the 'main click button' to use it.
You generally want to switch weapons in your main hand more often than you want to switch weapons in your off hand, but both needs to be easily accessible without moving your hands. In general, all the important stuff needs to be comfortably accessible from wherever you rest your hands on the keyboard.
Don't worry too much about weak and strong attacks - you can go through the whole game without worrying too much about strong attacks; they're generally more powerful but slower and consumes more stamina. Several weapons have very different movesets for strong and weak attacks, however, and using those strong attacks will make you more versatile. (For instance, several swords have lunges as their strong attacks, making you able to close in on an enemy quickly; several other swords just has a more powerful swing that doesn't really add a lot).
Classes and gifts
There are several classes to choose from, and while they're described in pretty decent detail, it can be hard to settle on which one to play as.

Don't fret too much about it - your class only affects your starting stats, and you can level up freely to change (or composite) your class. In general, I'd say the classes are listed in descending order of how difficult they are to play as, with the exception of the Knight being the best class for beginners.

Deciding on what "build" you want to go for early on might make it easier to decide what to level up - heavy weapons like maces benefit from strength, fast weapons like whips and daggers needs dexterity, and so on, but points spent on more HP, stamina or adaptability is always a solid choice.

Class breakdown
  • Knight - starts off with decent armor and the stats to back up a good shield (once you get one). Also starts off with a broadsword, a very well-balanced weapon you can use all the way until the endgame (if you keep reinforcing it as you go along); they easily have the best starting weapon of all the classes. With some investment in attunement and faith, you can use the basic healing miracle and a cleric chime, letting you play as a paladin-type character.
  • Warrior - Another solid choice for beginners with very balanced stats, an offensive alternative to the defensive knight able to equip most weapons you find in the first bunch of areas. Starts off with a broken sword you would probably like to replace quickly, and their shield and armor aren't top-notch either. Their faith and intelligence are in balance, letting you add either magic school to your repertoire later if desired.
  • Swordsman - Geared towards dual-wielding early on. More of a glass cannon with low equip weight and low HP. Starts off with two swords with different movesets, both upgraded to +1, giving you some extra attack power. The curved sword in particular has very good tracking when locking on, letting you hit evasive enemies.
  • Bandit - Starts off with a decent handaxe and a shortbow, although you can't get any refill arrows until you'd get a bow anyway - use your starting ammo wisely. Has the lowest magic stats, so if you are 100% sure you won't use magic, you should use the Bandit to get the least amount of wasted stat points. Their naturally high dexterity lets you use more or less every weapon at the start of the game two-handed (since two-handing a weapon lets you use it with half the indicated strength) letting you use powerful two-handed swords and such early.
  • Cleric - Starts off with a powerful mace, but more importantly - a healing spell and the catalyst to cast it. You would likely want to invest your first bunch of levelups in strength to wield your mace in one hand (so that you can use a shield), or get a sword for a more versatile moveset, but access to 3 extra charges of healing will be a great boon in the early game (although casting the spell is a bit too slow to use it for healing in the middle of a fight; you'd mostly use it to heal up between battles). The cleric also has very low stamina, so if you're going for a melee-based build, get your stamina stat up a few levels early on.
  • Sorcerer - Their Soul Arrow spell offers great power at a great range, but they are crippled once you run out of spell charges, having to rely on a weak dagger to defend themselves. Early game as a sorcerer is very difficult and definitely not something I'd recommend to a beginner, but once you're used to the gameplay mechanics, and once you get access to more powerful spells, they're very versatile and powerful. Using sorceries for burst damage or support spells like Magic Weapon or Yearn and using a light weapon as your main method of attack is generally easier than being a pure caster.
    You can unlock a sorcery merchant early on, but most spell merchants will refuse to speak with you if your intelligence or faith stats are too low (depending on what type of spells they're selling), so reclassing as a sorcerer later on takes a bit of preparation.
  • Explorer - Exporers start off with a great number of buff items and great Adaptability, the stat that affects things like dodge roll invincibility duration, as well as the Travelling Merchant outfit whose headgear part increases item drop rate when worn. Their lack of offensive options will make the start of the game a nightmare, though; you won't be able to equip anything more threatening than a knife or broken sword until after several levels of investment in strength or dexterity. However, they do start with a Pharros Lockstone, letting you access some treasure rooms and hidden areas earlier than normally. Certainly not a good class for your first playthrough, but their balance between intelligence, faith, strength and dexterity, and the wealth of their starting gear, gives them potential to quickly grow into any role you wish once you are more familiar with the game.
  • Deprived - Starts off at Lv.1 instead of around Lv.15, and with no equipment at all. Their stats also are completely balanced, offering the greatest customizability. Definitely a class for advanced players; the start of the game will be absolute hell.

Gift breakdown
As for starting gifts, absolutely don't fret too much - all of the gifts are available early in the game, and whichever you choose is mostly which type of early-game bonus you want to start off with.
Many of them are mostly useless due to how common these items are, but there's three good ones.
  • Healing Wares - This gives you a set of consumable healing items (20 lifegems, 3 radiant lifegems, 3 antidotes and 1 old radiant lifegem). Might be a bit too temporary for your tastes, but it's the best choice if you run the game with previous experience as it lets you get past the introductory chapters easily. It's also the most valuable starting gift, saving you almost 20,000 souls' worth of expenses compared to getting the items from merchants.
  • Life Ring - When equipped, this ring boosts your max HP with 5%. It's not a lot of extra health early in the game since you start off with low HP, and later in the game you're likely to find this ring or its upgrades. But it's better than nothing.
    Also note that joining the Way Of Blue covenant (speak with the guy at the obelisk monument in Majula until he offers you to join) gives you a member's ring that increases your max HP with 3% when worn, which stacks with the Life Ring.
  • Petrified Something - You can trade it in with the crows in Things Betwixt for a random rare item - a late-game upgrade material or a late-game weapon. Whatever you get is valuable, but likely won't be useful until much later in the game (the late-game weapons have huge stat requirements, and the late-game upgrade materials can't be used until you unlock the blacksmith).
How to equip yourself for survival
There's a lot of different items to learn about in DS2, and many of them are equally viable in the long run - as you get more confident, you should experiment to find a strategy that works for you... after all, having fun is the reason you're playing a videogame.

What works the best for a beginner, though, would be along these lines:
  • Get a shield. While dodging attacks is often better than blocking them with a shield, blocking them with a shield is better than taking a direct hit. The most expensive shield availalble at the start at Maughlin's inventory, the Silver Eagle Kite Shield, has nice damage absorbtion and great stability - it's definitely worth its price (which is about a levelup at this point in the game). There's also a decent wooden shield (Crimson Parma) in a treasure chest in the tunnel to Heide's Tower Of Flame; it's not as good, but it's definitely a viable option considering how easy it is to get.
    Also keep in mind that your stamina recovers MUCH slower when your shield is up, so dropping your guard every once in a while will be necessary - blocking hits drains your stamina, and if a hit empties your stamina gauge completely, you will be temporarily stunned, letting enemies wail on you with impunity.
    Finally, don't only dodge attacks with dodgerolls. Just walking out of an attack's range is enough to dodge it, and will save you stamina and possibly put you in a better position to retaliate.
  • Get a fast weapon. Being able to hit enemies on twitch-reaction will help you a lot early in the game. A broadsword or such will be able to carry you through the whole game due to their versatility, and even if you switch it out for something cooler further down the line, it's an excellent sidearm. Try out all weapons you find, even if you don't meet the stat requirements - it gives you an idea about the movesets.
  • Make sure you have both your Estus Flask and Lifegems equipped in the item slots. Lifegems heal over time [but has a faster usage animation], and Estus almost instantly [but force you to stand still for a while]. Using the right item in the right situation makes the difference between death and survival.
    Note that you can get two charges of Estus before you leave Majula - you get your first by speaking to the Emerald Herald, but there's an upgrade shard hidden in the small well next to the great hole in the ground - try knocking down the boulder tied to the well's rope and it will pull up a corpse with some loot.
  • Make sure to equip weapons/shields/catalysts in a smart way, so that you can easily switch to the equipment you can rely on in a pinch - for instance, you might want to always have a shield equipped in your off hand so that you're always depared to block an attack, and have all your weapons in your main hand and toggle between those as required.
  • Be mindful of your equip load - going past the 70% mark will make your dodgerolls ineffective (called "fat rolls"), and going past the 120% mark makes you pretty much immobile. Every percent of your equip load will also slightly slow down your stamina recovery and shorten the distance of your rolls, so adding more armor might actually make you MORE vulnerable depending on your playstyle. Also be mindful of your Poise stat - it represents your ability to endure hitstuns and knockback, and having too little poise means you're more vulnerable to getting stunlocked by an enemy, or being knocked out of an item use or attack animation that would have saved you. Generally speaking, heavy armor adds poise and clothes do not, but there are exceptions.
  • Practice fighting both locked on to enemies and without locking on - it's generally easier to fight an enemy while locked on, especially if you use a shield, but you generally won't see where you're going, making it easier to accidentally walk off a ledge or into the attack of another enemy. When you get surrounded, it's generally better to not lock on to enemies.
  • Don't forget that you can outrun every single non-boss enemy in the game by running. A little bit of cowardice never hurts!
Playing like a survivor - general tips
First and foremost, be observant. You can almost always see ambushing enemies clearly if you just look everywhere, and pay attention to their sounds. Some enemies hide on the ceiling, but just looking around corners can save your life.


Secondly, never enter the unknown unless you're prepared. If you carry a lot of souls, go back to the nearest bonfire, warp back to Majula, and cash them in so you won't risk losing them - the walk back to where you were is always easier the second time, when you're more familiar with the enemy placement and there's less item orbs around to distract you. Make sure you're fully healed before entering an area that might have ambushes, and if you can't handle an enemy, run back towards ground you've already covered - if you've killed the enemies there, you won't risk getting ambushed while busy fighting the current threat. And even if things goes wrong, the closer you are to the bonfire when you die, the easier retrieving your souls will be.

Thirdly, only fight one enemy at a time as much as possible - an arrow or sorcery often makes only the enemy hit aggro you, and fighting one enemy at a time means you can't be surrounded. Running into a group of enemies unprepared is just asking for trouble, and DS2 is sure to deliver.

Fourthly, don't look too much on weapon stats when deciding what weapons to upgrade - a stronger weapon may have a moveset you're not comfortable with or have other drawbacks, and the range and speed of a weapon is often more important than the actual damage it deals. Swing it around a few times and see if it FEELS right; even weapons in the same category can have different movesets, speed, range or other quirks.

Fiftly, actually upgrade your weapons once you've unlocked a blacksmith - it often gives a greater stat boost than leveling up your strength or dexterity a few points.

Sixthly, don't forget that you can summon other players - and sometimes friendly NPCs - to help with bosses. If you're stuck, never hesitate to ask for help! Once you find the Soapstone items, you can become a summon too - this will let you get a preview of what's ahead without risking losing souls or humanity (dying as a phantom doesn't make you 'die' normally), so take any chances you get; give help as you wish to receive.

Sevently, don't fret too much about losing humanity - effigies are limited, but you will get a steady supply of them throughout the game, especially if you help other players from time to time. There's a ring available early on that reduces the HP penalty for being hollowed, and even without it it takes a great number of deaths to cap out at half your normal HP.
Losing souls is much worse, so always try to die where you can retrieve them easily and always focus on getting them back from your bloodstain ASAP.

Eightly, don't forget that you can outrun more or less anything you come across in the game - running away from a battle is always better than losing a battle, and you always want to have the last word about where to fight. Just make sure you have enough stamina to actually start running; you don't want to give the enemy a free stab in your back.

Finally, never give up. Even if you fail, every mistake will make you better at the game. You won't see your own level increasing, but your own experience matters as much as your character's.
Powerlevelling in the early game
Early in the game, you will feel like you're at a constant shortage of status points so that you can't equip any nice weapons, have too little health or having too little stamina - it's not uncommon to want to grind a bit to stand a chance. So how would you get a lot of souls quickly at the start of the game?

Heide's Tower Of Flame might be full of imposing enemies, but you can reach it as soon as you set foot in Majula - you're not really meant to be here until you're done in the Forest Of Fallen Giants, but if you can handle it, you'll get great rewards.

In many ways, I'd actually recommend checking out Heide's Tower Of Flame early - the enemies are tough and hit hard, but their attacks deal a very little amount of stamina damage when blocked with a shield compared what you'd expect, and they drop several hundred souls on death each (the giant rusty knights drop 400 each, the resting knights in white armor drop 700). The area also is really small, and there is a summonable NPC (Masterless Glencour) right before the boss gate that you can bring along for the entire area, giving you a welcome distraction for the enemies - any enemies he kills will still drop souls and items with no penalty, and him being around to draw aggro will make the area's three bosses a lot more manageable.

If you're ready to take a risk, bringing Glencour to the dragon in the far end of the area will let you get a large number of souls. The dragon is, ironically, much safer to fight if you run up to it as fast as you can - its fire attacks can't hit you if you get behind it, and its stomp attacks are a lot easier to avoid. Glencour won't go for the dragon by himself, but recklessly charging into battle will make him tag along. Once the dragon is dead, you can enter another (optional) boss room, but you should head back to cash in your souls from the dragon kill first. Also don't forget to summon Glencour for the optional boss battle as well.

Also worth noting - the great knights are VERY susceptible to blunt damage, and the mace the Cleric starts off with can easily kill them in 4-6 hits with your weak attacks (especially if you increase your strength with 1 point to wield it in one hand). If you're playing as a cleric, starting off at Heide's Tower instead of the Forest Of Fallen Giants is highly recommended.

Other Early Good Stuff
There's a lot of good stuff hidden in Majula. Along the coast path between Things Betwixt and the Far Fire, there's a ledge you can drop down to (just walk off, don't run or jump or you'll end up overshooting the ledge), giving you the Binoculars (which lets you enter first-person mode; useful to look around corners or cast spells with better precision), a Morning Star and a Sacred Chime (a magic catalyst that lets you cast miracles, aka white magic).
The small well outside the mansion in Majula has a suspicious-looking boulder attached to a rope, try knocking it down into the well and see what happens.
The ledge right outside the tunnel to Heide's Tower leads to an altar where you can enter the game's hard mode (which you don't want to do if you're reading this guide), but there's also a couple of Homeward Bones at a nearby corpse - these lets you quickly teleport back to the last bonfire you visited, letting you get out of sticky situations or just avoiding having to walk back a long way. Note that you can use Homeward Bones to escape out of a boss battle - if you ended up dropping lots of souls after getting killed by a boss and want to spend them before trying the boss again, you could use a Homeward Bone to teleport out right after retrieving them.
The tunnel to Heide's Tower Of Flame has a treasure chest with a decent wooden shield; if you don't want to shell out the souls for the Silver Eagle Kite Shield, this shield is the best free option for quite a while.
Killing the ogre right before the three old ladies' house in Things Betwixt is really dangerous (as is engaging the ogre in the Forest Of Fallen Giants), but it is guaranteed to drop a really useful Stone Ring, a ring that makes it easier to stagger enemies with your attacks, letting you stunlock even very powerful enemies with fast attacks. Also, ogres drop 1000 souls and have a chance to drop Soul currency items, so taking the risk to attack them is profitable, especially if you have good long-range attacks to abuse their slow reaction speed.
Where do I go? I'm stuck!
One thing a lot of people have questions about is your end goal - you just kinda stumble into Drangleic without leads.

Your ultimate end goal is to reach Drangleic Castle and seek the king, Vendrick, rumored to be researching a cure for the undead curse.
However, to get into the castle itself, you must seek and slay the four major bosses, the Old Great Ones, ancient evils roaming the land. Majula has four paths leading to each of their lairs, although only two of them are accessible from the beginning; other paths will unlock as you save NPCs or obtain new items.

The Forest Of Fallen Giants is full of groups of weak enemies, although even a single one of them is a threat to the unprepared - while their attacks mostly consist of unfocused flailing that gives you ample time to counterattack, they still sting pretty badly if you get caught up in their flurry of attacks. This area is huge, with several separate sub-areas and three bosses, so don't expect to get through it in one sitting. It is also technically speaking optional, but there are important NPCs to recruit, some nice items to pick up, and a good place to practice your battle skills.

Early on, you'll find a merchant selling healing items; she also has the key unlocking the Blacksmith's house. Once you beat the area boss, she will relocate to Majula and expand her stock.
Also, when you first enter the area, you will see an ogre - they are just as dangerous as they look, and you probably should stay away from them for now and focus on the zombies; you don't need to kill everything you come across.


Heide's Tower Of Flame is small, but it's filled with miniboss-rank enemies... but since you only need to fight one of them at a time for the most part, it can be much more manageable. Just make sure to bring a shield.

Clearing the area's first boss will enable you to access a Miracles (healing magic) merchant, who will also move to Majula and open up a new path for you.

Clearing Heide's Tower Of Flame lets you access No Man's Wharf, a ghost pirate hideout. It is very dark, and using your torch to light the sconces scattered throughout the level will both make it easier to navigate and keep some enemies at bay. (To light your torch at a bonfire, press the button assigned for two-handing your weapon to cycle between interact options).

This area also has an NPC summon named Bradley of The Old Guard. If you struggle to make it through the area, use a human effigy and make sure to summon him. Also note that the zombie with a torch won't attack you, and is just as good at keeping light-fearing enemies at bay.
Clearing No Man's Wharf lets you access the dungeon of the first of the four Old Great Ones, the Lost Bastille. You can also get there early by defeating the Pursuer boss in the Forest of Fallen Giants, but note that it is a very difficult battle at that point.

Clearing Heide's Tower and recruiting Licia additionally lets you unlock the path to Huntsman's Copse, a great forest area filled with poison butterflies and dark magic. This area does not have very strong enemies, but there are plenty of ambushes to step into, so advance with caution.

Clearing this area will let you access several other areas, eventually leading to the second Old Great One.


If you really don't know where to go, there's no shame in checking out a walkthrough or a wiki - remember that knowing where you need to go isn't even half the challenge; actually getting there is what you need to worry about.
Closing words
I hope this guide is helpful to someone, I literally just wrote it in an afternoon. Hopefully it fills a niche of some sort; most material I've found assumed you already knew a bit about the game and there's not a lot of encouragement to be found.

When people tell you to 'git gud', they do have a point; but what they really are saying is "don't give up". Every failed attempt will teach you about one more thing that doesn't work, and when you find that critical path through the game, dragging yourself forward one boss at a time, one lit bonfire at a time, the sense of true accomplishment you feel will make it worth all the struggle. What doesn't kill you makes you stronger, but what does kill you also makes you stronger. Stay persistent, stay focused and stay determined, and you can overcome anything - that is the true lesson you'll learn in Dark Souls.

Appendix: Background Music Playlist
Do you think exploring the game is too creepy or too boring? Do you think some nice background music would make things easier? Well, so did I, so I set up a Soundcloud playlist with some fitting music from the good old N64 days. If you don't have the patience to set up your own, feel free to use mine :3

https://soundcloud.com/yal-5/sets/ds2-background-looping-bgm-1

There's a tracklist sorted by area (in the expected order you'll visit them) in the description of the playlist. In order to make sure you get the correct looping experience, make sure the "single loop" indicator is lit.
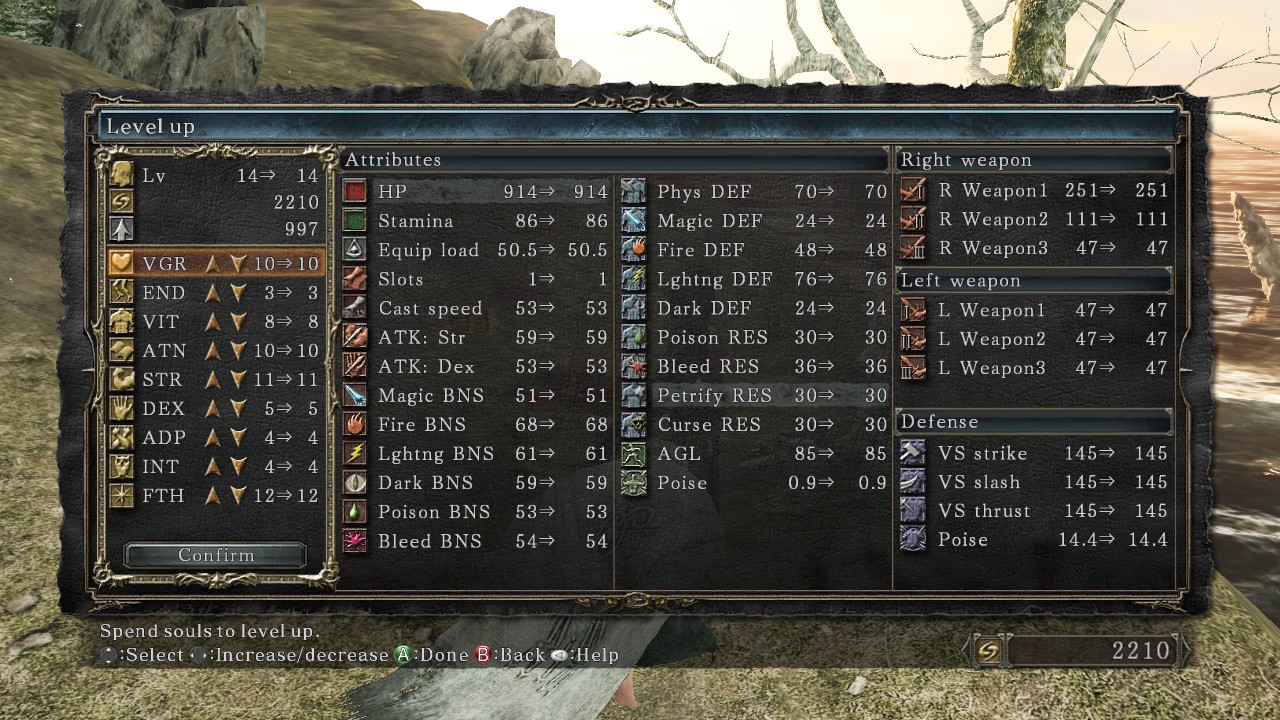
Appendix: What does all these stats do?
If you're anything like me, the first thing you thought when checking out your Status screen probably was something along the lines of "AAAAAAAAAAAAAAAA TOO MUCH MATHS STUFF WHAT DOES ALL OF THIS DOOOOOOOOOOO".
So here's a quick breakdown on the stats by column. Note that you can use the indicated button to display 'help' for some info in-game (or right-click and select 'help', then hover over the icon accompanying any of the stats).

From top to bottom:

First column - Character Attributes
  • Level: your Soul Level, aka the sum of all your level-ups and a quick assessment of your strength.
  • Souls: currently held souls.
  • Souls to next level: how many souls the next levelup will cost.
  • VGR - Controls your max HP. Early on in the game, raising this is much more effective than raising VIT. Starts out at giving 30 HP per levelup, then slows down with 20 and 10 points per levelup before soft-capping at a mere 5; the boost is also the most noticeable at low levels as a result.
  • END - Controls your max stamina, and also slightly boosts your innate defenses. High stamina is necessary for all classes, but extra important if you're relying on using a shield.
  • VIT - Controls your equip load and innate defenses. All armor will scale with your vitality stat, although the effect is not very noticeable, especially not at low levels. Higher vitality means you can equip heavier armor and more weapons at a time, and for any class other than a pure mage, you're likely to need an investment down the line.
  • ATN - Controls your number of spell attunement slots, and will increase the number of casts per attuned (equipped) scroll at certain thresholds. Also influences your casting speed.
  • STR - Boosts power of heavy weapons, and is required to equip some weapons without penalties. Wielding a weapon two-handed will halve the strength requirement to wield it properly.
  • DEX - Boosts power of fast weapons, and is required to equip some weapons without penalties. Since wielding a weapon in both hands only affects the STR requirement, you might want to prioritize dexterity first when going from a magic-based to a melee-based character.
  • ADP - Affects your resistances to ailments and your agility stat. Agility, in turn, affects the speed of certain animations (using items and climbing ladders), your number of invincible frames during dodge moves, your spell cast speed, and your window to successfully parry. While adaptability doesn't give any obvious advantages, it gives many subtle advantages that stacks up in the long run.
  • INT - Affects sorcery damage, what spells you can attune and what catalysts you can equip.
  • FTH - Affects miracle damage/recovery, what spells you can attune and what catalysts you can equip.

There's four types of magic in Dark Souls 2: Sorceries, Pyromancies, Miracles and Hexes. The power of Sorceries is based on your INT, Miracles on your FTH, Pyromancies on the sum of your INT and FTH (but with very low power scaling), and Hexes on whichever of your INT and FTH is the lowest (but with higher-than-average power scaling).

Note that all levelups also give a small number of extra HP for the first few levels of each stat.

Second column - Offensive stats
  • HP and stamina should be self-explanatory.
  • Equip load is the maximal weight you can equip; going past this value will make you more or less unable to move, and lock you out of running, dodgerolling and backstepping. You ideally want to keep your equip weight under 70% of your max equip load to avoid speed penalties, though being below 50% and 30% both speed you up even further. Also, every percent of equip load lowers your stamina recovery speed with half a percent - at 100% equip load, your stamina recovery is halved.
  • Slots is basically the number of spells you can attune; some scrolls will require more than one attunement slot, though.
  • Cast Speed governs the speed of your spell cast animation. It gets boosted by investments in either of INT, FTH and ATN.
  • ATK:Str, ATK:Dex: the value used in scaling calculations for equipped weapons with STR/DEX scaling.
  • Magic BNS, Fire BNS, Dark BNS, Lghtng BNS: values used for elemental scaling damage calculations. Affects both spells of the corresponding type and weapons with elemental infusions.
  • Poison BNS, Bleed BNS: Affects how quickly poisoned or lacerating weapons build up enemy ailment gauges.

Third column - Defensive stats
  • Phys DEF, Magic DEF, Fire DEF, Lghtng DEF, Dark DEF: should be self-explanatory; reduces damage from attacks with the corresponding element.
  • Poison RES, Bleed RES, Petrify RES, Curse RES: affects the length of your corresponding ailment build-up bars, which means you can be exposed to poison, bleed, petrification or curse hazards for a longer time without being afflicted.
  • AGL: affects your animation speed for using items, your window to parry successfully, and invinciblity frames during dodge moves.
  • Poise: affects your ability to withstand enemy attacks without flinching. Works like a regenerating health bar; you lose a bit of poise each time you're hit, and if your poise is emptied by an enemy attack, you flinch or stagger.

Fourth column - Equipment summary
  • Right weapon/Left weapon: The sum of the offensive values for each weapon, including scaling values. If a slot is empty, this value corresponds to your barehanded attack value.
  • Defense: the sum of your equipped armor and innate defenses, including scaling values.
  • Poise: the sum of your innate poise (see the 3rd column) and poise provided by your equipment.
44 Comments
clarkeveritas 31 Aug, 2021 @ 9:52pm 
Good guide. As someone who REALLY likes Dark Souls 2 (I understand the complaints but I just love how they took all the spells/items/whatnot from DS1 and added a TON).

Anyone looking to break into the series would do well to read this regardless of which game they start with. While DS2 has a few differences from the others (I think the only one to have Agility but I'm not sure) this has all of the Stuff You'd Figure Out After Dying a Bunch of Times Early On and Getting Mad About Losing Souls a Bunch of Times.

I was thinking about writing a basic DS Primer but this pretty much covers it.

:praisesun:
:2016popsicle:
:2016watermelon:
Alumno Superstes 22 Jun, 2021 @ 11:28pm 
Ye, I better just concentrate poise from armor
Yal  [author] 22 Jun, 2021 @ 2:00pm 
You don't get poise at every level, I think it's every 4th level. But the poise you get from armor (and the Giant's Ring) massively outnumbers the poise you get from stats so there's basically no reason to try to get poise from levelling up anyway.
Alumno Superstes 22 Jun, 2021 @ 8:56am 
Question about POISE and adaptivity: Google said Adaptivity would increase poise too, but seems my knight won't get any poise at all, it's still at 1.8, do I have obsolete info?
Yal  [author] 4 Mar, 2021 @ 6:44pm 
I've actually already made a DS3 guide :)
(DS1... I'll wait with that until Bluepoint gets to do a REAL remake)
Carver 4 Mar, 2021 @ 4:16pm 
I've played and beaten all the soulsborne games, and this guide is on the money. I think you did a good job. You should do the others.
bullyforme01 21 Jan, 2021 @ 3:55pm 
nice.
Ward3n 11 Jun, 2020 @ 2:12am 
this is a great guide, im a souls veteran but this was really helpful
doctor sex 11 Apr, 2020 @ 4:45am 
thanks! Im just starting out and i wouldnt survive with hardmode on lol
Yal  [author] 10 Apr, 2020 @ 4:55pm 
(She lives in the building closest to the path to Heide)