Insurgency

Insurgency

366 ratings
Insurgency weapon modding tutorial (not only) for beginners
By Far
In this tutorial I'll try to show and explain how to port custom weapon models to Insurgency. Be advised that I have never ever written a tutorial before, and English is not my first language, so some things may not be very clear. If you have any questions, use the comment section.
3
3
   
Award
Favorite
Favorited
Unfavorite
Introduction
We've all seen it. Someone makes a weapon replacer mod, and people start requesting another weapon or want it for different weapon slot. While some requests are reasonable, some are outright silly.

This guide is intended for those who are tired of requesting things (that no modder will make anyway) and want to make their own mod.

You might ask, why make another tutorial, if there already are two tutorials covering this same exact thing, one by Mr. Brightside[mrbrightsideanimator.net] and the other one by Tigg.[euanm.com] Well, while I agree that I am covering some things that are already explained pretty well in both of those guides, I am also covering things that are not mentioned in those, and trying to make the guide more beginner friendly, explaining things step-by-step.

All software used for making mods is available for free, and I have added links for download in the first section.

Another question that you might ask is, where to get the models from?
That's entirely up to you, you can make your own models and textures, or you can get community made models from Gamebana, models ripped from other games on Facepunch, or various other modding sites (for example Nexus, Moddb, or some other game's steam workshop). If you're using model made by someone else, be sure to credit the people who made it. If possible, ask model's author or texture artist for permission first, and add them as contributors if you can.

Model used for this tutorial is SA58 OSW from Battlefield Hardline, made by EA DICE.
1. Reference mesh
Tools that you'll need in this section:
Blender[www.blender.org] (with Source Tools Addon[steamreview.org])
GCFScape[nemesis.thewavelength.net]
Crowbar

So you've got your new model in blender.


We want to prepare it first so that things will be easier later on. It should be smoothed properly, have vertex groups prepared for assigning and materials sorted out.

Select it (right click) and go into edit mode (Tab)
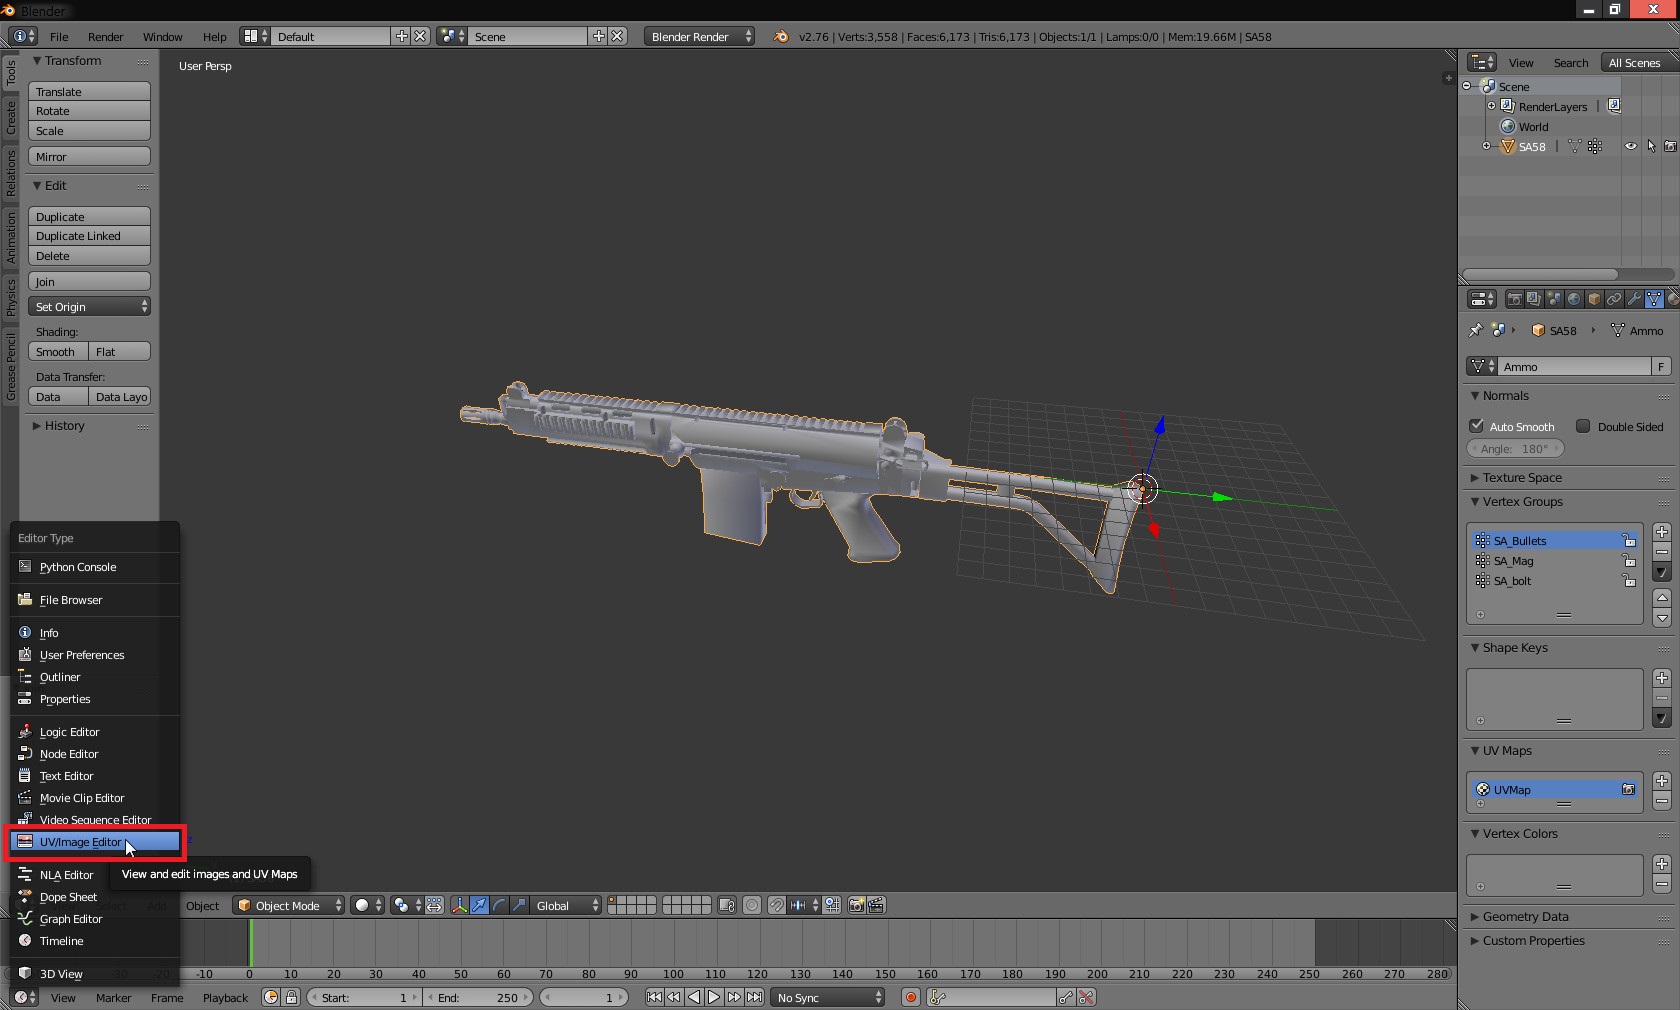
Open up UV/Image editor, click on UVs and then hit Seams from islands.


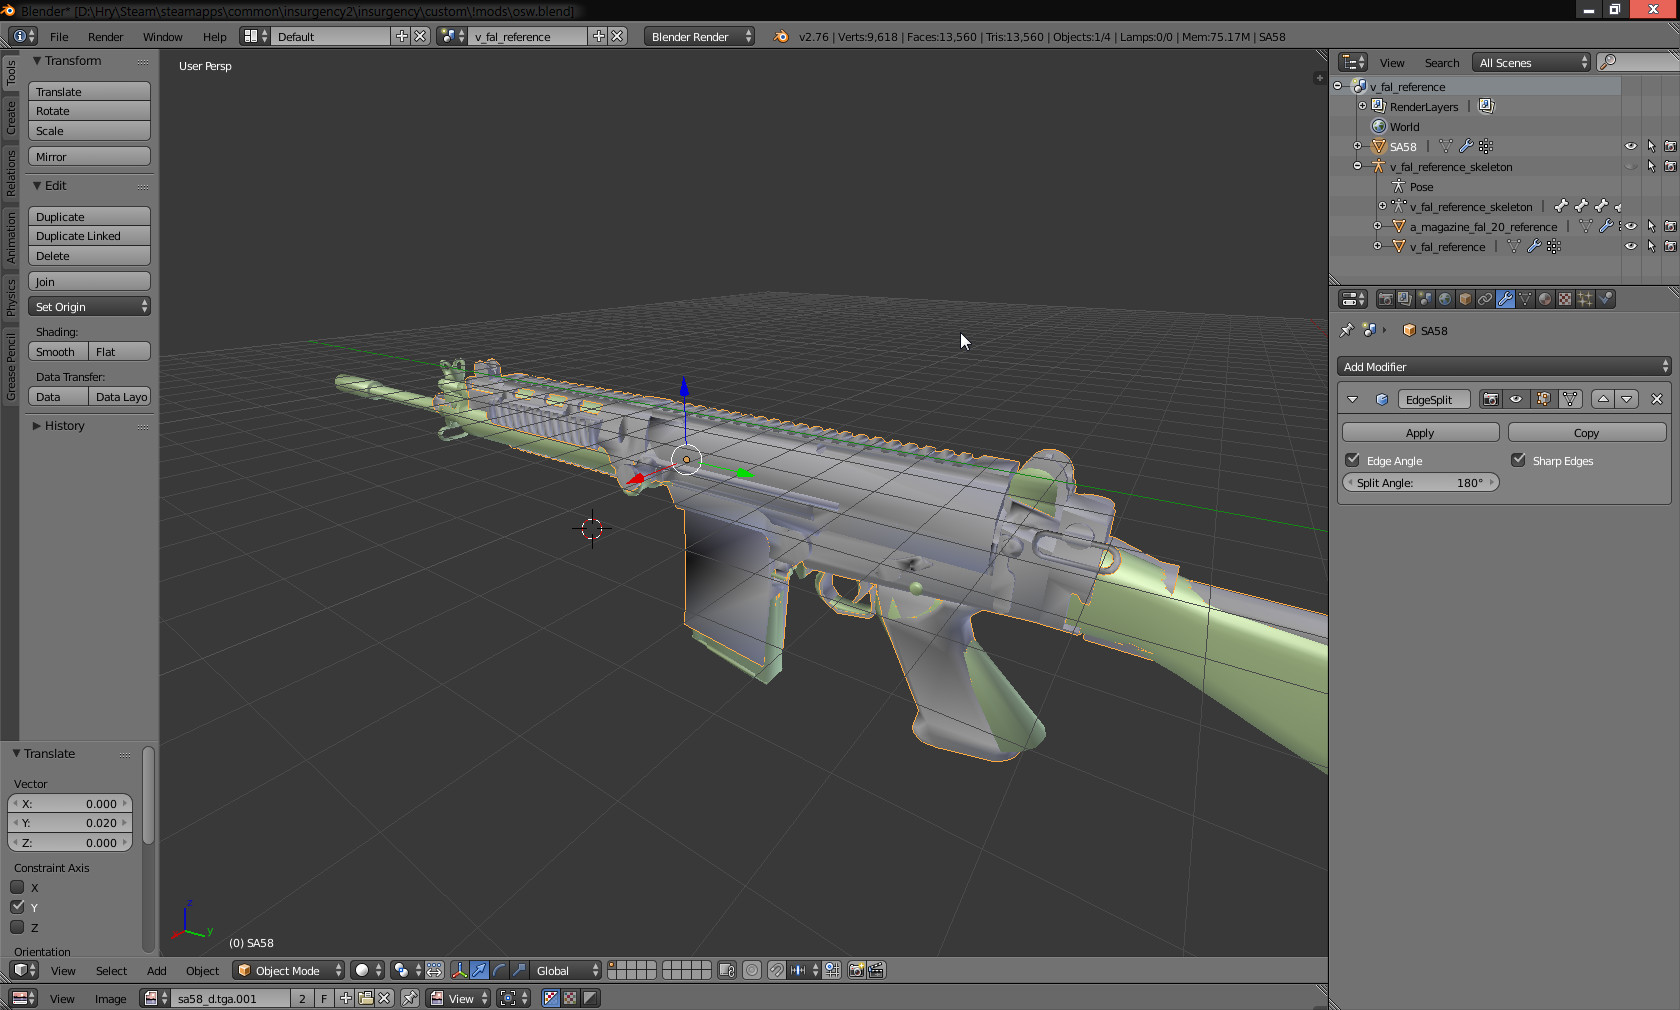
Then check both Mark Seams and Mark Sharp. Add Edge Split modifier and set the angle to 180°. Or you can just uncheck Edge Angle.


Switch to Materials tab, and see how the materials are named. You can either change the name for easier work with textures later, or you can leave it be. What's important is that you remember/write down/copy exact material names, because for textures to work properly, your .vmt files need to be named EXACTLY as the material in blender.


Next, we are going to prepare vertex groups. You can also do this later, but it's easier while you have just one model in the scene and you can split it up and hide sections for easier work when selecting parts of the model.

You should select any moving part of the model (Ctrl+L is your friend), like magazine, charging handle, fire selector switch, trigger and so on. Create new vertex group named accordingly (but the name should also be model specific, so you can find the group later, adding a simple prefix helps) and assign the parts of model. Once you have done that, you should also create a vert group for the weapon itself, so just hit A to select everything and then deselect all groups you've created, and repeat the process once more.


Now that we have our model prepared, you can import reference mesh of original weapon that you've gotten after decompiling .mdl of Insurgency weapon you've pulled from insurgency_models_dir.vpk. For decompiling you first need to extract the .mdl with GFCScape and then decompile it with Crowbar. 1st person models (viewmodels) have v_ prefix, 3rd person models (worldmodels) have w_ prefix.


After importing the reference.smd, you'll notice that your new model is in the wrong place, and is probably bigger or smaller than the imported weapon mesh. First apply the edge split modifier to the imported mesh (so that you won't forget later).


Then scale and position the new model so it's aligned with the imported mesh.


Ortho (Num 5) side view (Num 3) and wireframe mode (Z) make things easier.


Make sure you also align it along the X axis (Num 7).


New model is now aligned so that animation will fit the important parts like pistol grip or magazine. You may notice that charging handle is slighly in the wrong place, barrel is too short and irons are in a completely different place. We will fix these issues in the next section.


Now it's time to replace the default mesh with the new one. Go back into object mode, right click the new model and then shift right click the default model. The order in which you select them is important. Now hit Ctrl+J. This will join both models together, and transfer all properties and modifiers from the old model to the new one.


Back to the edit mode and to the vertex groups. Both models joined together, you can see that the vertex groups from the new model ended up at the end of the list, but we have them named so they are easily recognizable. Click on the vertex group of the new model (you know which is which since we named them and added a prefix to all of new vert groups) and hit select. Then click on the vertex group of the old model (without prefix) and click assign. Repeat for all vertex groups your new model has.


And now we go back to the materials tab. You can see that after joining models, their materials also got joined. We have all the work on new model done, so all we have to do now is to get rid of old model. Click on the material (all Insurgency materials are named weapon_xxx_dm), click Select and then press delete.


All that's left now is export the new reference mesh.


Bam, if you've followed all the steps in this tutorial, you've got your new reference model either ready for compile on default anim files. (which is covered in either Brightside's or Tigg's tutorial) or ready for further animation editing.
2. Animation editing
Tools needed in this section:
Blender

Once we have the reference completed, we should edit the animations to fit the new model.

Open up new Blender window and import the .qc file you got after decompiling.


After import, you might want to import hands mesh too, so you can adjust the animations more accurately. You can get it same as the weapon's model, just extract it from insurgency_models_dir.vpk (it's in the same folder as the rest of weapons), decompile and import the reference.smd.

Open up Dope Sheet and then Action editor.


Select the armature and go into edit mode (Tab). Now you can adjust attachment points.


Example of moving attachment point for suppressor, wireframe is turned on for more accurate positioning.


Once we have attachment points done, we should examine the animations to see if they need any adjustment for new model. First, take a look at base_idle animation. As we can see, left hand is clipping into the handguard rail.


That's not very nice, we should fix that.


There, that's better, isn't it?
Moving it for one frame animation is not very hard, but how about adjusting it for all other base_ animations?


If the fingers (bones) we moved are static during whole sequence, it's pretty easy. Just copy the keyframes and paste them into the beginning and end of the animation, and delete all keyframes inbetween. Alternatively, just paste them, delete all other keyframes and then just duplicate (Ctrl+D) the first keyframes and drag them to the end of animation.


But what to do if the bones we edited move during the sequence?


Again, we are going to copy/paste the keyframes. But only for the keyframes during which the bones are static. You can see this in the editor.


Now, open up the graph editor. Select only the bones that we edited. We only changed rotation, so we can hide Location lines.


You can see that there is some not very nice transition from the unedited keyframe to our edited one.


We want to smooth this transition out.


Repeat this for every line, and for every base_ and iron_ animation as well.


You can also edit hand movement during animation in the same fashion. Select the bone that controls whole arm. In this case, we've selected L UpperArm.


Go to first frame you want to make changes. In this case, we're going to the frame where the hand just grabbed the charging handle. Then we're going to move the hand so that it's position is adjusted better.


Then we're going to the keyframe where the hand's movement we want to edit ends. Again, adjust the hand position and then delete all frames inbetween.


Smooth out the beginning and end of this edit. You should play the animation few times to see how does it look.


Just like this, you can edit hand position and movements to accomodate new model.


As you'll be editing animations, you'll notice that beside base_, foregrip_ or deployed_, there are also delta_ animations. These are kinda specific animations that get corrupted when decompiling the model files.


What you want to do, it go back to base_idle, and copy the keyframe for all bones. Paste it to the delta_iron.


Select whole armature (A) and move it so that the tip of the front sight is in the center of axes. A_Muzzle_Ironsight will move too, so move it back the it's original place.


For other optics delta_ animations, you do the same as for delta_iron, but you move the gun a bit lower. For precise alignment you might want to look at this tutorial:

Fixing delta animations

Besides moving the weapon/armature along the Z axis, for optics with magnification, you should move it along the Y axis, that is closer to the origin/camera. Degree of magnification depends on this, it takes a bit of tinkering to get it right.


For delta_foregrip, just copy the first frame of any foregrip_ animation (preferably foregrip_fire)


Then paste into delta_foregrip and you're done.


All that's left to do now is export all animations. See following screen for export settings:


What more to add? We have adjusted attachment points, changed hands to match the model and fixed delta animations. All that's left to do is to compile and test things out!
3. Compiling
Tools needed in this section:
Notepad
Crowbar

Last step that needs to be done before we can get our new model in the game, is to compile it.

Before that, however, we have to edit few things in the .qc we will be compiling.

Open up the .qc you got after decompiling. It's in the same folder as reference.smd.

Right at the beginning should be a following line:

"$CDMaterials "models\weapons\fal\"

This is important, as it says to the model where to look for the .vmt files. When preparing our reference, we named materials, and now we know where to place the properly named .vmt. You can always change this as you see fit, to avoid conflict with other mods.

Scroll down a little, you'll get to the part where sequences are defined. Scroll down a little more and you will get to the delta sequences. Add following line to every delta sequence:
delta subtract "idle" 0

Sometimes (depending on the crowbar settings) the line will already be there, but make sure there's "idle" in it, and not any other sequence name.

It's very important not to change order of sequences, as that will result in broken animations. Also, if the update breaks your mod for online play, it's because the order of sequences was changed. To fix it, decompile new/updated model, and compare old and new .qc for changes in sequence order.

Now we are going to compile the .qc


If you've done everything correctly, it should compile without any errors. You will find compiled models in
\Steam\steamapps\common\insurgency2\insurgency\models\weapons\

If crowbar does not compile and shows some error messages, double check the .qc and/or try pasting the error message to google.

4. Worldmodel
This step is more or less optional, since viewmodels and worldmodels are entirely different things and do not affect or depend on one another.

Making worldmodels is a lot more simple than viewmodel. The process is basically the same as preparing reference mesh for viewmodel.

So open up insurgency_models_dir.vpk with GCFScape, and extract models with w_prefix this time. Do not mess with .phy file, decompile only .vtx, .mdl and .vvd, same as with viemodel. Decompile.

If your model already has low polygon optimized mesh for worldmodel, use that, if not, use the same mesh as for viewmodel.

First, get rid of the viewmodel armature, and delete all vertex groups but the ones on the weapon.


Import the decompiled worldmodel mesh. Don't forget to apply the edge split modifier.


Move and scale the model again.


Join both models and assign vertex groups. There is considerably less vertex groups on worldmodels, so just assign those that have their worldmodel counterpart, assign the rest to the R Hand group. After that, you can delete the old model.


Now we are going to optimize our model a bit. Add Decimate modifier. It lowers the vertex count, but it an also break the textures, so better load up a texture and see how far you can go with the angle limit.


Try to get to as high as angle as possible without it completely breaking the model and textures. You can see that we have got to the angle of 35°, and our vertex count went from 5500 to something below 2600. It's still insanely high vertex count for worldmodel, but it's better than no optimization at all.


We should also move the attachment points so they fit new worldmodel. First, select the skeleton and open up dope sheet and then action editor. You can see that there are no actions, so we've got to create new one. Click on New, and name it idle. Now go into Pose mode, select all bones (A) and hit I, then select LocRot. This will create keyframes for all worldmodel bones.


Go to Edit mode, and move the bones as you see fit. If you have automatic keyframing tuned on, you can proceed to export, if not, go into Pose mode, hit I and select LocRot again.


Export (see following screen for export settings).


For compile, there's no need to edit anything, just compile the original .qc file and it should work.


Afterword
Congratulations if you've made it this far!

If you've done everything in this tutorial, then deleted everything out of rage because it didn't work, then you've read all Blender tutorials out there and tried again and again until it finally worked, you can enjoy your finished weapon mod.


I would like to thank to many people without who there would be no tutorial and none of my mods, namely Mr.Brightside, Tigg, EliteElcoo and Sakura Sayaka for their help and support, and also Facepunch and Gamebanana communities for their awesome models.

If you've got any questions, something is still unclear, or you suspect I skipped a step or two somewhere, do leave a comment, or join our Insurgency community modding chat here: Discord InsMods channel[discord.gg]
171 Comments
Crabs Johnson 27 Oct @ 11:28am 
Great tutorial and very useful for any kind of model swapping
Pvt. Meatwad 18 Aug, 2022 @ 4:04pm 
too hard ill stick to bitching at other people more talented or with better work ethic lol.
Colonel_Yuri 25 Jun, 2022 @ 12:22am 
wow this sounds slightly easier than making a model for sfm. (speaking from experience)
[PBS] Revan 28 Sep, 2021 @ 9:52am 
Sorry to bother, but this seems quite complex and other guides you mentioned are no longer available unfortunately. What if I want to do something simple, like editing an existing mod - switching the model change from one weapon for another?
MORSO 19 Mar, 2021 @ 2:19pm 
Hey man, i believe this is outdated, Insurgency seems to not accept SMD files anymore and looks like it needs VMT and VTF files instead.
I have made a full M45 pistol, but i cant install it because i have no idea how to import the models into insurgency.
If you could reply, i'll apreciate it.
Favkis Nexerade 3 Feb, 2021 @ 8:04pm 
that happens after I import arms mesh https://imgur.com/a/zw3JDD0
tummyyummy :3 9 May, 2020 @ 5:13pm 
when I use gcfscape to get the reference smd all I get is a .qc file and some animations and nothing else leading me to a dead end and cant continue:steamsad:
BUTTERDOGESTARWARS 21 Sep, 2019 @ 10:14am 
nvm I don't think it works
BUTTERDOGESTARWARS 21 Sep, 2019 @ 9:31am 
Did the new version of blender break this?
njy022 6 Aug, 2019 @ 7:55am 
I followed this guide with BF4's HK416 on Mk18, and I compiled and applied the files correctly, but it's not work.(I can see Only Mk18 models.)

Do you know how to solve this?
(Sorry for my poor English)