Terraria

Terraria

96 ratings
Lord's Guide to Terraria Survival: The Pre Hardmode Grind and a Wall of Meat
By Lord Washington of America
With Hell explored, it is time to make the preparation for Hardmode. Yes, there is lots to talk about, but little story progression, so I tacked on the acual Wall of Flesh fight at the end. This time of the game is very important despite it's grindyness, and there are some stuff you want to do now that you don't want to do later. With that, lets get started!
   
Award
Favorite
Favorited
Unfavorite
Disclaimers and a New Sword
Disclaimer
This section is so that I can explain how I am going to order this guide. There will be a few sections to this guide (as you might of seen the table of contents already) and I am going to organize it like this. Any section name with an astrics (*) next to it means I would HIGHLY recommend doing these now rather than later or they are required (Wall of Flesh fight mainly). If you are in Expert Mode, I would highly suguest you do EVERYTHING as it will improve your experience in Hardmode. (Note from a future me after writing this... few is a shameful understatement. This is probably one of the longer guides on the Terraria guide page right now...)

*Hardmode Approch
*Home Improvements: Reccomended improvements
Home Improvements: Quality of Life improvements
*Farms to Make
Making an Event Grinder
*Upgrading your Arena
*World Improvements: Reccomended imrpovements
World Improvements: Quality of Life improvements
*Lord's Guide to Thirty Days of Fishing
*Loose ends
Gathering Potion materials
Drops to consiter getting
*Preparing Hell for the Fight
*Things you should do before the fight
*Boss: Wall of Flesh

The Night's Edge
Wether you were going to use it or not, it is worth the time to acually talk about this sword. The Night's Edge is a strange sword in that it requires four swords to make (the Maumasa, Blade of Grass, the Light's Bane/Bloodbucher, and the Fiery Greatsword) at a Demon altar. The Night's Edge is the best sword you can ever obtain before fighting the Wall of Flesh, and will last for a while in Hardmode (at least until you face the pirates, because cutlasses are always better than the legendary sword, Excalabur!)

Crafting a Night's Edge
Hardmode Approch
There are two ways you can do the beginning of Hardmode, as there will be a part of it where you will need to go mining. You can either:

a. Mine the hardmode ore
b. Fish up crates and open them in Hardmode.

The latter does not require the breaking of Demon altars, which will limit the amount of Corruption/Crimson and Hallow in your world, however grinding the crates needed will be very boring (as you need to do it now in order to be effective, and if you want a full set of armor, you will need a lot of crates). You also might want to do 30 fishing quests before even attempting to fish up the crates due to getting the best Fishing Rod as a reward for the 30th quest and the off chance of getting some crate potions to make fishing up the potions easier. However here are some things to keep in mind.

1. If you are mining, you HAVE to have a Molten Pickaxe or a Reaver Shark before you fight the Wall of Flesh. You can craft the Molten Pickaxe with 20 hellstone bars, and you can fish up the Reaver Shark in the ocean. Either way you have to have one of these two items before proceading into Hardmode if you plan to mine anything.
2. If you want to fish. You need A LOT of crates (fish up enough crates so that you have at least a stack or so of iron crates with a large supply of wooden crates and a few Golden Crates. It might be a good idea to get some biome exclusive crates as well, such as the sky crate or Jungle Crate.

I will cover both methods, and I will be suffering with those of you doing the mining as well as cheesing hardmode with crates. although just because you are going to mine, dosen't mean you should avoid crates all togeather, you should still stockpile some crates so that you can get as much ore and bars as you can squeeze from the crates you stockpiled to limit the amount of mining you have to do later.

Although I am mining, I used up all the crate potions I had stockpiled from fishing quests. These are all the crates I got since I began fishing... For those of you whom plan to open crates, these crates got me all six of the hardmode ores armor sets (including the other two hat variants) you get from demon altars. In retrospect, this is about two and two thirds stacks of Wooden crates, roughly a stack and a half of iron crates, 27 gold crates and four jungle crates. Crates stack up to 99.
Home Improvement: Reccomended Improvements
Alchemy Farm
If you have not done so, expecially you Expert Mode players out there, you want to make a farm for at least the alchemy herbs: Daybloom, Blinkroot, Shiverthorn, Waterleaf, Moonglow, Deathweed and Fireblossum. Here is a reminder of where these herbs grow and when they bloom (so you can get the seeds)
  • Daybloom: Daybloom grows on the surface pure biome on grass, it blooms during the day
  • Blinkroot: Blinkroot grows on dirt or mud found underground. It blooms randomly for a short period of time.
  • Shiverthorn: Shiverthorn grows on snow found in the snow biome (either above or underground). It has a long grow time but blooms at some point and stays that way.
  • Waterleaf: Waterleaf grows on sand and is found in the desert or ocean. Waterleaf will bloom in the rain.
  • Moonglow: Moonglow grows on jungle grass located in the Jungle. It blooms at night.
  • Deathweed: Deathweed grows on corrupt/crimson grass and grows naturally in the corruption or crimson. It will bloom during a Blood Moon or on a full moon.
  • Fireblossum: Fireblossum grows on ash located in the underworld. It will bloom at dusk assuming it is not raining.
Planters, which are sold by the dryad, are great for making a small, but effective farm. I usually find that 15 planters (15 plants) is enough to keep you well supplied in Hardmode, expecially if you start harvesting early with a Staff of Regrowth. Keep in mind you cannot get the Fireblossum planters yet unless you cheat them in using mods or another world.

If you want them for the astetic, that is fine, I don't consiter it cheating if you go to another world's NPC vendor and buy stock you can't get on your own world, as long as you pay for it with money you gathered. If you are good at gathering money and are happy with the reforges you have, money should be a non-issue.

Storage Area
Making an area to store your goods is a great idea. Expecially since your supplies will pretty much double in size in Hardmode. You will want a place to put all of your sweet, sweet loot! I would reccomend having everything stored in a central location, preferably close to the crafting stations and the entrence/exit to your base. You can name chests too, so be sure to use everything at your desposal to make sure you are well organized into Hardmode.

Hellevator
A Hellevator has two uses in Hardmode as well as right now. Easy acess to Hell is a great thing to have, expecially since you have been going back and forth between base and Hell a lot within the past few hours or so of gameplay. It will also serve well if you need to go underground in a pinch, wheather that be for a fishing quest, mining in Hardmode, or making a grinder. Hell will become a valuable place for us as well when we enter Hardmode, so be sure to have this useful structure in your world.

19 NPC houses and all Pre-Hardmode NPCS
You can create 19 NPC houses right now. You technically need 16 houses for all the pre-hardmode NPCs, however there are three NPCs that you can get right out of the gate in Hardmode (as soon as you kill the Wall of Flesh). It is worth to create NPCs homes for these NPCs so that you can obtain them...

A quick note on that though. One house must be in a surface Mushroom biome. This can be achived by planting mushroom grass on mud anywere on the surface. If you wish to not hear the Mushroom theme for eternity, you can build it a ways away from home base. (Rangers expecially will want to make at least this house. The Truffle is one of their prime NPCs for later).

So for a recap, these are the NPCs you should have housing for (and how to unlock them)
  • Gude: Spawns with you when you begin playing on a world
  • Nurse: Eat a life crystal + Merchant
  • Merchant: (carry 50 Silver)
  • Demolitionist: Carry an explosive + Merchant
  • Arms Dealer: Carry a gun or ammo for a gun
  • Dryad: Defeat a boss that isn't King Slime or the Wall of Flesh
  • Dye Trader: Hold a dye item after defeating a boss OR hold a strange plant.
  • *Tavernkeep: Found "derping about" after defeating the Eater of Worlds or Brain of Cthulhu.
  • Stylist: Found in a spider den underground
  • Painter: 7 other NPCs
  • Angler: Found in the Ocean Biome
  • Goblin Tinker: Found in Cavern Layer after defeating the Goblin Invation.
  • Witch Doctor: Defeat Queen Bee.
  • Clothier: Defeat Skeletron.
  • Mechanic: Found in the Dungeon
  • Party Girl: 13 other NPCs
  • Wizard:Found in Cavern layer after Hardmode has been activated.
  • Tax Collector: Found as a Tortured Soul in the Underworld once Hardmode is active. Use purification powder to save him.
[/b]Truffle: Have a house in a surface glowing mushroom biome once Hardmode is activated.[/list]

*The Tavernkeep along with the Old One's Army deserve a guide of their own at a later date due to the Old One's Army being... complicated.
Home Improvement: Quality of Life Improvements
Trophy Hall
While it is not required to have one, a Trophy hall is a great addition to your house, and to show off to your friends not only your building prowess at bulding large things, but your progress and achivements, drop wise, in the game. You can fill the trophy room with diffrent armor sets, trophies, rare mob drops, Boss masks, notable weapons you aren't using (such as my Night's Edge) and so on. I feel the trophy room should be the eye catcher of your base, so do try to make it as neat and nice as humanly possable. However, I am not the designer of it, you are. So do what you must. For convinence sake as far as building dementions go, I will do this.
  1. There are 55 conceivable craftable or common drop armor sets in the game. Including Hardmode drops and Tavernkeep armor. There is an additional 9 armor sets that are obtained otherwise, or are too rare or out of the way for anyone to really care unless you REALLY want their effects (Angler and Mining armors, I am looking at you).
  2. There are 17 "normal" Boss trophies to collect. There is an additional 9 Event boss trophies and 4 trophies obtained through fishing quests. This makes a total of 30 trophies in the game.
  3. there are a total of 18 boss masks to collect in the game.
  4. There are 13 Expert Exclusive items gotten from treasure bags, not counting the Dev Vanity sets. Two of these drops are from one boss, and I am counting the mech bosses's drop to count as 1/3 (as they are crafted togeather to create the mechanical minecart).
  5. There are 12 unique dev sets (Cenx has 2 sets, the leggings/breastplate, and the dress) to collect. While you cannot display everyting (every set comes with a pair of wings. Two sets come with a dye, one set comes with an accessory, and two come with a matching yo-yo). I won't go into too much detail about the dev vanity since that is an Expert Hardmode thing. I would suggest even normal mode players to hunt these sets, as they make for some of the best looking sets in the game.

A snapshot of a portion of my trophy room. All the signs are armors that are unobtainable due to not being in Hardmode, the empty manniquins are armors I am missing (my foreign ores: Tin, Lead, Tungstan, and Gold) Where my character is standing is where the armor I am wearing will go (Necro)

Liquids Room
For those of you who like convience, how would you like to have the elements of water, lava, and honey right at your fingertips? OF COURSE you do! A "Liquids room" as I will call it serves three functions
  1. An infinite source of lava, water, and honey close to home.
  2. an Obsidian and Honey block generator that never runs dry.
  3. a fishing spot for honey and whatever biome you place it in.
"But Lord, how would you accomplish such a feat?" you might ask. and I will say.
"By the power of ELECTRICITY!"

Yes, yes, You need to use wire. but don't worry! For the first time in this guide, I am going to post the oh so holy EXTERNAL RESOURCES that will assist you in tricking the game to make you an infinite water and lava generator. I have included two readable resoures and two youtube channels you can check out on tips on how to duplicate liquid in Terraria as well as wiring in general, as I know some of you may be intimidated by it. (it isn't that bad, trust me, I can make and test my own contraptions without a guide just out of my own knowledge due to just understanding how wire works. Even so, there are areas of wiring I have yet to learn, such as hoinking and using bird engines).

Steam Guide on how to duplicate liquids by Kahmunra

Steam guide that introduces the basics to wiring by Anna Druvez

A Youtube channel that specalizes in making grinders and such. By Happy Days

More advanced wiring techique tutorial videos by ZeroGravitas

There are more people on Youtube that create Wiring content for you to take up. I sometimes even come to their channels and check up on their wiring tips. However, once you do wiring for a little bit, it becomes second nature. It is not as complicated as Redstone in Minecraft (for now...) However there are some things we cannot get yet that involve Wire (Teleporters). We will be definately visiting Wiring again in Hardmode when we have acess to everything.

as for some useful things I you can do with wire... that may be for a guide for another time


A simple design of a Liquids room minus the liquid (wiring shown)

Liquids Room

23 NPC houses
If you wish to take the initiative, there are a grand total of 23 NPCs in the game. You can create 23 NPC homes now so that you don't have to later. If it is close to December, you may build an extra one, as Santa Clause is a seasonal NPC you may obtain during Terraria's Christmas Event. That brings the total up to 24 seprate houses for NPCs. However 23 should suffice if Christmas is not upon us.
Farms to Make
These all aren't the farms you might be thinking of. These are the survival game farms. Which by definition is:

An area in a survival game that you can obtain a lot of one or more items via exploiting game mechanics such as plant growth, and enemy AI
-Lord Washington's Deffinition to Farms and Grinders

Underground Mob Farm
Optional
If you fancy to get the items you can obtain underground, such as the Gladiator or Mining sets, you can create an underground mob farm. However keep in mind that you will be digging... a lot. Refer to the Event arena section for dimentions on the farm.

Pumpkin Farm
Even though you do not need Pumpkins till later, you might want to get some. They are easy to mass produce, as well as being the one and only ingredient for the Pumpkin Pie, which is the best food item in the game, giving the well fed buff for 45 minutes. Expert Mode players will expecially want to make a pumpkin farm to mass produce Pumpkins. But to be honest, if you are fishing extensively, you can just make a cooking pot and make cooked fish for your food items. You can easily get over 100 bass just by doing the initial 30 fishing quests! That is 2,000 minutes of well fed buff. More if you can get more bass, Atlantic Cod, Red Snapper, or Trout.

However pies aren't the only thing Pumpkins can make, and Summoners should remember this and start to gather some pumpkins now...
Making an Event Grinder
I am not going to say much about this now, as there are specifications for each event. Just make a flat area on the surface with a lava pit in the middle so that you can grind the future Hardmode events. Here are some things that will help you.

  1. The biome you are in will help you in enemy spawn. the Jungle and the Dungeon have a high natrual enemy spawn rate.
  2. events such as a Blood Moon will also help with monster spawn
  3. In most cases, Water candles and Battle potions help with monster spawn.
  4. do not place NPCs nearby, as they will decrease or even eliminate monster spawn

If you need more information reguarding Spawining Mechanics[terraria.gamepedia.com] or Mob Farming[terraria.gamepedia.com], you can check out these links (they are two diffrent links). When we get to the certain event, we will cover the Event Grinder you can use for the specific invation.
Upgrading Your Arena
At this point, you should upgrade your arena with some more perks if you haven't already. Here are some things you can add to your arena to make it better.

  1. Sunflowers will decrease spawn rates as well as make you run faster. Consitering this is a boss arena, you want that speed.
  2. Heart Lanterns aren't that bad to make once you have 400 HP, as then Life Crystals are nearly useless to you. However keep a good supply of crystals just in case you need to build something that might need the life regen of the heart lantern. Like your arena!
  3. adding pools of honey to your arena and running through them during a fight will allow you to get even more health regeneration during hard fights.
  4. Banners will help fend off invations you might fight in your arena, mainly Blood Moons, Goblin Invations and the later Solar Eclipse.

If you deem it nessasary, you could expand your arena if you so desire. However I will not be expanding it at all, as I don't really have room in my world (unless I expand up, but there are reasons not to) You could also pimp up your arena to make it more "Arena-y"

My arena after being outfited with Heart Lanterns, Honey, Sunflowers, and Bone Torches.
World Improvements: Reccomended Improvements
Easy acess to the main Underground Jungle areas
It does not need to be much when it comes to quick acess. Maybe a small shaft running from the surface to the Lihzhard or a large cave which you can quickly acess the rest of the Jungle will do. Just make it easy to get deep underground quick.

You may also want to prepare some bigger areas in the more hotspot parts of the Jungle for arenas, you may need them later.

Quarantining or Purifying the Corruption/Crimson
This is VERY important. When Hardmode begins, the Crimson and Corruption will begin to spread at a much quicker rate. This could cause some serious problems regarding NPC housing or what mobs you are near. While you cannot quarantine everything when hardmode beings, you can still yet quarantine or purify what you have now. I would not suguest purification due to how time consuming it will be at this point of the game, however the best course of action for you to dig an at least 4 block wide tunnels surrounding the Corruption and Crimson areas, getting rid of any backwall or chance of thorns. This will make it so that the Corruption and Crimson will not really spread out of their areas. However this will NOT solve the problem of Corruption or Crimson getting to your house just yet. That is a bridge we can cross once Hardmode starts.

If you feel your base will get caught in the initial spread of the world, have a Clentaminatior ready in case that occurs or if you don't want to cheat in a Clentaminator now, set up another base closer to the center of your world with additional NPC housing.

Smoothing out the World
If you are going to do anything reguarding transit between sections of your world, you might as well at least smooth out the world, that way you can easily get from point A to point B on a land mount without slowing down. Other options of travel include a skybridge and a rail cart system.
World Improvements: Quality of Life Improvements
Minecart Track or Skybridge
Building a skybridge or a minecart track running the length of your world is not a bad idea. If you build the minecart track in the sky, that will assist with a upcoming event we will be doing... much later. Making a skybridge out of dirt is also a good idea, as you can find Strange plants on the bridge, allowing you to get all the strange dyes once Hardmode comes around. Overall it just allows you to get from point A to point B that much faster


Beautifying the World
This is as optional as optional gets. You can do strange things to make your surface world look more appealing like planting trees in the desert, and making fancy bridges across lakes in the Corruption. It is a strange way of showing off creativity.

Chlorophyte Farm Shell
This is also pretty optional, as it is a structure that is big, cost a lot of resourses, and is COMPLETELY USELESS right now. However building it now will allow you to avoid Hardmode mobs. So if you are so inclined to do it now. I usually use a design that Happy Days engineered for this build.


World Bases
Expecially if you are playing on a Large world, you might want to make little homes near major areas you will be visiting a lot (oceans, Jungle, Dungeon, ect...) That way if you die for any reason while exploring the hardmode variants of these areas, you will be able to quickly get back because you are able to keep your spawn so close.

Measuring out the Celestial Tower
This is entirely unessasary, however knowing the whereabouts the four celestial pillars will most likely spawn is a pretty good thing (so you don't get overrun with solar baddies while you are trying to respawn. Celestial Towers will spawn equally spaced from the world's edges and eachother. If you want to find out the rough location a celestial tower will spawn, you have to multiply the world's size (in blocks) by 0.2, 0.4, 0.6, and 0.8. This is assuming you are starting at one edge of the world (when blocks stop generating in the unreachable place offscreen) and going out horizontally until you hit the other end.

This table only shows aproxaite locations on the x axis (horizontally) Pillars will spawn whereverer there are blocks as close to 80 underground as possable (will not go below 80 underground)

World Size (Length)
Tower 1 (0.2)
Tower 2 (0.4)
Tower 3 (0.6)
Tower 4 (0.8)
Small (4200)
840
1680
2520
3360
Medium (6400)
1280
2560
3840
5120
Large (8400)
1680
3360
5040
6720

all in all, it dosen't matter. we won't be killing the pillars for a long time, and these locations are approximate at best.
Lord's Guide to Thirty days of Fishing
Oh boy... This is probably one of the most boring aspects of the game. However there are some pretty great rewards you can get from doing fishing quests. Yes, I acually saved to talk about the Angler until now. I will not visit every detail about fishing in this guide. But I will give a quick rundown on how this will work.

And as a proud holder of the "Supreme Helper Minion" Achivement (one of the current nearly 1% of all PC Terraria players that play on Steam that hold said achivement), I will tell you little kiddies the benefits of FISHING!

Doing a Fishing quest just outside of base

The Angler will assign quests daily which reset at 4:30AM in game time (that is the literal crack of dawn in Terraria). You will be assigned a random, special fish that can only be caught in a specified location (in parenthesies under the Angler's explanation on why he wants the fish, next to the picture of the fish itself). Then you must head to that area and fish until you obtain the quest item (text is in orange) then you can return to the angler and cash it in for rewards by checking quests with the quest fish in your inventory. You can only do one angler quest a day, so the strategy here is to do these quest WHILE you do everything else in this guide (I would sugguest to get a Gold/Platinum watch, GPS, or a Cell Phone to keep track of the ingame time even when underground).

This table will outlay all the items the Angler will give out, even in Hardmode. Coin ammounts (which are not listed) will increase the more quests you do and coin drop is double on Expert Mode.

Item
Quest #
Chance
Hardmode?
Fuzzy Carrot
5
--
No
Angler Hat
10
--
No
Angler Vest
15
--
No
Angler Pants
20
--
No
Golden Fishing Rod
30 or 75
1/250(75 quests only)
No(30) Yes(75)
Hotline Fishing Hook
25
1/150
Yes
Fin Wings
10
1/70
Yes
Bottomless Water Bucket
10
1/70
Yes
Super Absorbant Sponge
10
1/70
Yes
Golden Bug Net
--
1/80
No
Fish Hook
--
1/60
No
Fishing Accessory
--
1/40
No
Vanity items
--
1/40 (full set at once)
No
Information Acessory
--
1/40
No
Fishing-related potion
--
3/14
No
Coralstone Blocks
--
1/88
No
Furnature Item or Trophy
--
1/88
No
Apprentice Bait
--
3/8
No
Journyman Bait
--
1/10
No
Master Bait
--
1/30
No

Notable Items
Fuzzy Carrot
it is a land based mount that is a bunny. Second fastest possible transportation method pre-hardmode

Angler Set
an armor set that increases fishing level. useful for quests

Fishing Accessories
There are three, each doing diffrent things to assist in your fishing experience.

Information Acessories
There are three information acessories to get from the Angler, for those of you wanting a Cell Phone... these are by far the hardest acessories to get due to the RNG involved.

Hotline Fishing Hook
Second best rod in the game, only rod that can fish in Lava

Golden Fishing Rod
Best fishing rod in the game at 50% fishing power. Useful if you want to fish for potion ingredients later in hardmode (or now...)

Celebrating the acquisition of the Golden Fishring Rod after my 30th quest.

Bottomless Water Bucket and Super Absorbant Sponge
The Bottomless Water Bucket is exactly what it is. It is a water bucket that has Jesus powers and never runs dry. You can do loads of crazy Noah's Ark style flooding of your world with this item.

The Super Absorbant Sponge is the exact opposite. It will get rid of water indefinitely. Esentually turning your world into California.

If there are any items to do fishing quests for in Hardmode, it is these two items.

A meager example of the flooding power of the Bottomless Water Bucket. This dungeon is completely flooded, Even the entire interior of the dungeon! Ignore the snorkal sporting cultists worshiping the Cthulhu coin at the bottom of this lake...

Loose Ends
Locating the Lihzahrd
Despite not being able to go into it yet (unless you are a: suicidal, or b: know the basics of hoinking). I would reccomend finding the Lihzahrd now. It will save you a lot of heartache in hardmode if you already know where it is.

As for incentive, sometimes you can find Lihzahrd traps or even chests outside the door of the Temple. The two most common traps you will find in the beginning seem to be Spear and Spikey Ball traps (Only encountered one occurance where there was a flame trap outside the temple. I was suprised too, I know). Which convinently are some of the most useful traps in the game. Sure you only get 4 on average, but those four traps could make a diffrence in DPS if used correctly.

You can also hoink yourself into the temple itself... But why would you do that?

Fully looting the Dungeon
Something purly optional, but doing this will ensure you have fully explored the Dungeon and probably have run into all the Biome Chests you cannot open. Knowing the location of Biome chests is good if you want the loot (either for use, or for your trophy room).
Gathering Potion Materials
Expecially for Expert players. There are some potions you want to have an abundance of. However some potions are exclusive to either Corruption or Crimson, but don't be afraid to go to those worlds and fish them up yourself (or make your own artificial biome with a lake). I will be organizing this list by class, however starting with the potions everyone will want to make. I will list the potion's effects and their recipie. Keep in mind that they are all crafted at the same place. A placed bottle or an Alchemy station. Also all potions are crafted with bottled water. so I will not include that.

Overall Useful Potions
Battle Potion
-Effect: Increases enemy spawn rate
-Duration: 7 minutes
-Herb: Deathweed
-Secondary: Rotten Chunk/Vertebrae

Builder Potion
-Effect: Increases placement speed and +1 tile reach.
-Duration: 15 minutes
-Herb: Blinkroot, Shiverthorn, Moonglow
-Secondary: none

Calming Potion
-Effect: Decreases enemy spawn rate
-Duration: 5 minutes
-Herb: Daybloom
-Secondary: Damselfish (Sky Lakes)

Endurance Potion
-Effect: Reduces damage taken by 10%
-Duration 4 minutes
-Herb: Blinkroot
-Secondary: Armored Cavefish (Underground/Caverns)

Heartreach potion
-Effect: Increases pickup range for dropped hearts
-Duration: 8 minutes
-Herb: Daybloom
-Secondary: Crimson Tigerfish (Crimson)

Hunter Potion
-Effect: Highlights Enemies
-Duration 5 minutes
-Herb: Blinkroot
-Secondary: Shark Fin

Ironskin Potion
-Effect: increases defence by 8
-Duration: 5 minutes
-Herb: Daybloom
-Secondary: Iron/lead ore

Mining Potion
-Effect: increases mining speed by 25%
-Duration: 8 minutes
-Herb: Blinkroot
-Secondary: Antlion mandible

Night Owl Potion
-Effect: Increases night vision
-Duration: 4 minutes
-Herb: Blinkroot, Daybloom
-Seconadry: none

Rage Potion
-Effect: Increases Critical stike chance by 10%
-Duration: 4 minutes
-Herb: Deathweed
-Secondary: Hemopiranha (Crimson)

Regeneration Potion
-Effect: Increases life rengeneration
-Duration: 5 minutes
-Herb: Daybloom
-Secondary: Mushroom

Spelunker Potion
-Effect: Shows the location of treasure (ore, pots, money background items, chests)
-Duration: 5 minutes
-Herb: Blinkroot, Moonglow
-Secondary: Gold/Platinum ore

Swiftness Potion
-Effect: 25% movement speed
-Duration: 4 minutes
-Herb: Blinkroot
-Secondary: cactus

Wrath Potion
-Effect: Increases damage done by 10% (all combat styles)
-Duration: 4 minutes
-Herb: Deathweed
-Secondary: Ebonkoi (Corruption)

Warrior Potions
Titan
-Effect: increases knockback
-Duration: 4 minutes
-Herb: Deathweed, shiverthorn
-Secondary: Bone

Thorns
-Effect: Attackers also take damage (recoil)
-Duration: 2 minutes
-Herb: Deathweed
-Secondary: Worm tooth, Cactus, Stinger

Ranger Potions
Ammo Reservation Potion
-Effect: 20% chance not to consume ammo
-Duration: 7 minutes
-Herb: moonglow
-Secondary: double Cod (Jungle)

Archery Potion
-Effect: Increases arrow speed and damage by 20%
-Duration: 4 minutes
-Herb: daybloom
-Secondary: lens

Mage Potions
Magic Power Potion
-Effect: 20% increased magic damage
-Duration: 2 minutes
-Herb: Moonglow, Deathweed
-Secondary: fallen star

Mana Regeneration Potion
-Effect: increases mana regeneration
-Duration: 7 minutes
-Herb: Moonglow, Daybloom
-Secondary: Fallen star

Summoner Potions
Summoning Potion
-Effect: increases max number of minions
-Duration: 4 minutes
-Herb: Moonglow
-Secondary: Variegated Lardfish (Jungle)
Items to Consiter Getting Before Hardmode
Mining Suit
Nothing much to it other than the fact that it gives a mining buff. You will need to grind undead miners to get this set. Be careful, as you can get the mining helmet from the Merchant, yet they still drop the hat. You only need the pants and the shirt.

Bone pickaxe
A drop from skeletons, it is the fastest pickaxe you can get for a while. Great if you need to dig out a large area for any reason.

Shark Fins
For Rangers, you will want to get a lot of shark fins. Now since shark fins are the ingredient for Hunter potions as well as Water walking potions. You might want to be collecting them anyway. However keep some aside just in case you need to upgrade a certain half gun.

1 Platinum coin
This is 100 gold coins. You may want one of these at the very beginning of hardmode so that you can have a fun and easy time early into hardmode, as there is an item you can buy pretty early on.

Slime Staff
With the resourses you have now. If you have not already gotten one, get this summoning item. Not because you will be using it for combat, no. You will see when we get there. The easiest way to get this item is to hook up slime statues to a 3 second timer three times (use diffrent color wire). You will not only get all the gel you would ever need, you will also obtain a Slime Staff... eventually.

And while you are at it. Reforge it to "Broken"
Tinkerer's Workshop and you: Pre Hardmode
I originally had this tacked on to the end of the Dungeon/Jungle guide, but I feel I did not do justice on just how crutial this crafting station really is. Essentually this station allows you to combine accessories so you get access to both abilities of the accessory at once. I'll quickly make a list on some of the useful items you can craft now

Mobility
Diving Gear
Gives the ability to swim and gives an extended breath meter underwater
1. Flipper: Obtained in water chests
2. Diving Helmet: rare drop from Sharks

Jellyfish Diving Gear
Gives the ability to swim. gives an extended breath meter underwater, and provides some light while underwater
1. Diving Gear
2. Jellyfish Necklace: rare drop from Jellyfish

Fart in a Jar
An upgrade to the Cloud in a Bottle that allows for a slightly higher double jump
1. Cloud in a Bottle: found in chests underground
2. Whoopie Cushion: Rare drop from Worms

Substance in a Balloon
higher jump height and provides a double jump (hight of jump depends on what you used to craft it)
1. Substance in a bottle
2. Shiny Red Balloon: Obtained from sky chests on floating islands

Colored horseshoe balloon
higher jump height, double jump, and immunity to fall damage
1. Substance in a balloon
2. Lucky Horseshoe: Obtained from sky chests on floating islands

Bundle of Balloons
Quadruple Jump
1. Sandstorm in a Balloon
2. Blizzard in a Balloon
3. Cloud in a Balloon

Spectre Boots
Allows a sprint as well as Rocket Boots flight
1. Hermies Boots or Variant: Obtained in Underground Golden or Frozen chests, or from wooden crates from fishing
2. Rocket Boots: Sold by the Goblin Tinkerer

Lightning Boots
Increases base movement speed as well as combining the ability with the Spectre Boots
1. Spectre Boots
2. Anklet of the Wind: Obtained from Ivy chests in the Jungle
3. Aglet: Obtained from Wooden Chests

Frostspark Boots
combines the Lightning Boots speed with the better movement on ice from the Ice Skates
1. Lightning Boots
2. Ice Skates: Obtained from frozen chests in underground tundra biome.

Obsidian Water Walking Boots
Allow the ability to walk on water and honey as well as immunity to fire blocks
1. Water Walking Boots: Obtained from Water Chests
2. Obsidian Skull

Lava Waders
Allows the ability to walk on all liquids, immunity to fire blocks, and a 7 second immunity to lava damage if dropped into lava
1. Obsidian Water Walking Boots
2. Lava Charm: Obtained rarely from Underground Golden Chests

Informational
GPS
Provides in game time, and horizontal/vertical positon
1. Gold or Platinum Watch: crafted with 10 gold/platinum bars and a chain on a table with a chair
2. Depth Meter: rare drop from cave and jungle bats
3. Compass: rare drop from Salamanders, giant shellys, crawdads, mother slimes, piranhas, snow flinxes, and Undead vikings

Fish Finder
Provides Fishing strength, weather, and moon phase
1. Fisherman's Pocket Guide:Quest reward from the Angler
2. Weather Radio: Quest Reward from the Angler
3. Sextant: Quest Reward from the Angler

Goblin Tech
Provides information about movement speed, DPS, and the most valuable item near you
1. Metal Detector: Dropped by Nymphs
2. Stopwatch: Occationally sold by the Traveling Merchant
3. DPS meter: Occationally sold by the Traveling Merchant

R.E.K 3000
provides enemy kill count, how many there are in your area, and if there is a rare one nearby
1. Radar: Obtained from wooden chests found on the surface
2. Tally Counter: Dropped by monsters in the dungeon
3. Lifeform Analyzer: Occationally sold by the Traveling Merchant

PDA
Provides the effect of all the informational accessories
1. GPS
2. Fish Finder
3. Goblin Tech
4. R.E.K 3000

Cell Phone
Provides the effect of all informational accessories as well as acting like a Magic Mirror. Most complicated item to craft in the game. Not an accessory.
1. PDA
2. Magic/Ice Mirror : Obtained in underground golden or frozen chests

Combat
Obsidian Shield
Provides immunity to fire blocks and knockback. Component for a later accessory.
1. Cobalt Shield: Found in a golden chest in the Dungeon
2. Obsidian Scull: Crafted with 20 Obsidian

Mana Flower
reduces mana usage by 8% and auto consumes mana potions
1. Nature's Gift: found among jungle plants
2. Mana Potion: can be crafted or bought by the wizard

Mana Regeneration Band
increases maximum mana and mana regeneration rate
1. Band of Starpower: Looted from a Shadow Orb in Corruption Worlds
2. Band of Regeneration: Found in underground gold chests

Mana Cuffs
increases maximum mana and restores mana when damaged
1. Mana Regeneration Band
2. Shackle: Dropped by Zombies

Celestial Cuffs
increases pickup range for mana stars and restores mana when damaged. One of the best magic accessories in the game.
1. Mana Cuffs
2. Celestial Magnet: Occationally sold by the Traveling Merchant

Uitlity
Angler Tackle Bag
Fishing bonus, less of a chance to consume bait and to break your line.
1. High Test Fishing Line: Angler Quest Reward
2. Tackle Box: Angler Quest Reward
3. Angler Earring: Angler Quest Reward

Architect Gizmo Pack
Increased building range, place speed for blocks and walls, and the ability to automatically paint placed objects
1. Brick Layer: Occationally sold by the Traveling Merchant.
2. Extendo grip: Occationally sold by the Traveling Merchant
3. Paint Sprayer: Occationally sold by the Traveling Merchant
4. Portable Cement Mixer: Occationally Sold by the Traveling Merchant

Multicolored Wrench
Allows to place and remove all four types of wire in any combination
1. All four colors of wrench: each are sold by the Mechanic
2. Wire Cutters: Sold by the mechanic

The Grand Design
Allows to place and remove all wire colors and actuators in any combination, provides a the ruler and mechanical lens effect.
1. Multicolored wrench
2. Mechanical Lens: Sold by the Mechanic
3. Ruler: Sold by the Goblin Tinkerer
4. 60 Wire: Wire sold by the Mechanic
Preparing Hell for the Fight
One of the most Important things about fighting the Wall of Flesh and making it easier on yourself is the arena. By far the best menthod of dealing with the Wall of Flesh is to make an runway out of any type of block. However there are some things to consiter.

  1. If you make the runway out of stone, ice, or some grass block (other than mushroom grass) some of the runway WILL get corrupted/crimsoned/hallowed when you kill the Wall of Flesh. If you don't mind corruptors in Hell, then by all means.
  2. making the runway out of ash (and making it low enough) will allow the bottom eye of the wall of flesh to travel along the bottom of the runway. This makes the battle even easier, as the eyes has no defence.
  3. making a runway and adding Minecart tracks will help tremendously. However I will only reccomend the use of Minecarts if you are in Expert. And there is a reason why.

As for the length of the arena. Lets sum that up in 5 points. An optimal length for the arena, assuming it is perfectly flat, is 1000 tiles (a stack of ash plus 1 block). However you might need to do 2000 or even 3000 tiles depending on the style of combat you wish to use.
  • Warriors: You have the least effective weapons on the Wall. You should make your runway longer than the other classes. Also since the Wall is moving at you, you will need to have a easy way of getting away from the Wall.
  • Rangers and Mages: You have a pretty easy time with the wall. In fact, you don't even really need an arena. Just be sure to give you and the wall some distance, and make sure the path is relativaly clear (so you don't get backed up to a wall).
  • Summoners: Your time with the wall consists of a lot of dodging and moving your Crimson cloud. You might want to have a long runway so that your Hornets/Imps can have enough time to defeat the boss.
  • Throwers: You have by far the easiest time with the Wall. Just use Beenades. If you are playing Normal Mode, You can half your arena and still have enough runway to beat the boss. However I would reccomend the runway anyway, as you can just roll the Beenades at the boss.
  • Expert Mode: If you are in Expert Mode, when the wall is low health, the wall will move at 40 mph in game. This is faster than you run with Hermies Boots! Making the runway out of Ice and using frostspark, use a minecart or the Bunny mount from the Angler will ensure you outrun the boss in the last part of the fight (you don't want to get behind it). As for the runway, you should make it longer than 1500 blocks, regardless of what combat style you use in the end.

A tip with the Bunny Mount for Expert Mode players. If you dash with the Shield of Cthulhu then quickly press your mount key (default 'R') The bunny will run slightly faster. (assuming you are holding down the key you want to go and you dash that direction). You can do a similar effect if you jump onto the mount with your Hermies Boots active. The mount will quickly reach it's top speed.

I decided to decorate the end of my runway.
Picking a Main Class
To Make your life easier on you in Hardmode, you can pick a class to main. You may switch mains anytime or even mix and match them, but it will take some work in order to aquire all the supplies nessasary in order to do that. Therefore, cutting the time nessasary to grind for items or weapons is very helpful for your game progression (and sometimes, sanity). I have also listed the criteria for the best modifer possible for each weapon. If you really want to know. I am doing a Gunslinger playthrough at this point (guns only) with allowance of up to 2 minions (bewitching table).

Melee
Melee players have the highest defence out of all the classes, however they tend to have a bit less DPS than a ranger or mage. They use swords, boomerangs, yo-yos, and other weapons that deal Melee damage. At this point you should have the following if you wish to follow the path of Melee. I will include some very useful potions for that class, but I will not include the obvious ones that all classes use (ironskins, regens, endurance, swiftness ect...)

Weapons: Night's Edge (Sword), Cascade or Valor (Yo-yo), Dark lance (spear), Flamerang (Boomerang)
Armor: Molten Armor
Accessories: Ferel Claws, White String, Yo-yo counterweight
Potions of use: Thorns, Inferno, Titan, Flasks (made at imbuning station)

Modifiers: If it is a melee weapon that is not swung over the head (minus shortswords), such as Yo-yos, boomerangs, or flails, the best modifer is Godly. Any other Melee weapon, like the Night's Edge, have the best modifier of Legendary.

Range
Range players contend with Magic to have the highest DPS of all classes at the sacrifice of defence. They use Bows, Guns and other range type damage items. Some Rangers can use thrown items, but thrown items do not get buffed by Range modifiers anymore. At this point, Rangers should have:

Weapons: Molten Fury (Bow), Bees Knees (bow), Hellwing Bow (Bow), Pheonix Blaster (gun), Boomstick (gun), Minishark (gun)
Armor: Necro armor for DPS or Crimtain/Molten armor for defence
Accessories: None, yet. If you are in Expert Mode, Hive pack for the Bees Knees.
Potions of use: Ammo Conservation, Archery, Night Owl (for vision)

Modifier: Range weapons that do not do or do meager amounts of knockback, such as the Minishark, should have a Demonic Modifier. All other Range weapons, like any bow, should have an Unreal Modifier.

Mages
Mages have great DPS like rangers do, however they tend to have more of a burst DPS than an continuous stream, also late game they become sort of the healer class. Mages use staves, spell tomes, laser weaponry and other magic dealing items. At this point Mages should have

Weapons: Bee Gun, Amber Staff, Demon Scythe, Water Bolt, Vilethorn, Space gun (with Meteor)
Armor: Meteor for Space Gun DPS, Jungle for everything else.
Accessories: Celestial Cuffs or Mana flower, Hive Pack if you are in Expert Mode for the Bee Gun.
Potions of use: Magic power, mana regeneration

Modifer: Similar to Range, if the magic weapon has no or meager knockback, such as the Bee Gun, should get a Demonic modifier. All other magic weapons benifit from a Mythical prefix.

Summoners
Summoner is the hardest class in the game, but as I said before, the final laugh goes to the summoner with their Stardust weaponry. Summoners are weak early on, but become some of the greatest DPS dealers late game all while taking minimal damage. Summoners use the familiar staves and sentry summons along with the Crimson Rod/Nimbus Rod. At this point, this is the best a Summoner can have.

weapons: Imp Staff, Hornet Staff, Crimson Rod, Balista or Flameburst rod
Armor: Bee Armor
Accessories: Go defensive for now. Summoners don't get their Acessories until later. It might be useful to get the Celestial cuffs just as a keepsake until you get your beetles and necromantic scrolls.
Potions of use: Summoner, Magic power (for crimson rod), mana regeneration

Modifier: Despite the "best" modifier being Mythical for summoning weapons. Summoning weapons have negliable knockback and don't cost much mana at all. The best modifer for any minion staff for sentry minion weapon is Ruthless. As for the Crimson Rod and later, Nimbus Rod. The best modifer is Demonic, as they don't do knockback.

Thrower
An honorable mention. Thrower class is a purly pre-hardmode class, and dosen't get anything new once Hardmode comes around. Throwers use items such as gernades, javalins, and molotovs. At this point, this is the best thrower loadout you can get in the game.

Weapons: Molotov Coctail, Beenade, Bone Javalin, Bone Throwing Knife, Bone Glove (Expert Mode)
Armor: Fossil Armor
Accessories: None, unless in Expert, then have the Hive pack for beenades
Potions of Use: Ammo Conservation

Modifers: Thrown items cannot have modifers, except the bone glove. The best modifer for the Bone glove is Unreal.

Acessories
For any Acessory, it depends on what you are going for as far as damage or defence. You might be switching the modifier on your acessory depending on what you need for the moment. Acessories can give one of 6 things with their modifiers: defence, mana, crit stike chance, damage, movement speed, and melee speed. There are multable modifiers for each, but here are the best in each catagory

Defence: Warding
Mana: Arcane
Crit Stike Chance: Lucky
Damage: Menacing
Movement Speed: Quick
Melee Speed: Violent

The best of these modifiers depnds on your situation. However the best two overal are Warding and Menacing; damage or defence. Lucky and Arcane have their practical usage if you wish to sacrifice a tiny bit of damage for higher crit stike or an extra mana star. Lucky is not as useful this early in the game, as all the weapons at this point have abismal crit stike chance to begin with. However Rangers should take notes here, as Rangers benifit most from Critical stike in Hardmode.

With everything prepared. Whenever you are ready, take up your arms (whatever you may use), make sure your potions did not go bad, grab a Guide Voodoo Doll, and make sure you say goodbye to the Guide. and head over to the end of your Runway in Hell. When you are ready...

Drop the Voodoo doll in the lava.
Boss: The Wall of Flesh
With great anticipation that you guys have had. Here is the big man himself! The Last Pre-hardmode boss, the WALL. OF. FLEEEEEEEESSSSSSSSHHHHHHHHHHHH!

He isn't hard. Not at all.
Basic Information

Damage: 50/150 (meele), 22-30/44-60 (eye lazer. damage depends on current HP)
Max Life: 8000/11200
Defence: 12 (eyes have 0)
Debuffs
-Horrified: A cautionary debuff, warning players that the Tounge Debuff will happen if you get too far away or get behinde the boss. If you use the Magic Mirror, you will die instantly. The debuff will be removed once you or the Wall of Flesh die.
-The Tongue: The Wall will use it's tounge to draw you closer to it. Movement is restricted as you are pulled to the boss. Any blocks you hit will deal severe damage to you. In Expert Mode, this debuff will deal 50 damage a second if afflicted with it.
Immune to Knockback
Is it immune to any debuffs? Tell me if it is!

Spawn Conditions
The Wall of Flesh will spawn if a Gude Voodoo doll is burned in lava in the Underworld if the Guide is alive. The Guide will die upon the Wall spawning

Basic AI and attack patterns
The wall of flesh will spawn on the side of the screen you are closest to the edge of the map on and will go from one side of the map to the other, not stopping for anything. When it spawns, it will also have spawned a sum of The Hungry, which you will have to dispatch before getting close to the wall itself. In Expert Mode, the wall will continue to summon more the hungry throught the fight.

When all the hungry are dead, the wall will puke out some leaches, which are worm type enemies. This is your opportunity to unload everything you got onto the wall's mouth or eyes (as those are the only places the wall can be hurt).

As the wall takes damage, it will begin to move faster and the wall will shoot lasers out of it's eyes at a much faster rate. If the wall reaches the edge of the map, all players in the underworld will immediately die, and the wall will despawn. The wall moves much faster in Expert Mode.

Drop Table
Healing Potion: 100%: The first and last boss to drop strait Healing Potions.
Pwnhammer 100%: A useful item if you acually want to break Demon Altars.
Wall of Flesh mask: 14.29%
Wall of Flesh Trophy: 10%
Treasure Bag: 100%: Expert only
--One of the following--
Breaker Blade: 16.67%: A stupidly large sword for those Cloud mains in smash.
Clockwork Assult Rifle: 16.67%: Sorry Minishark, this gun is so much better, don't worry though, you are getting an upgrade soon!
Laser Rifle: 16.67%: Not a ranged weapon. It is a magic weapon.
Combat Emblem 12.5%: The wall's best drop and the reason you might want to grind it. there are four variants, each for a style of combat (melee, range, magic, summoning) each giving a flat 15% damage bonus for their combat style. Even if you already grabbed one type, you may want multable.

Coins: 8 Gold

Treasure Bag Drop Table

Wall of Flesh mask: 14.29%
Pwnhammer: 100%
Combat Emblem: 25%
Laser Rifle: 33%
Breaker Blade: 33%
Clockwork Assult Rifle: 33%
Demon Heart: 100% (if no demon heart has been used): Hey Expert Mode players, have you ever thought you had way to less accessory slots? Would you like one more? Well here is your remedy. This item, when used, will give you a sixth acessory slot indefinately! However this accessory slot is only active on Expert Mode worlds, so it is completely useless for Normal mode players.

Coins: 8 gold

Arena Ideas
See the "Preparing Hell for the Fight" Section for the arena. Long story short, get a bunch of blocks and make a long runway.

Reccomended Equipment
Meele: Molten or Crimson armor. I would say Molten for defence though. Instead of using a sword, use a yo-yo, flail, or spear.
Range: Molten, Crimson or Necro armor. Minishark or phenox blaster (meteor shots), Hellwing bow (wood arrows), Molten fury (any arrow), Bees Knees (wooden arrow)
Magic: Jungle Armor when using Water Bolt, Amber staff, Bees Knees, Medusa Head, or flamelash. Meteor Armor for space gun use.
Summoning: Bee armor and imp staff. good luck.
Thrown: Beepocalypse. Fossil armor with Beenades. Go get em, kid.

Battle Stradegy
This boss is quite simple. Just watch your back (literally) so that you don't get tripped up by the turrain (hopefully you solved this problem. Focus on killing The Hungry first and then focus all the DPS you can muster into the Wall of Flesh's eye. The general rule is that you do not want to get too far from it, and you do not want to get behind it.

Expert Mode Stradegy

This boss does not get too much new to it, other than it will occational regenerate a hungry and it moves much quicker. Use mounts to your advantage, or the Wall of Flesh will lick you to death. Of course you can just meme it to death I did.


Fighting the Wall of Flesh

Once the Wall is slain, two things will happen. One, your loot will spawn inside a box (so it dosen't drop in the lava), and you will receive a small lagspike and get the message: "The Ancient Spirits of Light and Dark Have Been Releaced"

The Cliffhanger: Thank you!
Thanks for reading the guide! But Lord! You ended the guide as soon as hardmode began! If there are any typos or inconsistansies with the guide please tell me. I have one! it is that you ENDED THE GUIDE ON A CLIFFHANGER!

Also if you have something that you think people should build before Hardmode, tell me! I might add it to the guide!

Next time on Lord's Guide to Terraria Survival: We will be redoing the bio for just about everything that changed immediately as soon as the Ancient spirits were released, as well as getting started with our Hardmode adventure! Next guide is going to be information heavy, and it will come out as soon after this one is releaced.

Funny story and a question
So I just entered hardmode, right? I am in the process of opening my crates and I notice the Truffle keeps dying (his house is on a sky lake). So I go up there to investigate...

and suddenly, Wyvern.

So here is my question to you: What is the most unplesent suprise Terraria has thrown at you? That could range to a Nymph running out of the shadows, accidentially summoning the Wall of Flesh, or even a random Queen Bee coming out of absolutely nowhere (yes, all three of these have happened to me). What did you do about this? Did you try to fight the Wall of Flesh despite not having a runway? Or did you Magic Mirror the heck out, taking the death that comes with it?

Change log
November 24, 2016
-Fixed a whole slew of typoes thanks to C Moore (finally got around to it! yay!)
-Updated the guide to 1.3.4!
-Added some additional flavor text and information to praticular parts of the guide.

January 3, 2017
-Fixed a slight mistake saying the Wall of Flesh had 10 times less life than it actually has in Normal Mode. (I forgot a 0)
-fixed a typo

November 10, 2017
-Fixed the broken Fishing reward table
-Fixed a typo regarding the date in the last change log.

November 15, 2017
-The Revamp train has pulled into the station!
--Made the guide more readable
--fixed a lot of typoes
--added a little more information in a lot of sections!

November 16, 2017
-Added Wall of Flesh fight video
--For all of you unbelievers that belive memes can't get you to Hardmode.
73 Comments
Lord Washington of America  [author] 16 Feb, 2019 @ 4:07pm 
very wordy, and it might sound like complete nonsence, but I hope it helps. There is one thing about knowing how to build the thing and get it to function, it is entirely different to have an understanding on why and exactly how it works.
Lord Washington of America  [author] 16 Feb, 2019 @ 4:06pm 
To clone liquids, just turn on the liquids you want to clone and wait for a bit. with this design it takes 5-10 minutes for the vat to completely fill up for Lava and Honey, and 2-3 minutes for the water since water flows much faster. Be careful to turn the cloner off before opening the accuation as well, as there is a chance that you might cause an overflow and slowly flood your base. You'd want to get 5-10 buckets of each liquid to start off the cloning process, but after that it is fairly easy to maintain as long as you turn the thing on when you start running low on a particular liquid.
Lord Washington of America  [author] 16 Feb, 2019 @ 4:05pm 
For the surrounding room, it could be any size, however for the dimentions I used for the this design you want 27 blocks long, 46 blocks wide and discounting the vats themselves I have 4 blocks above, two on either side, and 5 blocks empty space on the bottom. The 5 blocks empty space below allow you to install the obsidian and honey grinders, however of course both of these are completely optional.
Lord Washington of America  [author] 16 Feb, 2019 @ 4:05pm 
As far as specifics in this specific design, I used
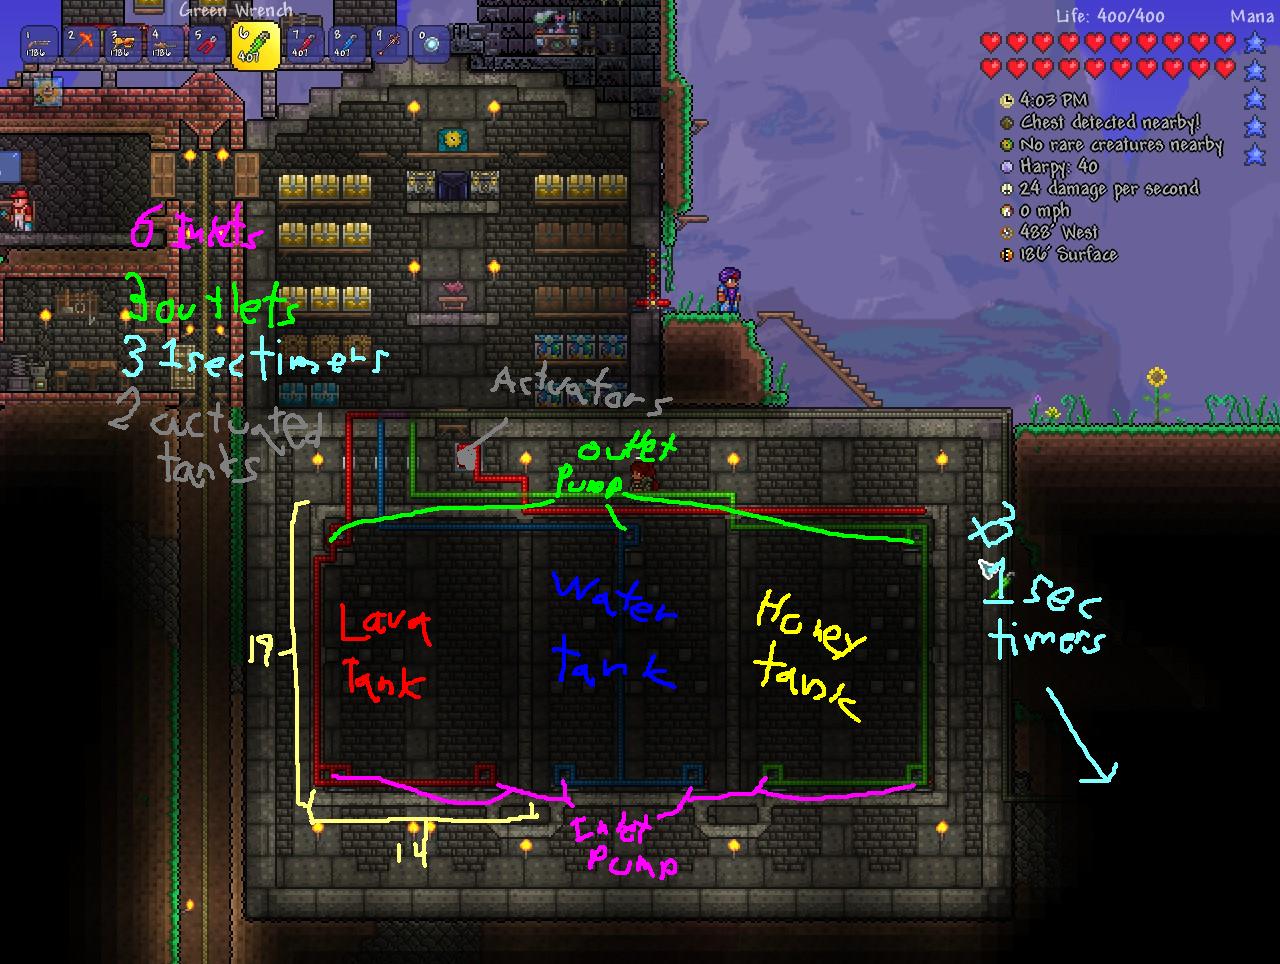
6 inlet pumps: two for each vat
3 outlet pumps: one for each vat
3 1 second timers: one for each pair of inlets and outlet
4 switches: three for duplicating each liquid and one for the accuation on the honey and water vats

The vats themselves are 19 blocks tall, 14 blocks wide, with 4 layers in the staggered pyramid (each layer 1 block apart from each other and alternate as shown in the picture) for the duplication itself. if you make the vats larger you can add more layers to speed up the duplication by a little bit.

Each vat MUST be wired to a different colored wire (as of 1.3.1 I use blue for water, red for lava, yellow for honey and green for accuators. This design was created before 1.3.1, so that is why there is no yellow wire). This ensures that the vats don't trigger each other unessasarally
Lord Washington of America  [author] 16 Feb, 2019 @ 4:04pm 
Well the water duplication glitch itself involves how falling liquid interacts with blocks. The liquid will duplicate itself by a small amount every time it lands on a block, so creating a staggered pyramid structure like that inside the vat is nessasary. Using Inlet and Outlet pumps, I can pump the liquid from the bottom of the vat to the top to get duplicated again, and each vat's inlet and outlet is connected to a 1 second timer and a switch to create a continuous stream.

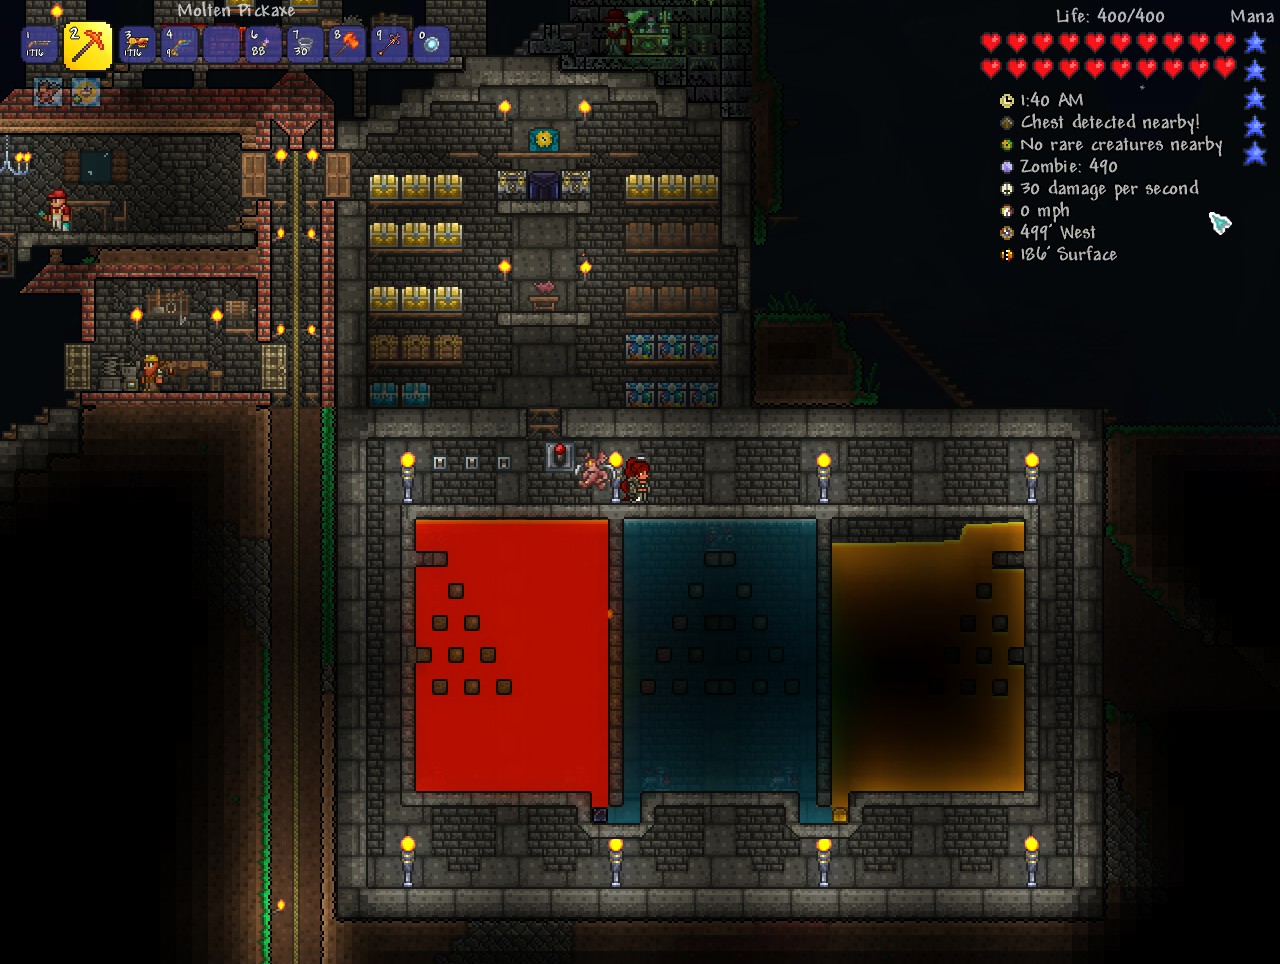
For the vats themselves, You can get even more out of them by doing two things.

1. Putting water in the middle and lava and honey on either side will allow the liquids room to also act as a honey block and obisidan grinder
2. creating a seperate circut that is accuated to the top of the water and honey vats allow you to use the vats themselves for some fishing quests if they are big enough (the ones shown are indeed big enough)
Ah! So Spider! 16 Feb, 2019 @ 3:10pm 
How exactly did you make that liquids room you showed? None of the links lead to anything that looked nearly as neat as that one, but I can't figure it out myself.
Yoshifan360 19 Jan, 2019 @ 4:03pm 
Thanks!
Lord Washington of America  [author] 19 Jan, 2019 @ 12:22pm 
@YoshiFan360 Yes. It is functionally identical to a sticky bomb.
Yoshifan360 19 Jan, 2019 @ 5:58am 
Is bomb fish an explosive?
Lord Washington of America  [author] 10 Nov, 2017 @ 8:14pm 
I hate it when my dog bumps my elbow when i am trying to do anything, let alone while in a video game XD. Series of misfortunate events I guess.