FINAL FANTASY XIII-2

FINAL FANTASY XIII-2

434 ratings
Stat Maxing Guide
By SirNinja
Learn how to level effectively in FFXIII-2 here! Includes a downloadable chart (PDF) with my recommended method.
   
Award
Favorite
Favorited
Unfavorite
Intro


"Intro"?! Whoa, buddy, I'm just here for those nice tables you made.

Here you go![www.dropbox.com] Enjoy the rest of your day.


Although the character enhancement systems in Final Fantasy XIII and its sequel are both called the same thing, Final Fantasy XIII-2 uses a very different Crystarium. In this one, all the nodes are blank rather than preset. You choose what they become, by selecting an available role for Serah or Noel. Every time you fill a node, you level that role up by 1, up to the maximum of 99. There are also a few big nodes, which give more or better stats than a regular one would. Filling all the nodes in the grid will advance the Crystarium one stage, giving you a new (and, sometimes, bigger) grid to work on. There are 22 stages to the Crystarium - just enough to level all six roles to 99.

However, you shouldn't just randomly fill these nodes in. XIII-2's Chrystarium operates on a set of rules that will give you different stats based on not just whether you activated a big node, but also whether you did so to an odd or even level. This is problematic for two reasons:
  1. Serah and Noel aren't ever going to become 3,500+ Str/Mag demigods like your party could become in FFXIII. When all is optimally said and done, Serah's only going to end up with a little over 1,000 Magic, and Noel's not even going to go past 1,000 base Strength. Neither of them will break five-digit base HP.

  2. You cannot erase or revert nodes that you fill in. Every single one is permanent. It's one of the few things in this game that can't be reset, no matter what. Haphazardly filling in nodes will give you a considerably weaker party than you would have if you knew the rules, and believe me: nothing is worse than spending 40 hours filling in ~600 nodes for two characters, only to realize you could have done it so much better.

For ease, I recommend only leveling up once you have enough CP to complete an entire Crystarium stage in one go. This helps keep mistakes to a minimum. And although it should really go without saying: always SAVE before filling in even a single node!


Side note: Each of your monster allies also has a unique Crystarium which can be used to develop them; however, those operate on a completely different set of rules, using four different flavors of tiered items to influence their growth. This guide only covers the game's two controllable party members.


The Rules
To get a great endgame party, you'll want to fill in every crystal according to a set of rules. HP is, in general, not as valuable as Strength or Magic. The more HP you have, the more you'll be hurt by Poison (as it's percentage-based) and the harder it'll be to heal you with items (and the most common Cure magic; lots of creatures only have access to Cure or Cura, which aren't percentage-based).

Here are the rules:
  • Leveling a Commando up on a big crystal will give you +2 Strength, and leveling a Ravager up to one will give you +2 Magic. Nothing huge there.
  • Always level a Synergist up to an ODD level on big crystals; you'll get Magic rather than HP.
  • Saboteur is the most complicated one. When leveling the Saboteur role onto big crystals, level up to an EVEN level for +2 Strength, or to an ODD level for +2 Magic.
  • Don't ever level Sentinel or Medic on a big node; you'll just get HP. In this guide, Serah will break this rule a tiny bit (in her final two Chrystarium stages), but that's for two reasons: by then, she's already exhausted her Magic roles, and she admittedly could use a little HP in the endgame compared to Noel.
Again: save before doing this!


Charts
These charts plan out what you should do, at each and every stage of the Crystarium, to end up with a very powerful Serah and Noel. Keep in mind that this is just what I did; feel free to deviate from it if (for example) you want Serah to end up with higher HP for endgame fights.


(Click here to download these charts as a PDF!)[www.dropbox.com]


Chart Legend
  • Stage and CP Cost - The current stage of the Crystarium, as well as how many Crystogen Points (CP) you'll need to completely fill it in (from blank). To minimize mistakes, I recommend waiting until you have enough CP to fill an entire section at once. Note that unlike FFXIII, the game doesn't tell you what Crystarium stage you're on; you'll have to look at your current role levels to determine where you are if you forgot.
  • Expansion Bonus - The bonus I recommend taking when the current Chrystarium changes stage. Bonuses include increasing your ATB bar, giving you more "points" for equipping accessories, unlocking new roles, and giving bonuses to existing ones.
  • Levels to gain this stage, plus (total role level) - These six columns tell you how many levels I recommend you increase at this stage, and in what role. The number in parentheses tells you what your new role level will be when every crystal in the current stage is filled in.
  • Big Crystals to Activate - Of the crystals detailed in the previous list point, these are the ones that you should be activating on the big nodes. Be careful, as this can be very tricky for some stages. See below for additional notes and strategy.


Avoiding Disaster

Let's say a number of Synergist crystals are listed under the "Big Crystals" column, and your current Synergist level is 17. Leveling Synergist up to a big crystal would only give you HP, which isn't as good as more Magic. To avoid this, you'll need to plan your moves in advance by leveling Synergist up to 18 on a small crystal, then to 19 on the next big one. If you need to level Synergist on more big crystals in this stage, it's wise to put down yet another Synergist on the next small crystal so that you'll be ready to level up to an odd-numbered level again.

Be very careful with the Saboteur role! It can, fittingly, mess up your plans if you're not careful. Remember: for more Strength, level up to an EVEN level on big crystals. For Magic, level up to an ODD level on them. Even for Strength, odd for Magic. There's a nice flexibility about the system, at least; if you want to give Noel more magic or Serah more Strength while still adhering very closely to this guide, this is the way to do it.


Glossary
Roles
  • Commando - Physical attacker. Commandos deal high damage and keep the target's Stagger gauge from rapidly decreasing. On the other hand, they can't drive up the Stagger gauge much by themselves. Commandos are essential fighters, especially against Staggered targets, and a group of them can make short work out of weak enemies.

  • Ravager - Magical/elemental attacker. Their attacks don't do as much damage as a Commando, but they can easily exploit enemy weaknesses, and their attacks rapidly increase the Stagger gauge. Unfortunately, their attacks also increases the rate at which it depletes. Pairing a Commando and 1-2 Ravagers together is ideal for most battles; the Ravager(s) drive the gauge up, while the Commando's attacks keep it from going back to normal.

  • Sentinel - Provokes enemies into attacking them before employing a variety of defensive abilities. Having a Sentinel can be great, as it essentially funnels most (if not all) damage to one character, who is more easily healed than a whole party. They can trivialize an onslaught of damage with Steelguard, lash out at attackers with Vendetta, and even slowly heal themselves with Mediguard. Sentinels automatically reduce the damage taken by the entire party; quickly switching to an all-Sentinel paradigm is a good way to survive devastating attacks.

  • Synergist - Casts various buffs on the party to enhance their attack and defense. Protect and Shell reduces incoming physical and magical damage, while Bravery and Faith increase a character's physical and magical attack. Cast En[fire/frost/water/thunder] to power up a teammate's attack with an elemental power, or cast Bar[fire/frost/water/thunder] to increase their resistance to it. Be on the lookout for monsters with rare Synergist abilities and/or Feral Links, as Serah and Noel don't learn all of them.

  • Saboteur - Casts various status ailments on enemies, hindering their ability to fight. De[protect/shell] will make enemies more vulnerable to attacks, while moves like Pain or Fog can prevent them from using physical or magical attacks altogether. Imperil is one of the best moves in their repertoire - not only does it make foes more susceptible to ailments, it also lowers their resistance to everything one level (i.e., Absorbed becomes Immune, Immune becomes Resistant, Resistant becomes Normal, Normal becomes Weakness). As with Synergists, look for monsters with Saboteur abilities which Serah and Noel can't learn.

  • Medic - Constantly heals the party and removes any status ailments they might have. Cure and Cura restore a set amount of HP based on the caster's Magic stat, while Curasa and Curaja restore a percentage of HP based on how badly hurt the target is. Esuna removes one ailment. Having a team of Medics will get everyone back into fighting shape very quickly, and are particularly useful for negating attacks that can inflict ailments on a party member.

Characters
  • Serah - Ranged/magic attacks make her a natural Ravager, but she's an excellent Saboteur as well. Very handy when fighting Caius, as almost all of his incarnations are susceptible to Poison. It's not recommended to make her a Synergist until all other roles are used up, as she only ever learns four Synergist moves. Her Full ATB skill, Ultima Arrow, significantly drives up the chain gauge of a target, especially a staggered one.

  • Noel - Fast physical attacker. Great Commando and Synergist. Despite his emphasis on strength over magic, he's surprisingly the better Medic of the two, having exclusivity over multi-target heal moves like Cura and Curaja. His higher HP makes him a decent Sentinel as well. His Full ATB skill, Meteor Javelin, does extremely high damage to a staggered target, but also fully clears its chain gauge.


50 Comments
Char_Natorn 15 Dec, 2021 @ 8:08am 
This looks like plagiarism of the official ffxiii-2 piggyback guide.
Artemis 30 Mar, 2021 @ 2:15pm 
Stage 15 of Noel is wrong. You need to go up to 48 medic to get the big nodes as listed.which means you're at 14 saboteur.
Dr_SnOOpy 31 Jan, 2021 @ 7:28am 
Plagiarism from the FF13-2 official guide and no credit for that
"by SirNinja" in the image above - what a fooling
YallowH 13 Jan, 2021 @ 5:11am 
Why get Sab role bonus before RAV. I dont get it. I dont even use Serah as SAB
zioschild 13 Mar, 2020 @ 3:29am 
For beginners nice, but a perfect part may be an example. I did it wrong on Serah stage 3 - so you can make mistakes early in the game. And it DEFINITELY takes time to understand the mechanism.

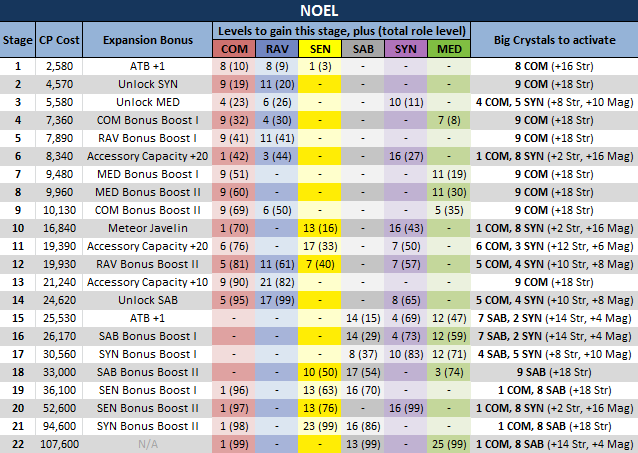
Example - Stage 3 - Serah - Nodes: BSSBSSBSBSBSBSSBSBSB (B=big, S=small)

Correct: RSCSCCRSSCRSSCSSSSCR - means Sab started with lvl 1, first point to a small node to lvl 2, then big(3) - small(4) - big(5) - small (6) - big(7) - small(8) ...

Wrong - as i did: RCCRCCRCRCSSSSSSSSSS - means Sab started with lvl 1, first point to a big node to lvl 2, then small(3) - big(4) - small(5) - small(6) - big(7) - small(8) ...

(R = Rav, S=Sab, C=Com)
So in the correct case - 5 times big node TO odd level = 5*2MAG, in the wrong case 3 times TO an odd level =3*2MAG - in the wrong case you'll loose just 4 Mag in comparison to the correct one.

Learning by doing doesn't work here :-)
Tamaster 19 Jan, 2020 @ 3:04pm 
What a huge headache. Back when I played on PS3 many years ago i didn't know this stuff in the least.

I will TRY to not mess it up. But I want to follow my own path. Ty for the heads up about the mechanics and even / odd slots.
Dedicatedhitman 24 Jul, 2019 @ 11:35am 
The tables have been taken right from the official ff13-2 guide i don't think you should be taking credit for it (they are exactly the same even the notations). Especially since you usually have to pay for this guide. The description however is a pretty good explanation but please add any references instead of taking credit for it.
Wolfpup3 19 Mar, 2019 @ 5:31pm 
Ugh, I forgot about this nonsense. Thank goodness for this guide. The upgrade system in this game is terrible. Just follow this.

13-3 is IMO a much better game, although still wonky. I'd still just prefer a normal upgrade system, though at least 3 has a better story IMO. Neither is as good as 1 though.
SirNinja  [author] 9 Oct, 2017 @ 1:07pm 
@Wolfpup3: Yeah, some of the early bosses in XIII-2 are unusually tough. I recommend having a high-HP Sentinel monster on your team to attract enemy attacks, which the controllable party members can easily heal as needed. That gives you breathing room to use a class combo for Serah/Noel that works well for you. Good luck!
Wolfpup3 9 Oct, 2017 @ 12:26pm 
Thanks SirNinja! I'm...I don't know, I'm having trouble actually PLAYING this versus FF13, like actually making use of the different classes on the fly very well. The bosses are slaughtering me *sigh*