Commander : The Great War

Commander : The Great War

118 ratings
Trench Warfare for Beginners
By Dr Duh
This is a guide for new players that want to learn to be a better challenge to the AI.
5
2
   
Award
Favorite
Favorited
Unfavorite
Foreword
This is my first steam guide, so working through some of the idiosyncracies of the Steam editing process has been, well, just so much fun.

After I started, I decided I wanted to rename the guide. I considered Trench Warfare for Dummies, but checked and found my surmise was correct that <anything> for dummies is actually trademarked. Besides, by then I had already hit upon Trench Warfare for Dummkopfs, and after all, along with the pickelhaube, that seemed much more thematically appropriate anyway.

Then I found out I couldn't edit my title or description on the Basic Guide Information page. This is a problem that seems to have cropped up in just the last few days, but I'm not holding my breath for my ticket to get answered any time soon.

I imagine there are some people out there that are hoping for a guide - any guide - to show up for this game really soon, and I'm certain they don't care near as much about its name as I do.

Anyway, I hope it helps.

Update 7 August -
Only the final section on Grand Strategy remains. Three sections on attacking and the section on manpower have been completed.

THIS GUIDE IS BASED ON VERSION 1.5.1 OF THE GAME.
The New Player Experience
What just happened?
So you picked up Commander: The Great War and watched some Let's Plays (not necessarily in that order). You even figure you've done more than your due diligence by reading the manual. Maybe you consider yourself a bit of a wargaming veteran, so you expect to win your first game handily - after all, you do with most games.

You fire up the single-player game and see the defaults: Entente, Balanced, and 1914. You say to yourself "no problem!" and confidently hit the Launch button. Three or four turns later you're thinking "OK, maybe I'd better restart on Central Powers and Handicapped." Three or four turns after that you're thinking: "I can't be this bad - this AI is cheating like hell!"

Well, it's not just you; the game AI is definitely a challenge. "But," the developers assure us, "it doesn't cheat."

What do I do now?
The first thing is lower your expectations. Just because the AI in a lot of games nowadays is so bad the typical 9 year-old can beat it first try doesn't mean this game's the same. The AI has some pretty good heuristics for how to conduct an attack or defense in this game system. Also, since it's a fixed scenario, a lot of the "strategic" AI play can be scripted, and as players find tactics to exploit AI weaknesses, the scripts can be strengthened as a counter.

Try, try again
Don't expect to finish a game for a while. Do try to learn something from each defeat though, and keep at it. I suggest changing sides each play thru, especially for your first half-dozen or so starts. Don't keep flogging a dead horse - once you know something has gone seriously wrong, fix an image of the carnage in your mind, then go ahead and restart.

While you're playing don't focus all your attention just on your own moves. Although you can't see any of what the AI does in the "fog of war" behind his lines, you can watch how it moves units in and out of the line and where it chooses to attack and so on. Each time you switch sides and start over, try to emulate the AI's moves. Eventually you should start to understand why it plays the way it does.

Which scenario to choose?
I've heard a number of opinions to the effect that starting the game in 1914 makes it easier to learn because you don't have to handle as much in the early turns. For instance if you take the Entente Alliance you start out with just Serbia for a couple turns, then you add France, and a few turns later Britain and Russia.

I agree you should learn the game using the 1914 campaign, but not because it's easier, rather because it's harder. In 1914 the situation is very fluid as nations mobilize and join the war. The fighting hasn't yet devolved into the more or less static struggle over trench lines. Even though you have fewer units to control, every single thing you do or don't do has a greatly magnified importance. Small missteps can doom you, but you may not realize it until years later.

So, you could muddle along through one of the other scenarios and it will take a lot longer to realize you're losing, or you could just jump right in to 1914 campaign and learn to play. As soon as you're doing well enough to hold your own through the end of 1914, finishing the game shouldn't be a problem.
What's a Front?
What would Wikipedia say?
Even In just the military sense, the meaning of front[en.wikipedia.org] can be nuanced, especially as it sometimes may be used loosely to refer to a theater of operations[en.wikipedia.org]. For our purpose here lets just say that a front is a continous line that runs between enemy and friendly forces. The ends of a front are usually defined by some natural or artificial barrier, such as an ocean or the border of a neutral country.

Some Historical Perspective
Prior to the Great War, most conflicts were fought by armies that travelled around as discrete amoeba-like blobs that would occasionally run into each other and fight, either by intent or happenstance. These fights would occur at specific places - basically wherever the "defending" army already happened to be. However, it was also often entirely possible for an army to intentionally bypass an enemy, or to miss one it was looking for.

This began to change during the American Civil War, where it became apparent future contests would be about industrial might to produce war materiel, and railroads to move it to the fighting. However, it wasn't until the Great War where armies were spread out facing each other along more or less continuous front lines that were hundreds or even thousands of miles long; the whole point of which was to make sure to keep all of the enemy in front of you and not allow any of them to slip through and get behind you.

The main reason for this was that this new style of industrial warfare required a prodigious expenditure of supplies for an army to just sit and do nothing; and an even larger expenditure of ammunition and supplies if it were to actually fight. This made the elements of any army completely dependent on a continuous flow of supply in order to maintain their effectiveness. If enemy units got behind you and disrupted your flow of supply you could find yourself helpless in a matter of days if you couldn't reroute or reestablish the flow. If you discovered that there were enemies actually surrounding you on all sides, your situation was truly desperate and often led to immediate surrender.

Unit Frontage
So what are the characteristics of a good front line? Well, you want enough men spread out to defend the entire length of the front. You don't want the enemy to be able to find and attack weak points, break through, and encircle any of your units. If you don't have enough men to defend your front line, or they aren't disposed properly to prevent a breakthrough and encirclement, then you're going to end up with, well, less men to defend your front line. This can quickly snowball into a complete collapse of your front.

Thus a useful metric that could characterize the effectiveness of your defense would be it's linear density. Except that's what a physicist might call it. Soldiers call it frontage. Each organizational subunit of an army (e.g. division, or regiment) has a frontage of so many yards (or at least the British ones do). It means that unit has a standard deployment that can effectively defend that wide a section of the front. A commander can add up the frontage of all his combat-ready units and if it's larger than the section of the front line he's been assigned to cover, he knows he's got enough units to defend his sector without leaving any gaps or getting spread too thinly. If the frontage of his units is less than his assigned section, he knows he's in trouble.

This concept of frontage is roughly modeled by the game's map hex and unit counter design. Each unit counter can be thought of as representing a force deployed along a frontage of one hex. If you have a front that's 10 hexes wide you'd better have 10+ units to defend it or you're going to be leaving one or more gaps open that an attacker could potentially exploit.

As the Front Moves
So did I mention fronts are dynamic - that is, they move over time? Actually, in this style of warfare, moving a front is in a sense your primary means to accomplish your goals. You want certain territory to be on your side of the front instead of on the other guy's side, and he probably feels the same way. Your overall strategic goal is to hold specific territory because:
  • it was yours to begin with
  • even if it wasn't yours, you just want it anyway
  • no matter what the fight's about, the other guy will almost always give up if you take enough of his territory

Aside from this desire to hold or acquire certain territory as a strategic goal, a commander may set operational goals to acquire or even give up territory solely as a means to alter the topology[en.wikipedia.org] of the front lines. Sometimes the specific location or underlying terrain along the front isn't nearly as important as its abstract shape or configuration (i.e. its topology). In layman's terms, fronts of certain shapes are harder to defend no matter where they are: a short, straight front line is much easier to defend than a long, meandering one.

*Mathematical Interlude*
General: Get those men up to the front lines right now!
Staff Topologist: Front curves, sir.
General: What??
Staff Topologist: Curves, sir. Technically they're curves.
General: Tactically they're homeomorphic!
Staff Topologist: Oh, yes sir! Sorry sir!

(I had to do it - don't wargamer mathematicians deserve a joke of their very own?)
*/Mathematical Interlude*
Establishing a Front
The Balkan Front, 1914
So let's take a look at the opening turn for Serbia in 1914, since that's where you're going to establish your own first front:


The blue line shows where the front is between the Serbs and Austrians. I just arbitrary made that up though. Since there are holes in both side's lines, like the hex north of Cetinje, we're left to quibble about where to draw the front. That's actually the point of this example though: the armies themselves are going to have to duke it out to settle the matter. However, according to the example, there are three holes to fill in our line.

There's a couple other military-speak terms that'll be helpful in this discussion. The convex bends in our line marked (1) are called salients. Because the bending radius of this salient is small relative to the frontage of the defender, an attacker can pack more units into the same frontage. In game terms, this is pretty obvious: the salient west of Belgrade is exposed to attack from 4 enemy hexes, while the other two can be attacked from 3 enemy hexes. In general, if you're in a 1-hex salient, you can be attacked by 3-5 adjacent enemy units.

If you're in a hex surrounded on all six sides, you're in a nest, which is a type of pocket, which is a very bad thing mkay? But, more about pockets later, when we talk about encirclements. The spots on the map marked (2) are points where there are concave bends in your line; or in other words, the bending radius is on the enemy's side of the line. This is called a re-entrant. In game terms, a re-entrant would be anywhere along the line where you have a unit subject to attack from only one enemy occupied hex.

Visualize Your Whole Move
OK, so when you look at the map you should not only be able to visualize where the front is, but also where you want it to be when you're done moving:


Here, my new blue front line shows how I plan to "shorten my lines." At each end of the line I'll do so by occupying territory. At the salient west of Belgrade, I might as well retreat and give up territory because even if I swapped my damaged garrison with a full-strength unit, I'm not going to be able to hold that salient against an attack from 4 hexes.

With these moves, I'll have formed a proper continuous front with no gaps. I'd like for the hex marked (1) to be within my lines, but I can't reach that hex by rail move with my cavalry. Why not occupy it with a different unit? Well, there's a lot more to say about why one configuration is better than another, but that's the subject of the sections on defense.
Initiative and Terrain
Initiative
How you dispose your units along a front and indeed, how you attempt to dispose the front itself has a lot to do with which side has the initiative. The side with the initiative chooses where and when to attack the enemy. If you don't have the initiative, you should know it, because you'll be preoccupied with just reacting to threatened or actual enemy attacks, and your only worry should be maintaining your defense and preventing an enemy breakthrough.

So, the first thing you need to do each turn before you can plan anything along a front is think about who currently has the initiative. That determines whether you should be planning an attack or a defense. If you're totally new to wargaming, you may be uncertain at first who has the initiative in any particular situation. In that case your best bet is to assume you don't have the initiative.

Also, as a brand new player, you should work more on learning to defend first. So even though I suggested earlier that it would help to alternate sides for the first few turns to see how the AI does things, focus on playing Entente first. At the start of the 1914 campaign, the Austrians have the initiative on the Balkan front, the Germans have it on the Western front, and the Russians have it on the Eastern front. By taking Entente, you'll get practice on your defensive technique along the Balkan and Western fronts, and on the Eastern front you at least won't immediately have a crisis on your hands if your Russians don't quite know what they're doing yet.

Terrain
The effect of terrain on combat results is noticable, but not decisive, at least early in the game before the entrenchment tech level has advanced. In the early game I think it's much more important to learn to take care of the topology of your front rather than worry about terrain effects. Think of it this way - a difference in terrain effects might shift your casualties by a point or two, but being subjected to attacks from 3-5 adjacent hexes in a salient is much worse than facing just 2 attacks if you're in a straight section of the line.

An exception to this is your cities and fortifications. Cities and fortifications provide your production points, so you definitely care about keeping that "terrain" inside your lines, and you should only give up a city or fort as a last resort.

As you might expect, fortifications provide excellent defensive bonuses, so having a fortification actually in your front line is usually a good idea. In fact, since a fortification is so hard to take, it is usually said to anchor your line, meaning that, while the rest of the line may move back and forth, the part connected to the fort stays put.

Cities, though, should be kept behind your lines as much as possible so that you don't give the enemy any twofers. What's a twofer you say? Twofer the price of one! Certain units (artillery, airships, bombers, cruisers, and battleships) have a strategic attack value and can damage a city's production. If a city is in your front line, attacks intended to defeat a defending unit gain "bonus" strategic damage against the city. If a city is behind your lines though, the enemy will have to divert units from normal attacks on the front and pay for their ammo if he wants to get strategic damage on the city.

Other terrain probably won't matter much in planning your front early in the game. Mountains give you a significant bonus, but you're not going to be fighting over many mountain hexes. The defensive bonus for forest, rough, and swamp hexes is fairly small. Where it's convenient, you want your front to run along a river, but I wouldn't want to defend a longer line or extra salients just to get a few extra river hexsides on the front.

WWI is supposed to be practically synonymous with trench warfare, so you'd think entrenchment would have this huge effect on combat. Well, in the early game - apparently not so much. To give you some idea of how much, I'll wave my hands and make up some generalizations:

  • An unentrenched garrison unit in a re-entrant or along a straight front could get retreated or destroyed if a few ranged attacks preceded the ground attack. An entrenched unit would survive most of the time.
  • An unentreched infantry unit in a salient attacked from 3 sides with artillery support is likely to get retreated or destroyed. An entrenched unit should survive.
  • An unentrenched infantry unit in a salient attacked from 4 sides is very likely to get retreated or destroyed. A well-entrenched unit might survive even if some support attacks were thrown in.

Later in the game after the tech level has gone up, entrenchment has a much greater effect. If you make it that far though, it's because you don't need help any more anyway.
Defending a Front
So in the section on "Establishing a Front" we looked at how you want to end up with a continuous line of units facing the enemy. In this section we'll focus on how to keep your line intact when an enemy is attacking it in one or more places.

Defensive Rules of Construction
  • Don't leave any gaps in your line.
  • Avoid salients, especially ones facing >3 enemy hexes.
  • Always defend salients with infantry units if possible.
  • You can use garrisons (or cavalry) in re-entrants
  • Along straight sections where each hex faces only two enemy hexes:
    • You can use a garrison (or cavalry) when facing 1 or 2 garrisons
    • Use an infantry if possible when facing 2 infantry or 2 units backed by artillery
  • Space out reserves behind the line.
  • Leave open spaces behind the line so every unit in the line can retreat.
Defensive Rules of Action
  • Close any gaps:
    • Fill it with a unit
    • Counterattack an enemy salient to shorten the line and eliminate the gap
    • Retreat along the line if it will shorten it and eliminate the gap
  • Straighten and shorten your lines as much as possible.
  • Repair or replace damaged units in the line.
    • Add 2 replacements to a 7+ strength white unit.
    • Rotate or swap out anything yellow, red, or under 6 strength.
  • Replace reserves as they are committed.
    • Produce new units - consider production lead time and travel time.
    • Transfer units from another front - consider TC and travel time.
Of course these are all rules of thumb and are not written in stone. As you get better at the game, you'll know when it's OK to break these rules.

Closing any gaps in your line is your number one priority. Really, all the other rules are just to help you satisfy that one rule. Your biggest problem is that, as the defender, you don't have the initiative. To be the attacker, your opponent pretty much by definition has to have stronger forces facing you; and thus may be forcing open gaps, encircling your salients, pushing back and stretching your lines - all despite your best efforts.

Planning Your Defenses
As mentioned earlier, a good habit to develop is to always plan and visualize all your moves along a section of the front before you start moving any units. Oh - section of the front you say - what's that? Well, figuring that out is one of the things you'll only get better at by doing it.

If you have a long enough front it's pretty clear that anything you do at one end of the front is going to be completely independent from what you do at the other end. At any particular hex, there's only so many units within movement range that can respond to the situation - or so you would think. One of the things about this wargame that sets it apart is how events in one hex can potentially "ripple" far down the line.
Example Defenses
Example 1: Defending the Russian Front, 15 Apr 1915
Since the beginning of the game the Central Powers have been focusing their efforts on the Western and Balkan fronts and they've supposedly been just trying to "hold the line" against the Russians. So yes, up until now I've been the attacker, and I even captured Koenigsburg.


By collapsing the German salient in East Prussia rather than pushing west and south from Warsaw, I've let the German defender shorten his lines. That's OK with me though because, while my longer-term goal for this year is to build up for a push further south; I needed to anchor, shorten, and strengthen my own line in the north before I could start accumulating reserves for any attack. I'd been cranking out infantry units as fast as I could, but both the Germans and Austrians had been matching my build-up and I ended up needing to commit all my new infantry to the north. The Germans didn't seem to know they were supposed to be on defense and had been rather persistent in their attacks, so I finally had to collapse that end of the line and man it entirely with infantry just to get them to stop.

As it happens, right now we're roughly at parity, so we can view this as a Russian "defense." Things are quiet in the north, but the Austrian AI is still doing the same thing the Germans were, attacking garrison units wherever they have infantry facing them, even though they don't have enough local superiority to actually threaten a breakthrough. These are the sort of attrition attack though that if you don't pay attention and handle them every turn, you may suddenly discover you're out of reserves to swap in for your damaged units and you have a big problem.

First look at the construction of this line as a defense. It's nice and straight, and is basically the shortest front it's possible to have between Romania and the Baltic Sea. There are only two hexes south of Warsaw that can be attacked by more than two enemy ground units. There are four garrison units in reserve spaced out immediately behind the line. Three of these reserves (circled in blue) can be directly swapped in for either of the two units in the line immediately in front of them (blue lines). Note also that every unit in the line has a hex it can retreat to if forced back.

For the moment, pretend the fourth reserve unit (blue X) isn't there. If you just started at the southern end of the line examining damaged units, you might go ahead and add 2 replacements to the garrison north of Lemberg, or swap it with the reserve behind it. If you did that though, when you went to deal with the much more serious problem of how to replace the strength-4 unit further up the line, you'd find that you couldn't do it (assume you couldn't use any units from further north). You'd only be able to add 2 replacements to form a strength-6 garrison, and that would get destroyed next turn.

BTW, why is it that a unit that was at full strength last turn, is down to strength-4 this turn? Because it was an unentrenched garrison unit facing two infantry units.

Anyway, if you instead examined both situations before committing to any moves, you might see that you could deal with both damaged units at once by making one long shift down the line (red arrows), followed by adding 1 replacement to the strength-8 unit.

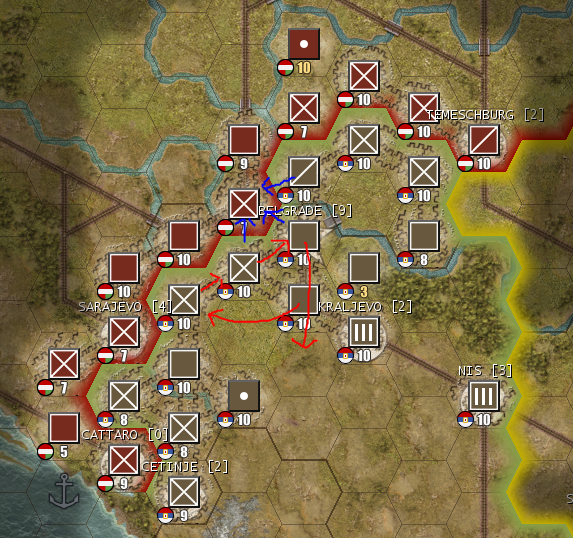
Example 2: OK Defense of Serbia, 1 Apr 1915


A few turns earlier in the Balkans I had started thinking about going over to the offensive since my defense was solid and the Austrians had been shifting units north to the Russian front. I had pushed into a salient between Cattaro and Sarajevo, and brought up artillery to try to take Cattaro. The salient was in a forest and entrenchment level 6, so it was a pretty good spot for letting the Austrians attrit themselves if they wanted to counter-attack.

Things were not ideal in the North though. As I shifted my infantry south to assault Cattaro, the Austrians brought in more infantry and artillery to reinforce the northern end of their line. This left me defending the hex north of Belgrade with only a garrison unit against 3 Austrian units, although at least it was entrenched (4). Leaving openings behind the line for retreats (marked 1) meant the reserves were pretty far away.

The Austrian attack reduced my garrison to strength 3, but at least it wasn't forced to retreat, so the hex is still mine. Finding a way to shore up my line without leaving a weak spot that will fall on the enemy's next turn could be a problem though.

One plan would move out the damaged garrison and shift the two infantry units over. The right flank would best be covered with my cavalry, since a strength-7 garrison holding the end of the line against an infantry and cavalry would be risky. The two damaged infantry units in the south would be exchanged, then have replacements added - this would put a full-strength infantry in the salient.

Example 3a: Better Defense of Serbia, 1 Apr 1915


The previous plan would entail pretty much giving up on attacking Cattaro though, and if he's going to attack my cavalry, I'd rather it be with 3 understrength units, especially since if he lost any more strength on the infantry southwest of Belgrade I'd have two full-strength infantries further down the line ready to shift over and counterattack.

So, the better plan is to go ahead with the assault on Cattaro (artillery followed by two ground attacks), add 2 replacements to the unit in the salient north of Cattaro, and rotate the cavalry into the salient north of Belgrade. The result is shown below.

Example 3b: Resulting Serbian position, 15 Apr 1915


So the bet worked out. Unfortunately, the unit defending Cattaro wasn't eliminated, so he was able to swap it out. I'm not sure why he didn't send replacements to his units near Belgrade, but that presents me with a fine opportunity to shift my infantry (red) for a strong attack (blue) southwest of Belgrade. Well, that's more properly the subject of the next section.
Attacking a Front
Why are you attacking there?
When you have the initiative and are planning your turn, you should always have a clear idea of what it is you're trying to accomplish with every series of moves and attacks you make. There are a lot of different objectives you can be working towards with any given attack:

  • Attriting the enemy.
  • Collapsing a salient.
  • Stretching (lengthening) the enemy's lines.
  • Attempting a breakthrough.
  • Performing an encirclement.
  • Collapsing a pocket.
  • Eliminating an enemy unit.
  • Capturing a specific objective like a city or fort.

This list is roughly in order of the desirability or importance of these goals.

Attriting the enemy. The objective of an attrition attack is usually to simply cost the enemy more than it costs you. However, sometimes if you have a lot more of a resource than the other guy, maybe you're even willing to lose more than him on each attack. The idea is over the long run to drive him to some breaking point before you reach it yourself. For example, the Russians have all sorts of manpower, so they're in a good position to fight a war of attrition. They don't need spectacular breakthroughs or massive encirclements to succeed; they just need to constantly trade blows with the enemy and wear him down over time.

Collapsing a salient. When you attempt to drive enemy units out of a salient in their lines, it is often for the purpose of shortening and straightening your own lines to make them easier to defend. This is a rather limited goal, but sometimes it's what you need to do.

Streching the enemy's lines. This is something that is definitely offensive-minded. For this to work, you need to have numerical superiority on the front, along with several strong units to spearhead a continous series of attacks. Your goal is to lengthen the enemy's lines so that he has to commit all his reserves. Once he has no more reserves to rotate into the line, your continued attacks will start resulting in breakthroughs.

There are all sorts of ways to stretch out a front, so which is best depends on the specific situation. However, you'll notice that a lot of the means by which you can lengthen the front, such as pushing open a bulging salient, are exactly the things you were told not to do if you wanted to maintain a good defense. That's why you have to be sure that you have the stronger position before you try this.

Attempting a breakthrough. With enough local superiority you can almost always find a spot to push an enemy unit out of line and move into the opening, but picking a time to do it that he won't be able to effectively counter-attack, and where you'll be able to force more units through the line for a breakthrough - that's the trick. You're most likely to succeed at this when the enemy is streched thin and has no reserves nearby. The only way he can close the hole you're working open is to shift units and leave a hole somewhere else.

Performing an encirclement. The next step after a breakthrough is to encircle one or more enemy units and cut off their supply.

Collapsing a pocket. A pocket contains one or more enemy units that are cut off from normal supply. If they have a city inside the pocket, they will be at half-supply, otherwise they are unsupplied. Once you have created a pocket of unsupplied enemy units, you can move on with your best units and leave collapsing and eliminating the pocket to rear-echelon troops.

Eliminating enemy units. Although it is sometimes possible with enough direct attacks by strong units to eliminate a unit in the enemy line, most of the time it will simply be damaged, and perhaps retreated. Always keep an eye out though for any spots in the line where enemy units have no hex open behind them that they can use to retreat. If you can force such a unit to retreat, it is eliminated instead.

It's hard to maintain the momentum of an attack over many turns. One key to doing so is to use your spearhead - your most powerful leading troops - in as few attacks as possible. Every time your spearhead has to stop or slow down to take replacements, or allow other units from the rear to leapfrog and take over as the spearhead - you're giving the enemy a chance to regroup and throw up a defensive line to stop you. Even if you see the opportunity to severely damage or kill an enemy unit in front of you with your spearhead units, don't do it. Bypass and encircle the enemy at every opportunity and only fight if you must to force an opening at the weakest available spot in an enemy line.

Push as many garrisons or other units in the rear forward behind your spearhead as you can. Use them to kill enemies trapped in pockets, and to form new lines along the flanks of your attack.

When the enemy is starved for units like this you have to keep your momentum going. If you can keep surrounding and eliminating units faster than he can produce them, then you're going to win the game.

Capturing objectives. Of course capturing cities and forts is good thing. Capturing a fort with a heavily-entrenched infantry unit defending it can be almost impossible if it is in supply and can swap in a new defender when needed. Even if it's surrounded and at half-supply, it can be difficult to take.

When cities and forts are captured, it takes several turns before their production starts recovering and becomes available to you.

Attack Order
The order in which you perform multiple attacks against a single unit during a turn is important. Attack first with units that are least likely to take damage. Plan to attack last with the unit you intend to move into the defender's hex. This is done for two reasons: if you eliminate or retreat the defender before your last attack, that "last attacker" gets to move into the defender's hex without a fight. If the defender was only retreated before, it will most likely be eliminated by one more attack form the "last attacker" after his advance. However, if the defender is still in his original hex when it's the last attacker's turn to attack, at least the last attacker will suffer the fewest casualties possible from his attack before possibly needing to move forward and defend the captured hex from counter-attack.

If it's one of the attacking units, you'll usually want the unit that moves into the defender's hex to be one that was in a re-entrant opposite the attacked unit - that way when it moves forward, you don't leave a gap in your lines. Of course if you have another suitable unit behind your lines that can move into the defender's hex then that's fine too. If there's no other unit that can move into the defender's hex and you have to make the last attack with a unit that will leave a hole in the line when it moves forward, then make sure that you'll be able to fill in the hole, either by moving in a unit from behind the lines, or shifting down a section of the line.

Attack with unit types in this order:
  • Fighters. Even if they do no strength damage, they'll usually reduce efficiency.
  • Battleships or Cruisers performing shore bombardment (uses ammo).
  • Airships (uses ammo).
  • Artillery (uses ammo).
  • Bombers (uses ammo).
  • Infantry
  • Cavalry
  • Garrison
  • Whichever unit that's designated to move into defender's hex.
Example Attacks - Eastern Front
After seeing these examples, some of you out there that have already figured out the AI's weaknesses may be thinking "man, this guy sure is a conservative plodder - I was in Berlin by the end of 1915." Well, I suppose you'd be right, but I was approaching this match as if I had a very competent opponent and I actually needed to follow best practices in my play.

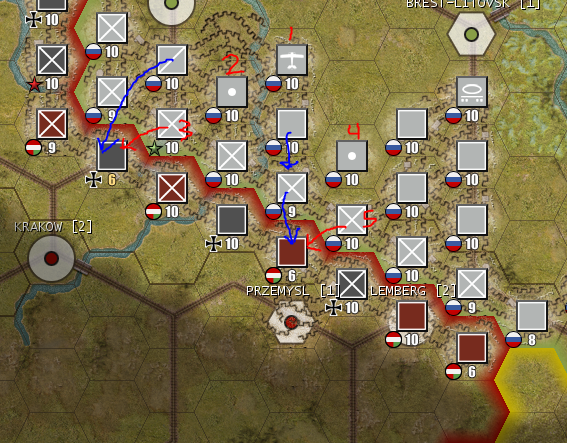
Russian Front, 2 September 1915


The defensive example from the Russian front that I presented earlier was from April. Now it's September and I've finally built up a nice force to go on the offensive against the Germans and Austrians on the southern flank. I have enough reserves in place that, along with new production, I should be able to keep rolling all the way to Vienna and Berlin.

I actually started my offensive on the previous turn with attacks on 3 of his garrison units. He's got no reserves because they've all been needed on the Western front, so his line should crack like an egg.

For the first attack against the German strength-6 garrison, the first step is to soften it up with the fighter (1), then an artillery attack (2) followed by my leader's assault (3). This easily eliminated the unit and I advanced into the hex with my cavalry. He's got no reserves so I'm not worried about a counter-attack that would actually be strong enough to eliminate my cavalry.

Further south, another artillery attack (4) is followed by an assault (5) that pushes back the Austrian garrison north of Przemysl. My two units to the north of Przemysl shift one hex south, so now I've made two breakthroughs he can't plug.

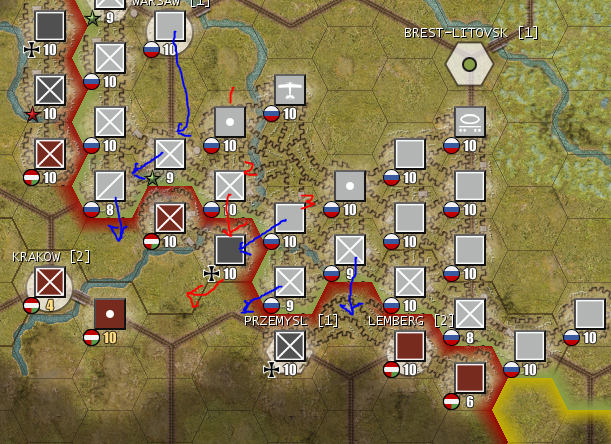
Russian Front, 16 September 1915


He wasn't able to do anything on his turn except retreat to Przemysl and rail move a badly damaged unit up from the Balkan frront. The units northeast of Krakow should have retreated as well, since it's pretty obvious they're in danger of encirclement.

Actually, instead of encircling both units, the German garrison is weak enough that I can blow it out right away. The first attack is softening up with the fighter again, followed by an artillery barrage (1) and an assault from the north (2). This forces the unit to retreat, and my designated "last hitter" in the re-entrant moves into the vacated hex, eliminates the retreated garrison with another attack, and gets to advance another hex to the southwest.

Other units move forward (blue lines) to complete the encirclement of the Austrian infantry and threaten to surround the fortress at Przemysl. The other garrisons south of Brest-Litovsk shift southwest to fill in behind them.

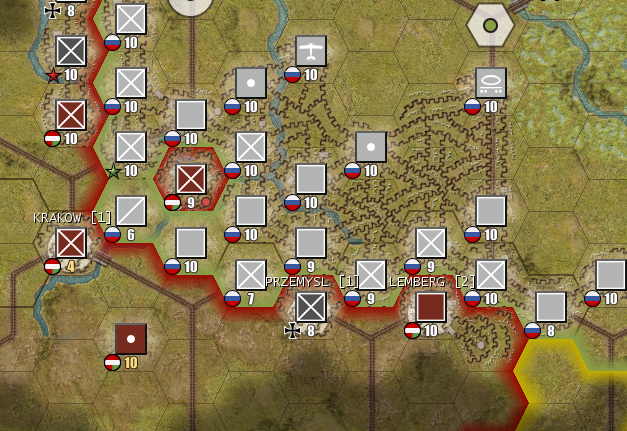
Russian Front, 30 September 1915


The southern flank of the front has been blown wide open. I'll eliminate the pocket northeast of Krakow this turn and start surrounding Krakow, Przemysl, and Lemberg as well. One artillery will move south to be ready to help reduce the fortress at Przemysl as soon as it's surrounded, while the other one will shift southwest.

In the next few turns, the entire northern flank held by the Germans is going to get encircled and rolled up in the same way.
Example Attacks - Western Front
Western Front, 10 June 1915


In this example I deal with some pockets. The fortress at Liege is very strong, so I'm waiting until I bring up another British artillery that happens to be crossing the channel right now before I try to reduce it.

There's also a big long German salient anchored by the fortress at Metz. That also will be a tough nut to crack. Right now I'm working on cutting off the whole salient so that everything in the resulting pocket will be at only half-supply.

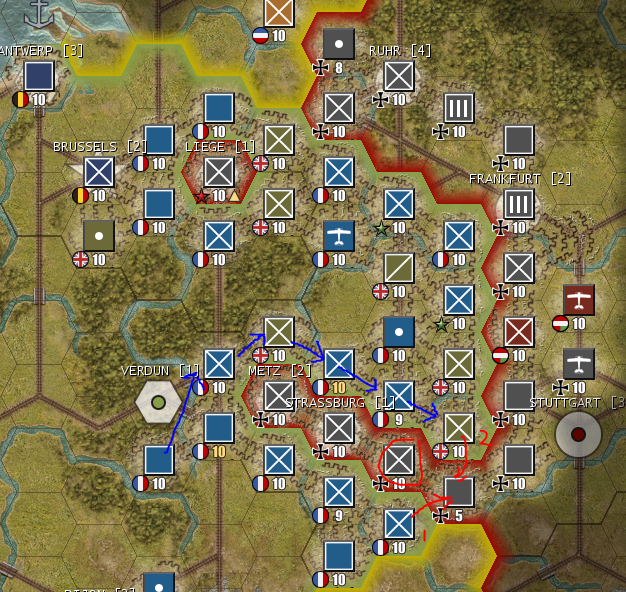
Last turn I had attacked a garrison unit that was in the circled hex. Even with a fighter, artillery, and ground assaults from 4 infantry units, it had only been reduced to strength 4 and I couldn't force it to retreat (which would have eliminated it). In the German turn, the AI swapped out the damaged garrison and added a replacement to bring it up to strength 5. Normally this would be the sort of swap that makes your shoulder's droop while you mutter "all that work for nothing..." In this case though I don't mind at all, because I think it will give me a chance to trap another full-strength infantry in the pocket I'm working on.

The strength 5 garrison is already reduced to 8 efficiency, so after a fighter attack, two ground assaults (1&2) easily eliminate it. Note that the French infantry (1) attacks first. At first, it may look like it makes no difference, but if I attacked with the British infantry (2) first and it happened to take any casualties, I'd be leaving a damaged unit in the front line when I didn't need to do so. By attacking with (1) first, there's a smaller risk of leaving a damaged unit in the line.

So, anyway, after moving into the vacated hex with (2), the entire line (blue line) shifts around. Three units are trapped in the Metz pocket. I'd sure like to start moving on Frankfurt and the Ruhr since his defense is so weak up there, but I need to reduce at least one of those pockets to free up enough units before I can start any push towards Berlin.

Western Front, 24 June 1915


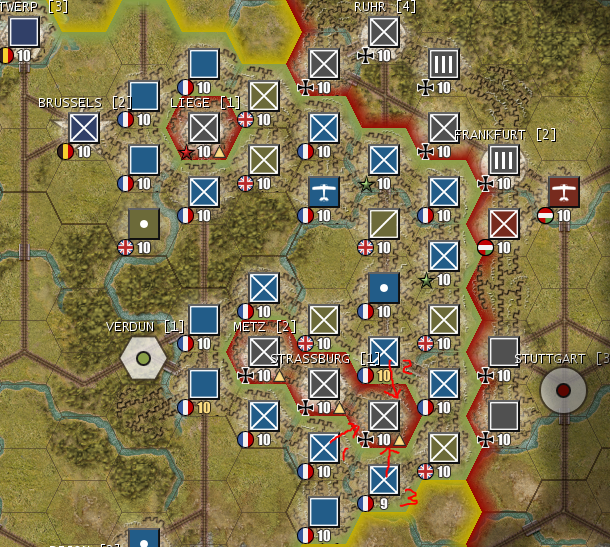
On this turn I content myself with just killing one unit in the Metz pocket. I start again with a fighter attack. I skip the artillery barrage this time because it probably is unnecessary and I'd like to save the ammo. The third attack (3) eliminates the defender and (3) advances into the hex.

I could have started the attack on Strassburg this turn as well, but with only two units attacking I didn't think I was going to eliminate the unit, so I decided to just wait till next turn.

Western Front, 22 July 1915


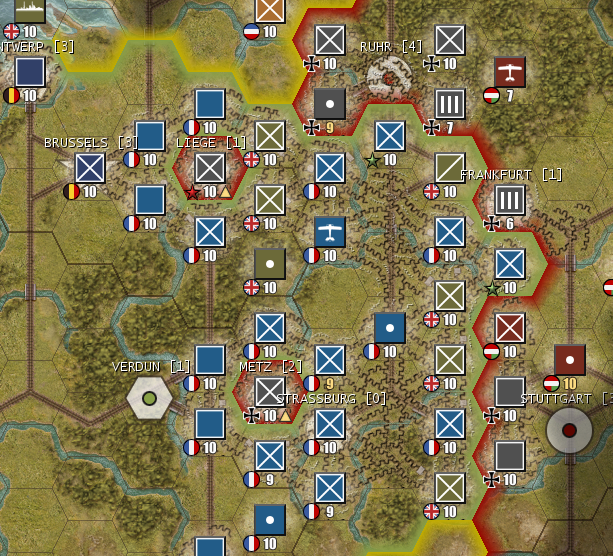
Skipping ahead a turn we see that only the fortress is left in the Metz pocket. For some reason, the AI has put an artillery unit in the line up on the Dutch border, so I'll oblige by killing it. I can also start to push on Frankfurt and the Ruhr.

Western Front, 5 August 1915


The fortress at Metz was reduced in one turn, so now there's plenty of units freed up to start pushing towards Berlin.

Frankfurt and Ruhr fell easily, and you can see that we're about to link up with the Italians to the south. After I move another artillery over, I'll try reducing Liege soon.

Compared to the previous example on the Russian front, this sure took a lot longer for a lot less territory gained, but that's entirely because of the two heavily entrenched fortifications at Metz and Liege. I didn't feel like taking casualties from piecemeal attacks on the forts, so I waited until I could deliver a hammer blow with air and artillery followed by up to six ground assaults. It worked.
Manpower
Manpower
For the economy, I was originally just going to have a section called Research and Production. Manpower could be discussed under production, since that's where it gets used after all right? But then I realized that wouldn't be giving manpower the top billing it deserves.

In the manual it tells you that as manpower for a country drops below certain thresholds (a percentage of the 1914 starting pool value), that very bad things happen. At some of the thresholds, it's only your PP production that suffers a percentage drop. At two of the thresholds though, the maximum quality of all of your newly produced units drops. These are very significant effects - if you get that far into a game to see them.

How you handle your manpower is not so important if you're still getting overrun by the AI in 1915, or if you've mastered the game to the point you routinely can achieve total victory within a year or two. However, if you ever find yourself in a game that runs all the way to 1918, you may find the outcome hinges on how you've managed your manpower from the earliest days of the war.

According to the manual, manpower is a finite resource and it will never increase. This seems realistic; in the five-year timeframe of the war, there are only so many able-bodied men of an age that can be conscripted into service in each country. There is supposed to be only one exception: every strength point delivered from a British or French convoy not only adds to its respective country's PP pool, but also adds a point to its MP pool. This represents the ongoing manpower contributions from these colonial power's overseas holdings.

One problem with the way information about manpower is presented in the UI is that you don't really get any warning you're about to drop under one of these MP thresholds before it happens. Unless you bothered to write down your starting pool and calculate what the 70% or 30% thresholds at the start of the game, at some point you're going to get a bit of a surprise when you see a message that your troop quality has just dropped. Thus the best policy would seem to be simply that you should be mindful of your manpower expenditures all the time. BTW, this drop in quality is irreversible - you can't push your manpower back above the threshold and regain quality.

Disbanding Units
It doesn't mention it in the manpower section, but in another part of the manual it tells you how manpower points are recovered when units are disbanded. So, technically there is another way for all countries to add points back to their MP pool.

At the moment not much can be said about how disbanding works. In the current version (1.5.1), there are some bugs in how the manpower returned from disbanding units is calculated. We'll have to wait to see how this gets addressed in the next patch.

One clue we've gotten from developer posts on the forums though is that how much you get back from disbanding is supposed to depend on where it happens. You're only supposed to get a full refund if you disband within your own country's borders. If you disband in territory originally owned by your alliance you get only half the normal refund, and anywhere else you get nothing. The manual says nothing about this at present, and again, we'll just have to wait and see what happens in the patch.

Replacements
Given the appalling level of casualties in WWI, how replacements were conscripted, trained, and distributed to combat units was actually a complex and critical part of how each army operated. However, differences in how the various countries handled the logistics of unit reconstitution have been subsumed by the game's simplified mechanics. For anyone interested in the subject though, they might find the following paper informative:
Unit Reconstitution - A Historical Perspective[usacac.army.mil].

Just as it is with the disbanding of units, the manual isn't that accurate or informative in its description of how replacements work. With full supply, an unmoved unit can gain back 2 strength points, while a moved unit can only regain 1 point. What isn't discussed is what the costs are in PP and MP.

What you find if you carefully watch the tooltips as you apply replacements is that, for some unit types, there is an anomaly in how the game handles reconstitution of a unit that hasn't moved but only needs one point to reach full strength (i.e. it has 9 strength) - you get charged more than what that one point costs if you move the unit first. This has been reported and perhaps will be fixed in the next patch.

What probably won't be changed in the patch is that, either deliberately, or simply because of the limitations of rounding, sometimes it costs more to reconstitute a heavily depleted unit via replacements than it does to disband it and simply build a new unit.

Some examples (assuming the disbanding bugs get fixed):
  • A garrison unit costs 10PP+6MP to build in two turns, and costs 1PP+1MP per point to reconstitute with replacements. If a strength 4 garrison doesn't move and takes replacements for three turns, it costs 6PP+6MP to reach full strength. If instead you simply build a new garrison unit and disband the damaged unit (sending it back home first if necessary), it costs you only (10-2=)8PP+(6-2=)4MP, and you get the new garrison a turn sooner.
  • An infantry unit costs 20PP+12MP to build in four turns, and costs 3PP+3MP per 1 or 2 replacement points applied while the unit hasn't moved, and 2PP+2MP per replacement point applied after the unit has moved. If a strength 4 infantry unit doesn't move and takes replacements for three turns, it costs 9PP+9MP. If instead you build a new infantry over 4 turns, it costs (20-4=)16PP+(12-5)=7MP.
  • A strength 3 infantry unit taking replacements for 4 turns costs 11PP+11MP. Disbanding it and building a new unit costs (20-3=)17PP+(12-4=)8MP.

So, at the cost of some extra PP, you can sometimes save MP and may even get your full-strength unit back faster by disbanding it and using new production instead.
Research
I don't want to get into making a big long list of exactly what you should or shouldn't research for each country, but I guess I do have a few country-specific recommendations to get you thinking about it. What I think is more important to know though is that the research screen really shouldn't take much of your time at all once you have it figured out and have a plan, but you definitely shouldn't just ignore it and let it run on the defaults.

Until there's a wiki or something that breaks it all out as a tree to look at, you should probably sit down and familiarize yourself with how the techs are organized and how you can examine them in-game. Unfortunately, in-game you can't look at a research line until it unlocks. Once unlocked though, what you do is click on the icon for a research line in the grid on the right.


German Research - Nov 1914
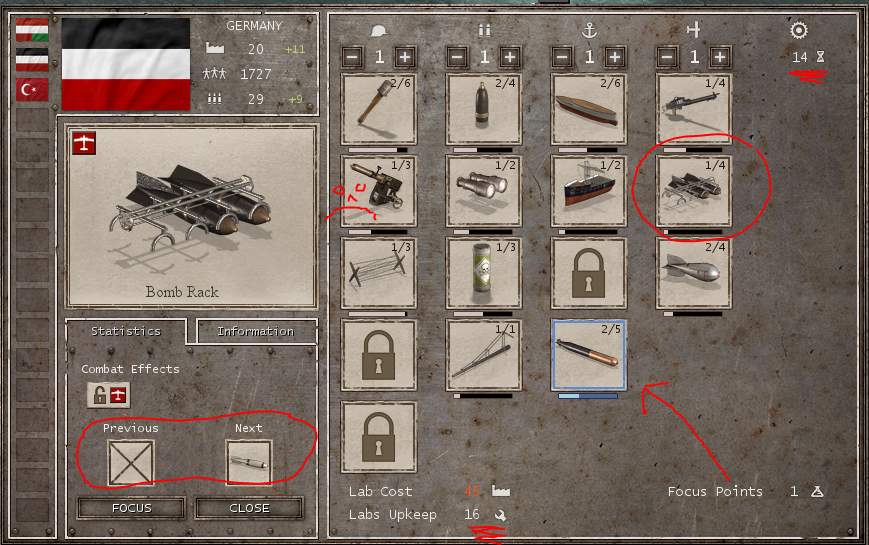
In the example above, I've clicked on the bomber research line in the Aircraft Tech column. This has brought up info in the left-hand pane about the current bomber research project, which is "bomb racks." If I squint and look in the upper right corner of the grid icon, I can see a 1/4, meaning this is the first of 4 bomber techs. To see what the rest are, I can use the Next and Previous buttons at the bottom of the left-hand pane. You can do this with every unlocked tech in the grid to get a preview of what each research line does.

There are two things you should pay particular attention to in the left-hand pane as you cycle through all the techs in a line. First, in the upper-left corner of the big picture of the tech, there's a set of small icons that indicate the unit types affected by that tech. That's something it's rather useful to be sure about if you're thinking of setting a focus on that line. For instance, it wouldn't do to think you were putting a focus on submarine techs but find out later you'd actually put the focus on ASW techs. You'd know for sure if you checked the unit type affected by the tech first. The other thing to note while cycling through the tech line is the combat effects of each tech. The bottom line on whether that tech line is worth your time is the sum of those combat effects.

You can also see in the above example that I've put a focus point into submarine techs. By doing so, I'm basically deciding that as the Germans, I don't care so much about keeping up with improvements to my cruisers and battleships, but I'm putting maximum effort into improving my subs (well, one lab's worth of effort at least).

It's A Fact!
  • There's a timetable for when research fields unlock for each country. You can see this as a little hourglass countdown at the top of the column for each research category (ex. above - 14 turns until vehicles unlock).
  • Once a category unlocks, you get a "free" lab for the new category. Not all nations will get access to all research categories: the Ottomans can never research anything except ground force and artillery techs.
  • That free lab isn't really free. As soon as you have it, your PP research maintenance costs go up (ex. above - Germany starts with 2 labs costing 8PP maint., but after adding 2 "free" labs, maint. is now 16PP).
  • If you sell a lab you get half its PP cost back. This works for your free starter lab too.
  • Your research maintenance costs directly compete with the cap on your military. If you have a bunch of labs, you're going to be stuck with a smaller military (unless you run a deficit and count on convoys to keep you out on bail).
  • If you sell back a lab you'll get 20+ PP.
  • That 20 PP represents 5 turns maintenance on a lab. It's can also buy an infantry unit.
  • You can focus on a single tech within each category, but you can't "unfocus" one tech (ex. above - I put the frowny face next to the anti-air tech line because I wish I could unfocus just that line and still split effort between infantry weapon and entrenchment techs).

So what's the most important decision to make about your research? Whether you really need every research category or not. If you don't need it, figure it out ASAP so you can sell the lab, collect your PP "refund" and avoid paying any more maintenance on it.

If you just leave your research on autopilot, you could end up like the Italians when they enter the war. You're researching everything, so yeah, you'll be able to build tanks and bombers and, well, everything - when you eventually unlock it - but you have ZERO PP! You can't even buy replacements for the troops you already have!

I don't know how you could test it, but I've suspected that the AI knows how to sell labs and does for certain countries.

One thing I definitely don't like about the research screen is that, once you've finished researching a tech line, it just gets removed from the grid. Most games, when you get to the end of the tech tree, you can look back and see it all. I imagine this was done as an expedient during the game programming though - if it's no longer there, you don't have to invent a way to mark the line as complete, or prevent someone from trying to put a focus on it, and so forth.

You Want Some Cheese With That?
SInce we have a crystal ball, we know where each tech tree "ends," and we also know the game ends. So some might feel it's cheesy to sell your lab(s) as soon as you're finished with one of the tech trees...

OK, so how about if you decide to shut down and sell your labs when there's still a couple unresearched techs in a field? Would that be less cheesy? For just about every country there are circumstances where, even if there were some unknown "future tech" over the horizon, that it would be reasonable for them to forego possible future research benefit in exchange for immediately freeing up PP to buy and support a larger force.
Production
Garrison vs. Infantry
Infantry units have basically double the costs and double the attack value of garrison units. However they don't have double the defense value. You need the infantry units for offensive action and at least to defend any salients in your lines, otherwise you can get by with garrison units.

You'll probably start to notice though that a little further along in the game, if you have a line that's mostly infantry, the AI will constantly be attacking the few garrison units in your line and basically leaving the infantry alone. So you'll need to think about what level of attrition game you want to play with him on that front.

Cavalry
Cavalry has two roles: to destroy damaged units, and to scout. Cavalry doesn't have a high defense value, so it shouldn't be used in defending an exposed salient, but at least in the early game it's roughly the same as a garrison unit and can take a couple hits. It has the same manpower usage as a garrison unit but an attack as strong as a regular infantry. Its best use in combat though is to attack already heavily damaged units.

With a sight range of 3, Cavalry can give you visibility behind the enemy front lines, even if placed behind your own lines. It's useful to have a couple on each front.

Armoured Cars
Armoured Cars are much cheaper than other land units, but they also can't fight worth a darn. They make excellent scouts though with a sight range of 4, so between them and your cavalry you should have several on each front so you can see what's going on behind enemy lines.

Their big movement allowance and special characteristic that favors their retreat makes them useful for two other things: they're good for plugging holes to delay and hinder enemy breakthroughs, and useful for friendly breakthroughs and encirclements.

When used for a delaying action, make sure they're not blocked in and have an avenue of retreat. On a breakthrough, don't count on them to withstand attacks to preserve an encirclement - instead use them for big sweeps that grab so much territory the encircled units and any relieving force will simply not be able to move far enough to recapture it all.

Artillery
Artillery is essential, but useless without ammo. If you're going to build additional artillery remember that you'll need to increase your ammo production, otherwise you'll only be using one artillery per turn while all the others sit and do nothing.

Armoured Trains
Maybe armoured trains become useful once tanks show up - I don't know. I don't see much use for them early in the game.

Fighters
It's useful to have at least one fighter on each front in the early game. Use it as the initial attack to soften up your most important attack each turn.

Airships
Airships have a very good range and good naval and ASW attack values. If you build a lot though just remember that their attacks do use 1 ammo. If you keep a bunch of airships near the front you don't need to keep any cavalry or armored cars just for scouting either.

Bombers
Once you have bombers available, they're better than airships, but they do cost more and use twice as much ammo.

Cruisers
Look at the lead time and cost. Only reason I can think of to build any of these is if as British you've somehow managed to get a bunch sunk already and need to replace them.

Battleships
Look at the lead time and cost.

Submarines
Subs are cheap and quick to produce. As the Germans, as soon as you have enough ground units to stabilize your fronts, it makes sense to start making a bunch of subs. For other countries? Not so much.
Naval Warfare
Originally, I was going to just call this section "Submarines and Convoys," since I didn't think I would have much to say about anything else you should do with your navy, or how the AI used its navy. I guess I had a couple reasons for thinking this way:
  • Other than for convoys and submarines, the naval AI is really pretty bad.
  • The developers have as much as admitted that it's really bad. They've intimated they were going to take a look at it, so I don't know how radically this part of the game might change in an upcoming patch.
  • I hadn't gotten far enough into any game to be thinking about doing other things with my navy. Since then I've tried out an amphibious invasion against the Ottomans, and done some shore bombardments and such.
  • Aside from managing convoys and subs, my main strategy was "stay in or near port and avoid getting sunk." Oh, and sink AI ships every time they failed to use my obviously excellent strategy.
Convoys
Convoy ships for both sides are AI controlled, so you don't actually move your own convoys. Perhaps that's good, since you don't have to worry about forgetting to move them, but it also means you can't adjust their route, or have them hold up a few hexes instead of just blundering into view of an enemy ship you knew about and could have avoided.

One potential worry about AI convoys is that they'll always use exactly the same path. If they did, it would be easy for enemies subs to just park in a spot and wait for every convoy to just sail right up, ready to be sunk. Well, that doesn't happen - convoys do change their routes.

However, all convoys can be reliably found somewhere on the way from A to B:
  • The German convoy from Sweden has little choice in its route to Koenigsberg.
  • The German convoy from Trondheim has little choice on its way to Jutland.
  • The German convoy from the South Atlantic always tries to run the English Channel.
  • The British convoy from Suez always has to traverse the Med.
  • The French convoy always goes to Brest (if owned, I suppose - if anyone out there has captured Brest, yet the French are still in the game - be sure to let us know where that convoy goes).
  • The British convoys all go to Belfast or Portsmouth.

The German convoys have only 2-3 strength points and are easily sunk by a single attack. The British and French convoys have a full 10 strength points and at least with early-game sub tech, take several attacks to sink.

It's better if you leave the destination port of a convoy open, at least when it gets close. If the destination port is open, the convoy will end its turn in port. If it's occupied, the convoy will end it's turn next to the port. In either case, the convoy is still on the map through the next enemy turn and subject to attack. If it has made it all the way into port though, it at least gets the port defensive bonus.

Submarines and Escorts

A German sub offensive in the Atlantic will be severely blunted unless you can capture a port further west than Wilhemshaven. If your subs have to trace supply from there, you'll find you can't hang out continously any further west than the north coast of Ireland or just west of Brest. From these positions, you only have one shot at arriving convoys, and if the allied AI has enough ships to "escort" the convoy on that last leg of its journey, you may not even get that one shot.

What's this about escorts? Well, the AI will use as many ships as it has available in the vicinity to occupy hexes adjacent to the convoy on its last turn before reaching port. If there are enough ships to completely surround the convoy, there won't be any unoccupied adjacent hexes for you to move into for your attack. Even if you can't be completely blocked out, it takes only two escorts (directly opposite each other) to guarantee that you'll be adjacent to at least one of them if you attack the convoy. That means at least one escort will get to attack you on its next turn. So, if you get in your shot on the convoy, the escort is going to get a shot at you.

Also, don't be suprised if the AI uses one or more of its own submarines in this escort role. This is a particularly aggravating trick because you don't see the sub until you try to move into its hex. For example, say there were two visible escorts, and you had only a single attacking sub - you're gonna be mad if you fail to attack the convoy because you hit the 25% chance of picking the wrong one of the four supposedly "open" hexes next to the convoy.

The most important thing to do as the Germans in the sub war is to capture Antwerp or Calais. Without one of these ports (or one even further west) for supply, you just can't be effective at intercepting Atlantic convoys. If you wait in the supplied "white dot zone," by the time you spot a convoy it will either already be in port, or only one turn away and probably covered in escorts.

With enough subs it might be possible to rotate units in and out of the "red dot zone" and be somewhat effective in picking up convoys and attacking them before they have escorts, but I haven't tried that yet. I always just taken Antwerp and/or Calais.

Surface Fleets

Right now, the AI doesn't handle battleships and cruisers well at all. It will use a Russian battleship or cruiser to intercept the German Baltic convoy and end up getting sunk. It will use a German battleship or cruiser to attack a transport it spots in the channel - and end up getting sunk. It will sail a British cruiser right up to Wilhemshaven and attack a German cruiser in port - and get sunk.

When I mentioned my "stay in port" strategy earlier, you perhaps thought I was being tongue-in-cheek, but it actually was a valid real-life strategy that the Germans followed - most of the time. They would have been well-advised to have followed it all the time. The main value of the German fleet was in just existing as a threat - this kept much larger British forces tied up waiting for them to do something.

One thing the AI does with its battleships that is perhaps a bit OP or unrealistic is to use them for shore bombardment turn after turn. So if you're playing Entente, should you go crazy with shore bombardment? Up to you.

One thing the AI does seem to do properly with its surface ships is use them for supply. If there is ever a pocket of unsupplied troops on the coast (happens a lot around Antwerp and Calais), the AI will park a ship offshore, which provides supply for the adjacent unit.
Sea Transport
Transports
There isn't a lot to know about the mechanics of usings transports, other than it takes a long time. It takes even longer if you screw up a step and lose a turn though. Here's the process:

  • Turn 1: Move your unit into a port city. The unit must be in the port at the beginning of a turn in order to board transports. This step is easy to screw up if there's another unit or small garrison already in the port. OK, maybe it isn't a problem for you, but I screwed it up more than once.
  • Turn 2: Select your unit and move it into one of the adjacent hexes with a small anchor. This consumes all your movement points.
  • Turn 3: Move your transport to a coastal hex adjacent to where you intend to disembark. This will take one or more turns depending on how far away it is.
  • Turn 4: Move the "transport" onto an adjacent land hex. This consumes all your movement points.

So it takes a minimum 3-4 turns to load a unit on a transport and move it anywhere. Other things to know about transports:

  • The AI puts a high priority on attacking transports. If it spots a transport, it will kamikaze battleships even in order to attack the transport.
  • You can screen the hex where the transport appears with other ships so that the AI can't directly attack the transport.
  • The AI will position subs off your ports where it thinks you might be loading up a transport. This messes up your plan to screen your embarkation.
  • You'd best screen your debarkation hex as well so that enemy ships don't attack your transport before it unloads.
  • Be careful about your choice of debarkation hex. Don't pick a spot where you only have one choice of where to move if it's possible the enemy might occupy that hex before the next turn.
  • A unit's efficiency drops the longer it's at sea. Don't count on being ready to fight the turn after you disembark unless it was just a one-turn hop (e.g. a trip across the channel).

Amphibious Assaults and Invasions
As far as the mechanics go, the only difference betwee a transport mission and what the game calls an amphibious assault mission is that in the latter, you debark into an enemy-held hex.

There isn't a lot to say about an amphibious assault as such, other than you'd better weaken the defender substantially or the assault will fail. The more important distinction to talk about is whether or not you're debarking into territory behind enemy lines without a proper supply line (i.e. performing an invasion). For that, it isn't necessary that your debarkation hex is itself actually enemy occupied, and obviously you'd rather that it wasn't. An invasion requires a lot more strategy and planning than a regular transport mission.

In an invasion, there's the question of how large a force you will face and how soon, and will you be getting support from elsewhere or do all reinforcements need to come by sea as well. Remembering the steps of loading and moving a transport, you need to have enough TC (transport capacity) available to have more than one transport at sea at a time, unless one unit every 4+ turns is an adequate reinforcement rate for you.

Also, is this a possibly doable flanking invasion like Anzio or a fiasco like Gallipoli? Remember that you'll only be able to maintain full supply for units that stay tethered to the coast with ships next to them, and even if you capture a city, so long as you're still in an isolated pocket you only have half supply from the city. You won't have full supply until you either capture a capital, or you hook up with other forces that have a proper supply line.

You can easily play a "normal" game without ever bothering to think about invasions. Maybe if you declare war on certain neutrals you'll actually need to perform one.
Grand Strategy
So far, most of this guide has dealt with operational issues: how to maintain a front, rotate troops in and out of the line, conduct attacks, escort convoys, and so forth. However, a few sections have focused on specific elements of strategy such as research and production.

Grand Strategy is the overall plan - the big picture. Without getting all the way down into the details of when and where each unit will move, how do you intend to win the war? What do you expect to accomplish on each front? What role will each country play in its alliance? Before you start moving units around and hitting "end turn," spend some time thinking about your plan.

AI or Human Opponent

As much as the AI might have terrorized you during your first game, once you master the basics of attacking and defending along a front, you'll soon see that the AI is far from perfect. On land, It does a very good job of managing the front so long as it has enough units to maintain a continuous line backed with at least a few reserves. Once it has holes in its lines that it can't fill though, the AI's play becomes much more erratic. You'll see it frantically shuffling units back and forth between fronts, and it isn't very good at recognizing where it needs to fall back to shorten its lines or avoid encirclement. So, if you can keep the AI starved for units, the end will be near.

At sea, the AI does some things surprisingly well at times, but always making wise decisions with your naval units is much more difficult than managing units along a front. One problem is that it seems the AI doesn't account so well for forces it can't see. Wargaming veterans might leap up and shout "Hallelujah! An AI that doesn't cheat by knowing where everything is!" But there's a difference between always knowing the exact location of an unseen unit, knowing it's out there somewhere, and it doesn't exist if you can't see it. It seems we've moved from one extreme to the other. Another problem is that the consequences of one "reckless" move can be much more far-reaching at sea: losing a garrison unit isn't a big deal, but losing a battleship sure is.

Anyway, the point is you probably don't need to read these next sections on strategy just to beat the AI. Hopefully though you'll find it an interesting read, and perhaps someday it might even be of some use if you take on a human opponent.

Roles of Countries

Some countries are better suited to certain tasks than others. Some of this is obvious: the British have a strong fleet, so they should be responsible for getting their own convoys to England. Other things are not so clear. For example, the Russians have a Baltic fleet - does that mean they should be responsible for interdicting the German convoy in the Baltic? It's also in their front yard, so to speak. But does that mean they need to research naval techs and produce more naval units to fight for control of the Baltic sea lanes?

It isn't necessary for every country to research and produce units of every type. In the Baltic example, maybe the Russians should drop naval research and focus on their army. If they do though, who will take care of the German Baltic convoy? Should British submarines get the job or Russian airships? Whichever it is, you'll need to plan ahead for the right research and production.

Naval Strategy

A good place to start in establishing your grand strategy is to decide your maritime strategy. The mission of a navy is twofold: control of the seas, and projection of power ashore. Examine each of your countries and decide if it actually needs to do either of these things. In reality countries like Austria, Italy, and Russia had maritime interests and had built fleets to protect those interests. However, the composition of many navies was less a matter of being able to accomplish an essential mission than it was a contest for national prestige.

In the game, nobody except the British, French, and Germans have any sea trade. So for example, what can the Austrians hope to accomplish with their navy? Do they contemplate needing to transport troops by sea, or are they expecting to conduct an invasion? The only sensible use for the Austrian navy is to interdict, or at least threaten British and French naval missions in the Central Mediterranian. Do they need more naval research or production to do that, or would the effort be better spent on their army?

Because of the potential loss of national morale, the Austrians shouldn't risk losing their battleship; and their cruiser is not worth losing just to attack one convoy. So aside from maybe making submarine attacks, preferably without exposure to an escort, the best thing for the Austrians to do might be to just maintain their existing naval units as a threat. That would force the British to escort any convoys or transports in the Med. Or at least that would be a valid strategy to use against a human opponent - against the poor naval AI it might be pointless.

Army Strategy

Your army strategy mostly depends on geography and manpower. If you start out with very limited manpower, like the British or Serbs, early losses can hamstring your production and troop quality. Therefore the Serbs shouldn't plan any big offensives. Unless the Central Powers are collapsing on all fronts and the game is essentially over, they can't afford the troop losses. They need to keep their front short, husband their strength, and hope they can field enough units if the Bulgarians enter the war.

With Serbia, at least you don't have to make decisions about airplane and vehicle labs. If you have a lot of manpower and a very long front like the Russians though, should you forget about planes and tanks and just worry about your infantry? After you've fielded all the ground units you'll need just to keep your front covered, is researching and producing a small number of advanced bombers going to give you the edge, or is that more likely to come from upgrading all that infantry after putting your research into focused infantry techs instead?
Entente Alliance Strategy
Serbia

Serbia's main job should be just staying alive. A secondary goal is to tie down enemy troops along the front. As mentioned in the previous section, Serbia's limited manpower means it can't afford losses. Since the AI loves to attrit any garrison units it sees, you should try to man your entire line with regular infantry. Once you've done this, the AI is likely to mostly leave you alone on this front.

If the AI has pulled a bunch of units off the Balkan front, resist the temptation to start any offensive push to the north. If the opportunity presents, go ahead and take Cattaro, Sarejevo, and Split - you can do that without lengthening your lines.

Be ready to field more units if it looks like Bulgaria is going to enter the war. This is going to put a real strain on your manpower, and you might even need to bring in some help from your allies via sea transport. BTW, this happened in the real campaign (see Macedonian front[en.wikipedia.org]).

If you're not going to be conducting a lot of attacks, artillery doesn't do you much good. Sure, you might use it on some counter-attacks, and you could research counter-battery fire techs, but chances are you're not going to get enough use out of it to be worthwhile. Consider closing your artillery lab and focusing on basic infantry techs instead.

Belgium
There's not really much to say about Belgium. Liege will fall before your first turn and Brussels most likely on the second. Whether or not you hang on to Antwerp probably depends less on your play than on the competence of the German attack.

Remember that a cruiser offshore can keep Antwerp in full supply if it gets cut off.

France

As long as the French navy is around, it can keep an eye on the Austrian navy and help with convoy escort duties in the Mediterranean. Beyond that though, the French should probably leave all the naval work to the British and close their naval lab. Their responsibility is providing nearly all the ground forces on the Western front.

The Western front at its shortest will be 7 hexes long, but more typically will be in the range of 10-14 hexes long. Initially, the French should want to work towards having at least 14 infantry units available to man the front lines. At the beginning of the game they may need to produce some garrison units just to keep the holes filled. They may even really need 2-3 BEF units to help stem the initial German advance, but they should try to stop producing garrisons and produce infantry instead as soon as possible.

Both the British and French will need to produce artillery units and increase their ammo production. All the artillery techs will be useful to the French. The counter-battery and gas techs research fairly quickly, so there isn't much need to focus either of them. The railroad gun takes a really long time, so if you want it, you should probably focus it at some point.

The French will probably want to build both fighters and bombers. Since they already have bomber tech available from the beginning, there's not much need for them to build airships. Bombers, especially with fully-upgraded tech, are much better at land and strategic attacks, which is what the French need. It would be nice to be able to unfocus a tech, but since you can't do that, the next best thing is to alternate focus on fighter and bomber techs.

Airships are very good at anti-ship and ASW duty. The French do have a convoy to protect, but that's a job that could be left to the British, so there's no need for the French to build airships as well.

The French could also forego vehicle research. With the front as congested as it is, they don't need armored cars; and if the British make some tanks, there's no need for the French to build those either.

Britain

At the beginning of the war, the British should stick to defending what they have (i.e. Egypt). They simply can't risk early casualties that could drop them below a manpower quality threshold. Later on, if they've been receiving an uninterrupted flow of colonial manpower from convoys, they can consider getting more adventuresome.

Except for during the first few turns, the BEF isn't really needed in France. Later on, those units may need to be pulled off the Western front if an attack is launched on Palestine or Iraq, or if reinforcements are needed in Serbia.

If the British contribute on the Western front, it should probably be with a few artillery and fighter units. Britain and France need to split duty on the artillery since it's cheaper for each of them to make half the ammo, rather than one of them try to make twice as much.

Britain's main job is protecting all the alliance's convoys, and destroying the German ones. Perhaps suprisingly though, this doesn't mean the British should build more surface ships or invest in surface ship tech. Submarines make good convoy escorts, and they're quite a bit quicker and cheaper to build. It may seem cheesy to completely "block out" submarine attacks with other submarines, but really, it isn't any cheesier than doing it with surface ships. After all, the game doesn't represent the use of armed merchantmen, which was actually the predominant response to merchant shipping attacks before convoys were instituted in 1917. Nor does it model the effect and elusiveness of surface raiders. Anyway, cruisers weren't used as convoy escorts and a submarine unit is similar enough in strength and function to some hypothetical "destroyer escort" unit to serve the purpose.

So, the British should build and improve submarines to serve as their convoy escorts and to hunt and destroy all the German convoys.

The other thing the British should do to keep the sea lanes open and maintain their sea superiority is build airships. If they're going to build fighters for the Western front, focus can be alternated between fighters and airships, otherwise just focus on the airships.

If the alliance wants to build tanks, the British are probably the best choice to do it. Assuming their convoys are getting through, they're the ones that have the PP to spare for vehicle research and tank production. The British also are the ones most likely to get good use out of armored cars - in the deserts of the Middle East.

Russia

Russia is in the best position to conduct a war of attrition. This means that they don't necessarily need to have superior quality troops, or advanced support units like planes, tanks, and artillery; they don't need spectacular victories, encirclements, or even territorial gains - it will suffice to simply have enough infantry and cavalry to constantly attack the enemy and inflict losses on him turn after turn. The only other thing they'll need is replacements - lots of replacements.

Russia doesn't need its navy for anything, so it should sell its naval lab immediately. The aircraft and vehicle labs could be sold as well. On the Eastern front, the Russians can get by fine with just artillery and basic aircraft to support their infantry and cavalry. They will want to keep the artillery lab though, because it's just so darn good.
Central Powers Strategy
28 Comments
Bugscuttle 1 Mar, 2023 @ 12:50pm 
This guide helped me decide to buy this game. And read the manual . And keep trying. And not rage quit. So thank you!
Lieutenant Gregory Stevens 2 Feb, 2023 @ 6:40pm 
Exceptional guide. This will be useful as I plan my first campaigns, thank you.
Aetini 18 Jan, 2022 @ 6:29pm 
Manpower has rarely* been an issue for me, but obviously the longer it goes on, the more you do attacks which have losses, and the more the enemy does attacks to cause losses on you... the more it will hurt.

Once you are in yellow or god forbid red I believe eventually manpower eats into your production power. The guide already goes into this a bit.

In games as the Central Powers I've seen generally the Ottomans go into the red in manpower first, then the Austrian-Hungarians. This can be countered by just not building as many infantry units and getting rid of garrison armies (and sometimes even replacing them infantry armies) ... but it can't be helped if you need to replace combat losses... which will begin to mount up.

Perhaps the surprising thing is its not Germany, in my games, which hits Yellow or Red often despite it being involved in some of the fiercest fighting with most units. I blame the lower manpower pools of Austria-Hungary and Ottomans.
joe cool 28 Aug, 2021 @ 5:59pm 
I've played a lot of this game, manpower has NEVER been an issue, its always been pp per turn
the_rock0123 24 Mar, 2020 @ 12:25pm 
Good job! Thank you. Very detailed guide.
Sputnik 6 Jan, 2020 @ 11:14am 
Great guide thank you mate
Kiffeh 24 Apr, 2018 @ 10:17pm 
I really needed some kind of comprehensive guide to wrap my head around this one. You are a gentleman and a scholar sir.
Junio V.B. 31 Dec, 2017 @ 2:08pm 
Thank you for your guide: a useful set of really needed hints.
The front examples are awesome.

Aussie 27 Jun, 2017 @ 2:26am 
Great guide good job commander
Heidrun The Goat 29 May, 2017 @ 2:11am 
any basic tips for Central Powers yet? i find them to be night and day harder. Also, it might help to explain to new people upgrading units and how units become able to be upgraded.