Orcs Must Die! 3

Orcs Must Die! 3

367 ratings
Rift Lord's Guidebook (Walkthrough, Traps, War Machines, Weapons, Trinkets, Enemies, Trap Ideas, Loadouts)
By Minoru
This is an extensive guide covering the basic aspects of the game: traps, war machines, weapons, trinkets, enemies and basic strategies. This is a guide aimed at people wanting to know about what a certain piece of game equipment does, or others maybe looking for a second opinion about a weapon or a trap.

This is an unofficial guide with no ties or any support from Robot Entertainment created solely by me. It does not aim to be perfect and cover every aspect and quirk of the game; it is mostly my opinion and general overview of basic and some advanced things in Orcs Must Die! 3.
9
3
30
7
4
2
3
4
2
2
   
Award
Favorite
Favorited
Unfavorite
⭐ Opening & Introduction

Please remember to rate this guide so it can reach more people.

How up to date is this guide? (YYYY/MM/DD)
  • First version of the guide released. 2021/07/23
  • Updated with balance changes. 2021/08/11
  • Updated with Cold as Eyes DLC info. 2021/11/11
  • Updated with balance changes. v.1.1.1.0. 2022/01/20
  • Updated with Tipping the Scales DLC info. v1.2.0.0 2022/04/07
  • Updated with Trap price changes and then some. v1.2.1.0. 2023/06/05


It doesn't matter if you're a newcomer or a veteran to the series. Welcome to my guide.
____________________________________________

What is this guide about?
As I mentioned in the preface, this is a guide aimed at both newcomers looking to understand what a certain trap or weapon does, or maybe more seasoned players looking for a second opinion.

Simply put this guide is the results of my experiences with the game, my experiments with traps and weapons fighting every type of enemy in many situations. Everything here is liable to change with time and as I learn more about the game, or if any patches changes the balance of the game.

What is this guide NOT about?
It is NOT about Endless.
I may cover some very basic aspects of this game mode, but you will not find any deep or complex strategy on it here since, being very honest: Endless bores me to tears.

This is NOT about combo making nor high scoring.
Like the above I may give some offhanded tips about it, but I won't be covering this subject extensively since I was never interested in high scoring at all.

Are you going to teach me how to 'win at the game'?
No. This guide is here to maybe give you pointers and let you try and see what could work best for you.

"I need help with [insert map name here]!"
"Where's the walkthrough with all maps?"
Refer to the "Walkthrough" section, the last one of the guide. I'll also leave a link with a playlist with every map completed on Rift Lord difficulty below.

Do keep in mind that this is just how I beat the maps, if you feel you can improve upon it or adapt it to your playstyle, please do it.
https://www.youtube.com/playlist?list=PLS7CYzATG6xA7lGNZVfCTxWmCFG31ERqC

Are there any plans to change this guide further?
Only if any other DLCs or balancing patches are released.

Sometimes I change my opinion especially about traps and weapons and I will change descriptions at my own discretion.


The Order has its fair share of legends. Are you ready to become the next one?
✍ Guide Credits
Me!
Responsible for:
Guide creation, writing, management, researching, proofreading, image gatherering. Basically everything.

Guide creator, editor and updater, and someone pointlessly dedicated to this game. That's about it, I guess.

Other guides by me:
This is not my first guide like this, I've also written many other extensive guides, and among these guides there is one about Orcs Must Die! 2, and many other games of this very peculiar genre that is Tower Defense/Action.
http://steamproxy.net/sharedfiles/filedetails/?id=321647347 http://steamproxy.net/sharedfiles/filedetails/?id=505739685 http://steamproxy.net/sharedfiles/filedetails/?id=482075212 http://steamproxy.net/sharedfiles/filedetails/?id=621968802 http://steamproxy.net/sharedfiles/filedetails/?id=729779266
📚 Table of Contents
  1. 🔰 Hints and Tips:
    General hints, advice and pointers about several aspects or game modes, and some for co-op too.

  2. 👑 Advanced Hints and Tips:
    Hints and Tips regarding 5-Skulling, Rift Lord difficulty. For those who want directions, but not straight up "how to" video guides.

  3. 💬 Characters:
    The six heroes of Orcs Must Die! 3 explained. Their special abilities and health and mana detailed.

  4. 📙 Traps:
    Want to know what something does before spending your skull on it? This is your section. It's divided in categories (Wall, Floor, Ceiling) alphabetically for your convenience.

  5. 📒 War Machines:
    The meaner, oversized, traps used in War Scenarios. Sorted just like Traps.

  6. ⚔️ Weapons:
    Your tools of trade, what you'll use to fight the Orc horde directly.

  7. 💍 Trinkets:
    Small equipment which are not mandatory nor necessary, but can give you an edge in battle.

  8. 📓 Weapon Loadouts (Builds):
    Just for fun. Suggestions of combination of weapons and trinkets I use. Might make people who goes with a single weapon raise an eyebrow.

  9. 💡 Trap Ideas (Builds):
    Again, just for fun. A few of the ideas for trap combinations I use here and there. Keep in mind it can always be slightly altered to suit the needs depending on the weapon loadout or the map.

  10. 📕 Enemies:
    Know what you'll fight here. While the game gives a small description for them I'll go in detail about their traits and weaknesses.

  11. 💯 Advanced Hints and Tips: Scramble Mode
    Small tidbits about Scramble Mode and some of its more unintuitive debuffs.

  12. 👣 Rift Lord Walkthrough:
    How I beat maps here and there. Not a strict guide, but it can help you if you're stuck.
🔰 Hints and Tips: Basics and General
Be prepared:
Before we move to the main course of the guide (traps, weapons and trinkets) I'll leave some Hints and Tips here, and more about Rift Lord below.

Aim for their heads!
This is one of the things that beginners may not notice right away is that almost every ranged weapon can deal Headshots-- which means almost all of them can deal far more damage in a short spam of time if you aim at the head of enemies.

Of course headshotting every single enemy is nigh impossible, but it's a very practical way to handle heavy threats like Ogres and Trolls.

The few ranged weapons that cannot deal Headshots are the Flame Bracers, the Ice Amulet and the Alchemist's Satchel.


The headshot icon. A sharp sound will also play whenever you score a successful headshot. Weapons with high fire rate can score several headshots in quick succession.
____________________________________________

Skull Refunds!
Refunds are unlimited and should be used shamelessly as long as you don't have enough Skulls to upgrade everything. Especially if you want to try out new traps and new strategies.

However do keep in mind that you CANNOT refund skulls when you buy an item to unlock it. It's a permanent deal.


Use this with impunity.
____________________________________________

Mana Conservation


Mana is used for most of the stronger attacks at your disposal and regenerates at moderate pace, but you can drain it almost instantly if you spam attacks that consume it.

Some of these attacks are potent and you might be tempeted to spam it, but you can put yourself in a really bad situation if you do this. Knowing when to blast your best attacks and having some self-control generally makes a lot of maps much easier to deal with.

It's also good to save Mana for particularly pesky enemies like Cyclops Mages, Armored Ogres and Gnolls.
🔰 Hints and Tips: Basics, the not-so-obvious
Early advantage


Fighting enemies on early waves as close to the spawn point as possible helps in many things, since your trap setup might be precarious attacking them as soon as you can will help you kill more stuff early and help you prevent from being overwhelmed.


Attacking as early as possible has the added benefit of helping, sometimes a lot, with Par Time for 5-Skulls.
____________________________________________

Rift Healing: a War Mage's best friend.
Standing close to the rift will give you a potent healing effect that might keep you alive and kicking. This is particularly useful to hold enemies pressuring you close to the rift.

It might be tempting to build everything around your rift because of that but keep in mind that if you're aiming for Perfect Victories you'll mostly likely miss Par Time since they are much more strict this time around and forces you to build closer to enemy spawn points.

You can also quickly run back to the rift to patch yourself up too, although this can be more difficult in Rift Lord with the very limited time between waves.


When close enough to the rift you'll gain a powerful healing and a very small Mana regeneration boost.
____________________________________________

Why enemies are attacking my Barricades?

Because of this. This is one of the examples that are best explained with images:


Example of a WRONG placement, with only half trap space. Big enemies like Ogres and Trolls WILL attack the Barricades. This also includes diagonal spaces.


I can't stress this enough: be EXTREMELY careful when building Barricades near pillars and diagonally as a misplaced Barricade will make enemies attack the nearest Barricade.


When in doubt always use regular sized traps like Spike Trap, Tar or Brimstone to make sure you have the spacing correct.
____________________________________________

"Death... Does truly suck."
Unlike previous games, Orcs Must Die! 3 does not punish you heavily for dying-- which is good since your character are still as squishy and enemies are even more aggressive this time around.

Penalties you get for dying is being kicked back to the rift and enemies getting the Rift Rush effect-- they'll move faster and ignore anything that would aggro them (Decoys, Guardians) until you respawn.

As fun as it sounds jumping into large crowds of enemies like a glorious berserker using your Bladestaff to hack and slash everything you might not want to get kicked back to the Rift if your trap course is far from it, as enemies can use the time you're not there to power through your Traps.

WARNING:
Death doesn't take out Rift Points... Unless you're playing on Scramble Mode with a certain debuff. If you are, be very careful about it.
🗪 Hints and Tips: Co-op

Orcs Must Die!... and having a friend surely helps.
___________________________________________________________

Co-op = More enemies
Two people means twice as much firepower, but it also means nastier wave of enemies coming your way. Make sure to keep a solid strategy in mind: either focusing all forces in a single spot or leaving each other to take care of separated doors.

Concentrating the strength of two characters is obviously much safer since not only two characters kill things much faster, but if one of you dies accidentally the partner will be there to prevent things from getting out of hand.

Separated defense has its advantages too with the biggest one being the ability to clear waves faster and avoid any risks in losing the skull from the Par time. When playing like this you need to be attentive to what's happening and be ready to assist your partner in any way they need: be it from building an extra trap on their side or some direct assistance with you killing stuff for them.


Remember that co-op throws more enemies your way, so both of you need to be prepared for tougher waves with shared income.
___________________________________________________________

Selling each other's traps:
This can be a good thing, but also a source of frustration depending on who you're playing with. Be considerate and mindful if you're going to sell a trap placed from your partner (they will get a full refund), but doing it for no reason, especially in Rift Lord, or without some explicit warning can cause trouble for both of you.

But it helps to have a thicker skin and don't always think your partner is selling something because they think your trap setup is bad or anything. People always have different ideas or views on how traps should work.
___________________________________________________________

Communication: Pinging (or character voice emotes)
Pinging in this case means using the wheel to quickly alert your partner about things that are happening during the game through the voice emote ring. This is another reason to keep an eye on the mini-map whenever possible as a ping will be marked on it.

You can show your partner where to place Barricades or even ask for help in case something goes wrong for you, so it's always a good thing to keep in mind as this can help you coordinate yourselves much better, especially if your partner doesn't like to use voice chat.


The game will notify you with the character's own voice line. Be attentive to the mini-map as well to see where the warning came from.
🗺️ Hints and Tips: Mini-map
Mini-map, an unsung hero:
The mini-map is an important tool used for navigation during your battles and not only to see where you are at, you can use it to see many other things quickly.

Knowing how to make the best use of the mini-map often improves your reaction times and might even save a Perfect Victory in some cases. Keeping eye on the mini-map can help you catch a possible straggler (most likely a Kobold Runner or a Fire Fiend Runner) and prevent them from ruining everything.

Learning how to keep an eye on it during chaotic fights can be difficult, but will definitely help you become a better player in the long run, especially if you decide to venture into Rift Lord difficulty.


Often overlooked and uncredited, the mini-map plays a vital role in helping you fight the Orc mob.
_______________________________

Enemy pathing:
During the planning phases, also known as "Go Breaks" (which doesn't happen in Rift Lord), you can see which path the enemies will take through the white dots traveling across the map. Drastic Steps DLC adds flyers to the mix and the route they'll take are signalized by white triangles.
_______________________________

Knowing where enemies will spawn from:
One of its best features is that it indicates which doors enemies will spawn from.

Paying attention where enemies will come from helps a lot since sometimes one of the spawns will not be active in a particular wave which can help you save money as you won't need to fortify said spot.

What each color means:
Yellow doors are the ones that will be breached by enemies in this wave.
Red doors are the doors that will spawn enemies in he current wave.
Gray doors will not spawn enemies from it.


Pay attention to each door.
_______________________________

The importance of the mini-map in Co-op matches:
During co-op matches the mini-map also serves as a way to see where your partner is defending and how they are doing.

A good player is attentive to the map and they can quickly judge a situation and may notice if their partner is doing alright, or if they're having trouble with their enemies, or if they're about to lose control of the situation, or just in need of a quick assistance without needing to rush to their current position.
_______________________________

What each icon means in the mini-map:

White arrow - Your location
Blue arrow - Your partner's location/Your location when using a mountable War Machine

Orange squares - Barricades

White dots - Regular enemy path.
White triangle - Flying enemy path.

Red dots - Common enemies (Orcs and Fire Fiends).
Big red dots - Very heavy enemies (Ogres, Elementals, Trolls).
Red triangle - Flying enemies.

Red diamond - Gnolls Hunters.
Yellow diamond - Gnoll Grenadiers.

Yellow dots - Barricade breaking enemies (Kobold Sappers, Firelings, Dynamite Archers).

Star - Boss enemy.

Green dots - Potions and Coins.

Red doors - Active enemy spawn for this wave.
Gray doors - No enemies will spawn from that door.
Yellow doors - The door will be breached by enemies this wave.
🥇 Advanced Hints and Tips: 5 Skulls
What is needed for 5 Skulls?

Getting 5 Skull, aka the Perfect Victory, in all maps demands practice and training.

You need two things here:
1) NOT lose any rift points, which means not allowing any enemy reach the rift, yes that includes even the smallest Kobold.
2) Finish the map under the required Par Time. This means you have a certain time limit to beat it.
________________________________________________________________

Empty Rift Trinket: A safety net
Technically you shouldn't allow any enemies in the rift to get the 5 Skulls rank and the Perfect Victory.

Why "technically"?

Because there is the Empty Rift Trinket that, with the right upgrade, will let you slip 1 enemy, quite possibly a straggler, a Kobold of Fire Fiend Runner that got through your defenses, or if you're a bit more daring that one Armored Ogre/Mountain Troll/Elemental Lord you let slip on purpose because you didn't want to waste time dealing with it.
________________________________________________________________

Par Time issues:
Finishing the map under the required time isn't difficult on paper, but sometimes it is on practice.

If you're having trouble with Par Time consider building your killzones closer to the enemy spawn points, even right next to it in early waves if needed. Of course if you're playing on Rift Lord difficulty you'll have only 5 seconds to sell things once the last enemy in the wave dies.
👑 Advanced Hints and Tips: Rift Lord
What is Rift Lord?
Rift Lord is the highest difficulty available to the normal campaigns of the game, it was formerly known as Nightmare in Orcs Must Die! 1 and 2, but it was renamed in Unchained and remained like that now.

Rift Lord is a far greater challenge presented to players who have mastered the War Mage difficulty and is more than just cranking up enemy numbers and health up. Rift Lord is meant for players who are ready to face more difficult waves of enemies and put their trap setups and combat skills to true test.

Rift Lord is often seen as a game difficulty made only for the hardcore players and usually avoided by some of the less experienced ones, and it's easy to see why people think that way due to how overwhelming the pace can feel compared to War Mage, it will feel like you went from a light jog to sprinting for your dear life the entire match.

However most of the pressure weights you down until you get your brain in gear and adapt to Rift Lord.


List of changes from Rift Lord to War Mage difficulty:
  • Enemies have more Health and hit harder.
  • Enemies are more numerous.
  • Rift Points are cut in half.
  • You only get 5 seconds of pause between waves to sell traps.
  • There are NO "Go Breaks", pauses where you have to manually start the next wave. That means no recovery in-between waves, and very little time to sell or replace traps.
  • Modified waves; stronger enemies appear much earlier. Ex: Armored Ogres show up in the first map.
  • Every Orc (Light, Medium and Heavy) will carry shields that allows them to tank the first hit against them.


Rift Lord is basically how the game tells you that it's done playing around. Everything you faced on War Mage you'll face with a bigger difficulty in Rift Lord.
________________________________________________________________

Rift Lord, a matter of time (mostly)
The biggest change from War Mage difficulty to Rift Lord is the fact you DO NOT have any "Go Breaks", those where you have to manually initiate the wave, anymore.

You also get only FIVE SECONDS of rest between waves, so fixing mistakes and selling traps to replace them from one point to another might be difficult unless you're really quick.

The pace can feel overwhelming at first and will force some habits out of you if you want to play efficiently in it. Getting your brain in gear is also necessary for it since playing in this difficulty as you played on lower difficulties will often get you into trouble.

Keep in mind that the lack of "Go Breaks" also brings some unintended difficulties as Guardians Archers and those from the Bank of Archers will NOT be resurrected at the end of any wave at all, so you'll need to be really careful with them.

Tip:
If you really need to sell a bad placed trap, Barricade or just replace something with a better trap you can lure (i.e: kite) the last enemy towards the place you want before finishing it off. This works with every non-passive enemy like Runners.


At first it will be tough, but you'll eventually learn to let one or two enemies alive to sell your traps quickly if you need to.
________________________________________________________________

Be prepared for stronger enemies earlier on
Enemies like Armored Ogres and Gnoll Hunters/Grenediers will show up earlier with the former appearing in the very first map of the game during Rift Lord, so make sure you have something to handle them.
________________________________________________________________

Orcs with shields: Do NOT underestimate them.
Besides being stronger (health and damage wise) than usual, every Orc will carry shields with them in Rift Lord.

The shield Orcs have in Rift Lord allows them to tank the first hit with near impunity, they still can be afflicted by status conditions (burn, freeze, fear), but they will not take damage be it from a single arrow from the Magic Longbow or a massive explosion from the Mega Boom Barrel Launcher.

This isn't usually a problem with weapons with high attack rates, or traps that hit more than once, but for anything else it's a nightmare. Since every Orc will be carrying shields they can make some traps like Brimstone and Shock Zapper much less effective and weapons that require Mana like the Ice Amulet and the Flame Bracers lose effectiveness too.

Tip:
Ceiling Lasers and Briar Patches are perfect traps to get these pesky shields off the hands of the Orcs. Generally speaking traps that does constant damage, like the Gravity Pillar, also work wonders against shielded Orcs.

It's not a bad idea to just go out attacking Orcs simply to pry off theirs shields before they reach your killzone.


One Orc with a shield wouldn't be a problem. An army with shields? You can bet it can be.
________________________________________________________________

Tough early waves?
With the increased number of enemies coming at you the Rift Lord difficulty can easily catch you off-guard. So if you're having trouble surviving the first waves try using crowd control tools until you can get your defenses running proper.

Suggestions:
Trinkets: Empty Rift Trinket, Mana Rage Trinket (with the right weapons), Jar of Ghosts.
Weapons: Stone Staff, Wind Belt, Ice Amulet.
________________________________________________________________

Learning and adapting
Learning how to quickly set traps during combat will be one of the earliest lessons Rift Lord will teach you. The other will be selling your traps in the measly five second pause each wave gives you.

Setting traps during intense combat can be annoying for some and it's very easy to misplace something or select a trap you didn't mean to set yet.

The latter aspect in particular makes it rather difficult to set traps in one place and then swap to another if you liked doing that to deal with maps with more than one spawn point. It's possible but you'll have to be very fast.


Building during combat can be difficult, but it becomes a necessity in Rift Lord.
________________________________________________________________

Planning somewhat ahead
It's always good to more or less have a plan in mind, but be always ready to improvise because somethings can (and trust me, they might) go wrong in Rift Lord. And due to the ridiculous low time you have to prepare yourself between waves it's always good to know what you're going to do next as you don't have a lot of time to make major changes to your trap course.
💬 Characters: Health and Mana
Characters have different amounts of health and mana, so it's something to consider when picking them.

The character with more Health are: Vorwick, Kelsey and Max.
The character with more Mana are: Cygnus, Egan and Gabriella.


The health loss was meticulously calculated by an Armored Ogre's club in Rift Lord difficulty.
The mana loss was from the Ice Amulet secondary, probably the most mana heavy weapon in the game.


Egan
Kelsey
Cygnus
Vorwick
Max
Gabriella
Health
135
175
125
185
165
150
Mana
165
125
175
115
135
150
Special thanks to the Orcs Must Die! Wiki for this specific information.[orcsmustdie.fandom.com]
💬 Characters: Special Abilities
Orcs Must Die! 3 offers more than two characters to play around this time. However, you must complete the Campaign in any difficulty first to be able to use all of them freely, and swap their default weapons as well.

Each character does have one an unique ability called "Special Movement Ability" that is activated by double jumping, each of them works differently, so be careful not to try to use one ability with another character.


We're not missing anyone here... right?
______________________________________

Kelsey
"That right there-- should be extra credit!"

Voiced by: Kara Edwards
Default Weapon: Blunderbuss

Special Movement Ability: Levitate (Mana regeneration stops) & Air Walking (costs Mana)

Kelsey has more health than Egan which makes her a more favorable choice for close combat, however her Mana pool is lower compared to his.

Kelsey's special ability allows her to stay afloat in the air for indefinite periods of time, but it will cancel your natural Mana regeneration and you are vulnerable to ranged attacks. You can use to cross some gaps but beware that it also uses Mana while Kelsey is moving.


Kelsey's ability can let her attack enemies from better angles and keep her in the right height for easy headshots on bigger foes. Beware that it will stop the Mana regeneration while standing still and will quickly drain your Mana if you move.
______________________________________

Egan
"One for Team Order!"

Voiced by: Gabe Kunda
Default Weapon: Magic Longbow

Special Movement Ability: Ground Pound (costs Mana)

Egan has more Mana than Kelsey making him a better choice if you like to favor weapons that use more Mana.

Egan's special ability also consumes Mana to use, it can be used to Stun enemies around an area. The ability also knock enemies off their feet, so you can use it as a makeshift "get off me" move against most enemies, or use it to knock down some enemies and beat them with weapons that has no knockdown capabilities.

Tip:
Egan's ability deals damage and stun enemies. It also applies an unique counter to combos as well.


Egan's ability Stuns big and small enemies alike, but only small enemies will be thrown around.
______________________________________

Cygnus
"Yes. I am prepared."

Voiced by: Ian Sinclair
Default Weapon: Chain Lightning Staff

Special Movement Ability: Feign Death

Cygnus has the highest Mana pool of all characters in the roster, however he's the most fragile character with Armored Ogres being able to down him in two hits.

Cygnus' special ability allows him to recover health by playing dead on the ground. More than that it will make enemies forget about him which is nice to get you out of a pinch. It also increases Mana regeneration by a small bit, ever so slightly, so maybe this can help a little. Who knows.

Tip:
Cygnus' ability is more than meets the eye. You can cancel the charge attack of Ogres, avoid the explosion of Dynamite Archers and even Cyclops Mage's homing projectile with it. Gnolls will also ignore you and head to the rift (and they don't take rift points away), which is particularly useful in late Endless matches.


At first glance Cygnus' ability seems nearly useless compared to others, but you can use it to get enemies off your back or even stay put to ambush a specific enemy/enemy group in the middle of a big fight.
______________________________________

Vorwick
"The Order will be protected!"

Voiced by: Daman Mills
Default Weapon: Elven Shortswords

Special Movement Ability: Teleport

Vorwick is the character with the highest Health pool out of the six heroes available, however this comes with the problem of having the lowest Mana pool.

Vorwick's special ability allows him to quickly travel horizontally across the map. The fact you can more or less spam it makes it faster than sprinting and you can use the teleport to get out of a hairy situation quickly as well. Be mindful of the distance as you can accidentally throw yourself into a pit if you're not careful.

Tips:
It's important to take note that Vorwick's teleport cannot go through enemies or obstacles. It can also be obstructed by traps like Dart Spitters and Haymakers.

The teleport will not be affected by a Gnoll Hunter's slowing attack, so you can use it to get away from them.


Vorwick's ability can be used to quickly travel to certain locations, escape Gnolls or reach a problematic target like an Archer harassing you.
______________________________________

Maximilian, the War Mage
"Max is handsome, sort of smart-ish-- he kills lots of ooooorcs~♫"

Voiced by: Rob McCollum
Signature Weapon: Crossbow

Special Movement Ability: Double Jump

Max stands in the middle ground having balanced Health and Mana. He has slightly less health than Kelsey, but slightly more Mana. Max is still tankier than Gabriella too.

Max's special ability returns from his old days as Miner; the simple, but practical Double Jump that can help you cross large gaps and gain some height, also being a good maneuver to jump in or out of battle as you feel like.


The double jump is as simple as it gets. You can cross larger gaps or jump over enemies to reach your desired location faster.
______________________________________

Gabriella, the Sorceress
"Almost forgot how powerful I can be..."

Voiced by: Colleen Clinkerbeard
Signature Weapon: Scepter of Domination

Special Movement Ability: Feather Fall

Gabriella parallels Egan in status having a little bit more Health, but a bit less Mana.

Gabriella's special ability is her Feather Fall, she can considerably slow her descent. There aren't many maps with high places to make good use of this ability, though.


Feather Fall lets you analyse a situation before jumping into it.
🔓 Tidbit: Unlock Progression
Some of the equipment you can get in the game will be locked until a particular level has been finished at least once. A good reminder is that levels completed on the Apprentice difficulty will unlock the next piece of equipment, so if you're aiming for a particular Weapon or Trap you can beat it in that difficulty and go back to the previous level that was troubling you.


Unlocks through game progression are permanent and even better: they are free.


Example of things being unlocked through level completion. In this case the Ice Amulet weapon and the Rift Lord difficulty.


Some equipment can be bought and used at any given time, others will be only unlocked after beating a certain map for the first time.

Map:
Unlocks:
Type:
1 - North Wing
Gravity Pillar
Trap (Ceiling)
2 - Great Room
Tar
Trap (Floor)
3 - Side Entrance
Healing Trinket
Trinket
4 - Hidden Dock
Barricade
Trap (Floor)
5 - Split Stairs
Giant Flip Trap
Mega Boom Barrel Launcher
War Machine (Floor)
War Machine (Floor/Mountable)
6 - The Lava Pits
Ice Amulet
Rift Lord (Nightmare) difficulty
Weapon
Misc.
7 - Close Quarters
Guardian Archer
Trap (Guardian)
8 - Cliffside
Bank of Archers
War Outpost
War Machine (Guardian)
War Machine (Floor)
9 - Front Lawn
Spike Wall
Trap (Wall)
10 - Coastal Hallways
Wall Charger
Trap (Wall)
11 - Secret Fortress
Snow Blower
War Machine (Floor)
12 - Mage Tower
Mana Rage Trinket
Scramble Mode
Trinket
Misc.
13 - Master's Courtyard
Decoy
Trap (Floor)
14 - Sludge Shelves
Flame Bracers
Weapon
15 - Dragon Boneyard
Auto Ballista
Trap (Ceiling)
16 - The Basement
Swinging Mace
Trap (Ceiling)
17 - Coloseum
Bowling Boulder
War Machine (Wall)
18 - Order Temple
Gabriella + Scepter of Domination
Maximillian + Crossbow
Cygnus + Chain Lightning Staff
Vorwick + Elven Shortswords

Slot 1 to swap default weapons
Misc.
📙 Trap Tome
About the Traps:
A section dedicated to traps-- what they do, how they work and applications here and there.

Traps are what you'd consider "towers" in a regular Tower Defense game and are crucial to win. You'll need to learn, know and understand what traps work the best for you and this section is dedicated for this purpose and for players wanting a little heads up before spending their precious skulls.

As it is the norm with Orcs Must Die! the traps are separated in their distinct categories: Wall, Floor and Ceiling (no more exclusive category for Guardians, sadly). And each can be placed only in their respective surfaces, save for one special case.

Learning and customizing your trap courses is one of the most fun aspects of the game, so don't be afraid to test out anything, no matter how absurd it sounds or looks. You never know what you'll like and what will fit your playstyle.


Traps come in many varieties and types.

Trap with different types of activation:
Most traps activate once before having to reload, some of them, like the Arrow Wall, will fire more than once before starting to cooldown.

However there are some traps like Tar and the Ceiling Laser will be always active and will never to reload.


Traps like Arrow Walls and Spike trap are of the single fire type while traps like Tar will always affect ground enemies.

Different ranges for traps:
Before setting traps always make sure to check its range to avoid bad surprises, especially when it comes down to wall and ceiling traps.

Some traps like the Gravity Pillar and Ceiling Laser have infinite vertical range, and others like the Arrow Wall or the Saw Blade Launcher have limited activation range but its projectiles will travel much farther than its original range indicates.

Traps like the Arcane Dragon and Boom Barrel Dispenser act on their own without needing enemies to get into their range to trigger which can either work in your favor or against you depending on how you set them.

Grinders will always hit even fast enemies like Runners, but will need to "reload" after doing a certain amount of damage.

There's also traps like the Confusion lower and the Dart Spitter that has larger activation ranges than most traps which allows you to set them in different places to make your strategies work.


Some traps with different uniques have different ranges. Always check to avoid unwanted surprises.

Crowd Control Traps are important
What are crowd control traps? They're basically support traps, traps that while they usually don't deal damage, or deal a very modest amount of damage at best, they work wonders in hindering the progress of enemies or leave them vulnerable for other traps or your attacks.

Among these traps are Tar, Gravity Pillar, Confusion Flower, Window of Butterflies, Push Trap and Flip Trap. They can all be used in conjunction with other traps to create big and efficient killzones.

Remember: while killing Orcs is the key point of the game, killing them efficiently is probably even better. Damage is always good, but using crowd control traps and weapons will allow you to deal more damage to more enemies at once.


Test all types of crazy combinations you can think of. You never know if you're going to create a huge powerful killbox or a combo making heaven.

Floor Traps
  • Acid Geyser
  • Barricade
  • Brimstone
  • Confusion Flower
  • Decoy
  • Flip Trap
  • Floor Scorcher
  • Guardian Archer
  • Rip Saw
  • Spike Trap
  • Tar

Wall Traps
  • Arcane Dragon
  • Arrow Wall
  • Boom Barrel Dispenser
  • Deep Freeze
  • Grinder
  • Push Trap
  • Saw Blade Launcher
  • Spike Wall
  • Wall Blades
  • Wall Charger
  • Window of Butterflies

Ceiling Traps
  • Auto Ballista
  • Ceiling Laser
  • Ceiling Pounder
  • Dart Spitter
  • Gravity Pillar
  • Haymaker
  • Shock Zapper
  • Snow Cannon
  • Swinging Mace

DLC only
  • Molten Gold
  • Briar Patch
📜 Trap Tables (General)
OVERALL TABLE:
This thing ended up being so huge it needed its own section to fit the character limit.

Trap:
Surface to Place:
Damage Type:
Skulls to unlock:
Skulls to Upgrade:
Skulls to buy Unique:
Coins to build during maps:
Acid Geyser
Floor
Acid
6
4, 6, 8
8 — 8
600
Barricade
Floor
None
Game progression
4, 6, 8
6 — 6
700, 650, 600, 500

(+300 with Unique 2)
Brimstone
Floor
Fire

Arcane (with Unique 2)
7
3, 6, 9
6 — 6
800
Confusion Flower
Floor

Ceiling (with Unique 2)
None
6
4, 6, 8
7 — 7
700
Decoy
Floor
Physical
Game progression
4, 6, 8
5 — 5
500
Flip Trap
Floor
None
4
4, 5, 6
5 — 5
600, 550, 500, 400
Floor Scorcher
Floor
Fire
8
4, 6, 8
8 — 8
750
Guardian Archer
Floor
Physical

Fire (with Unique 2)
Game progression
4, 6, 9
6 — 6
1000
Rip Saw
Floor
Physical

Ice (with Unique 1)
5
3, 5, 8
7 — 7
700
Spike Trap
Floor
Physical (without Uniques)

Arcane (with Unique 1)

Lightning (with Unique 2)
Starter
3, 6, 8
5 — 5
300
Tar Trap
Floor
None
Game progression
4, 7, 9
7 — 8
450

Arrow Wall
Wall
Physical

Fire (with Unique 1)
Starter
3, 6, 8
5 — 5
600
Arcane Dragon
Wall
Arcane
10
5, 7, 9
7 — 7
800
Boom Barrel Dispenser
Wall
Physical
8
5, 6, 7
6 — 6
900, 850, 700, 750
Deep Freeze
Wall
Ice

Acid (with Unique 2)
6
5, 7, 9
6 — 6
800
Grinder
Wall
Physical
7
5, 6, 7
7 — 7
900
Push Trap
Wall
Physical
4
4, 5, 6
5 — 5
300
Saw Blade Launcher
Wall
Physical
10
4, 6, 8
7 — 7
650
Spike Wall
Wall
Physical
Game progression
4, 6, 8
8 — 8
650
Wall Blades
Wall
Physical
6
3, 5, 7
6 — 6
750
Wall Charger
Wall
Lightning
Game progression
4, 6, 8
6 — 6
900
Window of Butterflies
Wall
None

Arcane (with Unique 1)
5
3, 6, 9
7 — 7
700, 650, 600, 550

Auto Ballista
Ceiling
Physical

Arcane (with Unique 1)
Game progression
4, 8, 10
6 — 6
750
Ceiling Laser
Ceiling
Lightning

Fire (with Unique 2)
8
4, 6, 8
7 — 7
900, 850, 800, 750
Ceiling Pounder
Ceiling
Physical
5
4, 6, 8
6 — 6
500
Dart Spitter
Ceiling
Physical

Ice (with Unique 1)
6
4, 6, 8
7 — 7
800
Gravity Pillar
Ceiling
Physical
Game progression
5, 7, 9
6 — 6
700
Haymaker
Ceiling
Physical
5
4, 5, 6
6 — 6
700
Shock Zapper
Ceiling
Lightning
7
5, 6, 7
6 — 6
800
Snow Cannon
Ceiling
Ice

Acid (with Unique 1)
7
3, 5, 7
6 — 6
1000
Swinging Mace
Ceiling
Physical

Fire (with Unique 2)
Game progression
5, 7, 9
7 — 7
1000

Molten Gold
Ceiling
Physical
Cold as Eyes DLC
5, 5, 5
5 — 5
500
Briar Patch
Floor
Physical
Tipping the Scales DLC
5, 5, 5
5 — 5
1000

850 (with Unique 2)
🔐 Trap Tables (Unlock Requirements)
Milestones to unlock Unique upgrades:
Trap:
Surface:
Condition to Unlock:
Acid Geyser
Floor
Deal 5000 damage.
Barricade
Floor
Place 15 Barricades.
Brimstone
Floor
Deal 1000 damage.
Confusion Flower
Floor/Ceiling
Confuse 100 enemies.
Decoy
Floor
Deal 2000 damage.
Flip Trap
Floor
Trigger 40 times.
Floor Scorcher
Floor/Wall
Burn 120 enemies.
Guardian Archer
Floor (Guardian)
Kill 50 enemies.
Rip Saw
Floor
Kill 50 enemies.
Spike Trap
Floor
Kill 50 enemies
Tar Trap
Floor
Slow enemies for 600 seconds.

Arrow Wall
Wall
Deal 3000 damage.
Arcane Dragon
Wall
Kill 75 enemies.
Boom Barrel Dispenser
Wall
Kill 150 enemies.
Deep Freeze
Wall
Freeze 50 enemies.
Grinder
Wall
Deal 5000 damage.
Push Trap
Wall
Push 250 enemies.
Saw Blade Launcher
Wall
Kill 75 enemies.
Spike Wall
Wall
Kill 50 enemies.
Wall Blades
Wall
Kill 75 enemies.
Wall Charger
Wall
Kill 75 enemies.
Window of Butterflies
Wall
Confuse 60 enemies.

Auto Ballista
Ceiling
Deal 5000 damage.
Ceiling Laser
Ceiling
Deal 5000 damage.
Ceiling Pounder
Ceiling
Deal 2500 damage.
Dart Spitter
Ceiling
Deal 3000 damage.
Gravity Pillar
Ceiling
Affect 200 enemies.
Haymaker
Ceiling
Deal 750 damage.
Shock Zapper
Ceiling
Kill 100 enemies.
Snow Cannon
Ceiling
Freeze 75 enemies.
Swinging Mace
Ceiling
Kill 75 enemies.

Molten Gold
Ceiling
Spawn 100 coins
Briar Patch
Floor
Sprout more brambles 30 times
⠀⤷ Traps {Floor} [Part 1]
Traps covered in this section:
  • Acid Geyser
  • Barricade
_______________________________

Acid Geyser:

Cost: 600
Damage Type: Acid
Skulls to upgrade: 4, 6, 8
Unique: 8 — 8
Condition to unlock Uniques: Deal 5000 damage.

Unique 1: Increase trap duration.
Unique 2: Increases Melt status duration.


Acid Geysers in action.

Acid Geysers are traps that will spray acid around a small area when stepped on. They will apply the Melt debuff which makes enemies more vulnerable to the very common Physical damage and make

The damage output of this trap is very low and shouldn't be relied to kill enemies. The Acid Geysers should be used to keep enemies debuffed for your Physical traps and increase your combo counter.

Unique 1 increases the duration of the trap acidic blast from 2 to 3 seconds.

Unique 2 increases the time the Melt ailment will last.

Melt Time with Unique 2
Melt Time without Unique 2
* 7 seconds
* 5 seconds
_______________________________

Barricade:

Cost: 700, 650, 600, 500 (less the more it is upgraded)
Damage Type: None
Skulls to upgrade: 4, 6, 8
Unique: 6 — 6
Condition to unlock Uniques: Place 15 Barricades

Unique 1: Increase defense against colateral damage.
Unique 2: Increases size to 2 blocks and cost (+300 Coins).


Rerouting enemies is a very powerful strategy.

Barricade is perhaps the most unassuming traps of the game, but also one of the, if not the, most useful. They allow you to block the enemy's path or at least force enemies march a single, usually narrow, path making it much easier to deal with the waves.

One of the many applications of Barricades is to bottleneck, funnel, enemies into a single small space forcing them into the range of traps with short activation range like Wall Charger, Grinder and Wall Blades and as a bonus you'll be able to lump them together which will usually make it easier to control the mob and hit everything with area attacks of your own.

Kobold Sappers and Firelings are among the worst enemies for your Barricades. Setting Brimstone or Shock Zappers is a good idea to prevent them from hitting your Barricades, you can also intercept them yourself and use something like the Flame Bracers' secondary to prevent them from doing any harm.

Collateral damage is also a problem. Dynamite Archers and Gnoll Grenadiers also bring a lot of troubles since their attacks have a pretty big radius and they might hit your Barricades if you're fighting close to your traps. Always make sure to keep an eye on the mini-map for those yellow marked enemies skittering amidst the crowd.

Tip:
The Trap Reset Trinket has an upgrade that repairs all Barricades. But in co-op it will only repair Barricades set by the trinket's owner.

Unique 1 increases the durability of the Barricades (not by much mind you) which is good in maps where you know you'll be facing a ton of those pesky exploding enemies.

Unique 2 increase the size and price for the Barricades so they'll be like two Barricades side-by-side. You can save up some money, especially if you're intending to set a lot of Barricades in War Scenario maps.


Barricades aren't used only to block other enemy paths, they can be used to create more efficient killboxes.


Long Barricades used to create a killbox.
⠀⤷ Traps {Floor} [Part 2]
Traps covered in this section:
  • Brimstone
  • Confusion Flower
  • Decoy
_______________________________

Brimstone:

Cost: 800
Damage Type: Fire | Arcane (with Unique 2)
Skulls to buy: 7
Skulls to upgrade: 3, 6, 9
Uniques: 6 — 6
Condition to unlock Uniques: Deal 1000 damage.

Unique 1: Reduced cooldown.
Unique 2: Converts damage into Arcane.


The checkerboard pattern is very useful to use with other traps like Tar, Spike Trap or Flip Trap.


Brimstone is a trap that's simple and does exactly what it implies: roasts anything that steps on it and will start recharging as soon it fades out after damaging a number of enemies. The regular Brimstone deals some damage over time, so you can leave a few gaps (like the checkerboard pattern) to let it do its full damage.

Brimstone is often used in conjunction with Tar and its Unique that increases fire damage since they pair up nicely. However due to how expensive this trap is it's often impractical to fill corridors with it and it's often better to have it spread out in a checkerboard pattern, or use it with Barricades to bottleneck enemies.

Unlike previous titles once the Brimstone "reloads" it will have most, if not all, of its charges restored ready to roast enemies instead of slowly recharging which makes this trap much more viable against the much more numerous horde.

This trap can also be used to protect your Decoys or Barricades making Sappers blow themselves up on it preserving your dummy protection for longer-- just make sure to set the Decoy or Barricade far enough so the Sapper's blast radius won't reach it.

Unique 1 will reduce its cooldown time before it becomes active again, and it works well with the Tar example mentioned above.

Unique 2 will swap its element from Fire to Arcane damage, allowing it to damage Fire Fiend and Fire Elementals which is good since late game is not shy about throwing these enemies at you.


Brimstone can be used both to do preventive damage to enemies before they step into your killzone or right into it.


The regular Brimstone and the Arcane one.
_______________________________

Confusion Flower:

Cost: 700
Damage Type: None
Skulls to buy: 6
Skulls to upgrade: 4, 6, 8
Uniques: 7 — 7
Condition to unlock Uniques: Confuse 100 enemies.

Unique 1: Trap can be placed on ceilings.
Unique 2: Increases pollen explosion radius.


The pollen bomb with increased explosion upgrade.

The Confusion Flower is a trap that will lob a pollen bomb that will confuse enemies hit by it and make them walk backwards to their original spawn point. It's one of the very few floor traps that doesn't require enemies walking directly under it to trigger and it has a good activation range being able to target enemies as far as two more traps side-by-side (above Barricades for example).

Placement is very important to this trap and setting one behind the other is usually a good idea as placing Confusion Flower side-by-side will usually result in them throwing their pollen bombs at the same direction which is a waste of shot.

Using the Confusion Flower at the middle or near the end of your trap course helps keeping enemies in the range of them as well.

If you use Barricade funneling you can also place the Confusion Flowers "outside" your killzone as this trap doesn't require enemies going directly under it to activate. This can provide more time so your traps can kill more enemies.

Unique 1 allows the Confusion Flowers to be placed on ceilings, ideal if you want to combine it with whatever trap setting you may have that needs floor space. The Confusion Flower has a low height activation, though, so it won't do anything if you place it on a ceiling too high.

Unique 2 is a nice little enhancement for this trap, it pairs well with most traps to force enemies to stay in killzones for more time.

Tip:
This trap works particularly well with Barricades creating large cluster of enemies since they can't walk over the other.


The ceiling upgrade can be used in conjunction with other ceiling traps, to position the flowers in a better spot, or to leave the ground open for other traps.
_______________________________

Decoy:

Cost: 500
Damage Type: Physical
Skulls to upgrade: 4, 6, 8
Unique: 5 — 5
Condition to unlock Uniques: Deal 2000 damage.

Unique 1: Increases explosion radius and damage.
Unique 2: Decoy will Bleed enemies that attack it.


Decoy in action.

The Decoy is a trap that will cause any aggressive enemy to attack it (about 4 to 5 minions). Passive ones like Runners and Earthlings will just ignore the thing and keep on with their rift point taking schedule.

While the Decoy is decently resilient when upgraded it will still be easily destroyed by big enemies like Elemental Lords, Mountain Trolls and Armored Ogres and it also has the bad tendency to draw attention from dangerous ranged enemies like Orc Archers and Cyclops Mages.

Unique 1 is good if you can pile up enemies around the Decoy to cause as much damage as possible. Using melee weapons is a good option for it.

Unique 2 causes Bleed to enemies that hit the Decoy. The bleeding damage doesn't add much to the damage pool of the Decoy, but it will take the shields off Orcs hands before exploding which is good if you can't do it yourself or supervise the Decoy in Rift Lord.

Tip:
Be particularly mindful of ranged enemies like Gnoll Grenadiers and Dynamite Archers as they will target a Decoy as soon as they can and if they do it near your Barricades it's almost certain they'll damage or destroy the Barricades through colateral damage.

Warning:
Unlike previous games the Decoy will NOT restore its health automatically.

Personal Opinion:
500 coins for a disposable trap still feels like a lot of money, if it cost 200 coins like the old Boom Barrel from Orcs Must DIe! 2 there would be some plausible use for this trap, but as it is now, this is the one trap I can't recommend at all.


Left to right: the regular Decoy, the explosion and damage upgrade, and the Bleed upgrade (notice the barbed wire around it).
⠀⤷ Traps {Floor} [Part 3]
Traps covered in this section:
  • Flip Trap
  • Floor Scorcher
  • Guardian Archer
_______________________________

Flip Trap:

Cost: 600, 550, 500, 400
Damage Type: None
Skulls to upgrade: 4, 5, 6
Unique: 5 — 5
Condition to unlock Uniques: Activate the trap 40 times.

Unique 1: Decreases reset time.
Unique 2: Flip Very Heavy enemies (Ogres, Trolls, Elemental Lords, Cyclops Mages)


Flip Traps in its natural state: sending Orcs in a one-way trip into a pit.

Flip Traps are funny little things that will throw any enemy unfortunate to step on them, however the distance depends on the size/weight of the enemy (and an Unique if the enemy is of the very heavy weight category).

The Flip Traps can have more utilities than merely using them to chuck enemies to their instant doom into pits, you can use them to throw enemies back to the beginning of your trap course. You can also aim them towards walls so they'll stall enemies without wasting too much time, and maybe even on things like higher placed Wall Blades or Grinders.

Just make sure to keep in mind their range as you can set them into places where light enemies like Orcs will be throw over where you expected causing problems for yourself. Also be mindful of Runner enemies as they can easily blaze through this trap unscathed if nothing is there to slow them down.

Unique 1 is perfect if you're planning to fill in the place with this type of trap, with enough numbers even a large number of enemies will have trouble getting through, except the big ones, of course.

Unique 2 is good to handle the bigger foes, however take note that the Flip Trap's throw range will be absolutely pathetic. This upgrade is meant to stall the big enemies, not throw them far away.


Flip Traps aren't used only to launch enemies into pits, you can use it to stall them in your killzone as well.
_______________________________

Floor Scorcher:

Cost: 750
Damage Type: Fire
Skulls to upgrade: 4, 6, 8
Unique: 8 — 8
Condition to unlock Uniques: Burn 120 enemies.

Unique 1: Increases trap range.
Unique 2: Trap can be also placed on walls.

Floor Scorcher is a trap with a different activation method: it will fire if enemies goes in front of it instead of merely stepping on it. It will fire a stream of fire for a few moments and roast anything that it hits.

Take note that the damage of this trap is very low, a far cry from its glory days in the previous game, and it's (probably) meant to be a complementary trap, or combo incrementer. Due to its narrow straight line attack it's also not nearly as good to set in the side lines as it was in the previous game either.

The Floor Scorcher doubles as some sort of physics trap since it will flip enemies up to heavy weight that steps on it, this can be used to stall or throw enemies slightly back on your trap course while roasting the ones that gets past it.

Keep in mind that the orientation for this trap is very important. A poorly set Floor Scorcher will throw enemies away from other traps which can reduce the effectiveness of your trap course, so be very careful.

Unique 1 increases the range of this trap to make it hit more enemies either in wider corridors or at the start or the end of a Barricade funneling.

Unique 2 gives this trap a lot of versatility since you can place it in several places where most of other wall traps would be beyond useless. Try it out and be creative when setting the Scorcher to enhance your killzones.


The wall upgrade allows this trap to be set in unorthodox places.
_______________________________

Guardian Archer:

Cost: 1000
Damage Type: Physical | Fire (with Unique 2)
Skulls to upgrade: 4, 6, 9
Unique: 6 — 6
Condition to unlock Uniques: Kill 50 enemies.

Unique 1: Archers regenerate Health. Revives faster if downed.
Unique 2: Archers now deal Fire damage.


More or less the range of Guardian Archers.

The Guardian Archers are sentries that will take aim and fire at enemies from a decent distance and their arrows are very fast, precise and deals a respectable amount of damage, especially with the Fire upgrade.

They've received an important buff in v1.2.0.0 giving them the ability to revive on their own. This allows you to set them in the front lines without having to worry about babysitting them. However as of update v1.2.1.0 their price was """slightly""" changed from 600 to 1000.

If you set them near Barricades be always careful with collateral damage that Dynamite Archers, Sappers and Gnoll Grenediers can cause, or crossfire from Orc Archers or Mages since they can hit your Barricades on uneven terrain.

Among the enemies that can easily cause problems for your Archers are:
  • Orc Archers/Tuatara Rangers (usually will have a ton of backup to unintentionally tank them)
  • Dynamite Archers (very high damage in a wide area, can easily kill several Archers even with Health regen)
  • Kobold Sappers/Firelings (they'll prioritize Guardians as well)
  • Cyclops Mages (high damage homing attack that outrange Archers)
  • Gnolls/Tuatara Assassins (they ignore Barricades and specifically target players and Guardians)

Unlike the previous game Archers don't have a target priority and will fire at the first thing that gets in their sights, be it an Orc or an Ogre. They're not very impressive in small numbers either, so you need to hire a lot of them to do considerable damage against larger number of enemies or bigger foes.

Unique 1 is ideal if you set Archers close to enemy lines, but do keep in mind that they're still fragile and will not be able to deal with dangerous things like Gnolls, Mages or Dynamite Archers. This upgrade also helps them get back on their feet quicker if they get downed.

Unique 2 is good to deal with Physical resistant enemies (and there's a lot of them), but you have to be careful with enemies immune to fire like Fire Elementals, Fire Fiend and Firebats as they'll be useless against them with this Unique.

Time to revive with Unique 1
Time to revive without Unique 1
* 30 seconds
* 60 seconds


As of patch 1.2 Archers will revive like War Guardians if brought down.


Guardian Archers are pretty fragile, but in numbers can be a good helping hand.


From left to right: regular Guardian Archer, with Health Regen upgrade, Fire Damage upgrade.
⠀⤷ Traps {Floor} [Part 4]
Traps covered in this section:
  • Rip Saw
  • Spike Trap
  • Tar Trap
_______________________________

Rip Saw:

Cost: 700
Damage Type: Physical | Ice (with Unique 1)
Skulls to buy: None
Skulls to upgrade: 3, 5, 8
Unique: 7 — 7
Condition to unlock Uniques: Kill 50 enemies.

Unique 1: Converts damage into Ice.
Unique 2: Reduced cooldown.


Rip Saws are great when used with Barricade funneling.

The Rip Saw is a trap with an odd sizing, standing at 6x1 instead of the usual 2x2, for reference it's as large as 3 Tar or Brimstones placed side-by-side with half of their width.

The Rip Saw will quickly strike enemies twice after being activated and it deals a decent amount of damage to enemies, due to its price, however, it can be difficult to set without using the Barricade funneling.

Placement is very important to this trap, more than usual, due to its increased length and the way it activated you can set it vertically with a few gaps between each other to save some money if you don't use Barricades.

Unique 1 gives the trap the ice element instead of physical. Being one of the few traps that can deal ice damage this is a good choice to pick when you're dealing with maps that has a lot of Fire Fiends or Fire Elementals.

Unique 2 is self-explanatory, faster cooldown means it will trigger faster as well. Nice to go along with the Trap Reset Trinket too.
_______________________________

Spike Trap:

Cost: 300
Damage Type: Physical (no Unique)
Lightning (with Unique 1) | Arcane (with Unique 2)
Skulls to buy: None
Skulls to upgrade: 3, 6, 8
Unique: 5 — 5
Condition to unlock Uniques: Deal 3000 damage.

Unique 1: Deals Lightning damage.
Unique 2: Deals Arcane damage.


The Spike Trap's damage isn't too bad for its price.

The Spike Trap is a simple, single firing trap that will activate when any hapless enemy steps on it dealing damage to it. It's fairly affordable costing 300 coins, so it might be very easy to fill entire spots with it.

The damage dealt by this trap is moderate, as expected from its cheap price, but keep in mind that the Spike Trap only hits once, so it might be much less effective on its own in Rift Lord difficulty where Orcs bring shields to tank the first hit.

One of the most usual ways to use this trap is to make a "checkerboard" style with Tar or Brimstone going along it with.

The Unique upgrades gives the Spike Trap an indirect, but important, damage boost since very few enemies are resistant to Lightning or Arcane.

Unique 1 gives the Spike Trap Lightning damage to electrify enemies that it damages for a moment. It helps that no ground enemies resist this type of damage and the damage it does to Heavy Orcs, Ogres and Trolls isn't negligible (the mini stun is also a bonus).

Unique 2 will convert its damage into Arcane giving you a chance to deal increased elemental damage to enemies.


The Arcane Spike Trap. This seemingly meek trap won't do much on its own, but it's an affordable option for your trap setups if you need something else for the floor.
_______________________________

Tar Trap:

Cost: 450
Damage Type: None
Skulls to buy: None
Skulls to upgrade: 4, 7, 9
Condition to unlock Uniques: Slow enemies for 600 seconds (5 minutes).

Unique 1: Enemies remain slowed for a brief time.
Unique 2: Increases Fire damage while on Tar.


Tar synergies well with the vast majority of traps in the game.

Tar is an old friend and something that newcomers will love and veterans will respect due to its sheer usefulness. Just 50 coins shy of its pricing in its debut game-- after almost 3 years it's finally (almost) back to what it was meant to be.

Tar will slow enemies down, more the more upgraded it is, and is the perfect tool to either hamper the horde coming your way and give you time to deal with enemies, let them take fire from your other traps and prevent them from rushing your trap course too quickly. Tar remains extremely versatile and there are hardly any traps where it doesn't synergies well with.

Friendly Warning:
While it's tempting to fill the map with Tar remember that too much of it can severely affect your Par Time if you're aiming for 5-Skulls.

Unique 1 is good if you want to save some money. The enemies will remain slowed down for approximately one Tar trap worth of distance - one full regular trap square size - and you can create gaps placing other Floor Traps in between as you please.

Unique 2 is the way to get the most out of your Fire attacks (Flame Bracers, Flame Swinging Mace, Brimstone, etc...). You can do stuff like placing a Brimstone and a Tar in front of it to increase its damage among other things.


The increased fire damage upgrade work wonders against anything that isn't fire immune.
⠀➥ Traps {Wall} [Part 1]
Traps covered in this section:
  • Arrow Wall
  • Arcane Dragon
  • Boom Barrel Dispenser
_______________________________

Arrow Wall:

Cost: 600
Damage Type: Physical | Fire (with Unique 1)
Skulls to upgrade: 3, 6, 8
Uniques: 5 — 5
Condition to unlock Uniques: Deal 3000 damage.

Unique 1: Deals Fire damage.
Unique 2: Pierces enemies.


The Arrow Wall trap is still one of the more versatile and reliable traps in the spellbook.

Another returning old acquaintance, Arrow Wall is a trap that requires little explanation-- it's a simple trap with good damage output and some versatility in its Unique upgrades. It's fairly cheap costing merely 600 coins too. It might be a basic trap, but it's nothing to sneeze at.

The simplicity of this trap belies how useful it actually is, since the Arrow Wall is one of the very few traps that can hit more than one lane of enemies in a corridor it's a good tool to wound groups of enemies (with the right upgrade) or at least pick off the shields from Orcs in Rift Lord.

Unique 1 has it change to fire damage. Fire damage also makes this trap deal more damage to Heavy Orcs and Armored Ogres. However take note that later in the game enemies like Fire Fiends and Fire Elementals will show up very often which can diminish its damage potential.

Unique 2 is good to use around corners or when piling up enemies with Tar and/or Barricades. It will be still considered as Physical damage, so plenty of heavy enemies will resist it, though.


The Arrow Wall projectiles can reach far more than what its trigger range indicates. Setting it around corners on in the back of long hallways is also a good idea to get the most out of this trap when you set it in scattered places.


The fire upgrade is capable of doing very good damage against most non-fire immune enemies.
_______________________________

Arcane Dragon:

Cost: 800
Damage Type: Arcane
Skulls to buy: 10
Skulls to upgrade: 5, 7, 9
Uniques: 7 — 7
Condition to unlock Uniques: Kill 75 enemies.

Unique 1: Increases duration of Arcane ailment.
Unique 2: Bounces off walls once.


The Arcane Dragon is usually best used in long Barricades bottlenecks or places where the bounce can hit several enemies lined up, preferentially with Elemental damage to complement it.

The Arcane Dragon is an odd trap that will constantly fire its projectiles without the need of enemies getting in front of it. The caveat is that its cooldown is fairly long and this trap is has a somewhat high price.

The firing pattern of this trap makes placing it with different timings, waiting a few seconds before setting another one if they're back-to-back, a key element to make multiple Arcane Dragons more effective.

Unique 1 gives it a bounce effect. If you're intending to use it you'll have a hard time finding good places for it since the developers apparently bear an innate hatred towards this trap's bounce effect. But if done correctly it's usually worth the trouble especially after patch 1.2.1.0 gave it a decent damage buff.

Unique 2 increases the Arcane debuff (15% extra elemental damage). But the Arcane Dragon's slow fire rate and price makes this upgrade rather impractical compared to the bounce one. A lowered cooldown would've been much more useful.


Example of a back-to-back Arcane Dragon setup. Wait a few seconds to set the other one to maximize the time projectiles from all traps will be traveling.

Warning:
Due to how this trap works the Trap Reset Trinket will not work for this trap.

Another Warning:
The surface must be perfectly flat for the bounce reflect the projectile back to the same wall.


If the projectile hits any corners it will fly at odd angles.

Arcane debuff without Unique 1
Arcane debuff with Unique 1
* 5 seconds
* 7 seconds
_______________________________

Boom Barrel Dispenser:

Cost: 900, 850, 700, 750
Damage Type: Physical
Skulls to buy: 8
Skulls to upgrade: 5, 6, 7
Uniques: 6 — 6
Condition to unlock Uniques: Kill 150 enemies.

Unique 1: Increased explosion area.
Unique 2: Decreases the height needed for barrels to explode.


Get ready for some explosions.

This is an interesting trap with many applications. The Boom Barrel Dispenser can be placed in many, many ways and is an excellent complimentary trap for most setups you can think of, it's one of the few traps that I tend to pick whenever I have a free slot. I'll show some of the applications in images because it will be far easier to show than to just explain.

The Boom Barrel Dispenser will spawn barrels at somewhat slow pace, one right away as the trap is built and more each 15 seconds, take note that the barrels will roll pretty far from where the trap is placed. If you're planning on using this trap as the sole damage dealer you might need a way to stall enemies.

The Unique 1 is good if you plan on using the boom barrels near other traps. Even if they won't explode upon falling on the ground you might explode them during combat or through other traps.

The Unique 2 drastically decreases the height needed for the barrels to explode and is ideal if you don't want to "babysit" this trap and set the boom barrels yourself. It's a good option to set this trap on top of another trap like a Grinder or Arrow Wall.


How far the barrels roll off the trap. Floor traps will influence, shorten, the distance.


The height difference needed for the barrels to explode when falling on the ground: without (left) and with (right) the Unique upgrade.


Most types of damages, including from other traps, will set the barrels off. You can set a trap near the barrels so you don't have to detonate them off manually.


Explosive chain reaction.
⠀➥ Traps {Wall} [Part 2]
Weapons covered in this section:
  • Grinder
  • Deep Freeze
  • Push Trap
  • Saw Blade Launcher
_______________________________

Grinder:

Cost: 900
Damage Type: Physical
Skulls to buy: 7
Skulls to upgrade: 5, 6, 7
Uniques: 7 — 7
Condition to unlock Uniques: Deal 5000 damage.

Unique 1: Slow enemies in range.
Unique 2: Increases time trap can damage enemies before jamming.


Grinder is good way to deal with numerous Runner enemies. It will blow up Sappers as well, but keep in mind Sappers drain a lot more of the Grinder's gauge than tiny Runners.

Grinder is a trap that will deal constant damage to whatever gets into its range. It's a very short range trap that almost always needs the aid of Barricades to hit enemies efficiently, but without them it will still hit enemies that walks close to walls.

One of the uses of Grinders is to set them near Barricades to intercept Kobold Sappers, but beware that without the right Unique the Grinder will jam quickly after killing about 3~4 without it and 4~5 with it.

Be careful when dealing with very heavy enemies and anything that resists Physical damage, including the very common Heavy Orc, since they'll make the Grinders jam much faster than usual.

Another thing to watch out for is that even Medium Orcs can power through this trap, especially if they're carrying shields since the Grinder won't make enemies flinch when they take damage from it.

Unique 1 is an interesting upgrade in that it slow enemies like Tar, but not on the same grade and can be used if you want to leave the group open for other floor traps like Acid Geyser, Spike Trap or Brimstone.

Unique 2 is simple enough, it makes the Grinder mow down more things before jamming.
_______________________________

Deep Freeze:

Cost: 800
Damage Type: Ice | Acid (with Unique 2)
Skulls to buy: 4
Skulls to upgrade: 5, 7, 9
Uniques: 6 — 6
Condition to unlock Uniques: Freeze 50 enemies.

Unique 1: Increases trap range.
Unique 2: Converts damage into Acid.


Corners with Barricades are usually good places to place this trap.

Deep Freeze is a trap that fires a single ice/acid blast against anything that goes in front of it, the blast does a decent amount of damage and causes freezing against anything that it hits. It will do very good damage against the Orcs, but since it hits only once it will not pierce their shields.

This trap is pricey standing at 800 coins, so it shouldn't be used solely for killzones, it will work better as a complimentary trap either as crowd control to keep enemies in check in your killzone. Or to decrease the defense of enemies against Physical damage with the Acid upgrade.

Unique 1 increases the range of this trap enough for it to trigger even in wider hallways or hit more enemies when set around corners.

Unique 2 converts the trap into Acid damage. The damage is still good enough and the Acid damage helps Physical traps deal with the wide array of Physical resistant enemies present in the game.

With the increased range Unique the Deep Freeze can trigger from walls that are farther than usual turning it into a good complimentary trap.


The Acid version of Deep Freeze.
_______________________________

Push Trap:

Cost: 300
Damage Type: None | Physical (with Unique 2)
Skulls to buy: 4
Skulls to upgrade: 4, 5, 6
Uniques: 5 — 5
Condition to unlock Uniques: Push 250 enemies.

Unique 1: Stun enemies.
Unique 2: Trap also deals damage.


Push Traps in its natural state: pushing Orcs to their doom.

Push Trap a simple trap that does exactly what its name says: it pushes things that goes near it. The range of this trap is pretty short. Normally this trap is used to simply throw enemies into pits or the oversized Grinders built in some maps.

As it is with any physics trap this trap won't affect very heavy enemies at all and without Unique upgrade will be completely ineffective against them.

Unique 1 will cause the trap to Stun enemies. You can set it in narrow corridors to stall enemies. Another use for this upgrade is, if you set it right, to throw enemies into other traps that deal extra damage to Stunned enemies (Ceiling Pounder and Wall Blades).

The same Unique has the benefit of being of some use against very heavy enemies as it will at least Stun them in place for a few moments.

Unique 2 causes the trap do deal damage, but the damage is below modest, it's paltry and even if you fill an entire room full with Push Traps they'll hardly do anything meaningful in War Mage difficulty, let alone in Rift Lord.


A simple example of a setup for the Unique 1, the Stun upgrade.
_______________________________

Saw Blade Launcher:

Cost: 650
Damage Type: Physical
Skulls to upgrade: 4, 6, 8
Unique: 7 — 7
Condition to unlock Uniques: Trap must kill 75 enemies.

Unique 1: Saw projectiles Bleeds enemies hit.
Unique 2: Saw projectiles explode on destruction.


Saw Blade Launchers in vertical orientation are powerful traps in enclosed spaces.

The Saw Blade Launcher is an interesting trap that will launch enemy piercing projectiles that will bounce on walls and Barricades. It's also a small trap around the same size of the Window of Butterflies (2x1) instead of the usual 2x2 trap size.

This is a very odd trap that needs some attention to placement in order to be really useful. One of the best ways to utilize this trap is by placing it in tight corridors where the saw blades will bounce around the same place dealing some grievous damage to enemies.

Alternatively you can place it as close as possible to the ground in a way so it will bounce off your Barricades dealing as much damage as possible while it travels. An unexpected benefit of doing this is that, if the saw blade doesn't fly off the map, the projectile of this trap will most likely bounce everywhere hitting enemies far beyond your killzone.

Each unique is focused on adding more destructive power to this trap, so you might just pick what fancies you the most.

Tip:
The range preview of this trap is one of the more important ones out of all traps in the game. It will show where the projectiles will bounce at and help you judge whether that wall is a good place to use it or not.


Some setups for Saw Blade Launchers.
⠀➥ Traps {Wall} [Part 3]
Traps covered in this section:
  • Spike Wall
  • Wall Blades
  • Wall Charger
  • Window of Butterflies
_______________________________

Spike Wall:

Cost: 650
Damage Type: Physical
Skulls to upgrade: 4, 6, 8
Uniques: 8 — 8
Condition to unlock Uniques: Kill 50 enemies.

Unique 1: Causes Bleed on hit.
Unique 2: Causes Stun on hit.


A Spike Wall launching a small enemy back and tripping an Ogre.

Spike Walls are big traps, 4x2 instead of 2x2, they're worth two Arrow Walls side-by-side, or on top of each other if you rotate them that way (yes, this can be done).

Spike Walls are among the very few traps that can trip very heavy enemies like Ogres, Trolls and Elemental Lords, the only other trap capable of doing this is the Flip Trap (with the right Unique). It won't throw them very far, however, but it can be used to stall and damage them.

If you rotate this trap aiming them downwards or upwards you can make it smash enemies or throw them upwards, the Spike Wall placed with this orientation will also save some horizontal space in the walls as well.

Unique 2 can be useful if you can space it right so other traps that deals increased damage to Stunned enemies will activate (like Ceiling Pounder and Wall Blades), you can also use the Wind Belt to push enemies into them as well. Forcing the Spike Wall to throw enemies into another wall with traps that deal higher damage to Stunned enemies is also another way to make the most of this unique.


Spike Walls in vertical orientation. Aimed downwards they'll knock down all enemies for a shorter time, but aimed upwards they'll throw lighter enemies pretty high.
_______________________________

Wall Blades:

Cost: 750
Damage Type: Physical
Skulls to buy: 6
Skulls to upgrade: 3, 5, 7
Uniques: 6 — 6
Condition to unlock Uniques: Kill 75 enemies.

Unique 1: Causes Bleed to enemies.
Unique 2: Deals more damage to Stunned enemies.


Wall Blades at work.

The Wall Blades is a short ranged trap that does damage to anything that goes near it. It does a pretty good amount of damage against everything up to a Heavy Orc and can hit more than one enemy, but they need to be really close to each other.

When compared to Grinder the Wall Blades are more of a single burst, bigger damage, type of trap whereas the Grinder deals lower, but more constant damage. Neither are recommended options be the main option to take down tougher customers like Ogres and Trolls, however.

Unique 1 gives this trap the Bleed status effect, the damage itself doesn't add much and it's probably best used for combos.

Unique 2 needs something to Stun enemies before this trap triggers. Crossbow's secondary, Chain Lighting secondary with the right Unique, the Shock Zapper or Ceiling Pounder and Spike Wall with the right Unique will help the Wall Blades with this Unique.


Wall Blades are unimpressive on their own, but with aid of crowd control traps they become a pretty useful, and relatively cheap, trap.
_______________________________

Wall Charger:

Cost: 900
Damage Type: Lightning
Skulls to upgrade: 4, 6, 8
Uniques: 6 — 6
Condition to unlock Uniques: Kill 75 enemies.

Unique 1: Stun enemies.
Unique 2: Deals increased damage to electrified enemies.


Wall Charger is a good option to deal with crowds of enemies.

Wall Chargers is a short ranged trap that deals Lightning damage against enemies that walk close to it. It's a trap that will deal a considerable amount of damage to the ever annoying Armored Ogre.

One of the best points of this trap is the fact it has potential to kill more than one enemy not only by hitting them pretty hard, but by making them exploding with the Lightning effect. The trap also has pretty good damage that can be further enhanced by Arcane and an Unique upgrade.

Unique 1 causes the Wall Charge to Stun anything that it hits which can be useful if you have several of them lined up and ready to kill enemies.

Unique 2 is a bit of an oddball of Unique that needs enemies to be affected by Lightning damage. The Ceiling Laser is the perfect trap to use with this upgrade, but the Shock Zapper, the Lightning Spike Trap, or the Chain Lightning Staff, Broadsword and the Ring of Storms can also be used to get this Unique to work.
_______________________________

Window of Butterflies:

Cost: 700, 650, 600, 550 (lower the more it is upgraded)
Damage Type: None | Arcane (Unique 1)
Skulls to buy: 5
Skulls to upgrade: 3, 6, 9
Uniques: 7 — 7
Condition to unlock Uniques: Confuse 60 enemies.

Unique 1: Deals Arcane damage.
Unique 2: Confusion lasts longer.


Due to its larger (but short) activation range this trap will trigger even if set on top of other wall traps. Keep in mind that when set like that it won't trigger if a small enemy like Runners goes near it.

The Window of Butterflies is an interesting trap that basically works like the Confusion Flower but must be set on walls. The activation range of this trap is short, but has wider range and can be set on top of other wall traps without the risk of Orcs and bigger enemies not triggering it.

This is one of the best complimentary traps due to its size (also being decently priced when fully upgraded) and can be placed in several ways to help you. It's one of the better options to reinforce your Barricaded killzones and help less enemies go through it or even prevent them from going through it at all if set correctly with other traps.

Unique 1 gives this trap the Arcane damage, but the damage itself is pretty humble and shouldn't be counted on to kill anything. It's far more useful to spread the Arcane debuff even though the game will show only the Confusion status effect.

Unique 2 increases the distraction time from 3 to 4 seconds (estimation).

Tip:
Like the Confusion Flower this trap works very well with Barricades to create cluster of enemies.


The Window of Butterflies will trigger even if set on unconventional places for walls traps due to its large range of activation. And thanks to the said range it will be able to catch a few Runners, if set at lower height, too.
⠀⤷ Traps {Ceiling} [Part 1]
Traps covered in this section:
  • Auto Ballista
  • Ceiling Laser
  • Ceiling Pounder
_______________________________

Auto Ballista:

Cost: 750
Damage Type: Physical | Arcane (Unique 2)
Skulls to upgrade: 4, 8, 10
Unique 6 — 6
Condition to unlock Uniques: Deal 5000 damage.

Unique 1: Gives the trap Arcane damage.
Unique 2: Increases trap's range.


The Auto Ballista can be set in almost every ceiling as complimentary trap. The Arcane element is always good to deal with heavier threats since most of them are resistant to Physical damage

Auto Ballista is a small ceiling trap, it's worth 1x1 size instead of the normal 2x2 of most traps. It's fairly affordable costing 750 and being capable of holding Arcane damage means it will be effective against big targets like Armored Ogres and Mountain Trolls as well.

Be mindful of its placement and spacing, though. Setting them side-by-side will most likely make them fire at one target, which in most cases is overkill, but setting them more or less one behind the other may prevent this from happening as often. The fact it's so small also helps setting several of this trap in a single spot enhancing your killzone.

Unique 1 gives you another source of Arcane damage and some of the tougher enemies that are resistant to Physical damage will not take reduced damage from this trap anymore.

Unique 2 gives the Auto Ballistae more time to shoot at enemies and can be very useful if you place them aiming towards your Rift instead of aiming them at the enemy spawn point.

Tips:
The Auto Ballista is good trap to set after your killzone to catch anything that may get past it. Consider setting a few past your killzone to deal with any stragglers or survivors.

However take extra care with placement as this trap can waste its shot firing at walls or obstacles.


This trap's range allows it to trigger even in very high ceilings.
_______________________________

Ceiling Laser:

Cost: 900, 850, 800, 750
Damage Type: Lightning | Fire (with Unique 2)
Skulls to upgrade: 4, 6, 8
Unique: 7 — 7
Condition to unlock Uniques: Trap must deal 5000 damage.

Unique 1: Adds 2 additional lasers.
Unique 2: Trap now deals Fire damage instead of Lightning.


Ceiling Laser's damage is modest, so it requires a lot of them to be set, or good setups with Tar and Barricades so it can deal a lot of damage.

The Ceiling Laser one of the very rare traps that's constantly active and will never need to recharge, like Tar. The default trap has three laser lines and deals damage to whatever tries to go under it. The caveat here is that its damage output is passable at best and you need many of them or a very good setup to truly shine.

Placement is crucial to get the most of this trap. You can rotate and create different patterns with it to suit your needs; placing it in horizontal orientation is ideal for long hallways, while a vertical placement will be great for Barricade funneling, or narrow corridors.

Unique 1 will add two more lasers filling the two gaps between the normal trap and is very good to create hallways full of these things, or if you simply want to fry anything going under it as much as possible.

Unique 2 works well with Tar and the unique to increase the fire damage dealt to enemies in it. It will still hold only 3 laser beams, though. You'd do well to always remember that there are no shortage of enemies immune to fire damage (Fire Fiend and Fire Elementals) in late game maps.

Tip:
The Ceiling Laser can be particularly useful to pry shield off Orcs hands in Rift Lord, and/or explode Sappers or help fry pesky Runners, when used in conjunction with Tar right by the doors they spawn from.


Barricade funneling is very useful to maximize the destructive potential of this trap.
_______________________________

Ceiling Pounder:

Cost: 500
Damage Type: Physical
Skulls to buy: 5
Skulls to upgrade: 4, 6, 8
Unique 6 — 6
Condition to unlock Uniques: Deal 2500 damage.

Unique 1: Stuns Enemies.
Unique 2: Increases damage against Stunned enemies.

The Ceiling Pounder is a basic ceiling trap that smashes anything going underneath it, it has a low activation range, so it must be placed on low ceiling to work. It isn't as flashy as other traps, but it gets the job done and it's very cheap as well, costing mere 500 coins.

This trap hits enemies once, so it will be less effective against large hordes of Orcs carrying shields on Rift Lord. The fact it deals Physical damage makes it somewhat ineffective against large threats as well, however the Ceiling Pounder has a few tricks up its sleeve with its Uniques...

Unique 1 gives this trap a Stun effect which can be nice when paired with Tar, Confusion Flowers or Window of Butterflies. Having plenty of these in a hallway is a good way to deal with a moderate amount of enemies.

Unique 2 is trickier to make use of, it's usually suited if you narrow down the enemies path with Barricades or in conjunction with the Push Trap in wider areas. The only weapons with Stun capabilities are the Crossbow and Chain Lightning Staff (with the correct Unique).
⠀⤷ Traps {Ceiling} [Part 2]
Traps covered in this section:
  • Dart Spitter
  • Gravity Pillar
  • Haymaker
_______________________________

Dart Spitter:

Cost: 800
Damage Type: Physical | Ice (with Unique)
Skulls to buy: 6
Skulls to upgrade: 4, 6, 8
Unique 7 — 7
Condition to unlock Uniques: Deal 3000 damage.

Unique 1: Deals Ice Damage.
Unique 2: Doubles active duration.


Dart Spitter boasts a large activation range and damages everything over a bigger area as well.

The Dart Spitter is a ceiling trap that has some interesting uses and nice properties that pairs very well with other many other traps. Its activation range is much larger than other ceiling traps being everything surrounding it.

Due to its expensive price it's not meant to be the only ceiling trap being best set at the center of your killzone, or by the side of your other ceiling traps in case you do the Barricade bottlenecking tactic.

The damage of this trap is also fairly good and since it hits multiple times it will have no problem at picking off shields from Orcs in Rift Lord.

Unique 1 is very useful due to its good damage and the overabundance of enemies resistant to Physical damage, it can shred through anything that isn't resistant to Ice and freeze anything that it hits giving you and your other traps more time to kill everything.

Unique 2 doubles the active time of the Dart Spitter. Do keep in mind that a lot of tough enemies are resistant to Physical damage, so even with that the damage may not be that spectacular.

Tip:
Try mixing the Dart Spitter, especially the Ice damage upgrade, with other ceiling traps.


Dart Spitters can be used in conjunction with many other ceiling traps due to its large activation range.


The checkerboard pattern on the ceiling with traps like Gravity Pillar and Shock Zapper makes for a mean crowd control trap combo as well.
_______________________________

Gravity Pillar:

Cost: 700
Damage Type: None | Physical (with Unique 1)
Skulls to upgrade: 5, 7, 9
Unique: 6 — 6
Condition to unlock Uniques: Lift 200 enemies.

Unique 1: Deals damage.
Unique 2: Increases lift duration (from 6 to 8 seconds).


The Gravity Well can lift a large number of enemies making it a good crowd control trap.

The Gravity Pillar is an odd trap that will lift enemies that goes through it and can be a powerful asset to your trap course, provided you take note of its quirks.

This trap is the one of the few that has virtually no vertical range limit. No matter how high the ceiling is it will trigger as long as the enemies go under it. However it won't affect heavy enemies like Ogres, Trolls and Cyclopses. There's also no apparent limit to how many enemies it can lift, so it works particularly well with Barricade funneling.

On low ceilings this trap does a good job at creating big cluster of Orcs and other light enemies, especially if set on a Barricade funneling corridor setup. When used with Tar it can significantly stall enemies that aren't immune to it.

On high ceilings you have to watch out as most wall traps can easily lift them far from the their range. With that said you can set Grinders or higher walls so the Gravity Pillar will pull enemies right into it, just be careful not to set them where they'll make your other ground level traps useless.

Unique 1 will make enemies take damage as long as they're being pulled upwards. The damage is modest, but is constant and will do take shields off Orc hands, this can be a good upgrade to be used to add more damage to your other traps. This upgrade will damage flying enemies from Drastic Steps as well.

Unique 2 does a good job at creating cluster of enemies on all types of ceilings and it's usually a good idea to set them before your trap course so enemies will be bunched together for your other traps.

Tips:
This is one of the few traps that can will hit Runner enemies perfectly since it will trigger as soon as something goes under it.

It also make enemies airborne which means they'll take double damage from all sources.

It's can be also used against Fire Elementals (not Lords) to lift them and prevent them from spawning Firelings in the middle of your Barricades damaging them.


A setup for Gravity Pillars in high ceilings. Grinders, Wall Blades and Wall Chargers are popular choices for variants.


The infinite vertical range and instant activation makes this trap more useful than it seems.
_______________________________

Haymaker:

Cost: 700
Damage Type: Physical
Skulls to buy: 5
Skulls to upgrade: 4, 5, 6
Unique: 6 — 6
Condition to unlock Uniques: Deal 750 damage.

Unique 1: Increases active duration.
Unique 2: Increase knockback force.


Haymakers will throw enemies up to heavy (not very heavy) weight around and halt their progress.

The Haymaker is a ceiling trap that will bash up to Heavy (not Very Heavy) weight enemies around, but it has low range activation and requires low ceilings to work.

Enemies from light to heavy weight will be smacked around by this trap, but very heavy enemies like Ogres, Trolls and Cyclops Mages won't be thrown around, but the Haymaker is no less effective as these enemies will still take constant damage while walking through it. The fact it also hit targets multiple times means it will have little trouble dealing damage to Orcs carrying shields.

Unique 1 is good as an all-purpose ceiling trap that keeps dealing damage to groups of enemies.

Unique 2 is great to use in wider trap courses to make the Haymaker throw enemies around other Haymakers or other traps. It shouldn't be used if you're using Barricade funneling as this can easily backfire having enemies being bashed over the Barricades.

Tip:
Reminder that Haymaker make lighter enemies airborne, airborne enemies take double damage. But as it is with the vast majority of traps with physics effects Haymakers won't throw very heavy weight enemies.

Warning:
Be very careful when using this trap with Barricades, especially with Unique 2 since it's very, very easy to throw enemies over them and ruin your own trap setup if you're not aware of how far it can throw enemies around.


Crowd control traps work great especially against very heavy enemies to let the Haymaker do as much damage as possible against them.
⠀⤷ Traps {Ceiling} [Part 3]
Traps covered in this section:
  • Shock Zapper
  • Snow Cannon
  • Swinging Mace
_______________________________

Shock Zapper:

Cost: 800
Damage Type: Lightning
Skulls to buy: 7
Skulls to upgrade: 5, 6, 7
Unique: 6 — 6
Condition to unlock Uniques: Kill 100 enemies.
Unique 1: Stun enemies.
Unique 2: Enemies killed by the trap explode dealing damage to enemies around it.


In sufficient numbers the Shock Zapper is surprisingly good at crowd control.

The Shock Zapper is a trap that can deal Lightning damage to enemies and is a good choice against the very annoying Armored Ogre (among other heavy threats) who is a common sight in later maps in Rift Lord difficulty. Its 800 coin price is the same of Brimstone and it has some similarities to it like having charges, a certain number of attacks, before needing to reload.

The Shock Zapper is a great trap to use to catch some pesky Runner if you set it near the end, or at the start, of your trap course, but keep in mind it has limited charges and takes a while to recharge.

One of the peculiarity of this trap is that once it starts attacking an enemy it will lock-on said enemy and will bombard it with lightning until it either dies or runs out of charges. Keep in mind that it needs time to recharge, so if it kills something and another enemy gets in its range the Shock Zapper will fire its remaining charges, but if its left cooling down it will eventually recharge itself completely.

Tip:
Be careful if too many Runner/Sapper enemies attack in thick groups. The Shock Zapper has a second or two pause between each electric blast and if said enemies attack grouped together like that there's a possibility of them slipping by one or two Shock Zappers.

Unique 1 is a good option to keep a few enemies in check and in larger numbers is pretty effective at crowd control, especially when it comes to very heavy enemies like Ogres, Elementals and Trolls.

Unique 2 goes well for crowd controls, the Shock Zapper hits decently hard and enemies like Heavy Orcs, Ogres and Trolls can be finished off by it especially if you have other traps in your killzone.


Shock Zappers, like Brimstone, is one of the few traps that can hit fast moving enemies like Runners, Earthlings and Gnolls with perfect accuracy.


Shock Zappers are surprisingly good to kill pesky flyers (except Shockbats).
_______________________________

Snow Cannon:

Cost: 1000
Damage Type: Physical | Acid (with Unique 2)
Skulls to upgrade: 3, 5, 7
Unique: 6 — 6
Condition to unlock Uniques: Freeze 75 enemies.
Unique 1: Converts trap into Acid damage.
Unique 2: Reduced cooldown.


Snow Cannons have a wide arc of range, but watch out for walls and other obstacles that may obstruct it lowering its effectiveness.

Snow Cannons are interesting traps that douse everything that goes in front of it in with Ice/Acid damage over a wide arc once it's activated. Its vertical height trigger is massive, on par with the Auto Ballista, something that isn't noticeable right away. The price of this trap is fairly high at 1000 coins.

Positioning is more important to this trap more than most since if you set it too close to walls, even small parts of the ceiling can greatly disrupt the effectiveness of this trap if you're not careful.

The damage from the Snow Cannons is pretty modest and even against vulnerable targets like Fire Fiends it won't do much, their purpose is mostly to act as crowd control to keep enemies frozen for your other traps do finish them off.

Unique 1 turns this trap into an Acid spewing cannon that will apply the Melt debuff for 5 seconds on enemies that are hit. It also slightly increases its damage, something that isn't told in its description.

Unique 2 is simple enough: reduced cooldown to make this trap activate more often.


"Bath time children!" - The Sorceress in her youth.


Snow Cannons have a VERY long activation range.
_______________________________

Swinging Mace:

Cost: 1000
Damage Type: Physical | Fire (with Unique 2)
Skulls to upgrade: 5, 7, 9
Unique: 7 — 7
Condition to unlock Uniques: Kill 75 enemies.
Unique 1: Lowers cooldown of trap.
Unique 2: Converts trap into Fire damage.


The Fire Swinging Mace in action.

The Swinging Mace is a large trap, the largest of the game, having a size of 6x2, basically three regular ceiling traps side-by-side. As its name indicates it will swing back and forth hitting whatever is unfortunate enough to get in its path.

Take note that the mace has a fairly long delay between each swing so you might need something to keep the enemies below it for this trap to be effective. You can set it in Barricade funneling as well, but be careful as the mace can inadvertently throw enemies further into from your killzone, maybe even past it.

This trap shares some similarities with Rip Saws in which that it can be set in horizontal or vertical orientations. Both placements can be good depending on what you're planning on doing with them. But keep in mind that, in horizontal orientation, the swinging mace won't hit every enemy wall-to-wall and those walking closer to the walls, far from the center, will probably get past it unharmed.

Unique 1 lowers the cooldown of this trap making the mace swing slightly faster. Keep in mind its damage will be low against Ogres and anything resistant to Physical damage (i.e: most enemies in the regular campaign).

Unique 2 gives the Swinging Mace the Fire element which is good when dealing with bigger crowds of Heavy Orcs and will deal at least passable damage against Ogres and Trolls as well.


Barricades go well with the Swinging Mace.
⠀⤷ Traps [DLC Only]
Trap covered in this section:
  • Molten Gold
  • Briar Patch
________________________________________________________________

Molten Gold:


Cost: 500
Damage Type: Physical
Skulls to buy: Cold as Eyes DLC
Skulls to upgrade: 5, 5, 5
Unique: 5 — 5
Condition to unlock Uniques: Spawn 100 coins by killing enemies affected by the trap.

Unique 1: Chance for enemies to drop potions.
Unique 2: Enemies can drop bigger coins.


Molten Gold in action. Notice the bigger coin (worth 50 money).

Molten Gold is the Coinforge's ceiling cousin and it functions like the old trap by giving you a (relatively high) chance of spawning small coins worth 25 moneys from enemies killed while they're affected by the trap's effect. Keep in mind that the effect is short lived and lasts for about 3 seconds only.

The Molten Gold also deals a bit of damage, on its own this damage is low and this trap shouldn't be used to do the heavy lifting for you. Try mixing it with other ceiling traps like Dart Spitters or wall traps to hasten the kill and profit even more from Orc killing.

One of the advantages of this trap is that it will trigger even when set in very high ceilings, so you can put it in places where traps like Shock Zappers, Haymakers or Ceiling Pounders wouldn't normally work.

Unique 1 gives the enemies affected by Molten Gold also a chance to drop potions, but as far as I've tested the chance is still rather low.

Unique 2 focus even more on the chance of earning more money from killing enemies affected by this trap's effect. The big coins are worth 50 moneys instead of 25 from the smaller, more common coins spawned by Molten Gold. The big coins spawn is decent, so this is a very nice upgrade.

Tip:
Crowd control is always welcome but even more important to get the most out of Molten Gold. Using trinkets like Jar of Ghosts can help in keeping enemies under this trap.


The increased height activation of this trap makes the Molten Gold another good option for high ceilings.


The profitable results of the Molten Gold.
_____________________________________

Briar Patch:


Cost: 1000
Damage Type: Physical
Skulls to buy: Tipping the Scales DLC
Skulls to upgrade: 5, 5, 5
Unique: 5 — 5
Condition to unlock Uniques: Make the trap grow 30 times.

Unique 1: Increases damage.
Unique 2: Reduce cost (850 coins).


An alternative to Tar. On the long run, if properly set, and cared for, much more economical too.

The Briar Patch is a trap that will slow down enemies that step on it just like Tar. Its slowing effect is weaker (20% vs Tar's 40%) and it does come at the very high cost of 1000 coins that can be reduced to 850 with the right upgrade.

Like the Ceiling Laser this trap can be useful to get the shields off Orc hands since it will never have to cooldown or reload.

How does it grow?
This trap will grow and create more patches the more it damages enemies passing through it, its damage however is low and should not be relied to kill anything stronger than Runners or Sappers type of enemies.


The patches marked with red "X" will never grow. The other patches can grow if they cause enough damage. Where they'll grow to is random, however.

Another warning when using the Briar Patch:

Briar Patch needs a full regular floor trap size to grow to, they cannot grow on 1x1 spaces. It also cannot grow from slopes to straight ground and vice-versa.

Tips:
The Wind Belt's primary, Crossbow, or Stone Staff secondary, Jar of Ghosts, or crowd control traps, like Gravity Well and Shock Zapper, are perfect to keep enemies on the Briar Patch to make it grow faster.

Also remember that the patch MUST have ground, one trap worth of size, to grow. If the patch is already occupied it will not grow. Only the "first" or "last" patch can grow.

As it is the norm with almost every trap in the game the Briar Patch works well with Barricades since it will "guide" its growth (and due to its price you won't be able to set too many of them anyway).

Unique 1 increases the damage of the Briar Patch which can make it grow and spread faster.

Unique 2 reduces the cost to 850 coins. Still expensive and not very useful given you might need only one to three for the entire map most of times, but if you feel you need the extra coins anyway, this upgrade is for you.


Briar Patches can be useful in small or big maps if set correctly.
📒 War Machines {War Scenarios Only}
About War Machines:
War Scenarios features much bigger enemy count for you to deal with, but in these maps you have access to special traps: the War Machines.

War Machines are basically huge traps that act as bigger and meaner versions of the Traps you know. They can be only used outdoors (with one exception) in War Scenario maps.

Keep in mind that even though they are big, powerful and very destructive, these types of Traps are not meant to kill everything, but are here to thin out the major bulk of the enemy force, so your regular traps can clean up whatever's left.

Of course, War Machines are not mandatory and if you want to challenge your wits you can go without them in any of the War Scenario maps.


For big problems we got big solutions.

Part 1
  • Bowling Boulder
  • Giant Flip Trap
  • Giant Killer Beehive Tree

Part 2
  • Snow Blower
  • Tornado in a Box
  • War Outpost

Part 3 {Mountables}
  • Mega Boom Barrel Launcher
  • Rapid Fire Ballista

Part 4 {Guardians}
  • Bank of Archers
  • Knight
  • Priestess

OVERALL TABLE:
Trap:
Surface to Place:
Damage Type:
Skulls to unlock:
Skulls to buy Unique:
Coins needed to build during maps:
Bank of Archers
Floor (Guardian)
Physical

Fire (with Unique 1)
Game progression
8 — 8
2750
Bowling Boulder
Wall
Physical
Game progression
7 — 7
1200
Giant Flip Trap
Floor
None
Game progression
8 — 8
1000
Giant Killer Beehive Tree
Floor
Physical
6
7 — 7
2000, 1650 (with Unique 1)
Snow Blower
Floor
Ice

Fire (with Unique 1)
Game progression
6 — 6
1000
Tornado in a Box
Floor
Physical (with Unique 1)

Ice (with Unique 2; no actual damage Freeze enemies only)
6
7 — 7
2400
War Outpost
Floor
None
Game progression
6 — 6
1000
650 (with Unique 1)

Mega Boom Barrel Launcher
Floor
(Mountable)
Physical
Game progression
8 — 8
2200
Rapid Fire Ballista
Floor
(Mountable)
Physical
6
6 — 6
2000

Knight
Floor
(Guardian)
Physical + Lightning (ability)
Drastic Steps DLC + 8
8 — 8
3600
Priestess
Floor
(Guardian)
Arcane
Drastic Steps DLC + 7
8 — 8
3000

How to unlock Unique upgrades:
War Machine:
Type:
Condition to Unlock Uniques:
Bank of Archers
Floor (Guardian)
Deal 5000 damage.
Bowling Boulder
Floor
Deal 10,000 damage.
Giant Flip Trap
Floor
Throw 500 enemies.
Giant Killer Beehive Tree
Floor
Confuse 500 damage.
Snow Blower
Floor
Deal 7000 damage.
Tornado in a Box
Floor
Throw 2000 enemies around.
War Outpost
Floor
Place 8 War Outposts.

Mega Boom Barrel Launcher
Floor (Mountable)
Kill 750 enemies
Rapid Fire Ballista
Floor (Mountable)
Deal 10,000 damage.

Knight
Floor (Guardian)
Kill 500 enemies.
Priestess
Floor (Guardian)
Deal 10.000 damage.
⠀⤷ War Machines [Part 1]
War Machines covered in this section:
  • Bowling Boulder
  • Giant Flip Trap
  • Giant Killer Beehive Tree
_______________________________

Bowling Boulder:

Cost: 1200
Damage Type: Physical
Skulls for Uniques: 7 — 7
Condition to unlock Uniques: Deal 10.000 damage.

Unique 1: Increases duration of the Bowling Boulder.
Unique 2: The Bowling Boulder explodes after it rolls long enough.
Note:
Must be manually triggered.

The Bowling Boulder is (as of this writing) the only trap that has to be manually activated. It will roll off and knock down everything in its path no matter the size and weight of the enemy.

It can be a little tricky to set and might take some practice, but you can roll them off as soon as you set them to test them and see where they'll travel. Do keep in mind that any obstacle, even ones set by you such as the Giant Killer Beehive Tree will affect its trajectory.

This War Machine resets pretty fast as well and should be set where you know you'll be staying and fighting the enemies.


Bowling Boulders can be tough to set, but they reset fast and do decent damage.
_______________________________

Giant Flip Trap:

Cost: 1000
Damage Type: None
Skulls for Uniques: 8 — 8
Condition to unlock Uniques:

Unique 1: Lowered cooldown.
Unique 2: This War Machine can be placed inside buildings.


Giant Flip Traps are good for thinning out the small trash. Bigger enemies will be only tripped by it, though.

The Giant Flip Trap is exactly what it means: a very big Flip Trap that will throw lots of enemies away and is one of the few physics trap that can affect very heavy enemies like Ogres, Trolls and Elemental Lords.

Being one of the cheaper options for War Machines, this is one of the simplest ways to thin out the massive Orc army coming your way. As long as you point this toy towards a pit it's very likely that any unfortunate Orc that is in range of this War Machine will be thrown to their doom. But since this thing is so huge it's very hard to force Ogres and Trolls walking near edges to do the same thing, but the Giant Flip Trap can still stall them, especially if more than one is lined up.
_______________________________

Giant Killer Beehive Tree:

Cost: 2000 | 1650 (with Unique 1)
Damage Type: Physical
Skulls to buy: 6
Skulls for Uniques: 7 — 7
Condition to unlock Uniques:

Unique 1: Reduced cost.
Unique 2: Confusion lasts longer.

The floor version, bigger and angrier, brother of the Confusion Flower and Window of Butterflies. This War Machine will periodically create beehives and drop them automatically whenever enemies are close and force them walk backwards while dealing some damage.


The beehives will are pretty good in stalling crowds of big enemies.
⠀⤷ War Machines [Part 2]
War Machines covered in this section:
  • Snow Blower
  • Tornado in a Box
  • War Outpost
_______________________________

Snow Blower:

Cost: 1000
Damage Type: Ice | Fire (with Unique 1)
Skulls for Uniques: 6 — 6
Condition to unlock Uniques: Deal 7000 damage

Unique 1: Deals Fire damage instead of freezing.
Unique 2: Freeze time is increased.


The Snow Blower works better in numbers and if you have something to stall enemies on it.

Snow Blower is a War Machine that freezes enemies that steps on it for a moderate amount of time (around 8 seconds). It is one of the cheaper War Machines in the game, costing 1000 coins, and you can set plenty of them around.

On its own the Snow Blower isn't much to look at since all it does is freeze enemies and in War Scenarios you hardly have enough time to kill them on your own. However when you combine it with other War Machines (Bank of Archers, Knight, Priestess) this little toy becomes pretty useful.

One of its Unique upgrades turns it into a Fire damage War Machine, however since War Scenarios often bring a lot of Fire Fiend and Fire Elementals, enemies that are completely invulnerable to fire damage, this is hardly a practical choice unless you want to thin out the Orc mob and handle these enemies on your own.


The Snow Blower with fire upgrade.
_______________________________

Tornado in a Box:

Cost: 2400
Damage Type: Physical (with Unique 1) | Ice (with Unique 2; no actual damage Freeze enemies only)
Skulls for Uniques: 7 — 7
Condition to unlock Uniques:

Unique 1: Tornado also damages enemies.
Unique 2: Tornado will freeze enemies, but will not throw them anymore.


Tornadoes will wipe out the enemy army, but be careful so you don't throw them inside your fort.

The Tornado in a Box is a War Machine that will fling Orcs of all sizes wildly everywhere. The tornado created by it doesn't follow a set path and will usually circle its spawning box, however the tornado cannot traverse your Barricades.

Do keep in mind that, like the vast majority of physic traps, the Tornado in a Box will NOT lift big enemies like Ogres, Trolls and throw them around.

The fact this War Machine is so unruly can be a problem and it won't do much damage in wide open spaces, but if used near pits it will certainly chuck a good number of Orcs to their doom.

The Unique 2 is interesting as it will freeze enemies and can leave them helpless against other War Machines or Traps just like the Snow Blower.


The freezing tornado will leave enemies defenseless against you and other damage sources.
_______________________________

War Outpost:

Skulls for Uniques: 6 — 6
Condition to unlock Uniques:

Unique 1: Cost reduced to 650 (default: 1000)
Unique 2: Walls are slanted.

The War Outpost is an interesting trap (more of a structure actually) that allows you to build lots of things on it: wall, floor and ceiling traps and create your own little killbox which can be a very powerful strategy provided you can force enemies into it.

There are many strategies and combinations of traps that can be used with it and you can often employ strategies that would be as viable indoors outdoors with the War Outpost.

One of its Uniques changes the walls of the War Outpost at an angle so you can set wall traps instead of ceiling ones, you can place things like Saw Blade Launchers, Window of Butterflies among other traps.

Another utility for the War Outpost is to set other War Machine traps on top of it like the Bank of Archers or the Mega Boom Barrel Launcher.


Two simple applications of the War Outpost: create custom killzones and set a mountable war machine for better range.
⠀⤷ War Machines [Part 3] {Mountables}
War Machines covered in this section:
  • Mega Boom Barrel Launcher
  • Rapid Fire Ballista
_______________________________

Mega Boom Barrel Launcher:

Cost: 2200
Damage Type: Physical
Skulls for Uniques: 8 — 8
Condition to unlock Uniques: Kill 750 enemies.

Unique 1: Increased explosion radius.
Unique 2: Increased range.

The Mega Boom Barrel Launcher is a catapult mountable that throws a powerful explosive projectile that hits a wide area. It's also one of the two mountable options that must be manually used to attack enemies.

While this seems like a very powerful options to fight the massive horde of War Scenarios there are things that you must take note:
  • The projectile has some considerable travelling time and flies in an arc. It can collide with other objects midway through which will cause it to explode.
  • The catapult has to reload after every shot, something that takes approximately 4 seconds.
  • Remember that in Rift Lord every Orc minion will carry a shield which allows them to tank the first hit.

You can launch the projectile with the Mega Boom Barrel Launcher and exit it soon after to attack enemies while it reloads too.

Another thing to note that the Mega Boom Barrel Launcher can be built at the top of the War Outpost to give it a better vantage point to rain fury on enemies.

Tip:
In War Mage difficulty you can use the Mega Boom Barrel Launcher to thin out the horde on their spawn points, however in Rift Lord you should use it at the end of your killboxes where enemies will most likely have lost their shields.

Using it right where your killzone is at can be a little tricky, but it's also a very effective way to get the most out of this War Machine.


Explosion size comparison: without unique (left) and with it (right).
_______________________________

Rapid Fire Ballista:

Cost: 2000
Damage Type: Physical
Skulls to buy: 6
Skulls for Uniques: 6 — 6
Condition to unlock Uniques: Deal 10,000 damage.

Unique 1: Attacks Bleed enemies.
Unique 2: Attacks Stun enemies.

Rapid Fire Ballista is the second mountable War Machine and instead of a slow, big, damage over an area it focuses more on singular targets. Its shots are somewhat inaccurate, but powerful enough to kill anything that isn't an Armored Ogre pretty quickly.

You can use this mountable either to pick off stragglers or soften up heavy enemies for your killzones. In Drastic Steps this is a good option to do heavy damage against Chromatica as well.

Keep in mind the Rapid Fire Ballista has a hard time hitting enemies far away, so try to focus on targets at medium range.
⠀➥ War Machines [Part 4] {Guardians}
War Machines covered in this section:
  • Bank of Archers
  • Knight
  • Priestess
_______________________________

Bank of Archers:

Cost: 2750
Damage Type: Physical | Fire (with Unique 1)
Skulls for Uniques: 8 — 8
Condition to unlock Uniques: Deal 5000 damage

Unique 1: Archers now deal Fire damage.
Unique 2: Archers fire a secondary volley of arrows.


The Bank of Archers will do some serious damage to large groups of enemies, but are extremely fragile. Never put them anywhere close to where ranged enemies will pass through.

Note:
As of patch 1.2 every Archer in the Bank of Archers will not vanish and will revive if they take too much damage.

The Bank of Archers is a War Machine that houses different type of archers. Unlike the Archer Guardian the range of the Bank of Archers is colossal, what you'd expect from longbow archers and they can target enemies pretty much from 1/3 across the entire map, maybe even more.

The damage from the Bank of Archers even without upgrades is nothing to scoff at, they can seriously harm enemy forces from very far and while one Bank of Archers may not do much, consider having up to three or even more of them and you'll realize how efficient this War Machine can be.

With that said the Archers stationed in this War Machine are very fragile and one of their worst enemies is the Orc Dynamite Archer that can clear ranks of them with ease. NEVER put the Bank of Archers where enemies can reach them unless you want to waste your coins.

Unique 1 gives the Bank of Archers the Fire element, but always remember that facing Fire Fiends and Fire Elementals are no an uncommon sight in from Mage Tower onward and they are completely immune to fire damage. This works very well against annoying enemies like Trolls and Ogres.

Unique 2 essentially doubles the damage output done by the Bank of Archers. Setting enough of Bank of Archers will cripple the enemy army before they reach your killzone.


The Fire upgrade will do grievous damage against anything that isn't fireproof.
_______________________________

Knight:

Cost: 3600
Damage Type: Physical | Lightning (ability)
Skulls to buy: 8
Skulls for Uniques: 8 — 8
Condition to unlock Uniques: Kill 500 enemies.

Unique 1: Increased health.
Unique 2: Reduce Lightning Strike ability cooldown.


Knights fighting for you.

Knight is one of the War Guardians available in War Scenarios. They're fairly sturdy and hit hard enough to handle enemies up to Ogres reliably, but are very expensive.

Due to their ridiculous price, Knights are not meant to be the "main course" of the War Machines and should be placed more to aid other War Machines or traps. Knights do a good job at being support tanks for Priestesses.

Knights will stand guard at the spot where you set them but will attack enemies once they get somewhat close to the spot where they are and will dash to fight them. The Knights have the same ability of the Broadsword, the lightning strike, but unlike the weapon the ability does a lot of damage.


A wounded Knight recovering.
_______________________________

Priestess:

Cost: 3000
Damage Type: Arcane
Skulls to buy: 7
Skulls for Uniques: 8 — 8
Condition to unlock Uniques: Deal 10,000 damage.

Unique 1: Reduce recovery time.
Unique 2: Increase Arcane Rain ability radius.


Priestess' normal attacks.

Priestess is the other War Guardian available only for War Scenarios. Their hire price is more affordable than Knights.

The Priestesses will attack by launching Arcane projectiles at enemies from a good distance and if the enemies get close enough they'll use the Arcane Staff's ability over a large area pulverizing most enemies around them.

This War Guardian is a lot less resilient than the Knight, so be careful, but just like any Guardian the Priestess will not fade if they fall in battle, they'll go back to the stand where she was hired and will rest until she recovers.

Since the Priestess doesn't need to leap into battle melee you can set her close to your killzone so she helps your traps kill things.


The Priestess' ability at work.


Like Knights they won't fade if they fall in battle, the Priestess will return to the place she was hired to recover.
⚔️ Weapons
Your personal arsenal:
Here there will be a list of weapons available to use in the game. Unlike the previous game all of them are available for all characters at all times-- no weapons exclusive to a single character this time around, thankfully.

The only annoying bit is that you'll need to finish the game once, in any difficulty, in order to be able to swap the default weapons of the regular characters, but other than that, there aren't limitations.

Your choice of weapons is as personal as your choice of traps and there's not a "best weapon" here. You may find out that some weapons work better for you than others with some traps and the other way around, so don't be afraid to test it at your own leisure.

Should I bring more than one weapon?
Honestly? That's your choice.

Personally since I have more of a hands-on approach when dealing with hordes, so I always pick more than one weapon to help me deal with any inconvenience I may come across, but plenty of other players go with a single weapon and are perfectly fine even well into Rift Lord difficulty.

Tip:
It's not wrong or bad to bring a second weapon only for what its secondary brings.

For example: some players like to bring the Stone Staff not because of its normal attack, but because of its area petrifying attack. Likewise, people bring the Blunderbuss with the freezing secondary because they feel it can be more useful than the Ice Amulet.

Happy headhunting!
One of the biggest changes to ranged weapons, with very few exceptions, is that almost all of them are able to get headshots this time around. Headshots deal much higher damage to enemies and is one of the best ways to get rid of the beefier ones quickly.


A good choice of weapon(s) is as important as a good choice of traps.

Part 1
  • Blunderbuss
  • Magic Longbow
  • Bladestaff

Part 2
  • Ice Amulet
  • Fire Bracers
  • Wind Belt

Part 3
  • Stone Staff
  • Dwarven Warhammer
  • Alchemist Satchel

Part 4
  • Crossbow
  • Scepter of Domination
  • Chain Lightning Staff

Part 5
  • Elven Shortswords
  • Broadsword
  • Arcane Staff

DLC only:
  • Flame Thrower
  • Hand Gatling

OVERALL TABLE:

Weapon:
Manaless Primary?
Damage Type:
Can score Headshots?
Skulls to unlock:
Skulls to Upgrade:
Skulls to buy Unique:
Blunderbuss
Yes
Physical
Yes
Starter
4, 6, 8
8 — 8
Magic Longbow
Yes
Physical
Yes
Starter
4, 6, 8
8 — 8
Bladestaff
Yes
Physical
No
4
3, 4, 5
6 — 6
Ice Amulet
No
Ice
No
Game progression
3, 6, 9
6 — 6
Flame Bracers
No
Fire
No
Game progression
4, 6, 8
8 — 8
Wind Belt
No
Physical
No
8
5, 6, 7
6 — 6
Dwarven Warhammer
Yes
Physical
No
5
4, 6, 8
5 — 5
Stone Staff
Yes
Physical
Yes
8
4, 6, 8
5 — 5
Alchemist Satchel
No
Acid
No
6
5, 6, 7
6 — 6
Crossbow
Yes
Physical
Yes
Game progression
3, 5, 8
8 — 8
Scepter of Domination
Yes
Arcane
Yes
Game progression
3, 5, 8
8 — 8
Chain Lightning Staff
Yes
Lightning
Yes
Game progression
5, 7, 8
8 — 8
Elven Shortswords
Yes
Physical
No
Game progression
4, 6, 8
6 — 6
Broadsword
Yes
Physical (primary)

Lightning (secondary)
No
6
5, 6, 7
8 — 8
Arcane Staff
Yes
Arcane
Yes
5
5, 6, 7
7 — 7

Flame Thrower
Yes
Fire
Yes
Cold as Eyes DLC
5, 5, 5
5 — 5
Hand Gatling
Yes
Physical

Acid (with Unique 1)
Yes
Tipping the Scales DLC
5, 5, 5
5 — 5

Milestones to unlock Unique upgrades:
Weapon:
Condition to Unlock Uniques:
Blunderbuss
Kill 50 enemies with secondary attack.
Magic Longbow
Headshot 50 enemies.
Bladestaff
Deal 20,000 damage.
Ice Amulet
Freeze 90 enemies.
Flame Bracers
Burn 90 enemies.
Wind Belt
Push 500 enemies.
Stone Staff
Deal 15,000 damage with primary attack.
Alchemist Satchel
Deal 7500 damage.
Dwarven Warhammer
Kill 125 enemies with secondary attack.
Crossbow
Headshot enemies 100 times.
Scepter of Domination
Deal 15,000 damage with primary attack.
Chain Lightning Staff
Kill 50 enemies with secondary attack.
Elven Shortswords
Deal 20,000 damage.
Broadsword
Kill 300 enemies.
Arcane Staff
Deal 20,000 damage.

Flame Thrower
Burn 750 enemies.
Hand Gatling
Kill 400 enemies.
⠀⤷ Weapons [Part 1]
Weapons covered in this section:
  • Blunderbuss
  • Magic Longbow
  • Bladestaff
_______________________________

Blunderbuss:

Skulls to upgrade: 4, 6, 8
Unique 8 — 8
Manaless Primary?: Yes
Damage Type: Physical
Can score Headshots?: Yes
Condition to unlock Uniques: Kill 50 enemies with secondary.

Unique 1: Increases secondary blast radius and damage.
Unique 2: Secondary becomes a freezing bomb. Deals no damage nor knockback.


Left: Primary fire - Right: Secondary bomb

The Blunderbuss is Kelsey's default weapon and is best used at short to medium ranges, it can be fired four times before having to reload. You can hit even enemies far away if you aim well, but keep in mind the damage will be pretty low.

Its primary attack fires a spray of pellets that deals a good amount of damage and is devastating at closer ranges, especially if you aim at the face of enemies. It's powerful enough to kill Light and Medium Orcs in one body shot (no need for headshotting) even through their shields in Rift Lord, and deal with Ogres and Trolls relatively quickly with headshots.

The secondary attack fires an explosive bomb that knock enemies around. It consumes a moderate amount of Mana, so don't be too trigger happy with it.

Unique 1 will increase the damage and size of the secondary attack. Keep in mind that the damage still won't be anything great, not shaving even half of a Medium Orc's health (without shield) in Rift Lord.

Unique 2 will lob a freezing bomb that stop enemies for 3 seconds, but will deal no damage and no knockback, the blast radius is not very big, so it's not recommended for heavy crowd control. It's good if you're intending to save one slot for crowd control as you can freeze a big target and unload the entire clip of the Blunderbuss in their face.

Tips:
Although the primary fire hits enemies almost instantly it does not have infinite range and after a certain distance it will do nothing to the target even though the game will show the pellets hitting something.

Also for the biggest headshot damage try to keep the circle of the crosshair centralized to the enemy's heads.


The freezing bomb secondary.
_______________________________

Magic Longbow:

Skulls to upgrade: 4, 6, 8
Unique 8 — 8
Manaless Primary?: Yes
Damage Type: Physical
Can score Headshots?: Yes
Condition to unlock Uniques: Headshot 50 enemies.

Unique 1: Primary Bleed enemies.
Unique 2: Secondary fires in a straight line.
Note:
* You can zoom in with this weapon.
* Chargeable secondary attack.
* You may use the primary attack while charging the secondary fire.


Left: Primary fire - Right: Secondary fire (scattershot)

A simple, easy to use and reliable weapon that Egan starts with, it has a decent fire rate, but even when fully upgraded its rate of fire is modest at best. This weapon is one of the few that allows you to aim, zoom-in, to get a better aim to hit enemies from farther away.

Its primary attack fires a projectile that is recoilless and has no accucary loss. Good for those who value precision. It will also pierce smaller enemies as well.

Its secondary fire is a 3-level charge attack that will fire a horizontal scattershot, you'll fire 3, 4 and 5 arrows with each level charge. You can also charge the secondary attack while firing the primary. The secondary will also knock enemies off their feet (not Ogres, though) and does a decent amount of damage-- the closer you are to the target the bigger the damage will be. The secondary CANNOT score Headshots, however.

Unique 1 causes enemies to Bleed when hit by the primary fire. This weapon doesn't have a very high fire rate (even when upgraded) to spread it everywhere, but it could used good to finish Orcs with one or two less Headshots and maybe for combo making.

Unique 2 converts the horizontal spread shot into a burst-fire type, straight line, of attack which will fire arrows quickly in a straight path. This can be good if used in a narrow paths, especially those created by Barricades, or against single, tougher targets.


A pointblank secondary does a lot of damage against most targets.
_______________________________

Bladestaff:

Skulls to buy: 4
Skulls to upgrade: 3, 4, 5
Unique 6 — 6
Manaless Primary?: Yes
Damage Type: Physical
Can score Headshots?: No
Condition to unlock Uniques: Deal 20.000 damage.

Unique 1: Primary attack heals on hit.
Unique 2: Secondary attack knocks enemies farther away.


Left: Regular slash - Right: Secondary shockwave

Bladestaff is a melee weapon that returns once more. It has fairly good range and damage for a melee weapon. However, being a melee weapon means it's very impractical to use against flying enemies from Drastic Steps DLC.

Its primary attack is a good old fashioned slash that deals damage to everything in front of you. It's fairly quick and easy to use compared to other melee weapons.

The secondary attack is a frontal shockwave that will send enemies flying a good height leaving them helpless against your attack. This can help when handling crowds of smaller enemies, you can use it to stall them in front of your traps or merely give yourself an opening to slash away with impunity. Take note that the secondary will not knock down bigger enemies like Ogres or Trolls, though.

Unique 1 is ideal for people wanting to get up close and personal with the Orcs. You won't have to worry as much about having to run to the rift or pray for a Health Potion to drop every time you get mangled while fighting. However the Health stealing isn't massive, so it doesn't mean you can just jump into a thick group of enemies with reckless abandon and expect to live long.

Unique 2 is fairly straightforward, it launches enemies upwards with more force than usual which can be good to give you some breathing room while your traps reset and help you with crowd control.

Tip:
The secondary can also knock heavy weight enemies off their feet, - remember that airborne enemies take double damage - including Gnolls and regular Elementals (not Lords, though), but these enemies won't be launched nearly as high as Orcs or regular Fiends.


The Bladestaff excels in getting rid of small trash quickly. Having something to incapacitate crowds like petrifying or freezing will help even more.
⠀⤷ Weapons [Part 2]
Weapons covered in this section:
  • Ice Amulet
  • Flame Bracers
  • Wind Belt
_______________________________

Ice Amulet:

Skulls to upgrade: 3, 6, 9
Unique 6 — 6
Manaless Primary?: No
Damage Type: Ice
Can score Headshots?: No
Condition to unlock Uniques: Freeze 90 enemies.

Unique 1: Enemies stay frozen for longer.
Unique 2: Secondary also creates an ice aura that damage enemies.


Left: Ice shots - Right: Ice storm.

The Ice Amulet is a fairly simple and straightforward weapon: aim, fire and freeze things. Frozen enemies can't fight back and take more Physical damage-- things to have in mind.

The primary attack fires a number of projectiles, it's one of the more mana consuming weapons, so you can't spam it, they spread in a "V-shape", so the crosshair of this weapon is very misleading at short ranges.

The secondary attack unleashes a freezing blast around the character that will keep enemies frozen for longer than the primary attack. Keep in mind that while the radius is decent this is also by far the attack that uses the most mana in the game.

Unique 1 is straight to the point, however it only works for the primary attack, not for the secondary, the area freeze one.

The second Unique creates an aura around you after you blast the attack. Its duration is short and the damage isn't very good, so it's hardly worth considering how much mana you'll use up.

Freeze Time with Unique 1
Freeze Time without Unique 1
* 4 seconds (primary)
* 8 seconds (secondary)
* 3 seconds (primary)
* 8 seconds (secondary)


The Ice aura from the secondary (lasts for 4 seconds).
_______________________________

Flame Bracers:

Skulls to upgrade: 4, 6, 8
Unique 8 — 8
Manaless Primary?: No
Damage Type: Fire
Can score Headshots?: No
Condition to unlock Uniques: Burn 90 enemies.

Unique 1: Increase primary attack damage.
Unique 2: Increases length of secondary and duration.


Left: Primary attack - Right: Flame wall

Flame Bracers is a weapon that lets you deal fire damage to enemies and raise a fire wall in front of you with its secondary. Keep in mind that Fire Fiends and Fire Elementals are completely immune this this weapon and you earn it after they start showing up.

It's primary fire will sling a fire blast at enemies, the damage is pretty good and can be further enhanced with the right Unique. It's a great option to deal with big crowds of Orcs and can be used to target pesky Archers in the middle of them with ease. The area of effect is decent, so you don't need to aim exactly at the enemy, you can aim more or less around where the enemy mob is.

The secondary attack is a great option to roast Orcs and pry shields off their hands in Rift Lord, but beware that it uses a fair chunk of Mana to cast.

Unique 1 is focused on the primary attack of the weapon making it do more damage and is better used against grouped enemies or the big ones.

Unique 2 increases the wall of fire size up to the size of the larger doors the Orcs break through (about 3 regular traps, Tar for example, side-by-side) which is a rather large area and a meek extra second to justify its description.

Tip:
The secondary is also very good to deal with Sappers and Kobold Runners, it's also a good option for a preventive attack against the Orcs before they enter your killzone

Secondary with Unique 2
Secondary without Unique 2
* 7 seconds + size increase
* 6 seconds


Secondary size comparison: regular size (right) and with Unique 2, increased size (left).
_______________________________

Wind Belt:

Skulls to buy: 8
Skulls to upgrade: 4, 6, 8
Unique 8 — 8
Manaless Primary?: No
Damage Type: Physical
Can score Headshots?: No
Condition to unlock Uniques: Push 500 enemies.

Unique 1: Increases push strength.
Unique 2: Secondary explodes enemies thrown.


Left: Wind blast - Right: Holding an enemy with secondary

The Wind Belt is a weapon that blow enemies away in front of your character.

The primary attack doesn't deal a lot of damage on its own, and it doesn't affect very heavy enemies like Ogres, Trolls or Cyclops mages. The range is also rather short, so you have to get pretty close to enemies to hit them.

You can use the Wind Belt's primary attack to push enemies into pits or into the gigantic grinders in certain maps, or back to the beginning of your trap course.

You can also use the Wind Belt to swat Kobold Sappers and Firelings away to prevent them from exploding on you or your Barricades. Alternatively the Wind Belt can be used to knock enemies down and leave them helpless against melee attacks for a short while.

The secondary attack picks an enemy and allows you to throw it around. Since you get attack by so many of them this has very little utility outside of picking something like a regular Elemental or a Gnoll and throw them away into a pit.


The Wind Belt can be used to keep enemies in your killzones as well.

Tip:
Friendly reminder that airborne enemies take double damage.

Just like the Bladestaff the Wind Belt's primary will also knock down Gnolls and regular Elementals. They won't be blown very far, but they can be left on the ground long enough for your traps to finish them off.

Warning:
Unlike previous title the Wind Belt will throw enemies everywhere, more or less in a "V-shape" pattern, so it's very easy to send enemies above, below or beyond where you expect. Be very careful when using this weapon,


Throwing an enemy with secondary with the explosion Unique.
⠀⤷ Weapons [Part 3]
Weapons covered in this section:
  • Dwarven Warhammer
  • Stone Staff
  • Alchemist Satchel
_______________________________

Dwarven Warhammer:

Skulls to buy: 5
Skulls to upgrade: 4, 6, 8
Unique 5 — 5
Manaless Primary?: Yes
Damage Type: Physical
Can score Headshots?: No
Condition to unlock Uniques: Kill 125 enemies with secondary.

Unique 1: Take reduced damage when using the secondary attack.
Unique 2: Move faster when using the secondary attack.


Left: Smashing attack - Right: The spinning attack secondary.

A melee weapon that but swings far slower than the Bladestaff or the Elven Shortswords. It requires more finesse and timing to use compared to the Bladestaff also due to the lack of healing on normal hits against enemies.

The secondary attack is a spinning attack that can hit large groups of enemies and will juggle up to heavy weight enemies. It's good to use against large groups of them, but you do have to keep an eye for Ogres and the like and they won't be thrown around and will retaliate.

Unique 1 is useful to keep the pressure against enemies and help you survive your own onslaught and in the likely case you get mauled by enemies retaliating and ranged ones pestering you from afar.

Unique 2 is good if you're intending to blitz through crowds and retreating or repositioning yourself, favoring hit and run tactics.

Personal Warning:
Sadly I can't recommend using this weapon.

The Dwarven Warhammer pales in comparisson to Bladestaff in every aspect. Bladestaff is easier to use, has better crowd control and more reliable damage spread, and oh, it can heal too. It's almost embarrassing to continue the comparisons.
_______________________________

Stone Staff:

Skulls to buy: 8
Skulls to upgrade: 4, 6, 8
Unique 5 — 5
Manaless Primary?: Yes
Damage Type: Physical
Can score Headshots?: Yes
Condition to unlock Uniques: Deal 15.000 damage.

Unique 1: Increase secondary range.
Unique 2: Secondary launches after brief delay.


Left: Primary attack - Right: Petrifying secondary

Stone Staff is a simple, but very useful weapon. It fires a projectile at moderate pace that will pierce an enemy and can be very good to pick off shields from Orcs quickly in Rift Lord Mode. It's a very well-rounded weapon that can be good for crowd control and even singling out targets.

The primary fire deals a good amount damage, it's nothing exceptional but with the Stone Staff's decent fire rate it's more than enough to bring regular Ogres and Trolls down quickly.

Be on the watch for really tough ones like Mountain Trolls and Armored Ogres, though, as this weapon doesn't have that big of a damage to quickly deal with them without aid of your traps.

The secondary attack will petrify enemies in an area in front of you for approximately 3 seconds. Do keep in mind this secondary bites a decent amount of Mana. One more thing to add is that the secondary attack excels at killing ranks of flying enemies in Drastic Steps DLC since they tend to fly in tight clusters.

Unique 1 is self-explanatory, it will petrify enemies in a larger radius. It's excellent for hitting more flying in Drastic Steps and keeping enemies in place for easy headshots or quickly mauling them with melee as well.

Unique 2 will launch enemies upward after petrifying them. What is it good for? Increasing damage against enemies further. Airborne enemies take double damage, so if you have have melee weapons, or traps, like Grinders, this Unique can work very well in your favor. Just take note that very heavy enemies (Ogres, Trolls...) will not be affected and this upgrade is going to make getting headshots a nightmare.

Another thing about the Unique 2 is that the small blast that launches enemies upward happens with a bit of a delay, so enemies rushing the area that weren't petrified will be launched upwards as well.

Tip:
Just like Freezing, Petrifying make enemies take extra Physical damage.


The Stone Staff is by far the best weapon to kill large groups of any type of flying enemy.


The Unique 2 in action. You can use melee weapons or use it in your killzones.
_______________________________

Alchemist Satchel:

Skulls to buy: 6
Skulls to upgrade: 5, 6, 7
Unique 6 — 6
Manaless Primary?: No
Damage Type: Acid
Can score Headshots?: No
Condition to unlock Uniques: Deal 7500 damage.

Unique 1: Increased explosion radius
Unique 2: Bombs destroyed by attacks deals increased damage


Left: Setting up bombs - Right: Detonating them manually with secondary

The Alchemist Satchel is the only weapon in the game that deals Acid damage which applies the Melt debuff to increase Physical damage. The Melt debuff applied by the Acid damage will last for 5 seconds.

The primary fire will launch the bombs, up to 3 can be set, and the secondary will explode them manually, the secondary will not consume Mana. Take note that it uses a large chunk of Mana even when fully upgraded.

Unique 1 increases the explosion size to affect more enemies.

Unique 2 will cause the bottles created by the primary fire to deal a bit more damage when triggered by damage, be it from your attacks, your traps or even an enemy's.

Personal Warning:
It saddens me to say this, I'll do for this weapon because it's that bad, and specially for a weapon I had high hopes for, but I do not recommend getting the Alchemist Satchel as of now (since August 11th, 2021 patch).

It's far too weak, uses too much mana and lacks the versatility that the Ice Amulet or the Stone Staff have (damage + crowd control), and those weapons also decrease Physical defense of enemies. The Alchemist Satchel is simply hopelessly outclassed in every single aspect-- from damage, to mana consumption, to utility.

This weapon needs some serious buffs to be even remotely useful at all.

The advent of the Hand Gatling and its manaless Acid primary attack made this weapon even more useless than it was before.
⠀⤷ Weapons [Part 4]
Weapons covered in this section:
  • Crossbow
  • Scepter of Domination
  • Chain Lightning Staff
_______________________________

Crossbow:

Skulls to upgrade: 3, 5, 8
Unique 8 — 8
Manaless Primary?: Yes
Damage Type: Physical
Can score Headshots?: Yes
Condition to unlock Uniques: Headshot enemies 100 times.

Unique 1: Headshot kills cause enemies to explode.
Unique 2: Enemies stunned by secondary take more damage.
Note:
* You can zoom in with this weapon. Rate of fire will be reduced while zooming in.


Left: Primary fire - Right: Stunning bolt secondary.

A returning weapon from the first two games, however now you don't have to wait every time you shoot to get consecutive Headshots. Crossbow is a versatile weapon with fast firing rate and crowd control capability with its secondary.

Its primary attack is a magic bolt that deals good damage, it's also automatic and fires very fast, much faster than a fully upgraded Magic Longbow, however unlike that weapon the Crossbow will suffer from accuracy loss on consecutive shots.

You can zoom in with this weapon (default button being Middle Mouse Button). While your aim is focused the fire rate will be decreased, but in return the accuracy will not drop, a great feature to hit far away enemies with precision.

The secondary attack is the familiar Stun Bolt that Stun enemies in a good radius leaving them wide open to any attack. It's rather Mana friendly as long as you don't spam it.

Unique 1 deals a small amount of damage in a small area around the enemy that was killed, but only by Headshots. The damage isn't very impressive and it's more of an utility tool with very few specific uses (more about it in Tips, right below).

Unique 2 is better suited when bringing the Crossbow alone, but keep in mind the damage increase is minimal. Stunned enemies will sway their heads and still jolt when hit, so getting constant headshots can still be annoying. This small damage increase does stack with Freeze and Petrify effects, however.

Tip:
The Headshot Explosion Unique will kill Firelings spawned by Fire Elementals and Fire Lords instantly. If you can intercept them and kill them with headshots this might prevent you from having to deal with the Firelings.


The Headshot Explosion in action.
_______________________________

Scepter of Domination:

Skulls to upgrade: 3, 5, 8
Unique 8 — 8
Manaless Primary?: Yes
Damage Type: Arcane
Can score Headshots?: Yes
Condition to unlock Uniques: Deal 15.000 damage.

Unique 1: Increases Charm duration (from 6 to 10 seconds).
Unique 2: Increases the blast radius of a fully charged attack
Note:
* Chargeable primary attack.
* You can use the secondary attack while charging the primary attack.
* DOES NOT HAVE AUTOFIRE.


Left: Fully charged blast (without Unique) - Right: An enemy charmed.

A returning weapon from the previous game. It holds all of its previous abilities with the added benefit of being able to get Headshots as well. The Scepter of Domination also has the benefit of being one of the rare elemental weapons that has manaless primary fire.

The primary attack is a quick, small and fast traveling Arcane bolt that deals passable damage, it doesn't have auto-fire but if you can keep clicking consistently it will tear apart enemies with Headshots.

This weapon also posses a 3-level charge attack with the maximum charge level that will ragdoll light and medium weight enemies. The level 2 charge does almost the same damage as the level 3.

Unique 2 will increase the radius of the fully charged primary attack, for those who don't feel like killing their wrists using the rapid fire.

Unique 1 will increase the duration of Charm from 6 to about 10 seconds (estimation).

The secondary attack will Charm enemies into fighting for you, this can be very useful either to get a big enemy to act as a temporary distraction. Do keep in mind it uses a large chunk of Mana. Charmed enemies will explode if they die fighting for you.

Tips for Charm:
Charming very heavy enemies is always a good idea since not only they might take a lot damage from other minions chances are they'll kill some of them for you. Another added benefit is that Sappers and Firelings will most likely target them as well.

The enemies that have been Charmed are not immune to damage from you or your traps and if no enemies are around will stand completely still allowing you to pelt their heads with near impunity.

Cygnus in particular is a great user of this weapon as his Feign Death ability will make every enemy stop targeting him and turn to the Charmed enemy.


Charming enemies to fight for you near your killzones is always a good idea.

_______________________________

Chain Lightning Staff:

Skulls to upgrade: 5, 7, 8
Unique 8 — 8
Manaless Primary?: Yes
Damage Type: Lightning
Can score Headshots?: Yes
Condition to unlock Uniques: Kill 50 enemies with secondary.
Unique 1: Secondary attack chains to more enemies.
Unique 2: Secondary attack Stun enemies (3 seconds).
Note:
* Chargeable secondary attack.
* You may use the primary attack while charging the secondary fire.


Left: Lightning ball primary - Right: Chain lightning secondary.

A weapon that fires Lightning balls at slow pace, slower than the Magic Longbow and certainly much slower than the Stone Staff or the Crossbow. The projectiles don't align perfectly with the crosshair and they also have more traveling time than usual, so you might need to get used to it before starting to deal consistent Headshots with this weapon.

Its primary attack is a basic Lightning bolt that will hit enemies for a good amount of damage a bit more than usual to try compensate for its slow attack (it doesn't).

The secondary attack will charge a Chain Lightning attack, the more charged the more enemies it will jump to dealing a decent amount of damage against a certain number of enemies - from 2, 3 and 4 at default, to 4, 5 and 6 with Unique 1. One thing to note is that you can charge the secondary attack while firing the primary attack.

Do keep in mind that the secondary attack uses a fair bit of mana and it's pretty weak. It won't kill even Light Orcs in one hit in Rift Lord and it's mostly to quickly take out heaps of Kobolds and pests the primary fire has no hope of dealing with.
⠀⤷ Weapons [Part 5]
Weapons covered in this section:
  • Elven Shortswords
  • Broadsword
  • Arcane Staff
_______________________________

Elven Shortswords:

Skulls to upgrade: 4, 6, 8
Unique 6 — 6
Manaless Primary?: Yes
Damage Type: Physical
Can score Headshots?: No
Condition to unlock Uniques: Deal 20.000 damage.

Unique 1: Increases the primary attack's speed
Unique 2: Secondary attack causes Bleeding


Left: Primary attack - Right: Fully charged projectile secondary.

A fast melee weapon with shorter range than the Bladestaff. Its damage potential is decent, but it lacks the versatility of other melee weapons.

Its primary attack consist of quick slashes, they're fast enough to deal with all of the lighter enemies up to Medium Orcs/Fire Fiends, but it still pales when fighting tougher enemies like Ogres or even Heavy Orcs.

The secondary attack is a 3-level charge twin slash sword beam that will pierce enemies, however even fully charged this move deals very low damage and is mostly here as a last resort to kill Sappers or finish off a far away (and heavily wounded) enemy. The damage from the secondary attack, even when fully charged, is pitiful and it uses a lot of Mana which would be best spent on anything else.

Also, keep in mind the secondary has a bad tendency to get caught in your own traps or the level geometry if you attempt to use it too close to them.

Unique 1 will increase the attack speed of this weapon increasing its damage and also helping in stunlocking most lighter foes.

Unique 2 adds Bleed to the secondary, but other than using it for combos there isn't much use for this upgrade.
_______________________________

Broadsword:

Skulls to buy: 6
Skulls to upgrade: 5, 6, 7
Unique 8 — 8
Manaless Primary?: Yes
Damage Type: Physical | Lightning (secondary)
Can score Headshots?: No
Condition to unlock Uniques: Kill 300 enemies with the weapon.

Unique 1: Primary attack heals on hit.
Unique 2: Adds an additional lightning bolt to secondary.


Left: Normal slash attack - Right: Lightning strike secondary

One more weapon to the melee arsenal and this time it's Bladestaff's bigger, angrier cousin, the Broadsword.

The first primary attack is a sword slash that's slower than the Bladestaff, for this reason its damage, although higher on singular hits is lower when compared to the Bladestaff's faster attack speed. To make things worse the Broadsword has bad range for a melee weapon which makes it hardly a good choice over the other option.

The secondary attack will rain three lightning strikes lined up in front of you causing some Lightning damage to enemies and electrifying them. It's pretty good to hit enemies lined up if you like using Barricades to funnel them, and the damage is decent at max level. You can use secondary to electrify enemies and kill them quickly so they explode dealing damage around them.

Keep in mind that the secondary of this weapon is very inconsistent since the area that projectiles hit is smaller than it looks and I've missed even big enemies like Earth Lords and Ogres with it.

Unique 1 is pretty much self-explanatory, healing on hit, more than the Bladestaff's to compensate this weapon's much slower attack.

Unique 2 is good if you like using its secondary attack and you are generally more careful on melee combat (or carrying the Healing Trinket).


The projectiles are spaced pretty far from each other. It's no wonder they miss even big targets easily.
_______________________________

Arcane Staff:

Skulls to buy: 5
Skulls to upgrade: 5, 6, 7
Unique 7 — 7
Manaless Primary?: Yes
Damage Type: Arcane
Can score Headshots?: Yes
Condition to unlock Uniques: Deal 20,000 damage with the weapon.

Unique 1: Increased secondary radius.
Unique 2: Reduce Mana cost for secondary.


Left: Arcane bolt primary - Right: Arcane rain secondary.

The Arcane Staff is a weapon that fires fast traveling projectiles at moderate pace, the projectiles are about as fast as any other weapon like the Magic Longbow and the Crossbow, so to hit far away targets you might have to lead them a bit sometimes.

Being an Arcane weapon means it's one more addition to the Arcane damage collection, and that it deals higher damage to pesky things like Armored Ogres and Mountain Trolls as the vast majority of weapons that can score Headshots deal Physical damage, which those enemies are resistant to.

The primary attack is a standard projectile that does pretty good damage against enemies and will debuff them with the Arcane effect (+15% damage from all elements, Arcane itself included). The primary attack is pretty powerful and will down Ogres and Trolls in three headshots in Rift Lord, but is strangely tougher to get headshots compared to other weapons.

The secondary is a shower of projectiles that will blanket the area just around you, it lasts for a decent while, but uses quite a bit of Mana, so you can't spam it like crazy. Bear in mind the secondary is VERY inconsistent (which seems to be a theme around Drastic Steps) and can easily miss any target smaller than an Ogre-- NEVER rely on it to take out Kobolds or Sappers, or any enemy for that matter.

Unique 1 increases the radius, the area the secondary attack affects, but it also means projectiles falling farther away making them even more unreliable at killing things.

Unique 2 is self-explanatory, but the Mana decrease is minimal, almost irrelevant, but at least it's something, I suppose.
⠀⤷ Weapons [DLC only]
Weapon covered in this section:
  • Flame Thrower
  • Hand Gatling
_______________________________

Flame Thrower:


Skulls to buy: Cold as Eyes DLC
Skulls to upgrade: 5, 5, 5
Unique 5 — 5
Manaless Primary?: Yes
Damage Type: Fire
Can score Headshots?: Yes
Condition to unlock Uniques: Burn 750 enemies.

Unique 1: Increases burn duration.
Unique 2: Secondary takes less time to reach full power.


Left: Primary fire - Right: Stream of fire (fully powered)

Flame Thrower is one of the few elemental weapons that can score headshots on enemies while having a manaless primary attack. Since this weapon deals Fire damage it goes without saying that it's useless against Hellbats and quasi-useless against the Fire Fiends.

Its primary functions as an automatic weapon that shoots small fire balls that will ignite enemies dealing extra damage over time. The rate of fire is pretty good and the damage is good for a manaless primary attack, but the projectiles are rather slow.

The secondary roasts enemies with a constant jet, of short-ranged stream of fire. One of the more interesting aspects of the secondary is that if you keep using it the secondary will eventually spew an even more potent stream which you'll notice by its coloring getting a shade of blue-- once it gets to this point the weapon will become stronger until you let go of the trigger or run out of mana (interestingly symbolized by the fuel tank).

The mana consumption of the secondary, when fully upgraded, is decent for the damage and utility. It won't drain your mana instantly, but if you want to use the fully powered secondary make sure to have a decent mana reserve.

Unique 1 increases the burn duration caused by any attack from this weapon. Good if you want to "spread the joy" by pelting enemies with the primary or running around with the secondary torching everything before they reach your traps.

Unique 2 focuses more on the power up the secondary gets if you keep using it. This upgrade can be pretty good if you're intending to fight enemies up close.

Burn with Unique 1
Burn without Unique 1
* 6 seconds
* 4 seconds


The secondary is a good option to spread the burning ailment to groups of enemies.
______________________________

Hand Gatling:


Skulls to buy: Tipping the Scales DLC
Skulls to upgrade: 5, 5, 5
Unique 5 — 5
Manaless Primary?: Yes
Damage Type: Physical
Can score Headshots?: Yes
Condition to unlock Uniques: Kill 400 enemies.

Unique 1: Primary deals Acid damage.
Unique 2: Secondary gets area of effect damage.
Note:
* You can zoom in with this weapon.
* You may use the secondary attack while firing the primary.


Left: Primary fire (with Acid) - Right: Secondary fire

The Hand Gatling it a good weapon against the Tuatara since its rapid fire will never be countered by the damage cap protection they have.

Its primary fire is an extremely fast firing attack, but loses accuracy quickly if you hold down the attack button. Its damage is decent but even so Physical resistant enemies can take a while to kill.

The secondary spreads a handful of caltrops around a small area. The damage isn't high and the caltrops are one-time damage things and they expire if you let them around for too long. Honestly, it feels like a waste of mana.

Unique 1 gives this weapon the Acid element which allows you to spread the Melt debuff freely rendering the Alchemist Satchel even more useless than it was before. It is also a gift to combo makers since Acid traps are either expensive or clunky (sometimes both). It's also great to go along most weapons, especially melee ones, as well.

Unique 2 focuses on the secondary, but this unique is not nearly worth compared to the utility and usefulness of the other upgrade.
💍 Trinkets
Introduction to Trinkets:
Trinkets are optional, complimentary equipment that take up a slot in your loadout. Most of them are there to help you in a certain gameplay style: either trapping or fighting. If you're feeling like you can pick more than one to complement both styles. The word of rule here is that Trinkets are not mandatory to win. They are here to make your life easier by enhancing your abilities.

The best part of Trinkets is that activating their abilities require no Mana at all, so you don't have to concerned about blasting one of your best attacks and be worried about not having enough for your Trinket.

Make sure to remember that all trinkets have considerable cooldown, some more than others and in most cases you can only blast them once per wave, some might take even more than one wave to fully cooldown.

"Do I need to have the trinket selected to get its passive bonus?"

No. As long as the trinket is in your loadout bar you'll get the passive bonuses. However you need to select and use it for the active effect to take place, no trinket will ever automatically use the active effect on its own.

"Can I bring more than one trinket?"
Yes, you can. I often go with 2 or even 3 trinkets out in the field due to my playstyle, but if you ever feel you have a vacant slot, and not enough money for traps, consider picking up a trinket for the upcoming battle.

"Does my trinket affect my co-op partner?"
The active effect does. The passive effect doesn't.

For example: the Healing Trinket's health regeneration will not affect your partner, but the active effect, the healing, will. Likewise the Mana Rage Trinket will only increase your mana pool, but the active effect will grant Mana Rage for both of you.

A strange exception for one Unique upgrade is from the Trap Reset Trinket-- the Trap Reset Trinket with Barricade healing will only heal the Barricades you, the trinket owner, placed, but not your partner's. However it will reset all of your partner's traps upon use.


Trinkets are optional, but a good choice of trinket(s) can make a world of difference.

Part 1
  • Healing Trinket
  • Mana Rage Trinket
  • Trap Reset Trinket

Part 2
  • Jar of Ghosts
  • Empty Rift Trinket

Part 3
  • Freedom Trinket
  • Ring of Storms

DLC only:
  • Cyclopean Gaze
  • Reptilian Carapace

OVERALL TABLE:
Trinket:
Trinket Cooldown:
Skulls to unlock:
Skulls for Special upgrade:
Skulls to buy Unique:
Healing Trinket
Short (1 minute)
Game progression
4
4 — 4
Mana Rage Trinket
Very Long (3 minutes)
Game progression
5
8 — 8
Trap Reset Trinket
Long (2 minutes)
6
6
8 — 8
Jar of Ghosts
Very Short (45 seconds)
5
5
8 — 8
Empty Rift Trinket
Very Long (3 minutes)
3
6
8 — 8
Freedom Trinket
Very Short (30 seconds)
3
6
8 — 8
Ring of Storms
Very Short (40 seconds)
6
6
7 — 7

Cyclopean Gaze
Extremely Short (15 or 10 seconds)
Cold as Eyes DLC
10
7 — 7
Reptilian Carapace
Extremely Short (25 seconds)
Tipping the Scales DLC
10
7 — 7

How to unlock Unique upgrades:
Trinket:
Condition to Unlock Uniques:
Healing Trinket
Use the trinket 9 times.
Mana Rage Trinket
Use the trinket 5 times.
Trap Reset Trinket
Use the trinket 12 times.
Jar of Ghosts
Scare 100 enemies.
Empty Rift Trinket
Use the trinket 9 times.
Freedom Trinket
Use the trinket 15 times.
Ring of Storms
Kill 100 enemies.

Cyclopean Gaze
Turn 75 enemies into stone.
Reptilian Carapace
Block 100 projectiles with barrier.
⠀⤷ Trinkets [Part 1]
Weapons covered in this section:
  • Healing Trinket
  • Mana Rage Trinket
  • Trap Reset Trinket
_______________________________

Healing Trinket:

Skulls to Unique: 4 — 4
Special: 4
Condition to unlock Upgrades: Activate Trinket 9 times.

Unique 1: Increases passive health regeneration.
Unique 2: Increases active health restoration.
Special: Increases character's max Health (+40).
Cooldown: Short. 1 minute.


Left: Healing Trinket equipped - Right: Healing activated

The Healing Trinket is an interesting piece of equipment that will allow you to remain in the front lines fighting longer without having to risk getting kicked back to the rift - either by falling back or just falling plain dead.

It gives the one equipped with it a passive Health regen that can be increased through one of its Unique upgrades. It also synergies well with Cygnus' ability, Feign Death, to regenerate Health faster, and with the Bladestaff's Health stealing Unique as well. It goes without saying that this trinket is extremely useful if you're planning to use melee weapons.

With its another Unique you'll restore practically all Health from you and your partner which is nice, but be mindful of the trinket's cooldown.

Tip:
Trinket isn't as superfluous as it was before especially since common enemies like Orcs Archers are way more aggressive this time around this and a lot of maps have a strict Par Time that forces you to build away from the rift-- which in turn makes death respawning or even falling back a risky tactic.
_______________________________

Mana Rage Trinket:

Skulls for Unique: 8 — 8
Special: 5
Condition to unlock Upgrades: Use the trinket 5 times.

Unique 1: Increases character's max Mana.
Unique 2: Increases Mana rage duration (8 to 12 seconds).
Special: First spell after using the trinket will cost zero Mana.
Cooldown: Very Long. 3 minutes.


Left: Mana Rage Trinket equipped - Right: Mana Rage activated.

The Mana Rage Trinket is one of the most useful Trinkets in the game by the simple fact it can give you more Mana - which lets you use secondary attacks or elemental attacks more often.

Using the trinket gives you virtually infinite Mana for a small period of time (roughly 8 seconds, or 12 with the right upgrade) through fast Mana regeneration, so you can go all out with your Mana consuming moves for a while. You can use the Mana Rage on early waves to give you a strong initiative and handle enemies while your trap setup is precarious.

The max Mana increase Unique increases Mana to a point even a Mana Potion dropped by enemies won't fully restore all of it.

Tip:
Keep in mind that this trinket does not increase the rate your Mana recovers, so this trinket may give the illusion that your mana is regenerating slower. You still have to watch out not to spend all your Mana all at once.

Another Tip:
Try to hold back a bit when the Mana Rage is about to end, this way you'll have a decent Mana pool and avoid unnecessary troubles should you need more Mana for any heavy threat that may have lived through your rampage.
_______________________________

Trap Reset Trinket:

Skulls to buy: 6
Skulls to Unique: 8 — 8
Special: 6
Condition to unlock Upgrades: Use trinket 12 times.

Unique 1: Traps passively reset faster.
Unique 2: Heals Barricades only set by the user when activated.
Special: Lowers trinket cooldown (1.50 minutes)
Cooldown: Long. 2 minutes.


Left: Trap Reset Trinket equipped - Right: Trap Reset Trinket activated.

Trap Reset Trinket is all about one of the core mechanics of the game and it should be no surprise it's very, very useful and can be extremely powerful if used correctly at the proper time.

This trinket passively lowers the time your traps take to reset and one of its Uniques further increases this trait. Traps reset and firing faster means more kills, but even with the matching Unique upgrade the cooldown reduction will be marginal, it won't make anything like all traps fire every second.

Unique 1 enhances its passive a little more, but as I just mentioned, don't expect traps firing every second, the reload time reduction is, at most, around 20%.

Unique 2 helps preserving Barricades against Kobold Sappers and Firelings if you don't let them blow the Barricades completely, it's also good in case enemies accidentally hit the Barricades, something that happens irritatingly often with the glitched hitbox of Archer's arrows.

Additionally, the Unique 2 is a good option for Endless matches too, since you'll get less money as Endless rages on and replacing damaged or destroyed Barricades can become a very costly problem.


Finding the most opportune moments to use this trinket can help clear waves much quicker or turn the tide of a losing fight.


This trinket will also reset the hanging bombs on certain levels like Cliffside and Secret Fortress.
⠀⤷ Trinkets [Part 2]
Trinkets in this part:
  • Jar of Ghosts
  • Empty Rift Trinket
_______________________________

Jar of Ghosts

Skulls to buy: 5
Skulls to Unique: 8 — 8
Special: 5
Condition to unlock Upgrades: Scare 100 enemies with active or passive.

Unique 1: Scare all enemies around a small area around you when you get attacked.
Unique 2: Increases duration of active effect (from 10 to 15 seconds).
Special: Increases Trinket's counterattack duration.
Cooldown: Very Short. 45 seconds.


Left: Jar of Ghosts equipped - Right: Spectral image active.


The active effect. Best used with Barricade funneling.

The Jar of Ghosts is a very nice trinket. The active effect can also save your skin if something goes wrong and can help you turn the tide of a losing battle if used correctly.

This is one of the trinkets I recommend bringing if you ever think you have a free slot available as it has be helpful in almost any situation or map, especially during early waves when things are much more prone to get out of hand.

Its active effect will create a spectral image that will spook enemies and make them walk back to their spawn point for a short while, this will usually create a cluster of enemies perfect for anything that hits a large group, like a Trap Reset Trinket activation.

Tip:
The fear caused by the Jar of Ghosts is more useful than merely halting the progress of enemies; it will completely stop them from attacking you as well, which is very useful when getting attacked by Orc Archers, Ogres and Gnolls.

The Unique 1 may seem odd at first, but it focuses heavily on the counterattack passive and it's perfect to go along with life stealing weapons, or medium range combat, as you might get hit a lot, especially by Orc Archers. Even if they hit you the small area of effect fear will trigger which can give you some breathing room.


"Fearing surrounding enemies" upgrade works very well when fighting with melee weapons.
_______________________________

Empty Rift Trinket

Skulls to buy: 3
Skulls to Unique: 8 — 8
Special: 6
Condition to unlock Upgrades: Use the trinket 9 times.

Unique 1: Increases the number of Rift Points.
Unique 2: Increases the duration of active effect (Rift protection).
Special: First enemy that gets into the rift won't take any points.
Cooldown: Very Long. 3 minutes.


Left: Empty Rift Trinket equipped - Right: Trinket activated.

The Empty Rift Trinket is a curious piece of equipment that can be a lifesaver if you use it correctly. Its main function is to prevent you from losing Rift Points and either losing a Perfect Victory or losing altogether in case something goes awry in your trap course, it's particularly useful at early waves where your trap setup might be fragile.

The active effect will grant protection against losing Rift Points and should be used if enemies are about to overwhelm you near the rift-- something that might be very common in early waves, or in case a Sapper or a Fireling broke a Barricade at the worst time possible.

Uniques 1 is particularly focused on increasing the duration of the active effect. But take note that the cooldown of this trinket is massive, about 3 entire minutes, so it might be used once or twice depending on the map you're going for.

Unique 2 is a good option if you're having trouble finishing a map, but it's useless for people aiming for Perfect Victories (or prideful players). It might be useful to let you survive a little longer in Endless matches as well.

Its Special upgrade in particular is nice since everyone who's played this game long enough always went through that infuriating situation where that single lone pesky Runner got past everything and ruined a would-be perfect game. With the Special you can let one of them slip and continue with your life.

Alternatively more daring player can let one big, burly enemy like an Armored Ogre, a Mountain Troll, or an Elemental Lord get away if you feel like he's going to be too much of a hassle to deal with. Keep in mind this is a single-use only for the entire map.
⠀⤷ Trinkets [Part 3]
Trinkets in this part:
  • Freedom Trinket
  • Ring of Storms
_______________________________

Freedom Trinket

Skulls to buy: 3
Skulls to Unique: 8 — 8
Special: 6
Condition to unlock Upgrades: Use the trinket 15 times.

Unique 1: Resist all ailments.
Unique 2: Your speed is increased instead of getting stunned.
Special: Partner gets a speed boost when healed from being stunned.
Cooldown: Very Short. 30 seconds.


Left: Freedom Trinket equipped - Right: Trinket activated.

The Freedom Trinket gives you natural immunity to being stunned by Ogres which is useful if you're going for close combat with melee weapons. Using it will heal the stun from your partner as well.

Its upgrades can give you immunity to all sorts of ailments, more useful in Drastic Steps with ailment slinging flying enemies, or a speed boost instead of being stunned by enemies. It will also grant immunity to being slowed down by Gnoll Hunters as well.
_______________________________

Ring of Storms

Skulls to buy: 6
Skulls to Unique: 7 — 7
Special: 6
Condition to unlock Upgrades: Kill 100 enemies with active effect.

Unique 1: Increase lightning thunders from active effect.
Unique 2: Increase rift lightning thunder from passive.
Special: Increased active time (from 10 to 15 seconds)
Cooldown: Very Short. 40 seconds.


Left: The passive effect in the rift, notice the clouds surrounding it - Right: Lightning cloud from the active effect.

Personal Warning:
This is one of the trinkets I cannot recommend using without its upgrades and getting it to unlock its Uniques can be a bit of a hassle, so I really suggest you do it on Apprentice difficulty, since, honestly speaking, without upgrades this trinket is very underwhelming.

The Ring of Storms is a trinket that will create a small lightning cloud that will rain lightning on enemies for a short period of time in a certain area.

The passive effect of this trinket makes it shoot lightning from the rift, but the lightning will fire very slowly, with a whooping 5~6 second delay between each shot, and even with the right Unique the range isn't very big. The lightning also won't kill anything beyond Runner type of enemies in one shot (especially in Rift Lord difficulty), so don't rely on it to kill most things that could've passed through your killzone.

You can use this trinket to rain lightning on a small group of enemies, but keep in mind the lightning rate of this trinket is modest at best, even with the right Unique, so don't expect it to do the heavy lifting for you.

Tip:
The active effect will hit enemies at random, so more enemies in the area will mean that the damage will be spread between them. If only a few enemies are in the area they'll be hit far more often by the lightning bolts.


The Ring of Storms can be an option to help you deal with dangerous enemies.
⠀⤷ Trinkets [DLC only]
Trinket in this part:
  • Cyclopean Gaze
  • Reptilian Carapace
_______________________________

Cyclopean Gaze


Skulls to buy: Cold as Eyes DLC
Skulls to Unique: 7 — 7
Special: 10
Condition to unlock Upgrades: Turn 75 enemies into stone with trinket's counterattack passive effect.

Unique 1: Increases the chance of petrifying enemies that attack you.
Unique 2: Lowers trinket's cooldown (10 seconds).
Special: Deactivating trinket's active effect causes a small Physical damage explosion.
Cooldown: Extremely Short. 15 seconds.


Left: Cyclopean Gaze equipped - Right: Trinket in use, the rune will fade until it deactivates on its own.


The petrifying counterattack.

The Cyclopean Gaze is a very weird trinket that functions not unlike the Jar of Ghosts enabling some close range shenanigans since you must get hit to its petrifying effect to trigger.

Keep in mind that only melee enemies will be affected by the trinket's passive counterattack and only one enemy can be affect at a time (unlike the Jar of Ghosts if it has the right Unique upgrade).

The active effect of the Cyclopean Gaze will turn your character into stone and you'll be invincible for the duration of the effect, or until you manually disable it. Having the Special upgrade will cause the character to do a small explosion, the damage is very low and won't bruise even Heavy Orcs, let alone bigger enemies.


The explosion caused by the Special upgrade after deactivating the active effect from the trinket.
______________________________

Reptilian Carapace


Skulls to buy: Tipping the Scales DLC
Skulls to Unique: 7 — 7
Special: 10
Condition to unlock Upgrades: Block 100 projectiles with the barrier.

Unique 1: Increases barrier duration (from 12 to 16 seconds)
Unique 2: Barrier moves with player.
Special: Increases defense even more.
Cooldown: Extremely Short. 25 seconds.


Left: Repitilian Carapace equipped - Right: Barrier activated.

This is a trinket that can be either extremely useful or extremely useless depending on your playstyle.

Its active effect creates a barrier for 12 seconds that blocks ranged attacks including from Dynamite Archers, Gnoll Grenadiers, flying enemies and Cyclops Mesmerizers, even if you're close to the edges of the barrier the area of effect will not hurt you. But enemies can still invade the barrier and melee attacking ones won't be affected by it in any way.

Warning:
Keep in mind that enemies inside the bubble can still shoot you and this does not block the attack of Fire Fiend Overlords.

Its passive effect is also very good, especially with the Special Upgrade. You gain more defense, but unlike most passive buffs in this game this is not a nominal amount-- it's a very high bonus that, with the right gear, turns you into a powerful tank that will be VERY difficult to bring down.

Needless to say this trinket goes very well with melee weapons, especially the Bladestaff and Broadsword that have life stealing. Even the Elven Shortswords can be not completely useless if you bring the Healing Trinket along too.

Unique 1 makes the barrier last longer (4 seconds more) which helps a bit. You can also leave the barrier protecting your Guardian Archers for longer too. Great for stationary defenders.

Unique 2 on the other hand can be useful if you tend to move a lot.


This trinket can useful in co-op allowing you to tank enemies for your partner and shield them from projectiles with the active effect.
📓 Weapon Loadouts (Builds)
Forewords:
This is a section dedicated to Weapon Loadouts, sets of equipment used to kill Orcs. Combination of weapons I use.

Like I mentioned in the Table of Contents, these are merely suggestions of weapons and trinkets that I like using, and if you feel you can swap something that suits more your tastes, all the better.

Practicality first: Weapon loadouts for Rift Lord.
These are weapon combinations I've used in Rift Lord, they're meant to be strong enough to help you on the ever shaky early waves you might face and on the late ones where the horde is much bigger.

"Loadout in action" videos are there, at the end of each loadout description, in case you need to have an idea of how I put these weapon loadouts to use in Rift Lord difficulty.

Why not recommend traps?
Because it's a very personal choice and there are lots of maps where the same trap setup will either be not nearly as effective as others, or simply not work at all.

"This is useless, I only need one weapon!"
Good for you, buddy.

"But, seriously, why do you use more than one weapon?"
Short answer: Because this just my play style.

Long answer: I like jumping into action and having tools to deal with enemies as much as I enjoy watching my traps shred them to gibs. Also in early waves most of times only your traps will not be enough to kill the vast majority of enemies, so it's always good to be prepared for both small trash and big trash.

Addendum: Like I mentioned in the Weapon section it's perfectly fine if you can deal with all enemies having a single weapon, and no more than that, in your loadout.


Just suggestions to (maybe) try help you decide what weapon(s) might suit your taste better.
💬 Characters: Health and Mana (again)
This again?
Just a little reminder if you want to check how much Health and Mana a character has before trying out a loadout.

The character with more Health are: Vorwick, Kelsey and Max.
The character with more Mana are: Cygnus, Egan and Gabriella.


The health loss from an Armored Ogre's attack in Rift Lord difficulty.
The mana loss was from the Ice Amulet secondary.


Egan
Kelsey
Cygnus
Vorwick
Max
Gabriella
Health
135
175
125
185
165
150
Mana
165
125
175
115
135
150
Special thanks to the Orcs Must Die! Wiki for this specific information.[orcsmustdie.fandom.com]
⠀⤷ Antipode
Weapons:
* Crossbow (Headshot kills explode enemies)
* Flame Bracers (Primary deals increased damage)
* Ice Amulet (Freezes enemies longer)

Trinkets (suggestion):
* Mana Rage Trinket (Increased max Mana)

This time one does not cancel the other.

Pros:
+ Balanced damage-wise. Kills a bit of everything well enough from any range.
+ Build that is safe since you'll be fighting from very long ranges.

Cons:
- Takes a bit of practice to use effectively.
- Can be very Mana consuming.

Personal notes:
A build focused on dealing with most types of enemies at early waves.

The primary weapon can be almost anything you'd want (although I sorely miss the mana regen headshot thing), but I'll go on more detail about my preferences soon below.

The Flame Bracer is the small trash clean up tool. Using either properly without spamming too much can get rid of small crowds of Orcs early on and even the big ones with proper trap setups.

The Ice Amulet is the heavy duty tool here meant to freeze and stall the big threats like Ogres, Trolls and Elemental Lords.

Be wary that even its primary attack is pretty mana taxing, so don't spam it-- blast it once and make sure to let the effect wear off before recasting it to freeze the enemy again. Make sure to use it from a distance aiming at lines or even firing while standing at sidelines to hit as many enemies as possible.

Regarding weapons for the primary slot:
The Crossbow is one of my favorite options being pretty powerful at dealing with very heavy enemies and being not bad at killing small mobs as well. Its headshot explosion is extremely situational, but will prevent Fire Elementals/Lords from spawning Firelings if you use it and can kill ranks of flying enemies reliably.

The Blunderbuss is a close second personal favorite mine since it has good crowd control and since you'll be close to enemies to use the Wind Belt it's one of my favored choices in many cases.

The Arcane Staff, or the Scepter of Domination, are good alternatives if you know how to work with them. The elemental balance they offer is nice and it will help you kill most types of very heavy enemies quickly too.

The Chain Lightning Staff can work in this build, but keep in mind its low attack rate makes it a very difficult weapon to use and the build is mana heavy as it is and its secondary is close to worthless with the Flame Bracers together.

Likewise the Magic Longbow damage is subpar compared to the other weapons and its secondary uses too much mana for very little crowd control, so it's one of my least recommended weapons.

Loadout in action:
Using the loadout to fight the Cyclopeans in Frostbitten. Killing enemies fast and controlling the bigger ones is necessary when fighting without Barricades.
⠀⤷ Breeze Slide
Weapons:
* Blunderbuss (Secondary freezes enemies)
* Wind Belt (Primary throw enemies farther)
* Stone Staff (Increased range on secondary)

For when you want to get up close and personal. Not too much, though.

Weapons:
* Blunderbuss (Secondary freezes enemies)
* Wind Belt (Primary throw enemies farther)

Simpler variant.

Pros:
+ Easy to use and learn.
+ Excellent crowd control from small to big enemies.
+ Stone Staff is very useful against flying enemies.

Cons:
- Long ranged enemies like Orc Archers and Cyclops Mages can be annoying.
- Does not kill big crowds quickly on its own.

Personal notes:
A simple build that is very focused on keeping you alive and fighting at early waves until you get money to set your defenses up.

Blunderbuss is the main choice for primary weapon due to its medium range which synergies well with the Stone Staff and Wind Belt-- both weapons that need you to be closer to enemies to affect them. The freezing bomb secondary uses less Mana than the Stone Staff's secondary but affects a very small area and should be used to deal with lone Ogres, Trolls or Gnolls.

Wind Belt is used to stall crowds of enemies up to heavy (not very heavy) weight. Remember that it will also knock enemies like regular Elementals (not Lords) and Gnolls too and it's good to swat Sappers and Firelings away too.

Another good reminder is that airborne enemies take double damage and with the Blunderbuss your aim doesn't need to be pinpoint to cause a lot of damage against enemies.

The Stone Staff is optional, but very good and can be used against both light and heavy enemies effectively (also being the best weapon against flyers in the game), its primary fire being far more accurate can be useful to pick off enemies from out of the Blunderbuss' range.

Take note that the Stone Staff secondary uses a fairly high amount of mana, so choose between the Wind Belt or even the Blunderbuss' freezing secondary according to the situation - vs. crowds of small enemies and if said crowd has big enemies/flyers in it - to conserve your mana.

Loadout in action:
Putting the loadout to use in Sand Sea Castle.
⠀⤷ Bow and Blade
Weapons:
* Crossbow (Enemies Stunned by secondary takes extra damage)
* Bladestaff (Primary attack heals on hit)


The Master's legacy still shines on.

Pros:
+ Versatile for fighting at long distances or up close.
+ Good crowd control for small and big enemies.
+ Bladestaff heals up without needing of potions or falling back to the rift.

Cons:
- Does not take out Armored Ogres and Mountain Trolls quickly on its own.

Personal notes:
A deceptively simple build that's extremely versatile in terms of crowd control.

Crossbow is used to deal with enemies from afar or at medium ranges (remember that you can also zoom in for a controlled, albeit slower, fire rate).

The stunning secondary of the Crossbow can also be used to stall even large crowds of enemies and keep the pressure on enemies that cannot be knocked over by the Bladestaff.

The Bladestaff itself is used to deal with the early mobs of Orcs that can cause problems and can be difficult to deal with until you get a few traps to help you. The primary will keep you alive as long as you don't push yourself TOO hard as well.

Using the secondary attack of the Bladestaff's will knock enemies off their feet (not Very Heavy ones, though) and as long as you don't spam it you'll be able to easily handle even the largest crowds of enemies.

Loadout in action:
In Colosseum. Showing its uses to control the early waves and picking off dangerous enemies on late waves.
⠀⤷ Defender
Weapons:
* Bladestaff (Primary attack heals on hit)
* Flame Bracers (Primary deals increased damage)

Trinkets:
* Reptilian Carapace (any Unique)
* Jar of Ghosts (Fear counterattack affects surrounding enemies)

Variant 1: Fear and Fire.

Weapons:
* Bladestaff (Primary attack heals on hit)
* Hand Gatling (Acid damage on primary)
* Stone Staff (any)

Trinkets:
* Reptilian Carapace (any Unique)

Alternative to Stone Staff:
* Cyclopean Gaze (Counterattack always petrify enemies)


Variant 2: Melt and Petrify.

Other Trinket suggestion:
* Healing Trinket (Faster health regeneration)

Pros:
+ Excellent for tanking and stalling large groups of enemies.
+ Works well with any trap setup.
+ Versatile and great to help in co-op.

Cons:
- Requires the "Tipping the Scales DLC" to work.
- Does not kill very heavy threats like Armored Ogres and Mountain Trolls quickly on its own.
- Melee centered build. Without the Stone Staff it's not recommended for maps with flying enemies.

Personal notes:
A melee build that may look odd at first, but it deals with big crowds of enemies easily.

Bladestaff is my main choice of weapon due to its versatility: it deals good damage and hits a decently large area with the primary (also healing you with the proper upgrade) and you can knock enemies up to heavy weight off their feet with the secondary.

Notes on Fire + Fear:
Variant 1 is more oriented towards crowds of enemies with the Jar of Ghosts counterattack being able to stall even big crowds of enemies you can face in War Scenario maps. The Flame Bracers helps in killing pesky Archers and wear down Ogres and Trolls quicker.

Notes on Melt + Petrify:
Variant 2 is focused on more singular threats and the defense debuffs from Petrifying and Melt stack, so it can help you kill bigger threats quicker. The Hand Gatling's Acid damage can also be used to spread the Melt debuff so other traps, and your co-op partner, does more damage against them.

You can swap the Cyclopean Gaze for the Stone Staff as well. Any upgrade helps and the "launch enemies after secondary" further increases damage since airborne enemies take twice as much damage.

Alternatives for the Bladestaff?
Broadsword:
The Broadsword has better health regeneration with its Unique upgrade. It can make you tankier at cost of crowd control and damage. The secondary does good damage but it's still very unreliable since it can even miss massive enemies like Earth Lords.

Elven Shortswords
Big, big maybe here. The Shortswords' damage output is higher, but not high enough to be worth trading in my opinion. Too much risk for little return.

Dwarven Warhammer?
No. The primary swings too slowly and the damage output is not nearly worthy to deal with crowds.

Loadout in action:
Showing the strengths of this build in Cliffside. Because you need to have something to deal with four Mountain Trolls at Wave 1.

A variant with Healing Trinket instead of Jar of Ghosts in Untrained Grounds. Still works well despite the lack of any additional trinkets.
⠀⤷ Max Sorcery
Weapons:
* Blunderbuss (secondary is a freezing bomb)
* Scepter of Domination (Charm lasts longer)

Maximilian and Gabriella's personal weapons make a powerful combination. Coincidence?

Other weapon build suggestion:
* Bladestaff (Primary attack heals on hit)
* Scepter of Domination (Charm lasts longer)

Tradition from the first and second games together in the third.

Pros:
+ Good damage potential.
+ Covers medium and long ranges.

Cons:
- Blunderbuss variant doesn't kill huge crowds of Orcs quickly without the aid of traps.
- Needs the completion of the game to unlock one of the weapons.

Personal notes:
Blunderbuss Variant:
This is a simple and useful loadout. The Blunderbuss, or Bladestaff, and the Scepter of Domination synergies with each other very well.

The primary attack of the Blunderbuss can be used to kill small trash rather quickly and even the heavier ones with the secondary being able to hold them in place. The Scepter's primary on the other hand is far more precise and can pick off enemies at greater distances, but packs quite a punch when half-charged and you can still use the Blunderbuss' secondary to hold enemies in place for either quick shots, or a charged attack as well.

Bladestaff Variant:
With the Bladestaff you can have as much crowd control as you have with the Blunderbuss against smaller enemies and Gnolls will not pose a threat to you, but you'll lack the freezing attack to deal with very heavy enemies more easily.

About the Scepter of Domination:
The Scepter of Domination can be used to Charm the very heavy enemies like Ogres and Trolls to make them fight for you and create big cluster of enemies for your traps or any other area attack you may carry. Instead of being worried about an Armored Ogre showing up you'll probably be happy instead.

The primary attack, normal or charged, can be used to kill very heavy enemies quickly. Keep in mind that the first charge of the scepter will do the same amount of damage the second level of charge (which adds the area of effect).

Loadout in action:
Blunderbuss variant. Aqueducts has some tough waves early on, so it's good to show how this works until you get your trap course running strong.

Bladestaff variant. Master's Courtyard has some nasty early waves too, so it's another good map to showcase how this loadout works.
⠀⤷ Bleeding Fire
Weapons:
* Magic Longbow (Primary causes Bleed)
* Flame Bracers (Primary deals increased damage)

Bleed and burn them.

Weapons:
* Magic Longbow (Primary causes Bleed)
* Flame Bracers (Primary deals increased damage)
* Wind Belt (Primary throw enemies farther)

Bleed, burn and blow them away.

Weapons:
* Magic Longbow (Primary causes Bleed)
* Flame Thrower (Primary burn enemies longer)

Flame Thrower variant

Pros:
+ Bleed and Burn helps a lot with trap damage and even combos.
+ Good damage spread at safe distances.
+ Mana friendly as long as you don't spam mana consuming attacks.

Cons:
- Without Wind Belt, Fire Lords will be dangerous since neither weapon can quickly handle the Firelings.
- Loses a lot of effectiveness if too many Fire resistant/immune enemies are in the map.

Personal notes:
A simple-looking weapon combination with the Magic Longbow.

The Magic Longbow's primary deals decent damage and causes Bleed which helps killing smaller enemies in fewer shots, the Bleed damage adds up nicely with the Burn from either second weapon (Flame Bracers or Flame Thrower).

If you have the Tipping the Scales DLC you'll have access to the Flame Thrower as well. It's a weapon that can help you spread the Burn quickly with its secondary and the primary is very useful to quickly get rid of Ogres, Trolls and Elementals (not Fire Elementals, though).

The biggest problem here is the complete lack of crowd control weapons, so you need to be aggressive and careful not to lose control of the situation, especially during early waves.

Needless to say this build works pretty well with the Tar Trap with Fire Damage Upgrade.

Loadout in action:
Flame Bracers variant. Fighting in Sand Sea Castle where damage over time helps a lot against the Tuatara.

Flame Thrower variant. In Close Quarters where early waves can be a bit chaotic.
💡 Trap Loadouts: Preface
What's this section about?
About giving some of the suggestions of trap combinations I use in a few cases.

Keep in mind these aren't strict combinations and I tend to change them slightly here and there to suit my tastes or depending which weapon loadouts I'm using in certain maps...

Needless to say the Trap Ideas below is just what the word means: ideas. They'll be there just to give you a few hints and maybe something to start and help you create your own killzones. Who knows.

What's the difference between "killzones" and "killboxes"?
None as far as I'm aware. Most people use either to describe their favored location of killing.

Others prefer to define them by size with killzones being bigger than killboxes, but for simplicity's sake I'll refer everything as "killzone" here.


Don't overthink trapping. The art of trapping can be as chaotic as the horde itself and some of the best trap courses people made were by accident after putting a trap in their loadout they didn't think it was going to be that useful.
⠀⤷ Trap Ideas: Barricaded
Killzones: Barricade funneling/bottlenecking
This is an extremely popular method of creating killzones and it's also very efficient and can be used in a plethora of ways with many traps.

These are killzones created with Barricades to funnel/bottleneck enemies into a specific spot forcing them to walk a narrow line which in trade makes it much easier to control even large crowds.

The game isn't shy about using Barricades and it's very, very obvious that it's biased towards Barricade-focused killzones rather than open ones, killzones that doesn't utilize them.

The most obvious advantage is the fact Barricades will force enemies into a narrow space which makes traps like Wall Charger, Grinder and Spike Wall work far more efficiently (not even putting your weapons into the equation). Another advantage is that it's much easier to control crowds when funneling them into smaller spaces, for this reason this tactic is a very good option for most War Scenario maps.

But like I mentioned in the initial preface, be very careful around Barricade-breaking enemies like Dynamite Archers, Gnoll Grenediers and even more with Sappers. Any holes in these setups is extremely dangerous-- they will either greatly diminish the effectiveness or outright disable them depending where the hole is made and, sometimes, if not fixed in seconds can be game ending for you.

Some of the traps considered of universal use for any Barricade setup are: Dart Spitter, Window of Butterflies, Confusion Flower and Tar. While almost every trap will work well with Barricades, there are two common types of Barricade setups that can be used which I'll show below: Straight Line and Snaking.

Straight Line:

Keeps enemies as close to walls as possible, simple and efficient. Great for traps like Wall Chargers, Wall Blades, Grinders.

Snaking:

A Barricade setup used to get the most out of traps like Saw Blade Launcher, Arrow Wall, Rip Saw and Deep Freeze.

Pictured examples:


There are many, many ways to make use of a Barricade funneling. Be creative.
⠀⠀⠀⤷ Aplomb
Main Traps:
  • Tar or Briar Patch
  • Shock Zapper, Gravity Pillar or Ceiling Laser
  • Ice Dart Spitter
  • Confusion Flower, Window of Butterflies, Guardian Archer, Spike Trap or Ice Rip Saw
  • Fire Arrow Wall, Deep Freeze or Wall Charger


Some suggestions. Mix up in any way you like/need it.

Personal notes:
A simple idea that focuses on most types of damage and can create killzones that will, most of times, take care of themselves. It has balanced damage types and is fairly versatile against all types of enemies, from Orcs to Cyclopses to Tuataras.

Floor:
Tar is one of the best options to slow enemies and keep them under pressure. Briar Patch is a good alternative if you're willing to stall enemies on it to make it grow.

Ceiling:
The Ice Dart Spitter with Shock Zappers or Gravity Pillars are the main stars of this trap setup and together, with some help of Confusion Flowers and Window of Butterflies or even Guardian Archers they can take care of big groups of enemies of all types.

Gravity Pillars, Shock Zappers or even Ceiling Lasers are the top choices against Runner-type enemies like Kobolds Runners, Fire Fiend Runners and Earthlings.

Gravity Pillar is great against crowd of small enemies, but bigger threats like Ogres and Trolls can trigger it prematurely, so you can mix it up with Shock Zappers for maxed efficiency.

Walls:
Fire Arrow Walls are here to give this setup a little more oomph to kill problematic targets like Armored Ogres and Mountain Trolls too. It can be replaced by Wall Chargers or Deep Freezes if you're going to deal with Fire Fiends.

Setups:

Gravity Pillar, Shock Zapper, Deep Freeze, Fire Guardian Archer.


Gravity Pillar, Ice Dart Spitter, Fire Arrow Wall and Confusion Flower.

Trap Loadout in action:
In Sand Sea Castle with three separate killzones.

In Order Enclave with three separate killzones as well. One of them being "open boxed".
⠀⠀⠀⤷ Lightning Lane
Main Traps:
  • Ceiling Laser
  • Lightning Spike Trap
  • Wall Charger
  • Tar Trap
  • Ice Dart Spitter
  • Confusion Flower

Personal notes:
A trap loadout focused on Lightning damage.

Lightning is an element that isn't resisted by most enemies and the selection of traps meant to deal damage and keep them under pressure.

The Ceiling Laser or Shock Zapper are here to electrify enemies so the Wall Chargers, with the "electrified enemies take more damage, will deal with the heavier enemies. They are also adept at catching Runner enemies as well.

The Lightning Spike Trap complements the setup pretty well and also electrify enemies. Patch 1.2.1.0 buffed their damage which makes them pretty good at softening anything up to Ogres and Trolls.

Ice Dart Spitter and Tar together are always two very good crowd control traps and will make sure nothing blazes through the setup and will make sure they'll take as much damage as possible.

Setups:

Setup in one of the doors in Slag Field.


Setup in Cliffside (east).


Setups in Close Quarters.

Trap Loadout in action:
Two killzones in Slag Field.
⠀⤷ Trap Ideas: Open Box / "Barricade-less"
Killzones: Open Box
This is the name I choose for killboxes that don't rely on Barricade funneling to work. Of course having more space means it can be more difficult to control huge crowds earlier, but they (usually) work well enough.

These are ideas that work better when a map already gives a decent place for you to work with your traps, usually when you only need to block one or two sides and force enemies into the right hallway you'll be fortifying.

The biggest advantage in this type of killzone is the fact that you have to worry much less about collateral damage when dealing with Dynamite Archers, Fire Elementals and even Sappers. For the most part you'll use the level layout to create your killzones, so no need to search for good spots to spend coins on Barricades.

Open Box ideas work with Barricades, but they're here because I'm a stubborn player who likes to avoid using Barricade killzones as much as I can.

Traps that are either cheap (Spike Trap, Ceiling Pounder) or that hits larger areas (Arrow Wall, Dart Spitter, Boom Barrel Dispenser, Confusion Flower) are some of the options to consider when building this type of trap course.

However the problems are that wider areas means that it's much easier to get some leakers getting through in the mid of big fights. So make sure to ALWAYS bring either something like Shock Zappers or Brimstone to avoid issues with fast enemies like Kobold Runners, Fire Fiend Runners or Earthlings and Firelings.


An example of an "open box" killzone.


The golden rule for this type of trap course to work is to use the level's layout at its fullest and instead of focusing in a single fortified spot, set as many traps over widespread areas as possible. Always remember to find good places where the traps will do the most destruction as well.

Pictured examples:


Killzones without Barricades can take as many shapes and forms as barricaded ones and they are especially great when you want widespread damage without worrying too much about Dynamite Archers, Sappers or Grenediers ruining your day.
⠀⠀⠀⤷ Attrition Battle
Main Traps:
  • Shock Zapper or Gravity Pillar
  • Ice Dart Spitter
  • Guardian Archer
  • Tar or Briar Patch
  • Fire Arrow Wall or Deep Freeze
  • Arcane Brimstone, Ice Rip Saw, Spike Trap


Personal notes:
This trap loadout is balanced to counter most type of enemies, be them light or heavy.

The mixture of Shock Zapper/Gravity Pillar and Ice Dart Spitter is the main star of this build, together they are good crowd control traps that can handle most crowd of enemies with ease.

Fire Arrow Walls or Deep Freezes are essential to be through the map to spread damage as well.

Guardian Archers with Health Regen will resurrect faster (30 seconds), this can be good to set them near enemy lines so they'll stall enemies as, when in sufficient numbers, if one or two falls the others might be able to hold on until they get back up.

Fire Guardian Archers will deal a lot more damage but will revive slower (60 seconds) and they'll be useless against Fire Fiends or Hellbats. The slow resurrection also makes them much less efficient at stalling and you should place them farther away from harm.

Setups:


Make sure to set traps like Confusion Flowers, Gravity Pillars, Ice Dart Spitters and Fire Arrow Walls to protect your Archers and help them keep enemies under pressure.

Trap Loadout in action:
⠀⠀⠀⤷ Boom Barrel Boon
Main Traps:
  • Ceiling Laser
  • Boom Barrel Dispenser
  • Ice Dart Spitter
  • Deep Freeze
  • Tar or Briar Patch


Personal notes:
A set of traps meant to be used without the need of Barricade funneling.

The Ceiling Laser is meant to be set at the start of the trap course to take the shield from the Orcs in Rift Lord difficulty. It can be also used to deal with Sappers and Runners since none of the other traps can reliably kill them.

Tar or Briar Patch is the trap used to group enemies together so the Boom Barrel Dispensers will hit as many as they can.

The main damage will be dealt by the Boom Barrel Dispensers while the Deep Freeze and Ice Dart Spitters will hold enemies in place.

While these traps deals with large crowds of heavy and light enemies it's also prone to letting some leakers survive and some enemies, especially Trolls and Mountain Trolls can survive it.

Setups:


Two examples in Slag Field.

Trap Loadout in action:
Slag Field is a pretty annoying map, but good to stress test your trap setups.
⠀⠀⠀⤷ Dragon's Alley
Main Traps:
  • Arcane Dragon
  • Ceiling Laser or Shock Zapper
  • Ice Dart Spitter
  • Tar or Briar Patch
  • Deep Freeze or Fire Arrow Wall


Personal notes:
This set of traps is focused on the destructive power of Arcane Dragon's bounce effect. While it's not easy to set them due to most maps being made specifically to spite the bounce whenever you can set them it's worth the trouble.

Every other trap is meant to complement the damage debuff caused by Arcane effect (+15% elemental damage) and keep enemies under pressure with the Ice Dart Spitter and Shock Zappers being excellent choices.

The Fire Arrow Wall and Deep Freezes are there to balance out the elemental damage in case you need more power to deal with other enemies. Depending on how many weapons and trinkets you like to bring you can also add Brimstone and Spike Traps to the mix as well.

Setups:


Some setups with Ceiling Lasers and Shock Zappers.

Trap Loadout in action (Open Box):

Trap Loadout in action (Barricaded):
💭 Tidbit: Elemental Damage and Status Effects

Forewords:
Before we move into the Enemies section I'll leave a table with the elemental damage that every Weapon, Trap and War Machine can have. This is in case you want to check a particular enemy and know what equipment can have the right damage for the said enemy and test the damage against the enemy.
____________________________

About Elemental damage and status effects:
Elemental damage is a good thing to keep in mind when creating trap courses as enemies often have different resistances and will take reduced damage from certain ones.

Can more than one effect/ailment be applied to enemies?
Yes! And you should for combos and better killing.

Element weakness damage:
Element resistance damage:
Damage increased by +30%
Damage reduced by -50%

It's not uncommon for Status Effects, also known as Ailments, to be caused by elemental damage, although some of the more specific effects can be only caused by a few choice of traps or weapons.

For simplicity's sake I won't be detailing here what weapon and trap deals what elemental damage or what status effect. You'll be able to read in better detail about it in their specific sections.

Element:
Effect:
Weapons:
Trinkets:
Traps:
War Machines:
Physical
* Kill enemies dead.
* Bladestaff
* Blunderbuss
* Broadsword
* Crossbow
* Dwarven Warhammer
* Elven Shortswords
* Hand Gatling
* Magic Longbow
* Stone Staff
* Arrow Wall
* Auto Ballista
* Bank of Archers
* Bowling Boulder
* Briar Patch
* Ceiling Pounder
* Dart Spitter
* Decoy
* Grinder
* Guardian Archer
* Haymaker
* Knight
* Mega Boom Barrel Launcher
* Molten Gold
* Rapid Fire Ballista
* Rip Saw
* Saw Blade Launcher
* Spike Trap
* Spike Wall
* Swinging Mace
* Tornado in a Box
* Wall Blades
Headshot
* Greatly increased damage against the enemy.
* Arcane Staff
* Blunderbuss
* Chain Lightning Staff
* Crossbow
* Magic Longbow
* Scepter of Domination
* Stone Staff
* Flame Thrower
* Hand Gatling
* None
Fire (Burn)
* Enemies take damage over time.

* Enemies move 20% slower.
* Flame Bracers
* Flame Thrower
* Arrow Wall
* Bank of Archers
* Brimstone
* Ceiling Laser
* Floor Scorcher
* Guardian Archer
* Snow Blower
* Swinging Mace
Ice (Freeze)
* Stop enemies in their tracks.

* Enemies take increased damage from Physical attacks (30% more).
* Blunderbuss
* Ice Amulet
* Dart Spitter
* Deep Freeze
* Rip Saw
* Snow Cannon
* Snow Blower
Lightning (Shock)
* Enemies killed by Lightning explode damaging other enemies around them.

* Sometimes stun enemies for a very, very brief moment.
* Broadsword
* Chain Lightning Staff
* Ring of Storms
* Ceiling Laser
* Shock Zapper
* Spike Trap
* Wall Charger
Arcane
* Enemies take increased damage from all elements (15% more), including Arcane itself.
* Scepter of Domination
* Arcane Staff
* Auto Ballista
* Arcane Dragon
* Brimstone
* Priestess
* Spike Trap
* Window of Butterflies
Acid (Melt)
* Enemies take increased Physical damage (50% more).
* Alchemist Satchel
* Hand Gatling
* Acid Geyser
* Deep Freeze
* Snow Cannon

Status Effect (Ailment):
Effect:
Weapons:
Trinkets:
Traps:
Airborne
* Enemies take more damage from all sources (100% more).
* Bladestaff
* Blunderbuss
* Dwarven Warhammer
* Scepter of Domination
* Stone Staff
* Wind Belt
* Flip Trap
* Floor Scorcher
* Gravity Pillar
* Haymaker
* Push Trap
* Spike Wall
* Swinging Mace
Slow
* Moves slower (20~40%).
* None
* Briar Patch (-20%)
* Tar (-40%)
Bleed
* Enemies take damage over time.
* Magic Longbow
* Elven Shortswords
* Wall Blades
* Saw Blade Launcher
* Spike Wall
Charmed
* Charmed enemies will fight
for your side and will explode
on death whether by your
attacks or other enemies.
* Scepter of Domination
* None
Confusion
* Enemies will walk backwards.
* None
* Confusion Flower
* Window of Butterflies
Fear
* Enemies will walk backwards.
* Jar of Ghosts
* None
Petrify
* Stop enemies in their tracks.

* Enemies take increased damage from Physical attacks (30% more).
* Stone Staff
* Cyclopean Gaze
* None
Stun
* Stop enemies in their tracks.
* Crossbow
* Chain Lightning Staff
* Ceiling Pounder
* Push Trap
* Shock Zapper
* Spike Wall
* Wall Charger
Golden
* Enemies may drop a small coin worth 25 money.
* None
* Molten Gold
💭 Tidbit: General Table of Resistances and Weaknesses
General Table of Resistances and Weaknesses:
Reminder:
Element weakness damage:
Element resistance damage:
Damage increased by +30%
Damage reduced by -50%

Element:
Enemies that are weak against it:
Enemies that resist it:
Physical
* Cyclops Mage
* Zelzadore
* Heavy Orc
* Ogre
* Armored Ogre
* Troll
* Mountain Troll
* Gnoll Hunter
* Gnoll Grenedier
* Earth Elemental
* Earthling
* Earth Lord
* Heavy Fire Fiend
* Fire Fiend Overlord
* Cragg
* Ghorbash
Headshot
* Ogre
* Troll
* Chromatica
* Cyclops Mage
* Medium Cyclops
* Heavy Cyclops
* Cyclops Mesmerizer
* Cyclops Shaman
* Heavy Orc
* Armored Ogre
* Mountain Troll
* Earth Elemental
* Earthling
* Earth Lord
* Heavy Fire Fiend
* Fire Fiend Overlord
* Cragg
* Ghorbash
* Zelzadore
Fire
* Light Orc
* Medium Orc
* Heavy Orc
* Orc Archer
* Dynamite Archer
* Kobold Runner
* Kobold Sapper
* Ogre
* Armored Ogre
* Troll
* Mountain Trol
* Wraith Healer
* Fire Elemental
* Fireling
* Fire Lord
* Light Fire Fiend
* Medium Fire Fiend
* Heavy Fire Fiend
* Fire Fiend Runner
* Fire Fiend Mage
* Fire Fiend Overlord
* Zelzadore
* Hellbat
* Hell Baby
Ice
* Light Orc
* Medium Orc
* Heavy Orc
* Orc Archer
* Dynamite Archer
* Ogre
* Wraith Healer
* Earth Elemental
* Earthling
* Earth Lord
* Fire Elemental
* Fireling
* Fire Lord
* Light Fire Fiend
* Medium Fire Fiend
* Heavy Fire Fiend
* Fire Fiend Runner
* Fire Fiend Mage
* Fire Fiend Overlord
* Hellbat
* Hell Baby
* Shockbat
* Voidbat
* Bilebat
* Troll
* Mountain Troll
* Frostbat
* Zelzadore
* Cyclops Mage
* Medium Cyclops
* Heavy Cyclops
* Cyclops Mesmerizer
* Cyclops Shaman
Lightning
* Light Orc
* Medium Orc
* Heavy Orc
* Orc Archer
* Dynamite Archer
* Kobold Runner
* Kobold Sapper
* Armored Ogre
* Troll
* Mountain Troll
* Wraith Healer
* Shockbat
* Zelzadore
* Light Tuatara
* Heavy Tuatara
* Tuatara Ranger
* Tuatara Assassin
Arcane
* Light Orc
* Medium Orc
* Heavy Orc
* Orc Archer
* Dynamite Archer
* Ogre
* Earth Elemental
* Earthling
* Earth Lord
* Light Tuatara
* Heavy Tuatara
* Tuatara Ranger
* Tuatara Assassin
* Gnoll Hunter
* Gnoll Grenedier
* Wraith Healer
* Cyclops Mage
* Fire Fiend Mage
* Zelzadore
* Cyclops Mage
* Medium Cyclops
* Heavy Cyclops
* Cyclops Mesmerizer
* Cyclops Shaman
Acid
* Cyclops Mage
* Medium Cyclops
* Heavy Cyclops
* Cyclops Mesmerizer
* Cyclops Shaman
* Bilebat
* Light Tuatara
* Heavy Tuatara
* Tuatara Ranger
* Tuatara Assassin
📕 Enemy Encyclopedia

"Orcs. Must. Die... It's also the name, right? Not a big spoiler."

Part 1:
  • Light Orc / Medium Orc
  • Heavy Orc
  • Orc Archer

Part 2:
  • Dynamite Archer
  • Kobold Runner
  • Kobold Sapper

Part 3:
  • Ogre
  • Armored Ogre
  • Troll
  • Mountain Troll

Part 4:
  • Gnoll Hunter
  • Gnoll Grenadier
  • Wraith Healer
  • Cyclops Mage

Part 5:
  • Earth Elemental
  • Earthling
  • Earth Lord
  • Fire Elemental
  • Fireling
  • Fire Lord

Part 6:
  • Light Fire Fiend
  • Medium Fire Fiend
  • Heavy Fire Fiend
  • Fire Fiend Runner
  • Fire Fiend Mage
  • Fire Fiend Overlord

Drastic Steps:
  • Hellbat
  • Hell Baby
  • Bilebat
  • Voidbat
  • Shockbat
  • Frostbat
  • Chromatica

Cold as Eyes:
  • Medium Cyclops
  • Heavy Cyclops
  • Cyclops Mesmerizer
  • Cyclops Shaman

Tipping the Scales:
  • Light Tuatara
  • Heavy Tuatara
  • Tuatara Ranger
  • Tuatara Assassin

Bosses:
  • Cragg
  • Ghorbash
  • Mongrifel
  • Zelzadore
  • Chromatica
📜 Enemy Table: Overall View
General Overview Enemy Table:
Enemy
Weight
Resists
Weakness
Special Trait
Light Orc
Light
Nothing
Anything
* Shield (Rift Lord)
Medium Orc
Light
Nothing
Anything
* Shield (Rift Lord)
Heavy Orc
Heavy
Physical
Headshots
Elements
Arcane
* Shield (Rift Lord)
Orc Archer
Light
Nothing
Anything
* Long ranged attack
Dynamite Archer
Light
Nothing
Anything
* High damaging long ranged explosive attack
* Can break Barricades through colateral damage
Kobold Runner
Light
Nothing
Fire
Lightning
* Very Fast
* Passive; will dash straight to the rift
Kobold Sapper
Light
Nothing
Fire
Lightning
* Very Fast
* High Damage Suicide Bombs
* Prioritizes Barricades, Guardians and players
Ogre
Very Heavy
Physical
Fire
Ice
Headshots
* Stun attack
* Charges when close to players
Armored Ogre
Very Heavy
Physical
Headshots
Lightning
* Stun attack
* Charges when close to players
* Very high defense and Health
Troll
Very Heavy
Physical
Ice
Fire
Lightning
Headshots
* Health Regeneration
Mountain Troll
Very Heavy
Physical
Headshots
Ice
Fire
Lightning
* Health Regeneration
* Sturdy
Gnoll Hunter
Heavy
Physical
Arcane
Nothing
* Stalk players and Guardians
* Leaps over Barricades
* Powerful slowing melee attack
* Will not take Rift Points if he escapes
Gnoll Grenadier
Heavy
Physical
Arcane
Nothing
* Stalk players and Guardians
* Leaps over Barricades
* Powerful ranged attack that can break Barricades
* Will not take Rift Points if he escapes
Wraith Healer
Light
Arcane
Elements
* Heals nearby enemies
Cyclops Mage
Very Heavy
Elements
Arcane
Headshots
* Powerful and fast homing projectile attack
Earth Elemental
Heavy
Physical
Headshots
Arcane
Ice
* Breaks into two Earthlings when destroyed
Earthling
Light
Physical
Headshots
Arcane
Ice
* Very Fast
* Passive; will dash straight to the rift
Earth Lord
Very Heavy
Physical
Headshots
Arcane
Ice
* Breaks into two Earth Elementals when destroyed
Fire Elemental
Heavy
Fire (Immunity)
Ice
* Breaks into two Firelings when destroyed
Fireling
Light
Fire (Immunity)
Ice
* Very Fast
* Damaging Suicide Bombs
* Prioritizes Barricades
Fire Lord
Very Heavy
Headshots
Fire (Immunity)
Ice
* Breaks into four Firelings when destroyed
Light Fire Fiend
Light
Fire (Immunity)
Ice
* None
Medium Fire Fiend
Light
Fire (Immunity)
Ice
* None
Heavy Fire Fiend
Heavy
Physical
Fire (Immunity)
Ice
* None
Fire Fiend Runner
Light
Fire (Immunity)
Ice
* Very Fast
* Passive; will dash straight to the rift
Fire Fiend Mage
Very Heavy
Fire (Immunity)
Arcane
Ice
* Long ranged attack
Fire Fiend Overlord
Very Heavy
Physical
Headshots
Fire (Immunity)
Ice
* Sturdy

Hellbat
Flying
Fire (Immunity)
Headshots
Ice
Petrify
* Flying enemy
* Burns target dealing damage over time
Hell Baby
Flying
Fire (Immunity)
Headshots
Ice
Petrify
* Flying enemy
* Ranged area attack that Burns dealing damage over time
Frostbat
Flying
Ice (Immunity)
Headshots
Fire
Petrify
* Flying enemy
* Ranged area attack that Freezes for a few seconds
Shockbat
Flying
Lightning (Immunity)
Headshots
Ice
Petrify
* Flying enemy
* Ranged attack that Stuns for a few moments
Voidbat
Flying
Arcane (Immunity)
Headshots
Ice
Petrify
* Flying enemy
* Ranged attack that decreases defense against elemental attacks

Medium Cyclops
Light
Ice
Arcane
Headshots
Acid
* Heals other Cyclopses on death
Heavy Cyclops
Heavy
Ice
Arcane
Headshots
Acid
* Heals other Cyclopses on death
Cyclops Mesmerizer
Very Heavy
Ice
Arcane
Headshots
Acid
* Medium range high damage eye laser
* Heals other Cyclopses on death
Cyclops Shaman
Very Heavy
Ice
Arcane
Headshots
Acid
* Summons trap disabling totems
* Heals other Cyclopses on death
Light Tuatara
Light
Acid
Lightning
Arcane
* Damage cap
Heavy Tuatara
Heavy
Acid
Lightning
Arcane
* Damage cap
Tuatara Ranger
Light
Acid
Lightning
Arcane
* Damage cap
* Long ranged attack.
Tuatara Assassin
Light
Acid
Lightning
Arcane
* Damage cap
* Invisible until damaged enough
* Undetectable on mini-map while invisible
* Will not take Rift Points if he escapes

Bosses:
Enemy
Weight
Resists
Weakness
Special Trait
Cragg
Immovable
Physical
Headshots
Elements
Arcane
* Jam traps over a large area
Ghorbash
Immovable
Physical
Nothing
* Break Barricades
Mongrifel
Immovable
Nothing
Fire
Lightning
* Very fast; very tough for Runner
* Leaps over Barricades
Zelzadore
Immovable
Arcane
Elements
Physical
Headshots
* Resurrect enemies
Chromatica
Immovable
Varies
Headshots
* Changes elemental resistance
⚖ Enemy Table: Weight Classes
The Weight Table:
Light
Heavy
Very Heavy
Immovable
Flying
Light Orc
Heavy Orc
Ogre
Cragg
Hellbat
Medium Orc
Earth Elemental
Troll
Ghorbash
Hell Baby
Orc Archer
Fire Elemental
Armored Ogre
Mongrifel
Frostbat
Dynamite Archer
Gnoll Hunter
Mountain Troll
Zelzadore
Shockbat
Kobold Runner
Gnoll Grenadier
Earth Lord
Chromatica
Voidbat
Kobold Sapper
Heavy Fire Fiend
Fire Lord
Earthling
Heavy Cyclops
Cyclops Mage 
Fireling
Heavy Tuatara
Fire Fiend Mage
Light Fire Fiend
     
Fire Fiend Overlord
Medium Fire Fiend
     
Cyclops Mesmerizer
     
Fire Fiend Runner
     
Cyclops Shaman
     
Wraith Healer


Medium Cyclops


Light Tuatara


Tuatara Ranger


Tuatara Assassin


⠀⤷ Enemies [Part 1]
Threat Levels:
Very Low < Low < Moderate < High < Very High < Extreme

Enemies in this part:
  • Light Orc / Medium Orc
  • Heavy Orc
  • Orc Archer
________________________________________________________________

Light and Medium Orc
Threat Level
Very Low
Low (Rift Lord)
Weight
Light
Resists
* Nothing
Weakness
* Being an Orc in a game called "Orcs Must Die!"
Special Trait
* Will carry Shields on Rift Lord.
* Shield will allow them to take a hit, no matter how strong or weak it is.

Our most loyal and traditional costumers we all love to kill in the most creative ways.

Light and Medium Orcs are rarely a threat on their own, but they do come in very large numbers, after all this game is literally named after doing something to them.

Orcs do start bringing shields on Rift Lord difficulty which allows them to tank a hit, no matter how powerful, so exercise some caution around it as underestimating that with their sheer numbers is a recipe for defeat.
________________________________________________________________

Heavy Orc
Threat Level
Low
Moderate (Rift Lord)
Weight
Heavy
Resists
* Physical
* Headshots
Weakness
* Elements
* Arcane
Special Trait
* Will carry Shields on Rift Lord.
* Shield will allow them to take a hit, no matter how strong or weak it is.

Tougher than their smaller brothers and this time around they're actually noticeably stronger being somewhat resistant against physical damage and can even take a few Headshots before dying. They can soak a decent amount of damage for an enemy that's very common, so don't underestimate them too much.

Heavy Orcs are very common and even more numerous in War Scenarios, so you'll need some heavy crowd control strategy to deal with them. Keep in mind most types of elemental damage will tear them a new one, maybe several ones.
________________________________________________________________

Orc Archer
Threat Level
Moderate
Very High (Rift Lord)
Weight
Light
Resists
Nothing
Weakness
Anything
Special Trait
* Long ranged attack.

Annoying enemies that will persistently try to snipe you from a good distance should you get in their sights. Unlike previous games these guys actually hurt a lot and are very stubborn when trying to kill you, most of times they'll stand in their spot firing away until you get to cover or kill them.

The fact they're the same color of the other Orcs can make difficult to pinpoint where the Archer is in the middle of a crowd, so it's kind of annoying dealing with them when you're fighting the bigger waves.

While there is no penalty for dying, you'll most likely fight them close to your killzones and getting kicked back to the rift can cause a lot of (maybe not so) unforeseen problems. This is particularly dangerous in Rift Lord since enemies can easily overpower your defenses if you die at a bad moment.

Orc Archers are also problematic for your own Guardian Archers as they'll target them and Guardian Archers have no targetting priority they'll get shot until they die since they won't counter the Orc Archers.

Area hitting attacks like the Blunderbuss secondary, Flame Bracers or the Arcane Staff secondary, can be useful in getting them without forcing you to aim in the middle of a chaotic fight. Since they're pretty fragile any damaging trap does a good job at dealing with them too.

Alternatively you can walk away and let your traps do the killing for you at the end of your trap course.

Tip:
Orc Archers have very high aggression thresholds which means that they will still target you even if a lot of other enemies are fighting you.

Unlike previous games these guys will not leave you alone until get out of their line of fire, or you die, or (preferentially) until they die.


Annoying in War Mage and deadly in Rift Lord. Don't underestimate these guys.
⠀⤷ Enemies [Part 2]
Threat Levels:
Very Low < Low < Moderate < High < Very High < Extreme

Enemies in this part:
  • Dynamite Archer
  • Kobold Runner
  • Kobold Sapper
________________________________________________________________

Dynamite Archer
Threat Level
Very High
Extreme (Rift Lord)
Weight
Light
Resists
* Nothing
Weakness
* Anything
Special Trait
* High damaging long ranged explosive attack
* Can break Barricades through colateral damage

This is one of the enemies that might teach you to keep an eye on the mini-map and stay on your toes for those yellow dots. Dynamite Archers hit harder than regular Archers and their attack will damage Barricades as an extra problem.

Even though they're easier to distinguish than regular Archers with their puke-yellow skin, it's not always easy to pick them off from the crowd of enemies and the last thing you want to do if you have a Barricade trap course up is try to jump after them while they bombard you.

These things are fierce competitors to Gnoll Grenadiers since they love to kill your Guardian Archers whenever they have the chance, but being more difficult to distinguish amidst the crowd and more common compared to their canine buddies.

Tip:
Most of times it's better to go out of your way and intercept this type of enemy as they will almost always bring problems by either heavily damaging your Barricades or you. Always keep an eye for the yellow dots in the mini-map, especially in Rift Lord where they are more common.


You'll learn to be on the watch for this enemy as you do not want the image on the right to happen.
________________________________________________________________

Kobold Runner
Threat Level
Moderate
High (Rift Lord)
Weight
Light
Resists
* Nothing
Weakness
* Fire
* Lightning
Special Trait
* Very Fast
* Passive; will dash straight to the rift

Kobold Runners are some of the squishiest enemies in the game with near everything being able to one-shot them with ease. However they can cause plenty of trouble for you by the mere fact they might speed through most trap courses if left unchecked.

Kobold Runners have the bad habit of spearheading waves every now and then triggering a bunch of traps meant for beefier targets which is problematic enough, but they also usually come in packs and one or two almost always seem to find a way to get past your traps and you amidst the chaos.

Grinders are a good way to deal with these pests. You can set one far from your killzone and let it work its magic against these pests. A Grinder can easily mow down a good number of Kobolds without risk jamming.

You can and might waste time chasing after a Runner that got past your defenses in a mad dash to prevent them from ruining your Perfect Victory and that moment of distraction can let more enemies get through. Alternatively a Runner can get through you unnoticed amidst the chaotic fight and ruin your perfect game.

Tip:
Ceiling Lasers, Grinders, Shock Zappers and Brimstone are some of the best traps to deal with these pests. Anything combined with Tar will also bring them down reliably, however in lower numbers.

Do take care as in later maps they attack in much larger numbers, so the Shock Zapper and Brimstone can run out of charges before they kill all of them.
________________________________________________________________

Kobold Sapper
Threat Level
Very High
Extreme (Rift Lord)
Weight
Light
Resists
* Nothing
Weakness
* Fire
* Lightning
Special Trait
* Very Fast
* High Damage Suicide Bombs
* Prioritizes Barricades, Guardians and players

Kobold Sappers are among the most hated enemies in the game due to the fact they exist only to blow up your Barricades, Guardians and you (not necessarily in this order, mind you). Giving how much more Barricade focused this game is this is very bad news.

They're as squishy and fragile as their Runner counterparts and are somewhat easier to hit due to their barrel of bombs and the usual anti-Runner strategies work well against them.

Ceiling Lasers, Shock Zappers and Brimstone are good traps to dispose of them, but remember that the Shock Zapper and Brimstone can run out of charges and Sappers sometimes comes in the middle of waves where tons of enemies show up.

The mere sound of Sappers invading the map can be panic inducing if you're not prepared for them (thankfully dying to them no longer deducts Rift Points from you), but if you're prepared you can turn the tables making the Sappers explode amidst the enemy crowd hurting them as much as they'd hurt you.

The Ceiling Laser in particular set near the doors is a very good way to kill them before they even think about starting trouble, but make sure to set enough of them and correctly.


If you are able to lump Sappers together you can kill large groups of them in one attack.
⠀⤷ Enemies [Part 3]
Threat Levels:
Very Low < Low < Moderate < High < Very High < Extreme

Enemies covered in this part:
  • Ogre
  • Armored Ogre
  • Troll
  • Mountain Troll
________________________________________________________________

Ogre
Threat Level
Moderate
Moderate (Rift Lord)
Weight
Very Heavy
Resists
* Physical
Weakness
* Fire
* Ice
* Headshots
Special Trait
* Stun attack
* Charges when close to players

Ogres are bigger, beefier and angrier enemies that have a nasty habit of causing trouble for unsuspecting players. They tend to come in much smaller numbers than Orcs, but are no less problematic.

I get the feeling Ogres exist to teach new players that aiming for the head with ranged weapons is the way to go and that pure melee combat isn't the best solution against every single thing.

An Ogre's biggest problem is the fact he can stun you if you get too close to him and they're deceptively fast when giving chase, and backpedalling is not enough to escape their charge attacks. The stun lasts only for a brief moment, but when you're surrounded by lots of enemies on in the middle of a huge fight a second is all that's needed for something to go wrong.

Keep your distance and enjoy your head target practice with these guys. It's oddly satisfying to pelt their heads away with whatever ranged weapon you might bring.

Tip:
Ogres charge at players based on a certain distance, medium range, about 2~3 floor traps of given distance, and if he's targeting anyone. If you're too close or too far they won't charge at you.

However if you're fighting too many enemies and the Ogre isn't actively targeting you he won't do the charge, but if you kill the enemies targeting you, an Ogre might start targeting you and if the distance is right he'll perform the charge attack.

Charging Ogres can, might and will knock Orcs over Barricades, so be very careful especially in maps like The Basement.


Some levels (like Secret Fortress) are brimming with Ogres, Armored versions included, be prepared for them.
________________________________________________________________

Armored Ogre
Threat Level
Very High
Extreme (Rift Lord)
Weight
Very Heavy
Resists
* Physical
* Headshots
Weakness
* Fire
* Ice
Special Trait
* Stronger than Ogres
* Stun attack
* Charges when close to players

What's worse than an Ogre? Two Ogres. What's worse than two Ogres? An Armored Ogre.

Imagine Ogres only nastier and with a VERY HIGH resistance against physical damage and a ridiculous defense against Headshots. The usual anti-Ogre measures often work against them as well, but they take a ton of punishment and it's almost always a good idea to fight them when with the aid of your traps.

This thing is a rather common sight in Rift Lord difficulty, and in late game maps you might fight one or two of them at Wave 1, so be prepared.

Fighting them on your own is a chore since they resist Physical and Headshots, even with elemental weapons of your own they take very little damage from players, so, again, it's highly encouraged that you fight them near (preferentially elemental) traps.

Tips:
Armored Ogres are very vulnerable to most Elemental trap damage in particular. Fire Arrow Walls, Ice Rip Saws, Shock Zappers and Ice Dart Spitter will do great damage against these things.

Armored Ogres also make for great targets for Charming using the Scepter of Domination.


Armored Ogres are best fought alongside your traps whenever possible as they take an eternity to bring down using only weapons.
________________________________________________________________

Troll
Threat Level
Moderate
Moderate (Rift Lord)
Weight
Very Heavy
Resists
* Physical
* Ice
Weakness
* Fire
* Lightning
* Headshots
Special Trait
* Health Regeneration

Trolls are in basically green Ogres minus the obnoxious stun part and much less belly. They share the same fragile cranial problem of their fatter counterparts, but can be obnoxiously hard to get headshots at due to their naturally bigger height.

The main treat with this enemy is that if you leave him be after doing some damage he will start regenerating and will force you to re-do the job of killing him all over.

Trolls are unusually strong against Ice damage and have a strong resistance against physical damage too, but they can be easily brought down via Headshots. Fire and Lightning are also good ways to quickly get rid of these things.


Trolls regenerate health which makes fighting them only with melee much more time consuming.
________________________________________________________________

Mountain Troll
Threat Level
Moderate
Very High (Rift Lord)
Weight
Very Heavy
Resists
* Physical
* Ice
* Headshots
Weakness
* Fire
* Lightning
Special Trait
* Health Regeneration
* Much sturdier than regular Trolls

Mountain Trolls are the bigger cousins of Trolls and share most of their same traits, like self-healing and resistance against ice and physical damage. While regular Trolls won't pose much of a threat, Mountain Trolls are pretty tough enemies you should treat with about the same respect as Armored Ogres.

Mountain Trolls are considerably sturdier than regular Trolls but not on the same ridiculousness of Armored Ogres and just like them Headshots will be less effective against Mountain Trolls (unlike what its tooltip says, keeping the old tradition of Mountain Trolls having their tooltip wrong), but headshotting them is still a decent way to dispatch them if you're not too close to your traps. Fire and Lightning traps will rip them apart just as easily as well.

Their regeneration is more potent than of regular Trolls, so try not to leave an unfinished job before moving to another target. They're right on par with Armored Ogres in terms of "tankiness", so if they show up in a lane you're not watching be very careful as they're often one of the enemies that can power through even reinforced trap courses.


Mountain Trolls hit much harder, on par with Armored Ogres, and take much longer to kill. Their health regeneration is also stronger. Watch out for them.
⠀⤷ Enemies [Part 4]
Threat Levels:
Very Low < Low < Moderate < High < Very High < Extreme

Enemies covered in this part:
  • Gnoll Hunter
  • Gnoll Grenadier
  • Wraith Healer
  • Cyclops Mage
________________________________________________________________

Gnoll Hunter:

Threat Level
Moderate
High (Rift Lord)
Weight
Heavy
Resists
* Physical
* Arcane
Weakness
* Fire
* Ice
* Headshots
Special Trait
* Stalk players and Guardians
* Leaps over Barricades
* Powerful slowing melee attack
* Will not take Rift Points if he escapes


Gnoll Hunters are enemies that go specifically after players and Guardians, prioritizing players, they always howl upon entering the map and are indicated by a diamond shaped icon. They will never try to escape the map, and even if they do they won't penalize the player with loss of Rift Points.

Hunters are fairly tough and posses a slowing melee attack that will make escaping from them nearly impossible if you get hit even once. They are very dangerous opponents for unwary players and should not be underestimated.

Hunters will always attempt to target you, or Guardians, so always make sure to see where they're coming from so they won't catch you off-guard if one spawns from a door you're not watching directly.


When you hear howling Gnoll Hunters are certainly coming after you. Use crowd control effects to deal with them more easily.
________________________________________________________________

Gnoll Grenedier:

Threat Level
Extreme (Rift Lord)
Weight
Heavy
Resists
* Physical
* Arcane
Weakness
* Fire
* Ice
* Headshots
Special Trait
* Stalk players and Guardians
* Leaps over Barricades
* Powerful ranged attack that can break Barricades
* Will not take Rift Points if he escapes


Gnoll Grenadiers behave the same way as their Hunter buddies: they chase and seek to kill players and their Guardians and will never escape the map unless you force them to walk through the rift, and just like Hunters they will not reduce your Rift Points even if you do it.

The main problem with Grenadiers is the fact they're a very deadly distraction. Their bomb attacks can and will break your Barricades, kill your Guardians or damage your Decoys if you're not careful. If you have any of these around they'll force you to move to another spot which is problematic enough, but if you're not ready for them a single Grenadier can ruin a perfectly good run by distracting you long enough so enemies can power through your traps.

Grenadiers are also much more skittish than Hunters and will move unpredictably around, so having something to Stun, Freeze or Petrify them will help wonders dealing with this type of enemy quickly.

Tip:
Grenediers don't howl when entering the map, the noise announcing their invasion is far more more subtle, a mixture of hissing with low growl, so that can easily go unnoticed until you get an angry Grenedier chucking explosives at your face.


Grenediers are dangerous foes that do a lot of damage and can break Barricades if you fight too close to them. Be very careful around them.
________________________________________________________________

Wraith Healer:

Threat Level
Moderate
Moderate (Rift Lord)
Weight
Light
Resists
* Arcane
Weakness
* Headshots
Special Trait
* Heals nearby enemies

Wraith Healers are enemies that support other enemies by healing them. They're pretty squishy and are not very common, but are annoying enough that you'll most likely prioritize them as soon as you see one in the crowd.

The biggest problem is that Healers can do obnoxious stuff like start healing tougher enemies like Ogres or Trolls forcing you to waste more time on them than you expected. Healers are also one of the few enemies resistant to Arcane damage, so be careful if you use a lot of this damage type.


Wraith Healers in action.
________________________________________________________________

Cyclops Mage:

Threat Level
High
Extreme (Rift Lord)
Weight
Very Heavy
Resists
* Elements
* Arcane
Weakness
* Headshots
Special Trait
* Long ranged attack
* Powerful and fast homing projectile attack

Cyclops Mages are one of the more annoying enemies in the game, they are aggressive toward players and Guardians and will use long ranged, fast moving, homing projectiles that deals considerable damage.

The good news is that they are very vulnerable to Physical and Headshot damage, which means most weapons will quickly kill them. The bad news is that they're strong against elemental damage, so a lot of traps won't do as much damage against them and elemental weapons will only do good damage through headshotting.

Taking everything in consideration it's always a good idea to hunt them down personally and kill them before they even have a chance to stir up trouble.

Cyclops Mages are on the same weight class of Ogres and Trolls, which means Flip Traps will not work on them without a specific Unique upgrade and they won't be fazed by the Wind Belt at all.

Tip:
The Cyclops Mage's projectile although fast has a very predictable trajectory and will always circle the player if they sidestep to dodge it. You can use this to make the projectile crash into a wall or an obstacle.

You can also jump while sidestepping, if done correctly this will make the projectile crash on the ground.

Link to a video example (Steam won't allow short clips in the preview):
https://www.youtube.com/clip/Ugxl4aajMMts3AlKeF14AaABCQ


Cyclops Mages die easily but are always a threat.
⠀⤷ Enemies [Part 5]
Threat Levels:
Very Low < Low < Moderate < High < Very High < Extreme

Enemies covered in this part:
  • Earth Elemental
  • Earthling
  • Earth Lord
________________________________________________________________

Earth Elemental
Threat Level
Low
Moderate (Rift Lord)
Weight
Heavy
Resists
* Physical
* Headshots
Weakness
* Arcane
* Ice
Special Trait
* Breaks into two Earthlings when destroyed

Earth Elementals are tough costumers that resists the very common Physical damage and will break into two small Earthlings upon death, they're decently tough, they hit hard and often come in pairs, sometimes more.

Never leave this thing to kill last as you don't want to have to deal with Earthlings running around beyond your killzone and having to chase them like Runners. A pair of Earthlings may not be trouble, but two or three pairs can cause trouble, especially during early waves.

Tip:
Be very careful around multiple Earth Elementals as Earthlings will bolt to your rift like Runner enemies as soon as the elemental dies. The little poof of smoke they do upon death is like a ninja bomb and can camouflage the Earthling. It's much easier than it looks letting one slip by and ruin your 5-Skull Victory.


Earth Elementals rarely come alone, if ever in Rift Lord, so be ready to deal with the Earthlings.
________________________________________________________________

Earthling
Threat Level
Moderate
High (Rift Lord)
Weight
Light
Resists
* Physical
* Headshots
Weakness
* Arcane
* Ice
Special Trait
* Very Fast
* Passive; will dash straight to the rift

Earthlings are basically beefy (rocky?) Runner enemies that are slightly tougher to kill due to their resistance against Physical damage. They're fast enough to outrun a few traps, so watch out for them, especially if they're near the end of your killzone.

Be careful when killing Earth Elementals since Earthlings will bolt to the rift as soon as the elemental dies and it's much easier than it looks to let one get past you in the middle of a fight.


Earthlings are as fast as Runners and just enough tougher to get past some traps and ruin your day. Keep your eyes on the mini-map.
________________________________________________________________

Earth Lord
Threat Level
Moderate
Very High (Rift Lord)
Weight
Very Heavy
Resists
* Physical
* Headshots
Weakness
* Arcane
* Ice
Special Trait
* Breaks into two Earth Elementals when destroyed

How do you feel about dealing an enemy that breaks into smaller versions of it each time you kill it? Sounds like fun? No? Because it isn't.

Earth Lords are among the most annoying type of enemies due to how much time you can waste handling it and its smaller versions. Make sure you either have enough time to deal with them or fight this thing close to your traps to hasten the process of killing them.

Being an Elemental Lord means this enemy is on the same weight class of Ogres and Trolls, so most physics traps like the Flip Trap (without a specific upgrade) and the Push Trap will not affect them. They hit very hard too, almost on par with Armored Ogres, so be careful if you attempt to fight it using melee weapons.

Tip:
Be always prepared for Earth Lords either with traps or weapons to deal with with lesser forms as you might waste precious time dealing with them and one of them, usually an Earthling, always seems to get past every trap alive.

Weapons like the Bladestaff (it can knock off Earth Elementals) and Flame Bracers (great damage and area of effect versus all forms) are good choices to quickly deal with them on your own.
⠀⤷ Enemies [Part 6]
Threat Levels:
Very Low < Low < Moderate < High < Very High < Extreme

Enemies covered in this part:
  • Fire Elemental
  • Fireling
  • Fire Lord
________________________________________________________________

Fire Elemental
Threat Level
Moderate
High (Rift Lord)
Weight
Heavy
Resists
* Headshots
* Fire (Immunity)
Weakness
* Ice
Special Trait
* Breaks into two Firelings when destroyed

Fire Elementals are about the same deal as Earth Elementals, sans the complete immunity to Fire, they're tougher than regular Orcs and will break into smaller parts once killed. So they're nothing to worry about, right?

Not exactly. They break into two Firelings and these are enemies that will explode on your Barricades as soon as they get the chance. Fire Elementals usually come in decent numbers so you have to think about the Firelings they'll leave behind because if you kill a Fire Elemental in the middle of a Barricade-centred killzone the Firelings will immediately blow up on your Barricades and a bunch of Firelings might create a hole in your Barricade killzone.

Targetting the Fire Elemental before it has a chance to get near your Barricades is a good idea, but having the Trap Reset Trinket with the right Unique to repair Barricades also helps to lessen the trouble this enemy brings.

Tip:
Killing Fire Elementals while they are affected by the Gravity Pillar will prevent them from damaging your Barricades if they're at good enough height.


Fire Elementals are more dangerous for the Firelings they carry than for what they are.
________________________________________________________________

Fireling
Threat Level
Very High
Extreme (Rift Lord)
Weight
Light
Resists
* Fire (Immunity)
Weakness
* Ice
Special Trait
* Suicide bomb itself on Barricades, players or Guardians
* Very fast moving enemy

Firelings are smaller versions of Kobold Sappers and will suicide themselves on Barricades if they get the chance. If you do not have Barricades nearby they'll go after you or your Guardians just like Sappers would, which is enough to make you very wary of these things.

Although these things are very fragile and die easily from most damage sources, they are immune to fire damage sources can cause a few problems depending on your trap and weapon selection. Even if killed they explode and the explosion can cause damage to your Barricades, so make sure you kill them away from them.

Firelings sometimes comes on their own, without you needing to break Fire Elementals/Lords in maps, so keep an eye for them.

Tip:
Generally speaking most anti-Sapper tactics work against them with the exception of the regular Brimstone. Any weapon with fast fire rate works well against them too.
________________________________________________________________

Fire Lord
Threat Level
Very High
Extreme (Rift Lord)
Weight
Very Heavy
Resists
* Headshots
* Fire (Immunity)
Weakness
* Ice
Special Trait
* Breaks into four Firelings when destroyed

Fire Lords are Fire Elementals on steroids, the usual anti-Elemental strategies work against them, but keep in mind this thing creates four Firelings instead of two for your to deal with. In certain maps, like Colosseum, where you might have to use a lot of Barricades to survive they show up often, so always be ready to deal with the inevitable swarm of Firelings.

Hunting this enemy and killing them before they actually reach your Barricade killbox is a very, very good idea as when they die the four Firelings will either cause heavy damage to your Barricades or outright destroy them.

Tip:
Any crowd control weapon can easily handle the four Firelings as soon as the Fire Lord dies if you're quick enough.

For instance: the Crossbow and Stone Staff can hold almost all of them in place if you use its secondary attacks quickly enough.

The Wind Belt is also a good choice since it will swat all Firelings away and the fall damage should be enough to kill all of them in one cast.

Melee weapons like the Bladestaff can also kill all of them at once, beware that you must be at the right distance to avoid damage, if you're too close you'll get exploded for massive damage (or instant death).


Try to kill these things as far as possible from your Barricades.
⠀➥ Enemies [Fire Fiend Family]
Threat Levels:
Very Low < Low < Moderate < High < Very High < Extreme

General Overview of Fire Fiend enemies:
Fire Fiends are enemies introduced in the Mage Tower map and are very common from that point onward. They are basically like most type of enemies you've faced so far, but with complete immunity to the fire element-- no matter how powerful the trap or attack they will not affect these enemies.

Important Update:

As of v1.2.1.0, the Fire Fiend enemies are not completely immune to Fire traps and weapons, but every enemy of this type still boasts a hefty resistance against them. It's high enough that the even with the Damage Boost from Tar's Unique any Fire trap/weapon does a "probably-barely-passable" amount of damage.

Never rely solely on Fire traps or weapons to kill these things, but at least now they CAN kill them if the Fire Fiend is wounded enough.

There are some differences between some of the Fire Fiends and the Orcs, though:

Heavy Fire Fiends are not resistant against Headshotting so you can kill them quickly with most ranged weapons. Fire Fiend Mages act more like Orc Archers on steroids since their projectiles will not home on you like the one from Cyclops Mages.

They also never carry shields but have a bit more health than their Orcs counterparts.

How to deal with them?
Generally speaking all Fire Fiends are very weak against Ice damage and it will deal significant damage to them and are not resistant to other elements like Lightning or Arcane.

General Overview Enemy Table:
Fire Fiend
Enemy Equivalent
Threat Level
Light Fire Fiend
Light Orc
Very Low
Very Low (Rift Lord)
Medium Fire Fiend
Medium Orc
Low
Low (Rift Lord)
Heavy Fire Fiend
Heavy Orc
Low
Low (Rift Lord)
Fire Fiend Runner
Kobold Runner
Low
Moderate (Rift Lord)
Fire Fiend Mage
Orc Archer
Low
Moderate (Rift Lord)
Fire Fiend Overlord
Ogre
Moderate
High (Rift Lord)


It only took a few years, but they're not absolutely immune to Fire now.
⠀⤷ Enemies [Flyers]
Threat Levels:
Very Low < Low < Moderate < High < Very High < Extreme

Enemies covered in this part:
  • Hellbat
  • Hell Baby
  • Frostbat
  • Shockbat
  • Voidbat
________________________________________________________________


The Drastic Steps DLC was sold together with the Steam ver. of the game.

Flying enemies' are very dangerous threats not only because they fly over everything rendering the vast majority of floor traps useless, but will usually take very short routes to the rift in many levels.

Another big problem with these enemies is the fact each one can inflict a status condition, the same ones you can inflict on enemies, so you'll probably taste a bit of your own medicine dealing with these dangerous pests.

Flying enemies almost always attack in pretty large groups, swarms, of enemies and makes fighting them a very time consuming and dangerous task since you'll still have to deal with the same number of enemies on the ground. Needless to say it's extremely easy to let one slip or get bombarded by a few of them and get completely screwed over by them.

What traps work against them?
Regarding traps, some of the best experiences I had using ceilings traps were using Grinders, Shock Zappers and Gravity Pillars. Haymakers are also surprisingly effective in Canyon Keep when set in sufficient numbers.

To be frank most traps are pretty ineffective against them. Even those (probably) designed to deal with these enemies, like the Auto Ballista and the Guardian Archer, are not very good since they don't deal enough damage or have enough range to kill the large number of enemies attacking.

What about weapons?
When it comes to intercepting them personally, the Stone Staff is my absolute favorite choice since it will murder dozens of them if they're close enough instantly with its secondary.

Weapons with high fire rate like the Crossbow, or that hits hard like the Blunderbuss or Arcane Staff are also good options. The Chain Lightning Staff is not usually a good choice due to its low attack rate, but its secondary attack can kill a good number of Hell Babies which is helpful in Abandoned Passages.

Magic Longbow with Bleed upgrade will down any type of flying enemy in two shots on Rift Lord.

The Scepter of Domination and Ice Amulet are a good choices as well, but always watch out for elemental bats if those are your choices.

The Wind Belt can halt their progress a bit, they'll spin stunned for a few moments, but you need to be pretty darn close to them for it to work.
________________________________________________________________

Hellbat
Threat Level
High
Very High (Rift Lord)
Weight
Flying
Resists
* Fire (Immunity)
Weakness
* Ice
* Petrify
Special Trait
* Long range area attack.
* Burns. Deals damage over time.


The most common type of flying enemy throughout Drastic Steps and one of the more annoying.
_____________________________

Hell Baby
Threat Level
High
Extreme (Rift Lord)
Weight
Flying
Resists
* Fire (Immunity)
Weakness
* Ice
* Petrify
Special Trait
* Long range area attack.
* Burns. Deals damage over time.


I like to call them flying Kobolds. Small, annoying, and loves to screw your Perfect Victory because they're faster than regular flyers and will only attack you a few times before deciding to keep running to the rift.
_____________________________

Frostbat
Threat Level
High
Extreme (Rift Lord)
Weight
Flying
Resists
* Ice (Immunity)
Weakness
* Fire
* Petrify
Special Trait
* Long range area attack.
* Freeze. Stop players in their tracks.


Frostbats are among the worst of the bad lot that flyers are.
_____________________________

Shockbat
Threat Level
High
Very High (Rift Lord)
Weight
Flying
Resists
* Lightning (Immunity)
Weakness
* Ice
* Petrify
Special Trait
* Long range area attack.
* Stun. Stops players for a moment on hit.


Shockbat's attack can throw you off quite a bit.
_____________________________

Voidbat
Threat Level
High
Very High (Rift Lord)
Weight
Flying
Resists
* Arcane (Immunity)
Weakness
* Ice
* Petrify
Special Trait
* Long range area attack.
* Arcane. Lowers defense against elements.


Voidbats attacking. The least annoying probably.
⠀➥ Enemies [Cold as Eyes DLC]
Threat Levels:
Very Low < Low < Moderate < High < Very High < Extreme

Enemies covered in this part:
  • Medium Cyclops and Heavy Cyclops
  • Cyclops Mesmerizer
  • Cyclops Shaman
______________________________

General overview of Cold as Eyes enemies: the Cyclopeans

The Cyclopean race.

Cyclopses are nothing new to the game, but so far we've seen only one dangerous representative of this race: Mages.

They are unique in the fact they can heal each other for a small amount if one of them dies close enough to each other. This can cause groups of them to become a lot tougher to kill than any mob of Orcs you've faced so far.

What traps work against them?
Anything that doesn't deal Arcane damage is fair game against the Cyclopeans. Fire damage and constant crowd control are great options to keep them under pressure. Even though they resist Ice damage, they can be frozen which remains being a good option in crowd control even in the three maps they show up.

However be always wary of the Cyclops Shaman that can disable groups of traps. I'll go on more detail about him later.

What about weapons?
None of the Cyclops resist Physical damage, so any weapon, sans the Arcane damage dealing ones, will do great harm if you aim at their heads.

Since Firebats and Fire Fiends are completely absent from maps they appear in the Flame Thrower and Flame Bracers are also good options to deal with them.
______________________________

Medium Cyclops and Heavy Cyclops

Threat Level
Very Low
Low (Rift Lord)
Weight
Light and Heavy
Resists
* Ice
* Arcane
Weakness
* Headshots
* Acid
Special Trait
* Heals other Cyclopses on death.

Old costumers with different skins and an annoying ability to heal each other upon death. The silver lining here is that they don't have the ever, extremely annoying, resistance to Physical damage and headshots will do some grievous damage quickly killing these very common enemies of Cold as Eyes.

Their health is about the same of Medium and Heavy Orcs, and they hit just as hard, so be careful, especially in Rift Lord as a Medium Cyclops dying will health a lot of his buddies' health bar which can easily make you waste more time than you expected dealing with a crowd of these things, and this trait can enable them to endure long enough to survive trap setups that would kill even the toughest of enemies.


The healing aura caused by the death of any Cyclops (Mages included).
______________________________

Cyclops Mesmerizer
Threat Level
Moderate
High (Rift Lord)
Weight
Very Heavy
Resists
* Ice
* Arcane
Weakness
* Headshots
* Acid
Special Trait
* Very high damage, medium-ranged eye laser.
* Heals other Cyclopses on death.

Cyclops Mesmerizers are basically Orc Archers with a very nasty eye laser attack that does heavy damage at constant pace once they get their sights on you. The saving grace of this enemy is that they're nowhere as aggressive as Orc Archers themselves and will usually not target you if Medium and Heavy Cyclopses are already trying to kill you.

Be wary when fighting around them as their eye laser will easily make you drop dead in a matter of seconds if you're not careful and they don't have a very distinct sound to signalize their attack.


He got his eye on you.
______________________________

Cyclops Shaman
Threat Level
High
Extreme (Rift Lord)
Weight
Very Heavy
Resists
* Ice
* Arcane
Weakness
* Headshots
* Acid
Special Trait
* Summon totems that disables traps over an area.
* Heals other Cyclopses on death.

One of the more dangerous foes of the Cold as Eyes campaign and something to always be on the watch for. The Cyclops Shaman has the nasty ability to create totems that will disable traps over an area creating problematic gaps in your defenses.

The totems are particularly deadly for Barricaded defenses as losing even one or two traps in those trap networks WILL create a gigantic hole in your trap course that will certainly let enemies get through it.

Something to know is that totems are rather fragile and can be broken by attacks like the Flame Bracers primary or the piercing shots from the Stone Staff primary. Collateral damage from your traps can also break the totems, but don't rely entirely on it.

Cyclops Shamans are also pretty easy to kill, so if you have the chance to intercept and kill them, do so before they stir up trouble with their totems.


Examples of totems disabling traps.

Tip:
Totems show up in the mini-map with their own distinct icon. Use it to know if a Shaman has summoned one and keep an eye on that side since it means some of your traps are currently disabled.


The Shaman's totem icon on the mini-map.
⠀⤷ Enemies [Tipping the Scales DLC]
Threat Levels:
Very Low < Low < Moderate < High < Very High < Extreme

Enemies covered in this part:
  • Light Tuatara and Heavy Tuatara
  • Tuatara Ranger
  • Tuatara Assassin
______________________________

General overview of Tipping the Scales enemies: the Tuatara

The Tuatara race.

The Tuatara are new enemies that have one dangerous unique trait to their entire race: Damage cap. This means they cannot take too much damage all at once which means certain strategies will not work on them. They are also resistant to Acid and Lightning damage as well.

What traps work against them?
Most traps that don't deal all damage in one shot will work efficiently against them: Gravity Pillar, Ice Dart Spitter, Fire Arrow Wall, Briar Patch, Fire Ceiling Lasers are among my favorite options to fight the Tuataras.

What about weapons?
Blunderbuss and Hand Gatling are good options since their shots fire several projectiles and will not trigger the defensive ability of the Tuatara.

Weapons with fast firing rates like the Crossbow or Stone Staff can also work really well against them. Arcane damage sources like the Scepter of Domination and Arcane Staff are also excellent choices. The Arcane Staff will trigger the damage cap on bodyshots which means you don't have even to aim at their heads to get maximum damage with it.

With the addition of the Reptilian Carapace trinket you can also use melee weapons with less risk of getting kicked back to the rift as well. The Bladestaff is always a good option especially with its health draining upgrade.


The 'Damage cap' icon triggering. This means these enemies were protected from bigger harm that would've been caused by this attack.
______________________________

Light Tuatara and Heavy Tuatara

Threat Level
Moderate
High (Rift Lord)
Weight
Light and Heavy
Resists
* Acid
* Lightning
Weakness
* Arcane
Special Trait
* Damage cap: Cannot take too much damage all at once

Scaly Orcs that have somewhat more tankiness, but instead of having their buddies healing each other on death they all have individual defensive bonuses that helps them survive traps that rely on singular, heavy hits.

Fast firing weapons or weapons like the Hand Gatling and the Blunderbuss are very good against them if you plan to fight the Tuatara head on.
______________________________

Tuatara Ranger
Threat Level
Moderate
Very High (Rift Lord)
Weight
Light
Resists
* Acid
* Lightning
Weakness
* Arcane
Special Trait
* Damage cap: Cannot take too much damage all at once
* Long ranged attack

Even more annoying versions of Orc Archers with a defense bonus to boot. While still fragile, they take (relatively speaking) longer to kill than enemies of this type which can be troublesome when you're being harassed by two to four of these things at the same time.

Tuatara Rangers have somewhat delayed attacks compared to the crossbow of Orc Archers so that can throw you off a bit, especially in the middle of a huge wave.
______________________________

Tuatara Assassin
Threat Level
Very High
Extreme (Rift Lord)
Weight
Light
Resists
* Acid
* Lightning
Weakness
* Arcane
Special Trait
* Damage cap: Cannot take too much damage all at once
* Stalk players and Guardians
* Ignore Barricades
* Stays nearly invisible until damaged enough
* Undetectable in the mini-map while cloaked
* Will not take Rift Points if he escapes

Dangerous enemies that will hunt players and Guardians down much like Gnolls. Just like them they will not penalize you for letting one escape.

Tuatara Assassins are true to their class name and don't make the faintest noise upon invading a map and its near invisibility is very difficult to perceive while you're battling other enemies. They won't be shown in the mini-map until they uncloak either.

To make matters worse their attacks are very strong and they can bring you down very quickly. Like Gnoll Hunters you can dodge their attacks by backpedalling but this is much harder as they lunge with their blades. The only saving grace with this enemy is the fact that they don't slow you down if they hit you.

Invisible Tuatara Assassins are not immune to traps and may trigger them or get caught in the crossfire at any given time, they're also not immune to any ailment or physics effects so anything that can stop or knock them off their feet will help you quickly shake them off your back.


A Tuatara Assassin about to strike.
⠀⤷ Enemies [Bosses] {Part 1}
WARNING: HERE BE SPOILERS!!

I will details my favored strategies against bosses, so if you don't want to be spoiled and want to see firsthand what they do, ignore this section!

Threat Levels:
Very Low < Low < Moderate < High < Very High < Extreme

Enemies covered in this part:
  • Cragg
  • Ghorbash
  • Mongrifel

Boss enemies:
Boss enemies encountered in War Scenarios and Scramble Mode as debuffs (with the exception of Chromatica for Scramble).

They often have unique abilities that makes them extremely dangerous if left unattended and are best dealt with personally, sometimes even before they reach your trap course.

Generally speaking in most cases it's best to intercept bosses before they reach your traps, especially Cragg and, depending on the case, Ghorbash and Mongrifel, before they even try anything funny with their special abilities.
________________________________________________________________

Cragg
Threat Level
High
Very High (Rift Lord)
Extreme (Scramble)
Weight
Immovable
Resists
* Physical
* Headshots
Weakness
* Elements
Special Trait
* Disable traps over a large area.
* Passive. Will not attack players or Guardians.

Cragg is the first boss to show up and his special ability is to disable traps over a large radius, his ability, but he can use it twice if your killzone is large enough. The disable duration is fairly long and more than enough to let a ton of enemies slip by. Cragg will not waste his ability on a few scattered traps, he will on War Machines, but a few Spike Traps will not force him to use his ability.

Cragg is one of the bosses that is imperative to be taken down quickly before he reaches any key parts of the map that are heavily trapped since he will make those traps useless.

Cragg is particularly deadly in Scramble Mode as maps there tend to be much smaller and you won't have nearly enough funds to set a proper killzone before he shows up. Always bring a powerful crowd control tool or early trap setup to deal with him as fast as possible (and hope Scramble mode doesn't trip you up by making enemies immune to crowd control effects).

Tip:
The Trap Reset Trinket will "heal" the traps and make them work normally without having to wait for the long delay of Cragg's ability to end. Keep in mind Cragg can and might use his ability again, though.

You can interrupt Cragg's skills while he raises his hammer with crowd control effects (stun, freeze, petrify...)

One last thing to note is that Cragg's ability will not affect War Guardians.


Cragg disabling traps.


Cragg's special ability's range.


Be very careful with Cragg in Scramble as even with weapon buffs he's much more dangerous due to the smaller maps and lowered income compared to War Scenarios.
________________________________________________________________

Ghorbash
Threat Level
Moderate
High (Rift Lord)
Extreme (Scramble)
Weight
Immovable
Resists
* Physical
* Headshots
Weakness
* Nothing
Special Trait
* Breaks any Barricades in his path.
* Very high damage against players and Guardians.

Ghorbash appears as the boss of Front Lawn, his special ability is to break your Barricades. On Front Lawn he shows up in the final wave and in 99% of cases he will head for the left path of the map.

Generally speaking Ghorbash can be easily intercepted and killed before he does any lasting damage to your Barricades, especially if you can stop him for your War Machines kill him or even you kill him on your own. Take note that Ghorbash's toughness is right on par, if not above, of Armored Ogres, so be ready for a relatively long fight.

Ghorbash's threat however is extremely high in Scramble Mode. Whenever he shows up he will always take the shortest path to the rifts and will mess with any Barricades in the way, and might show up in different lanes, so chances of him going for a path that you did not prepare any traps are very high.


Ghorbash breaking Barricades in his path.
________________________________________________________________

Mongrifel
Threat Level
High
Very High (Rift Lord)
Extreme (Scramble)
Weight
Immovable
Resists
* Nothing
Weakness
* Fire
* Lightning
Special Trait
* Ignores all Barricades in his path; goes over them as if they weren't there.
* Very tough for a Runner enemy. An Ogre in Kobold's skin.
* Passive. Will not attack players or Guardians.

Mongrifel is the boss of Mage Tower, his special ability is to ignore Barricades like Gnolls.

Mongrifel appears in the north side of Mage Tower. He will always head to the northern side of the tower interior, probably where a lot of people set their killboxes. If you set your killbox in the southern side (possibly to use your War Machines against the horde) you'll need to hurry and intercept Mongrifel.

In Scramble Mode a debuff can make Mongrifel show up in every wave and like Ghorbash this is extremely dangerous because although Mongrifel dies quickly for a boss enemy, he's can distract you long enough for enemies to go force their ways through your early fragile trap course causing a ton of problems.


Don't be afraid of using crowd control effects against him (or most bosses for that case).
⠀⤷ Enemies [Bosses] {Part 2}
Threat Levels:
Very Low < Low < Moderate < High < Very High < Extreme

Enemies covered in this part:
  • Zelzadore
  • Chromatica
________________________________________________________________

Zelzadore
Threat Level
Low
Moderate (Rift Lord)
Very High (Scramble)
Weight
Immovable
Resists
* Arcane
* Elements
* Headshots
Weakness
* Physical
Special Trait
* Revives the last enemy killed near him.

Zelzadore is the boss of Dragon Boneyard. The special ability of this boss is to revive one enemy, usually the last one you killed near him.

Zelzadore's special ability doesn't look like much, and truth be told: it isn't... In the War Scenario he shows up. In Scramble Mode, a debuff can make him show up in every wave of every map the debuff is active and there you'll realize how infuriating this boss can be since he will revive Ogres, Trolls, Gnolls and maybe even a Fire Lord or Fireling right in your face or close to your Barricades.

Scramble Mode has the other problem that is you have lowered funds compared to the (relatively speaking) massive income of War Scenarios, so a revived very heavy enemy can bring a ton of unforeseen problems.

Even though this boss doesn't resist Physical damage, like most bosses, he is still deceptively tough and even headshots will take a long time to bring him down. Make sure you have time in your hands when dealing with him.

Tip:
Just like Cragg, you can interrupt Zelzadore's special ability before he actually revives something with crowd control effects (stun, freeze, petrify...)


Zelzadore can resurrect basically any enemy. From Orcs to Armored Ogres to Fire Lords to Firelings right in your face.


Enemies revived by Zelzadore sports a halo.
________________________________________________________________

Chromatica
Threat Level
Moderate
Very High (Rift Lord)
Weight
Immovable
Resists
* Varies (see Special trait for details)
* Crowd Control effects (Stun, Petrify, Freeze...)
Weakness
* Headshots
Special Trait
* Flying enemy.
* Changes elemental immunity while moving through the map.


Chromatica approaches.

Chromatica is the boss of Canyon Keep, the only War Scenario of Drastic Steps campaign.

Unlike most bosses Chromatica is completely unfazed by any crown control effect: freeze, petrify, stun or confusion will do nothing to hamper the progress of this boss and to top it all Chromatica will change elements while flying towards your rift.

The only saving grace that doesn't make this boss a true nightmare to fight is the fact Chromatica is rather fragile for a boss and if you focus your attention on this enemy chances are you'll kill this thing before it even has a chance to reach your killzone. But like most bosses, the main function of this enemy is to distract players.


Chromatica ready to swap elements.


Finished, the boss swapped to Acid element.
💯 Advanced Hints and Tips: Scramble Mode

Scramble Mode is an extra game mode unlocked after beating the Mage Tower map (12th level) and it has randomness added to it to spice things up.

What is this "randomness" I'm talking about? The buffs and debuffs. Things that can change wildly how a map normally plays out, and more importantly: how YOU play a map.

Scramble Mode is not to be taken lightly and due to how debuffs work it's extremely recommended that you come here having as many traps and weapons as possible and knowing how to use them since some of the trickiest maps in the game, War Scenarios and Drastic Steps maps included, can show up in the map selection.
_______________________________________________________

A word of advice:
If you're just fresh off War Mage difficulty and want to go straight to Scramble Mode, consider playing Scramble Mode on your own a few times to familiarize yourself with the mode first and learn some of its quirks.

Tiers 4 and 5, the two final maps, will always be in Rift Lord difficulty, the hardest setting. I'll talk more about this soon.

Learning about more than the handful of traps and weapons you've probably used during the regular Campaign before jumping into Scramble Mode helps a lot.

As I just mentioned Scramble Mode can be tougher than Rift Lord at times and jumping into a Scramble Mode co-op without basic knowledge of the game might turn you into a liability more than anything else.
_______________________________________________________

Want to practice before jumping into Scramble?
Rift Lord is a great way to ready yourself for Scramble Mode. Since this difficulty will throw bigger and meaner waves with tougher enemies at you from the get go, it will be a good test to your abilities in handling tough early waves and how your current build and weapon + trap loadout holds out against them.

Tip:
It's important to know that Tiers 4 and 5 will always be in Rift Lord difficulty. Take note of what it changes and be ready for it as going unaware is going to catch new players by surprise and give them a good scare at very least.

Having general knowledge of how to handle unexpected situations happening like one Barricade breaking in the middle of a fight, or one of the re-routing Barricades being destroyed is also very good. Rushing to replace the broken Barricade and jumping back to the fight seamlessly is something that takes practice and demands composure not everyone has, especially under pressure.

Another Tip:
Some debuffs make every regular War Scenario boss appear in every wave. Remember that regular maps are much smaller and have much lowered income compared to the massive sized War Scenarios, so you'll have much less time to deal with them.

The good point is that they're like Mr. Moneybags and will drop a big coin worth 500 moneys upon death on each wave.


Scramble does not care about your feelings. Be unlucky enough and you can get more than one boss showing up to fight you in every wave.
_______________________________________________________

Have a varied arsenal of traps and weapons
Since the game will apply different buffs and debuffs it's also very wise to be comfortable with as many weapons as you can since you do not want to be stuck with a debuffed weapon against buffed enemies. It's also equally good to be ready and very confident in fighting every type of enemy as you can and will inevitably fight them with buffs at some point.

Each time a Scramble Mode map starts you'll have the chance to swap your traps, weapons and trinkets. This is extremely important in case a particularly nasty debuff pops up and goes against the strategy you have in mind.

This is why I recommended back there to know what every trap and every weapon does, especially if you go alone, because it won't be very fun learning how to use a certain trap or weapon you're not familiar with when you have several enemy debuffs stacked against you.
_______________________________________________________

DOUBLE CHECK YOUR UPGRADES!
It's very easy to get careless and go with an upgrade in a certain trap that will make it useless, especially when it comes down to elemental damage. It won't be fun to go with the wrong variant of the trap when every enemy is immune to it.
_______________________________________________________

Whole 100 Rift Points
This is what you have to survive through five maps in Scramble Mode. It may sound like it's a lot and you might even be tempted to think it's way too much and will make the game too easy, but remember that these Rift Points will not regenerate and that there are several debuffs that can very easily trip you up.

One of these debuffs happens to be a heavy penalty on death that deducts 10 Rift Points at once if you die. Combine that with debuffs that makes Gnolls appear in every wave and another debuff that makes your usual weapons and traps weapon weaker and you've got a recipe for disaster if you're not careful.

Another debuff makes every enemy be worth 5 Rift Points, including Gnolls which are normally worth zero points if you force their escape.


Sounds like a lot, but a bad wave can easily eat from 10 to 20 to even whole 50 points...
_______________________________________________________

Co-op Scramble
Co-op requires finer attention and, dare I say, have better synergy and know how each other plays and how much they understand about the game.

Scramble Mode has debuffs that will punish reckless behavior much harder than other normal game modes and it won't be fun to deal with someone who ends up losing a ton of Rift Points right in the first map.

Depending on the set of debuffs you two are stuck with you'll need to cover the weaker angles your partner may not be ready for or vice-versa.


If you have a "boss in every wave" debuff will you go after the boss or will your partner do it, or both of you will do it? Those are things to consider and plan ahead whenever possible.
⠀⠀⠀⤷ About some debuffs
Crowd Control effects:
This is the one that confused me the most at first.

This is one of the nastier debuffs of Scramble; basically crowd control amounts to ANY status effect that would hinder the progress of enemies-- it means that the following status will NOT work:
  • Stun
  • Slow
  • Freeze
  • Charm
  • Confusion
  • Fear
  • Petrify (Stone)

However keep in mind physic effects WILL work, like the one from Wind Belt, Flip Trap, Push Trap, Gravity Pillar and Giant Flip Trap.
_________________________
"No Selling" debuff:
This also means no selling EVEN DURING "GO" BREAKS.

If you make a mistake, like setting Barricades, you'll have to tough it out, so be very careful around this debuff.
_________________________

How much the price debuffs increase the trap prices?
A specific surface debuff (Floor, Wall or Ceiling) will increase their price by whooping 50%.

The general "All Traps are more expsive" will increase trap price by 25%. And yes, they do stack.

To counter that the price discount have the same weight; they lower the trap price by 25 and 50% respectively. They also stack if you're lucky enough to get them in a single run.
_________________________

Does "more expensive floor traps" affect Barricades?

No, thankfully it doesn't.

Debuffs that affect Barricade prices:
  • "Barricades are more expensive" (+50% cost)
  • "All Traps are more expensive" (+25% cost)
These debuffs DO STACK, so be careful.

For reference, a fully upgraded Barricade (normal costs: 500 for regular and 800 for doubles) will cost:
  • Regular Barricade: 625 or 750
  • Double Barricade: 1000 or 1200
_________________________

Word of advice for "Enemies are immune to [insert element here]":
This also means they will be immune to the status effect respective to the element.

For instance: immunity to Ice means enemies cannot be frozen, immunity to Arcane means they cannot be debuffed, and immunity to Lightning means they cannot be electrified.
_________________________

More enemies in every waves:
The make "every [insert enemy here] appear in every wave" debuff will always cause them to show up all at once and from the same door. This also includes boss enemies if you have that debuff.

Each map has its own specific door to spawn the extra enemies, so once you notice it, keep an eye on that door so you'll be ready for the extra enemies that are coming your way.

Keep in mind that sometimes the last door that opens will be the one that spawn extra enemies, so until that door opens the game will spawn the extra enemies from any other door available.


An example in Coastal Hallways: the extra enemies will always spawn from the leftmost door once it opens at Wave 5. However they'll spawn at first from the central and rightmost door until then.
_________________________

Ranged enemies buff: be VERY careful with Mages and Grenediers...
When the debuff means "Ranged enemies have greatly increased damage" they mean more than just Orc Archers and Tuatara Rangers.

In this list enemies like Dynamite Archers, Gnoll Grenediers, Cyclops Mages and Mesmerizers and Fire Fiend Mages and every flying enemy from Drastic Steps will be included, so be extremely careful when dealing with this debuff. Even more so if you have the "Every Orc deals more damage" because they do stack and it won't be pleasant to see a puny Orc Archer downing you in a single hit.

Another Warning:
If a "more enemies" debuff also has an extra effect, like making Armored Ogres stronger, Mountain Trolls faster or Kobold Sappers stronger, it will also affect enemies that show up naturally in the map.
👣 Rift Lord Walkthrough
What is this section about?
This is how I beat the campaigns. This is not a strict guide and you can always change something to suit your tastes more instead of using what I use in the videos.

Have you found a better way to build a trap course? Change it to your liking.
Have weapons you like using other than the ones I do? Change it to suit your needs.
Prefer to play less aggressively? Perfectly fine.

I left this one for last because the video previews can be really bothersome and take a lot of space in the guide.

Why there is more than one video for some maps?
Sometimes I find other strategies for maps I like to share. But usually the big ones are the my favored/safest methods I could come up with.

How up to date are these videos?
Every video was at the August 11th, 2021 patch which considerably nerfed Ceiling Lasers, Saw Blade Launcher and Tar.

June 5th, 2023 patch (1.2.1.0) changed a lot of things. Made traps cheaper and more powerful, so while these setups might also work they might differ a lot.

Another thing to note:
The difficulty rating is purely based on my personal opinion, it's how tough I think a map is (or was) for me.

With that said a map that was difficult for me could've been a complete joke to you and vice-versa.

If you need a playlist with maps completed click on the link below:
https://www.youtube.com/playlist?list=PLS7CYzATG6xA7lGNZVfCTxWmCFG31ERqC

Map Order:
  1. North Wing
  2. Great Room
  3. Side Entrance
  4. Hidden Dock
  5. Split Stairs
  6. The Lava Pits
  7. Close Quarters
  8. Cliffside
  9. Front Lawn
  10. Coastal Hallways
  11. Secret Fortress
  12. Mage Tower
  13. Master's Courtyard
  14. Sludge Shelves
  15. Dragon Boneyard
  16. The Basement
  17. Colosseum
  18. Order Temple
  19. Abandoned Passage
  20. Aqueducts
  21. Canyon Keep
  22. Order Enclave
  23. Slag Field
  24. Northern Rampart
  25. Icebound Mine
  26. Frostbitten
  27. Sandstorm Shelter
  28. Oasis Outpost
  29. Untrained Grounds
  30. Sand Sea Castle
  31. Desert Wall

Map:
Difficulty:
Campaign:
North Wing
⭐☆☆☆☆
Old Friends
Great Room
⭐⭐☆☆☆
Old Friends
Side Entrance
⭐⭐⭐☆☆
Old Friends
Hidden Dock
⭐⭐⭐☆☆
Old Friends
Split Stairs
⭐⭐☆☆☆
Old Friends
The Lava Pits
⭐⭐☆☆☆
Old Friends
Close Quarters
⭐⭐⭐⭐☆
Old Friends
Cliffside
⭐⭐⭐⭐☆
Old Friends
Front Lawn
⭐⭐☆☆☆
Old Friends
Coastal Hallways
⭐⭐⭐☆☆
Old Friends
Secret Fortress
⭐⭐⭐⭐☆
Old Friends
Mage Tower
⭐⭐☆☆☆
Old Friends
Master's Courtyard
⭐⭐⭐☆☆
Old Friends
Sludge Shelves
⭐⭐⭐☆☆
Old Friends
Dragon Boneyard
⭐⭐⭐☆☆
Old Friends
The Basement
⭐⭐⭐⭐☆
Old Friends
Colosseum
⭐⭐⭐⭐⭐
Old Friends
Order Temple
⭐⭐⭐☆☆
Old Friends
Abandoned Passage
⭐⭐⭐⭐☆
Drastic Steps
Aqueducts
⭐⭐⭐☆☆
Drastic Steps
Canyon Keep
⭐⭐☆☆☆
Drastic Steps
Order Enclave
⭐⭐⭐⭐⭐
Drastic Steps
Slag Field
⭐⭐⭐⭐⭐
Drastic Steps
Northern Rampart
⭐⭐⭐☆☆
Cold as Eyes
Icebound Mine
⭐⭐⭐⭐⭐
Cold as Eyes
Frostbitten
⭐⭐⭐⭐⭐
Cold as Eyes
Sandstorm Shelter
⭐⭐⭐⭐☆
Tipping the Scales
Oasis Outpost
⭐⭐⭐⭐☆
Tipping the Scales
Untrained Grounds
⭐⭐⭐⭐⭐
Tipping the Scales
Sand Sea Castle
⭐⭐⭐⭐⭐
Tipping the Scales
Desert Wall
⭐⭐⭐☆☆
Tipping the Scales
Maps 01 ~ 09 [Old Friends]
For a playlist with maps completed, click on the link below:
https://www.youtube.com/playlist?list=PLS7CYzATG6xA7lGNZVfCTxWmCFG31ERqC

Maps covered in this section:
  • 01) North Wing
  • 02) Great Room
  • 03) Side Entrance
  • 04) Hidden Dock
  • 05) Split Stairs
  • 06) The Lava Pits
  • 07) Close Quarters
  • 08) Cliffside
  • 09) Front Lawn
______________________________________

Old Friends:
Map 01 - North Wing
Difficulty: ⭐✩✩✩✩
Personal Notes:
One lane, one path.

North Wing is nothing scary. The only problem is that Par time can trip you up a little and there are some Gnoll Grenediers to let you know that Rift Lord will have different, tougher waves waiting for you.
______________________________________

Map 02 - Great Room
Difficulty: ⭐⭐✩✩✩
Personal Notes:
Great Room is a map that may force you to use Barricades to funnel enemies into a smaller space as the last waves can be pretty tough to handle unless you have a plan and good crowd control tools with you.

Other than that it's another easy map, but it features Armored Ogres, so watch out.
______________________________________

Map 03 - Side Entrance
Difficulty: ⭐⭐⭐✩✩
Personal Notes:
Side Entrance is when Rift Lord stops playing nice. You'll face Dynamite Archers, Mountain Trolls, Armored Ogres all while Kobold Runners try to sneak past amidst the chaos.

If anything this map might teach you the value of anti-Runner tactics like using Brimstone, Shock Zappers, Grinders or Ceiling Lasers because you can bet they will ruin your day if they can.

______________________________________

Map 04 - Hidden Dock
Difficulty: ⭐⭐⭐✩✩
Personal Notes:
This isn't a very difficult map, but Rift Lord throws a lot of Sappers and Dynamite Archers your way here, so it's another map to teach you the dangers of Barricade breaking enemies.

Another problematic thing is the high number of Orc Archers here, you'll learn how infuriating fighting them can be in high stress situations.

______________________________________

Map 05 - Split Stairs
Difficulty: ⭐⭐✩✩✩
Personal Notes:
On War Mage this level teaches you the value of Barricades.

On Rift Lord it teaches you to be wary of Kobold Sappers.

Other than that it's also a map that you have to be more creative using the high ceilings. Ceiling Lasers and Gravity Pillars, or Molten Gold, will work well here if you need them.

______________________________________

Map 06 - The Lava Pits
Difficulty: ⭐⭐✩✩✩
Personal Notes:
The first War Scenario and the easiest one.

Using the bridge, usually with War Outposts, or the insides of the fort are the more obvious solutions to this map. Make sure to intercept Cragg before he gets to your main killzone as his special ability can easily cause a lot of problems.

______________________________________

Map 07 - Close Quarters
Difficulty: ⭐⭐⭐⭐✩
Personal Notes:
This is the map where the game stops holding your hand. Two entrances and merging them together will inevitably result into a mesh of enemies that can be difficult to manage and you'll fight a bit of everything, including Gnoll Hunters and Grenediers.

Always make sure to keep an eye for Kobold Runners, Earthlings and anything that can get through unnoticed in the middle of a big fight.

Kobold Sappers show up in the last 2 waves as well, so be prepared to intercept them.

______________________________________

Map 08 - Cliffside
Difficulty: ⭐⭐⭐⭐✩
Personal Notes:
Cliffside is a tough map mostly due to its heavy early waves with too many Mountain Trolls. It's a map where having to build temporary defenses for the first two waves is high recommended as it is learning how to quickly sell them so you can focus you defenses on either side.

This is also an interesting map where each side can provide different types of strategies depending on the traps you have.

But be VERY careful with Sappers that show up from Wave 4 onward.

______________________________________

Map 09 - Front Lawn
Difficulty: ⭐⭐✩✩✩
Personal Notes:
The second War Scenario is nothing scary provided you block one of the sides and make good use of the War Outpost and maybe the Bank of Archers.

You can also use the inside of the fort, but watch out as that might be tough on Par Time.

Maps 10 ~ 18 [Old Friends]
For a playlist with maps completed, click on the link below:
https://www.youtube.com/playlist?list=PLS7CYzATG6xA7lGNZVfCTxWmCFG31ERqC

Maps covered in this section:
  • 10) Coastal Hallways
  • 11) Secret Fortress
  • 12) Mage Tower
  • 13) Master's Courtyard
  • 14) Sludge Shelves
  • 15) Dragon Boneyard
  • 16) The Basement
  • 17) Colosseum
  • 18) Order Temple
______________________________________

Map 10 - Coastal Hallways
Difficulty: ⭐⭐⭐✩✩
Personal Notes:
Make sure to bring something to counter Kobold Sappers (Ceiling Lasers, Shock Zappers, Brimstone, Gravity Pillars...) because this map has a ton of them coming at you.

Coastal Hallways is one of the few maps where I don't recommend using Barricade funneling due to the high number of Fire Lords and Kobold Sappers that show up. Its design also leaves a lot of spots to create killzones that don't rely on them.

The final two waves have a large amount of Kobold Sappers, so be careful.

______________________________________

Map 11 - Secret Fortress
Difficulty: ⭐⭐⭐⭐✩
Personal Notes:
This is a map that can be tough due to its early wave having a ton of problematic enemies and very little money to work with. It will also be one of the maps that will (try to) teach you how to deal with Armored Ogres when they attack in large numbers.

______________________________________

Map 12 - Mage Tower
Difficulty: ⭐⭐✩✩✩
Personal Notes:
Another War Scenario and not very difficult. This map on War Mage introduces you to the annoying Fire Fiend enemy.

You can use either side to build your defenses, but both have very high ceilings and one of the sides leave you with some room for War Machines to be used more or less inside the fort.

______________________________________

Map 13 - Master's Courtyard
Difficulty: ⭐⭐⭐✩✩
Personal Notes:
Master's Courtyard can be tricky map without a proper Barricade setup.

There are creative ways to barricade the ground floor and force enemies into the northern balcony and this map is very good to test your barricading skills.

______________________________________

Map 14 - Sludge Shelves
Difficulty: ⭐⭐⭐✩✩
Personal Notes:
Sludge Shelves is an interesting map with mixed enemies. It features a lot of Fire Elementals, Fire Lords and Kobold Sappers, so if you're planning on using Barricades here you'll need to know how to protect them or you'll be wasting a ton of money on repairs, even if you have the Trap Reset Trinket handy.

Beware that this map still has an infuriating glitch, present since day one that hasn't been patched even in 1.2.1.0, where Sapper/Fireling's death explosion can rocket enemies straight into the rift room in even directly into the rift and there's absolutely nothing you can do to prevent it.

______________________________________

Map 15 - Dragon Boneyard
Difficulty: ⭐⭐⭐✩✩
Personal Notes:
The second last War Scenario can look intimidating due to its size and two inner doors, one that will spawn enemies pretty close to your rift room, but once you learn how to set your Barricades and deal with the first wave this map is no more difficult than the other ones you faced thus far.

You can use Barricades to re-route enemies into one room, or make more killzones if you're feeling confident enough. In the end this map is a good place to experiment how effective some of your trap setups are.

______________________________________

Map 16 - The Basement
Difficulty: ⭐⭐⭐⭐✩
Personal Notes:
The Basement is a difficult map but all for the wrong reasons. It has the unflattering "honor" of being considered as "worst designed map of all OMD games" and, oh boy, is it hard to disagree.

It features a lower floor that will make enemies walk to a staircase leading to a backroom to the rift, ignoring the usual path and since Ogres can, and will, shove Orcs to the lower floor you have to be extra careful around them.

The limited floor without walls or ceilings in the central area will also force you to be either very creative with Barricades (and floor traps) or very aggressive with preventive trapping with the side doors.

______________________________________

Map 17 - Colosseum
Difficulty: ⭐⭐⭐⭐⭐
Personal Notes:
This is one of the more dangerous maps in the main campaign and is basically your final exam before you face the final map. Some might consider it tougher than the last map of the campaign.

Colosseum, in Rift Lord, features all types of enemies from the regular, from the puniest Light Orc to the mightiest Armored Ogre to the ever dangerous Sapper and Fire Lord and it also has doors that are uncomfortably close to your rift. Be ready for everything here.

______________________________________

Map 18 - Order Temple
Difficulty: ⭐⭐⭐✩✩
Personal Notes:
The final map of the game and one with a nasty gimmick. I'll keep everything down in tags so people just browsing won't get spoiled.

Order Temple looks like an intimidating map at first, but if you've dominated Dragon Boneyard this map won't be much of a problem to you.

The one thing to be careful is its gimmick: rifts that Vorwick will create generating extra enemies, sometimes this will happen inside the fort and a few in Waves 2, 5 and 6 will spawn VERY close to the rift or in places you'll most likely have not fortified.

Picking a spot and learning where each rift will spawn (they're not random) is imperative to win here. The final three red rifts at the end of Wave 6 will spawn A TON of enemies, so be ready.

Maps 19 ~ 23 [Drastic Steps]
For a playlist with maps completed, click on the link below:
https://www.youtube.com/playlist?list=PLS7CYzATG6xA7lGNZVfCTxWmCFG31ERqC

Maps covered in this section:
  • 19) Abandoned Passage
  • 20) Aqueducts
  • 21) Canyon Keep
  • 22) Order Enclave
  • 23) Slag Field
______________________________________

Drastic Steps:
Map 19 - Abandoned Passage
Difficulty: ⭐⭐⭐⭐✩
Personal Notes:
The first map from Drastic Steps is quite a jump in difficulty and can be pretty tough to deal until you either learn how to build a killzone to thin out or kill all ground enemies while you deal with the flying enemies.

Abandoned Passages is a map all about that and the fact its so small makes for a very chaotic experience where you might find yourself running everywhere to catch one pesky flyer or intercept that big enemies that survived your traps.

Building close to the rift is not an option due to its short Par time either. Welcome to Drastic Steps, it only gets worse.

______________________________________

Map 20 - Aqueducts
Difficulty: ⭐⭐⭐✩✩
Personal Notes:
Aqueducts is a bigger map and flying enemies come only from one spot, although they have a very short path to the rift.

The problem here is that it also features two enemy doors and you'll be forced to do some heavy barricading or have learned how to build strong killzones to hold of each side almost independently since you'll have to fend off the flying enemies.

______________________________________

Map 21 - Canyon Keep
Difficulty: ⭐⭐✩✩✩
Personal Notes:
Canyon Keep is a breather compared to the previous two maps and one you should enjoy because the next two maps are among the toughest ones in the entire game.

This War Scenario is big and you can use many places to set your defenses. Flying enemies attack en masse as should expect, with Chromatica showing up to the party in the final wave.

One thing to note is that Fire Elementals only show up at Wave 5 and Fire Lords and Sappers only at Wave 6, both show up early on in small numbers with Sappers coming after Fire Lords.

______________________________________

Map 22 - Order Enclave
Difficulty: ⭐⭐⭐⭐⭐
Personal Notes:
Order Enclave is one of the hardest maps of the game. It doesn't matter where you choose to build your defenses-- you'll have your work cut out for you here: it has three doors, one you absolutely can't merge, Fire Lords and Sappers in the final waves and a flock of flying enemies that will path to the middle part of the map.

The central area is one of the choices here, but beware that you'll have to face ground enemies while flying enemies will bombard you and flying enemies attack in big numbers at Waves 2 and 5, so it's frighteningly easy to get overwhelmed if you're not careful.

The east wing is another option but building there means you'll need to always keep an eye on the central area as flying enemies will always go there.

The west wing is another problem and one of the reasons this map can be so difficult. You must build a very strong trap course and be careful so nothing leaks from there since it's almost impossible to supervise everything here.

______________________________________

Map 23 - Slag Field
Difficulty: ⭐⭐⭐⭐⭐
Personal Notes:
Slag Field is the final map of Drastic Steps and it makes sure to absolutely teach you how to hate flying enemies with a burning passion. The first two waves are all about them and it baits you into building anti-air defenses.

The problem here is that Wave 3 throws ground enemies and it's not only a handful of Orcs with a few Ogres-- it's a full blown heavy wave with Mountain Trolls and Fire Fiend Overlords in the mix, so using money on anti-air defenses can easily get you into trouble here.

Wave 5 will open the second door which has things like Armored Ogres, Fire Lords and Earth Lords to deal with, so you'll need to focus good defenses in two separate spots because building near the rift will not give you the 5-Skull rank here.

Maps 24 ~ 26 [Cold as Eyes]
For a playlist with maps completed, click on the link below:
https://www.youtube.com/playlist?list=PLS7CYzATG6xA7lGNZVfCTxWmCFG31ERqC

Maps covered in this section:
  • 24) Northern Rampart
  • 25) Icebound Mine
  • 26) Frostbitten
______________________________________

Cold as Eyes:
Map 24 - Northern Rampart
Difficulty: ⭐⭐⭐✩✩
Personal Notes:
Northern Rampart is the introductory level of Cold as Eyes and features both Cyclopses and flying enemies. The level splits in two distinct paths, one that has low ceilings and is a great choice to build trap courses while the other is more open and lacks ceilings, but merges with the path of flying enemies.

In any case you should be wary of the Cyclops Shaman that will summon totems to jam and disable your traps until you break it.

______________________________________

Map 25 - Icebound Mine
Difficulty: ⭐⭐⭐⭐⭐
Personal Notes:
Icebound Mine can be a tough map since it has two spawn points and a flying enemy spawner as well. The flying enemies will always take two paths, and how many will split between each route is random.

This is one of the few maps where I prefer using scattered traps across the map rather than use Barricades as barricaded killzones can be easily disabled by Shamans.

Using Barricades in the big room near the rift is possible, keep in mind that the Par time for that strategy is very tight.


______________________________________

Map 24 - Frostbitten
Difficulty: ⭐⭐⭐⭐⭐
Personal Notes:
Frostbitten is a returning map from Unchained and is the only one not to bring flying enemies (thankfully). However the map is fairly big and has back doors that cannot be merged, much like Order Enclave.

Finding a suitable spot for the two front doors is one of the biggest hurdles in this map and depending where you go for you'll need very different trap setups. You might need to have a fairly strong trap course as you'll need your traps to take care of enemies while you fight enemies in the back doors.

Why? The back doors usually throw less enemies your way, but not few enough that a handful of traps will take care of them, but the problem is that in the final waves the southeast door in particular will spawn many Shamans which will most likely force you to personally handle it since the Shamans will disable a lot of traps if you're not there to intercept them.

Maps 27 ~ 31 [Tipping the Scales]
For a playlist with maps completed, click on the link below:
https://www.youtube.com/playlist?list=PLS7CYzATG6xA7lGNZVfCTxWmCFG31ERqC

Maps covered in this section:
  • 27) Sandstorm Shelter
  • 28) Oasis Outpost
  • 29) Untrained Grounds
  • 30) Sand Sea Castle
  • 31) Desert Wall
______________________________________

Tipping the Scales:
Map 27 - Sandstorm Shelter
Difficulty: ⭐⭐⭐⭐✩
Personal Notes:
A small map with three entrances. You can merge two of them into the center part and make use of the (mildly) improved Wind Belt or physics traps to get rid of the enemies.

There's a way to merge the other door but it's costly and might not get you the 5-Skull due to Par time issues unless you're VERY aggressive at early waves.

______________________________________

Map 28 - Oasis Outpost
Difficulty: ⭐⭐⭐⭐✩
Personal Notes:
A bigger map with two doors and a central flying enemy spawner. Both doors have high ceilings close to them, but a spot with lower ceiling more inside the map, any spot will be good for killzones.

Take note that flyers attack in large numbers, so make sure to have the anti-air measures or strong killzones so you can kill flyers yourself.

______________________________________

Map 29 - Untrained Grounds
Difficulty: ⭐⭐⭐⭐⭐
Personal Notes:
Three doors; two which you can easily merge in the small room close to the south door and one far to the west. Like most DLC maps building near the rift means losing Par time, so if you're going for 5-skulls get ready to build separate killzones.

Make sure to kill the last enemy of Wave 4 while you're close to the west door or else you probably won't have enough time to set your traps before enemies swarm you.

______________________________________

Map 30 - Sand Sea Castle
Difficulty: ⭐⭐⭐⭐⭐
Personal Notes:
A very big map where merging everything will not get you 5-Skulls due to Par time (shocking, I know). Creating separate killzones for each door is almost a must here. Be wary of the Fire Elementals if you intend to use Barricades.

______________________________________

Map 31 - Desert Wall
Difficulty: ⭐⭐⭐✩✩
Personal Notes:
Another map returning from Unchained. Par time is deceptively short for a War Scenario map, so be careful.

There are three lanes, but this map is on par with what you've dealt in previous War Scenarios so far. You have plenty of money to create a strong killzone for each door too. Alternatively you can build stuff on the outer walls as well.

The west side has flyers and Sappers and the east side has Fire Fiends and Fire Elementals/Lords. That's all.

🙇 Closing
Remember to rate and favorite this guide so it can reach more people as well.

If you have spare points maybe consider giving an award?

Anyway, thank you for taking your time to read this guide. I hope it was useful in any way for you.


And remember:

Orcs. Must. Die.

Other guides by me:
If you liked this guide make sure to take a look on other guides from games similar to Orcs Must Die! 3, including its previous title, Orcs Must Die! 2.

http://steamproxy.net/sharedfiles/filedetails/?id=321647347 http://steamproxy.net/sharedfiles/filedetails/?id=505739685 http://steamproxy.net/sharedfiles/filedetails/?id=482075212 http://steamproxy.net/sharedfiles/filedetails/?id=621968802 http://steamproxy.net/sharedfiles/filedetails/?id=729779266
18 Comments
LittleTale 16 Jan @ 2:37pm 
Great guide ! +1
Ninaran 15 Oct, 2023 @ 1:29pm 
Sweet, must've just been me "feeling" like it doesn't work, but not "knowing". Thank you for still reacting to comments after all this time. =)
Minoru  [author] 15 Oct, 2023 @ 11:21am 
@Ninaran
Unless they've changed the mechanics at some point (or for some odd reason these two effects conflict with each other, a glitch, etc.) status effects don't cancel each other.

I've tested it with freezing and burning an enemy and the enemy was both frozen and took the burning damage over time.
Ninaran 15 Oct, 2023 @ 6:38am 
What an amazing guide, thank you for that. One question that came up in play is if status effects cancel each other out. Like it feels a Melted enemy getting Shiny from the Molten Gold takes a heap less physical damage.
Minoru  [author] 8 Jun, 2023 @ 8:56pm 
@Sanity Dance
Thank you!

I've been updating it little by little with new information and even some new videos for the walkthrough, especiall for maps like Order Enclave and Slag Field.
Jacob Syme 6 Jun, 2023 @ 7:01am 
Hi, Minoru. Love your guides. Will you be taking a look at this game again with the patch that just came out?
Staalby 31 Dec, 2022 @ 6:09am 
A guide so massive it lags my browser. 10/10 would download more RAM again.
Minoru  [author] 24 Nov, 2022 @ 6:13pm 
Late answer, but better late than never, right?

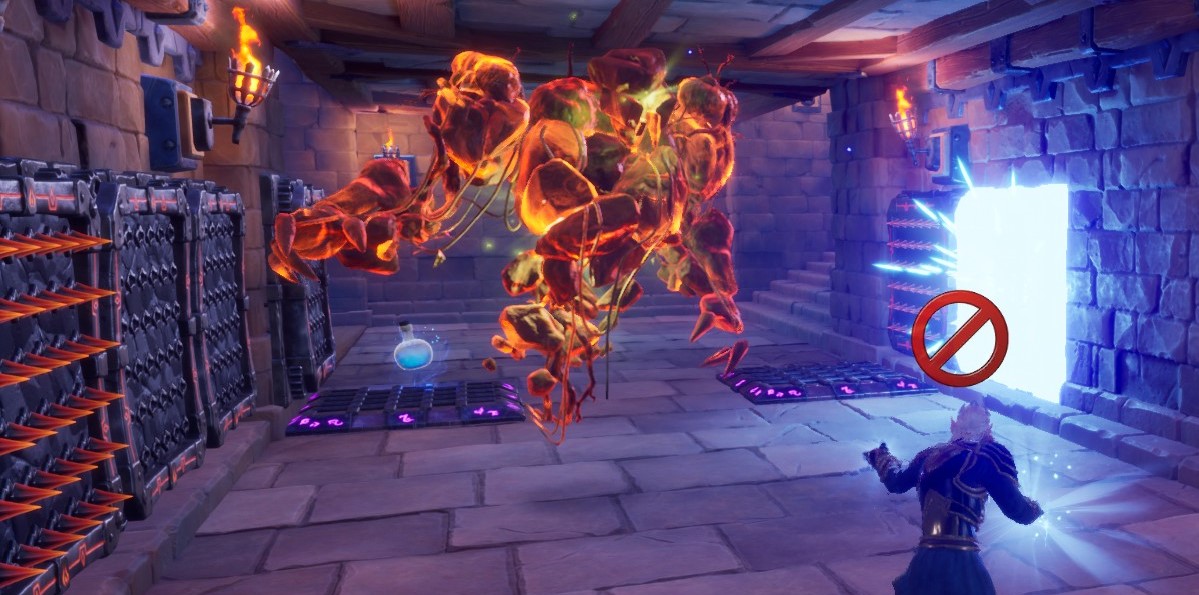
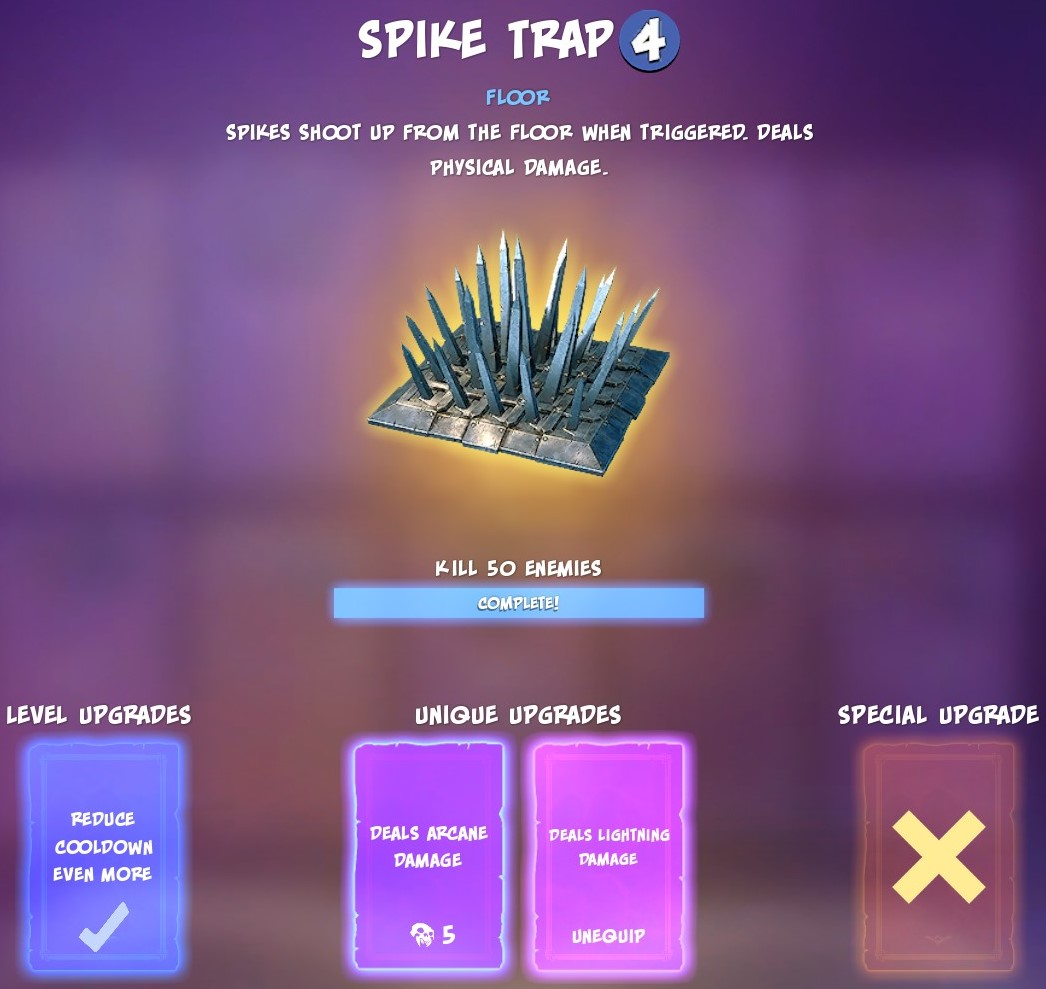
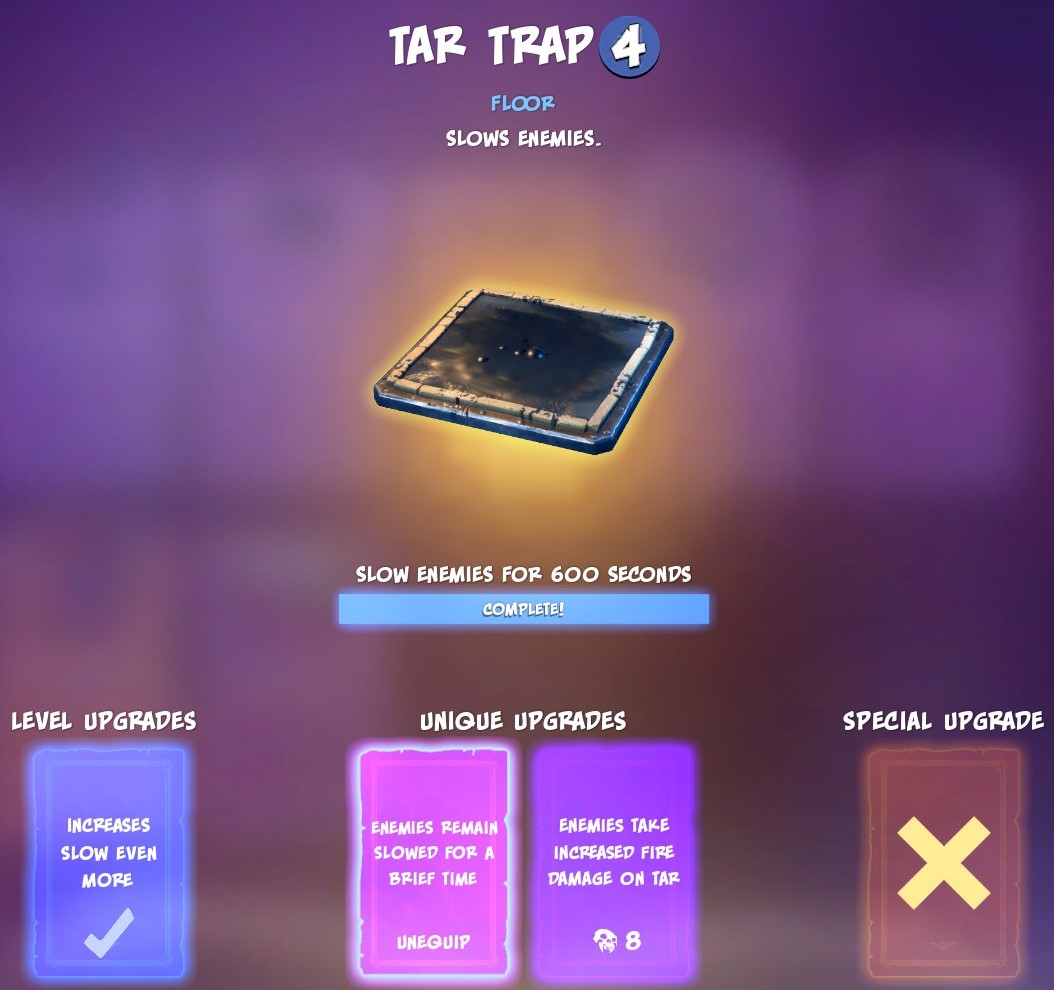
**Only Trinkets** have Special Upgrades.

Special Upgrades for Traps, War Machine and Weapons ARE NOT AVAILABLE IN THE REGULAR GAME. If you saw it somewhere, they're mods for OMD!3.
over 10 Sep, 2022 @ 11:34am 
same question, HOW get "special upgrade" :wtf: :cozyteddymoo:
DrumDealer 17 Feb, 2022 @ 10:04am 
How to unlock special upgrade for traps ????
???
????
??!!!!