Killing Floor 2

Killing Floor 2

80 ratings
An in-depth guide for the Support
By FIRE-POWER
Just a guide for the support, the dude who always love to share ammo with teammates, but forgot he may have not enough ammo for himself to fight zeds horde
   
Award
Favorite
Favorited
Unfavorite
Part 1: The Role of Support
1. The support is considered as a general-purpose perk who is responsible for handling zeds at close to medium range.


The above is the figure provided by the Tripwire Interactive Officials. I personally disagree with the target priority proposed by them. This is because target priority is not applicable to the support as such completely dependent on:

Who are you laning with?

If you are laning with a big-zed hunter like the sharpshooter, gunslinger and demolitionist. The support should prioritize trash zeds and medium zeds first as they could impose a major disturbance to your teammates when they are performing big zed take-downs.

On the contrary, if you are laning with a trash zeds specialist like the commando, swat and firebug. It is recommended that you should initialize big zed take-down or co-operate with your teammates to take them down.

Which map are you playing?

The support is suggested to hold choke-points such as the long hallway found in containment station and biotics lab.
Biotics Lab

Containment station

2. Welding doors (Not recommended)

The Support is proficient in welding doors and capable of repairing broken doors. Unfortunately, welding doors are never a solution in surviving zed horde since such action can constrain your escape/kite route for the entire team.

Only at one situation the doors should be welded: Giving breathing space for your teammates after ALL OF THEM have passed through the door during kiting. Such action can:

1) Buy time for the medic to heal you and your teammates,

2) Gain some time for the guns to be reloaded

3) Relieve the mental stress for the whole team.


3. Repairing doors

Only at 2 circumstance the technique should be utilized:

1- Gaining XP for levelling up the support.

2-You have achieved a promise/consensus with the demolitionist in which he will weld doors to provide door traps to delay zeds's attack.

Nevertheless, repairing doors is still not suggested for the support since it will consume twice the energy when compared with welding doors. Most importantly, you are unarmed when repairing doors. If you are doing so and several karate girls and spiders surrounded you, that will be a R.I.P.

Thanks to the devastating fire-power of shotguns, majority of the trash and medium zeds can be eliminated within 1-3 headshots, provided that they are close enough (Preferably <15 metres)

Part 2: Skill choice
Assumption: 6 player and Hell On Earth Difficulty

Waves 1-3:


Resupply Packs offers your teammates with extra 30% ammo and 25% of armor, which extensively improves the economy of the whole team. For example, the commando can keep gaining ammo from the support for his AR-15. Hence, it is possible that he can buy Tier 4 assault rifles on wave 3 at the earliest. This is also the main reason why support is one of the most beloved perks in KF2.

Starting from wave 3 (wave 5 is the deadline)


Being 3-5 waves of a friendly and generous guy is more than enough, concussion rounds provides extra stumble power which is ESSENTIAL for big zed take-downs.

Level 5: High Capacity Mags VS Tactical Reload

High Capacity mags synergise with mag-fed guns, those guns include the Nailgun, HZ-12, HM-TECH 301 and AA-12.


Tactical Reload synergize with shotguns that adopt tube-fed system, those involved in SG-500 shotgun, Double-Barreled Boomstick (DBS), M4 Combat Shotgun, Dragons-breath and the Doomstick.


Level 10: Fortitude VS Salvo

Despite having 150 points of HP is quite tempting, the extra 30% damage is a must on a support to take downs zeds effectively while preserving ammo economy. (Reminder: Support's ammo are expensive- 20 rounds of AA-12 costs you 82 dosh)

Level 15: Armor Piercing Shot VS Tight Choke

The support has already possessed the greatest penetration power among the 10 perks reflected by his passive skills (+20% shotgun penetration power per level). The bullet spread of the shotguns is the major hurdle for support in handling medium to long range enemies. With tight choke equipped, a massive reduction in bullet spread can be applied to various shotguns and hence a massive increment in your action range.

Level 20: Resupply Pack VS Concussion rounds

As mentioned in the first part of this section, being a nice guy for the first 3-5 waves is sufficient. The stumble power offered by the Concussion Round ensures you in taking down big zeds without taking damage.

Level 25 (Zed Time Skill): Penetrator VS Barrage

Barrage allows you to shot in real-time. You can spam AA12 rounds like FPSRussia to clear large group of zeds in emergent situations such as breakage of defensive lines. Penetrator is a far inferior choice as the support has already possessed the greatest penetration power among the 10 perks (+500% shotgun penetration power at level 25)

Part 3: Buy strategy
Assumption: 6 player-HoE PUBLIC match

Wave 1:

SG-500 is your best friend for trash and medium zeds slaying. 9mm is ideally a backup weapon if you run out of SG-500


Wave 2:

Sell the SG-500 for either a single HRG buckshot OR in my opinion, the preferred choice-HZ12.


Criteria / Arsenal
HRG Buckshot
HZ-12
Magazine size/Backup ammo
(with Resupply Pack and Tactical Reload)
5/123

Total 128
16/116

Total 132
Cost(Dosh Required)
550 for a single one
750
Damage (Assuming all the pellet hits)
160
200
Ammo cost
21 dosh for 5 shells (4.2 dosh/shell)
64 dosh for 16 shells (4 dosh/shell)
Bullet spread factor
0.15
0.15

In terms of damage, ammo in single magazine, total ammo and ammo economy, the HZ-12 is better than HRG buckshots. However, HRG buckshot is considerably cheaper than the HZ-12 counterpart. If you decided to go for HZ-12, you might not have enough dosh for its ammo. Thus, don't be shy to ask teammates for little dosh on wave 2. Why? Go and read the description of my guide again-" You are the dude who always love to share ammo and armor with teammates, but forgot he may have not enough ammo for himself to fight zeds horde". It is completely acceptable to ask your teammates for dosh to fill up some ammo of your arsenal, since you are the one who gave him ammo and armor, which means DOSH.


Waves 3-4:

Keep utilizing the HZ-12 or upgrade to M4 Combat shotgun.


Wave 5:

Get yourself an AA-12. It is a general-purpose shotty for a general-purpose perk, allowing you to deal with pretty much everything. Again, don't hesitate to request some dosh form your teammates. Don't forget you are the one who build up the team's economy.


Wave 6-7:

Keep using the AA-12 until you can afford the Doomstick, which is over-powered for Big-zeds IMO.


Waves 8-10:

Maintain the load-out of AA12+Doomstick, fulfill your responsibility as a support.

The aforementioned load-out is just one of the many, it is completely fine if you decided to go for upgrades for other shotguns such as the double-barreled boomstick and HZ-12.
Part 4: Loadouts
A huge diversity of load-outs for the support are suggested by different KF2 community, a plethora of demonstration of utilizing them in big zeds take-down have been observed across different social media like Youtube and KF2 Reddit. However, by combing the factors such as the ease to perform Big-zed takedowns, Time To Kill (TTK), risks of taking damage and dependence on teammate assistance. I will recommend 3 loadouts for the support:

1. The AA-12 + Doomstick (probably the META loadout for the support)


The doomstick is reserved for big zeds like Scrakes (SC), Fleshpounds (FP) and Quarter Pounders (QP)

The AA-12 is for trash and medium zeds' termination. The AA-12 can also be used to operate follow-up shots for a big-zed take-down.

2. Partnering with a trash zed specialist

Tier 5 Doomstick + Tier 5 M4 Combat Shotgun + Tier 2 HM-TECH 101 pistol

Tier 5 Doomstick can 1-shot a SC/QP if all the pellet hits the head.

The M4 will be used for trash and medium zeds' clearance (despite the M4 itself is decent for big-zed take-downs). The M4 can also be used to operate follow-up shots for a FP take-down.

The HM-TECH 101 pistol provides healing for your teammates.

3. The Generalist Build

Tier 5 AA-12 + Tier 5 M4 Combat Shotgun + Tier 2 HM-TECH 101 pistol


Despite the deprivation of Big zed take-down power, such build is quite similar to the M14+FAL build for the sharpshooter, capable of dealing the majority of zed types with successive head-shots. Even big zeds can be terminated within a single mag of either shotgun.

Upon reading to this point, you may wonder the reason behind that the Double-Barreled Boomstick is not included in the load-out for the support. This is because:

1. DBS scales poorly with the weapon upgrade system. Before the introduction of the weapon upgrade system, it can 2 shot SC and 3 shot FP assuming all pellets hit the head. The weapon has been nerfed after the introudction of the weapon upgrade system in which the basic damage of it reduced from 480 to 250. It is needed to upgrade the DBS to tier 4 in order to 2 shot a scrake.

2. The addition of the Doomstick over-shadows the effectiveness of Boomstick in big zed take-downs. To be honest, Doomstick trivialize big zeds and make performing take-downs easy mode due to its ridiculous amount of damage and stumble power. Before the introduction of the Doomstick, Boomstick is the best way to take down big zeds effectively and IN STYLE (Link to RykerZzZ's youtube channel related to support take-down combos. You have to know this pro if your are a KF2 support main).
Part 5: Big Zed Take-downs
Assumption: 6 player, HoE difficulty

1. The Doomstick is your best choice to kill big zeds efficiently thanks to its enormous amount of damage and stumble power (especially with Concussion rounds equipped). Even the biggest threat- the raging FP, stands NO CHANCE under the "BIG BOI GUN".


If you decided to go for the meta loadout (AA12+Doomstick), the AA12 can be used to operate follow-up shots after the Doomstick alt-fire.


2. The upgraded (Tier 5) Doomstick allows the destroyer to reach the threshold to 1 shot a scrake and QP.


3. The AA12 itself is good to deal with big zeds


NOTE: If you have successfully landed 5 shots on a scrake's head, it will exhibit a stumble animation. You can continue head-trace and kill it with 9-12 shots in total.


Learning the raging animation of a fleshpound/ quarter-pound is the key to performing a successful take-down. When it starts the raging animation, his head will go down first--->tilt to left of your screen--->tilt to right--->left again--->the head goes up. Please familiar with such animation (L-R-L) so that you can keep head-tracing while FP is raging.

The upgraded (Tier 5) M4 is exceptional in terminating large zeds, allowing 4 shot a SC/QP and 5 shot a FP.


NOTE: If you have successfully landed 2 shots on a SC/QP's head, it will exhibit a stumble animation. You can continue head-trace and kill it with another 2 HS.


Learning the raging animation of a fleshpound/ quarter-pound is the key to performing a successful take-down. When it starts the raging animation, his head will go down first--->tilt to left of your screen--->tilt to right--->left again--->the head goes up. Please familiar with such animation (L-R-L) so that you can keep head-tracing while FP is raging. Hence, you can probably decapped a FP even before his raging animation ends.
Part 6: Advanced skills and notes for the Support
1. Penetration is your biggest advantage:

Try to line up the zeds and then unload your shotgun shells. At level 25, you possess an absurd amount of weapon penetration power in which 3 low-tier zeds can be killed within a single shot.


2. Range is your biggest weakness and the nemesis for the support are E.D.A.Rs and Husks.


Support may have a hard time in dealing with E.D.A.Rs and Husks as they can attack you from a long range while shotguns are effective only at close to medium range. Multiple shots need to be fired in order to eliminate them.

3. Over-capping as a support


To sum the clip up:

1) After the wave ends, get to the trader and get the guns you want [The step can be skipped if you have already completed your load-out]

2) Open the menu by pressing "Esc", configure skills by switching from tactical Reload (Level 5) and Concussion Rounds (Level 20) to High Capacity Mags and Resupply Pack respectively.

3) Buy ammo and armor

4) Reload shotguns

5) Throw them onto the ground (DON'T get spotted by teammates as some may steal them and sell it, try to do it at some corners but close enough to the trader.)

6) Switch High Capacity Mags and Resupply Pack back to Tactical Reload and Concussion Rounds respectively.

7) Acquire both guns

NOTE: Avoid picking up any ammo boxes or get ammo from another support after you have performed steps 1-7. Otherwise, ALL OF YOUR HARD WORKS, GONE!

NOTE: High capacity mags is NOT APPLICABLE to both Doomstick and Boomstick .

4. Maintain a certain distance away from trader during trader time, but enough for you to open the trader menu. Such action allows your teammates to grab ammo and armor from you easily during trader time instead of accidentally opened the trader menu.


5. AA-12 is the best weapon during Zed Time with Barrage skill equipped, allowing you take-down big zeds rapidly or to clear a large groups of zed.


6. Concussion rounds must be equipped to take-down raged FP safely without getting hit


There are 2 types of stumble for a raged FP:

Short stumble:

RNG Long stumble:

7. The passive +25% damage is applicable ONLY to shotguns, the 9mm is NOT included.


Even the low-tier zeds get head-shoted by the 9mm, it still leaves the body moving around, which is quite a sad thing for the support.


8. Reload Cancelling

Such trick is applicable to all mag-fed guns, boomstick and the doomstick.


Method 1: Observe the reload animation, when the mag/ shotgun shells is about to be put into the gun, press V (key for bashing in default) followed by pressing Mouse 1 (Shoot) or middle mouse button (alt.fire). The interval between pressing the 2 keys should be almost instantaneous.

Method 2: Observe the Ammo HUD at the bottom right corner


When the number of bullets changed from 0 to 4 (take Doomstick for example), immediately press V (key for bashing in default) followed by pressing Mouse 1 (Shoot) or middle mouse button (alt.fire).

1. Method 1 is relatively risky buy allows you to focus on Zeds

2. Method 2 is safer but it shifts your focus to the bottom right HUD instead of the Zeds in front of you.

9. Try to leave at least 1 shotgun shell in your tub-fed shotguns since a longer time is needed to load the first shell into the gun. This is particularly crucial if you are using SG-500 and M4 Combat Shotgun

[/previewyoutu[previewyoutube]

10. A special feature about the doomstick/boomstick is that the they will knock player backwards when alt-fired, (or upwards if aiming down and jumping).
What advantages can this bring to you?

1) Dodging attacks from zeds, which can save you from sticky situations

2) Stepping on all zed types to make them fainted for a moment, including the BOSSES.


In version 1105, the "goommba stomp" has been patched and players can no longer do its all the time since a cool-down is incorporated into it.
Acknowledgements and Final words
KF-TestingMapRedux all credit to Fauxy_

Killing Floor2 wiki [wiki.killingfloor2.com][wiki.killingfloor2.com]

Simple Rabbit (Link to his support guide)

RykerZzZ (The best Support in KF2)

Some Final words:

Support is the economic back-bone of the whole team since he is the only perk who can provide additional ammo and kevlar to his teammates. Not to mention the raw power of the shotguns send zeds flying. In my opinion, support is also one of the top picks in public matches besides the "holy trinity" (The commando, sharpshooter and gunslinger). "Team Support" is waiting for you join their army!

Here are my guides to other perks in KF2, feel free to check them out!

Commando Sharpshooter Gunslinger
SWAT
Medic
14 Comments
FIRE-POWER  [author] 2 Dec, 2023 @ 3:12am 
@spirit Apologies for such a late reply. Thank you very mcuh :steamhappy:
spirit 16 Jun, 2023 @ 1:01pm 
Great guide, very well written ! :brfire:
Ricardo Milos 11 Jun, 2021 @ 3:16am 
Glad to hear that, man. In fact, some of your guides inspired me to make my own 'up-to-date' kf2 tutorials. My sincere thanks and thumbs up for you
FIRE-POWER  [author] 11 Jun, 2021 @ 12:59am 
@Ricardo Milos Thanks for the support my man. I watched your videos on youtube too:steamthumbsup:. They are great
Ricardo Milos 10 Jun, 2021 @ 10:34pm 
Great guide
Bro Bike 31 Mar, 2020 @ 6:38pm 
Your loadouts are very bad. I did 75 large kill with max up nailgun +hz12 max up + medic pistol + support pistol
Wedge_13 23 Feb, 2020 @ 12:12pm 
Thus Armor Piercing may be better as it leaves the spread value of those weapons as is.
And i think it reduces DMG drop per target pierced but im not certain on this one.
Wedge_13 23 Feb, 2020 @ 12:10pm 
Interesting guide but there is one thing i dont agree with you.

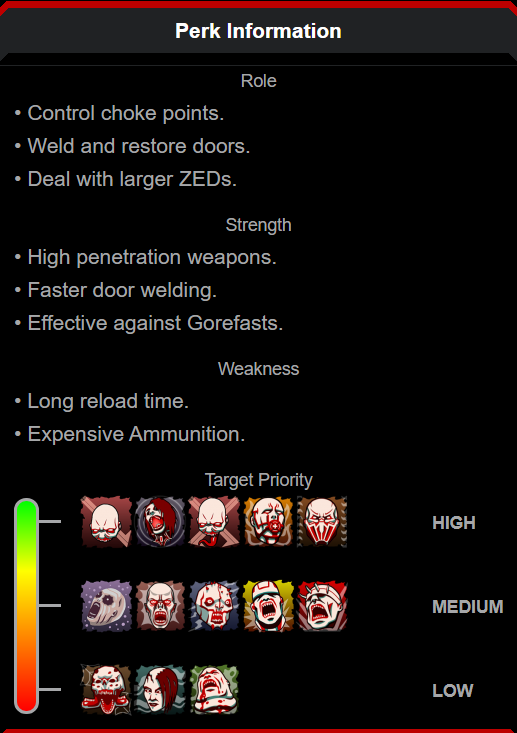
Wether you choose tight choke or armor piercing should depend on the guns you are using as it synergizes differently depending on the weapon choices.

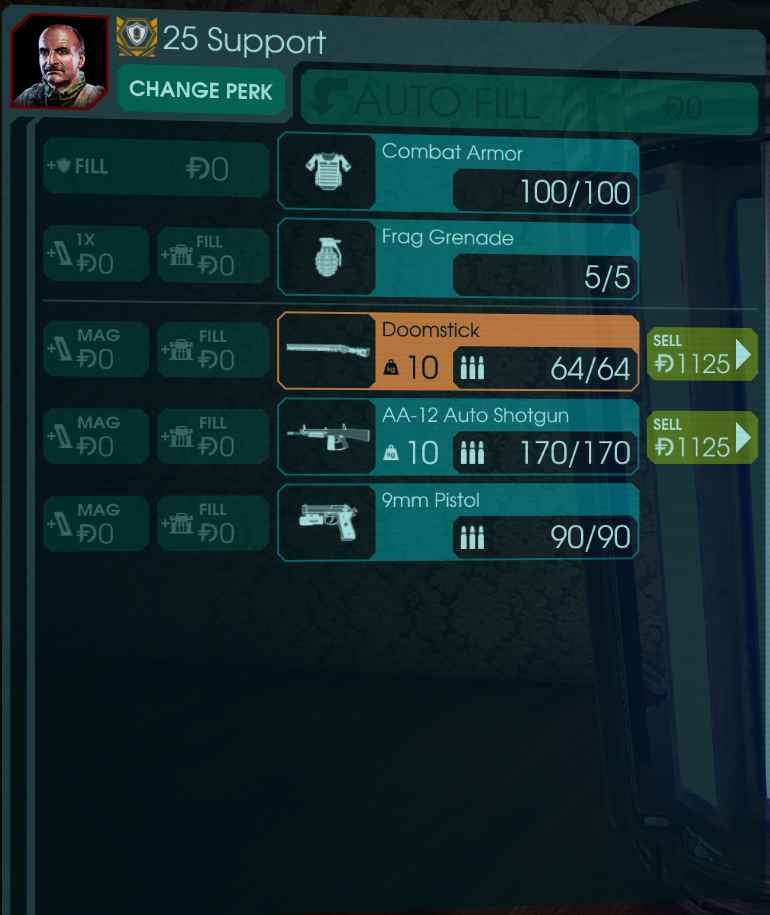
Weapons with high base spread gain greatly from tight choke like DBS, Doomstick or Hz12 as they become capable close - midrange clearers and can engage big game from a safer distance.

On the other hand the same perk becomes detrimental on weapons with initially tight spread like sg500, M4 & AA12. Especially on the M4 the pellets become so dense its basically a slug round. This actually makes the support very vulnarable at CQB as he cant efficiently engage multiple targets anymore (small mags & low firerate) . You may think a SG with slugs may be good for long range engagements but GS and SS are far superior here since their weapons are hitscan while SGs are projectile weapons with significant traveltime.
FIRE-POWER  [author] 17 Feb, 2020 @ 5:30am 
@AnorakEagle Thank you very much :steamhappy:
AnorakRaven 16 Feb, 2020 @ 10:28am 
Real talk these guides are some of the best I've ever seen for any game, keep up the good work.