Killing Floor 2

Killing Floor 2

112 ratings
An in-depth guide for the Sharpshooter
By FIRE-POWER
Just a guide for the sharpshooter, another indispensable perk in Killing Floor 2
2
3
2
   
Award
Favorite
Favorited
Unfavorite
Part 1: The Role of the sharpshooter
1. An innate BIG-ZED HUNTER: Your top priority should always be the big zeds (Scrake, Quarterpound and Fleshpound). In other words, you have to be the first one to initiate the big zed take-downs.


2. A medium zed terminator, particularly for husks and E.D.A.R.s: We need a long-range perk to deal with enemies that can attack you and your teammates from long range.


3. Trash Zeds are at your lowest priority: Commando and swat are designated trash zeds expert. However, the Rioter and Gorefiend are an exception. This is because rioter and gorefiend can be killed with a single-headshot with your starting weapon, which is the Winchester 1894.


4. Laning: Staying with a precision-based perk is always preferred such as the commando, swat, gunslinger and support. Never consider laning with a hectic/AoE perk like the berzerker, firebug and demo.

5. Memorise the number of shots/bullets (of your commonly used arsenal) required to eliminate the Zeds.

I mean this takes time but probably takes less if you are free to check-out my list provided on part 3

6. CREATE ZED TIME BY ACTIVELY SCORING HEADSHOTS!!!
CREATE ZED TIME BY ACTIVELY SCORING HEADSHOTS!!!

(Extremely important and defines the necessity of sharpshooter on higher difficulty of gameplay. The sharpshooter is the ONLY perk that can spontaneously generate Zed Time by scoring headshots on zeds thanks to his Level 25 skills)


Part 2: Skill choice and Loadouts
Assumption: 6 players, Difficulty=Hell On Earth, Level 25 sharpshooter

On wave 1: LLRRX (X means you can choose either of the Level 25 skills)


With sniper and stability, using the winchester 1894 allows you 1 shot rioters and gorefiend. They also enable you to 1 body-shot trash zeds. Bloat requires 2 headshots to be decapitated.


Since Winchester 1894 adopts tube-fed system (reload bullet one by one), its reload speed will be greatly improved by equipping Tactical reload (Level 15)

Don't forget your 9mm, it works wonders on clot variants (1 headshot) and bloats(3 headshots) too.


On waves 2-5: Maintain the LLRRX until you can afford the M14/Railgun/M99. Don't be shy to request some dosh from your teammates as the load-outs of a sharpshooter are quite expensive.

The Winchester also 1-shot siren, E.D.A.Rs and husk's fuel tank.

Sharpshooter has 2 distinct styles of play: 1) Railgun/M99 bulid or 2) M14/FN-FAL build

For the Railgun/M99 bulid, it deletes SC/QP/FP within 1-2 headshots but the trade-off is underwhelming trash-handling power. The skill choice has to be damage-oriented (You must equip Sniper and Stability). Most importantly, these loadouts COST A LOT (more than 3000 dosh).

1) Tier 5 Railgun+ SPX 464 (Large zed specialisation + medium zeds)


2) Tier 5 Railgun+ .500 Magnum Revolver +Dual 9mm pistol (Large zed specialisation with slightly enhanced trash clearing ability)


3) M99 AMR +. 500 Magnum Revolver (Large zed specialisation + medium zeds)


4) M99 AMR + dual 9mm+ HM-TECH 101 pistol (Large zed specialisation + slightly enhanced trash clearing ability + provide healing to your teammates)


The M99 builds licence a more flexible skill choice: LLRRX (Sniper and Stablity allows the M99 AMR to 1 shot SC/QP), increased reloading speed and extra bullets/grenades also help. (Extra 5 bullets of m99 means 5 more SCs/QPs).


For the M14/FAL build, it greatly improves your trash clear capability but consistent headshots are needed (10-15 with the right skills) in order to decap a big zed.

1) M14+FAL (known as the zed time generator build, both allows you to handle everything that comes into your eye)


With Marksman (Level 5) and either of the MASTER techniques (Level 25), such build can significantly increase the opportunity to create zed time, assuming most of the time you are scoring headshots.


2) Tier 4 M14 + Tier 4 SPX (M14 for trash and medium zeds, SPX reserved for larges)


3) M14+ fully upgraded T5 SPX (M14 for trash and medium zeds, SPX reserved for larges)


Skills configuration: RLLRX


Now, I believe you guys will understand why I combine skill choice and loadouts together into a single part because your skill configuration should correspond to your loadouts.

Additional notes:

1) The description for the skill "Ranger" is too vague in-game


A correct description to that skill is that the stun power of your perk weapons will be 10000 times greater INSIDE zed time and such DOES NOT stack with the Ballistic Shock (Level 10 perk skill)

Hence, if you are using any sharpshooter's weapon (9mm included) to kill big zeds and zed time initiated, a SINGLE shot is all you need to stun a scrake/FP/QP.


2) Dead-eye (Level 20) can reduce the number of shots required to terminate big zeds by ONE. The additional 10% recoil reduction also comes in help especially if you are using the FN-FAL, which is characterized by its high recoil.
Part 3: Number of shots required to kill or decapitate a zed
Assumption: 6 players, Hell On Earth and Level 25 sharpshooter (Skills: LLRRX)

ReU stands for Rack em up (Level 15 skill), HS stands for head-shot and BS stands for body-shot

On wave 1:
Zeds/Guns
Winchester 1894
9mm
Cyst/Aphla Clot/Slasher
1 HS

1 BS
1 HS

3 BS
Rioter
1 HS

3 "Leg-shots"
Never use 9mm on rioters
Gorefast
1 HS

2 BS
2 HS

6 BS
Gorefiend
1 HS

3 BS
4 HS

12 BS
Bloat
2 HS

Don't even bother to BS them
3 HS

Don't even bother to BS them

By reading the stats, it is remarked that HS with the Sharpshooter is far better than BS. The Sharpshooter is classified as a precision-based perk in which head-shots is extra effective than shooting zeds' body.

On waves 2-10:

1) Railgun Builds (Skill config: LLLLX)

Zeds/Guns
SPX 464 Centerfire
.500 Magnum Revolvers
Railgun
Cyst/Alpha Clot/Slasher
1 HS

1 BS
1 HS

1 BS
N/A
Rioter
1 HS
1 HS
N/A
Crawler
1 HS/BS
1 HS/BS
N/A
Stalker
1 HS/BS
1 HS/BS
N/A
Gorefast/Gorefiend
1 HS/BS for gorefasts

1 HS/2 BS for gorefiends
1 HS/BS for gorefasts

1 HS/2 BS for gorefiends
N/A
Siren
1 HS
1 HS
N/A
Bloat
1 HS

Don't even bother to body shot them
1 HS

Don't even bother to body shot them
N/A
Husk
1 HS

Don't even bother to body shot them
1 HS

Don't even bother to body shot them
1 HS
E.D.A.R.s
1 shot to the chest core
1 HS
Scrake
N/A
N/A
2 HS (The second shot can be the auto-aim)

1 HS(if you have at least 1 Rack em up)
Quarter pounders
N/A
N/A
2 HS (The second shot can be the auto-aim)

1 HS(if you have at least 3 Rack em ups)
Fleshpound
N/A
N/A
2 HS (The second shot can be the auto-aim)

2) M99 Builds (Skill config: LLRRX)

Zeds/Guns
.500 Magnum Revolvers
m99
Cyst/Alpha Clot/Slasher
1 HS

1 BS
N/A
Rioter
1 HS
N/A
Crawler
1 HS/BS
N/A
Stalker
1 HS/BS
N/A
Gorefast/Gorefiend
1 HS/BS for gorefasts

1 HS/2 BS for gorefiends
N/A
Siren
1 HS
N/A
Bloat
1 HS

Don't even bother to body shot them
N/A
Husk
1 HS

Don't even bother to body shot them
N/A
E.D.A.R.s
1 shot to the chest core
N/A
Scrake
N/A
1 HS
Quarter pounders
N/A
1 HS
Fleshpound
N/A
2 HS OR

1 HS+ 2 HS from the Magnum

3) M14+FAL build (skill config: RLLRR)
Zed/Guns
M14
FAL
Cyst/Alpha Clot/Slasher
1 HS

1 BS
1 HS

2 BS
Rioter
1 HS
1 HS
Crawler
1 HS/BS
1 HS/BS
Stalker
1 HS/BS
1 HS/BS
Gorefast/Gorefiend
1 HS/2 BS for gorefast

1 HS/4 BS for gorefiend
1 HS/2 BS for gorefast

1 HS/4 BS for gorefiend
Siren
2 HS (No or X1 ReU bonus)

1 HS (if you already have X2 ReU)
2 HS (X0,1,2,3,4 ReU bonus)

1 HS (if you already have X5 ReU)
Bloat
3 HS (No ReU bonus)

2 HS (if you already have X1 ReU)

DECAP ONLY
3 HS (X0,1,2 ReU bonus)

2 HS (if you already have X3 ReU)

DECAP ONLY
Husk
1 shot to fuel tank

3 HS (X0,1,2 ReU bonus)

2 HS (if you already have x3 ReU)
1 shot to fuel tank

3 HS regardless of ReU bonus
E.D.A.R.s
2 shots to the chest core (No ReU bonus)

1 shot to the chest core (At least X1 ReU)
2 shots to the chest core (No ReU bonus)

1 shot to the chest core (At least X3 Reu)
Scrake
10 HS (Starting from 0 ReU)

9 HS (At least x2 ReUs)
11 HS (regardless of ReU)
Quarter pounders
11 HS (regardless of ReU)
Fleshpound
14 HS (0 ReU)

13 HS (At least x2 ReUs)
16 HS (regardless of ReU)

15 HS (at least X1 ReU bonous)


4) Tier 4 M14+ Tier 4 SPX build (skill config: RLLRR)

Zeds/Guns
Tier 4 M14
Tier 4 SPX (Reserved for big zeds)
Cyst/Alpha Clot/Slasher
1 HS

1 BS
N/A
Rioter
1 HS
N/A
Crawler
1 HS/BS
N/A
Stalker
1 HS/BS
N/A
Gorefast/Gorefiend
1 HS/2 BS for gorefast

1 HS/4 BS for gorefiend
N/A
Siren
1 HS regardless of ReU
N/A
Bloat
2 HS regardless of ReU

DECAP ONLY
N/A
Husk
1 shot to fuel tank

2 HS (X1 ReU bonus) [DECAP ONLY]

2 HS (X2 ReU bonus) [Clean KILL]
N/A
E.D.A.R.s
1 shot to the chest core regardless of ReU
N/A
Scrake
9 HS (Starting from 0 ReU)

8 HS (At least x1 ReU)
4 HS (regardless of ReU)
Quarter pounders
9 HS (X0,1,2 ReU)

8 HS (At least x3 ReU)


4 HS (regardless of ReU)
Fleshpound
12 HS regardless of ReU
6 HS (X0,1,ReU)

5 HS (X2 ReU)


5) M14+ Tier 5 SPX

Zeds/Guns
M14
Tier 5 SPX (Reserved for BIG zeds)
Cyst/Alpha Clot/Slasher
1 HS

1 BS
N/A
Rioter
1 HS
N/A
Crawler
1 HS/BS
N/A
Stalker
1 HS/BS
N/A
Gorefast/Gorefiend
1 HS/2 BS for gorefast

1 HS/4 BS for gorefiend
N/A
Siren
2 HS (No or X1 ReU bonus)

1 HS (if you already have X2 ReU)
N/A
Bloat
3 HS (No ReU bonus)

2 HS (if you already have X1 ReU)

DECAP ONLY
N/A
Husk
1 shot to fuel tank

3 HS (X0,1,2 ReU bonus)

2 HS (if you already have x3 ReU)
N/A
E.D.A.R.s
2 shots to the chest core (No ReU bonus)

1 shot to the chest core (At least X1 Reu)
N/A
Scrake
10 HS (Starting from 0 ReU)

9 HS (At least x2 ReUs)
4 HS (X0,1,2 ReU)

3 HS (X3 ReU)
Quarter pounders
11 HS (regardless of ReU)

4 HS (regardless of ReU)
Fleshpound
14 HS (0 ReU)

13 HS (At least x2 ReUs)
5 HS
Part 4: Big Zed Take-downs
Before start talking about the big zed take-downs, it is essential to understand how to perform over-capping as a sharpshooter and reload cancelling of various weapons, especially the railgun.

Q: How to over-cap as a sharpshooter?

To sum the clip up:

1) After the wave ends/During Trader time, get to the trader and get the guns you want [The step can be skipped if you have already completed your load-out]

2) Open the menu by pressing Esc, configure skills by switching Dead Eye (Level 20) to Always Prepared [The step can be done when a new wave starts/ when a wave is about to end/ during trader time]

3) Buy ammo

4) Reload sniper rifle(s)

5) Throw them onto the ground (DON'T get spotted by teammates as some may steal them and sell it, try to do it at some corners but close enough to the trader.)

6) Switch back from Always Prepared to Dead Eye

7) Acquire both guns so that you can enjoy the bonuses offered by both skills

NOTE: Avoid getting ammo from support or pick up any ammo boxes after you have performed steps 1-7. Otherwise, ALL OF YOUR HARD WORKS, GONE!
If you decided to use Always Prepared for the entire match, you don't need to perform over-capping.

Q: How to reload cancel as a sharpshooter?


Method 1: Observe the reload animation, when the mag is about to be put into the gun, press V (key for bashing in default) followed by pressing Mouse 1 (Shoot). The interval between pressing the 2 keys should be almost instantaneous.

Method 2: Observe the Ammo HUD at the bottom right corner


When the number of bullets changed from 0 to 1 (take railgun as an example), immediately press V (key for bashing in default) followed by pressing Mouse 1 (Shoot).

Such strategy is applicable to all mag-fed guns, including the M14,FAL, 1858/Magnum revolvers and the Railgun but Not applicable to tube-fed guns like the Winchester 1894 and the SPX 464 Centerfire.

1. Method 1 is relatively risky buy allows you to focus on Zeds

2. Method 2 is safer but it shifts your focus to the bottom right HUD instead of the Zeds in front of you.

3. Dry reload with reload cancelling slightly faster, except for those guns that only hold a single bullet per magazine (Railgun, M99 and Crossbow).

Scrakes' take-down using:

1. Railgun (skill: LLLLL)
NOTE: The railgun has been nerfed since the introduction of the weapon upgrade system, it can no longer one-shot a scrake on 6p HoE. Now, you need to have AT LEAST X1 Rack em Up in order to 1 shot a scrake with Sniper, Stability and Dead Eye. However, if you already have 2 ReU. You can forgo ADSing and no-scope those scrakes

2. M99 (skill: LLRRR)

NOTE: With or without ADSing, M99 1 shot scrakes

To summarise 1 and 2: Both guns delete scrakes with a single head-shot. With the mastery of reload cancelling, handing multiple Scrakes should not be a problem for you.

3. M14 (skill: RLLRR)

NOTE: Consistent headshots (10 at least) need to be landed in order to kill a scrake, head-tracing will be the key.

4. FAL (skill: RLLRR)

NOTE: Try to use the full-auto mode of the FN-FAL to take down scrake, especially when Zed Time kicks in. I understand the recoil is quite challenging to manage in which you may missed a number of bullets. Again, practice makes perfect. It is also perfectly fine if you use the semi-auto mode but more back-pedaling is needed.

To summarise 3 and 4: Both guns requires consistent headshots on scrake. However, this could bring a huge benefit to your team by consistently scoring headshots and hence generating Zed Time (Both Level 25 skills allow 5% of chance to provoke ZT for every headshot you made).


5. SPX (Tier 4) (skill: RLLRR)

NOTE: 4 headshots is all you need to kill a scrake.

6. SPX (Tier 5) (skill: RLLRR)
NOTE: Use your 9mm to get at least 3 ReU first. Then, 3 headshots is all you need to kill a scrake.

To summarise 5 and 6: Despite the fact that SPX is excellent in killing scrakes, the major drawback associated with it is the tube-fed system. You need to determine when is the best timing to perform the painful reloading.

Quarter pounds' take-down using:

1) Railgun

2) M99

To summarise 1 and 2, even QPs are spawned in groups, they are not that much of a problem in the right hands of Railgun/M99 Sharpshooter. Moreover, don't forget you have 6 freeze grenades to immobolise them.

3) M14/FAL/SPX are quite challenging in taking down multiple QPs and sometimes 4-6 of them can spawned together. Utilize your freeze nades and focus fire on them together with your teemmates.

Fleshpounds' take-down using:

1) Railgun

NOTE: FPs always need 2 head-shots from the railgun to be killed. The first shot always need to be aimed manually but for the follow up shot, you can utilise the auto-aim mode to decapitate FP without getting a clean kill.

2) M99

Similar story to the railgun, the M99 still needs 2 shot to kill a FP. If you want to save a bullet of M99, you can try shooting 1 bullet of M99 to FP's head first and then follow up using 2 magnum shots. This results in decap only.

3) M14/FAL/SPX

As mentioned, head-tracing is the key to successfully decap a FP.
Part 5: Advanced skills and notes for the sharpshooter
1. Sharpshooter possesses the second-best asset to your whole team: Triggering Zed Time by actively scoring headshots. (The best asset is the Zed Time refershes offered by the commando)


2. It is is worth highlighting that the passive 25% damage bonus is only applicable to HEADSHOT only.


Unlike other perks, the global 25% damage increment is applicable to BOTH headshot and body shot


What does this implies? Headshot is the key if you are a sharpshooter, try to hit the head as frequent as possible.

3. Your loadout should be situational and dependent on your skill ceiling of your teammates that are laning with you. For instance, you may consider going for Railgun/M99 build if a commando/swat/support knows EXACTLY what they are doing (i.e. keeping trash and medium zeds away from you, providing cover when you are performing a big-zed take-down).

If you don't trust your teammates or they have disappointing skill ceiling, it is better for you to go for the M14/FAL build as either of them greatly improves your survivability and makes you less depdenent on your teammates.

4. A friendly-reminder: After you have purchased the railgun from the trader, switch off the auto-aim mode of the railgun by pressing midde mouse button (default button for alt.fire). Auto-aim mode reduces the damage output of the railgun by HALF while the manual aim mode grants full damage.

Q: How to differentiate between auto-aim mode and manual aim mode?

Method 1: Observe the bottom right HUD

Auto-aim mode:


Manual aim mode:


Method 2: When you are ADS-ing an enemy using the Railgun and you observed this:


The yellow/red rhombus means you have the Auto-aim mode activated. SWITCH IT OFF!

Only at 2 scenarios the auto-aim mode of the railgun should be applied: Scenario ONE: Operating a follow-up shot in a big zed take-down (please refer to part 4) Scenario TWO: Eliminate long rage enemies (Husks and E.D.A.R.s) when you have no time no aim since they are about to initiate their attacks to you/ your teammates.


5. The Re-buy strategy: When you have used up all bullets OR there are only few bullets (less than 2 mags) in your Winchester 1894 after the wave ends. It is better to sell it to the trader and buy a new one. The new one costs 200 but it also contains 60 bullets, which saves you a lot in ammo economy.

6. The difference between a virgin sniper and a chad sharpshooter is Crouching


No matter which loadout the sharpshooter is going for, the Level 10 skill (stability) is A MUST to take-down big zeds efficiently while preserving ammo economy. Ballistic shock is used ONLY when you are NOT familiar with the attacking animation exhibited by the zeds.

7. On boss wave, sharpshooter(s) is/are highly welcomed because T5 railgun+ reload cancelling provide the highest possible DPS in the entire game (around 2000). You can pair T5 railgun with a Boomstick during boss wave for dodging attacks or even Goomba the boss.

Sharpshooter also has freeze nades which can immobilize the Patriach and this prevents him from running away and healing himself. Consequently, the whole team can focus fire on Patty and eliminate him in one go.


To summarise the clips above:

1) Tier 5 railgun is a must on boss wave

2) The skill choice should be LLRRR


Sometimes, it is really hard to trace the head of the boss. It is perfectly fine if you body shot since Sniper and Stability gives you a global 55% damage increment for boss the regardless you hit the head or not. Moreover, you should keep spamming railgun shots on the boss during boss wave and hence Dead Eye is less important. Ranger increases your chance to stun the boss if you score headshots on the boss. This could provide more time for you and your teammates to focus fire on the boss or giving some breathing space to the team.

Alternative Sharpshooter load-out on boss wave:


The skill choice is LLLRL


The load-out:


The T5 railgun is the highest dps option for the sharp, dual 9mms allows you to get ReU stacks rapidly and the medic SMG allows you to handle trash zeds better and offer healing to your teammates.

8. Try to leave at least 1 bullet inside the Winchester 1894 and SPX 464 Centerfire when start reloading. This is because a longer time is required for the player to load the first bullet into the gun.

9. You have the best grenade in the game: Cyro/Freeze grenade. Despite it's negligible damage (25), the grenades can offer you with the best incapacitation effect on zeds. The zeds will be frozen and they will be more susceptible to head-shot from you/your teammates. However, you may wonder what is the best timing to use them?

Situation 1-Defense line breached

When too much trash zeds/mediums are overwhelming your defense line, you can throw 1-2 to them. This provides you and teammates with more breathing space so that you guys can push the line back.

Situation 2-Multiple big zeds (especially quarter pounders) appear

You can throw multiple nades if you are a railgun sharp and 3 FPs appear and several QPs following by. Priorities should be killing those that are not affected by the nades first.

Situation 3-When the Patriach is about to run away OR Dr.Hans Volter enters his last phase (i.e. less than 1/3 HP)

Multiple freeze nades can be put out to freeze the Patriach when the colour of the Boss health bar changed from green to yellow. The nades can immobilize him for several seconds and this prevents him from running away to heal himself. It is also reminded that when Dr.Hans finished his last shield phase (reflected by the RED health bar of the boss). He is extremely dangerous, it is suggested to freeze him first for few seconds by throwing multiple nades (3-4 at least). Hence, the whole team can focus fire on the boss and get the victory.

10. Sharpshooters may have hard time to manage the significant recoil from the FN-FAL. A trick to that is tap-fire instead of holding mouse 1. During a big-zed takedown, you can hold M1 for 0.5 second, wait for another 0.5 second for the recoil to compensate and repeat shooting.


11. Apply quick and consecutive headshots to decapitate medium enemies like husks and bloat before they pose damage to you and your teammates. Such is applicable to M14/FAL build.

Acknowledgements and Final words
Abyss (Hong Kong)

KF-TestingMapRedux all credit to Fauxy_

Killing Floor2 wiki[wiki.killingfloor2.com]

Eventually, I have a few words to say about the sharpshooter.

In my opinion, sharpshooter has the most balanced skill tree among the 10 perks in which every perk skill can be considered useful and viable at certain circumstances. It is really sad to be informed by the Tripwire Interactive that sharpshooter is the LEAST PLAYED PERK in KF2. I hope that the sharpshooter can get more love from the current players of/ newcomers to KF2 becuase he is extremely underrated .

Without sharpshooter, Zed Time will be triggered less frequently.
Without sharpshooter, you will see big zeds more frequently as no one deletes them even before they appear in your line of sight.
Without sharpshooter, KF2 will be a MESS.

Ladies and Gents, don't be hesitate to try out sharpshooter in KF2. I mean, the perk could be quite painful to level up but once you get to Level 25, you will understand how powerful sharpshooter could offer to your team in the right hands of a professional marksman a.k.a. YOU.

Here are my guides to other perks in KF2, check them out if you are free!

Commando

Gunslinger

Support

SWAT

Medic
17 Comments
Johnson 6 Jul, 2022 @ 9:36pm 
The difference between a "dead" sniper and a "alive" sharpshooter is Crouching
FIRE-POWER  [author] 25 Jan, 2020 @ 10:21am 
@Panda Thank you very much:steamhappy:
Panda 25 Jan, 2020 @ 10:17am 
Another perfect guide, just a little fact btw, sharp CAN one shot FP during zed-time (not a big deal with a commando in the team) + x5 headshots stacks, ofc using m99
FIRE-POWER  [author] 18 Nov, 2019 @ 5:04am 
@PerfoRashh

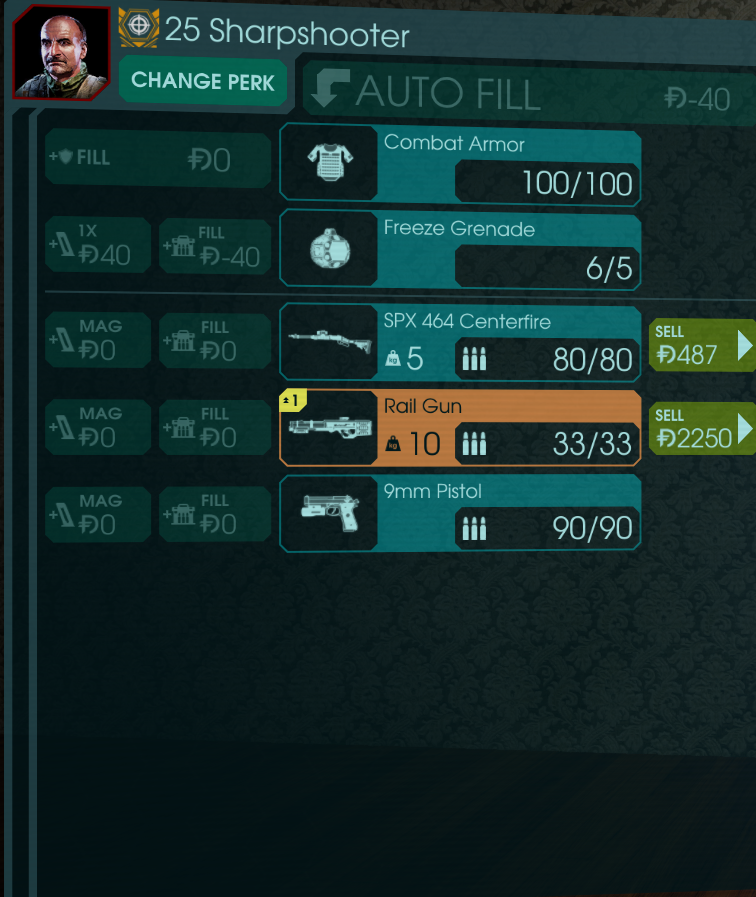
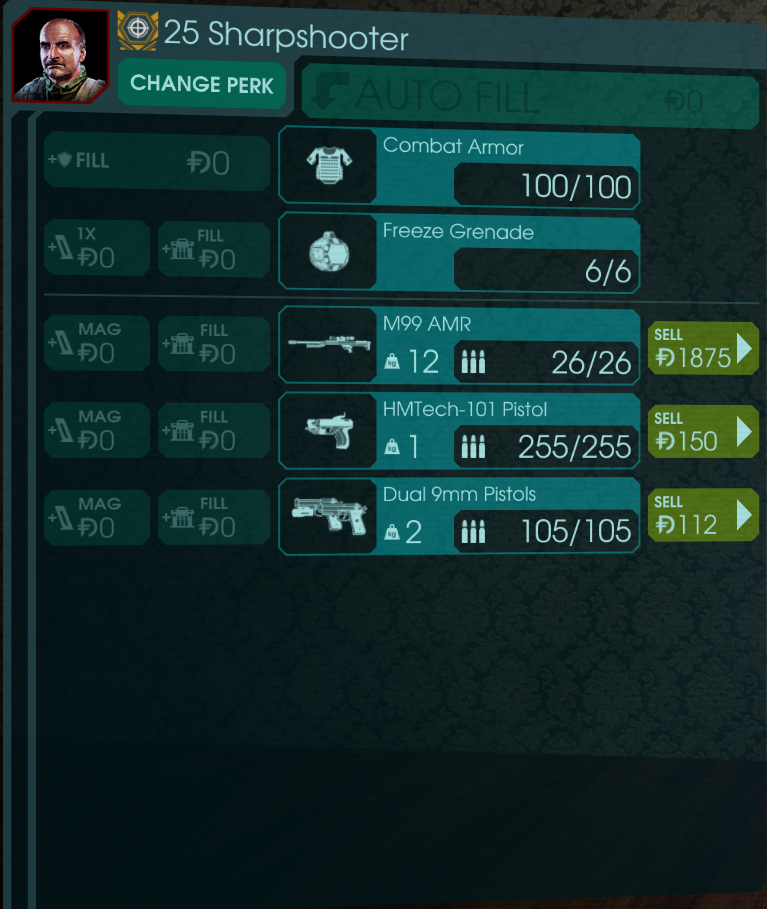
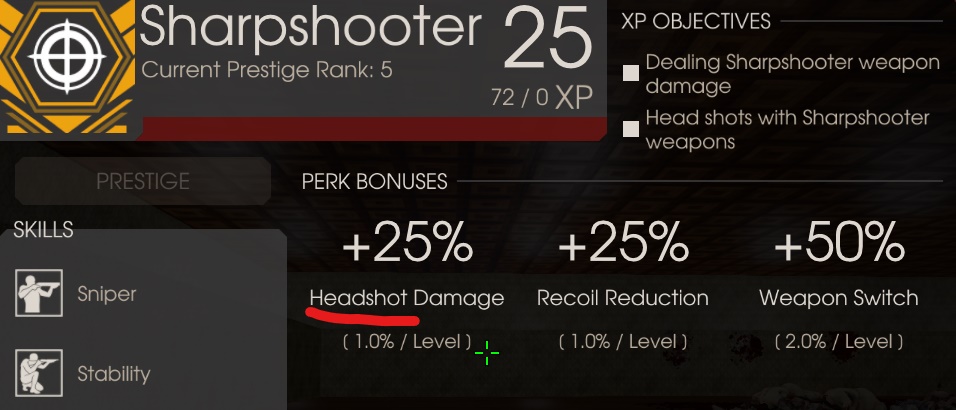
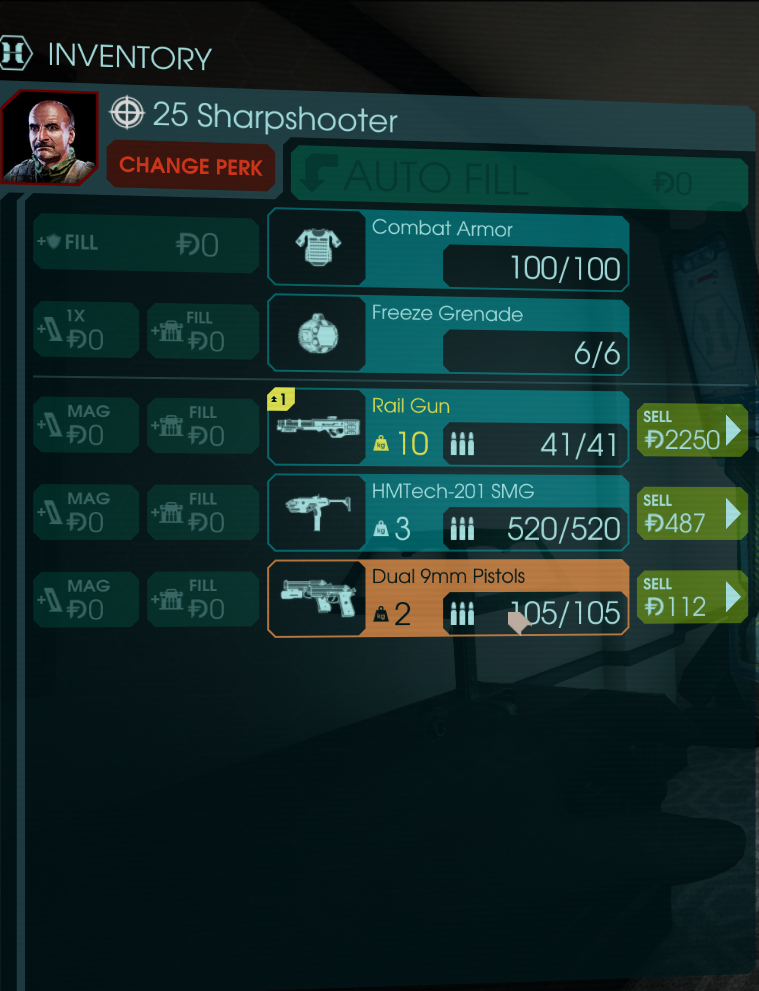
Dual 9mm is considered as a perk weapon for the sharpshooter so it can stack ReUs with consecutive headshots

IIRC only revolvers are regarded as sharpshooter's sidearms. Deagles/M1911/AF-2011/MED pistol are mag-fed so....I don't think medic pistol will be listed as a sharpshooter's arsenal instead of the Gunslinger's.

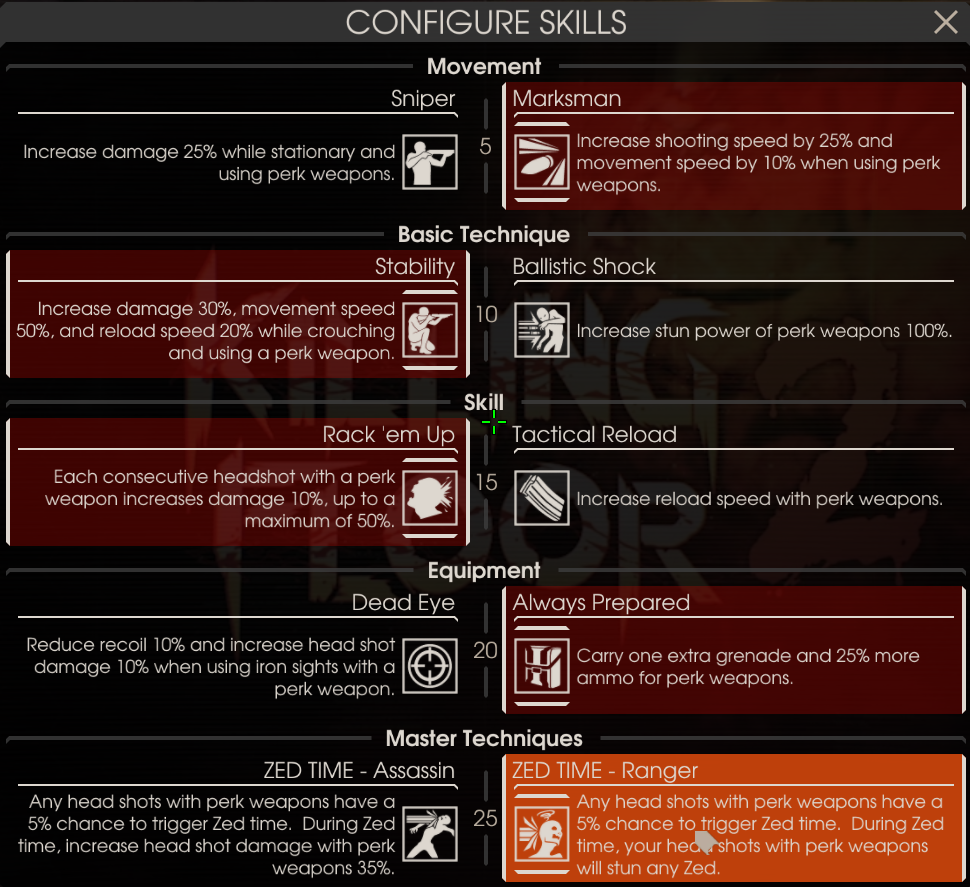
"The Boomstick alt-fire attack adds up to +/- 5 meters per second towards player current falling velocity." (Quoted from KF2 wiki)
This allows you to dodge various attacks like the close-range melee hits from the bosses. You can even use the 5 meters to step-on the boss to make him fainted and falls onto the ground. IIRC, this exploit has NO cool-downs. Hence, a skilled sharpshooter (like you) can do this endlessly to allow you and your teammates to focus fire on the boss.
PerfoRashh 18 Nov, 2019 @ 4:53am 
@FIRE-POWER I see. (1000h kf2 90% sharp) I dont remember, but one time dual 9mm dont stacks ReU. Hmm. need check this now... I want when med pistol can get stacks.)))) I see one time, but one beta.=( And very thx for say setup rail and boomstick. Need test this)
-_-
FIRE-POWER  [author] 18 Nov, 2019 @ 4:42am 
@PerfoRashh It's totally fine if you don't pick Tactical Reload on boss wave. Actually, you can pair a dual 9mm with T5 railgun on boss wave (Using skills LLLRX). If you are confident enough with your head-shooting skill, you can use the dual 9mm first to get x5 ReU stacks and then spam the railgun to the boss. IT HURTS A LOT:Sadclot:
FIRE-POWER  [author] 18 Nov, 2019 @ 4:38am 
@ PerfoRashh Actually, the Hans in clip 3 of part 5 only has 3-players' health and that's why he gets demolished rapidly by the Railgun spam.
FIRE-POWER  [author] 18 Nov, 2019 @ 4:36am 
@ MorseCode762 Please follow the instruction enclosed in this guide to install the corsshair overlay for KF2: https://steamproxy.net/sharedfiles/filedetails/?id=1623217467&searchtext=crosshair
PerfoRashh 18 Nov, 2019 @ 4:26am 
But one moment. I'm shoot more faster's when don't pick skill Tactical Reload. If him take, he interferer normally shooting. (In my case.)
PerfoRashh 18 Nov, 2019 @ 4:19am 
Good guide bro. Yea i agree, RailSpam is better BossPenetrationShow. 3 stady Hanz shield? Pffff... Come here doggy!