Subnautica

Subnautica

513 ratings
Subnautica: The Grand, Regularly-Updated Tutorial V2
By Mango Turtl
Welcome to the best Subnautica guide on Steam - Version 2! The original wasn't updated in about a year, so I've decided to create a brand new guide in which things are easier to read, easier to understand, easier to find within the guide, and of course 100% fully updated and as accurate as possible.

New players are welcome to read a spoiler free section on what to do first or find out how to get that one thing they've been looking for, and even older Subnauts might learn something they don't know!

Now with handmade maps of the Subnautica world and the things in it!

So welcome! I hope you enjoy Subnautica: The Grand, Regularly-Updated Tutorial V2!
11
6
37
4
6
7
3
3
   
Award
Favorite
Favorited
Unfavorite
Before we Begin...
As of now, the guide is finished!!! Enjoy!

A guide of the same style as this for Subnautica: Below Zero can be found here: https://steamproxy.net/sharedfiles/filedetails/?id=1969070518 It is finished, but not as large as this guide - I have a more limited knowledge of Below Zero.

Please be aware of spoilers! This guide goes through...literally the entire game. The only section that has absolutely zero instantly-viewable spoilers within is the "first steps" section. Aside from in the aforementioned section, only larger story spoilers will be covered, and minor spoilers will remain uncovered. To view covered spoiler text, simply hover your mouse over the black boxes.

Finally, if there's anything that you think should be in the guide that isn't, or if you simply have a question about the game that isn't in the guide itself, just add a comment or message me directly. I'll be happy to help.

Thanks again for coming to this guide for help, and stay tuned for more! It would be greatly appreciated if you left a like on this guide, so that more people can be helped by it!
Game Mechanics: The Basics
Mechanic #1: Resource Gathering and Fabrication
In Subnautica, resources come in all shapes and sizes. Most resources that you will find outside your lifepod are raw materials. Raw materials are then used to create, or "craft" different items. The first crafting device is your lifepod's fabricator. When you interact with the fabricator, it will open a menu, which is used to sort the different things you'll make. Things that you can make using the things currently within your inventory are highlighted in blue.

The fabricator has four of those sorting menus. The first one is called "resources." At the start of the game, the resources menu has two separate menus within it. The first is for "basic materials," like titanium or rubber. The second is for "electronics," like batteries or wiring kits. You can hover over a thing you want to make to learn what you need to make it. You can also use the blueprints tab in your PDA for this same purpose. The second menu is called "sustenance." This is for your food and water needs. The third menu is very important and is called "personal." Just like the first menu, this one opens two other menus: "Equipment" is for things like oxygen tanks or fins, and "tools" is for things like a knife or repair tool. Finally, the fourth menu is for "deployables." Deployables are things that you deploy into the water, like a beacon. Later in the game, you'll be able to build other things that create more advanced items than the fabricator does.

Some resources are gathered in different ways than others. Most resources are in three categories for this:
  • Some resources can just be picked up off the ground, like scrap metal or quartz.
  • Some resources are found inside breakable outcrops that lie on the seabed, like copper or silver.
  • Some resources have to be gathered with a special item, like the knife. These include creepvine samples and table coral samples.

Mechanic #2: Hunger, Thirst, Oxygen, and Health:
The bubbles in the bottom left of your screen represent hunger, thirst, oxygen, and health.

Health goes down when you are extremely hungry or thirsty, being attacked, or in some other physical danger. Some things drop your health faster than others. When your health becomes 0, you die, and respawn in the last habitat that you were in (like your lifepod). When you die, you will lose any items that you acquired after you last entered a habitat. Your health naturally increases slowly over time, and you can instantly increase it by using medkits.

You need to eat and drink to stay alive. Some fish and plants give more food than others. A cooked fish will always give the maximum amount of food and water that you could get from eating that fish. However, cooked fish will go rotten. Raw fish will restore some food, but you will lose water. Cured fish give you the same amount of food as cooked fish, but slightly drop your water level. Cured food will not go rotten. Some plants can also give you food, and can be more sustainable. Once you have a place to plant them, you can cut most plants to give you seeds to grow more plants!

Oxygen is a huge part of the game, since you're underwater so often. You start out with 45 seconds of oxygen. Swimming to the surface will automatically restore your oxygen. Your oxygen will also be restored when you enter a powered seabase or submarine. When oxygen gets to 0, you start black out. Black out without recieving more oxygen for too long, and you'll die. You can make oxygen tanks to increase the amount of oxygen you have. Oxygen tanks do not stack. Generally, your oxygen meter shows how many seconds of oxygen you have left, however the efficiency of oxygen decreases when you go below 100 meters, then decreases again when below 200 meters. This effect can be counteracted by wearing a rebreather.

Mechanic #3: Fragments and Blueprints:
Blueprints are an extremely important part of the game. You already have some blueprints to begin with, but you'll need a lot more in order to beat the game. Once you make a scanner, you can go out and get more blueprints.

There are a few ways to get blueprints. The first and most important are fragments. Fragments are usually found among wreckage, but can also be found scattered randomly across the seabed. Scanning a fragment will give you part of a blueprint. Some blueprints will be unlocked after scanning only one fragment, but to unlock others you will have to scan more than one fragment.

Databoxes are another way to get blueprints. Databoxes are not scattered randomly, and are instead in set locations around wreckage or other points of interest. To acquire a blueprint from a databox, simply click on the databox to open it.

Finally, some blueprints may be unlocked once you find a certain resource or create a certain item.

If you scan a fragment or open a databox that is for a blueprint you already have, you will get two pieces of titanium instead.

Mechanic #4: Seabases, Power, and Hull Integrity:
Seabases are areas of safety in the game other than your lifepod. They can be built anywhere with the habitat builder, provided you have enough resources.

Seabases have to be powered. Without power, a seabase will not produce oxygen and modules inside the seabase will not function. There are four methods of power generation in the game:
  • Solar panels are the most basic type of power generation tool. They can be placed on top of or near a seabase and will produce power throughout the day. The amount of power it produces depends on its depth and the time of day.
  • Bioreactors can turn biological matter, like plants, eggs, and fish into energy. They produce a lot of energy, but slowly. They must be built in a multipurpose room. Bioreactors must be restocked with organic matter from time to time.
  • Thermal generators must be built in areas of extreme heat in order to function. They generate a lot of power, and pretty quickly too.
  • Nuclear reactors produce an enormous amount of energy. They are powered with reactor rods. Like bioreactors, they must be built in a multipurpose room and must be restocked with new reactor rods from time to time.
Seabases can sometimes suffer from a lack of sufficient power. The more modules you add to your base, the more power you will need to produce. Solar panels and thermal reactors transmit power to your base via a blue energy stream. If you don't see this blue line going to your base, you may need to add a power transmitter to increase the range of your power transmission.

Seabases can also suffer from a lack of structural support. Adding more structures to your base, adding glass windows or rooms, or building a deeper base will cause your base's structural integrity to go down. When a base's structural integrity goes below 0, it will begin to flood. Reinforcements, bulkheads, and foundations will add to your bases structural integrity when built. If the base already flooded before you built one of these, you'll have to repair the holes in your base with a repair tool. Ramming or throwing something into/at your base may also cause your base to flood.
Some Recommended First Steps
You've just crash landed on an alien planet. Once you've put out the fire in your pod, you notice that all you can see around you is water and your crashed ship. Inside your lifepod are a few useful things to get you started:
  • A fabricator. This can get you anything you need, provided you have the required blueprints and resources.
  • A medkit fabricator. This will periodically generate medkits, which, when used, restore 50 health.
  • A storage cabinet (the red thing that looks like a bench). This starts with two waters, two nutrient blocks, and two flares. You can store your own stuff inside once you get some.
  • Broken secondary systems. Once repaired, all it really does is light up the lifepod a bit.
  • A broken radio. Once repaired, transmissions will start coming in from other lifepods. You can unlock cool stuff from these and progress the story.

Now that you know about what you have, lets get some stuff you don't have! Go ahead and jump down into the water by opening the hatch at the bottom of your lifepod.

Below you, you'll see the colorful environment called the Safe Shallows. Although this is, as the name implies, one of the safest and shallowest places in the game, you still have to watch for a few things:
  • Food and water. Unless you're playing in freedom mode, you'll need some. Even though your lifepod comes with some, you will find that you run out very fast.
    -Hint: One fish, the bladderfish, can make water as well as food.
  • Oxygen. You can't hold your breath forever. Don't go too deep, or you may not make it back to the surface in time.
  • Dangerous creatures. Two creatures pose a threat to you in the Safe Shallows.
    -The gasopod is the thing that looks a bit like a manatee, with green bubbles
    in its tail. Get too close, and it'll release toxic gas.
    -The crashfish. They live inside caves and will swim towards you and
    explode if you get to close. Hint: Inside their "homes" is cave sulfur,
    which you need to get the repair tool
    .

Now that you have hopped in, you need some basic tools. Most of these basics are really easy to get. To get them, you need four basic resources, which you can find in abundance in and around the Safe Shallows:
  • Titanium. Titanium comes mainly from metal salvage. You can find this scrap metal scattered along the sea floor. Each piece gives you four titanium in the fabricator.
  • Copper. Copper comes mainly from limestone outcrops. These are little bits of rock sticking out of the sea floor. They can be a little hard to see, but don't worry! The game directs you towards one of them when you get into the water so you know what they look like.
  • Acid mushrooms. These look like exactly what they sound like. Bright, colorful mushrooms scattered around the seabed. You'll need them, but don't fill your storage with them, since they're super easy to gather.
  • Creepvine seed clusters. These are actually found in the second biome that you should go to, the Creepvine Forest, which is adjacent to the Safe Shallows. Some creepvines grow glowing pods on them. Grab them! Beware of stalkers though; they have a nasty bite.
You'll now be able to make your basic tools and equipment. In total you'll need 5 titanium, 1 copper, 2 acid mushrooms, and two creepvine seed clusters. You'll use these to make a scanner, a survival knife, a standard oxygen tank, and fins.

The scanner is probably your most important of the tools, it will allow you to scan broken equipment that is on the sea floor. Scan enough of one item, and you'll unlock that item and learn the recipe for how to make it. You can find blueprints for the seaglide, grav trap, and beacon in the Safe Shallows, often in boxes or small piles of junk.

Now that you have these basics, here are a few good next steps:
  • Get some more advanced tools and equipment, like the repair tool, habitat builder, seaglide, laser cutter, and high-capacity oxygen tank.
  • Explore around! There's dry land hidden somewhere...
  • Go to the Aurora (crashed ship). Remember to make a radiation suit first.
  • Find wrecks. There's always a new cool blueprint to scan!
  • Collect story elements. Collect logs from abandoned PDAs, the radio, and other technology that you scan.

For more tips on how to progress further, comment on the guide or visit other sections of the guide.
tl;dr - Some Helpful Tips and Tricks
Yes. This guide is huge, and reading through it to find only a small tidbit of information that you need can be tedious. So, here is a section that will give you few tips and tricks to help you along through the game. Warning: Spoilers Ahead. Want some tips on something that isn't here? Just ask!

General Tips
  • Once you have a seaglide and a high capacity tank, don't be afraid to explore. You can save yourself a lot of trouble later by just exploring around to find things, instead of having to find one specific thing later on.
  • Getting a scanner should be the first thing you do. It's easy to focus on making other tools or gathering materials instead, but remember that basic tools can only get you so far.
  • Make sure you have everything you need before embarking on a long journey. I once forgot to make the cyclops depth upgrade and only realized when I was halfway to my destination...
  • Always carry a beacon with you, especially if you're new to the game. You never know what you might want to locate again later.
  • The cyclops works better as a portable base than as an exploration device. Going to the Lost River/Lava Zone is the exception to this.

Food and Water Tips
  • The bladderfish, which is abundant in the Safe Shallows, can be fabricated into both water or food. They're also one of the easiest fish to catch.
  • Most fish move around slower during the night. Spend your nighttime easily catching fish so that your daytime can be as productive as possible.
  • The reginald, found commonly in the Grassy Plateaus, is the best fish for food.
  • Fish and other food items rot if they aren't eaten within a few minutes. Cure food to get around this, but make sure you have loads of water on hand.
  • Marblemelons give approximately equal amounts of food and water, making them a great, stable food source.
  • Plants can grow in growbeds inside unpowered bases as well as powered ones.
  • Sitting in a chair will allow you to browse your PDA without depleting your food and water bars.

Seabase Tips
  • Your base will draw power from the first generator you construct, then the second, and so on. You can save yourself fuel by constructing automatic power generators like solar panels first, then construct things like bioreactors as your backup power.
  • Lantern fruit is fast growing, making it extremely good as a bioreactor fuel.
  • Water filtration machines are slow and expensive, making them obsolete as long as you have another water source like marblemelons.
  • If you have enough power without using bioreactors or nuclear reactors, you can often get by with just a moonpool serving as your entire base.

Tips for Exploring the Aurora
  • Make sure you have a radiation suit first.
  • You can use Lifepod 3 as a little hiding spot until the reapers go away. Then you can make a run for the entrance.
  • Laser cutters and repair tools are required to explore the Aurora.
  • PDAs can sometimes give you more than just story-related info.
  • There are two entrances. You might miss something important if you don't search for the second one.
  • Don't bring your own food, water, or spare batteries. There are plenty inside the Aurora.
  • Don't skip the Seamoth Depth Upgrade!! Make sure you have it before leaving!
Subnautica’s Beautiful Biomes
This section will cover all biomes, going over some pointers on how to find them, how dangerous each one is, and some important landmarks or items that you can find there.

Shallow Biomes (<250m)
  • Safe Shallows
    -You spawn in this biome.
    -There isn’t much here except for the basic starting resources.
    -As the name suggests, it’s relatively safe and shallow.
  • Creepvine Forest
    -Patches of this biome are scattered around the Safe Shallows.
    -Identifiable by strand of kelp growing in the water.
    -A few unique resources exist here, like stalker teeth.
    -Relatively safe, but beware of stalkers.
  • Grassy Plateaus
    -Also scattered around the Safe Shallows.
    -Identifiable by mounds of red seagrass and interesting rock formations.
    -One of the best places to find early game fragments like the seamoth; also abundant in copper, gold, silver, and lead.
    -Again relatively safe, with the exception of sandsharks.
  • Floating Island
    -Found Southwest of the Aurora; the first actual landmass you might come across.
    -No substantial resources other than plant life; a Degasi seabase is here which contains some extremely important fragments.
    -Pretty safe, as long as you can dodge the cave crawlers.
  • Mountain Island
    -Found northwest of the Aurora, almost exactly opposite from the Floating Island.
    -A great place to find diamonds; also contains the Quarantine Enforcement Platform.
    -The island itself is safe, but the waters around it can contain reaper leviathans and warpers.
  • Mushroom Forest
    -Found on both the eastern and western parts of the map, approximately in line with the Aurora’s nose.
    -Identifiable by large mushroom trees.
    -Large amounts of lithium can be found here, as well as many cyclops fragments.
    -Safe, except for a few bonesharks scattered around; reaper leviathans may occasionally wander into the eastern Mushroom Forest.
  • Crash Zone
    -The area just around the Aurora.
    -A great place to get scrap metal and cyclops fragments, as well as being the entry area for the Aurora.
    -Shallower areas contain only stalkers and sandsharks, but deep areas contain reaper leviathans.

Deep Biomes (deep but not in caves)
  • Underwater Islands
    -In the north, but in the center of the map; sort of between the two Mushroom Forests.
    -Literally a cluster of islands perched just under the surface.
    -Not much to be found here other than a wreck, but clusters of thermal vents underneath the islands can provide tons of thermal power.
    -Absolute tons of bonesharks here.
  • Mountains
    -The biome surrounding Mountain Island.
    -Relatively barren apart from some shale outcrops, lithium, and a wreck.
    -Very dangerous, since reaper leviathans live here along with an abundance of warpers.
  • Bulb Zone
    -In front of the Aurora's nose.
    -Identifiable by a bunch of purple/blue, spherical plants.
    -Abundant in plant life, but not much else resource wise other than a wreck and thermal vents.
    -Tons of bonesharks and ampeels here, so be careful.
  • Crag Field
    -Towards the south, almost directly east of the Floating Island.
    -Identifiable by large rock spires along with basically nothing else.
    -Not many resources at all, but there is a fun easter egg here if you're vigilant enough to find it.
    -Occasionally patrolled by bonesharks.
  • Grand Reef
    -The biome under the Floating Island.
    -Marked by a blueish-tinted landscape filled with these floating, weird, blue, glowing stone things.
    -A great place to find ruby and contains a wreck which contains some important fragments as well as a Degasi Base.
    -Look out for warpers and crabsquids, along with a ghost leviathan.
  • Sparse Reef
    -Due north of the floating island.
    -As the name suggests, this area is pretty sparse. It's a good place to search for rubies.
    -This is actually one of the safest biomes, with the only dangers being drowning and tiger plants.
  • Blood Kelp Zone
    -The second biome that has two sections, a northern zone and southern, or "trench" zone. They are found towards the west in their respective locations (north/south).
    -Marked by extremely deep, dark waters with blood kelp inside, a white kelp-like plant that grows red "blood oil."
    -Blood oil, deep shrooms, and uraninite are all abundant resources here.
    -One of the most dangerous biomes, with crabsquids, ampeels, blood crawlers, and warpers in the area. A ghost leviathan also patrols the northern section.
  • Sea Treader's Path
    -Directly east of the Sparse Reef.
    -Very similar to the Sparse Reef; a good place to find outcrops of all sorts as well as alien feces.
    -Just like the Sparse Reef with very little danger, although warpers can occasionally be found here.
  • Dunes
    -Goes almost all the way down the map on the western edge.
    -Literally just a bunch of sand.
    -Not much to find here other than a useful wreck and a cool structure to find.
    -Pretty much the last place you want to be, with reaper leviathans patrolling the entire place.

Cavernous Biomes
  • Jellyshroom Caves
    -Under the Grassy Plateaus.
    -Lots of giant pink mushrooms.
    -A great place for lithium and magnetite, and the Jellyshroom Caves Degasi Base is here.
    -Crabsnakes are here in great numbers, and of course being in a caves makes it harder for you to get out.
  • Lost River
    -A huge biome that is basically just underneath the entire map, with entrances in both Blood Kelp Zones, the Bulb Zone, and the Grand Reef.
    -In this biome is nickel as well as many other important resources, and the very important Precursor Disease Research Facility.
    -This biome is very dangerous, containing crabsquids, warpers, river prowlers, and ghost leviathans.
  • Inactive Lava Zone
    -Two entrances in the Lost River.
    -Lots of lava, but, as the name suggests, no lava is actually flowing down here.
    -Kyanite and crystalline sulfur are the main resources, and the Alien Thermal Plant can also be found here.
    -Very dangerous, with lava lizards, warpers, and sea dragon leviathans.
  • Active Lava Zone
    -Two entrances in the Inactive Lava Zone.
    -Basically the same as the Inactive Lava Zone but with more lava and the all-important Primary Containment Facility.
Subnautica's Wonderful Flora (plants)
Note: These plants are only plants that are useful, meaning that they can be a source of food or an ingredient in some sort of item. A small section at the end of this part of the guide will list the few dangerous plants in the game. For your convenience, the flora in this section are organized alphabetically.

Harvestable/Useful Flora:
  • Acid Mushrooms
    -Found primarily in the Safe Shallows, but can also be found in other biomes.
    -A key ingredient in batteries.
    -Has seeds (cut with knife).
    -Yes, these can be planted in an outdoor growbed!
    -Beware: Cutting these with a knife releases a cloud of toxic acid!
  • Bloodvine
    -Found in the Blood Kelp Zone.
    -Yields blood oil, which is used to make benzene.
    -Yes, these can be planted in an outdoor growbed!
  • Bulb Bush
    -Can be found in the Bulb Zone.
    -Yields bulb bush samples (cut with knife), which can be used as a water-heavy food source. They are also one of the ingredients to make hatching enzymes.
    -Yes, these can be planted in an outdoor growbed!
  • Bulbo Tree
    -Found on the Floating Island and Mountain Island.
    -Yields bulbo tree samples (cut with knife), which can be used as a good food source.
    -Yes, these can be planted in an indoor growbed or plant pot!
  • Chinese Potato Plant
    -Found on the Floating Island.
    -Yields chinese potatoes, which can be used as a food-heavy food source.
    -Yes, these can be planted in an indoor growbed or plant pot!
  • Creepvine
    -Found in the Creepvine Forest.
    -Yields creepvine seed clusters. These are used to make silicone rubber and lubricant.
    -Yields creepvine samples (cut with knife). These are used to make fiber mesh, or they can be used as a mediocre food source.
    -Yes, these can be planted in an outdoor growbed!
    -Hint: Planting creepvine samples yields creepvines without seed clusters, but planting seed clusters yields creepvines with them.
  • Deep Shroom
    -Found in the Blood Kelp Zone and the Lost River.
    -Used to create hydrochloric acid.
    -Has seeds (cut with knife).
    -Yes, these can be planted in an outdoor growbed!
    -Beware: Cutting these with a knife releases a cloud of toxic acid!
  • Eye Stalk
    -Found in many biomes, however found in abundance in the Sparse Reef.
    -Yields eye stalk seeds (cut with knife) which are used in hatching enzymes.
    -Yes, these can be planted in an outdoor growbed!
  • Gel Sack
    -Found in relatively low numbers in many biomes.
    -An ingredient in aerogel (used to make the PRAWN suit) and is a mediocre food source (please don't eat these unless you're somehow really desperate).
    -Has seeds (cut with knife).
    -Yes, these can be planted in an outdoor growbed!
  • Ghost Weed
    -Found primarily in the Blood Kelp Zone and Lost River
    -Yields ghost weed seeds (cut with knife) which are used in hatching enzymes.
    -Yes, these can be planted in an outdoor growbed!
  • Giant Tube Coral
    -Found in the Safe Shallows.
    -Yields coral tube samples (cut with knife) which are used in bleach to purify water.
    -No, these cannot be planted in a growbed.
  • Lantern Tree
    -Found on the Floating Island.
    -Yields lantern fruit, which is a good, abundant food/water source.
    -Yes, these can be planted in an indoor growbed or plant pot!
    -Hint: Because many fruits can grow at once on one plant, this makes a great bioreactor fuel!
  • Marblemelon
    -Found on the Floating Island.
    -A very good food source.
    -Has seeds (cut with knife).
    -Yes, this can be planted in an indoor growbed or plant pot!
  • Purple Pinecone
    -Found in the Mushroom Forest.
    -Yields salt when broken.
    -No, this cannot be planted in a growbed.
  • Sea Crown
    -A very rare plant found in the Dunes, Grassy Plateaus Caves, Bulb Zone, and the Primary Containment Facility Aquarium.
    -Yields sea crown seeds (cut with knife) which are used in hatching enzymes.
    -Yes, this can be planted in an outdoor growbed.
  • Sulfur Plant
    -Found in Safe Shallows Caves and Kelp Forest Caves.
    -Yields cave sulfur, which is used to make the repair tool and laser cutter.
    -No, this cannot be planted in a growbed.
    -Beware: Crashfish live inside these, which explode if you get too close.
  • Table Coral
    -Found primarily in the Safe Shallows, but can be found in other biomes.
    -Yields table coral samples (cut with knife). These are used in computer chips.
    -No, these cannot be planted in a growbed.
  • Tree Mushrooms
    -Found in the Mushroom Forest.
    -Yields fungal samples (cut with knife) which are used in hatching enzymes.
    -No, these cannot be planted in a growbed.

Dangerous Flora:
  • Tiger Plant
    -Found in the Grassy Plateaus, Crag Field, and Sparse Reef.
    -Shoots spines at fauna as well as the player when they get too close.
  • Drooping Stinger
    -Found primarily in caves in the Grassy Plateaus and Creepvine Forest, but can also be found in other caves or dark spaces.
    -Poisons creatures, including the player, on contact with the plant.
Subnautica's Usually Terrifying Fauna (animals)
In this section, all exploitable and dangerous fauna are covered! Fauna that meet neither of the criteria (such as the rockgrub or rabbit ray) are skipped. For your convenience creatures in each section are organized alphabetically.

Edible Fauna
  • Bladderfish
    -Found in many biomes, but primarily the Safe Shallows.
    -Can be cooked for +16 food and +4 water.
    -The only fish that can also yield pure water (+20 water).
    -Can be combined with silicone rubber to make an air bladder.
  • Boomerang
    -Found in nearly every biome.
    -Can be cooked for +21 food and +3 water.
  • Eyeye
    -Found in many biomes, but primary the Creepvine Forest.
    -Can be cooked for +18 food and +10 water.
  • Garryfish
    -Found in a few biomes, but primarily the Safe Shallows.
    -Can be cooked for +13 food and +5 water.
  • Holefish
    -Found in the Safe Shallows, Mushroom Forest, and Bulb Zone.
    -Can be cooked for +21 food and +3 water.
  • Hoopfish
    -Found in many biomes, but primarily the Creepvine Forest.
    -Can be cooked for +23 food and +2 water.
  • Hoverfish
    -Found in the Creepvine Forest and the Crash Zone.
    -Can be cooked for +23 food and +3 water.
  • Magmarang
    -Found in the Inactive and Active Lava Zone.
    -Can be cooked for +20 food and +3 water.
  • Oculus
    -Found in the Jellyshroom Caves.
    -Can be cooked for +30 food and +2 water.
  • Peeper
    -Found in most biomes.
    -Can be cooked for +32 food and +5 water.
  • Red Eyeye
    -Found in the Inactive and Active Lava Zones.
    -Can be cooked for +18 food and +9 water.
  • Reginald
    -Found in most biomes.
    -Can be cooked for +44 food and +4 water.
  • Spadefish
    -Found in a few biomes, but primarily the Grassy Plateaus.
    -Can be cooked for +23 food and +3 water.
  • Spinefish
    -Can be found in the Blood Kelp Zone and the Lost River.
    -Can be cooked for +23 food and +3 water.

Dangerous Fauna:
  • Ampeel
    -Found in the Blood Kelp Zone and the Bulb Zone.
    -Approach with caution: Deals 15 to 45 damage.
  • Biter
    -Found in a few biomes, but primarily the Grassy Plateaus and the Mountains.
    -Approach with little caution: Deals 7 damage.
    -Swarms of biters can pose a real threat, as damage can add up quickly.
  • Bleeder
    -Found primarily in the Sparse Reef, but can also be found in the Creepvine Forest and the Aurora.
    -Approach with caution: Attaches to the player and deals about 5 damage/second until it is punched off.
  • Blighter
    -Found in the Blood Kelp Zone.
    -Approach with little caution: Deals 7 damage.
  • Blood Crawler
    -Found in the Blood Kelp Zone and the Lost River.
    -Approach with little caution: Deals 5 damage.
  • Boneshark
    -Found primarily in the Bulb Zone, Crag Field, and Underwater Islands.
    -Approach with caution: Deals 30 damage.
  • Cave Crawler
    -Found on the Islands, in the Dunes, and in the Aurora.
    -Approach with little caution: Deals 5 damage.
  • Crabsnake
    -Found in the Jellyshroom Caves.
    -Approach with caution: Deals 35 damage.
    -Lives inside Jellyshrooms and will swim out and attack if the player approaches their Jellyshroom.
  • Crabsquid
    -Found in the Grand Reef, Blood Kelp Zone, and Lost River.
    -Approach with caution: Deals 40 damage.
    -Can send out an EMP blast which temporarily disables electronics, including submarines.
  • Crashfish
    -Found in caves in the Safe Shallows and Creepvine Forest.
    -Approach with caution: Can deal a lot of damage if they are close to you when they explode.
    -Bad turn radius. Try to outmaneuver them instead of outrun them.
  • Ghost Leviathan
    -Found in the Crater Edge, Grand Reef, Blood Kelp Zone, and the Lost River.
    -Approach with extreme caution: Deals 85 damage.
  • Lava Larva
    -Found in the Inactive and Active Lava Zones.
    -Does not deal damage, but is still a threat. It attaches to the cyclops or PRAWN suit and gradually drains the vehicle's energy.
    -They can be hit off with a knife or will go away (temporarily at least) by turning the cyclops engine off or removing the PRAWN suit's power cells.
  • Lava Lizard
    -Found in the Inactive and Active Lava Zones.
    -Approach with caution: Deals 30 damage.
    -Immune to the thermoblade.
  • Mesmer
    -Found mainly in the Creepvine Forest, Bulb Zone, and Mushroom Forest.
    -Approach with caution: Deals 35 damage, but is easy to get away from.
    -Attempts to draw creatures (including the player) towards it with a hallucinogenic effect.
  • Reaper Leviathan
    -Found in the Crash Zone, Dunes, and Mountains.
    -Approach with extreme caution: Deals 80 damage.
    -They are attracted to submersible vehicles and can be partly avoided by simply not using submersibles when in their area.
  • River Prowler
    -Found in the lost river.
    -Approach with caution: Deals 30 damage.
  • Sandshark
    -Found in the Crash Zone, Dunes, and Grassy Plateaus.
    -Approach with caution: Deals 30 damage.
  • Sea Dragon Leviathan
    -Found in the Inactive and Active Lava Zones.
    -Approach with extreme caution: Deals 20 to 100 damage.
    -This is the only creature that can instantly kill the player at full health.
  • Stalker
    -Found in the Creepvine Forest and the Crash Zone.
    -Approach with caution: Deals 30 damage.
  • Warper
    -Found in biomes deeper than 300 meters.
    -Approach with extreme caution: Deals 5 to 65 damage.
    -Can teleport the player outside of the seamoth or PRAWN suit.
    -Can teleport other dangerous creatures to the player.

Inedible Exploitable Fauna:
  • Gasopod
    -Found in the Safe Shallows and the Dunes.
    -Can release a gas cloud if you get too close, which deals about 9 damage/second while you are inside it. However, your health regenerates once out of the gas cloud.
    -When you hear the gasopod release gas (a "squirt" noise), you can easily just run away before the gas cloud appears.
    -Can yield gas pods, used to make gas torpedoes.
  • Reefback
    -Found mainly in the Grassy Plateaus, but also in other open biomes.
    -Has barnacles on its back, which can yield copper or silver.
  • Sea Treader
    -Found on the Sea Treader's Path
    -Can reveal different outcropping types, which can then be broken.
    -Can occasionally drop Alien Feces, which can be used as an incredible bioreactor fuel.
    -Be careful: Getting in their way can be a bad idea, as getting stepped on will deal 40 damage.
  • Stalker
    -Can drop stalker teeth, which are used to make enameled glass.
    -For more information, see the "Dangerous Fauna" section above.

Spoiler Fauna:
  • Cuddlefish
    -An extremely rare fish that can only be found in eggs, which can then be hatched in the Alien Containment Unit.
    -A few eggs are scattered across the map, the most well-known of which can be found in the Precursor Laboratory Cache in the Lost River.
  • Sea Emperor Leviathan
    -Found only in the Primary Containment Facility Aquarium.
    -Juvenile members of this species can produce Enzyme 42, which can cure the Kharaa Bacterium.
  • Warper
    -A biomechanical creature built by the Precursors which can teleport itself and others at will.
    -Aggressive only towards creatures (including the player) infected with the Kharaa Bacterium.
    -For more information, see the "Dangerous Fauna" section above.
Natural Resources: Where do I get them?
This section will go over all raw materials that can be found in the game. Materials that are made in the fabricator are not covered. Also, materials that are plants or come from plants or coral are not listed. For those, please see the Subnautica's Flora section. For your convenience, all resources in this section are listed alphabetically.

  • Alien Feces
    -Found on the Sea Treader's Path dropped by sea treaders.
    -Used as bioreactor fuel.
  • Cave Sulfur
    -Found in caves in the Safe Shallows and Creepvine Forest, inside empty sulfur plants.
    -Used in the repair tool and laser cutter.
  • Copper
    -Found pretty much everywhere inside barnacles and limestone outcrops, or as large resource deposits.
    -Used in pretty much every electronic thing.
  • Crystalline Sulfur
    -Found in the Lost River and the Inactive and Active Lava Zones.
    -Used in a few vehicle upgrades and in the neptune rocket.
  • Diamond
    -Found in a bunch of biomes such as the Mountains (usually deeper biomes) either on the seabed or inside shale outcrops.
    -Used in many items, but is especially important as an ingredient in the laser cutter.
  • Gas Pod
    -Found in the Safe Shallows and the Dunes dropped by gasopods.
    -Used in gas torpedoes.
  • Gold
    -Found in almost every biome inside sandstone and shale outcrops, or as large resource deposits.
    -Used in a lot of electronic things.
  • Kyanite
    -Found in the Inactive and Active Lava Zones either on the seabed or as large resource deposits.
    -Used in some vehicle upgrades and in the neptune rocket.
  • Lead
    -Found in almost every biome inside sandstone outcrops or as large resource deposits.
    -Used in all of the vehicles in the game, and is especially important as an ingredient in the radiation suit.
  • Lithium
    -Found in many biomes, but especially in the Mushroom Forest and the Mountains, either on the seabed, in shale outcrops, or as large resource deposits.
    -Used in many vehicle upgrades and is especially important as an ingredient in plasteel.
  • Magnetite
    -Found in the Jellyshroom Caves and the Mountains sitting on the seabed.
    -Used in a bunch of vehicle upgrades, but rarely used otherwise.
  • Metal Salvage
    -Found in most biomes that are not caves (i.e. it isn't found in the Lost River, but is found in the Blood Kelp Zone) on the seabed.
    -Used to create titanium, which is used in pretty much everything.
  • Nickel
    -Found in the Lost River either on the seabed or as large resource deposits.
    -Used in some vehicle upgrades and in the neptune rocket.
  • Quartz
    -Found in most shallow biomes as well as a couple of deeper ones on the seabed or as large resource deposits.
    -Used primarily in glass but also used heavily in seabase equipment.
  • Ruby
    -Found in most deep biomes on the seabed.
    -A component in a couple of vehicle upgrades and an ingredient in aerogel.
  • Salt
    -Found in many biomes on the seabed, and can also be gotten from purple pinecones in the Mushroom Forest.
    -Used primarily to cure food for long journeys.
  • Silver
    -Found in many biomes inside sandstone outcrops and barnacles, or as large resource deposits.
    -Used in a lot of electronic things and is also a key ingredient in high capacity oxygen tanks.
  • Stalker Teeth
    -Found exclusively in the Creepvine Forest dropped by stalkers.
    -Stalkers will drop them more if they are constantly chewing on metal salvage.
    -Used in enameled glass.
  • Uraninite
    -Found in the Mountains, Grand Reef, Blood Kelp Zone, and Lost River on the seabed or as large resource deposits.
    -Used in reactor rods to power nuclear reactors.

The Basics: Your Seabase
In Subnautica, a seabase is one of the most important things that you can make, since it allows you to store more items and build modules like the battery charger or modification station. When building a seabase, there are a few different things you need to worry about:
  • Power. Modules use power, and if you can't generate enough power, your seabase won't function.
  • Integrity. Adding more rooms to your base can increase its functionality, but adding too many will cause your seabase to become structurally unstable, flooding the base.
  • Space and Resources. Obviously, adding more stuff to your base costs valuable resources. Your base needs to maximize the number of helpful stuff inside while minimizing the resource cost.
  • Looks. Of course, while your main goal is to progress through the game, you want your main base to look awesome too... A tangly mess of rooms won't look too great.

So, without further ado, welcome to a guide on how to make a great seabase!

There are a few things to really think about when constructing your first ever seabase. First of all, there are very limited resources at the beginning of the game, and limited blueprints too, so your first base shouldn't be that big or expensive. Personally, all I do is make a small base with an "I" corridor, a hatch, and a solar panel, right underneath your lifepod. This adds storage capacity and only costs a few titanium and some quartz. If you already have something like a battery charger, then you can make that too!

Here's what you need to know about building bigger bases:
  • Power.
    -After this point, power may become an issue, and solar panels may not work well enough anymore. I find that bioreactors work very well for a shallower but still large base, and thermal generators work great for super deep bases in the Lost River or Lava Zones. I tend not to use nuclear reactors at all, as I find that reactor rods are hard to get, especially for newer players.
    -The more things you add to your base, the more power they take. I tend to go for power in place of convenience: Yes, water filtration systems are useful, but they take nearly an entire bioreactor's energy all for themselves! I usually just have a growbed full of marblemelons or a tank of bladderfish instead.
  • Structural Integrity and Space Conservation.
    -Again, as your base grows in size, this becomes more and more of an issue. Multipurpose rooms and moonpools usually have the biggest impact on structural integrity.
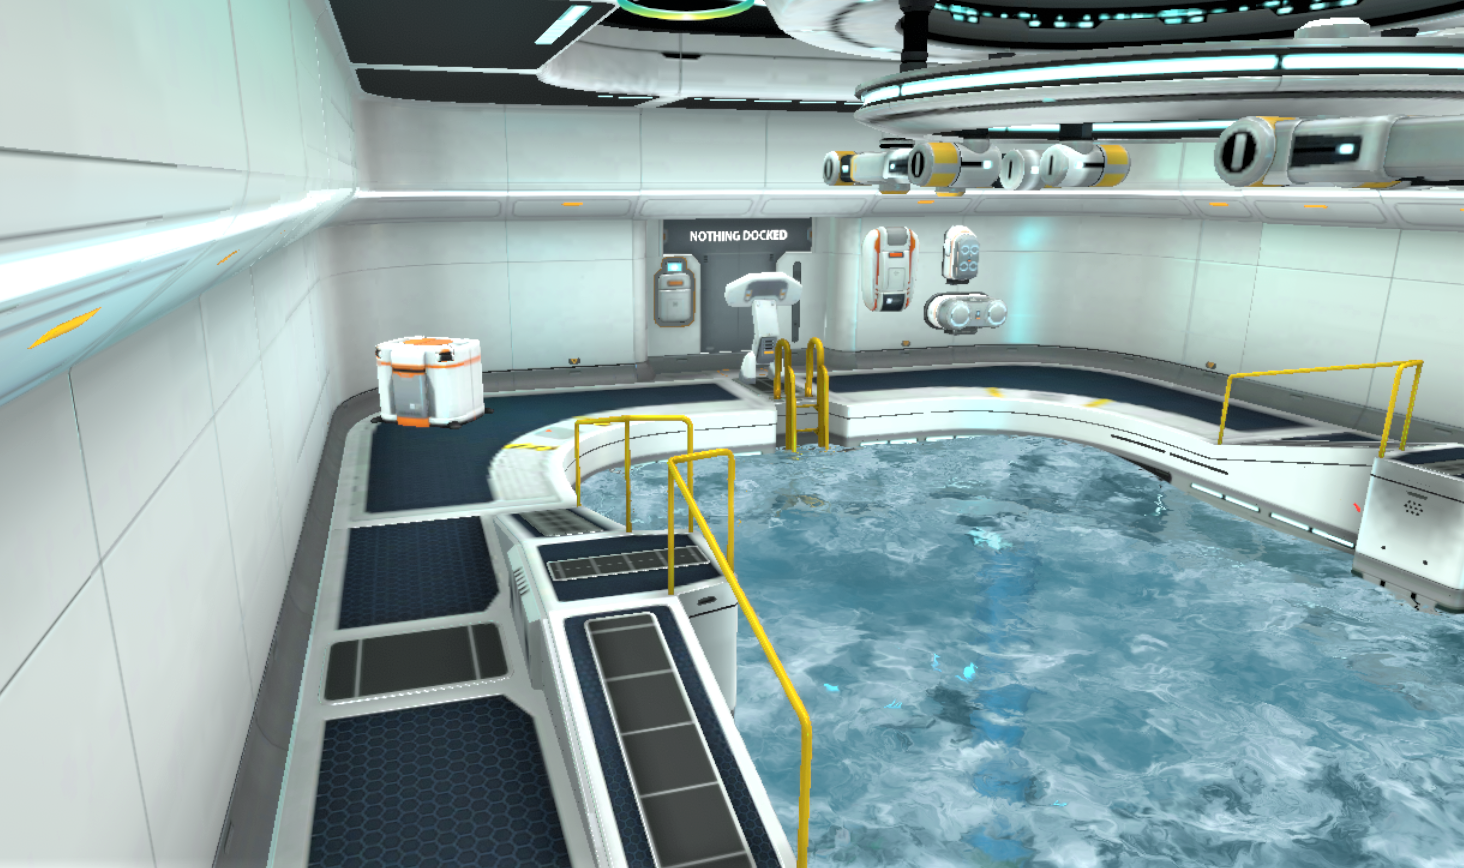
    -When deep enough to easily use thermal generators, an easy way to conserve structural integrity is to simply use a moonpool as the entirety of your base. Many things can fit in a moonpool, and adding a single reinforcement panel to it can allow you to add an extra multipurpose room (see images below).

  • Vehicle Upgrade Console and Modification Station allow for fabrication of upgrades on the go.
  • This is the only room in the entire seabase (no hatch required)!
  • Food and storage can be kept inside your cyclops or transferred into the moonpool.
  • Power cell charger allows for your cyclops to be charged.
  • An exterior growbed is used to grow plants not commonly found in the Lost River (this base's location).
  • Three thermal plants attached to the base via power transmitter is all you need to keep your base powered.
How To: Outfitting the Cyclops to Dive Deeper
The below images represent how I would normally outfit my cyclops for a trip to the Lost River. Extra depth upgrades are needed to go deeper than 900m and into the Lava Zones.

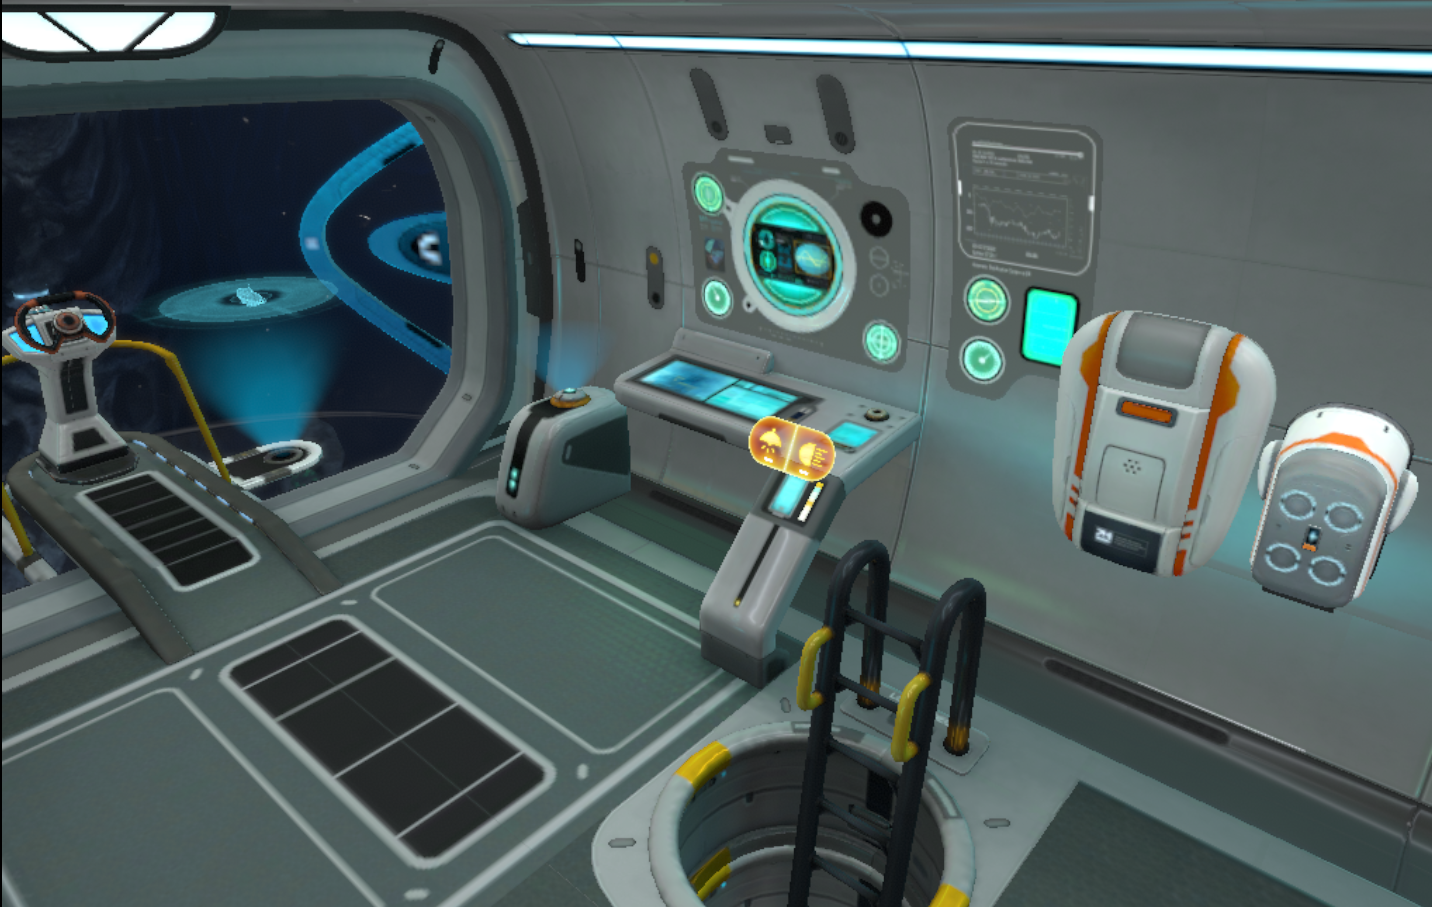
Fig. 1: Cyclops Bridge Section
  • Fabricator and battery charger for easy access to these two important pieces of equipment.
  • Notice that there is no power cell charger here or anywhere else on my cyclops. Charging a power cell inside the cyclops literally drains one power cell worth of energy from the cyclops. Don't waste your time.

Fig. 2: Cyclops "Airlock" Section
  • Useful as a storage area apart from the main storage section (see fig. 5).
  • You can put a bed in here if you like using one to skip forward in time. Beds can be useful if you're waiting for plants to grow or power cells/batteries to charge.

Fig. 3: Cyclops Midsection
  • Easy access to your prawn suit comes with the cyclops. Get a prawn suit in there!
  • Good place to put a modification station and any other modules that you might not want cluttering the bridge area.
  • Great space to put a growbed full of marblemelons for food and water.

Fig. 4: Engine Room Upgrade Panel
  • Not much is in the engine room except for the power cells and this upgrade panel.
  • I have a mk. 1 depth module, a shield module, an engine efficiency module, and a sonar module.
  • Later on when you have the resources, the depth module will be replaced with a better one and a thermal generator and a fire suppression system will be fitted into the last two slots.

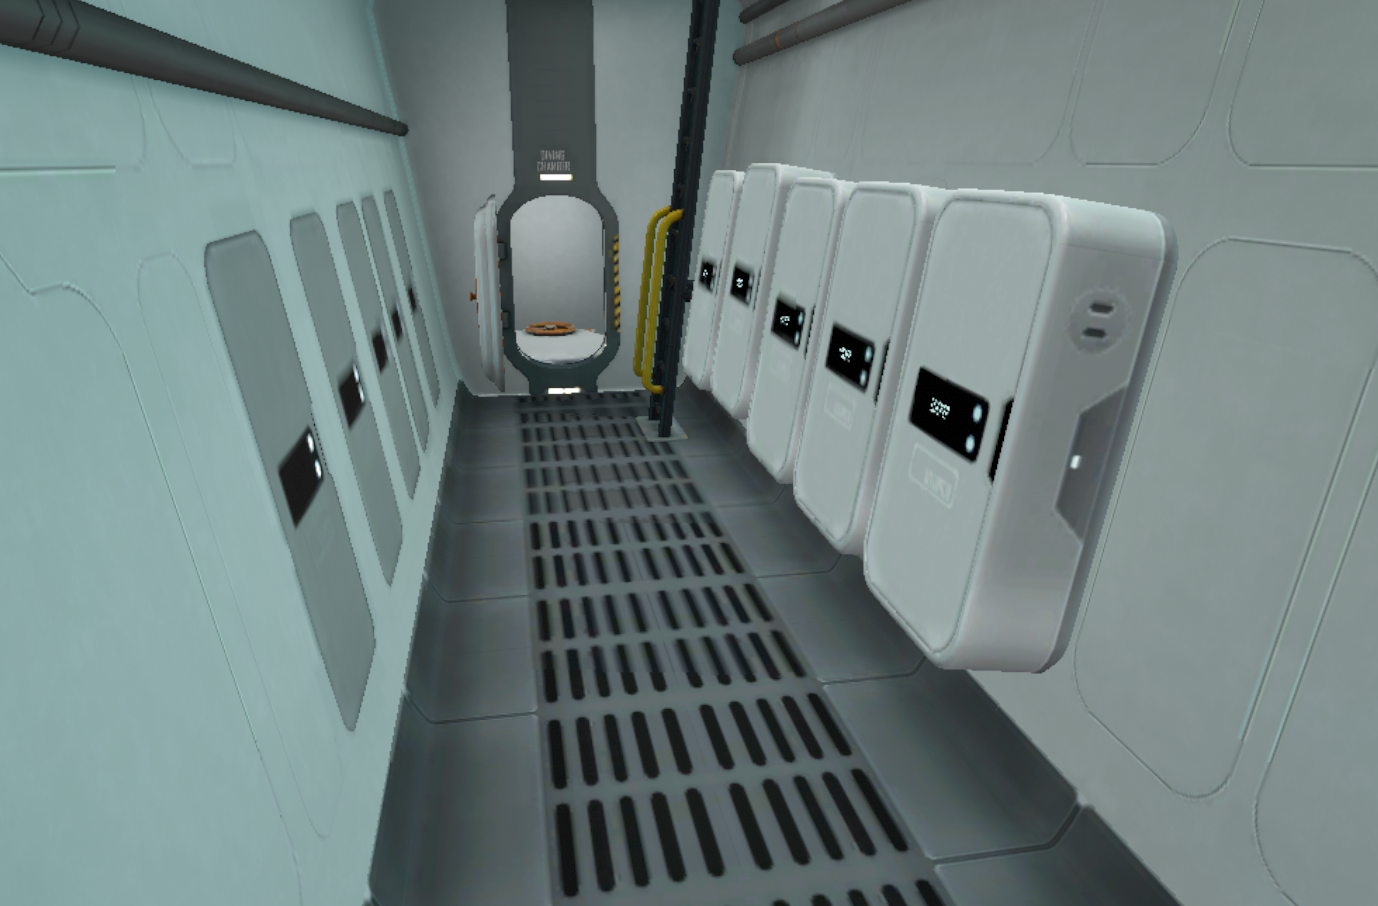
Fig. 5: Entry Section/Main Storage Section
  • The cyclops comes with some lockers, but you can get tons more storage by adding your own lockers on the opposite wall as I have.
  • You can keep your most important items in here so that you have easy access to them from the entryway.
Blueprints: What are they and where do I get them?
Blueprints come in two main forms: Fragments and databoxes. Fragments usually spawn inside or around wrecks, but can also be found near abandoned lifepods and abandoned seabases. These fragments are displayed as a small piece of whichever thing it is a fragment of. When scanned with the scanner, fragments can yield blueprints for new items, which you can then fabricate. Some blueprints require you to scan multiple fragments to acquire. Databoxes are found in the same places as fragments, but are rarer and give more specialized items. Click on a databox to open it and acquire the blueprint inside. Some fragments or databoxes can be duplicates of blueprints you already have unlocked. Scanning a duplicate fragment or opening a duplicate databox will give you 2 titanium.

Now, on to where to find them! For your convenience, blueprints are listed in alphabetical order. Important blueprints that are required or extremely helpful in the game are underlined. Please Note: Information on exactly which wrecks/biomes to find certain fragments in is hard to come by. All information on fragments is purely from my own knowledge of the game. Information on databox locations is easier to come by and should be accurate. If you've found a fragment a lot in a place not listed here, please write a comment and the issue will be resolved.

Also note that the Cyclops requires three blueprints to be unlocked: The Bridge, Hull, and Engine. The Bridge and Hull fragments are merged into one entry, and the Engine is entered here separately as it is found in slightly different places.

Fragments and Databox Downloads
  • Alien Containment Unit
    -Databox found in the Bulb Zone, Mountains, or Underwater Islands.
    -Fragments found in the Grand Reef Degasi Base (scan 1 to acquire blueprint).
  • Bar Table
    -Fragments found in the Aurora, Bulb Zone, Dunes, or Grassy Plateaus (scan 1 to acquire blueprint).
  • Basic Double Bed
    -Fragments found in the Aurora, Bulb Zone, Mountains, or Grand Reef (scan 1 to acquire blueprint).
  • Basic Plant Pot
    -Fragments found in the Grassy Plateaus (scan 1 to acquire blueprint).
  • Battery Charger
    -Fragments found in the Grassy Plateaus or the Jellyshroom Caves Degasi Base (scan 2 to acquire blueprint).
  • Beacon
    -Fragments found in the Safe Shallows (scan 2 to acquire blueprint).
  • Bench
    -Fragments found in many wrecks (scan 1 to acquire blueprint).
  • Bioreactor
    -Fragments found in the Grassy Plateaus (scan 2 to acquire blueprint).
  • Bulkhead
    -Fragments found in the Floating Island Degasi Base (scan 2 to acquire blueprint).
  • Coffee Machine
    -Fragments found in the Dunes or Safe Shallows (scan 1 to acquire blueprint).
  • Chic Plant Pot
    -Fragments found in the Grassy Plateaus (scan 1 to acquire blueprint).
  • Command Chair
    -Fragments found in many wrecks (scan 1 to acquire blueprint).
  • Compass
    -Databox found in the Creepvine Forest or inside Lifepod 3.
  • Composite Plant Pot
    -Fragments found in the Grassy Plateaus or in the Floating Island Degasi Base (scan 1 to acquire blueprint).
  • Counter
    -Fragments found in the Aurora, Dunes, or Safe Shallows (scan 1 to acquire blueprint).
  • Creature Decoy
    -Databox found in the Underwater Islands or inside Lifepod 4.
  • Cyclops Bridge and Hull
    -Fragments found in the Crash Zone or Mushroom Forest (scan 3 to acquire each blueprint).
  • Cyclops Decoy Tube Upgrade
    -Databox found in the Grand Reef, Mountains, or Sea Treader's Path.
  • Cyclops Depth Module Mk1
    -Databox found in the Dunes, Grand Reef, or inside Lifepod 2.
  • Cyclops Docking Bay Repair Module
    -Databox found in the same place as the Cyclops Decoy Tube Upgrade.
  • Cyclops Engine
    -Fragments found in the Aurora, Mountains, Crash Zone, and Underwater Islands (scan 3 to acquire blueprint).
  • Cyclops Fire Suppression System
    -Databox found in the Southern Blood Kelp Zone, Sparse Reef, or Underwater Islands.
  • Cyclops Shield Generator
    -Databox found in the Dunes, Sea Treader's Path, or in the Grand Reef Degasi Base.
  • Cyclops Sonar Upgrade
    -Databox found in the Southern Blood Kelp Zone, Bulb Zone, or Grand Reef.
  • Cyclops Thermal Reactor
    -Databox found in the Grand Reef, Mountains, or Northwestern Mushroom Forest.
  • Desk
    -Fragments found in many wrecks (scan 1 to acquire blueprint).
  • Exterior Growbed
    -Fragments found in the Floating Island Degasi Base (scan 1 to acquire blueprint).
  • Floodlight
    -Fragments found in the Aurora or the Jellyshroom Caves (scan 1 to acquire blueprint).
  • Grav Trap
    -Fragments found in the Safe Shallows (scan 2 to acquire blueprint).
  • Interior Growbed
    -Fragments found in the Floating Island Degasi Base (scan 1 to acquire blueprint).
  • Laser Cutter
    -Fragments found in the Grassy Plateaus (scan 3 to acquire blueprint).
  • Light Stick
    -Fragments found in the Grassy Plateaus or Sparse Reef (scan 2 to acquire blueprint).
  • Lightweight High Capacity Tank
    -Databox found in the Bulb Zone or Grassy Plateaus.
  • Mobile Vehicle Bay
    -Fragments found in the Creepvine Forest or Grassy Plateaus (scan 3 to acquire blueprint).
  • Modification Station
    -Fragments found in the Crag Field, Mushroom Forest, Sparse Reef, Grassy Plateaus, and in the Jellyshroom Caves Degasi Base (scan 3 to acquire blueprint).
  • Moonpool
    -Fragments found in the Grand Reef, Mushroom Forest, or inside the Jellyshroom Caves Degasi Base (scan 2 to acquire blueprint).
  • Multipurpose Room
    -Fragments found in any abandoned seabase (scan 1 to acquire blueprint).
  • Nuclear Reactor
    -Fragments found in the Mountains or inside the Jellyshroom Caves Degasi Base (scan 3 to acquire blueprint).
  • Nuclear Waste Disposal
    -Fragments found in the Dunes, Grassy Plateaus, or in the Grand Reef Degasi Base (scan 1 to acquire blueprint).
  • Observatory
    -Fragments found in any abandoned seabase (scan 1 to acquire blueprint).
  • Office Chair
    -Fragments found in many wrecks.
Blueprints (continued)
  • Picture Frame
    -Fragments found in many wrecks (scan 1 to acquire blueprint).
  • Plant Shelf
    -Fragments can be found in the Grassy Plateaus (scan 1 to acquire blueprint).
  • Power Cell Charger
    -Fragments found in the Jellyshroom Caves Degasi Base (scan 2 to acquire blueprint).
  • Power Transmitter
    -Fragments found in the Crash Zone or Mushroom Forest (scan 2 to acquire blueprint).
  • Prawn Suit
    -Fragments found in the Aurora (scan 4 to acquire blueprint).
  • Prawn Suit Drill Arm
    -Fragments found in the Dunes, Southern Blood Kelp Zone, Grand Reef, or Underwater Islands (scan 2 to acquire blueprint).
  • Prawn Suit Grappling Arm
    -Fragments found in a bunch of wrecks (scan 2 to acquire blueprint).
  • Prawn Suit Propulsion Cannon
    -Fragments found in the Mountains, Sea Treader's Path, or Underwater Islands (scan 2 to acquire blueprint).
  • Prawn Suit Torpedo Arm
    -Fragments found in the Southern Blood Kelp Zone, Mountains, or Sparse Reef (scan 2 to acquire blueprint).
  • Propulsion Cannon
    -Fragments found in the Aurora, Crash Zone, Grassy Plateaus, or Underwater Islands (scan 2 to acquire blueprint).
  • Quilted Double Bed
    -Fragments found in the Grand Reef and Mountains (scan 1 to acquire blueprint).
  • Reinforced Dive Suit
    -Databox found in the Bulb Zone, Dunes, or Sparse Reef.
  • Repulsion Cannon
    -Databox found in the Grand Reef, Underwater Islands, or inside Lifepod 12.
  • Scanner Room
    -Fragments found in the Crag Field, Grassy Plateaus, or Sea Treader's Path (scan 3 to acquire blueprint).
  • Seaglide
    -Fragments found in the Safe Shallows or Creepvine Forest (scan 2 to acquire blueprint).
  • Seamoth
    -Fragments found in the Aurora and Grassy Plateaus (scan 3 to acquire blueprint).
  • Single Bed
    -Fragments found in the Aurora or in the Grand Reef Degasi Base (scan 1 to acquire blueprint).
  • Single Wall Shelf
    -Fragments found in many wrecks (scan 1 to acquire blueprint).
  • Spotlight
    -Fragments found inside the Floating Island or Jellyshroom Caves Degasi Base (scan 1 to acquire blueprint).
  • Stasis Rifle
    -Fragments found in many wrecks or the Floating Island Degasi Base (scan 2 to acquire blueprint).
  • Stillsuit
    -Databox found in the Bulb Zone, Dunes, or Mountains.
  • Swim Charge Fins
    -Databox found in the Underwater Islands or inside the Grand Reef Degasi Base.
  • Swivel Chair
    -Fragments found in many wrecks (scan 1 to acquire blueprint).
  • Thermal Plant
    -Fragments found in the Grand Reef and inside the Jellyshroom Caves Degasi Base (scan 2 to acquire blueprint).
  • Trash Can
    -Fragments found in the Aurora, Grand Reef, Grassy Plateaus, or Safe Shallows (scan 1 to acquire blueprint).
  • Ultra Glide Fins
    -Databox found in the Grassy Plateaus or inside Lifepod 6, Lifepod 14, or the Floating Island Degasi Base.
  • Ultra High Capacity Tank
    -Databox found in the Dunes or inside Lifepod 19 or the Jellyshroom Caves Degasi Base.
  • Vehicle Upgrade Console
    -Databox found in the Dunes, Grassy Plateaus, Northwestern Mushroom Forest, or Sparse Reef.
  • Vending Machine
    -Fragments found in a bunch of wrecks (scan 1 to acquire blueprint).
  • Wall Planter
    -Fragments found inside the Floating Island and Jellyshroom Caves Degasi Bases (scan 1 to acquire blueprint).
  • Wall Shelves
    -Fragments found in the Aurora (scan 1 to acquire blueprint).
  • Water Filtration Machine
    -Fragments found inside the Jellyshroom Caves Degasi Base (scan 1 to acquire blueprint).

Special Blueprints
  • Hatching Enzymes
    -Blueprint acquired by activating the teleporter in the Primary Containment Facility Aquarium.
  • Ion Power Cells and Ion Batteries
    -Blueprint acquired by interacting with a data terminal inside the Alien Thermal Plant which can be found in the Inactive Lava Zone.
  • Neptune Rocket
    -Blueprint acquired by interacting with the data terminal inside the Aurora Captain's Quarters.
  • Radiation Suit
    -Blueprint added to your PDA after the Aurora explodes.
Vehicles and Propulsion: A Quick Guide
In Subnautica, vehicles and speed are two extremely important concepts. The player has a base swim speed of about 5.5 m/s. This is pretty slow, but can be enhanced with certain pieces of equipment.

Aside from the equipment and vehicles below, swim speed is also affected by a few different things. First, holding an item will reduce your swim speed, as will equipping an oxygen tank. Larger oxygen tanks weigh down the player more. Also, swimming at the surface rather than underwater boosts your swim speed slightly. The game also affects swim speed; swim speed without a vehicle such as the seaglide or seamoth is capped at about 7.5 m/s.

Fins
  • Fins are your first propulsion device to help you move quickly and easily. They are made with two silicon rubber.
  • Fins improve your swim speed by about 15%, up to about 6.5 m/s.
  • Two upgrades for the fins exist. They can be acquired from data boxes and fabricated with the modification station:
    • Ultra Glide Fins enhance your swim speed by an extra 15% for a total of about 30%, up to about 7.5 m/s. The boost to speed is seen more easily while holding an item or using an oxygen tank.
    • Swim Charge Fins charge an electronic device in your hand while you are swimming as long as you are moving faster than 2 m/s.

Seaglide
  • Scan two seaglide fragments to unlock the blueprint. It is made with a battery, a copper wire, a titanium, and a lubricant.
  • The seaglide improves your speed by almost 100%, up to 11 m/s. This speed stays constant regardless of oxygen tanks equipped while holding the seaglide.
  • It comes with a built in flashlight and a holographic map of the seafloor below you.
  • Unfortunately, the seaglide's battery depletes extremely quickly.

Seamoth
  • Your first submersible vehicle; scan three fragments to unlock the blueprint.
  • It is made with a mobile vehicle bay and costs a titanium ingot, a lubricant, 2 glass, a power cell, and a lead.
  • Adds a small amount extra to the seaglide's speed (up to 13 m/s) but also allows for safer diving and a place to restore oxygen.
  • Starts out with a maximum depth of 200m but can be upgraded for a maximum depth of 900m.
  • Can be outfitted with storage and defense upgrades.

Prawn Suit
  • A submersible that can walk on the sea floor; scan four fragments to unlock the blueprint.
  • It is made with a mobile vehicle bay and costs 2 plasteel ingots, 2 aerogel, an enameled glass, 2 diamonds, and 2 lead.
  • Slow and not very maneuverable, but sturdy and capable of picking things up while you're inside it; comes with a storage module.
  • Starts out with a maximum depth of 900m but can be upgraded for a maximum depth of 1700m.
  • Can be outfitted with many different upgrades including extra storage, jump boosts, drills, propulsion cannons, and grappling hooks.

Cyclops
  • The cyclops is a huge submersible that can act as a mobile base; scan 3 engine, hull, and bridge fragments to unlock the blueprint, for a total of 9 fragments.
  • It is made with a mobile vehicle bay and costs 3 plasteel ingots, 3 enameled glass, 3 lead, an advanced wiring kit, and a lubricant.
  • Usually slow and not very maneuverable (minimum speed of 7 m/s). Can go fast (up to 12 m/s), but you risk attracting unwanted attention and catching the engine on fire. It is still very good as it can house modules like a fabricator and can dry-dock a seamoth or prawn suit.
  • Starts out with a maximum depth of 500m but can be upgraded for a maximum depth of 1700m.
  • Can be outfitted with many different upgrades including a shield and a fire suppression system.
World Maps - No Spoilers
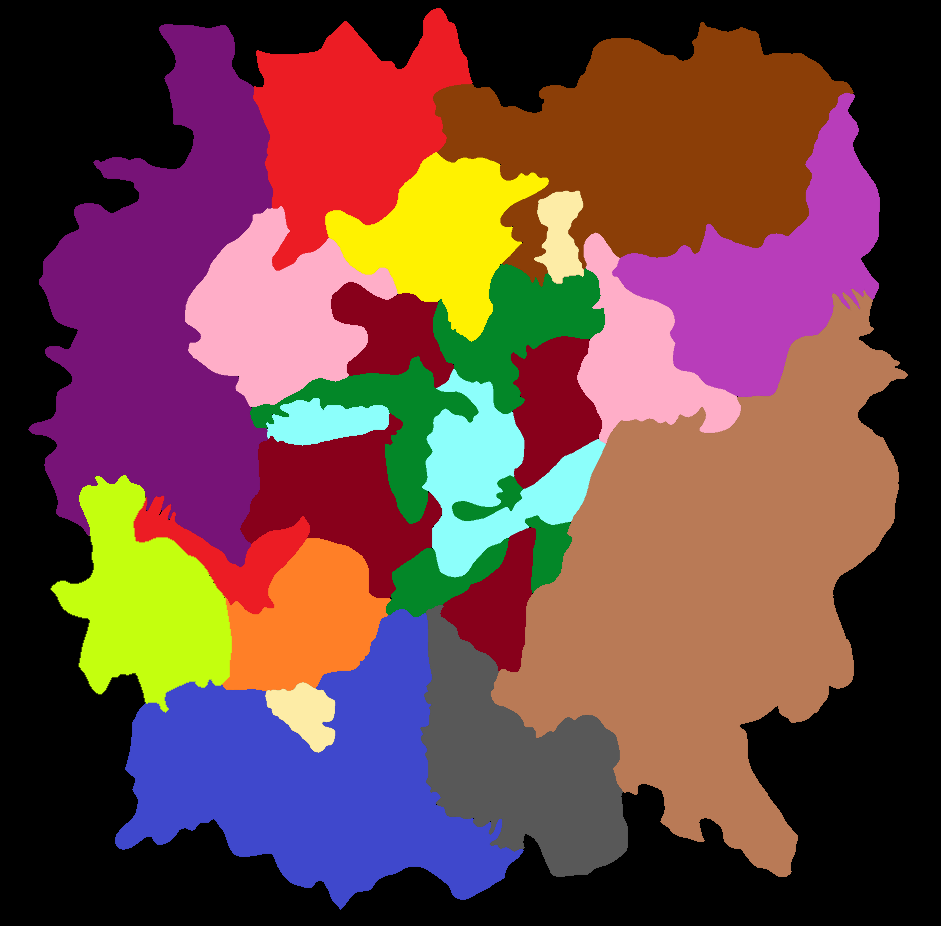
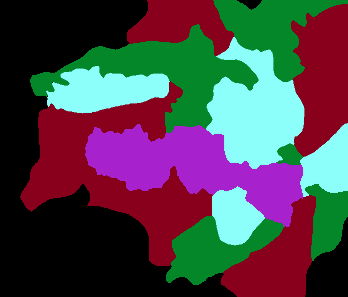
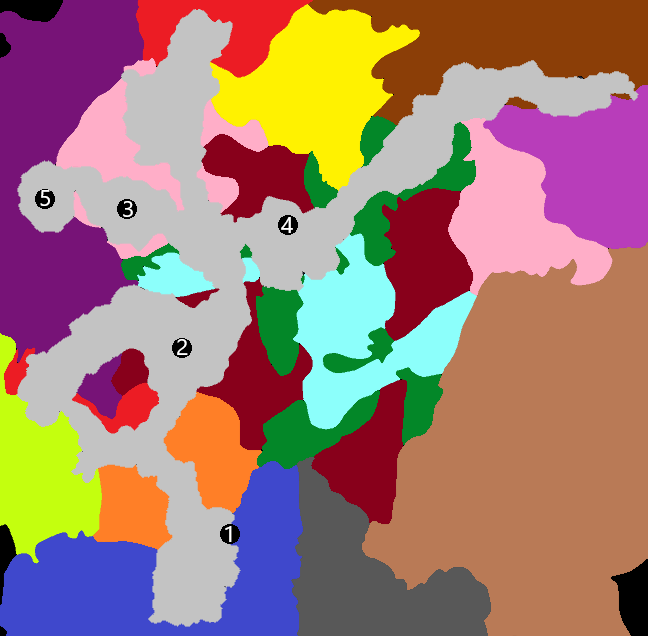
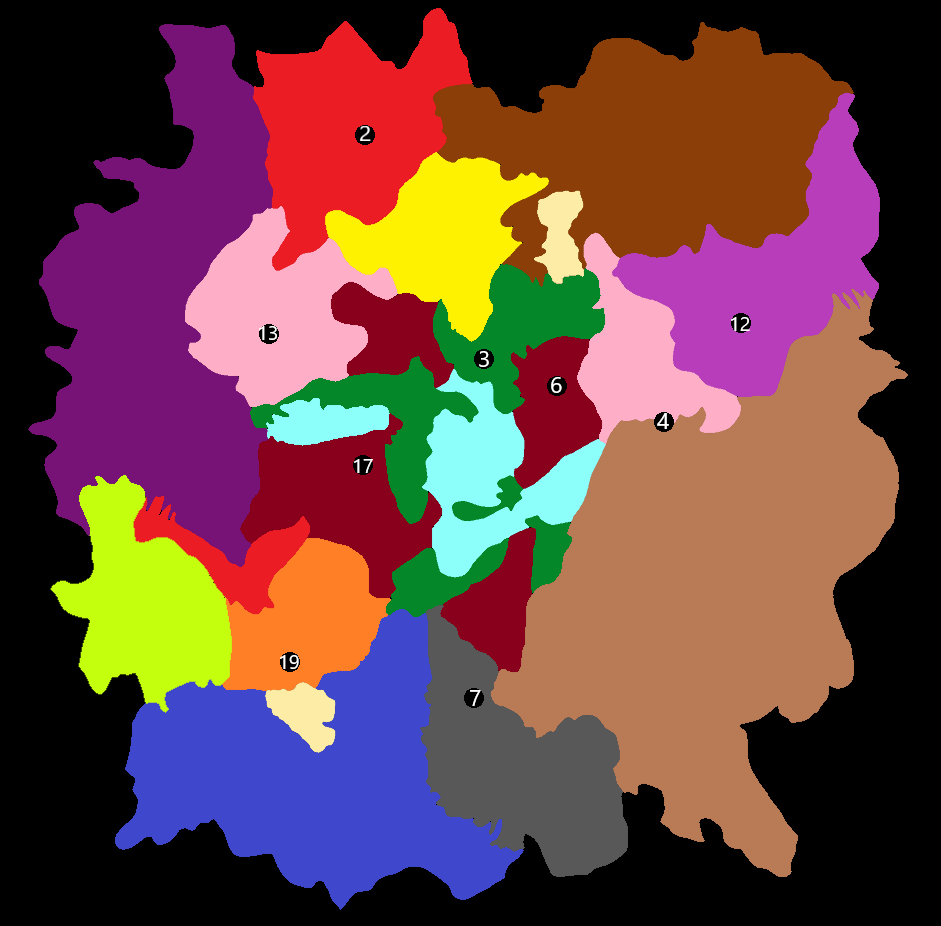
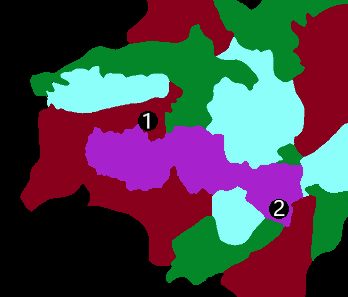
While looking through the guide, there may be some things that are confusing without a visual reference. Here are maps of the main biomes, the Jellyshroom Caves, the Lost River, and the Lava Zones.

Warning: Although this is the non-spoiler version of the maps, it is still an entire map of the game. If you want to play the game with absolutely no spoilers, stay away!

Color Code for Main Biomes:
Aquamarine = Safe Shallows
Dark Green = Creepvine Forest
Dark Red = Grassy Plateaus
Pink = Mushroom Forest
Light Yellow/Tan = Islands
Light Brown = Crash Zone
Blue = Grand Reef
Orange = Sparse Reef
Lime Green = Sea Treader's Path
Bright Red = Blood Kelp Zone
Yellow = Underwater Islands
Light Purple = Bulb Zone
Dark Brown = Mountains
Dark Purple = Dunes
Gray = Crag Field

Main Map

Jellyshroom Caves Map
Note: Pink = Jellyshroom Caves; all other biomes shown are the same color as the main map. Remember that the Jellyshroom Caves are actually underneath the shown biomes.

Lost River Map
Note: Same as Jellyshroom Caves Map; Lost River = light gray.

Inactive Lava Zone Map
Note: Same as previous maps; Inactive Lava Zone = dark orange/gold.

Active Lava Zone Map
Note: Same as previous maps; Active Lava Zone = dark orange/gold.
Warning: Extreme Spoilers Ahead!
Sections past this point contain extreme spoilers which may not be covered by a black spoiler box. Do not read the following sections if you do not want to see extreme spoilers for the game.

If you're stuck on a certain section of the game, but want to play the rest of the game spoiler free, do not read the following sections. Instead, comment on the guide and I will get back to you!

Disclaimer: The gameplay described in the Playthrough Guide sections is based on how I play the game. I believe that this method helps you enjoy the game while also making it so you don't experience the frustration of dying too much. If you like to do something another way, or if you like to go someplace that I don't go, great! Enjoy your own personal playstyle.
The Playthrough Guide, Part 1
Starting the Game: Getting Your First Tools
After putting out the fire in your lifepod, the first order of business is to take a medkit from the medkit fabricator and then leave to get some resources. The starting tools I know that you'll need are:
  • Scanner
  • Survival Knife
  • Oxygen Tank
  • Fins
  • Seaglide
  • Repair Tool
These tools will basically be kept with you at all times, no matter what. To get all of these, you'll need:
  • 7 Titanium
  • 4 Copper
  • 3 Creepvine Seed Clusters
  • 4 Acid Mushrooms
  • 1 Cave Sulfur
You will need to scan 2 seaglide fragments in order to unlock it, so that'll be the last of the tools you get. Fragments are often just scattered around and inside boxes within the Safe Shallows and Creepvine Forest.

The items you got will be used to make 2 batteries, 1 copper wire, 2 bundles of silicon rubber, and 1 lubricant, which is in turn used to make the needed items. While I'm out and about, I also like to grab some fish. If you've spawned close enough to the Grassy Plateaus, it will also be extremely helpful to grab some silver and gold. Extra copper is always helpful as well.

After you've gotten those basic tools, you need to repair your lifepod's radio. Radio signals will start coming in. At this point, you should head off to the Grassy Plateaus if you didn't before. The seaglide should make it easy to get all the gold and silver you need. You should also pick up a bunch of quartz to save for a bit later. You can now also make the high capacity tank to increase your oxygen, and you can make the habitat builder if you'd like. If you need extra storage capacity, I would recommend making a single "I" corridor under your lifepod with a hatch and a solar panel. You can then put some storage lockers inside.

Depending on how fast you completed these things, the Aurora may or may not have exploded. If it did, you can build yourself a radiation suit as well. If not, just make one whenever it does happen.

A Grassy Plateaus Fragment Hunt
After you've gotten your basics from the previous section, you're going to need more stuff. A bunch more stuff. That radio is going to become important not just for extra story elements, but also for wayfinding.

After you built your seaglide you should have gotten radio message from lifepod 17. That's where you're going to go now. It's in the Grassy Plateaus, and it's very important because it is next to a very large wreck, which you can find many important fragments in. You can explore in and around the wreck and the lifepod. It's okay if you don't find everything, but here's list of good blueprints that you can gather:
  • Seamoth
  • Mobile Vehicle Bay
  • Bioreactor
  • Scanner Room
  • Modification Station
  • Battery Charger
  • Laser Cutter
Seamoth and laser cutter fragments can also be found simply strewn across the Grassy Plateaus, not just around the wreck, so be on the lookout. If you didn't find all the mobile vehicle bay fragments, you can look in the Creepvine Forest for those, too. At the very least, you absolutely need to have blueprints for the seamoth, mobile vehicle bay, and the laser cutter. Bioreactors and battery chargers aren't required, but help a ton.

A Trip to the Floating Island
You're now going to want to go to the Floating Islands with the main goal of getting blueprints. Normally the game guides you towards the island much later in the game, but it's extremely helpful and not uncommon for explorers to randomly come across it anyways. To get there, you're going to want to face almost due south (but slightly west) from your lifepod (south is where the back of the Aurora is pointing). Then, swim! I often like to keep my face underwater so I can keep a lookout for goodies that might be on the way, but seeing super deep water below you can scare some people. You'll know once you get there. On the island there are three different abandoned bases, called the Degasi bases. You can find many story elements here as well as blueprints. The middle base, in the middle of the island, is the most important. From there, get the blueprints for:
  • Multipurpose Room
  • Exterior Growbed
  • Pick up the Purple Tablet
  • Pick up a Marblemelon
From the other bases (the observatories up on the peaks), you should get the Interior Growbed and you should pick up a lantern fruit.

After getting all your items and blueprints, I recommend heading straight down from the Floating Island into the Grand Reef. Although you aren't ready to explore it fully, you can at least pick up some rubies and gel sacks while you're there. After that, you're ready to go home.

Mountain Island Resource Gathering
Even though you just got back from one journey, you need to prepare to go on another. Eat, drink, store your items, and leave to the Mountain Island. You will, however, need that purple tablet you got. Mountain Island is in almost the direct opposite direction from the Floating Island (almost due north but slightly east). Again, the story will point you towards it later, but why wait?! Mountain Island is more dangerous than the Floating Island, so be careful. First, go around the island a bit and break shale outcrops, pick up lithium, and scan any fragments you see. The most important thing to get here is diamonds from the shale outcrops. If you don't get enough from those outcrops, you can find more in the caves around the island.

You should now explore that giant building on the island, which is called the Quarantine Enforcement Platform. There's another purple tablet on a ledge overlooking the beach, which you should get. Now enter, and explore. Once you've looked around and had some fun, take yourself and all your goodies back home. You should have one purple tablet left over.

Hunt for a Propulsion Cannon + Building a Seabase
There's a couple things in this section that you're going to want to do. First, you need to scan two propulsion cannon fragments to get the blueprint, then make a propulsion cannon. You may already have the blueprint because it is possible to find it in the Grassy Plateaus, but the next easiest place to find it is the Crash Zone, right along the side of the Aurora.

After you make it, you should make a seabase. Make a multipurpose room with a hatch under the lifepod, with about two or three solar panels on top. Inside, build a bioreactor, a battery charger, a modification station, and an indoor growbed with a lantern fruit and a bunch of marblemelons. You can eat the marblemelons and power the bioreactor with lantern fruit.

Getting to the Aurora
In order to get to the Aurora, you're going to need all of your standard tools as well as your new propulsion cannon and a laser cutter. You should have the diamonds needed to make it from your trip to Mountain Island. You don't need to bring food, water, or spare batteries, as there are plenty inside the Aurora. Make sure your inventory is empty with the exception of your tools. To get there, seaglide your way toward the front of the Aurora, where the entrance is. This is reaper leviathan territory, so I recommend you not stop for any reason. There is an abandoned lifepod along the way. This lifepod can be used a small place to hide in if there is a reaper too close by. Once you get through one of the holes in the Aurora's front section, you're safe from the reapers.

Climb up onto the Aurora and walk around. I'll let you find the entrance yourself. There'll be a bunch of useful supply crates along the way, and you can pick up a fire extinguisher to get you inside. From here on out, I'll be talking about making your way through the ship via the main entrance. If you used the lab entrance, where you have to move boxes out of your way to get inside whatsoever, you should go to the prawn bay and living quarters first, then everything else.

(continued in part 2)
The Playthrough Guide, Part 2
Getting to the Aurora, Continued
Basically, the best advice I can give for the Aurora is just exploring everywhere. There are, however, a few other tips I can give. First of all, you absolutely need to grab the seamoth depth module found in the seamoth bay, and you need to scan the PRAWN suit fragments in the prawn bay. This is pretty much the only way that you will ever get enough fragments to unlock the PRAWN suit. Also, watch out for bleeders. They're tiny, but the damage adds up. After you've explored all through the Aurora, go back home as quickly as possible. Remember, you just went into reaper territory - you have to get out of it, too.

Your First Submarine
Now that you have been to the Aurora, you should make a mobile vehicle bay and then the seamoth. The materials can be quite grindy, especially the titanium ingots, but with the multitude of batteries you took home from the Aurora, you should have no problem making the power cells. After you've created the seamoth, make sure to put that depth upgrade into the seamoth's upgrade panel (you'll need it for the next part).
Jellyshroom Caves Exploration
You may remember me talking about lifepod 17 and how it was important for finding things. Well, turn that beacon back on, because it's how you're going to find the entrance to the Jellyshroom Caves. Make sure to bring your seamoth, because you're going to need it for air. Go down into the caves and explore around. At around 250 meters depth, there's another abandoned seabase, just like the ones found on the Floating Island. Here, you can find a ton of story stuff. You can also find moonpool fragments, power cell charger fragments, water filtration system fragments, and modification station fragments, if you don't have those already. Probably the most important thing that you can find there is a databox containing the blueprint to the ultra high capacity tank. Once you've gotten this, you can either leave or search around a bit more. Somewhere there's an abandoned PDA that gives you coordinates which will help you later on.

A Resource Gathering Extravaganza
Now that you've been to the Jellyshroom Caves, it's almost time to go deep. As in like 800 meters deep. This calls for a trip to gather a whole bunch of resources as well as some blueprints, if you don't already have them. First, you need all of the materials to make a cyclops and a prawn suit. It's a huge grind, and should take about 15-30 minutes of your time, depending on how much you've been stockpiling. You'll already have the prawn suit blueprint from the Aurora, but you might be missing the cyclops blueprint. The bridge and hull fragments can be found in the Mushroom Forest (go towards lifepod 13), and engine fragments can be found easily (but dangerously) at the back of the Aurora. Even if you have the cyclops blueprint already, you should still visit the Mushroom Forest to gather lithium and the moonpool blueprint if you don't have that already.

You also absolutely have to have the vehicle upgrade console. It's built in the moonpool and will allow you to upgrade your vehicles even further than you already have. The databox can be found in the Grassy Plateaus but is more easily found at the wreck in the Sparse Reef. The easiest way to find this wreck is to go under the Floating Island, then head due north. You'll find it eventually. You should also pick up some ruby while you're there. You can also try to go and find the Sea Treader's Path to pick up some easy copper, silver, and gold. This biome is due west of the Sparse Reef. You should also get some blood oil. The Blood Kelp Zone, where you can find this, is north of both the Sparse Reef and Sea Treader's Path.

You also need a bunch of blueprints that you get in the Grand Reef wreck. The easiest way to find this wreck is to go towards the Floating Island until you find the Grand Reef. Then, find the edge of the Grand Reef and move along it in the opposite direction (away from the Floating Island). At some point, you'll find a Creepvine Forest. Move along the border between the Grand Reef and Creepvine Forest until you find a big pillar of rock a few meters into the Creepvine Forest. You should put a beacon down here for use later. From here, go straight down into the Grand Reef. The wreck is at about 220 meters. From the wreck, you need to get a few blueprints. The most important of these is a databox containing a cyclops depth module. You will also need the prawn suit drill arm and the prawn suit grappling arm, and the thermal plant is very good to have. If you don't find all of the prawn arm fragments in the wreck, you're going to have to go to the Underwater Islands wreck. It's on the other end of the map, but lucky for you it's easy to find as it's pretty much due north from the Grand Reef wreck.

The Cyclops and the Prawn Suit
Now, it's time to build your next and final two submarines. The prawn suit and the cyclops. Make the prawn suit first, then make the drill arm and the grappling arm for the prawn suit with the vehicle upgrade console. You'll need a moonpool for this, which may require you to add extra power generators to your base. You can also make a storage module for the prawn suit, if you want, but the prawn suit does come with a bit of storage capacity.

Next, build the cyclops. However, because the cyclops is so big, you could easily damage or destroy it by attempting to maneuver it through the Safe Shallows. Remember the spot in the Creepvine Forest you went to to find the Grand Reef wreck? Build the cyclops there. You can the dock the prawn suit inside it, as you need both vehicles. Make sure you build the cyclops depth module, as the cyclops can't go down to the depth you need to go.

Last Minute Preparations
You're now going to prepare whatever you need to go to the Lost River, a cave 800 meters below the Grand Reef. You're going to need to prepare your cyclops. It will act as a mobile base. You're going to want to build a fabricator, battery charger, modification station, a growbed with marblemelons (and lantern fruit if you don't have the thermal plant blueprint), and storage lockers depending on how much you want to bring (the cyclops comes with some built-in lockers). You can also build a medkit fabricator if you find yourself taking damage often. As for what to put in your lockers, bring a couple extra power cells, some creepvine seed clusters and blood oil, some table coral samples, and enough resources for a base. Bring enough materials for 2-3 thermal plants, a moonpool, a vehicle upgrade console, an exterior growbed, a power cell charger, and a platform to put the growbed on. If you don't have the thermal plant blueprint, do the same as above except replace the thermal plants with bioreactors and bring extra materials for a couple multipurpose rooms to put the bioreactors in and a reinforcement panel. If you want to be super efficient with all this, you can dismantle your shallow base (you don't have to though; I know some people can get attached especially if they decorated it). You don't need to bring too many resources as there are large outcrops of titanium and other resources in the Lost River (that's why you need the drill arm for your prawn), but you might want to bring some extra titanium, lithium, and quartz just in case.
The Playthrough Guide, Part 3
The Lost River
You're finally ready to go to the Lost River. Take your cyclops and prawn suit. The easiest way to get there is to go down towards the Grand Reef wreck, then just keep going down. Anywhere you can go deeper, just go deeper. It may be challenging to maneuver the cyclops through some tighter spaces, but it's not impossible (I promise). You know you're almost there when you find the third and final Degasi base. Explore the base, but watch out for crabsquids. The only thing that you really need to get is the databox containing the blueprint for the cyclops shield generator. It isn't necessary now, but you'll need it later. There's also an orange tablet...it opens a secret cache somewhere in the Lost River, that I'll let you find on your own. After you explore this area, just keep going. You'll know when you get there. It's literally an underwater river. You'll need to meander through the caverns, dodge a ghost leviathan (I recommend using silent running mode), and make it to a central section of the biome, called the Tree Cove. You'll know you're there when you see bright blue river water (instead of the normal green) and the giant cove tree. This is where you're going to want to put your base. There are some small smokers dotted about, so you can put your thermal plants there.

Now that you're in the river, you should go ahead and gather some resources. Nickel will allow you to create the second depth module for the cyclops and the first for the prawn suit, allowing you to go deeper later. After setting up your base, go explore the place! The Disease Research Facility is there. This place will allow you to advance the story further. You will need a purple tablet to open all areas within the facility.

The Inactive Lava Zone (ILZ)
It's time to go even deeper than you already are. You may have noticed that there is an exit from Tree Cove, on the other side of the cove from the main entryway. This will take you to the ILZ corridor, which leads to the ILZ. Take both the cyclops and prawn suit with you, as well as two purple tablets (remember you can fabricate them). Your first order of business is to get as much kyanite as possible. Kyanite is the blue crystal found in the ILZ, and is used to make the next set of depth modules. After going down the ILZ corridor, unload your prawn suit and use just it to progress further. Sea dragon leviathans reside here, and you don't want your cyclops to be destroyed (a prawn suit inside a cyclops will be instantly destroyed when the cyclops is). Gather kyanite, and store it safely in the cyclops. You can also get some crystalline sulfur, which is found here too. Next, you need to get to the third alien facility, the Alien Thermal Plant. It is located inside a mountain-like structure inside the ILZ. Get inside, and use your purple tablets to explore around. The ion cubes may look super important, but if your inventory is full of kyanite and sulfur, keep it instead of the ion cubes. The most important things are behind the two force fields. One is a blue tablet. Grab it. The other is a blueprint for ion batteries. That'll be super important later. An alien teleporter is also here, which allows you to easily get back to the surface if you need something from up there; it will take you to the Quarantine Enforcement Platform. Once you have these, get back to the cyclops and proceed back to the Tree Cove. Make sure to make the next set of depth modules for both vehicles, and fabricate an extra blue tablet.

Packing Up
Here's the deal. You're going to have to abandon this base now. Instead of just leaving it there, the best course of action is to dismantle it and put everything inside your cyclops. You never know when you're going to need the resources later. So pack everything up and get mentally prepared to sneak past more sea dragons; then head out back towards the ILZ.

The Primary Containment Facility
You need to make your way to the Primary Containment Facility. It's in the Active Lava Zone (ALZ). This is underneath the ILZ. You can get to it via a big hole near the end of the ILZ Corridor. It may be hard to squeeze your cyclops through, but it isn't impossible. Once you go down into and then exit the hole, you're in the ALZ. Straight and to the right is the Primary Containment Facility. It is guarded by a sea dragon, so my recommendation is to use silent running all the way, then park your cyclops in front of the facility and shut down the engine. Then, take your prawn suit out and enter.

Inside, you'll find a big open room, called the antechamber. There are a bunch of doorways in the side of this room, as well as another locked doorway at the end of it. First, explore the side-rooms. Four of them contain teleporters going to the Lost River, Mushroom Forest, Bulb Zone, and the Crag Field. Activate them - they will be useful later. Now, use your second blue tablet to enter the locked room. This room is called the aquarium.

Inside this aquarium is the sea emperor leviathan. Everything is harmless inside, so go ahead and jump in with your prawn suit. There'll be a bunch of dialogue, then the emperor will direct you toward her eggs. Activate the incubator with an ion cube, then activate the teleporter (covered with sand until the emperor blows it away). This teleporter will take you just outside of the Quarantine Enforcement Platform, and activating it will give you the blueprint for hatching enzymes. At first, it seems like a difficult task to gather all these plants, but, lucky for you, the Subnautica devs decided to make it easier. Each teleporter in the antechamber will take you to a place where you can gather one of these: The Lost River has ghost weed, the Mushroom Forest has fungal samples, the Bulb Zone has bulb bush samples, and the Crag Field has eyes plants. And what about the sea crown? These can be, conveniently, found inside small caves inside the aquarium. Go out to your cyclops and fabricate the hatching enzymes. Then come back inside and let the cutscenes play out. Once the eggs hatch, the babies will start spitting out enzyme 42, which will cure you of the disease. All you have to do now is exit through the aquarium teleporter and deactivate the Quarantine Enforcement Platform. Congratulations!! All you have left to do is grind resources...

Endgame Preparations: You Did It!
Now you just have to build the rocket to get out of there. Depending on how soon you went to the Aurora, you may or may not have the blueprint for the rocket. The blueprint is found in the captain's quarters, the code for which is in a radio message. If you got it already, great! If not, find the code in your PDA's databank and go back to the Aurora to get the blueprint.

After you have the blueprint, you need a lot of resources to build the rocket. Lucky for you, you now have an easy way back to your cyclops in the Lava Zone via the teleporter outside the Quarantine Enforcement Platform. Gather the resources, build the equipment, and go! Congratulations! You've successfully beaten Subnautica!
World Maps - Spoiler Version
While looking through the guide, there may be some things that are confusing without a visual reference. Here are maps of the main biomes, the Jellyshroom Caves, the Lost River, and the Lava Zones.

Note: Some small black circles have been marked on each map. These mark points of interest that are described in the Playthrough Guide sections of this guide. Their meanings are described under each map, and are covered with a black spoiler box. Warning: The spoiler boxes are there for a reason. Please only view these if you are prepared for extreme spoilers!

Color Code for Main Biomes:
Aquamarine = Safe Shallows
Dark Green = Creepvine Forest
Dark Red = Grassy Plateaus
Pink = Mushroom Forest
Light Yellow/Tan = Islands
Light Brown = Crash Zone
Blue = Grand Reef
Orange = Sparse Reef
Lime Green = Sea Treader's Path
Bright Red = Blood Kelp Zone
Yellow = Underwater Islands
Light Purple = Bulb Zone
Dark Brown = Mountains
Dark Purple = Dunes
Gray = Crag Field

Main Biome Map
Circle #1: Lifepod 17
Circle #2: Sparse Reef Wreck
Circle #3: Grand Reef Wreck
Circle #4: Main Lost River Entrance

Jellyshroom Caves Map
Note: Pink = Jellyshroom Caves; all other biomes shown are the same color as the main map. Remember that the Jellyshroom Caves are actually underneath the shown biomes.
Circle #1: Lifepod 17
Circle #2: Jellyshroom Caves Degasi Base

Lost River Map
Note: Just like Jellyshroom Caves Map; Lost River is in light gray.
Circle #1: Grand Reef Degasi Base
Circle #2: Ghost Leviathan Lives Here
Circle #3: Tree Cove
Circle #4: Disease Research Facility
Circle #5: Inactive Lava Zone Entrance

Inactive Lava Zone Map
Note: Just like the previous maps; where the Inactive Lava Zone is dark orange/gold.
Circle #1: Inactive Lava Zone Entrance
Circle #2: Active Lava Zone Entrance
Circle #3: Alien Thermal Plant

Active Lava Zone
Note: Just like the previous maps; where the Active Lava Zone is dark orange/gold.
Circle #1: Active Lava Zone Entrance
Circle #2: Primary Containment Facility
Extra Maps!
Map of Destroyed Lifepods
Lifepods labeled by Lifepod Number. Lifepod 5 (your lifepod) not included.

Map of Large Wrecks
Extremely small wrecks not included.

Map of Lava Geysers and Smokers and Cave Entrances
Lava Geysers and Smokers = Black; Cave Entrances = White. Lost River entrances not included. Lava geysers and smokers in the Lost River and Lava Zones are not included.

Steam Achievements
For those of you who really just want all the Steam achievements for the game. Here's how to get all of them, in order from when you'll probably get the achievements, based on the playthrough guide.

1. Getting Your Feet Wet.
  • Literally just get into the water. That's it.
2. Settling in for the Long Haul.
  • This one is also pretty easy. You need to make a habitat builder, the build some piece of a habitat with it.
3. Seaside Living with an Ocean View.
  • You need to find the Floating Island Degasi Base.
  • To make sure you get the achievement, explore the place fully.
4. Ancient Technologies.
  • Just find the Quarantine Enforcement Platform.
  • As with the previous achievement, make sure to explore it fully. This same thing goes for every achievement that says something about "finding" something.
5. Extinction Event Avoided.
  • Repair the Aurora's drive core.
6. Personal Propulsion.
  • Make a seamoth.
7. Follow the Degasi.
  • Find the Jellyshroom Caves Degasi Base.
8. Ordered the Prawn.
  • Build a Prawn suit.
9. 40-Foot Sub for One.
  • Build a cyclops.
10. Seamonsters.
  • Find the Grand Reef Degasi Base.
11. Follow the Lost River
  • Find the Disease Research Facility.
12. Thermal Activity.
  • Find the Alien Thermal Plant.
13. Fourteen Thousand Leagues Under the Sea.
  • Find the Primary Containment Facility.
14. Optimal Health.
  • Cure yourself.
15. Man's Best Friend.
  • Probably the hardest achievement to get because it isn't required to complete the game. You have to hatch a cuddlefish.
  • Cuddlefish eggs are scattered around the map in the following locations:
    • Mushroom Forest Caves (both Forests).
    • Dunes Sinkhole.
    • Grand Reef Degasi Base.
    • Lost River Laboratory Cache.
  • Once you have a cuddlefish egg, hatch it in an alien containment unit. It will take approximately 20 minutes.
16 and 17. Go Among the Stars and Leave Only Time Capsules.
  • Launch the rocket and create a time capsule beforehand.
Subnautica's Full Storyline
This section will go over Subnautica's entire storyline, in chronological order.

Approximately 1000 years before the events of Subnautica, an alien race called the Precursors came to planet 4546b in order to study and hopefully find a cure for a disease called the Kharaa. The Kharaa was highly contagious, and had already killed billions of the aliens.

The Precursors built four main facilities to study the disease in a volcanic caldera on the planet. The Quarantine Enforcement Platform was built in case of an emergency. In the case of an outbreak of the disease, it wouldn't let anyone enter or leave the planet, to prevent the spread of the Kharaa. Warpers were also built to attempt to kill any infected creature to cull the infection if it ever spread. The Disease Research Facility was also built, with the main goal of developing a vaccine for the Kharaa. A Thermal Plant was built to generate energy for the facilities. Finally, a Primary Containment Facility was built to house a creature, the sea emperor, that had immunity to the Kharaa, as well as her eggs.

Years into the Precursors' study of the Kharaa, a huge creature, called a sea dragon, rammed into the Disease Research Facility, in an attempt to retrieve its eggs from the facility. The facility was heavily damaged, releasing the Kharaa into the planet's oceans. The Quarantine Enforcement Platform was activated, and the Precursors seemingly disappeared.

Many years later, a few years before the events of Subnautica, the Degasi takes a detour to planet 4546b on their way to a space station, hoping to make money from discovering riches on the planet. Instead, the Quarantine Enforcement Platform shoots them down. After some days floating in open water, the three survivors wash up on an island. These survivors are Paul Torgal, the ship’s captain and businessman, Bart Torgal, his son and botanist/biologist, and Marguerite Maida, a mercenary. They salvage the shipwreck, building a base on the island. Some time after the crash, a storm hits, washing away the crew’s food supply. Marguerite recommends that they move to an underwater cave, rich in resources. While Paul disagrees, Bart notes that without the extra resources, they would starve. They end up moving to the cave.

While the new base serves them well, Marguerite again convinced the crew that they need to move deeper still. They realize that whatever shot them down would do the same to any rescue ship, and Bart finds something unusual deep underwater on a scanner. After moving to this new location, Bart realized that they are all infected by the Kharaa. Marguerite starts bringing him fish to study to try to cure the disease. Unfortunately, Marguerite goes too far and attracts a reaper leviathan to the base. It rips a hole in the base. Paul drowns after being disoriented, Marguerite is lost in the darkness trying to kill the reaper, and Bart escapes back to the island, where he eventually dies of the Kharaa.

Then, the Aurora, a capital ship launched by the Alterra Corporation, flies toward the sector of space in which planet 4546b is in. While the main goal of the mission is to construct a phasegate in order to decrease the journey time to get to the sector of space, the Aurora has a secondary mission to attempt to find the survivors or remains of the Degasi. While making a slingshot maneuver around planet 4546b, presumably in order to scan for signs of the Degasi, the Aurora gets too close to the planet's surface and is shot down by the Quarantine Enforcement Platform.

During the Aurora's decent towards the planet, multiple lifepods are jettisoned. The ship's captain, Hollister, sacrifices himself for his crew by making sure that the Aurora's crash isn't too violent. This is successful, and Alterra is able to send a blueprint for an escape ship to the ship's computer.

Meanwhile, most of the Aurora's lifepods have unfortunately landed either in dangerous areas or with malfunctioning equipment. Lifepod 2's flotation fails, and they sink too deep. Lifepod 3's seaglide is damaged. They are presumably eaten by stalkers. Lifepod 4 landed in the crash zone, and the occupant is eaten by a reaper leviathan. One of lifepod 6's crew members accidentally exploded the lifepod and the survivors with a flare. Lifepod 7's fabricator was malfunctioning, making only useless items like toys. Lifepod 12's crew succumbed to the Kharaa. Lifepod 13 malfunctioned as a whole, crashing violently into the water and killing the crew. Lifepod 17's crew was extremely scared of going outside. They presumably died of either a creature attack or dehydration. Lifepod 19's crew survived the initial planetfall and reached dry land, but were eaten by a reaper leviathan as they attempted to get inside the Aurora.

Lifepod 5 was lucky. It landed in a relatively safe area abundant in resources, with a working fabricator. Once its crew member, Ryley Robinson, repaired the lifepod short-range radio, messages start coming in from the other, unlucky lifepods as well as Alterra HQ and a trading vessel called the Sunbeam. While the Sunbeam was extremely small, it was relatively close to planet 4546b and heard the Aurora's distress call. After a few weeks en-route, the Sunbeam picks an island as their landing spot. Unfortunately, as with all the other ships that attempted to come to the planet, it was shot down. Because of its small size, it was completely destroyed.

Some time later, lifepod 5's crew member has discovered the precursors and the Kharaa bacterium, and is looking for a cure. At the Primary Containment Facility, Ryley meets the sea emperor. At this point, she is near death, and only hopes for her unborn children to see the light of day. Unlike the precursors, who were much less emotional and more robotic than the common human, Ryley listens and activates a portal to the open ocean. Pleased with this, the sea emperor reveals to Ryley a mix of ingredients that will stimulate the hatching of the sea emperor's eggs. The eggs hatch, and the baby sea emperors go through the portal the Ryley had activated earlier. The babies, much less weak than their dying mother, produce a potent form of Enzyme 42. This enzyme kills the Kharaa bacterium. Now cured, Ryley deactivates the Quarantine Enforcement Platform, allowing him to begin his return journey home.
99 Comments
Smirky 24 Jan @ 8:09pm 
Under Aurora, you said hide in lifepod 3, did you mean 4?
SequencedLife 4 Oct, 2023 @ 4:01pm 
i would recommend you to tell us the codes for the Aurora.
Opalina 27 Jun, 2023 @ 11:29am 
fantastic guide, it inculdes everything, thanx a million!
YolandaGonda 4 Mar, 2023 @ 3:27pm 
@ETesseract it's in the mushroom forest next to the dunes
ETesseract 30 Jan, 2023 @ 2:20pm 
note: The lifepods map is missing 13
StarSailorAster 1 Jan, 2022 @ 10:03am 
i cant see the map images on the walkthrough

do you mind attaching them or sending them ?
belisarius 8 Nov, 2021 @ 12:33pm 
is it just me or are the sea dragon leviathans really passive with their ai
i drive my cyclops at full speed without silent mode on and only get hit once at most before being left alone to go about my day
FISH 18 Sep, 2021 @ 11:13am 
wowwwww i never knew half of this thank you
and i leave a like
jschnak950 19 Jul, 2021 @ 6:21am 
I've found the Primary Containment Facility, but didn't get the achievement. Do I need to go meet
the emperor or is it bugged for me?
Luigeburger 12 Jan, 2021 @ 2:44am 
Excellent guide.
It should also be noted that if the reaper leviathan attacks a player that is below 80 HP it will grab them & instakill said player.

Great job!
:seamoth: