S.T.A.L.K.E.R.: Call of Pripyat

S.T.A.L.K.E.R.: Call of Pripyat

636 ratings
A Misery Handbook
By airmarmot
Sit right here my little soldier!

This is a collection of hints, tips and generally helpful information about the differences between Misery and vanilla S.T.A.L.K.E.R.: COP. Fundamental to the handbook is this 'insight':

Misery isn't difficult.

Well, it is difficult compared to the standard game, but half of that is just because it's more complicated. The remainder is because the difficulty is set to master, so there's simply less room to screw up. If Misery is trashing you after hours and hours of play, this may help you. It will also help those who are just starting the mod and aren't really sure what to expect or how to proceed.
3
4
2
3
   
Award
Favorite
Favorited
Unfavorite
Introduction
This guide is for Misery v. 2.0.2 + QF.

This guide is not about basic game mechanics that have remained the same since vanilla Call of Pripyat. It is also not a proper walkthrough and it doesn't really hold your hand. This is an ongoing collation of general gameplay mechanics and tips unique to Misery, which, if observed, will seriously increase your life expectancy.

I've read a few 'guides' on Misery and haven't really been impressed so far. Many people seem to consider Misery unbelievably difficult. This is simply not the case unless you approach it like your average FPS and give the A.I. zero respect. If you do this, you will spent a lot of time pressing F9.

Approach Misery as you would a difficult tactical shooter. Don't be prepared to 'soak' hits. Don't stay in the same piece of cover and take potshots at aggressive NPCs. Don't take on large groups of mutants unless you have an escape plan. And for the love of god, don't screw around in anomaly fields.

If you follow the tips in this guide you will have a lot of flexibility in how you play Misery. With experience, you will be able to take on all the Mercs in the waste treatment plant with no armour and a broken rifle and barely take damage (although you will need ammunition, this guide isn't that crazy).

This is serious time, m'kay?
I. General Tips
General information that you may, or may not know. These will be more helpful for those just starting Misery.
  • Save frequently. Use hard saves, not just quick saves. If you can, have four or more hard save slots and save over the oldest whenever you
    feel you’ve done something that you really
    don’t want to repeat.

  • Stashes have been moved and contain entirely different items. Tools have also been moved.

  • Mouse over stats and resistances in your inventory screen for a very detailed description of how they work.

  • Stamina, and therefore fullness (hereafter 'satiety'), is very important in Misery. The icon indicating hunger looks like an intestine. If it’s grey, you’re getting hungry and your stamina regeneration is suffering. If it is yellow, you should eat as soon as possible. If it is red, such as just after waking up, you will lose health slowly and die of starvation without food.

  • Radiation is listed in millisieverts (mSv). A small dose of radiation appears as a flashing symbol below the hunger icon and its effects will be almost unnoticeable. If the symbol stays solid yellow, you will lose health noticeably over time. An orange or red symbol indicates that you have very little time to live without medical aid.

  • The wind-up flashlight (default O) needs one free hand.

  • You will hear a siren shortly before a blowout/emission, but there are earlier warning signs. It will get darker quickly and a huge, dark, mushroom cloud-esque formation will be visible in the sky. If you see it, start running for cover.

  • Buy a headlamp as soon as you can and double click it to equip (default L to use). If you’re playing Black Road, you’ll need a UPD too.

  • The lower your weight, the longer you can run and the faster your stamina will recover. With a low enough weight (~10kg) it is possible to run forever. This involves wearing little to no armour however.

  • By carrying under your weight limit and remaining satiated, you will be able to run until your stamina is at 1/3 and then regain it by moving at normal speed.

  • Low crouch is crouch (default ctrl) plus walk (default x). You will need low crouch to get to many stashes.

  • If you seem to be walking very slowly for the stamina you are using up and are under weight, you may be crouching and not realise it.

  • Repair kits are single use. You may add one additional +% repair item when using a kit, such as gun oil or cloth pieces to increase the amount repaired. Tiers of repair kit are determined by the minimum condition at which they can repair an item. Better repair kits can repair more damaged items.

  • Identification Friend or Foe (IFF) is turned off by default. This means your aimer will turn neither red to identify enemies, nor green to identify friends. Only bandits will fire at you on sight, unless you have previously made enemies or friends with another faction.

  • If a mission says ‘Help the stalker by doing X.’ You will actually have to do X to complete the mission. For example, if you do not actually help your chosen faction intercept the trade deal in Zaton (by killing some of the opposition), you will not be given a reward, because you don't deserve one!
II. Consumables
Consumables are far more complex in Misery than in vanilla COP. They might seem a little overwhelming at first, but aren't really so bad once you get the hang of them.

  • Don’t use anti-radiation drugs if you can help it. They hurt you and reduce satiety. Use rolling tobacco, which does neither and lasts longer.
    Sell cigarette packs.

  • Don’t use anti-psych drugs, use marijuana instead. Sell individual joints.

  • Always have rolling tobacco on you to pre-empt or counter radiation and a bag of marijuana to counter psychic influences. They weigh next to nothing (actually, rolling tobacco weighs literally nothing as of 2.0.2.)

  • Stimpacks are much better than medkits, but will reduce satiety. Don’t carry stims without some food to bring your stamina back up.

  • Cocaine is the best (er, in Misery). It weighs nothing, has no downsides and gives you satiety, temporary adrenaline, increased carry weight and reduced bleeding. Epinephrine also does this (only more so), but is far rarer.

  • Protein bars are an excellent food, as they weigh very little but give you good satiety. Consider saving them for when you know you won't have carry capacity to spare.

  • The irradiated meals which give the most 'bang for your buck' are Bloodsucker Goulash and The Masculine Meal. Both give significantly more satiety than radiation, but are rarer in stores.

  • It is generally not a good idea to eat raw meat unless you are in danger of starvation, as the radiation to satiety ratio is often close to equal.

  • Keep a half used or full (military) battery pack on you at all times unless you like the idea of your flashlight and PDA being useless halfway through a challenging mission.

  • Don’t buy imported food. Instead, save drinks like beer, water and vodka and drink one with boar beef or another irradiated food that gives 300+ satiety. The drink will offset the radiation from the food.

  • Bandages need to be used as soon as you start bleeding. The longer you wait, the more worthless they are.

  • Sell all consumables you’re not planning on using, except for food/medkits/stimpacks/bandages.
III. Weaponry
Weaponry is quite diverse in Misery. To tell the truth, if you stick to headshots, any weapon will work pretty effectively on humanoids. Mutants, however, are a totally different story.

  • It's best to specialise your weapons for the
    roles you know you'll need e.g. shotgun for mutants, rifle for ranged targets and a
    handgun in reserve.

  • Diversify your ammunition. Meaning try not to carry any weapons that use the same ammunition type. Why? Because when you run out of bullets (and you will run out), you have a higher likelyhood of scavenging useful ammunition.

  • Take advantage of Hydrashock rounds and get yourself a .45. They work on everything and are fairly plentiful.

  • Getting a 'heavy' hit on a humanoid npc will stagger them, just as it will stagger you. When this occurs, try and line up a headshot to finish them off.

  • Always carry a main weapon and a secondary for durability as well as practical reasons. When you have the funds, consider getting a third, light weapon, such as a pistol, and making your secondary a shotgun or SMG.

  • It is rarely, if ever, necessary to buy a weapon from a vendor. It is often far less expensive to find a weapon in 25%+ condition and repair it.

  • Damaged weapons aren’t as bad as you might think. If you’re in a position where a single weapon jam will kill you, you should probably rethink your strategy.

  • Worn or rusted weapons can never be fully upgraded. Similarly, many weapons must be designated as 'modern' to be available for tier 3 upgrades.

  • If you upgrade a scope to have night-vision, it will have it permanently. Keep this in mind for weapons with scopes that cannot be removed – it is very difficult to see with night-vision during the day (herp-derp).

  • Silencers increase your accuracy and reduce NPCs’ awareness of where you’re shooting from. However, they will pinpoint you eventually if you don’t move.

  • Save all the ammunition you find. Sell ammunition as a last resort or if you have decided never to use it, e.g. if you have a great 9x19mm handgun and will never need one which fires 9x18mm.

  • Switch to armour piercing ammunition for npc combat. Stay on standard ammunition for mutants and exploration.

  • Just because you don’t have high proficiency with a weapon doesn’t mean you can’t use it. Medium is perfectly fine, but avoid low.

  • If you find a weapon with high durability that uses a different ammunition type than your current one, and you have medium or high proficiency with it, consider keeping it to repair later. If you collect ammunition in general, you can switch to this weapon instead of buying more ammunition when your current weapon runs out.

  • Keep AKM parts as these can be used to repair any weapon by an additional 10% (when using the appropriate repair kit). This is the most possible without using other repair kits as scrap.
IV. Armour
Armour is important, but weapons are much more so, especially early on in the game. It's not impossible to do all the non-anomaly sidequests in Zaton without any armour at all, because you'll have almost infinite stamina. Trying to do so with a peashooter is... well... it's unlikely.

  • The CS-3 armour from Nimble has great stats and is excellent value because it comes with a Sphere-08 helmet included. [Currently a bug is preventing the Sphere-08 from being included in the deal - be warned!]

  • The exoskeleton gives insane defense, but you won't be able to run in it until you get Cardan all the tools. You'll also need deep pockets, it's about 60,000 rubles in total (tier 3 upgrade).

  • Artifact hunting suits like the SSP-99 degrade very quickly from both physical damage (bullets, claws) and direct anomaly damage (fire jets, gravitational and fruit punch). If you expect to take unavoidable physical damage, you might want to take the suit off first and save some money.

  • High temperatures in areas that have fire jets (e.g. boiler anomaly) will damage suits fairly quickly even if you don't step on the anomalies themselves. Get in and out as fast as possible. Passive degradation is slow to non-existent in chemical based anomalies.

  • Repairing armour is very expensive once it falls two bars of durability or more below maximum condition. Buying repair kits, bringing the condition higher than this by yourself, and letting an NPC fix the remainder is almost always cheaper.

  • Slots are best used for weight reducing items such as titanium frames. Mobility is survivability when in combat. Since increasing your carry capacity decreases your relative load, you're also increasing your mobility. Remember to remove metal frames and camelbacks for electrical anomalies.
V. Artifacts
Artifacts work differently in Misery. There aren't any that remove radiation and there are only a couple that increase carrying capacity higher than their innate weight.

  • Lower tier artifacts such as Fireball can be found on humanoids and mutants.

  • You will need an SSP-99 or similar suit to hunt for artifacts. Don’t even bother without one because anomalies and the areas around them are lethal in Misery.

  • You will need one or more artifact containers to carry artifacts without accumulating radiation. The artifacts do not go inside the containers, they use separate slots. This is due to game engine limitations.

  • As in vanilla, artifact detectors are tiered and you will not be able to find the better artifacts without upgrading yours.

  • Heavy artifacts are of dubious worth. Personally, I think most artifacts are bad, period, except as a source of easy cash.

  • You don’t need artifacts to make money, but you do need them to complete several side missions – consider saving them in your stash until you have more than one, then selling the excess to Beard or Hawaiian.
VI. Combat
Combat in Misery is about mobility. I've said this already, but I'll say it again: you cannot just 'tank' damage, even with an exoskeleton you will eventually die from a grenade or a few headshots. Hard cover is your friend, but only until someone throws a grenade at you.

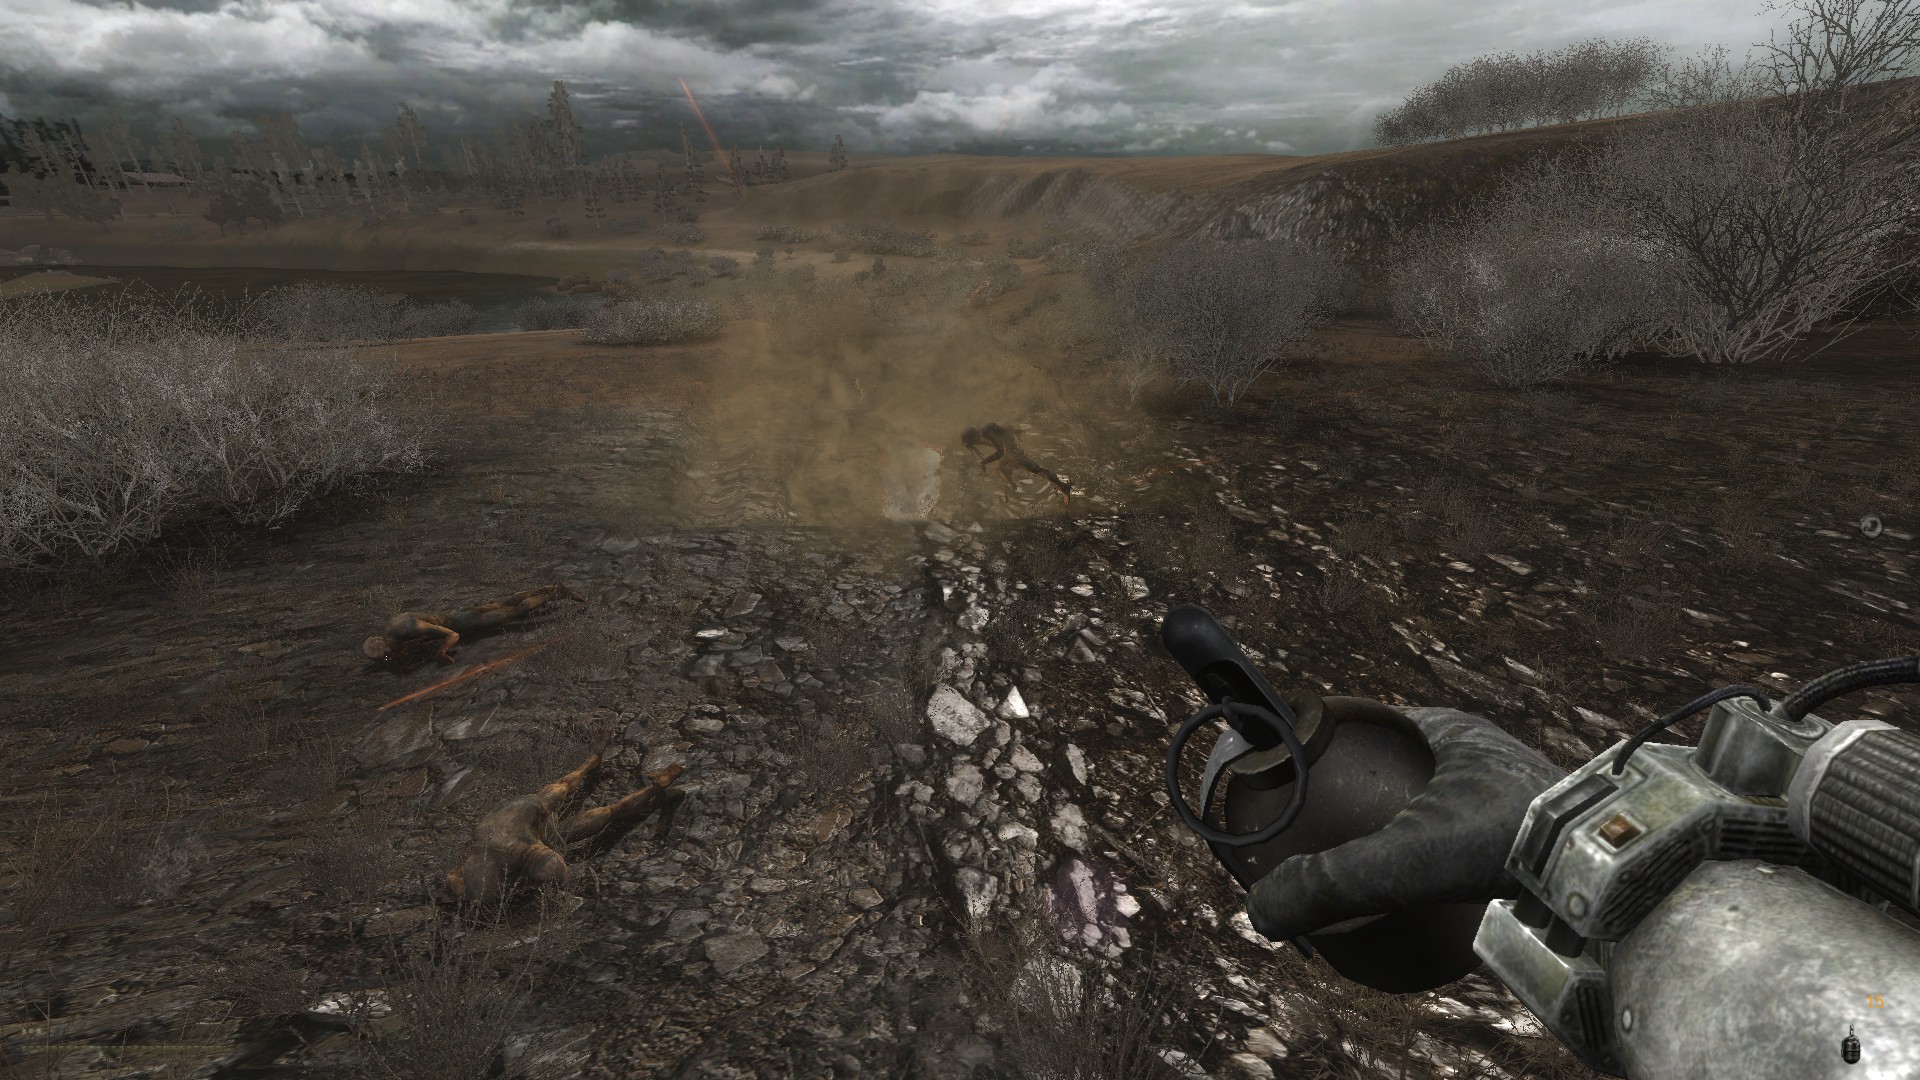
  • You can throw grenades much farther by
    holding the right mouse button.

  • The classic tactic of ‘letting the enemy come to you’ only works in Misery as long as you are laying a trap. Assuming anyone is left after the trap is sprung, you will need to change location, and keep doing so until combat is over.

  • Staying in the same spot once combat has begun is a recipe for disaster. Enemy fire will get more precise the longer you stay in the same position (logical, eh?).Unless you are in an unhittable position, therefore, you will eventually get shot and probably bleed out.

  • If you think you’re in an unhittable position you probably haven’t considered grenades, and NPCs have a lot of grenades. Changing location after firing a few shots will save you from a quick and shrapnel-laden death.

  • Switch your weapon’s fire selector to single shot (default 0) and keep it that way unless you’re fighting at close range.

  • Crouching is good. It allows you to sneak up on targets, it increases your accuracy and also presents a lower profile target to attackers. When your position is pinpointed however, don't even consider crouch-walking to cover - run!

  • If you keep your stamina high, you will be able to run to cover in combat. If you can’t run to cover in combat, you will die.

  • Because IFF is off, you will sometimes be unsure whether or not you should attack a group of NPCs if you spot them before they see you. You can generally tell which faction they belong to by what they are wearing:

    • Bandits often have overcoats and neutral coloured, shabby armour.
    • Stalkers will have at least one person wearing the classic sunrise bodysuit and gas mask.
    • Duty generally wear red and black PSZ combat armour.
    • Freedom always have woodland camouflage on their armour.
    • Mercenaries wear mixed neutral coloured armour and/or exoskeletons.
    • Ecologists/Scientists wear SSP suits.

  • It can be advantageous, though expensive, to hire stalkers to take you to places where you know there will be difficult combat. This dialogue option starts with the line 'What's your business?'. Feel free to loot any party members who fall once you arrive.


    Mutants

    • Listen for growls, shrieks and snorting and you’ll be prepared for combat. Snorks, boars, flesh, bloodsuckers and dogs all telegraph their presence through noise. Cats, on the other hand, are very quiet.

    • When fighting mutants that can’t jump such as dogs, cats, boars, flesh and bloodsuckers, jumping on the nearest rock or high position will save you no end of trouble. Watch out for snorks though, they can jump surprisingly high.

    • Flesh: Will squeal at you. Shoot them to make it stop.

    • Zombies: Headshot whenever possible to conserve ammunition and try not to get surrounded. Alone they’re pathetic, but some have shotguns or rifles that will hurt if they hit.

    • Boars: Should be shot in their weakly armoured flanks after dodging the charge. Or stand on a rock and unload.

    • Dogs: Move in packs and are the leading cause of PC death early on. If there are more than three, you will not be able to kill them before they reach you. Find higher ground if you can't take a couple hits.

    • Pseudodogs: Sometimes lead packs of dogs and are basically irradiated wolves. They do high damage, even against an exoskeleton, and take several shots to kill.

    • Psydogs: Pseudodogs that can create multiple replicas of themselves. These replica dogs take one shot to 'kill' but will damage and distract you while the real psydog attacks from the rear. Killing the original one destroys all the replicas; grenades and high ground are recommended.

    • Snorks: Will crawl to range, jump at you and then roll into a crawl to repeat their attack. The roll will damage you, so don't backpedal; either run or sidestep them. Their movement makes hitting them with rifles and handguns difficult. A shotgun loaded with buckshot is optimum.

    • Bloodsuckers Are a real pain. They still retain complete invisibility up until melee range (unlike SoC), but no longer breathe heavily as they approach you. In packs of two, walking backwards while in combat will make bloodsuckers attack at +/- 20 degrees from the player's front, making sidestepping and then firing an effective tactic. In groups of three or more, the bloodsucker's special draining attack means finding a choke point or rock to stand on is essential. A shotgun such as the Saiga is by far the best weapon against bloodsuckers. Unless you're using an RG6 of course, in which case you can probably just spin in circles and fire wildly while trying not to choke on your pacifier.

    • Poltergeists: Most easily killed from range, though actually hitting them is sometimes quite difficult, because their hitbox is very small. A shotgun will work from medium range, but getting much closer is a terrible idea.

    • Psychic poltergeists: Require some form of psy-protection to defeat if you plan on getting closer than long range. Their psy-field becomes very damaging as you get closer, up until you die regardless of resistance. You can kill them without any resistance by lobbing grenades into their patrol path. If you have resistance, crouching and not moving will prevent them from throwing things at you.

    • Pseudogiants: Are faster than you unless you run and can take a huge amount of punishment. If you let them get close you'll be a smear on the ground almost before you can regret it. A high capacity shotgun is recommended. Grenades are effective, but beware the ground stomp - it will throw grenades back in the direction they came from, i.e. towards your pretty face.

    • Controllers: Need to be taken out from behind a piece of hard cover. Trees are not very effective. Fire and then duck back in before they can blast you. If you hear the screeching noise they make and there's no cover turn around and face the ground while retreating (or advancing, since you aren't facing them anymore!).

    • Burers: Will hold up their arms to psychically block projectiles and throw objects at you. Don't bother shooting them when they're doing this. Instead, wait for them to move and then unload before they start blocking again. They can grab your equipped weapon and toss it aside (or bludgeon you to death with it), so unequip it when they're blocking your shots.

    • Chimerae: Are apex predators. They jump like snorks and hit like pseudogiants. Letting them get close will reduce your lifespan to a matter of seconds. The one you may or may not fight during a side mission is wounded, so don't get cocky. Shoot at them and run, but not in a straight line. If you can't run, you're just a free meal.
VII. Loot & Looting
Loot is great, but are you looting at maximum efficiency? Are you ahead of the curve? Does Beard cry under the weight of a thousand broken handguns?

  • NPC vendors buy things at different prices. Beard and Hawaiian pay more for artifacts and consumables and will buy damaged weapons. Owl and Bonesetter in Jupiter will pay much more for full condition weapons, faction patches and non-consumable mutant parts.

  • Vendors' stocks will change depending on both game progression and when you speak to them. Some items, such as the powerful Green Dragon (.338 Lapua sniper rifle), can be bought from Bonesetter but will only appear occasionally.

  • NPCs will loot corpses once combat has ended if you don’t get there first.

  • Holding the pickup key (default f) will show you the location of nearby items. This is useful for stashes that aren’t already in containers.

  • The sprint key (default x) will loot everything from a corpse. Once combat has ended, it’s often a good idea to run around looting everything and then decide what to keep and what to drop (like broken weapons).

  • Weapons in very bad condition won’t sell for much and are quite heavy. Leave them on a corpse unless you like random piles of broken guns lying around. The exception to this is if your own guns are low on ammunition. Even a loaded broken weapon is better than a knife.

  • Remember to empty any weapons before you sell or discard them by right clicking and unloading them. If you can’t unload them, they’re empty.

  • You can also remove sights/silencers/grenade launchers from undesirable weapons. They sell for reasonable amounts and don’t weigh very much.

  • Using grenades on mutants seems to destroy their saleable parts.

  • Stashes are often in visibly difficult to reach places, such as roofs that require moving along stretches of pipe to get to. Look for these, experiment, and you will find good things.

  • As of 2.0.2, not all stashes will show up as ‘looted’ on the PDA; don’t worry about it.
VIII. Item Locations and Area Difficulties (spoilers)
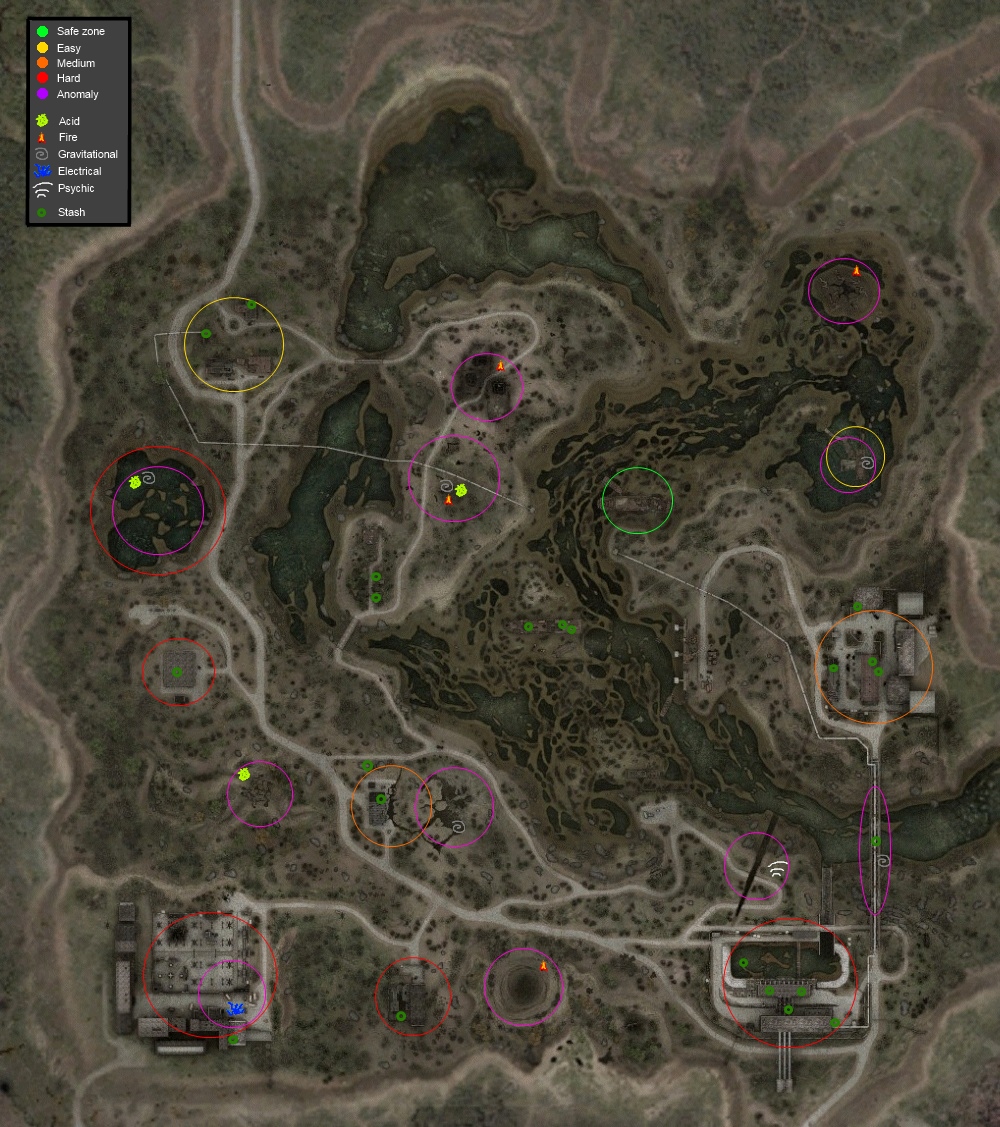
Items are enjoyable to find for yourself, so giving them all away would be no fun, but here are a few stashes and tool locations for those who need them. I've also annotated a map to illustrate the relative difficulties of different area in Zaton and their associated hazards.

Easy stashes:
  • There are three stashes on Shevchenko that contain rather useful items. One is on the second floor, in a side room adjacent to the fire. Another is on top of the deck, inside a shipping container at the far end of the boat. The third is on top of one of the engines and can be gotten to by dropping down from the deck above after getting the second stash.

  • The most useful stash in Zaton is probably on top of the gas station. You can get there by climbing up the steps onto the irradiated oil tank behind the station and making a running jump to the gas station roof. The stash contains a loaded and full condition AKM along with some other goodies.


Tools in Zaton:
  • Basic - In the ranger station, go up a ladder to the left of where the duty trader meets the bandits. Follow the walkway and look for them sitting on some pipes on the right.

  • Fine - At the back of the iron forest is a building with an open door and some stairs going down to another locked door with a keypad. Look under the stairs.

  • Calibration - Inside the waste treatment plant guarded by mercenaries, there are three floors. On the middle floor on the side facing the downed helicopter is a 'stash pack' containing the tools.


Tools in Jupiter:
  • Basic - Underneath the Volkov-AA complex, inside a container in a room containing a burer.

  • Fine - At the back of the Jupiter plant behind a small out-building. See: Here.

  • Calibration - Also at the back of the Jupiter plant, inside a school bus facing a large entrance to the plant. See: Here.
IX. Errors/Bugs/CTD
Misery is a mod, which means it's always likely to be less stable than a general release.

It's also free. Remember this when you get frustrated by a recurring bug or crash. A lot of people have put a lot of work into this mod and then released it to everyone. Have some respect for the people who gave up their time to make Misery what it is before you think about raging at them.

That being said, if you encounter a bug, error or CTD (crash to desktop), please first check that you have an up to date version of Misery. Currently this is v. 2.0.2 + QF. Then please check what kind of error you are having. An 'out of memory' error indicates that your pc setting are inadequate for the game and that you should lower them.

If you get a corrupted save and a CTD citing MSVCR80.dll, please look here as this has been fixed.

Otherwise, you are encouraged to post the error reports here so that the mod team know what needs to be fixed.
X. Credits
This guide is posted with permission from Slubg0b (MODDB) and is no longer being updated
  • Thanks to Ak47inyourface (MODDB) for posting tool location pictures in jupiter.

  • Thanks to Huppey (MODDB) for information on the most efficient irradiated meals.

  • Thanks to thetommunist (MODDB) for reminding me that you can join stalkers on patrol.

  • Thanks to Yastiandrie as well as Real Wolf, Chorbit & practik (MODDB) for creating the save corruption fix.

  • Thanks to Str8Z (MODDB) for reminding me about artifact detector differences and pointing out that epinephrine should be listed as technically better than cocaine.

  • Thanks to =Th0raxe= for pointing out that I forgot to mention bloodsuckers at all. Durrr.

  • Thanks to Pengwertle for reporting the Sphere-08 helmet bug.

271 Comments
Ah nu cheeki breeki ive damke 3 Feb, 2023 @ 2:21am 
True true. I suppose it's just more my perspective of how I play. High quality item only greedy bastard that likes to conserve ammo and is mega fussy about keeping his gear in tip top shape, no matter the cost :P
Moon-Shadow 2 Feb, 2023 @ 5:10am 
So from the point of view of how much easier it is, as you can see from me below, it is even easier.

And that in "Hard Version", where many things cost more at the dealers, and some things are less effective in their effect.
Moon-Shadow 2 Feb, 2023 @ 5:07am 
I continue to only eat 1 Boar or 1 Flash meat and 2 units of water when I wake up and of course I go to bed hungry. ( Depending on the character class, it can also be 2 Flash meat and then 3 units of water. )

Cheaper, doesn't cost that much time either, all other food is for the trip, and since you only have one meal with you, you don't need more and saves weight.
Moon-Shadow 2 Feb, 2023 @ 5:07am 
Suits with tape, always have 2 rolls with me, so I have 3 to 4 repair units.

Weapons, of course, everything cheap that goes over 90%, and if it falls below that then with the parts that you can get out of disassembled weapons, i.e. the parts that have the option for repairs, the others are only good for sale, you usually have to use the weapons disassemble because nobody wants to buy them below 50%.

-

Head lamp and 1 to 2 middle batteries for recharging.

Black gas mask is not expensive, except if you take the "Black Street" Start where you don't have anything, otherwise you'll quickly have the money together.

All goods with tobacco and alcohol always sell exactly that brings the most money at the beginning, and finds it in certain places and some opponents also have something like that with them.
Moon-Shadow 2 Feb, 2023 @ 5:07am 
Grenades. ( The ones with more fragments on larger Areas )

To eliminate the bandits at the second ship, where the bandits hire you, which you can tell Berd, and then eliminate the bandits by going back to the bandit and letting them take you to the ship at night, the other go vorward and you throw a grenade between them to get everything gone, have a lot of loot, and be sure they don't get too far and kill the stalker boss who also gives me a reward for killing bandits.
Moon-Shadow 2 Feb, 2023 @ 5:07am 
And 1 to 2 grenades, for the follow-up mission, which I only accept by handing in the one before that, but I wait until that a day is that it also starts that day, to sneak in with the other stalkers, wait until bandits and mercenaries standing in the hall and throwing 1 or 2 grenades in a row at different places, out of cover where you are with the others, to catch as many as possible, and loot them all before the stalkers can get to you achieve without.

Important for the second mission, save before you talk to the stalker at the wall, because from the moment you talk it will be determined what the enemies will have in terms of loot, so that you can get the best possible for your class.
Moon-Shadow 2 Feb, 2023 @ 5:04am 
Weapon restrictions, Assaulter can do everything but only assault rifles where others can do 2 well, Sniper not carabiners, Recon not sniper rifles.

Always a shotgun, preferably a Saiga, often as loot in the second mission mentioned above, but I do it a maximum of 10 times, either for a lot of loot or the right weapon depending on the character class.

Since the game has a loot chance system but uses the original quantity limit system of the game, which is why you can hardly find loot with a lot of opponents unless they have a higher Rang, since many opponents have no weapons when they are dead Cannot be found on them even close as the limit system has decided to give you any small stuff en masse but no guns and ammo like the ones they shot to Player with before as each loot has a 100% chance of being found and with the amount of things that are there low Chance of Weapons, only fixed opponents have a lot of loot, the missions and the mercenaries at the sewage treatment plant.
Moon-Shadow 2 Feb, 2023 @ 5:00am 
.45 caliber pistols are always a good choice.

Especially for the Recon since its primary weapon class is pistols as well as carbines.

But there is an armor system, so a 9x18 from the Russian pistols can also be good if you load the right type, and the 9x19 as found in Gsh-1 and Beretta is even stronger with AP ammunition than an EXO Suit carrier also works.

Mutants are the only ones that are so resistant to all types of calibers and ammunition types, except for shot with which you can get all mutants, except for Chimeras, because you need a lot of shots.

Silencers are important, if a human opponent doesn't hear or see you, it saves ammunition, which also saves money, Saves weight and offers more loot to take with you.

In addition, I only use automatic weapons in single-fire mode, saves ammunition, and you can fire fast enough, have less recoil and hit better.
Ah nu cheeki breeki ive damke 2 Feb, 2023 @ 2:07am 
And finally, get a good handgun. Desert Eagle is powerful, sure, but honestly, too weighty, too much recoil, low ammo capacity, ammo is expensive and harder to come by. Get somethign chambered in .45, such as Colt early game, and then a USP later on. Focus on ammo capacity, fire rate and recoil. It's your backup if you run out of ammo, or are too close range, or artefact hunting. It's your last resort. If you need to kill with it, you need to be able toput down as many rounds down range as accuratley and quickly as possible. A fast shooting .45 will outstrip a powerful .357 any day of the week in the zone. Alternative handguns are Berettas, chambered for 10mm. 10 mm is a cheaper substitute for .45, and just as comparable honestly if you want to focus on budget instead.
Ah nu cheeki breeki ive damke 2 Feb, 2023 @ 2:06am 
5. Weapon wise, get a shotgun. A simple over/under Toz-34 is a godsend, even through to the midgame, possibly beyond if you are clever. They are effective against mutants, cheap, generally reliable, ammo is plentiful to loot and cheap to buy, and can deal with other stalkers fairly easily as well. Slugs can sorta snipe a short ways away, nothing insane tho. I personally don't worry too much about getting an automatic rifle (like AK variants etc, as you will bleed through ammo fairly quickly in a confrontation in a prolonged zone expedition). Instead, invest in something for long range battle, like a sniper rifle, a Mosin. Any scoped weapon to give you a range advantage.