Door Kickers

Door Kickers

130 ratings
Cover and Movement: Tactics from the Real World (Pt. 2)
By Galco
Part two of my advanced guide to real-world tactics. Dealing with large open spaces, flashbangs, and more room clearing.
4
   
Award
Favorite
Favorited
Unfavorite
What's New?
Welcome back!

My first assumption is that you have read part one of my guide to real-world tactics which covers the core concepts that I will be building on here. Assumption two is that you have enough experience with this game that you know how to do all the things I illustrate throughout the guide such as strafing and using items, etc. If not... yeah, go do that.

Ok so what exactly is new in part two here? We're going to be looking at more examples of what we talked about in the first guide and seeing how those essential tactical components are the glue for more advanced movements with the aim of giving you enough of a theoretical framework that you could rewrite part one yourself! I'm also going to talk about some alternate room clearing methods and getting into more detail about everyone's favorite masking and pesky fatalities that result from doing things you shouldn't have. Secondarily, I will be touching on the use of flashbangs, though an in-depth discussion will be coming in part three. For this guide I'm still going to be sticking with two officers as I found it easier to illustrate the concepts this way. With that, 4-officer tactics are also coming in part three. However, as you'll come to see, as long as you stick to what I teach you here you can apply it to any number of squad members. Go on, try it out.
Some more fun vocabulary
A couple of new terms I'm gonna throw at ya include...


Stacking up
This refers to a position in which one officer is behind the other to the side of a doorway with the imminent purpose of clearing a room.

Fluidity of Motion
I touched on this in the first guide but essentially what this means is not getting stuck in a rigid order of movement for your officers. After executing clearances, and suspects for that matter, positioning and angles will change and fluidity of motion allows you to recognize it and embrace it.

Fatal Funnels
A fatal funnel is any narrow space, most typically an open doorway, that exposes one to direct and lethal enemy fire. Wasting time in a doorway or other fatal funnel is one of the best ways to meet your maker. You don't wanna do that. There's cooler ways to die.

Partial Clearances
THIS IS IMPORTANT!! A room that you have previously cleared but would still have been accesible to suspects usually due to other connecting rooms. In these cases, it is likely that the room is still clear but you cannot be certain, thus it is only partially clear. A room or other space is not considered clear until you absolutely know it is. Do not forget this.

Corner-Fed and Center-Fed Rooms
There are basically two types of arrangements for doors in a room. The room can be corner fed, which means that the door is placed in a corner of the room adjacent to a wall, or it can be center fed which is what it sounds like; a room where the door is more or less in the middle of a long wall and not in a corner. This is important because the approach to handling these rooms can be significantly different.
Roles and Responsibilities
We'll be dealing with a bigger and much more complicated building layout this time around. Now, when you are going in as an operator you inherently have a disadvantage in that you do not know the space and your enemy is likely fortified and ready for your arrival. We have to accept this and look to take every possible opportunity to reduce our disadvantage and win with our superior tactical maneuvering. You do not lose by being outnumbered, you lose by being outsmarted.

Alright let's get going. Take a look at the image below. What are the potential threats here? The two doorways. Fortunately, they are both closed but nonetheless dangerous. We could jump right in and go for the bottom door leading to the main building but that would leave us with a completely uncleared room up in the right corner that will stay a constant threat throughout the whole mission. So we evaluate: Is it safe to clear the room now? Is there any reason not to? The answer here is yes and no, respectively.

Ok we're clearing that room first. So why did I choose to move along the top wall instead of the one we are already on? By moving up, we expand our field of view and we don't put ourselves in a horrible position like being cramped into a corner exposed on both sides. Both officers would have their backs exposed to each other's doors. Not good.


The primary consideration in dealing with large and more open spaces is that you inherently have more angles to cover. Your field of view, especially in this game, is limited and we must look for ways to reduce this disadvantage through our movement.


Ok, we're stacked up on the door and ready to go. A key point here is that our officers do not need to take the same responsibilities. Purple is the pointman right now and so his focus is on the direction they are moving. Orange is covering the other threat. The same concept applies during the room clearance. Purple is going to have the main responsibility of clearing this room. Orange button hook and tuck into his corner only briefly enough to ensure purple doesn't get popped in the spine. Then he needs to move swiftly back to his duty of covering the other threat; the second door. If both officers fully commit to the room clearance, it leaves both of them exposed to someone charging in from the other door and ending their picnic early.


Great, the room was cleared without incident and both officers are stacked up on the next door. Notice the first example of fluidity of motion. Orange was on cover duty but due to his positioning, it made more sense for him to take on pointman now and Purple will follow up behind.


We didn't open the door first and instead used our element of surprise to deadly effect in this entryway room. I'll talk about this idea more later in the guide.

Next, like every plan, we need to start by asking ourselves what the biggest threats are. Only then can we possibly know how to counter them. In this case, the large open space itself is a threat, sure, but equally if not more concerning are the two other doors which are circled here in red. Take a second to look at the plan and notice all the arrows and really understand the movement that is about to take place. Orange is the point so he's going to be primarily responsible for the room as we talked about before. He will button hook in and then immediately turn his attention to the rest of the room. The reason he button hooks first is because, as you hopefully remember from the first guide, most suspects are going to hide in corners or behind cover. So he takes the corner first then he can move on. Meanwhile, Purple is going to do our first mask of the mission and oh what a glorious mask it will turn out to be.


See what I mean? This was a beautiful clearance that worked exactly as it was supposed to. Thanks to his quick tuck and turn Orange made two suspects' parents cry themselves to sleep tonight and Purple made equally quick work of the idiot that launched himself head on into a fatal funnel.


The next step. This plan should look logical and familiar to you by now so I won't get into detail on it. Just take a look at it notice what is happening. What I do want to talk about though is the decision to move to the right side of the building. It would be tempting in this position to press on into the huge room on the left since we have already engaged a suspect that was running amok in there. However, that room is going to be hard enough to handle without also having to worry about yet another doorway from a partial clearance. Instead, we are going to unpartialize (is that real?) the clearance and make it feel whole and complete again. Then and only then will we be ready to tackle the big beast.


Great, we moved into the hallway and faced no resistance. We have run into a tactical problem, though. We could go ahead and clear the room on the right but there is a very significant and perhaps not immediately obvious reason not to. It is a corner-fed room. The location of the doorway can be turned into our advantage. I'll show you how below.


Look what this simple movement does for our field of view. If he had opened the door before we would just be looking at a wall. Walls are cool and all but they aren't useful to look at. By moving across to the other side we open up the long angle on the door and enable our officer to see a much wider area of the room before committing. In a corner-fed room like this, you can usually gain the upper hand by moving into such a position. Now, you might be wondering why I didn't just slice the pie on the room instead. Well, because doing so would have separated our officers and exposed Purple's back to the uncleared room up top. Moving as I did and then slicing the pie wouldn't solve the problem because then his back would be exposed to the partially cleared room.


Oh no! Purple didn't properly clear his corner first and took a bullet. A valuable lesson in not getting ahead of ourselves. Yes, the long angle was opened up by our last movement and gave us a space to move into but we must never neglect our corners. EVER! Side note, notice Orange sticking to his literal and proverbial guns and being a good cover for his partner while he clears the room. Also notice his position. He didn't stay in the hallway to cover that closed door up top because his back would have been exposed to the partial clearance from the room on the left. Instead, he tucked inside into a very secure angle and still did his job. Open doors almost always get priority over closed ones, especially in this game where suspects can't shoot through them.


The next room. Not much to say about this, just notice the angles, fluidity of motion, and split responsibilities.


Now this time it does make sense, and is in fact a very good idea, to slice the pie. There is no uncleared space that would be behind him AND it's a center-fed room. Slicing the pie is most effective on center-fed rooms.
More Space, More Angles
As mentioned before, one of the threats that gets bigger as a room gets bigger is that more space means more angles to cover. If that weren't enough, large rooms also often have at least one, usually several, connecting rooms and adjacent spaces. I remember clearing a commercial office once in real life that had a huge open central lobby and NINE connecting rooms with all open doors. There was just two of us. Fun times. But I digress, let's get back to the guide.


So we obviously have to move on to the large room now but why is this approach a pretty foolish one?


The picture says it all. Moving up along that wall puts us, and keeps us, right in the fatal funnel. Sometimes you have no choice but this isn't one of those times. We have nothing to gain by doing so and there is a much better option available. As for the room entry itself, well we of course have to address the size and number of angles and ask ourselves if there is a tactical movement that we can use to our advantage. There is, and I'll get to that in a second, but first this is a great time to introduce our friend the flashbang. These little charmers flash and bang. They also happen to be extremely bright and extremely loud.


A large open space (but not too large) is a great opportunity for us to temporarily disorient any potential enemy and use our element of surprise to move swiftly across what might otherwise be a dangerous space. Remember that this room is not even a partial clearance, we just got a peek inside it earlier when we masked across it don't think that just because it isn't in the "fog of war" on this game means it's been cleared. This situation isn't the ideal one for a banger and there are plenty of other times to use one but that will be in the scope of the third and final guide. For now, just start thinking about them this way.


Time to move! We want to move quickly but always safely. We still need to mask and we still need to consider our angles. Purple's first immediate threat is the corner behind the couch but he can knock it out from afar and then keep moving along with Orange to a better and less exposed position. They move across, Purple needs to quickly clear what's left of the small open room and then move back up to cover his buddy and prepare entry on the closed door. Again, we did not address the door first because it is closed and open space and adjacent space are more pressing concerns. This does not mean ignore closed doors, but simply prioritize.


Here's how he does it.


Now we have to make a small but meaningful tactical decision. Do we keep with the idea of fluidity of motion and moving where the space is and have Orange step up to mask and let Purple slip in behind? That works, but another option here is to slice a little pie and move safely rather than swiftly. Take a second to also notice the angles they are ordered to cover and the fact that they are sticking to their walls, not overcommiting and not floating around in dangerous open space. This is even more important in large open rooms. Do not move through the middle of them!


They made it, but there's a problem. Now they are hideously exposed to three different doors and uncleared rooms, not to mention the open space at the bottom.They need to get out of harm's way and cross the space immediately. But, as always, they must still do so safely and the best way to do that is masking.


Just a quick view of how a perfectly synced masking movement across an open space should look. Purple has two doors in his zone of coverage and Orange has one door and an open space. Once they cross, Orange checks the final corner and then stacks up for the next room entry.


It goes down thusly. Orange does his quick tuck and back to coverage, still remaining in partial cover by the doorway. The doorway in these kinds of cases is not a fatal funnel by the way because it being used as cover/concealment in a room that has been cleared. The room ends up being cleared without incident.


The final screenshot of the mission. Unfortunately these guys were too effective and killed the last suspect, abruptly ending the mission. If it had continued though, I would have gone as illustrated. Something to note here is that rather than stacking up, the officers split the doorway. Why? It's a very strangely shaped, center-fed room and they can both cover more angles and increase their field of view by lining up this way. Either way, this type of room entry is about equally as popular as stacking up on the same side but as a general rule I don't like splitting my officers up. Due to the wideness and volume of space in the last room, a couple of flashbangs would make it far easier to clear as indicated by the red stars in the image.
The End
Alright that does it for part two. I had originally intended to introduce four-officer tactics here but I think you'll agree that it was better saved for the last guide as it is a pretty big topic that opens a lot of other tactical discussion. So, next time we will get into that as well as fairly comprehensively cover the use of flashbangs and breaching charges. I hope you were able to build on your skills with this guide and as always feel free message me any questions you may have. Good luck and stay stafe my friends!
20 Comments
Hakurei Reimu 4 Jul, 2023 @ 7:31pm 
very nice 2 but it would be appreciated if you linked the first one here too
[UCaP]Inkompetent 8 Nov, 2020 @ 2:05pm 
That's great to hear! Will be interesting to see what you conclude considering the very different armament and scenarios in DK2 compared to DK1.
Galco  [author] 8 Nov, 2020 @ 11:49am 
Thanks everyone for all the support. Now that Door Kickers 2 is finally upon us, you can expect to see more of me over there :)
[UCaP]Inkompetent 8 Nov, 2020 @ 4:37am 
Oh, and as another note, just to make sure you are aware of it: There is a Door Kickers 2 on Steam now in Early Access. It's absolutely amazing, in a very different setting, and with a lot of features added that one wished had existed in this game (such as curtain-covered but breakable windows and the ability to climb through them and across other obstacles). If you are still into these games/gaming in general I *really* recommend getting it.
[UCaP]Inkompetent 8 Nov, 2020 @ 4:35am 
Another excellent guide! Having written a few detailed buy differently focused ones myself in other fora (Naval Action, IL-2 Sturmovik, ArmA) I know that it's not easy to keep producing them as it takes quite some inspiration to get the thumb out one's ass and have the motivation, energy and presence of mind to do it over other tasks, but I really hope that you keep writing them! Some of the best guides I've ever read for any game ever.

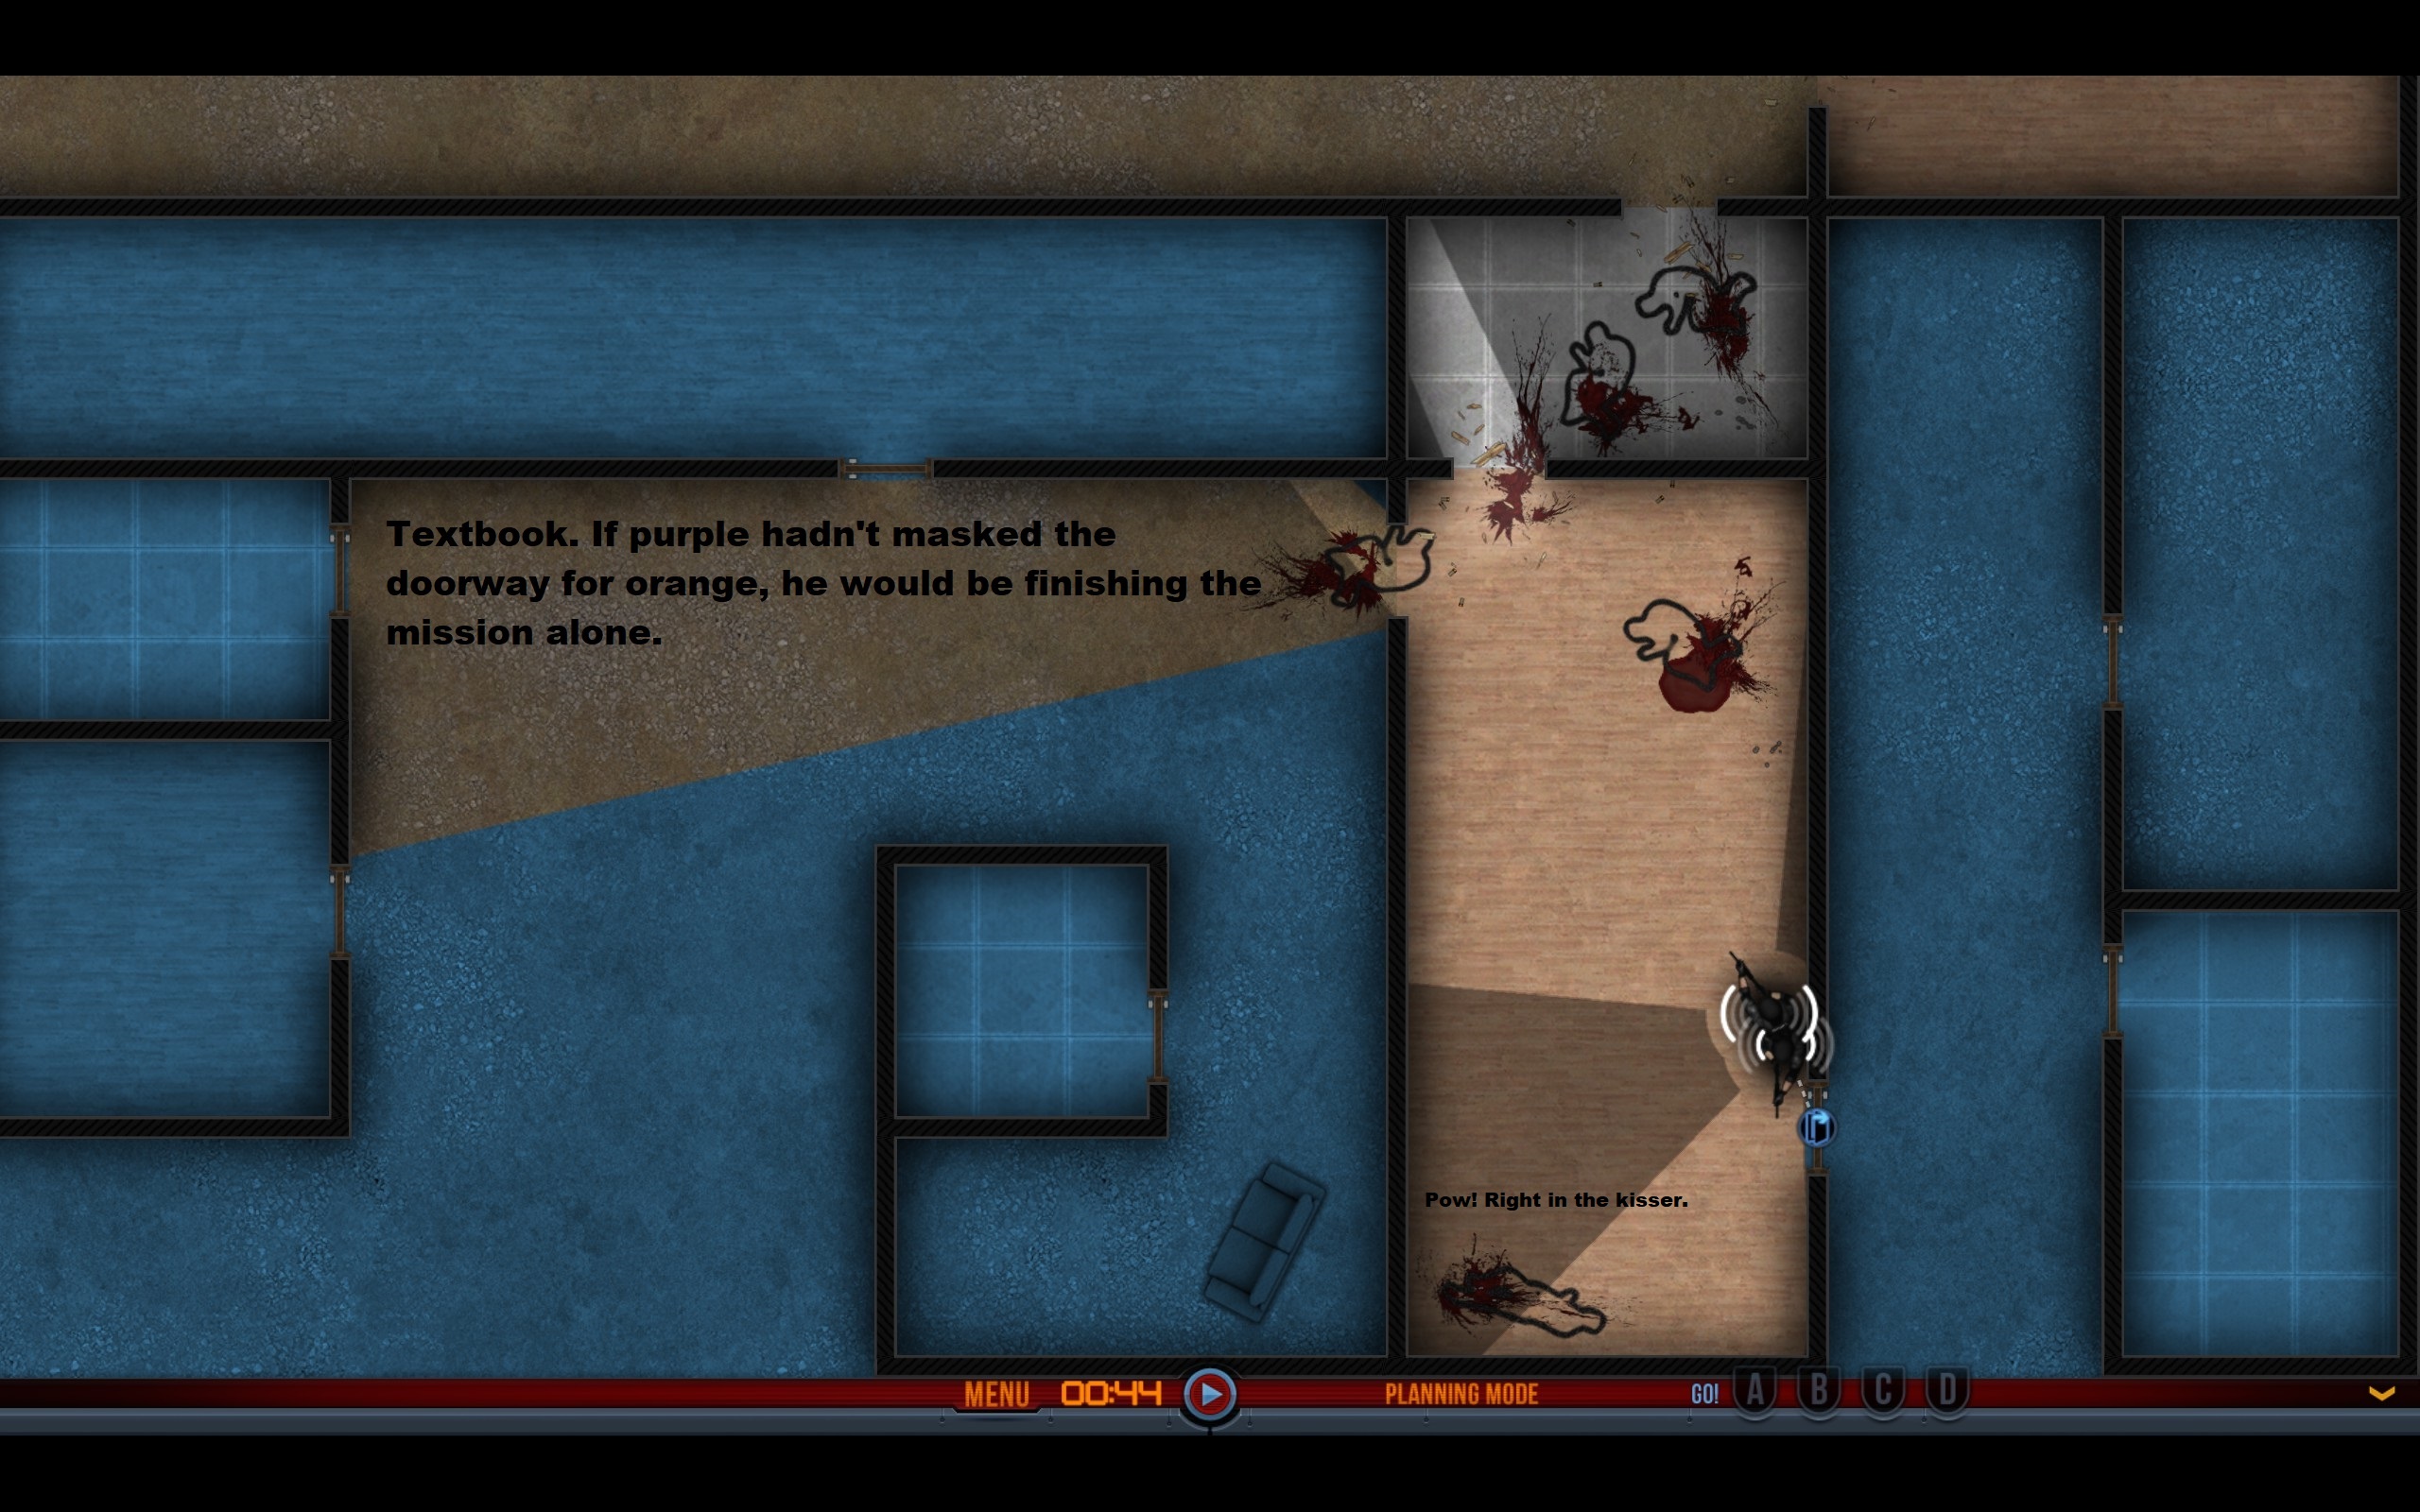
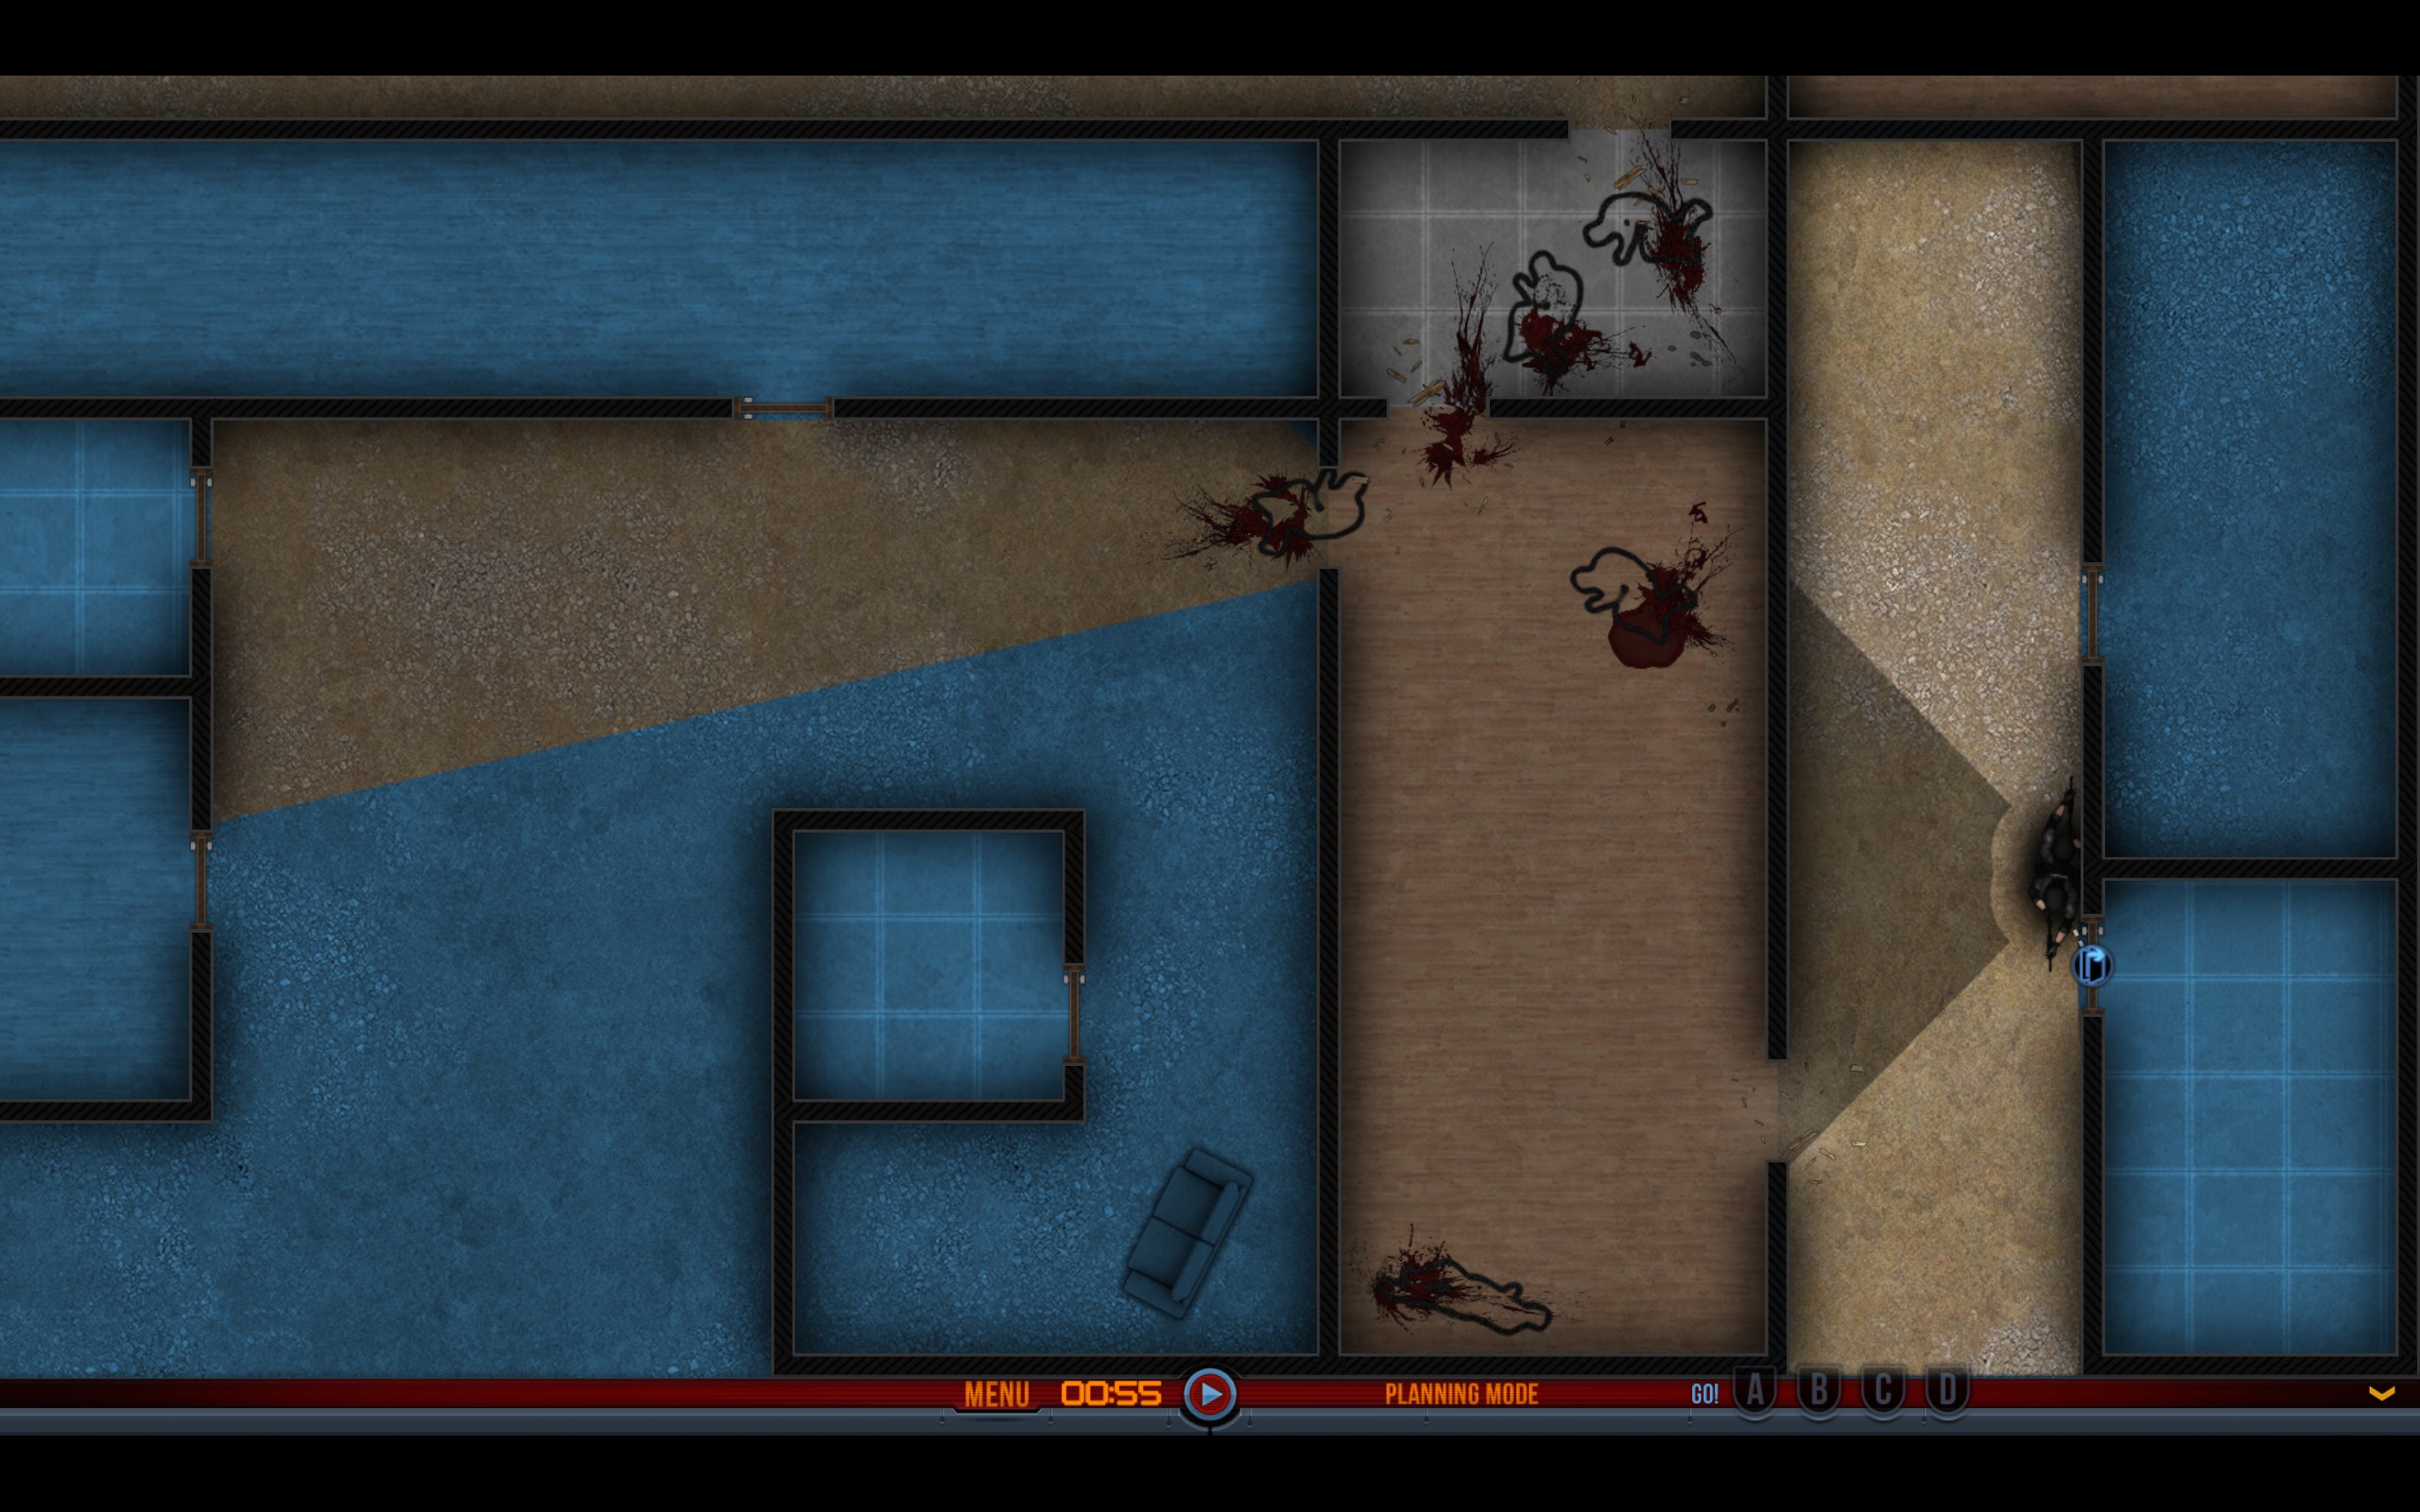
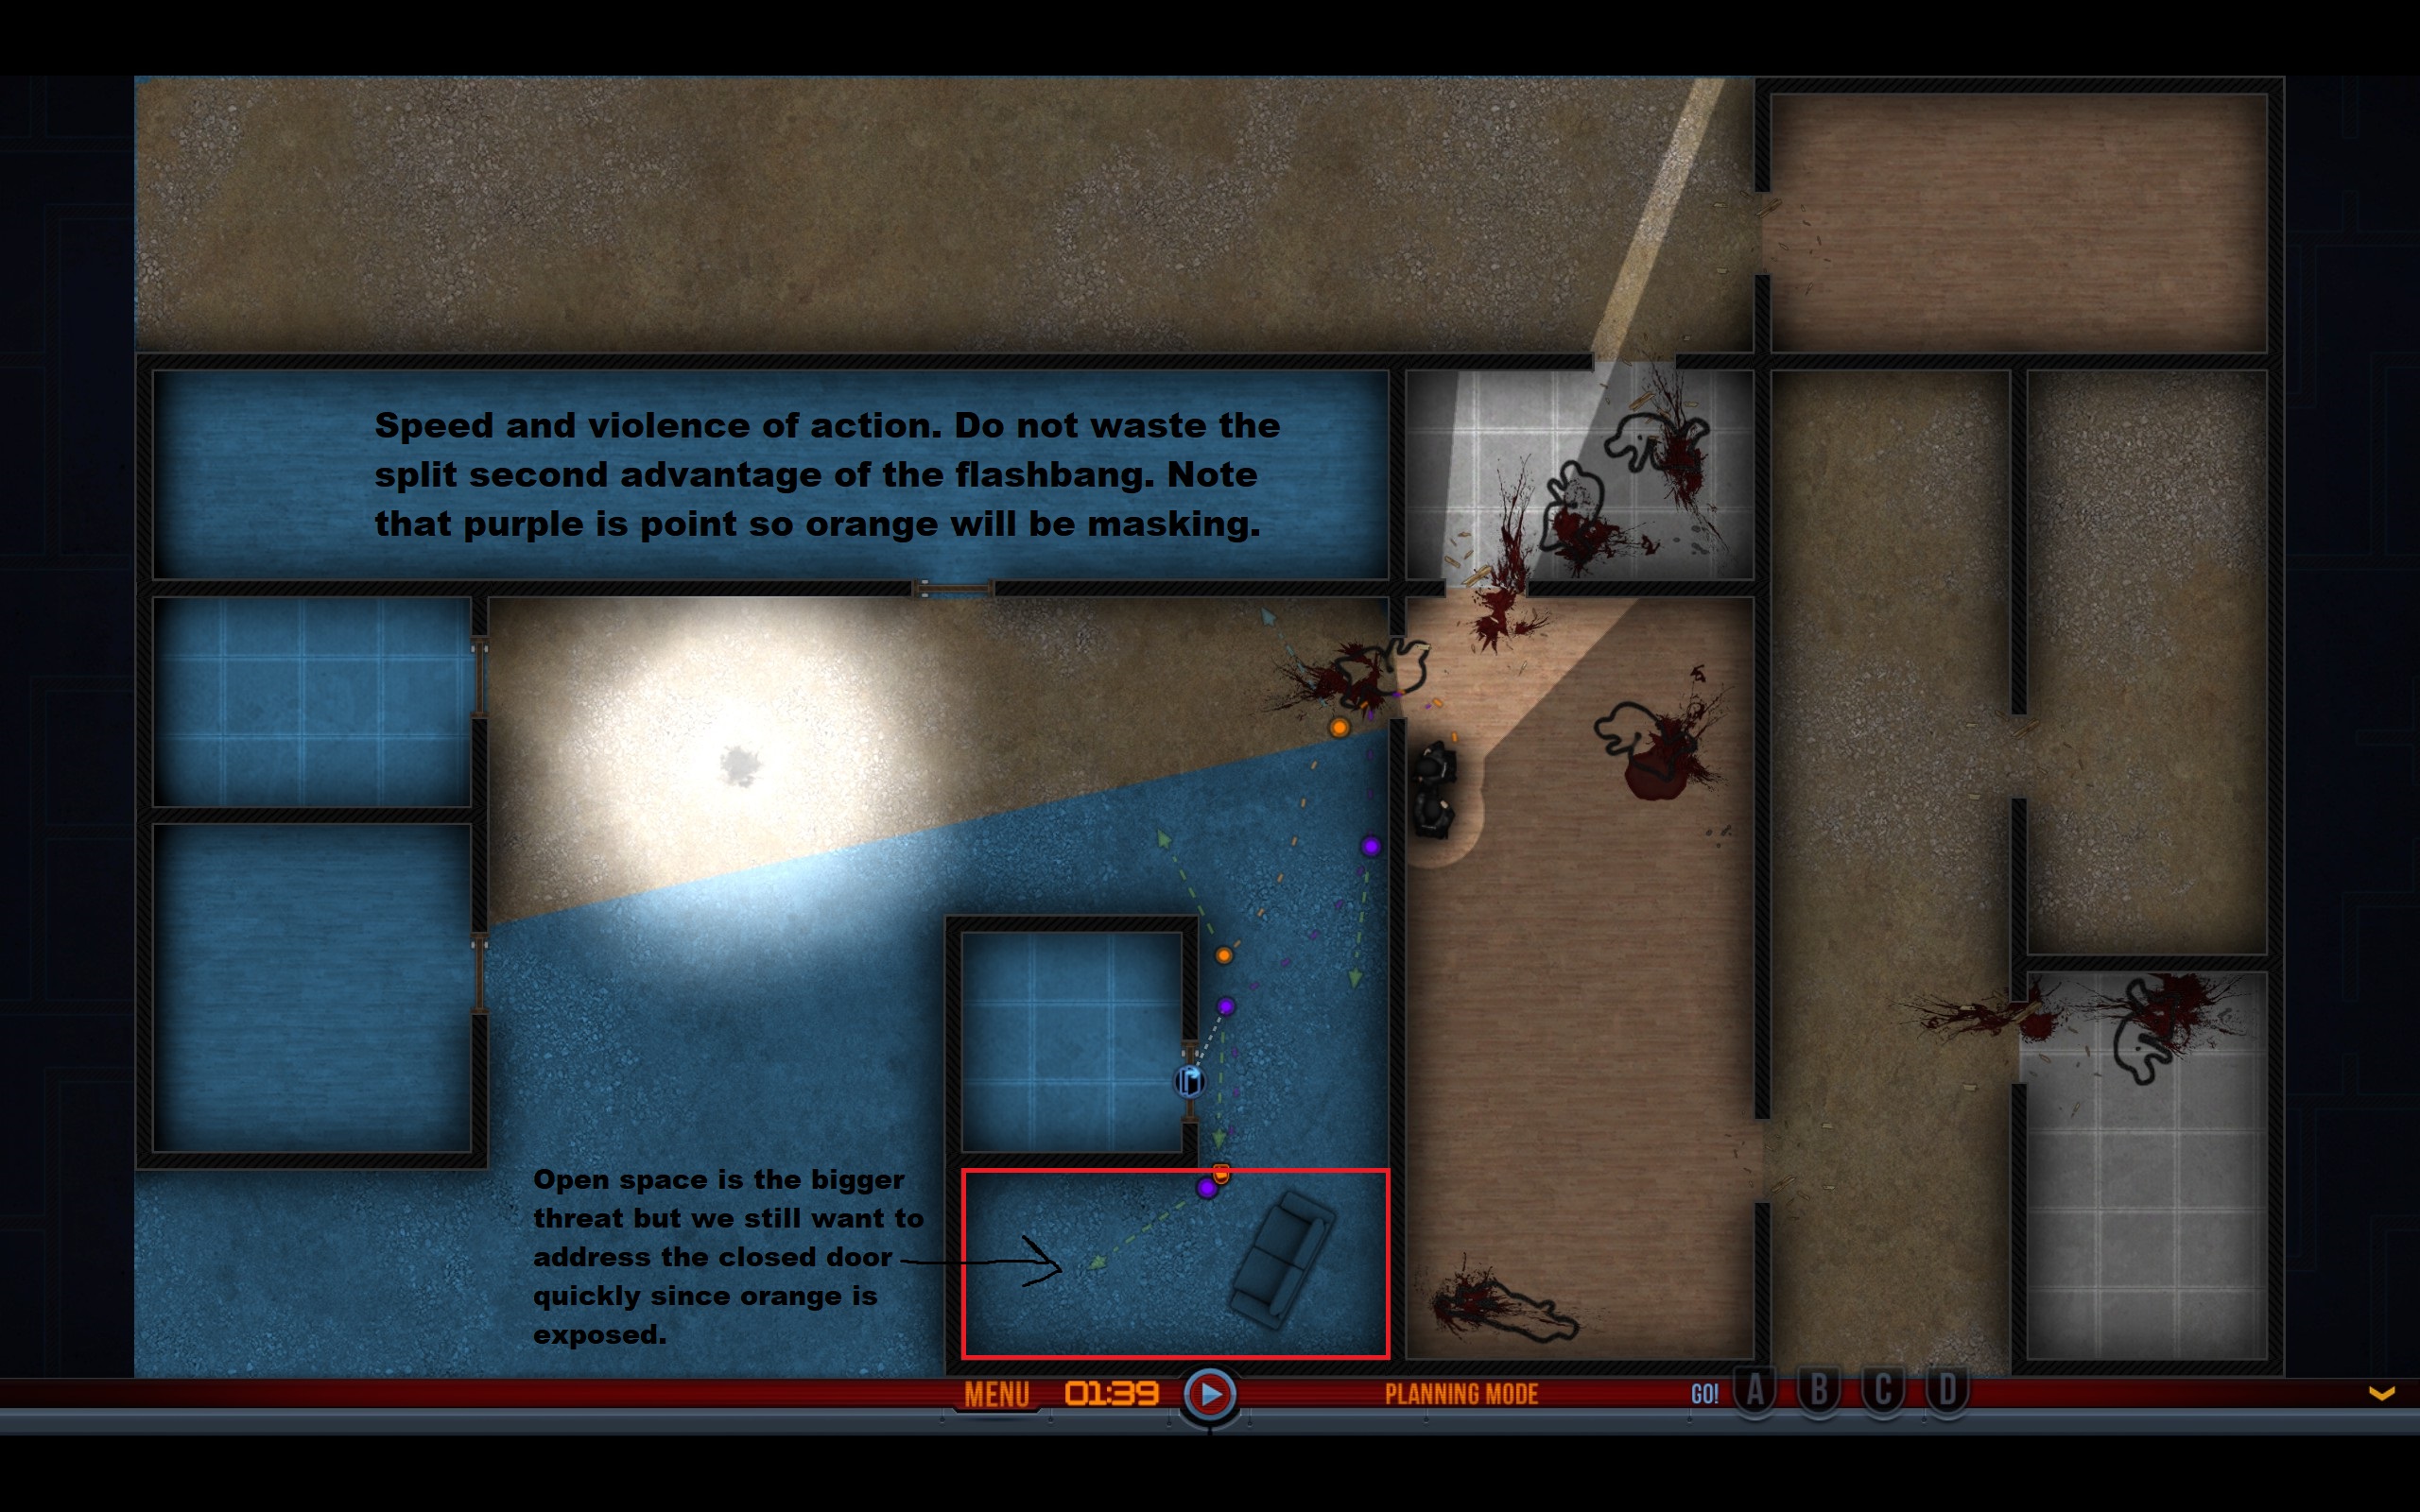
As a little side note I think it'd be good to mention that, unlike the previous guide, the operators here are not using pistols as primary weapon (MP5s by the look of it?) which lets them handle open spaces without heavy use of other equipment such as flashbangs and breaching charges.

Keep up the excellent work!
Manaco 28 Jul, 2020 @ 7:36pm 
Thanks for the guide. Very detailed. Looking forward to play coop with you and see those tactics on hands of a veteran of CQB :D
Sonny 5 Apr, 2020 @ 1:59am 
me2! Would be absolutely amazing! :D
DeathByBlue 4 Apr, 2020 @ 9:46pm 
I'll be looking forward to it!
Galco  [author] 4 Apr, 2020 @ 9:16pm 
Hey guys. Looks like I'm gonna have some free time soon.. maybe I should make the next guide :)
DeathByBlue 4 Apr, 2020 @ 7:20pm 
I second Sonny's question