The Fall of the Dungeon Guardians

The Fall of the Dungeon Guardians

158 ratings
Combat Basics, Party Composition, Walkthrough, Maps
By Sehkter
Complete guide that features tips for beginners, annotated maps for every level and detailed instructions for the difficult achievements.
2
8
   
Award
Favorite
Favorited
Unfavorite
Combat Basics
Targeting

When combat is engaged, you need to select a target. Party members who do NOT have a target will have an EYEBALL ICON on their portrait and won't do anything. Most of the time, this is a bad thing. You should give everyone a target. To do so, select one or more of your characters and right click an enemy.

To select a single party member, you can left click their portrait. To select more than one, you use right click instead. Right clicking will add or remove characters from the selection. You can tell who is selected by the golden fringes on the corners of their portraits.

In the case where a group of enemies is facing you, you don't need to target one in the front. Everyone, ranged or melee, can target enemies in the back. As far as I can tell, ranged attack are only for hitting targets that aren't in an adjacent map square. If you are having difficulty targeting the back row of enemies, use the TAB key to cycle through all available targets.

Speaking of squares and their adjacency, the "square dancing" that exists in some other dungeon crawlers doesn't work quite as well in this game. Enemies will usually immediately follow you when you move and continue attacking without missing a beat. Moving in combat should generally only be done to avoid being flanked or surrounded, to dodge nasty abilities that will be specified in the walkthrough, or to plain old just run away until the enemies stop chasing. Note that the enemies you run from will be healed when you reengage them later.


Abilities

Having a target is well and good, but that'll only have your characters use their auto weapon attacks. If you want to make combat faster and more fun, you'll need to use abilities. Abilities are the icons at the bottom of the screen next to your party members' portraits. Each ability has its own cooldown (some share cooldowns, but these special cases are always indicated in the ability tooltips).

There are two types of abilities: instant abilities which work immediately when used and normal abilities which can been QUEUED and have a casting or channeling time during which they can be INTERRUPTED. Once a normal ability has been used, the GLOBAL COOLDOWN of 6 seconds kicks in, during which your character cannot use normal abilities. Normal abilities cooldowns are usually longer than the global cooldown, forcing you to wait or use other abilities in the meantime before they can be used again.

To summarize, instant abilities have a (usually long) cooldown but no casting or channeling time and work immediately. Normal abilities have casting or channeling time during which they can potentially be interrupted and they trigger a global cooldown of 6 second after their use.


Queue

What's the queue? The order of normal abilities you want a character to use as soon as cooldowns allow. To use it, simply left click on multiple ability icons, or the same more than once. Right click on queued abilities' icons to remove them from the queue. Remember that you cannot queue instant abilities as they will be used immediately even if the game is paused. Watch what you click!


Interrupts

What can interrupt? Your tank's Kick (for warrior protectors) or Pommel (for rogue duelists). Note that some abilities cannot be interrupted. You can tell by the chains on the enemy's action bar. Some enemy abilities can be DODGED by moving away from them. You can tell by the nails at either ends of their action bar. The following screenshot shows an ability that is uninterruptible (chains) but can be dodged (nails):


Generally it is best to wait until the very last moment before interrupting to waste more of the enemy's time, but some channeling abilities you'll want to interrupt immediately, such as Life Drain.

Enemies have some interrupting abilities too. A red X will appear on a character's portrait when they are interrupted. How can you tell what an ability will do? PAUSE the game and put your cursor on the enemy action bar. You'll get a detailed description of the ability being used. Enemy abilities that STUN will apply broken glass effect over their targets' portraits and will also interrupt them.


Aggro

Aggro is simply the enemies' aggressive intentions toward one or more of your characters. You wish to manipulate it toward the character that can handle sustained punishment (the tank) and away from those who can't (everyone else).

You can tell if a character drew aggro and is currently under attack when their portrait has a red border. You can also tell who's about to draw aggro by an orange border. Those who are about to lose aggro have their border colored yellow.

So what determines aggro? Threat. How does threat work? Here's a list straight from the official site[www.managames.com] (unedited)

Originally posted by ManuTOO:
  • 1 damage point = 1 threat point against the damaged enemy
  • 1 healed point = 0.4 threat points against all surrounding enemies
  • the tank has abilities that multiply the threat generated by each damage point (eg: Thunder Clap)
  • threat levels of each enemy constantly goes down slowly
  • each enemy attacks the character with the highest threat against him
  • enemies can’t change of target while they are preparing their attack, except if the tank taunt them
  • enemies can’t willingly change of target less than 2 seconds after their last target assignation

So in short, the tank still needs a weapon with respectable DPS if they want to reliably keep aggro on themselves since their threatening abilities use a multiplier of their DPS. You also want your damage dealers not to use all of their most damaging abilities in quick succession or you might have trouble keeping them alive.

Note that at any time, you can see the threat score of each of your characters on a particular enemy by putting your mouse cursor over that enemy.


Putting It all Together

The space bar is your best friend. Use it frequently to pause the game. Always pay attention to what enemies are doing and react accordingly. Queue some abilities but always be ready to change them as needed.

Read the tooltips. This game is fairly verbose and thorough. There aren't any mystery mechanics at work in the background. Everything is up front.

To open hostilities you should have your tank draw aggro with Sweeping Blow or Thunder Clap before letting your damage dealers and healer do their thing. If you see the threat score of anyone but the tank starting to rise dangerously, you might have to clear their queue and swap in some less damaging abilities, or even use a taunt or other aggro manipulating ability.

Survival is the name of the game, because the DPS of a corpse is 0. You want to stretch the tank's life for as long as possible, and to do that the healer will likely have to draw aggro at some point by shielding or healing, not to mention the aggro your damage dealers will draw. Is your tank losing health faster than he's being healed? Then you might have to purposely draw aggro off them to give them some breathing room, but not for too long because damage dealers and healers are squishy.

It's a fine balancing act and a lot of judgment calls will have to be made. You might frequently be incorrect at first but you will eventually get the hang of it. And if it's too hard and you're not having fun, you can drop the difficulty at any time.
Party Composition
Difficulty greatly influences whether your party and combat approach will work or not. On the lowest ranks, pretty much anything works as long as you have a tank, a healer and 2 damage dealers. On the higher ones, you have less leeway.

To increase the odds of getting favorable loot drops, you shouldn't mix warriors with rogues in the same party. The game won't drop loots no one can use, so you can tighten the item pool this way. No warrior means no plate equipment, and no rogue means no leather stuff. You can't make an all-rogue or all-warrior party however, since you really need a healer.


Respeccing

You can't change the base class (warrior, rogue, healer, mage) but you CAN change specialty. A necromancer into a druid? No problem! Your mage is heavy on fire damage and the upcoming boss is resistant to it? Respec to something else!

How do you do it? Open the Talent menu and click the dice at the top of the screen. All your talent points will be refunded, even your specialty. You can do this once at level 1 and once more every 4 level thereafter. Oblivion stones also grant extra opportunities to respec. You will find several of them along the way while doing the Treasure Hunt. These opportunities to respec are called "reroll points" in the game.

A nice thing about respecing is that nothing is set in stone until you hit the checkmark to confirm the new talent distribution. Changed your mind? Just cancel and you'll keep your reroll point.


Tank

You have the choice between a warrior protector and a rogue duelist. The protector has more health, armor and block (but block isn't very good) whereas the duelist has higher parry and dodge (higher chance of taking NO damage). The duelist gains an ability to self heal at level 9 (Recovery In Blood) whereas the protector has none unless he dips very deep into the paladin tree. The protector is more consistent and, importantly, has an extra taunt, but with some luck the duelist can survive what no one should be able to survive. The choice of tank will come down to who you want as a first damage dealer, paladin or (wo)man-at-arms vs. ranger or assassin.

On higher difficulties, the damage sustained by the tank will frequently outpace the healing your healer can provide, guaranteeing the death of the tank if the battle isn't ended quickly. Having a "secondary tank" that can draw aggro as your first damage dealer to relieve some pressure is very helpful. The paladin is ideal in this role as the specialty has the aggro drawing ability Divine Punishment from level 1, as well as the ability to reduce threat by 75% as soon as level 2. The ranger gets a taunt, Warning Shot, at level 5, the ability to completely drop aggro with Play Possum at level 8 and the ability to redirect 40% of the threat they generate toward another party member with Sidetrack at level 10.


Damage Dealers

First damage dealer: The choice is between paladin and ranger. As previously mentioned, the paladin gets his aggro abilities early while the ranger has better ones, but gets them much later.

Second damage dealer: I would use a mage. While you can go without one, most warrior and rogue abilities are physical damage, and enemies with physical damage resistance (i.e. armor%) are quite common.


Healer

The necromancer's primary healing ability is such a cool concept. Use damage dealt to the enemy to heal someone, it's perfect! Except... that's an offensive ability. Which means it can miss, just like any other offensive ability. And if it misses, it won't heal. And a tank who's not being healed is going to be very, very sad.

I would go with either a druid or a priest(ess), depending what you prefer between healing over time vs. shielding and direct healing. I've had success on crusader difficulty with a pure druid, a pure priest and a hybrid of the two, so you really can't go wrong here. If you do go with a necromancer, prioritize chance to hit on gear.


Party Recommendation

The first party I beat the game with on crusader difficulty: Protector, paladin, priest, arcanist.

The early game is rough since you don't have a lot of options so having the paladin's aggro management right off the bat helped the tank survive more easily. I respecced him often but he was usually mostly a man-at-arms with 2 points in the paladin tree for Divine Punishment and Celestial Blindness.

The protector was never respecced and all points went into his own tree. I picked the talents that made him tankier as well as his second taunt, Rage Yell, at level 5. If you're having poor luck finding a good tank weapon (stamina and dodge or parry) with high DPS, you should spend points on the Improved Thunder Clap talent.

From the start, the priest was specced Righteous Shield, then was specced out of it specifically for the Level 7 arena fight. Immediately after that, he was respecced back to Righteous Shield, then later in the game when I felt that Righteous Shield wasn't all that great anymore, I respecced him one last time to everything that wasn't a Righteous Shield talent. The last few points went into the druid tree, but for most of the game he was a pure priest.

The arcanist provided great party support with Arcane Lock, Arcane Armor and Arcane Focus while still contributing as a damage dealer with the excellent single target DPS of Arcane Rupture. He was respecced to elementalist/warlock specifically for the Level 7 arena fight, but for the rest of the game he was a pure arcanist. Last few points before hitting level 20 were spent in the warlock tree to skill Piercing Curse and allow his Arcane Rupture to crit.
Choosing Gear
Throughout this section, always remember that more survivability equals more DPS in the long run, because the DPS of a corpse is 0. That being said, I wouldn't sacrifice a bunch of offensive stats just for +1 stamina. Use your judgment, but when unsure err on the side of safety.

Attributes don't boost their associated stats by that much. If you want to increase your parry score, for example, it's far more effective to equip gear that boosts parry directly than gear that boosts strength. There's no gear that increases health and mana directly, so if you need more of those, you'll have to equip stamina and willpower boosting gear, respectively. There is also no gear that directly increases resistances, but willpower increases them by such a pitiful amount that you're better off just stacking more stamina for more health instead.


Hit Chance Bonus

The most important offensive stat in the game. Your big bad ability might do 100 damage, but it has to connect first. If it doesn't, it does 0 damage. This means that every class but the druid and priest(ess) wants hit chance bonus. Fortunately you don't need a huge amount of it to get close to 100%, but keep in mind the amount you need increases with every level up.


Haste

Haste makes everything faster except ability cooldowns. This includes auto attacks, casting and channeling times of abilities, the 6 second global cooldown between normal abilities and the tick rate of damage over time and healing over time abilities.

For warriors and rogues, haste is a no-brainer because it has no downside. Healers and mages will see their mana consumption increase, however. I personally never bothered with haste on mages and healers.

Haste is generally more beneficial to characters with big slow attacks and long casting times like rangers and (wo)men-at-arms with two-handed weapons, and less so to, say, an assassin dual wielding daggers.


Critical Chance

Critical chance is great, even over time abilities can have ticks that crit with the appropriate talents (druid's Acute Persistence for healing, a 5 point investment and warlock's Piercing Curse for damage, a 4 or 5 point investment). A good priority to have once you have enough hit chance bonus.


Strength, Agility, Awareness, Willpower

But what about the main "power" attributes, strength for warriors, agility for rogues and awareness for healers and mages? They're important, for attack power and spell power if nothing else, but the thing is, they're the most common thing you'll find on the gear you'll want to equip anyway. You'll get plenty of your "main attribute" without having to go out of your way for it.

Willpower is useless to warriors (yes, even paladins) and rogues. Healers and Mages should try to keep a ~2 to 5 Willpower to Awareness ratio to avoid frequently running out of mana.


Stamina

Even the healer and damage dealers need some stamina, because eventually they'll be hit by AoE attacks if nothing else and it'd be nice if they had enough health not to die instantly. It's hard to say how much you need because it varies by party composition and how far into the game you are, but try to get a little more on everyone whenever you can. Gauge the survivability of every character and adjust accordingly.


Tank

You'll want to prioritize dodge and parry foremost, followed by armor and stamina. After that, these previous, more important things being equal, I would consider hit chance bonus since the aggro drawing abilities have to hit after all (although melee AoE never misses, as per ManuTOO) and maybe strength for a protector or agility for a duelist, if it comes to that.

Be aware that parry and dodge have diminishing returns, so to be optimally efficient you'll want to stack both in equal measure.


Weapon DPS and Weapon Base Damage

Weapon DPS is extremely important for warriors and rogues, and almost not important at all for mages and healers. It's OK for a warrior or rogue to equip a weapon with worse stats if it's an appreciable DPS boost since almost all their abilities are weapon based.

Some warrior and rogue abilities have their damage based on the weapon damage instead of attack power. This means that, given two weapons of similar DPS, you'll want to use the weapon with higher base damage as opposed to the weaker, but faster one. Similarly there are abilities whose damage is based on attack power and cooldown is based on the weapon speed. In this case you'll want to use a faster weapon. Read the tooltips of the abilities you're using and choose your weapon(s) accordingly.


Dual Wielding

Be careful when dual wielding. The penalty to the chance to hit is significant but can be overcome with enough hit chance bonus from gear. This makes gearing an assassin or dual wielding (wo)man-at-arms difficult but not impossible. Just something to keep in mind.
Advanced Concepts
If you are playing on the lower difficulties, you don't really need to know any of this stuff. If, on the other hand, you're trying to play on crusader difficulty, it's highly recommended you read this section.


Rotating Aggro

When your tank is getting hurt faster than you can heal, you'll need to deliberately shift aggro to another character so they don't die. Rangers can do this easily with Warning Shot, a taunt. Paladins have Divine Punishment which is a highly threatening ability that should draw aggro after the target enemy's current action finishes. Other specializations don't really have anything for this.

Un-queue your tank's aggro drawing abilities to let aggro stick on the "secondary tank" for a few rounds of uninterrupted healing, then just re-queue those abilities and use a taunt to get the heat back on your tank. During the fight, if there's an opportunity to heal the secondary tank (for instance after the tank dodges or parries a few times), do so. You'll be able to rotate aggro again later down the line, if necessary.

That's the gist of rotating aggro.


Loot Drop Manipulation

Let me preface this subsection with You don't have to do this, even on crusader difficulty.

The type and statistics of an enemy dropped item are determined when they die. If you quicksave a couple of seconds before the last one dies, you'll be able to change what drops by just reloading the game.

NOTE: you can't use the quickload key for this because it will load the autosave that was created when the last enemy died. You will have to manually load the top quicksave in the load game menu.

Drops follow a cycle. The game will drop one item appropriate for each of a character's slots, for every character, before resetting the pool and starting over. Some item types, specifically weapons and chest armor, are significantly better when they're of rare quality instead of superior, compared to say a cloak. If, for example, an ordinary mob drops a bad DPS weapon, you might want to reload and have it drop something else so that the DPS weapon stays in the pool for when you're going to be killing elites and the boss and hopefully get a better, rare weapon instead.

Again, You don't have to do this, but if you want to make the game a bit easier, it's an option. Personally, I found that reloading the game a bunch of times after every fight got boring, fast.
Walkthrough
This is just a grocery list of tips and miscellaneous stuff before the Level sections.

- Increase the gamma in the video options. The game is very dark in some places and, except for one level, there is no way to generate light to see better.

- Turn on the 'Highlight Items' helper. Small items are basically invisible in the dark without it. Very occasionally the helper will fail to mark an item, but stepping away from it will fix it.

- Gates, doors and walls that have a button, lock or lever to open them next to or on them aren't marked otherwise the maps would be too difficult to read.

- For the same reason as mentioned above, potions, food and items of lesser quality than epic are not marked. Keep your eyes peeled or you might overlook many of them.

- Speaking of food, it isn't terribly useful. But early in the game when your regeneration is slow, it can save you half a minute of waiting for your health and mana to refill. There's no need to hoard it, however.

- Keep looking slightly downward. Small items and potions tend to hide on the floor or inside small, low openings in the walls. Never near the ceiling.

- Items with no obvious uses that should be kept are marked on the maps and mentioned in their level's section.

- There is a carrying weight limit in this game which will slow your movement speed down when exceeded and there's absolutely no point in holding on to something you'll never wear again. You can't sell it, you can't break it down for parts, you can't improve it later. Throw away obsolete equipment.

- All levels that require throwing or placing rocks for completion will provide enough of them to do so. However, the same doesn't apply to secrets and the Treasure Hunt. It's recommended to keep a few rocks handy.

- ALWAYS save before throwing rocks or placing Treasure Hunt notes in case something goes horribly wrong.

- This guide was written with high difficulty in mind. All the advice still applies to lower difficulties, however the game is much more forgiving and many of the more elaborate combat strategies are not necessary at all. Feel free to adjust the difficulty to whatever you find fun.

- The boss of a few levels can be fought very early, but clearing as much of the level as possible before fighting them usually is the better option. More mobs and more areas explored mean more XP and more loot.

- For sequences with tight timing (usually Puzzle Rooms), it's good to know that you can activate buttons and levers while the game is paused. You can turn by holding right-click and moving the mouse when paused as well. If you're running slow it's because you're overburdened! Throw some junk away.
Level 1


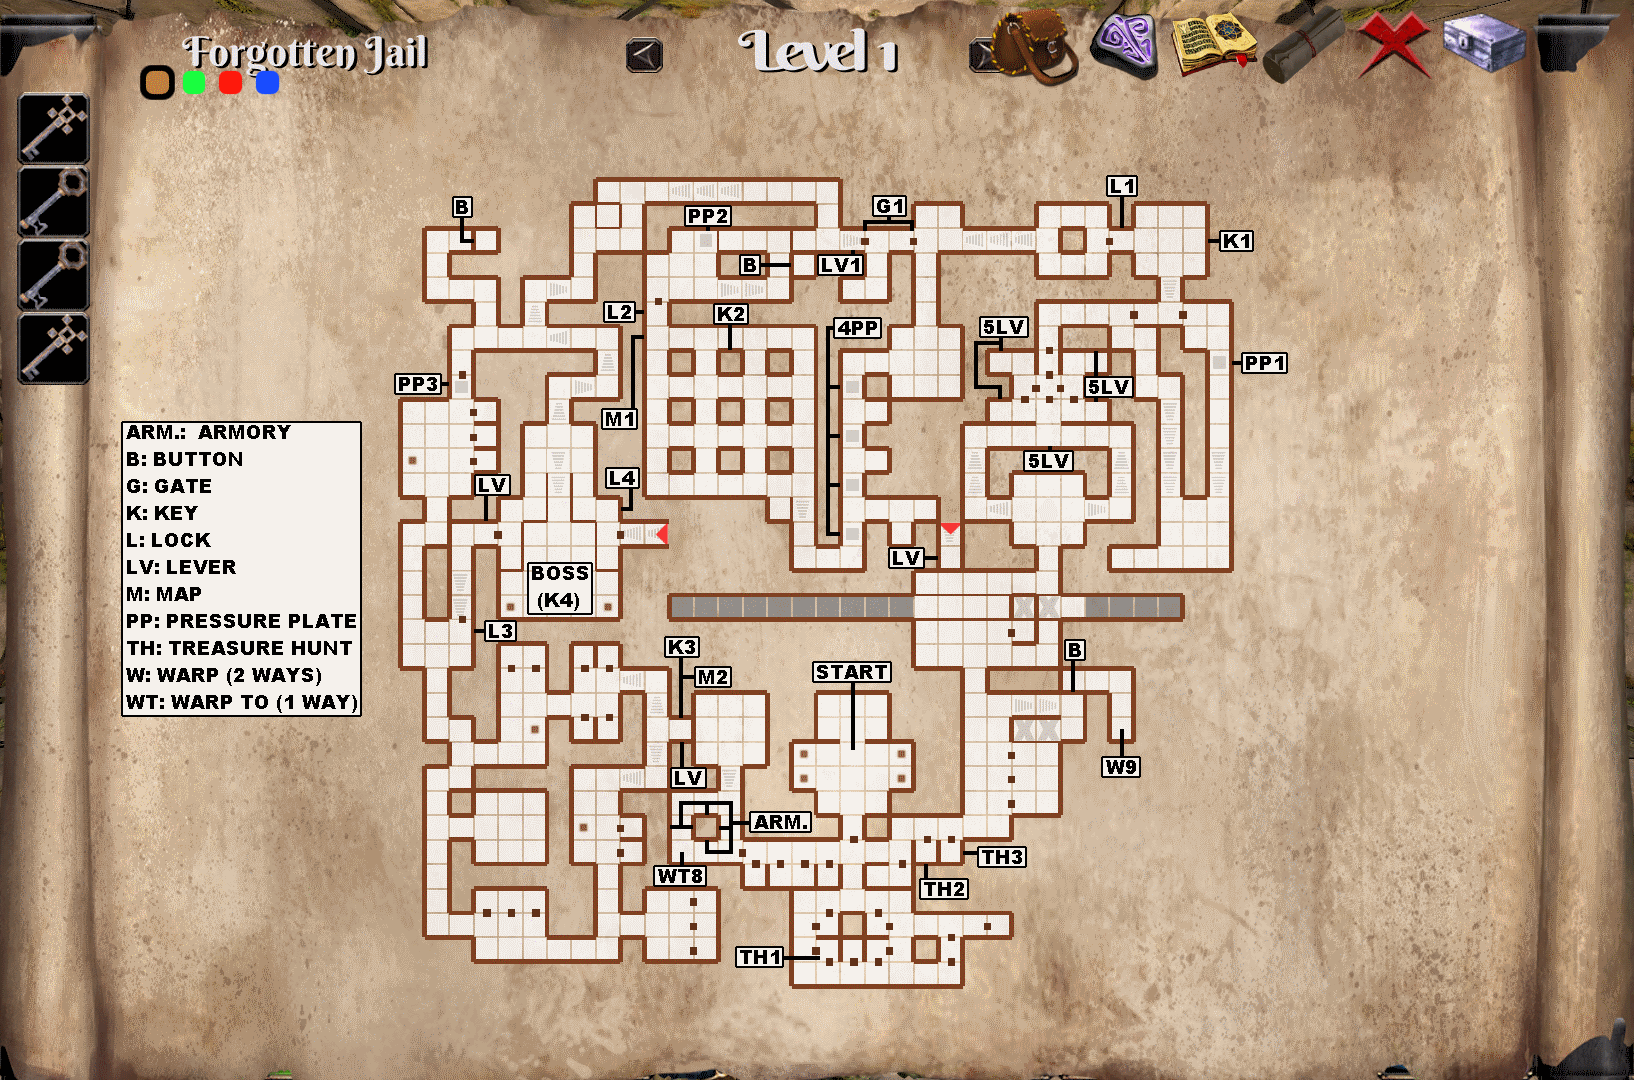
The armory (ARM.) contains 4 awful swords that are actually part of a puzzle. You can place them in the 4 holders around the center square of the room. To complete the puzzle, you'll need a 5th awful sword that you'll get much, much later in the game. You actually don't need the first 4 awful swords at all, just the 5th one that you get later.

The room with 5 levers (5LV) isn't a puzzle room. Just lower all 5 of them and move on to the next room.

The pressure plate at (PP1) requires constant pressure to keep the nearby gates it is linked to open. By the closest gate you'll find a stone you can use to weigh it down.

To avoid taking damage in the corridor with 4 pressure plates (4PP) and the fireball trap, do the following: Run past the 1st pressure plate and move left to avoid the fireball. Do the same for the 2nd pressure plate. For the 3rd one, from the square behind the plate, place a rock on the pressure plate and move left to dodge the fireball. It will then be safe to move over the plate as it is weighed down by the rock and the trap will not fire again. Do the same thing for the 4th and last pressure plate.

The pressure plate at (PP2) does not need to be weighed down. It's on a timer. After stepping on it, wait for the trapdoor to close before walking on it and waiting for the next one to close, and so on until you're across the gap.

The lever at (LV1) raises the 2 gates labeled (G1) which opens a shortcut around the (4PP) fireball trap corridor in case you want to backtrack.

To open the gate blocking the way to the (PP3) pressure plate, place a rock through the grate on it.


Boss

Easy fight, it's the first level after all. His big combo is Stunning Light followed by Monumental Swipe. If you interrupt Stunning Light, you'll be able to dodge Monumental Swipe by simply stepping away from him.

This boss fight is the first and best opportunity to earn the WHO'S THE BOSS NOW ? (no pausing) and I LOVE IT WHEN A PLAN COMES TOGETHER achievements. For the sake of your sanity, I suggest attempting them separately (make a hard save before the fight).

There's not a lot to say about the first achievement. Just fight him as you normally would except don't pause. Don't be afraid to use all your potions because you're going to be reloading anyway.

The second achievement will take several attempts even with the proper setup. When the boss is starting to get low, have your tank stop drawing aggro and let him beat up and eventually KO your party except your tank who should have the most health and armor. When he's almost dead, order your tank to stop attacking and let the boss chip away at your tank's health. When it drops below 5%, immediately pause and order your tank to make one last attack to kill him. There's quite a bit of luck involved here, hence why you're trying this with the character with the most health and armor.


Treasure Hunt

Take the 'bench' note through the bars at (TH1) and place it on the bench at (TH2). After the nearby gate opens, take the 'alcove' note at (TH3).


Armory revisited

When you return with the 5th awful sword, place it in the holder on the western wall. If you placed the other 4 swords around the middle square of the room, A one-way warp (WT8) to a previously inaccessible part of Level 8 will appear. Refer to section Level 8, subsection Cave Entrance Revisited.
Level 2


This is theoretically the first level you can earn the THIS IS SPARTA ! achievement but your chance of doing so is close to 0%. When moving through the level, it's almost impossible not to aggro mobs that are unreachable because they're on the upper floor or on the wrong side of a grate.

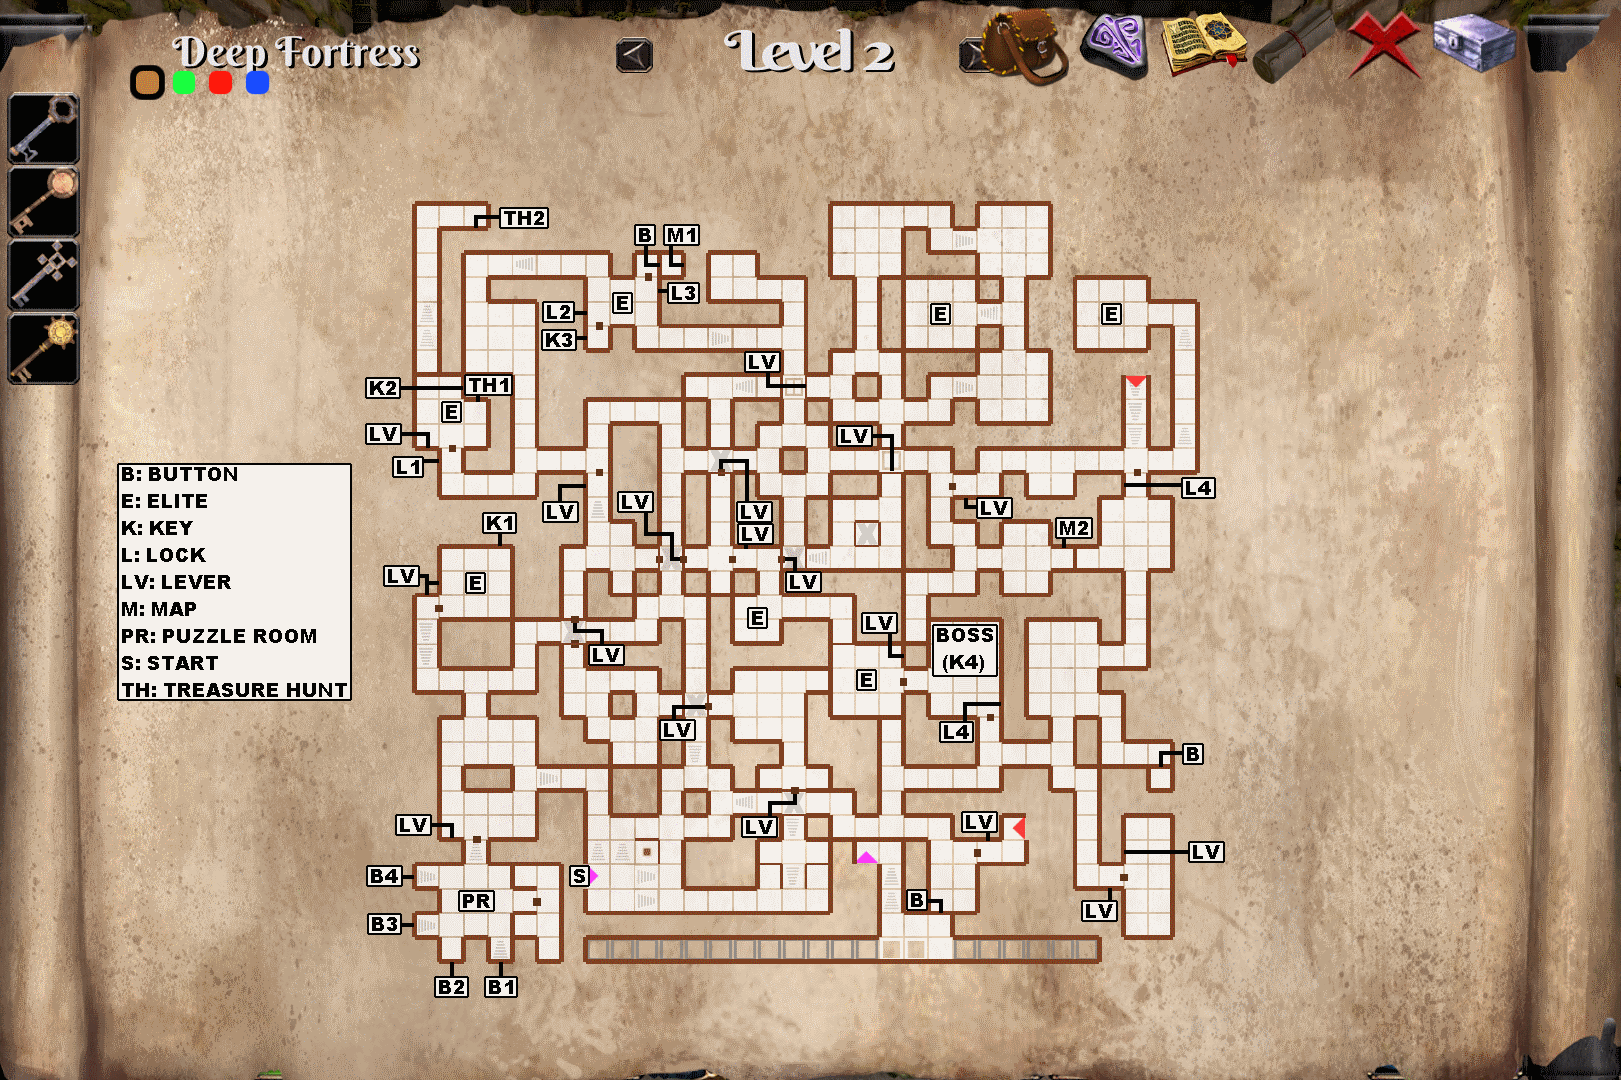
There are 8 levers to flip on the lower floor to fully open the upper floor path to the boss. Giving, and more importantly, following directions for them would be quite difficult given all the mobs roaming the map and the winding nature of the corridors. Your best bet to avoid getting lost is to beeline to the 2 maps and whenever you hit a gate or open trapdoor on the upper floor, look at the map to see where you are, drop down to the lower floor and find your way to the closed gate or open trapdoor blocking your path. The lever to open the way is always directly below them.

The first thing you should do is head to the puzzle room and get the loot. After that it wouldn't be a bad idea to scour the lower floor for mobs to kill for XP and hopefully some loot. The (M1) map requires you to fight through 3 elite Evil Watchers, but not (M2).


Puzzle Room

Press the 4 buttons in the correct order to open the storeroom. It contains equipment, not just food.

Hint: Examine the stairs leading to the buttons.

Solution: B2 B1 B4 B3. From the button with the least amount of steps leading to it to the one with the most.


Elites

Evil Watchers (6): They spam Firebolt which does a lot of damage as you'll have little to no fire resistance, so just interrupt it as often as you can. On higher difficulties you'll probably have to use a health potion on your tank for the first few fights. Your tank might even die but it's OK if the Watcher is close to death. Remember there is no penalty for characters who die in combat.

Consider approaching them when they have their back turned to get a free round of hits in and letting them attack a damage dealer once or twice before drawing aggro with your tank. You can also engage them in range combat and dodge their Firebolts by moving left or right just as they're casting them, if you don't mind cheesing a bit.

Skeleton Champion (1): I would interrupt Smash. You won't be able to do it every time but I think it's its deadliest attack. Significantly less dangerous than the Evil Watchers. It should be easy to earn the ELITE WITHOUT A PAUSE achievement fighting it.


Boss

A fairly straightforward fight. Other than Swing and Rip, he has a Veil of Shadow move that makes him reappear behind or beside you which he then immediately follows up with Backstab. Both moves are interruptible. Backstab can be interrupted by simply stepping away from him but watch out for its extremely fast casting speed. Since his special combo does no damage, I would probably use my interrupt for Rip.


Treasure Hunt

Put the 'alcove' note from Level 1 in the empty alcove at (TH1). At the end of the revealed secret passage, take the 'brazier' note (TH2).
Level 3


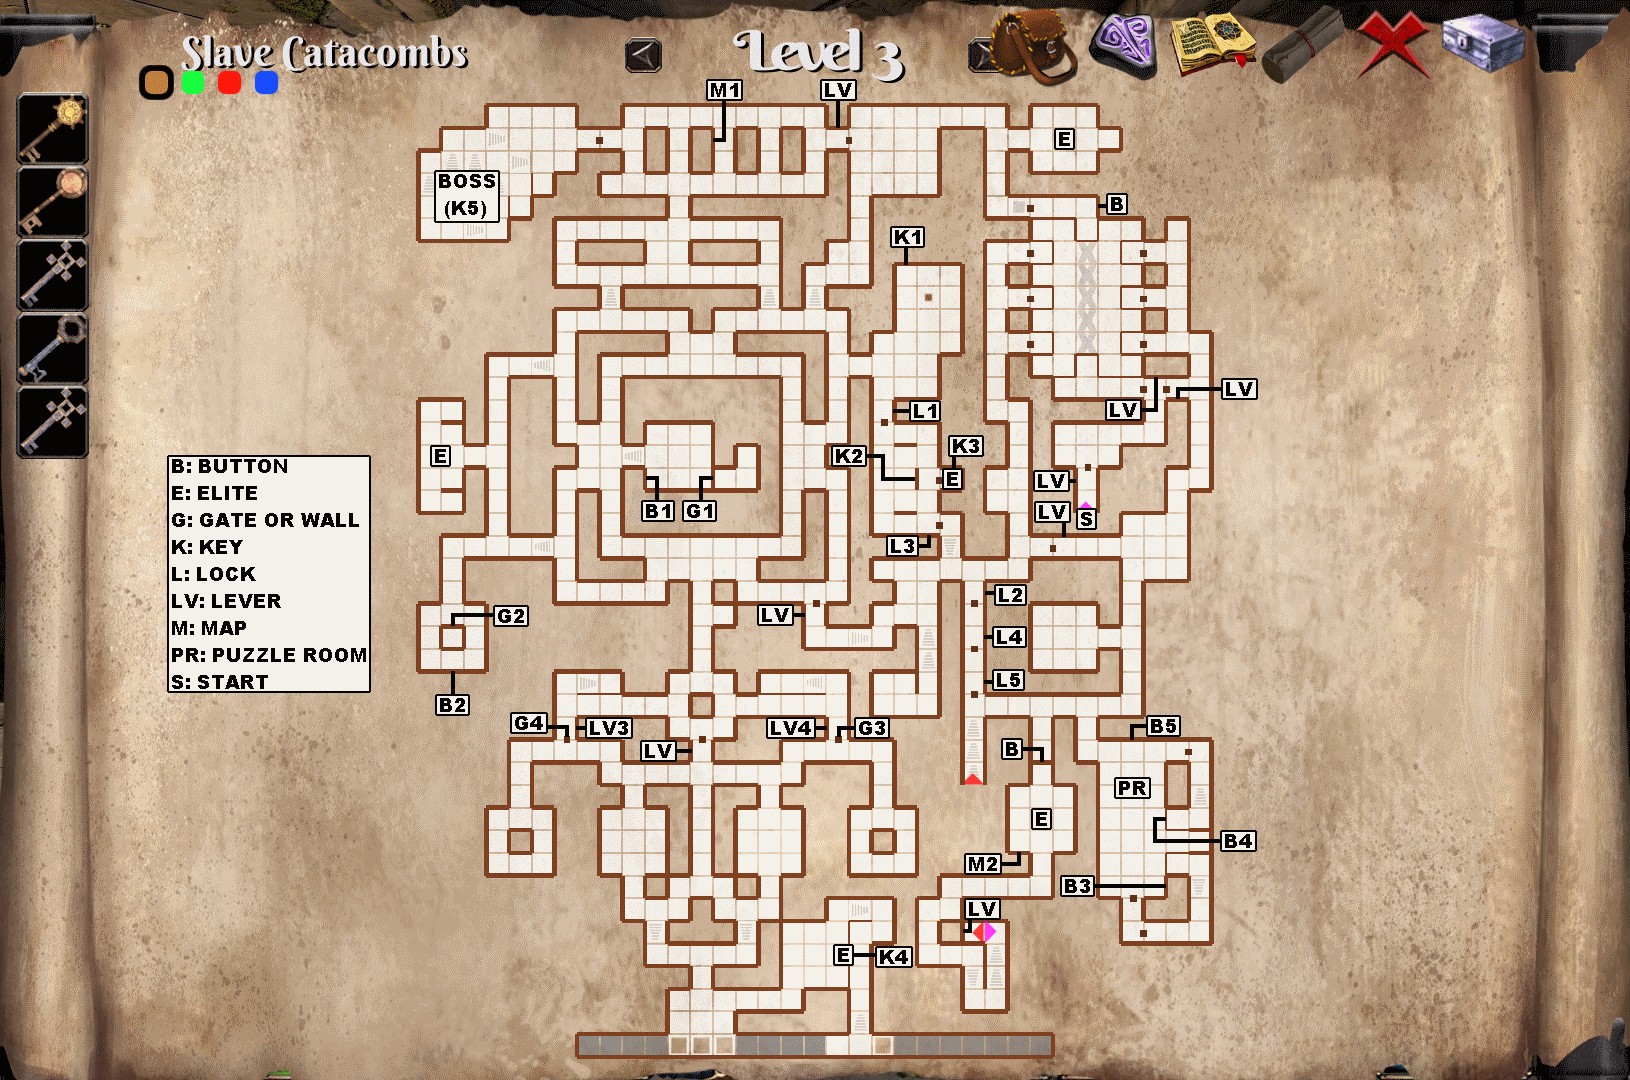
I earned the THIS IS SPARTA ! achievement on this floor. Apparently escaping the skeleton archer ambush at the beginning doesn't count as running away. Speaking of which, don't stop in that room. Just keep running. The pressure plate at the end will close the door behind you. The button inside the room is to open the door back up once you've cycled around the level.

Not a whole lot of direction to give here. You can get the first map very early and the level isn't a maze like the previous one, so finding your bearings should be easy. It's a matter of clearing as much of the floor as you can before hitting the elites and the boss.


Elites

Evil Watcher (2): Same as the last floor. Interrupt Firebolt as often as you can. You shouldn't have to use potions by now.

Skeleton Champions (2): They hit REALLY hard compared to the one on Level 2. Hold off fighting them until you hopefully find an armor upgrade for your tank. On higher difficulties, defeating them will still probably require rotating aggro, potion usage and some luck.

Spider Queen (1): Impale hits really hard but can be dodged, so save your interrupt for Poison Spit. The strategy is the same as the Skeleton Champions'. Rotate aggro to delay your tank's death for as long as possible and use potions if you must, but not too many because you still have a boss to fight.


Boss

The first boss with an uninterruptible ability: Minion Summoning. The first thing you should do after aggroing him is to run back to the room entrance so that you only fight one square of mobs at a time. The position at the room entrance is safe because you have your back to a closed door and walls on both sides. With only one side exposed, you can control the aggro of every mob attacking your party with Sweeping Blow or Thunder Clap.

When you're not flanked, the boss is surprisingly easy even on crusader difficulty. Just make sure to quickly kill the skeletons that add themselves to the boss's group to reduce the DPS coming your tank's way. Don't bother farming these skeletons. They give 0 XP and drop no loot. Other than Minion Summoning, the boss only uses Swing and Rip. Use your interrupt for Rip.


Puzzle Room

Hint: No clues for this one, just trial and error. Hit the 3 buttons in the correct order, avoid the fireballs and run through the gates before they close.

Solution: Face (B3) and pause the game. Click the button and hold the move left key, then unpause. As soon as you moved 2 squares to the left, pause the game again. You should have barely dodged a fireball coming from behind. If it hit you, try the sequence again.

Click (B4) and hold the back key then unpause. This will move you out of the way of a slow moving fireball coming from the left. Pause the game again. Turn to the left to face north and move all the way to the wall. There will be button (B5) in front of you. Pause the game and click it, then turn right to face a gate that is opening or just about to open, depending on how fast you were.

Unpause and run through the gate. Follow the path all the way to the loot. If you did everything perfectly you should have about 2-3 seconds of leeway to go through the final gate before it closes.

Level 4


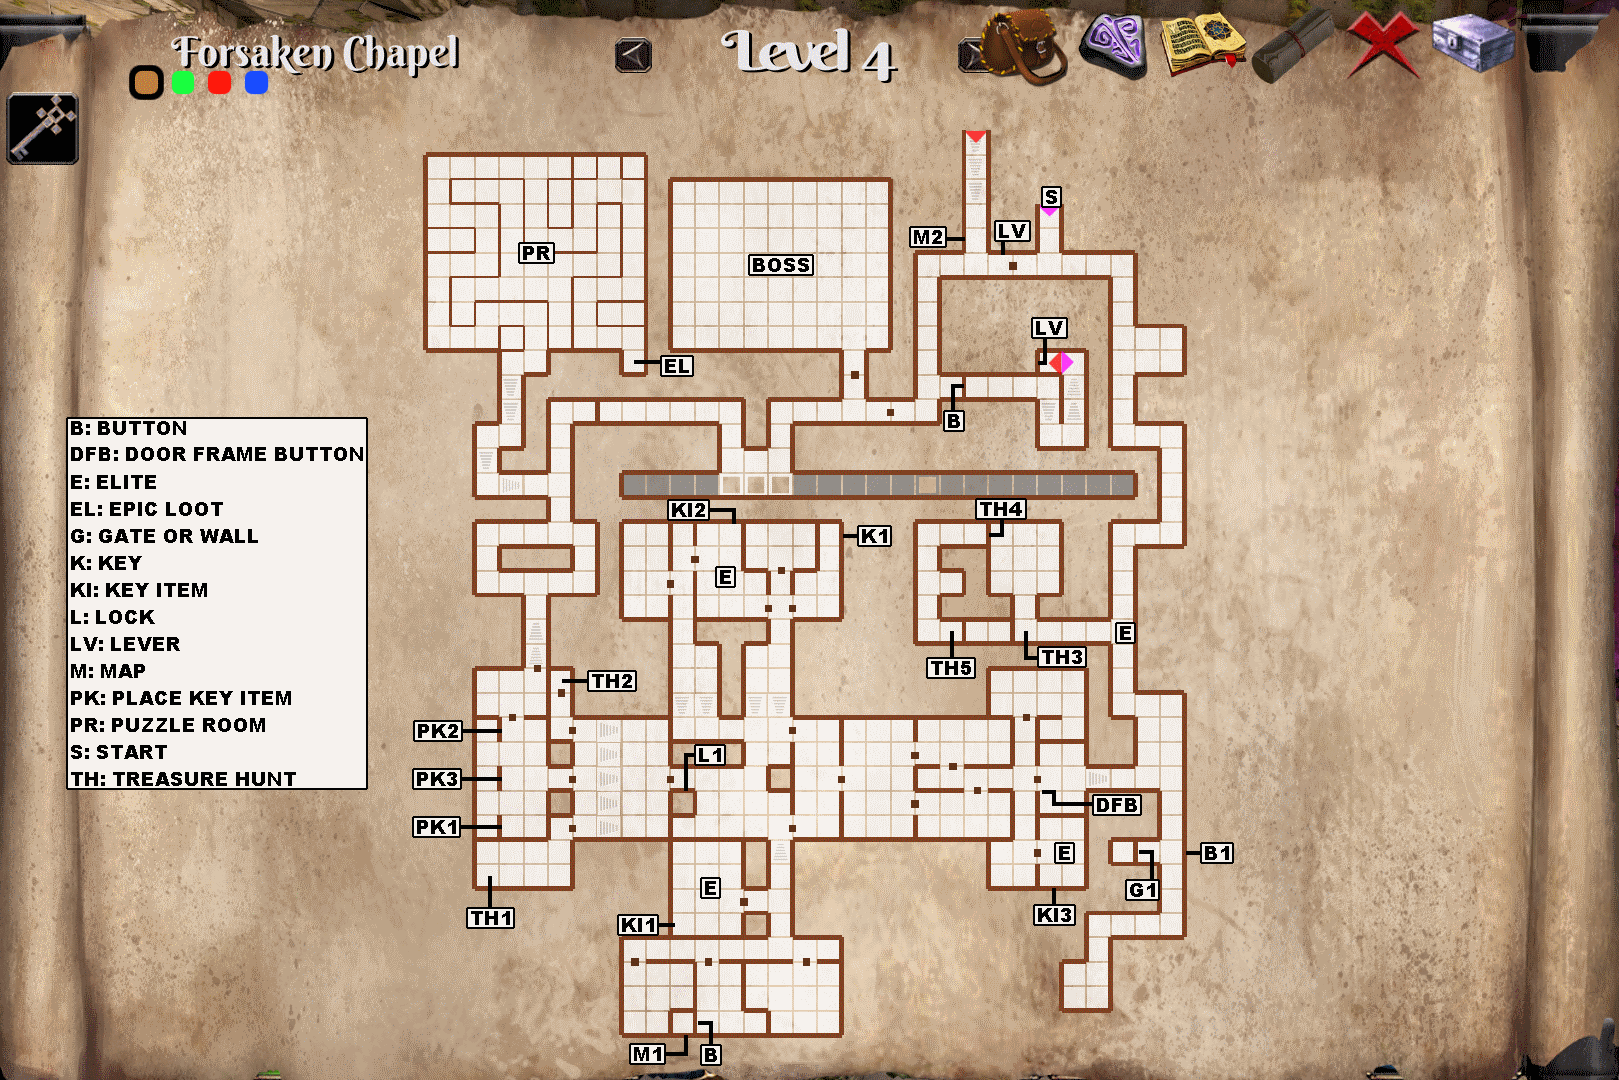
Straightforward level. You won't get lost here. All the doors on this level have a button on the left inside of the door frame, on both sides of the door. Only the first one (DFB) is marked on the map to draw attention to it. Since all other doors are the same, I decided not to clutter the map needlessly.


Elites

Evil Watchers (2): Back to being problematic like the first few on Level 2 were, the first one especially as you can't really run past it. You can sort of cheese it by dodging a Firebolt around a corner and backing away one more square so it hits the wall (If its square and yours are diagonally touching, projectiles will still hit you even though there's visually a wall corner in the way). This won't buy you a lot of time as it will follow you around the corner, but an extra healing cycle or two with no damage taken by your tank can be the difference between victory and defeat.

If you're fast and a bit lucky, you can dodge a Firebolt around a corner and move back to your previous position before the Evil Watcher has time to move, giving you another free dodge with that corner. It's also possible to engage it in a long range battle with auto-attacks and sidestep to dodge the Firebolts. If you immediately return to your previous position, there's a chance it won't move. Eventually it'll get in your face, but by then you should have weakened it enough to make a head-on fight not require the use of potions.

The 2nd one is guarding (KI1) in a 3x4 room, giving you plenty space to dodge Firebolts. It's a slow but sure way of winning without having to use potions.

Skeleton Champions (3): Hit like a truck and cannot be cheesed as far as I can tell. Delay the fights for as long as possible and use potions. While the first 2 guard 2 necessary puzzle items, (PI2) and (PI3), it's possible to outmaneuver them, grab the urns, run out of their room and close the door behind you. Doing so will let you loot the rest of the level and gain an extra level before facing them.

It's very easy to lure the 3rd one out of its room, go in and shut the door behind you, letting you place the 3 key items and move on to loot the fireball room.


Treasure Hunt

Place the 'brazier' note from Level 2 on the floor in front of the brazier at (TH1). Doing so will open the gate that was blocking the (TH2) square where you'll find a 'cascade of rocks' note. Pick it up.

Backtrack through the level all the way to (TH3). Placing the 'cascade of rocks' note on the floor at (TH3) in front of the blocked passage will open the wall at (TH4). Enter the passage and pick up the 'sun' note at (TH5).


Puzzle Room

This is the place where you can earn the THERE'S NO TRY achievement, the hardest one in the game. You have to run all the way to the loot and then back out without taking any damage.

If you don't care about the achievement, then there is no puzzle here. Go to the end, taking damage or not, and get the loot.

Hint: Make a hard save in front of the wall sign and use quicksaves a lot. If you ever take damage, reload. Restart from scratch if necessary. The general strategy is to move as fast as possible, pausing a lot to look around with right-click and moving the mouse to see if any fireballs are coming your way and only stopping if absolutely necessary. Once you reach the loot, don't pick it up! Instead, immediately run back out. Once you unlock the achievement, then you can return to loot.

Solution: A detailed solution for the THERE'S NO TRY achievement is in the Loose Ends section at the end of the guide.


Boss

The gimmick of this boss is, when it's casting Call of Darkness, to run to the purple cloud for 16 seconds of shadow protection. When it's casting Acid Fury, run to the green cloud for nature protection. You don't need to stay in the clouds, just touching them is enough.

It has a LOT of health, your healer and mage will need to use mana potions more than once. Other than the 2 previously mentioned uninterruptible abilities, all the boss does is Bite and Rip as long as you stay in melee range. If you run away, it'll shoot Lethal Fireballs at you. I would stay in melee range and use my interrupt on Rip. Bite doesn't do a lot of damage, but both are fairly weak all things considered. It will still be a long battle of attrition.
Level 5


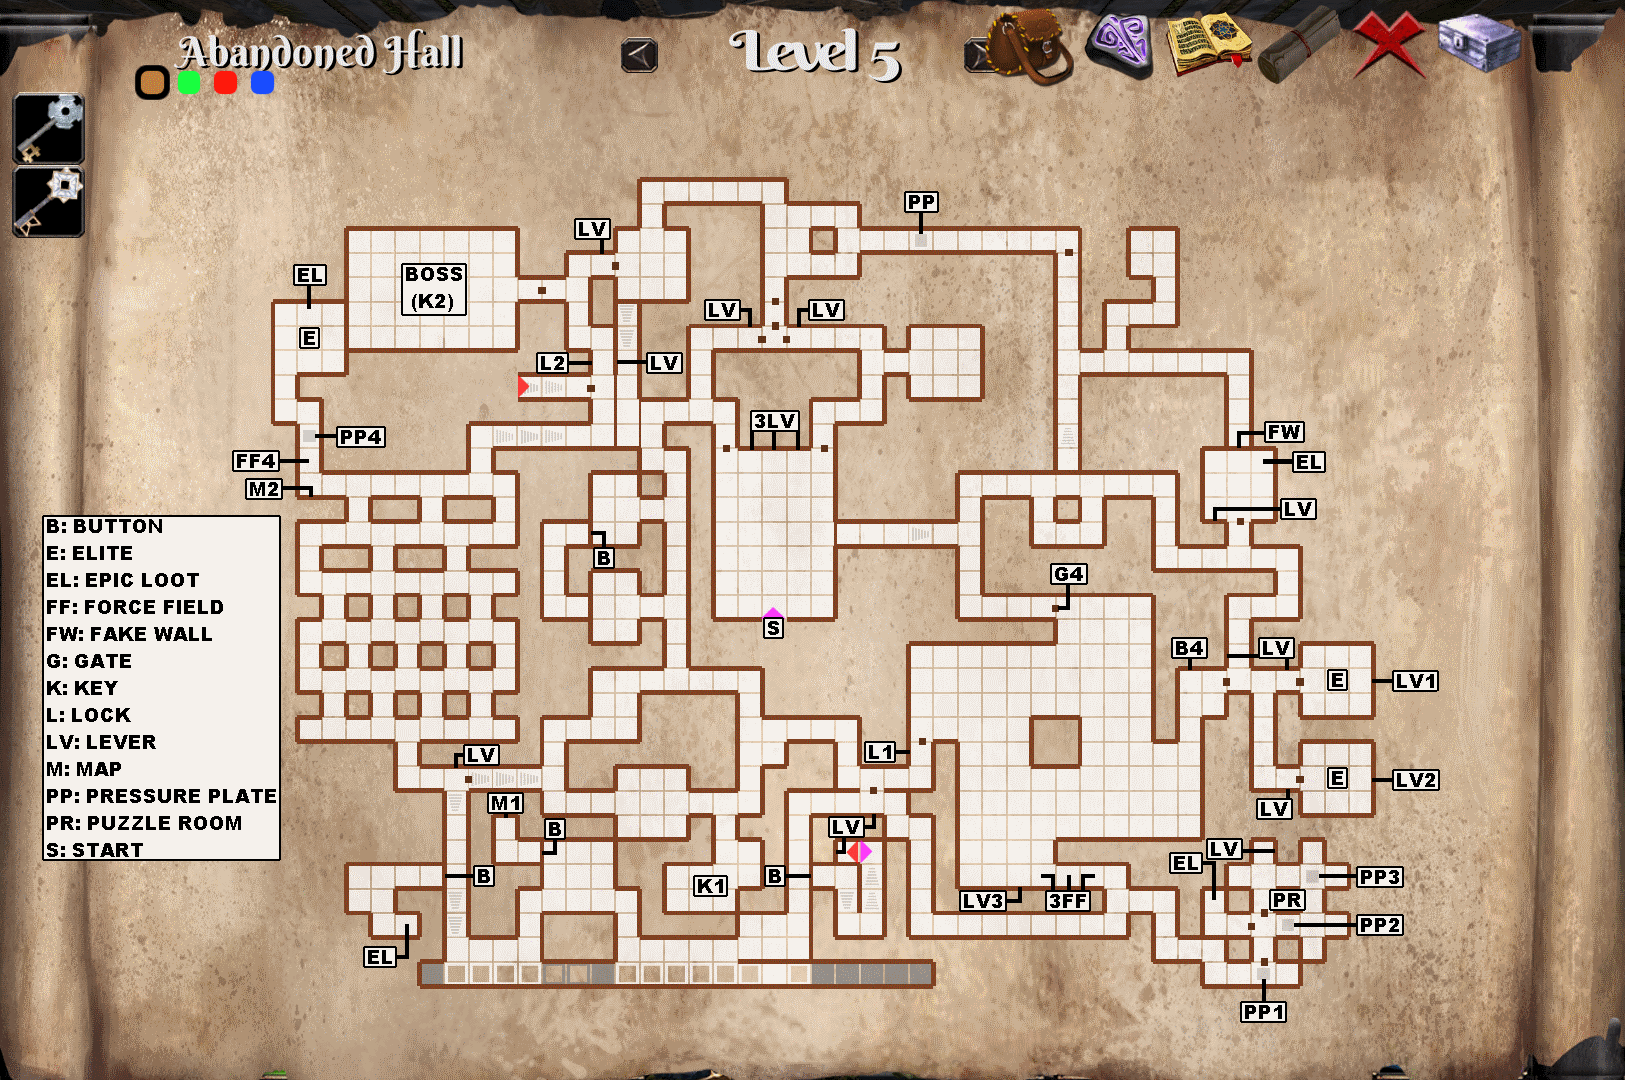
In the starting room there's a simple 3 lever (3LV) puzzle. From left to right: down down up will open the left door and down up down will open the right one.

Stepping on the pressure plate marked (PP) will cause a trap to fire a light ball down the corridor. Back up and step aside to let it hit its target which will open the door at the other end of the corridor. Now you can walk to and go through it.

The wall marked (FW) is fake. Just walk through.

Flipping the 3 levers (LV1) (LV2) (LV3) will deactivate the 3 force fields marked (3FF) blocking the exit of the big room.

The first key is dropped by a mob that wanders around a bit but usually is close to the spot marked (K1).

To deactivate the force field at (FF4) you have to throw an object onto the (PP4) pressure plate. If you're having trouble hitting the mark, try bouncing the objects off a wall. Hitting the pressure plate once is enough to permanently disable the force field. You don't have to leave an object on it on your way out. Remember to save before starting to throw anything.


Elites

Golden Knight (2): Finally, new Elites! They fight just like a Skeleton Champions, however. Swing, Rip and Smash.They also have more armor at 35%, but with no other resistances.

Evil Watcher (1): One of them is still around and still works the same way. There's plenty of space in the room you'll find it in to dodge its Firebolts, if you're so inclined.


Puzzle Room

Hint: The pressure plates make the wall traps shoot arrows that trigger an effect once they hit their targets at the other end of the corridor. Some effects are desirable, others are not. There is a way to let arrows through and a way to stop them from hitting their target.

Bigger hint:Standing still lets the arrows fly through you harmlessly and reach their target. Moving, even repeatedly bumping into a wall, will intercept the arrows and deal damage to your party.

Solution: Step on (PP1) and stand still until the gate opens. Go through. Step on (PP2) and hold left or right to bump against the wall to intercept the arrow. The gate to the loot is open, now for the force field. Stepping on the last pressure plate will trigger 2 arrows, one from the trap ahead and another from the left. Only JUST ONE of these arrows must hit its target to remove the force field. The one from the left is easier to intercept because it's from farther away, so step on (PP3) and immediately move left, then hold forward to bump the wall repeatedly and intercept the arrow. The force field is now gone. Flip the lever (LV) to open a shortcut and claim your prize.


Boss

His first gimmick is Slow Enrage which slowly increases his damage output over time. Nothing you can do about it. His other is Titanic Shield Bash which you can and should interrupt but you won't be able to every time because its cooldown is slightly shorter than your interrupt. Other than that it's the usual Swing, Rip and Smash. He has a high armor% so a party with no mage might struggle to beat him before his damage gets out of control.
Level 6


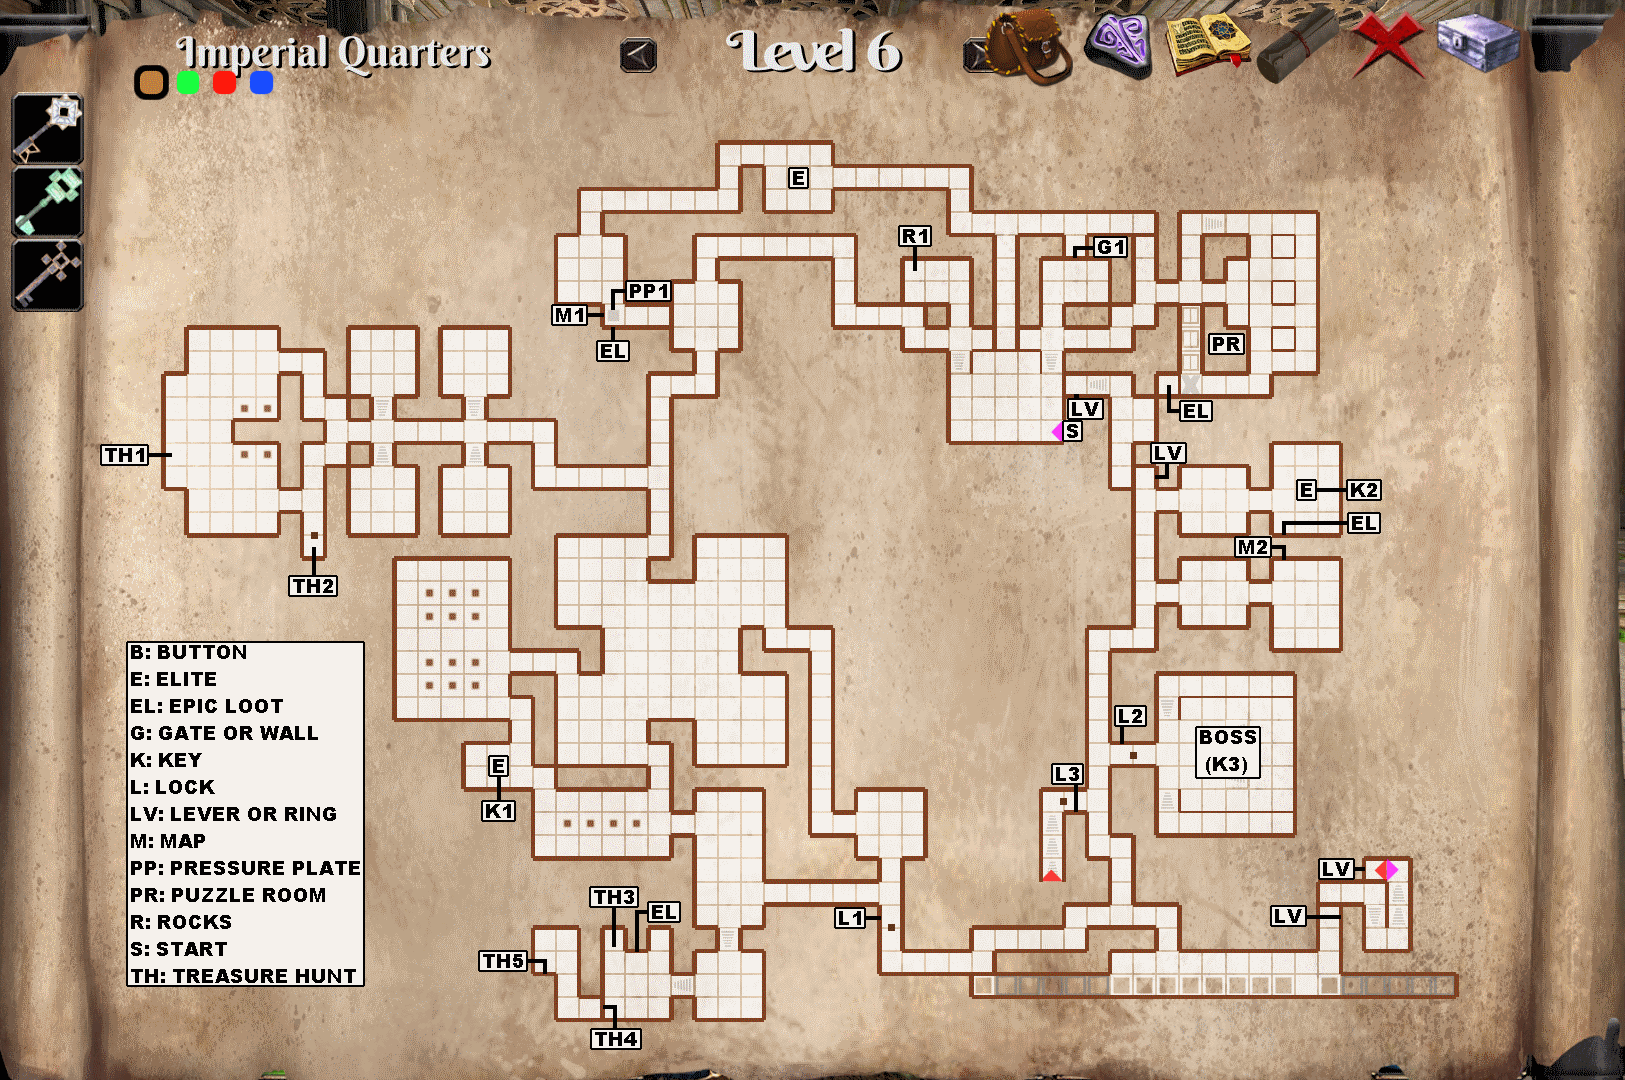
To open the wall at (G1) You need to throw a rock through the grate so that it stops on top of the (PP1) pressure plate. Some rocks can be found at (R1). If you're having difficulties, try throwing them at the floor a little short of the mark so that they roll on top of the plate and stop there. Remember to save first!


Puzzle Room

Hint: More of an accuracy test than an actual puzzle. You have 3 rocks, 3 open trapdoors and 3 columns with a strange fixture on top of them.

Solution: Throw from as close as you can be to each column from the upper floor. Vertically your throws should be close to the center of the screen. You don't need to hit the fixtures, as long as the rock comes to a stop on their squares, the trapdoors will close. Remember to save first.


Elites

Golden Knight (3): Same as they were on the last level, but stronger. The last one even has 2 minstrels with him. Tough fight. Get rid of the minstrels first.


Treasure Hunt

Place the 'sun' note from Level 4 on the square in front of the sun fixture on the wall at (TH1). This will open the door at (TH2) behind which you'll find the 'spider' note. Pick it up. Put the 'spider' note on the (TH3) square, under the extremely low ceiling. This will open the nearby wall (TH4) and in the secret room behind it you'll find the 'place of death' note (TH5). Grab it.


Boss

He makes 2 copies of himself when the fight starts and they appear on either sides of you on the upper floor, making getting to them annoying. The Light Avatar isn't dangerous except for its occasional Sniper Shot. The Shadow Avatar is more dangerous but much more easily killed with only 588 health on crusader difficulty. The Avatars do not count as boss or elite enemies, so Arcane Lock works on them.

Whenever the boss uses the uninterruptible Rain of Arrows ability is a good time to go after the Shadow Avatar. Both Avatars have their own version of Rain of Arrows (Shadow's is interruptible) and are resummoned a while after being killed. That said, don't bother going after Light. You can tank Light's Rain of Arrows because it does very little damage, so don't disengage the boss if its Rain is the only one active.

Fortunately the boss doesn't have have a lot of health otherwise this fight could be very long given how often you have to disengage to avoid Rain of Arrows. When the boss falls, the Avatars disappear.
Level 7


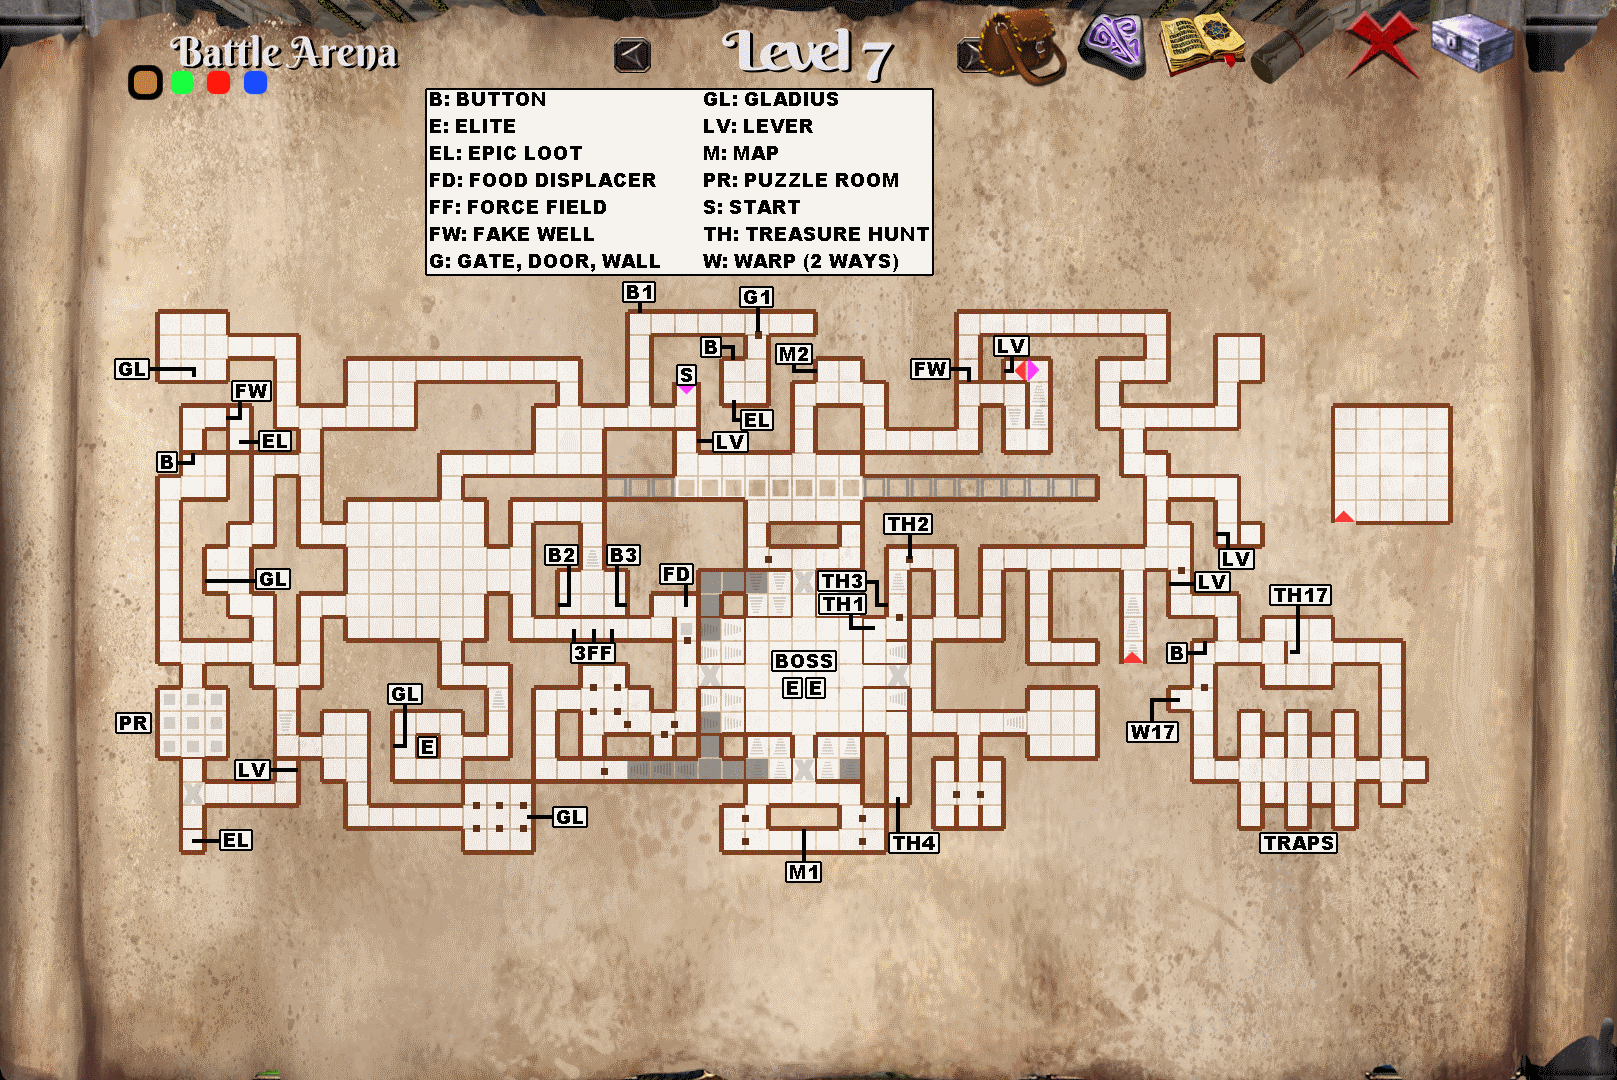
The button marked (B1) opens the door at (G1), but stepping on the square in front of the door will immediately close it. If you move without stopping, you can walk through the closing door and into the room. There's a button inside to let you back out.

Press buttons (B2) once and (B3) once to shut off the 3 force fields at (3FF). The other 2 buttons are not necessary.

As you approach the arena, stepping on the (FD) square in front of the wall sign will teleport all the food in your inventory to a storeroom with barrels past the arena. If you wish to cheese a bit, you can smuggle food into the arena by placing it on the floor just before the food-displacing square, walking on the square, turning around and picking the food back up from there. It's only upon moving on the square or throwing food over it that food is teleported.

The bottom right section of the map is inaccessible until much later in the game. It's covered under "Arena Revisited" at the end of this section.


Arena

To start the arena fight where the boss is, you need to have collected all 4 gladiuses marked (GL) and placed them in the 4 holders found on the walls of the arena. Once done, a force field will appear to block the entrance and enemies will gradually start coming in.

This is a long, grueling fight so move to a corner so that you only get attacked on 2 sides and do your best. AoE damage really helps here. Respec if you find yourself overwhelmed by the mobs. I found that having a warlock/elementalist with Hell Fire and Fireball helped a lot.

To avoid your healer getting targeted at all times by every enemy, don't use Righteous Shield on your tank and use heals over time or direct heals, whichever are the most effective in keeping your party alive, but use them sparsely. Just enough to keep everyone alive. The healer will still take fire, but not the 100% aggro at all times from everyone that Righteous Shield on the tank causes. It also helps to shift your attention from a group with 1-2 enemies left to a full group, to control more of the aggro going your healer's way.

After about 24 barbarian slaves you will have a short moment of respite, allowing K.O.ed characters to get back on their feet and heal up. If you smuggled food, now is a good time to use it.

The second wave consists of about 6 cave beasts. Strong single target damage is helpful as they only come 2 at a time. Arcane Lock is really handy here.

The third wave starts with a new elite, a Cave Mother, followed by another Cave Mother

The fourth and last wave is the boss. Once defeated, the force fields disappear.


Puzzle Room

Hint: Many pressure plates, 2 trapdoors. The plates are tied to one or the other. Stepping on one when its trapdoor is open will close it OR it will open it if it's already closed.

Solution: From entering the room with both trapdoors open, 1 step forward, 1 back, then straight forward to the loot.


Elites

Golden Knight (1): A bit stronger now.

Cave Mother (2): Rip and Bite. That's it.


Boss

Part of the arena fight. Melee warrior with no gimmick. Uses Double Smash, Rip and Swing. Interrupt Double Smash whenever possible.


Treasure Hunt


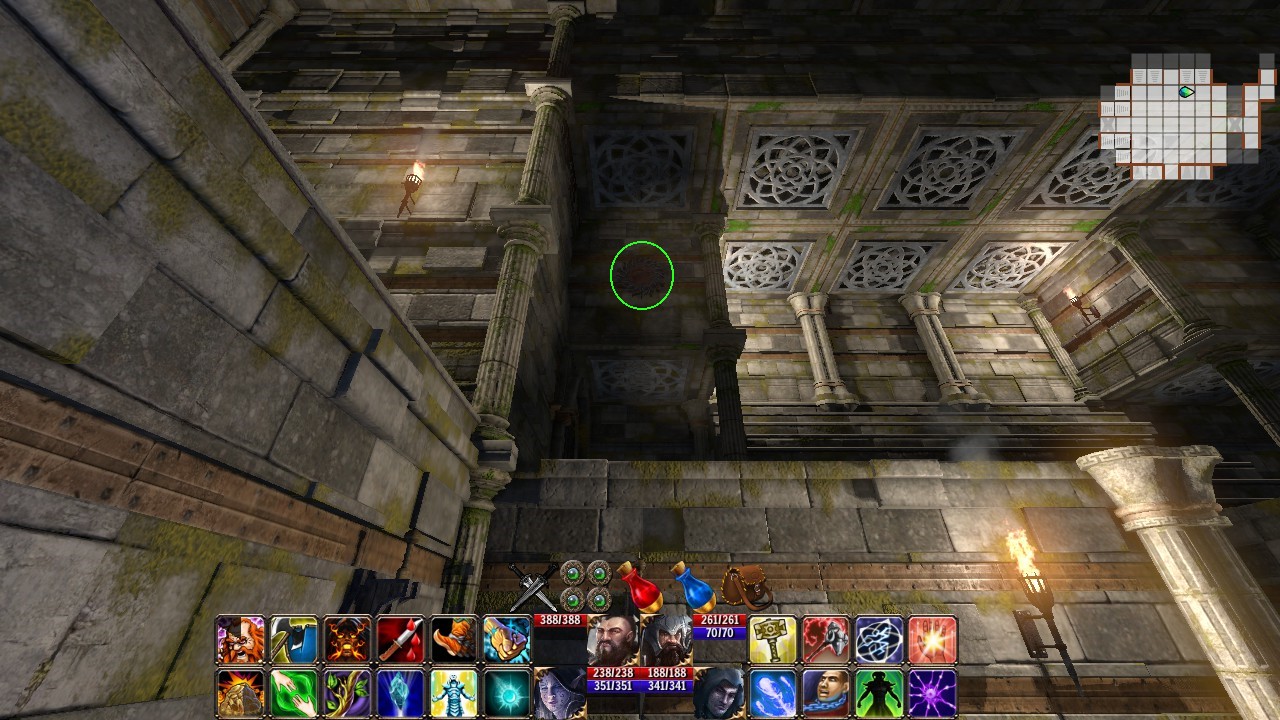
Throwing a rock at the wall with the sun fixture as shown in the above screenshot will make the rock fall on the (TH1) square, opening the gate at (TH2). Go through it and drop the 'place of death' note from Level 6 in the alcove at (TH3) to open the adjacent gate. Past that gate you'll find the 'tortuous rifts' note at (TH4). Take it.


Arena Revisited

You will appear at (W17). To navigate the dark trap room without taking damage, run past the traps shooting shadow balls from the left and right, then sidestep to avoid the fireball coming from down the corridor. Do this 3 times and you're through. Pick up the 'family' note at (TH17).
Level 8


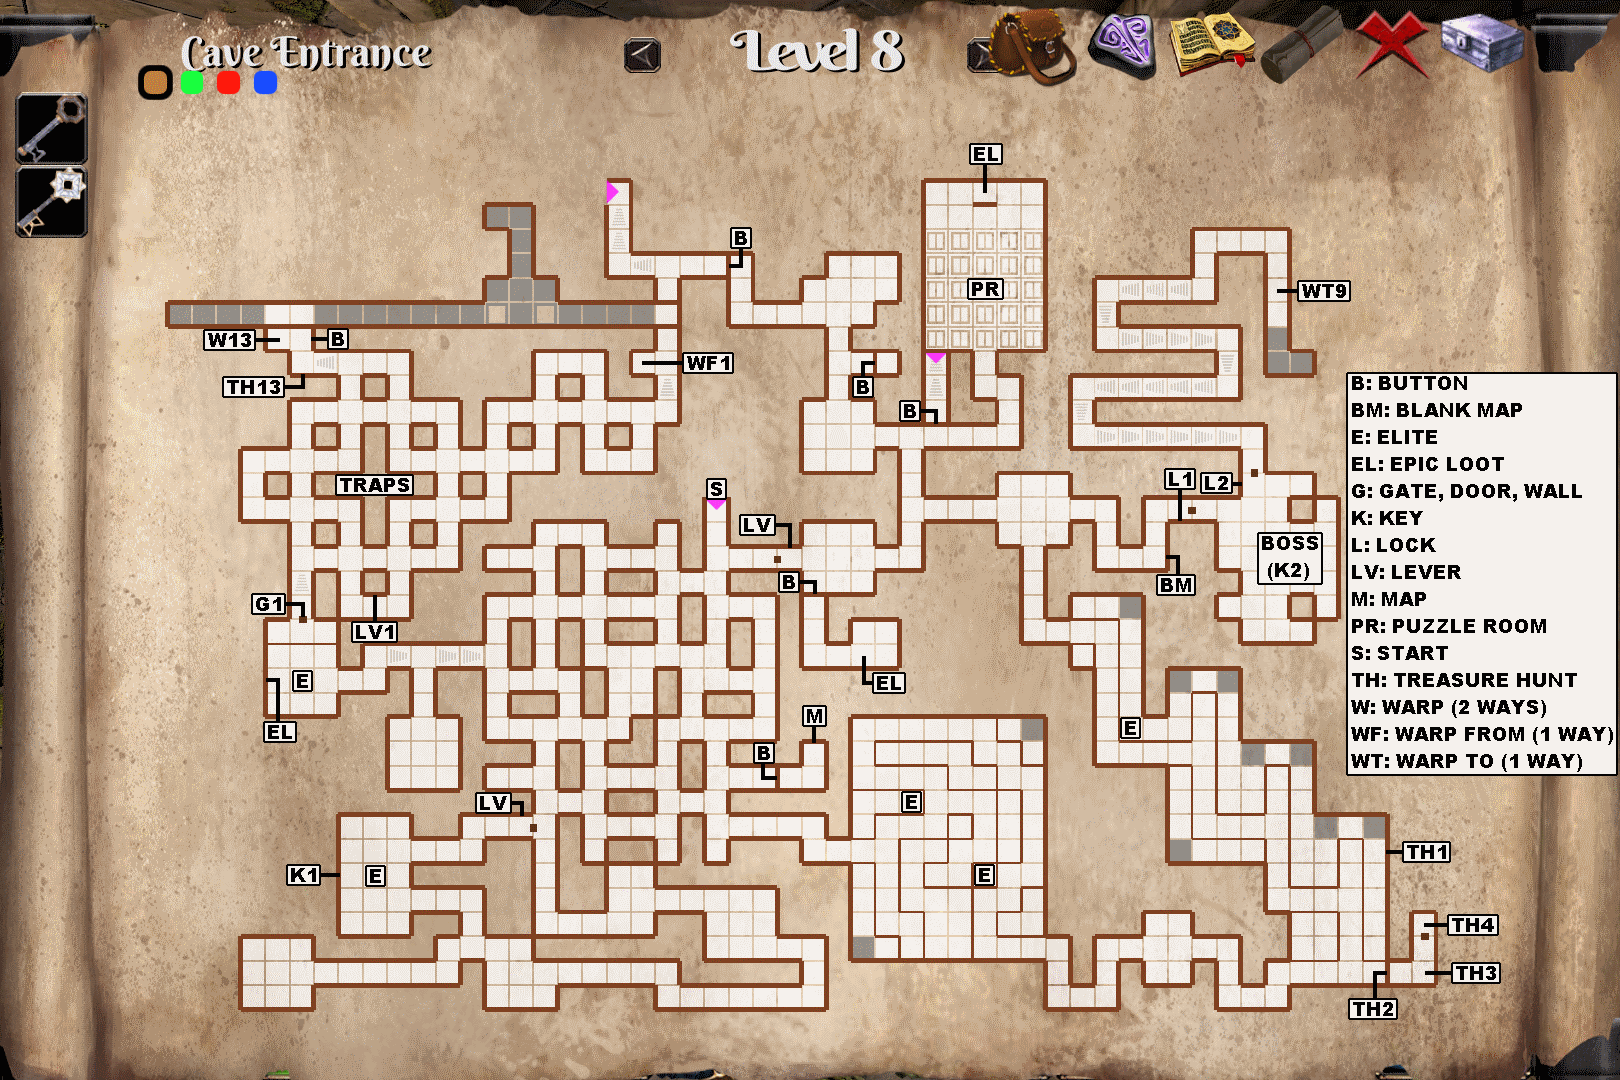
There's a bit of a maze at the start of this level, but the map (M) is very close by. That will make navigation much easier.

The blank map marked (BM) is a necessary part of the Treasure Hunt later in the game. Hang on to it.

The large trap room in the north west is inaccessible until later in the game. It is covered in the Cave Entrance Revisited subsection.


Elites

Cave Mothers (2): Still just Rip and Bite.

Evil Watchers (3): They're back and waiting for you in awfully inconvenient and dangerous rooms. Watch your step. Firebolt hurts a whole lot now. Make sure you don't kill them while they're flying over a pit or you won't be able to grab the loot they drop.


Treasure Hunt

Throw a rock at the sun fixture on the wall at (TH1). The rock will fall into the pit in front of it, opening the wall at (TH2). Put the 'tortuous rifts' note from Level 7 on the square in front of the other sun fixture at (TH3) to open the nearby door. Pick up the 'deep caverns' note at (TH4).


Puzzle Room

After solving the room, you might want to deliberately fall into a hole to explore the isolated room on the Level 7 map. There's loot down there.

Hint: The trapdoors are not timed. Stepping on a closed trapdoor will close or open nearby trapdoors. Find the correct path to the loot across the room.

Solution: From the room entrance using cardinal directions (open the map): N N W W N E N W E S E E E N N N


Boss

The boss uses Swing, Swipe and Smash. His gimmick is Hell Fire. Swipe is an AoE attack that is problematic if you have no group healing spells, but it can be dodged by stepping away from him. Don't wait too long to dodge it, it takes time to fully move 1 square away from it (diagonally touching is still in range) and it charges quickly. Smash cannot be dodged, so interrupt it. Be very attentive, Swipe and Swing look like the same word at a quick glance but Swipe is much, much deadlier than Swing.

As soon as he uses Hell Fire, move 2 tiles out of the way in a single direction to avoid taking damage more than once. He won't follow. Note that 1 square back and 1 square left or right is still in range. Make sure to position yourself so you don't have to run past him to escape or you'll take more than one instance of damage from Hell Fire.

This battle is very long but it shouldn't be too taxing on your healer's mana pool since a lot of it is spent waiting for Hell Fire to stop instead of taking constant damage. Try to use low mana cost healing spells like Renew while you're waiting.

Hell Fire's damage isn't constant. It "pulses" every 2 second or so. The 4th and last pulse also occurs before the channeling ends, so you can start running toward him before he begins moving again without having to fear taking extra damage. You don't need to wait for the graphical effect to disappear, it's just cosmetic. The damage is instant on every pulse, the rest is just for show. If you're quick, he'll stay in place and you'll appreciably speed up the fight by eliminating the dancing required to have a clear path to evade Hell Fire.

It IS possible to avoid the first pulse of Hell Fire but you need to pause constantly after every one of his Swings because the margin of error is very thin. This will lengthen the fight but it might end up saving you a few potions.

IN SUMMARY: Get into a position vs the boss where you can back away 2 tiles. When he uses Hell Fire, immediately back away twice, queue a healing spell or two. As soon as Hell Fire pulsed for a 4th and last time. Charge forward. If done quickly enough, the boss won't move. He'll then charge Swipe. Back away once to dodge, then move forward again. Now fight him normally. He should follow up his failed Swipe with Smash (interrupt it if Kick or Pommel is off cooldown) and then a few Swings until he uses Hell Fire again. Repeat the process until victory.


Cave Entrance Revisited

From the (WF1) warp, you'll have to go through a rather large maze of shadow bolt traps. To make things more complicated, the blue halos on the floor at every intersection will spin you around to disorient you. You could pay attention to the way the shadow bolts are deviated to figure out which way you'll be facing, but it's much easier and faster to just open the map (or turn on the minimap) and brute force your way through the maze. Save beforehand in case you die before reaching the end.

At the south western part of the maze you'll find a lever (LV1) that opens a gate (G1) which leads to some loot and a 1-way shortcut to Level 8. On the north western part you'll find the '2 wooden grids' Treasure Hunt note (TH13) and a button that will activate a warp (W13) back to the Level 13 warp room. Once you're done here, take the Level 13 warp and return to Level 14 to continue your journey.
Level 9


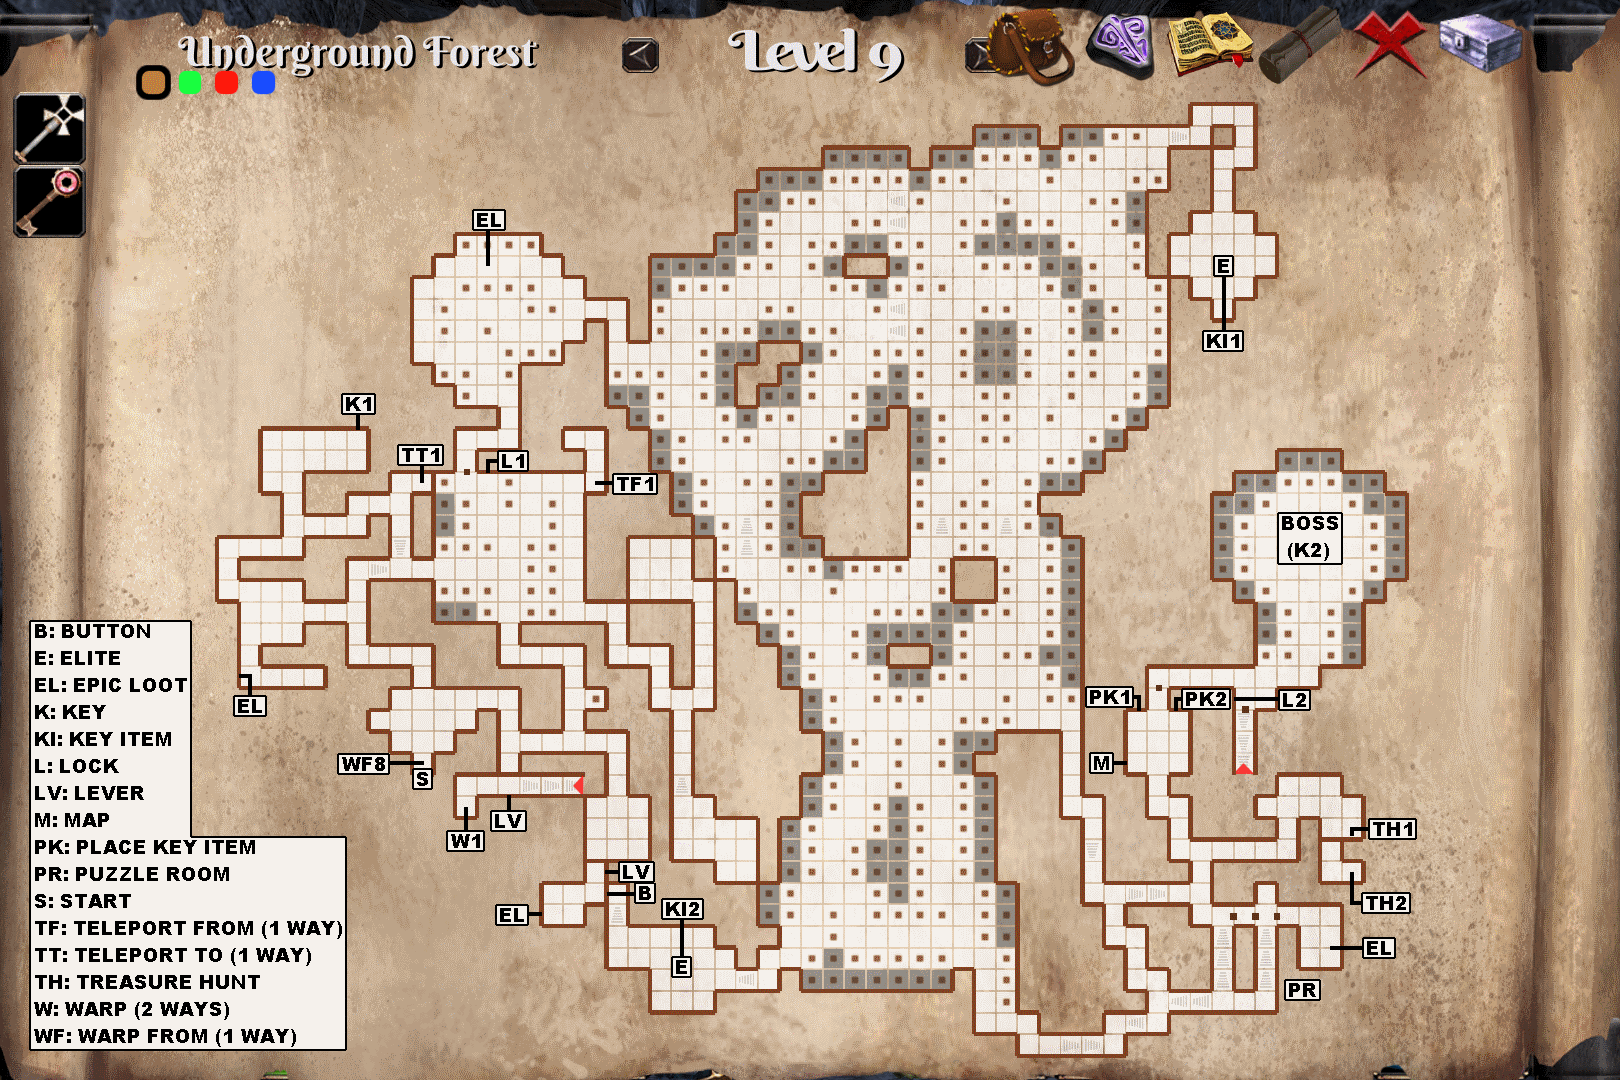
You will definitely want to increase gamma in the video options if you haven't already. This level is very dark.

To avoid getting lost in the forest, keep your left until you get to the first elite's room. Kill it and grab the first key item (KI1). Upon leaving it you can once again stay left and turn left every time you can until you end up into the room with the map (M). You can then backtrack and explore the forest at your leisure as there is some loot to collect amidst the trees.

Fun fact about gem locks: the game won't let you put a gem in the wrong hole.


Elites

Dragon Vampire (1): Blood Sucking hurts a lot and heals it to boot, so reserve your Kick or Pommel to interrupt it, otherwise it spams Firebreath. Firebreath can be dodged in the same manner Firebolt is.

Cave Patriarch (1): Like a Cave Mother except with resistance to physical and fire instead of ice. Uses Rip, Bite, Fire Breath (different from the Dragon Vampire's Firebreath) and Fire Flood. Fire Flood can easily be dodged but not Fire Breath, so interrupt Fire Breath whenever you can. Fire Breath's appearance is deceptive, it looks like a prolonged effect but the damage is immediate and only hits a single target.


Treasure Hunt

Put the 'deep caverns' note from Level 8 on the bench at (TH1) to open a nearby wall. Pick up the 'red reptilian' note at (TH2).


Puzzle Room

Hint: The sign on the wall says "test your dexterity" and there is a boulder, a rock and a skull on the ground.

Solution: Save the game and throw something on the fixture that's on the ground past the 3 teleporters. The boulder is too heavy and won't reach, and while the rock can do it, it's very easy to overshoot the target. The skull is just right. Bounce it off the low ceiling so that it lands on the fixture's square, which will open all 3 doors to the loot.


Boss

Witch Spit is her main attack. Witch Curse starts off fairly harmless but can stack up to 10 times with the damage increasing exponentially, so you'll want to interrupt it at some point. However, you also want to interrupt her Spirit Healing as often as you can otherwise the fight will last forever. Prioritize interrupting Spirit Healing until the Witch Curse's DPS becomes unmanageable.
Level 10


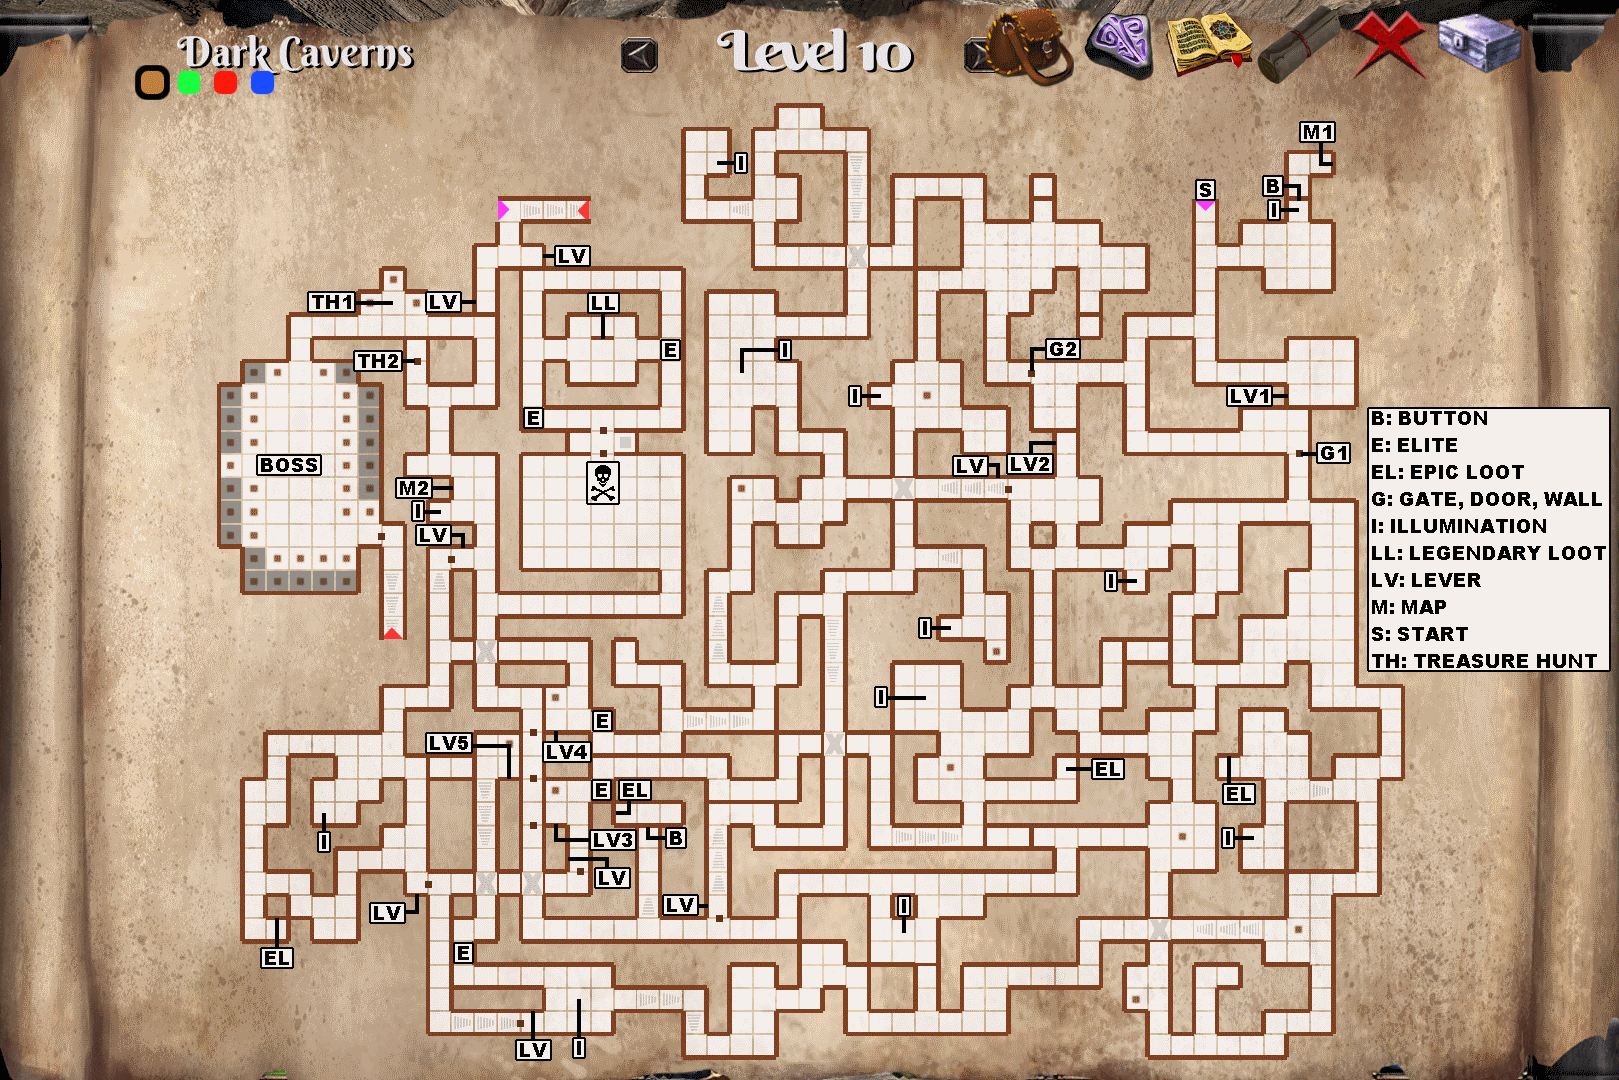
This level provides a means of illumination for the party. Walking on the squares marked (I) will grant the party an 8 minute long lighting buff.

It is fortunate the first map (M1) is available early because navigating this level can be a pain.

The first goal is to find levers (LV1) and (LV2) to get in the caverns proper. This doesn't take very long. After that you need to navigate the maze of dark tunnels to find and flip levers (LV3), (LV4) and (LV5) to open the 3 doors barring the way to the boss. No matter which path you choose, you will have to do some backtracking, but fortunately with the map it shouldn't be too difficult to find your bearings.

Avoid the Cave Troll area marked with a skull on the map. They're level 15, you're not. Come back later.


Elites

Dragon Vampire (1): A bit stronger now. It's guarding (LV3) and will annoyingly assist the Hell Mushroom guarding (LV4) by casting Firebreath through the wooden grate, so you'll have to go after it first.

Hell Mushroom (1): Lots of Bites and occasionally Hell Fire. It doesn't move but it blocks your way, so you have no choice but to engage. If you move out of melee range it'll use Black Spit instead of Bite.

Worm Dragon (1): Bite and Swipe. You can dodge Swipe but you have to be quick because it charges really fast.

Cave Trolls (2): Stomp (can't dodge, stuns the whole party), Double Smash, Swipe (can dodge) and Swing. They're a handful. They're also level 15. Come back later.


Treasure Hunt

Put the 'red reptilian' note From Level 9 on the floor at (TH1) and door (TH2) will open. Behind it you'll find the 'broken teleporter' note. Pick it up.


Boss

She will teleport (Light Warp) ever so often. It's uninterruptible. Every time she does, she will summon 3 groups of 2 snake minions (68 health each on crusader difficulty) and begin casting Sniper Shot, which hurts a lot. If you start running to the other side of the room as soon she begins channeling Light Warp, you should be able to reach her destination point and interrupt Sniper Shot without being body blocked by the minions. Thin the minions out whenever you can. While they give no XP or loot, their Poison Spit damage adds up.
Level 11


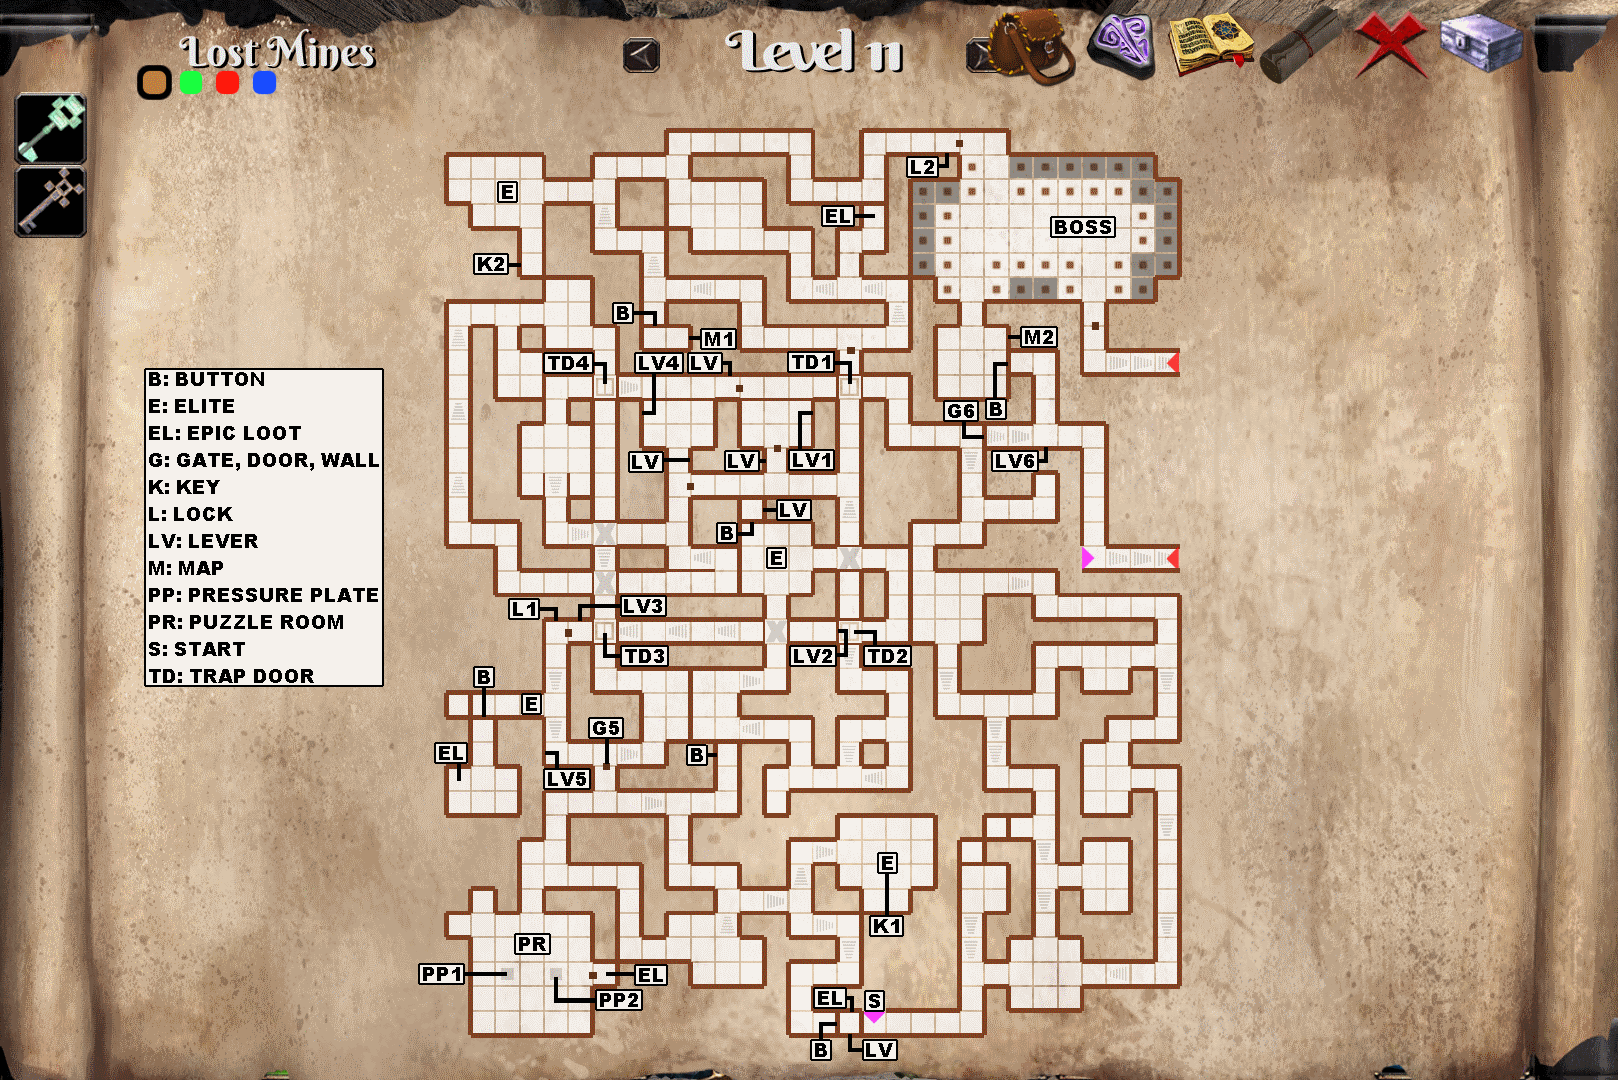
This level has multiple floors and can be quite confusing, so I marked the trapdoors (TD1), (TD2), (TD3) and (TD4) as they are your means of accessing the top, middle or bottom floor.

The first time you come to (TD1) you will drop down from the top floor and through the open trapdoor on the middle floor, landing on the bottom floor. After walking for a few squares you'll come to a fork. Before going up the stairs ahead, explore the storeroom to the right to find and flip (LV1) to close (TD1). Next time you'll be able to explore the middle floor instead of falling back down to the bottom floor.

Up the stairs you'll come to a hole and find that (TD2) is above you and open. If you look down you'll see (LV2) is on the bottom floor, so drop down and flip it. Another trapdoor closed.

Past the elite you'll eventually find yourself on the top floor walking over the now closed (TD2) and a bit further also walking over a closed (TD3) that needs to be opened.

Beyond that you'll fight 2 elites, one of which carries the (K1) key. After opening the (L1) lock but before dropping in the hole, flip the (LV3) lever. This will open (TD3) and allow you to drop to the bottom floor.

You'll come to another hole with an open (TD4) above you. Drop to the bottom floor. Keep your right and you'll eventually come to another storeroom (and a shortcut back to the first) that hides the (LV4) lever. Flip it to close (TD4). Now the way to the last part of the level is open.

Of note in this level is your first opportunity to access the shortcut stairs connecting Levels 9 through 13 from the room with the (M2) map. Backtracking this way to Level 9 you'll find a warp leading all the way back to Level 1. There's no need to return to the first 8 levels quite yet, however.


Elites

Gnome Protector (2): 1301 health isn't much for an elite but with 50% dodge and 35% resistance to everything, it sure won't feel that way. It doesn't help that he also hits really, really hard. His abilities are Shield Bash, Rip, Smash and normal Swings. I'd say interrupt Smash.

Snake King (1): Poisonous Spit and Bite, no resistances.

Cave Troll (1): Even at level 11 it might still be a bit too much for you to kill. You can sneak in and snatch the (K2) key while it's not looking your way. If you decide to face it, at least make sure you have room to dodge its Swipe. It's doubtful your healer can handle the damage output of both Swipe and Double Smash, on top if its regular Swings.


Puzzle Room

Find a way to make the light ball hit the sun fixture in the recess in the western wall.

Hint: The blue teleporters only rotate the light ball. The pressure plates can be pressed more than once.

Solution: With the teleporters in their default southwestern and northeastern positions: (PP1), (PP1), (PP2), (PP2) and (PP1). Wait for the ball to hit the teleporter you just moved before pressing the next plate.


Boss

Melee fighter with 25% dodge and 15% armor. Double Smash, Rip and Swing are the standard abilities. Special is Whirlwind which can't be interrupted but can and should be dodged as soon as it begins channeling. Like Hell Fire, the last tick of Whirlwind occurs about 1 second before channeling end, so if you're quick you can move back toward her and take no damage, preventing her to move and getting a free hit in.
Level 12


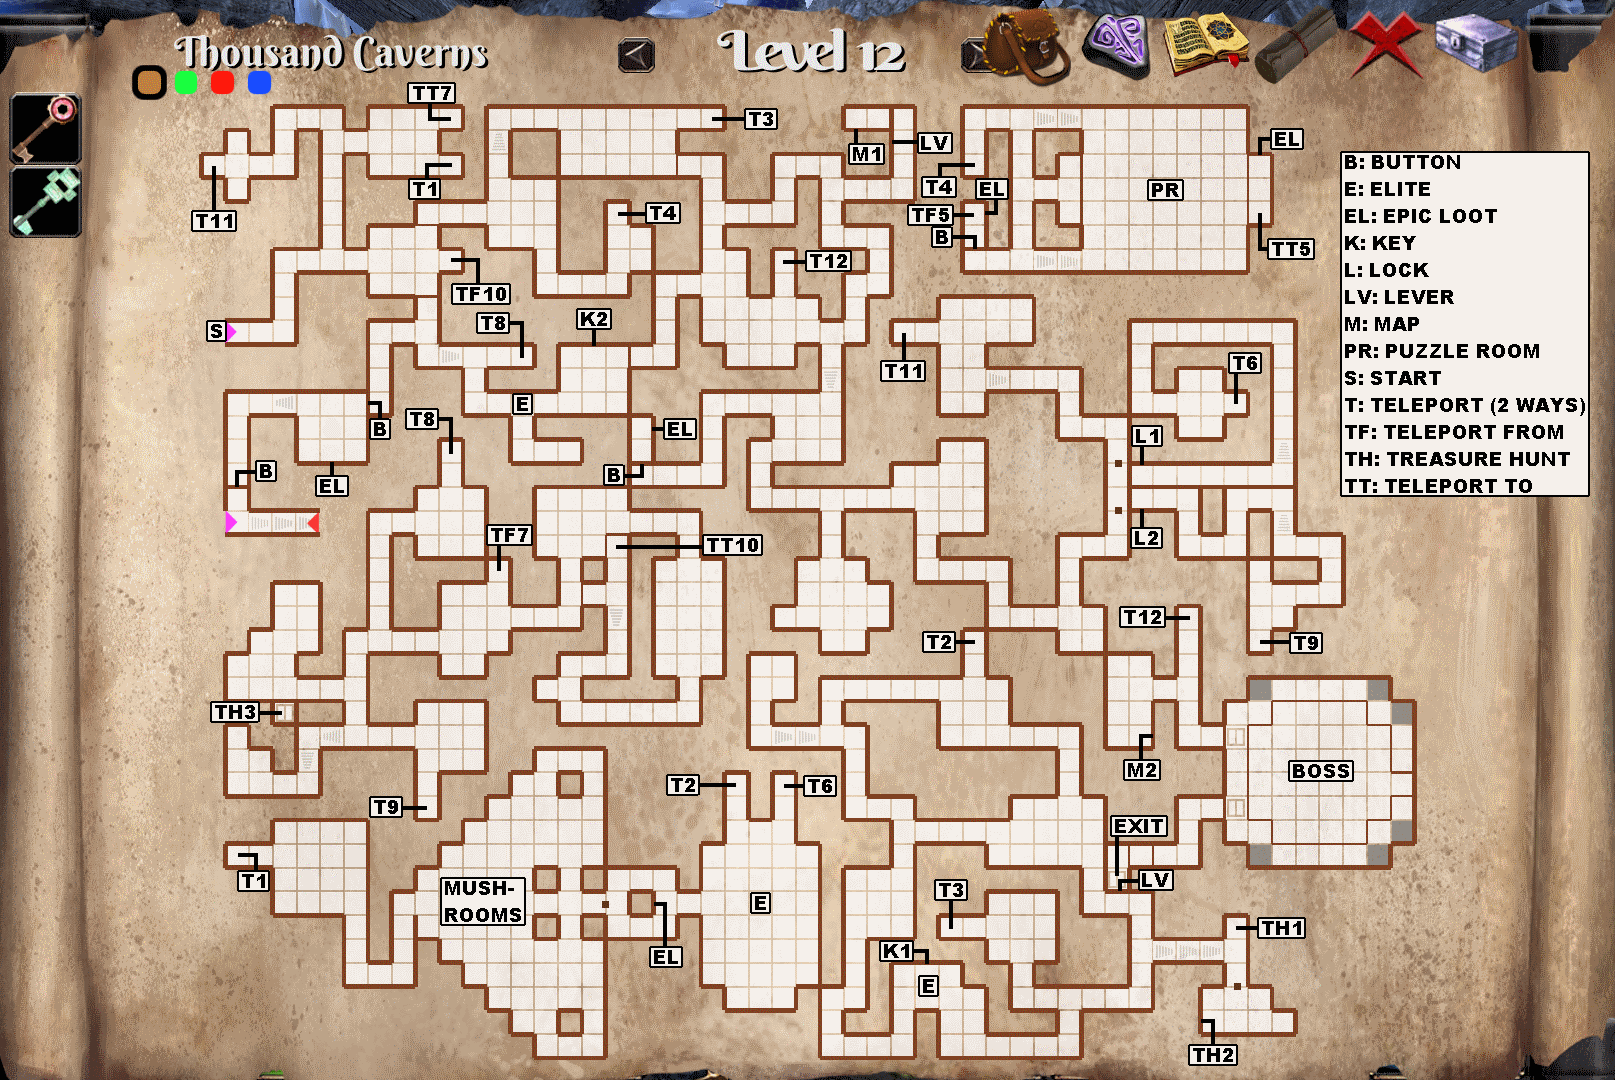
Lots of teleporters on this level. They are numbered in a sequence that minimizes backtracking.

The mushroom room is difficult, but they fortunately can't chase you. If you're ever in trouble you can just run away to drop aggro, heal up, regenerate mana and return to resume fighting. Damaged mushrooms will heal, but dead ones won't come back. You don't need to kill all of them to open the gate leading to the next room, but I'm not sure if you have to beat a certain amount of them or if you have to kill specific ones.


Elites

Gnome Protector (1): One of these guys alone is already hard enough, but now the first one you meet on this level has 3 priests with him too? Get rid of the priests ASAP. The fight can be cheesed if you're so inclined. You can run through a teleporter to heal up and regenerate mana and long cooldowns after getting rid of the priests. The elite won't follow and the dead priests will stay dead.

Gnome Giants (2): Two of them in the same fight! Only 1990 health each and no resistances, fortunately. Rip, Swing and Smash are the abilities used. They hit hard but can be cheesed like the Gnome Protector.

Cavern Patriarch (1): Back from Level 9 and much tougher. Dodge Fire Flood, interrupt Fire Breath.

Armored Elven Beast (1): Nasty critter. The good news is you don't have to fight it but you might as well. Its abilities are Chew, Rip, Acid Spray and Acid Flood. Acid Spray is single target and can't be dodged, while Acid Flood hits the whole party but can be dodged. Not only do both deal significant damage, they also inflict a debuff that reduces armor by 20% that stacks up to 3 times.


Treasure Hunt

Throw the 'broken teleporter' note from Level 10 at the (TH1) teleport and the door behind you will open. Pick up the 'these caverns' note at (TH2).

Put the 'these caverns' note through the bars on the trapdoor at (TH3). The note will fall down to Level 13 and you should hear something open below.


Puzzle Room

Hint: Nothing special about this puzzle. The trapdoors are on a timer. Find your way across through trial and error.

Solution: Starting from the northern square: 3E 2S 2E 3N 2E 1S 1E


Boss

The gimmick of the fight is the boss has a huge health pool, but there's a cursed square with a purple halo that makes whoever touches it take 300% increased damage. Baiting the boss into standing on the square fortunately isn't very difficult. You technically don't have to make it remain on it, but the debuff only lasts 5 seconds, so you definitely should. Eventually the cursed square will move and so should you. The beast fights like any other Elven Beast with the same abilities, so interrupt Acid Spray and dodge Acid Flood.

Once it's down you still have to take care of its rider. You will have a moment of respite before facing the Elven Queen and you won't get the help of the cursed square anymore. Fortunately she isn't very difficult to defeat. Shield Bash, Rip and Swing are all she does. I would interrupt Rip.
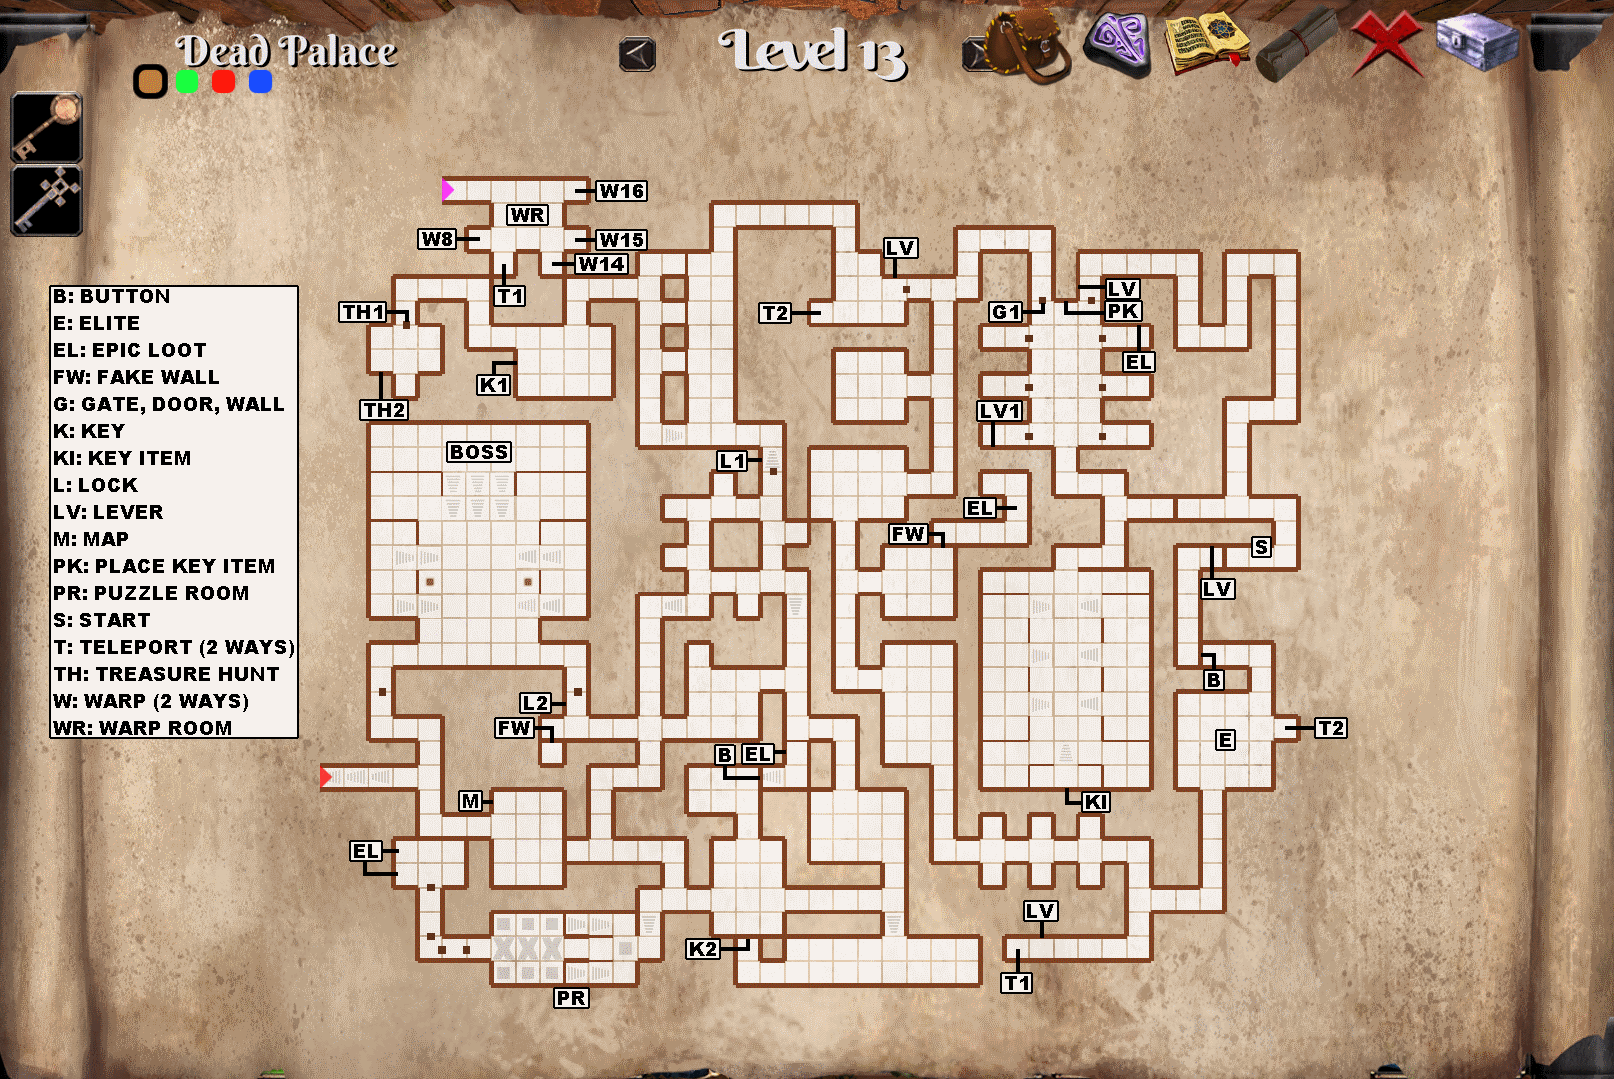
Level 13


The warp room (WR) shortcuts must be activated from within the levels they lead to before they can be used here.

Elites

Lizardman (1): He has no resistances and not a lot of health, but he hits extremely hard. Unload everything you have against him as soon as possible. Double Smash, Double Swing, Swipe and Swing are his abilities. Swipe can be dodged, so interrupt Double Smash.


Treasure Hunt

If you correctly put the 'these caverns' note through the bars onto the trapdoor, had it drop to the level below when the trapdoor opened and heard something open back on the previous level, the door marked (TH1) should be open. Pick up the 'elders' note at (TH2).


Puzzle Room

6 rocks, 6 trapdoors, 6 pressure plates, 3 gates.

Hint: Not all pressure plates are necessary. You need to find a way to open all gates simultaneously.

Solution: Flip the lever on the lower floor to close the trapdoors on the upper floor. Place a rock on both trapdoors in back (northwest and southwest) and a 3rd one on the trapdoor (southeast) in front of the left (south) stairs. Go back down and flip the lever again and run through the gates.


Boss

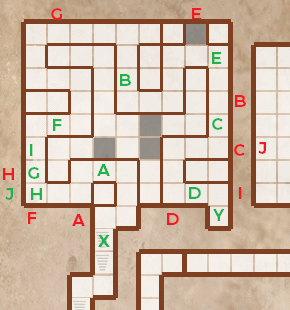
A combination of the Level 9 and 10 bosses. He'll make you choose between interrupting his stackable Black Curse and Shadow Regeneration and will also teleport (Shadow Blink) and summon 2 golem minions whenever he does so. The curse damage isn't exponentially increasing however, so your healer should be able to handle it. Interrupt Shadow Regeneration. His minions are very weak but can easily become a problem if left unchecked. They should be destroyed whenever they appear, but only after you interrupt Shadow Regeneration.
His Shadow Blink destination follows a cycle. First west, then east, then north, then west again and so on.
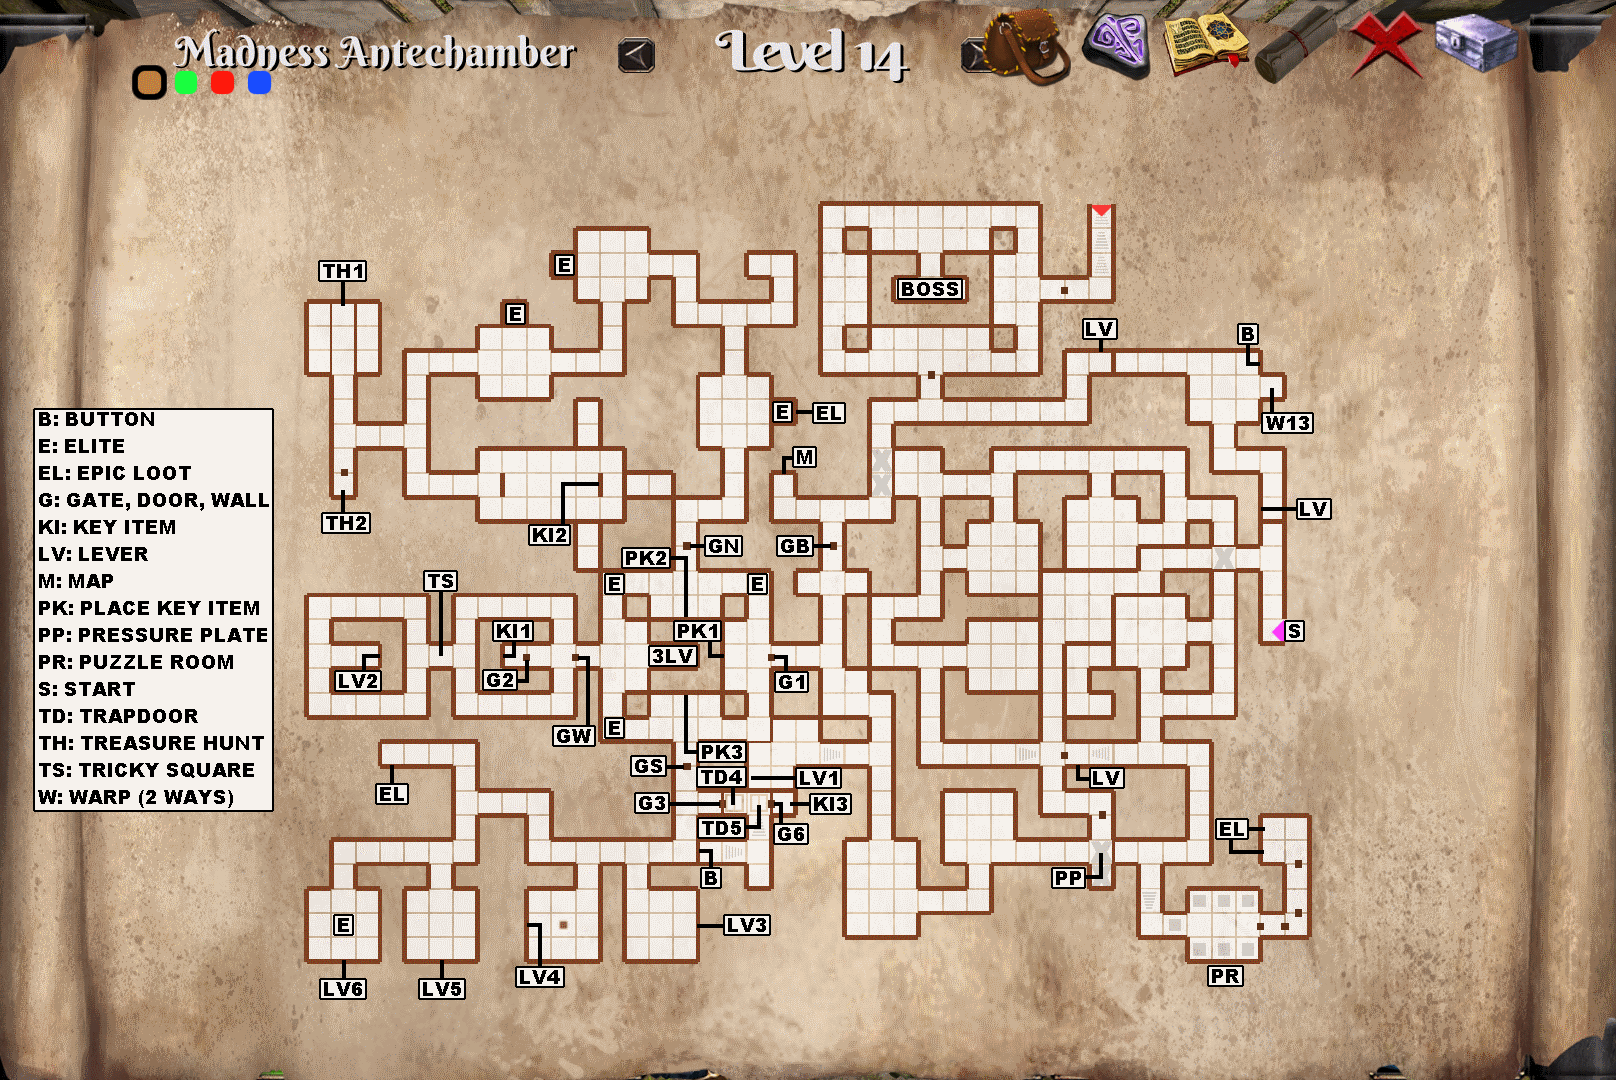
Level 14


Lots of elites on this level.

Drop a rock through the floor grate to weigh down the pressure plate below at (PP) which will open the door blocking your progress.

There are 3 levers at (3LV). The lever on the north wall opens the north gate (GN), the lever on the south wall opens the south gate (GS) and the lever on the east wall opens the west gate (GW).

The tricky square marked (TS) makes you face the opposite direction when you walk on it. if you were looking west, your view will be rotated toward the east, and vice versa.

The elites past the northern gate (GN) are freed upon picking up the emerald (KI2).

The gate to the boss (GB) will open after you place all 3 gems (KI1) (KI2) (KI3) in their proper sockets (PK1) (PK2) (PK3).


Puzzle Room

6 pressure plates, 3 gates. Find the sequence.

Hint: Only 3 pressure plates are part of the sequence.

Solution: From the pressure plate at the entrance of the room: forward, forward, left, right, back, back, left, right, forward, forward, right, left. You're now in front of the first open gate, run through the corridor to the loot. The timing is very tight, you have no leeway.


Elites

Cyclops (3): Bash, Smash, Swipe, Swing. Dodge Swipe, interrupt Smash.

Lizardman (4): They're back and they're still nasty. Give them all you got and remember to interrupt Double Smash and dodge Swipe.

Treasure Hunt

Put the 'elders' note from Level 13 on the pedestal at (TH1) and the door down the corridor behind you will open. Pick up the awful sword at (TH2). Remember the armory with 4 of the same sword? Once you activate the warp back to Level 13 (W13), backtrack to Level 1 and refer to section Level 1, subsection Armory revisited.


Boss

Death Ray, Swiping Maim, Rip and Swing. You can dodge Swiping Maim and Death Ray, so interrupt Rip. When Death Ray starts channeling, immediately run away and put a wall between your party and her. This is a suprisingly easy fight if you never fail to dodge Swiping Maim and Death Ray, even on crusader difficulty.
Level 15


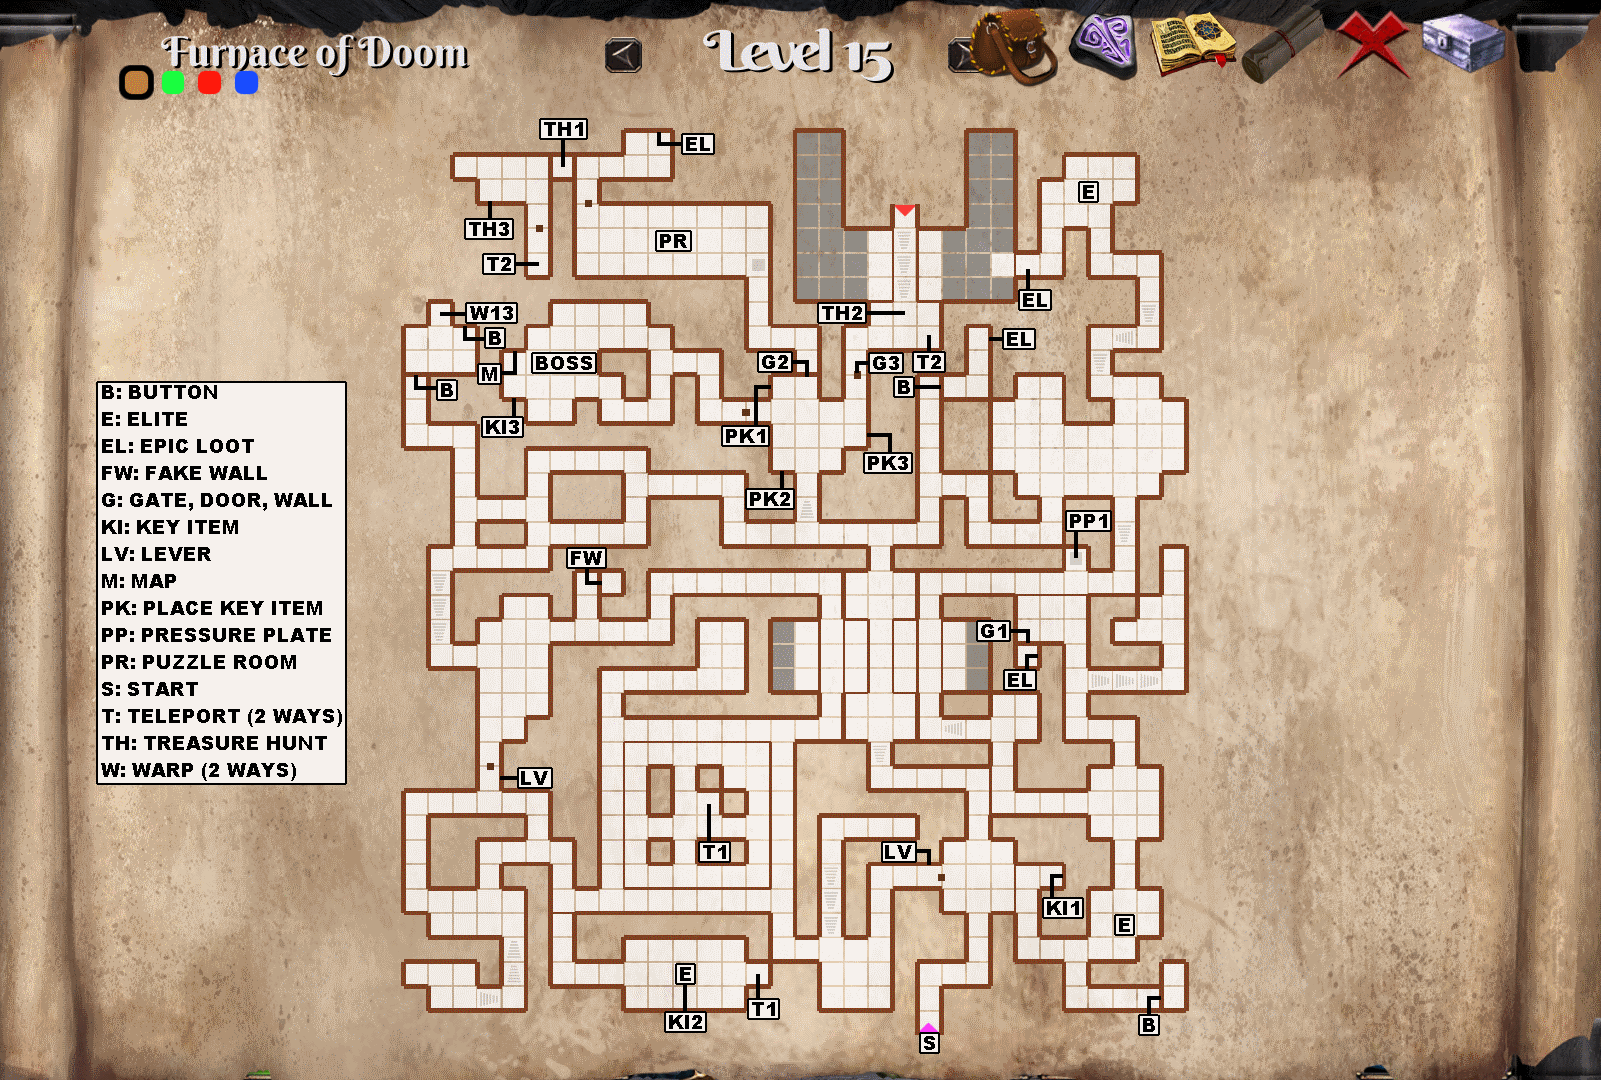
To continue the treasure hunt on this level, you must solve the puzzle room.

(PP1) opens (G1) but only for a few seconds. To have enough time to get the loot, throw a rock from the upper floor onto the pressure plate.

To open (G2) place just one of the key items (KI1) or (KI2) or (KI3) on the correct shelf, (PK1) or (PK2) or (PK3). Placing more than one key item will close the secret wall. Remove all but one of the key items from the shelves if you ever wish to return to the puzzle room.

(G3) opens when all 3 key items are placed on their respective shelves.


Elites

Cyclops (1): Bash, Smash, Swipe, Swing. Dodge Swipe, interrupt Smash.

Ratkin Warlord (2): Middling health and no resistances. Abilities are Smash Frenzy, Thrust, Double Smash and Swing. Interrupt Smash Frenzy as soon as it starts.


Puzzle Room

Stepping on the pressure plate starts a barrage of light balls from 3 traps at the other end of the room. They seem to be guarding a door.

Hint: You must reach the end and dodge ALL the light balls the traps shoot. The door at the end won't open until there aren't any light balls remaining and none have hit you. You only have 2 seconds to go through the door before it closes.

Solution: The following directions assume you're facing the end of the room, where the light balls are coming from. From the pressure plate and as fast as possible: 2 forward, 2 right, 1 forward, 1 left, 1 forward. Here wait a bit to dodge the middle light ball. 1 left then 1 right once it flies past. Once the ball on the left flies past, 1 left again. When the middle ball flies past, 1 right, then 1 left once the left ball moves past. Now quickly move 3 forward and run to the door. The middle trap just shot the last light ball.


Treasure Hunt

Just past the puzzle room, save your game. Carefully place the '2 wooden grids' note you got from the Level 8 trap area (after teleporting from the armory on Level 1) through the wooden grate, on the ground at (TH1). You will hear something open. Past the (G3) door, place the 'Useless Erased Map' item you got all the way back on Level 8 on the ground at (TH2) in front of the stairs leading to Level 16. When you do so, a teleporter (T2) will appear. Go through and pick up the 'cage' note at (TH3).


Boss

He has a lot of health but no resistances. His gimmick is that he hits 2 targets at once with his Double Smash and Double Swing. His other abilities are Bash and Swipe. Dodge Swipe. It would make sense to interrupt Double Smash, but it's difficult to do so. He only ever uses Double Smash after Bash, and both will likely be targeted at your tank. If your tank is bashed, they will be stunned and unable to interrupt Double Smash. That said his damage isn't too crazy, it's just spread out. If you have good group healing, this battle should be relatively easy.
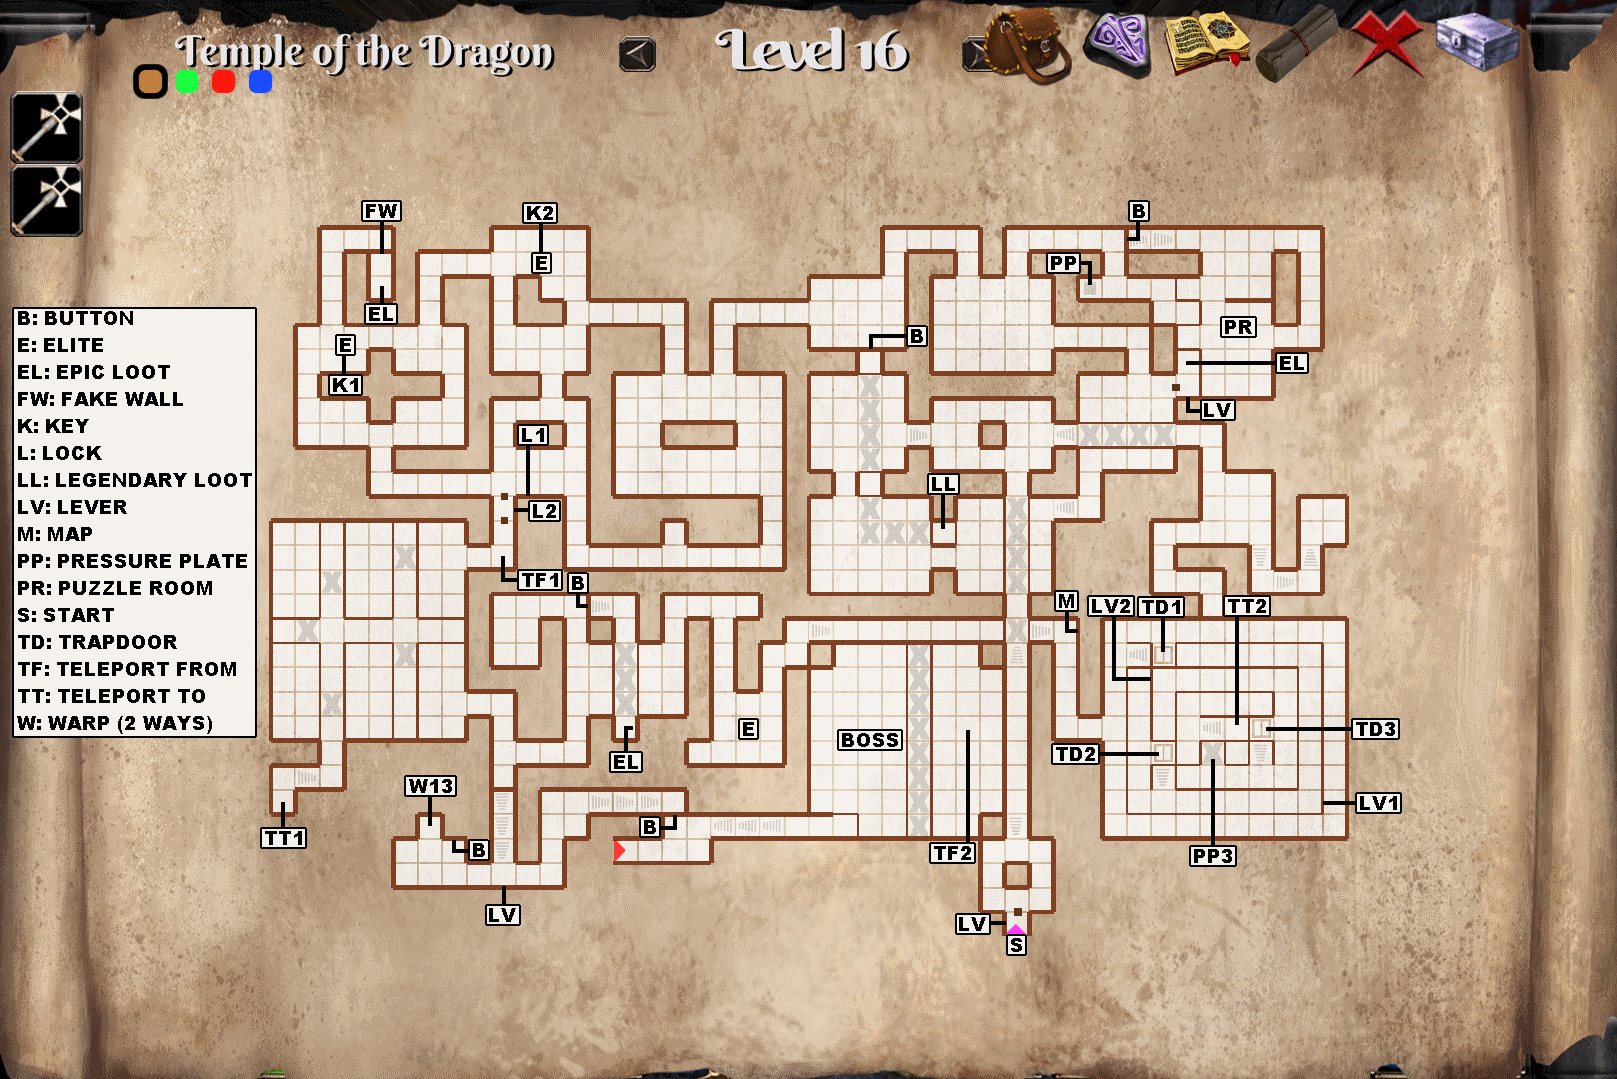
Level 16


You can spy the boss of this level through the grates near the beginning.

The 2 elite lizardmen carrying the 2 keys wander quite a bit and probably won't be found at the locations shown on the map.

In case you fall into the lava the (TT1) teleporter is there. There's also a potion close to it.

Once you beat the boss and activate the (W13) warp back to Level 13, you should be strong enough to defeat the cave trolls on Level 10 and 11 if you haven't done so already.


Puzzle Room

A pressure plate (PP) starts a timed sequence of trapdoors closing for a few seconds, gradually forming a path to the loot.

Hint: Throw a rock at the pressure plate to start closer to the trapdoors. If you're overthrowing, aim at the floor in front of it so the rock rolls and comes to a stop on top of the pressure plate.

Solution: From 3 squares east of the pressure plate, throw a rock at it, then quickly go 4E 2N 2E 4S 2W 1N 1W 2S 1E 1S 3W


Elites

Lizardman (2): They're back and they still hit hard. Dodge Swipe, interrupt Double Smash.

Ratkin Warlord (1): Smash Frenzy, Thrust, Double Smash and Swing. Interrupt Smash Frenzy as soon as it starts.


Boss

The dragon has a huge health pool and fire resistance. If your mage is fire specced, I highly recommend respeccing.

Its opening and recurring powerful ability is Fire Flood. Move away and stay 2 squares away until it stops. The other abilities are Rip and Bite. Interrupt Rip. This is a long battle of attrition, but it shouldn't be too difficult as long as you're quick at moving away from Fire Flood.

The dragon will use 8 abilities between Fire Floods. If you count them, it's difficult but possible to dodge Fire Flood in the short moment between when its last ability ends and when Fire Flood is about to start and avoid the first tick of damage entirely.

If you prefer to see it in a different way, then it follows 2 alternating patterns between Fire Floods: Rip, 6 Bites, Rip and 3 Bites, 1 Rip, 4 Bites.
Level 17


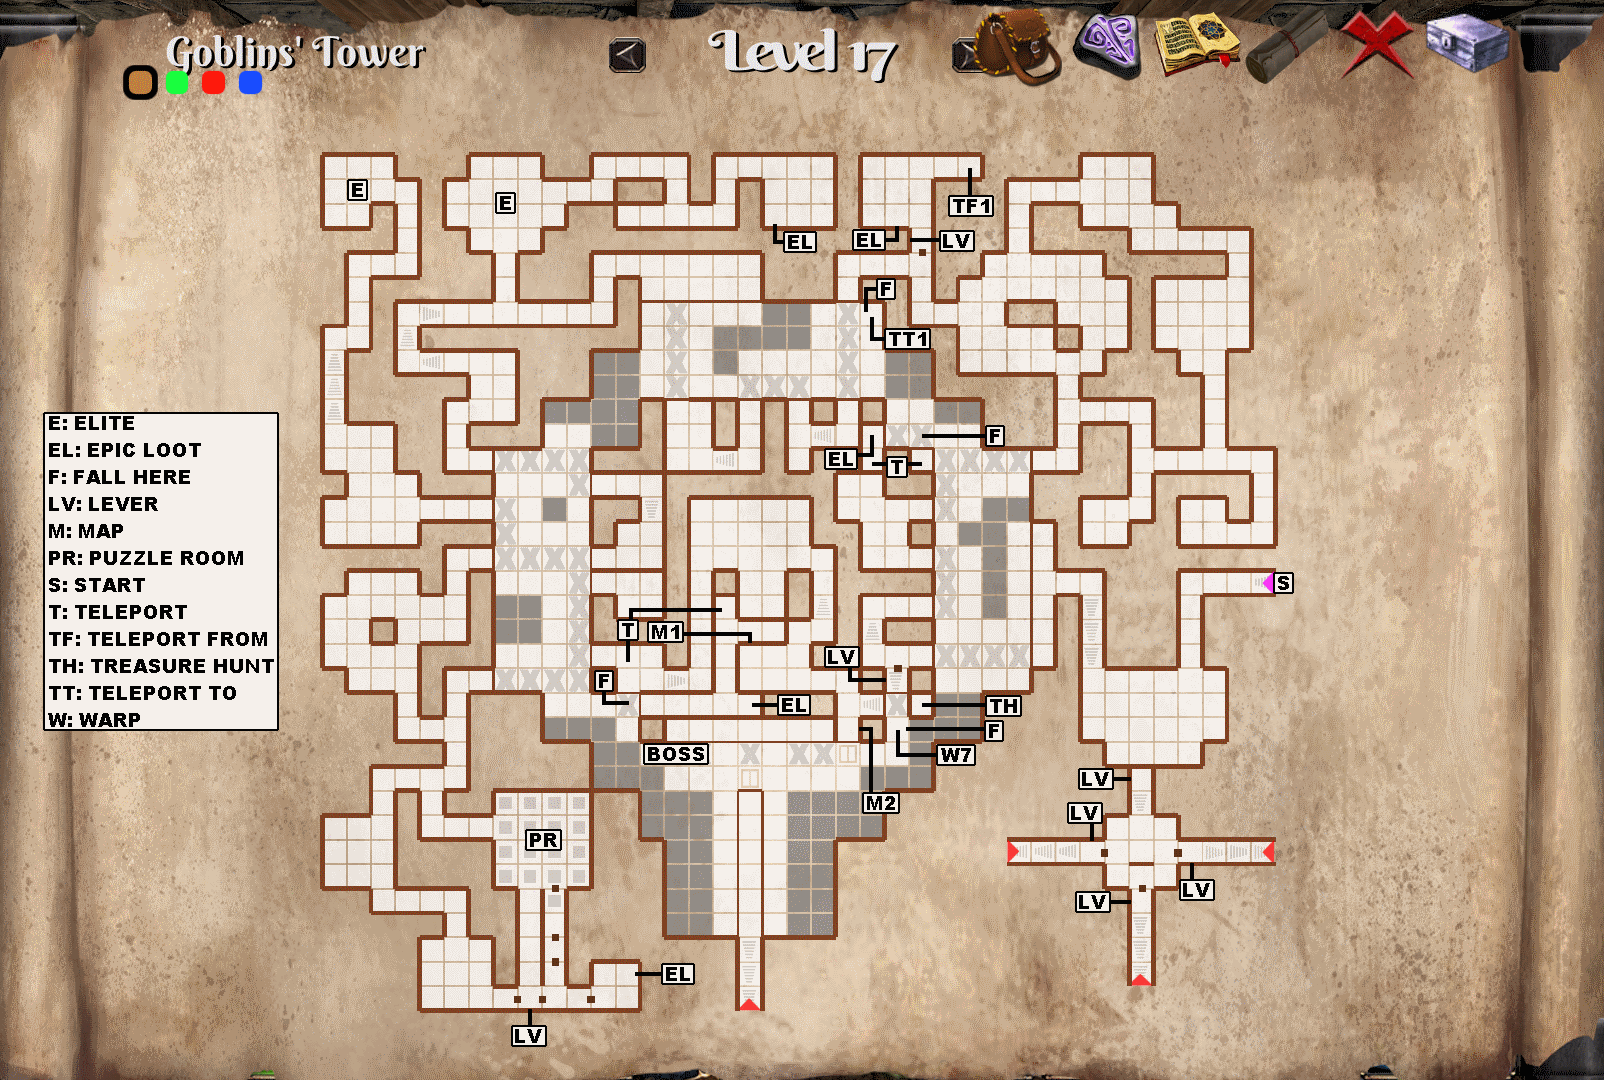
There are 4 locations where you need to intentionally fall to find new areas. They are marked (F) on the map.


Elites

Greater Dragon Bug (4): Come in pairs. Low health and no resistances. Ablities are Sludge Spit, Rip and Fire Breath. Interrupt Sludge Spit, it's a nasty ability that absorbs a large amount of healing like a reverse Righteous Shield. If your tank is a protector, Sludge Spit can be avoided by using Spell Deflection before it hits.


Puzzle Room

Many pressure plates, 4 gates between you and the loot.

Hint: The gates are on a timer when opened and stepping on some pressure plates will close them immediately.

Solution: From the entrance of the room: 4E 2S 1W 1S 1W 1E. The timing is very tight for the 3rd gate.


Treasure Hunt

Save your game and carefully deposit the 'cage' note from Level 15 into the caged square marked (TH). Doing so will make a warp to Level 7 (W7) appear at the bottom of the chasm on your right. Walk off the ledge to fall onto it. You will not die or take damage from the fall. Once through refer to section Level 7 subsection Arena Revisited. When you're done, taking the warp there will bring you back near the boss of this level.


Boss

Less health than the last boss and 20% resistance to everything but physical. Her abilities are Life Leech, Fireball, Scorch, Arcane Ball and Wand. Reserve your interrupt for Life Leech, and use it as soon as it starts. This battle will test your single target healing. On higher difficulties, you will most likely have to rotate aggro.
Level 18


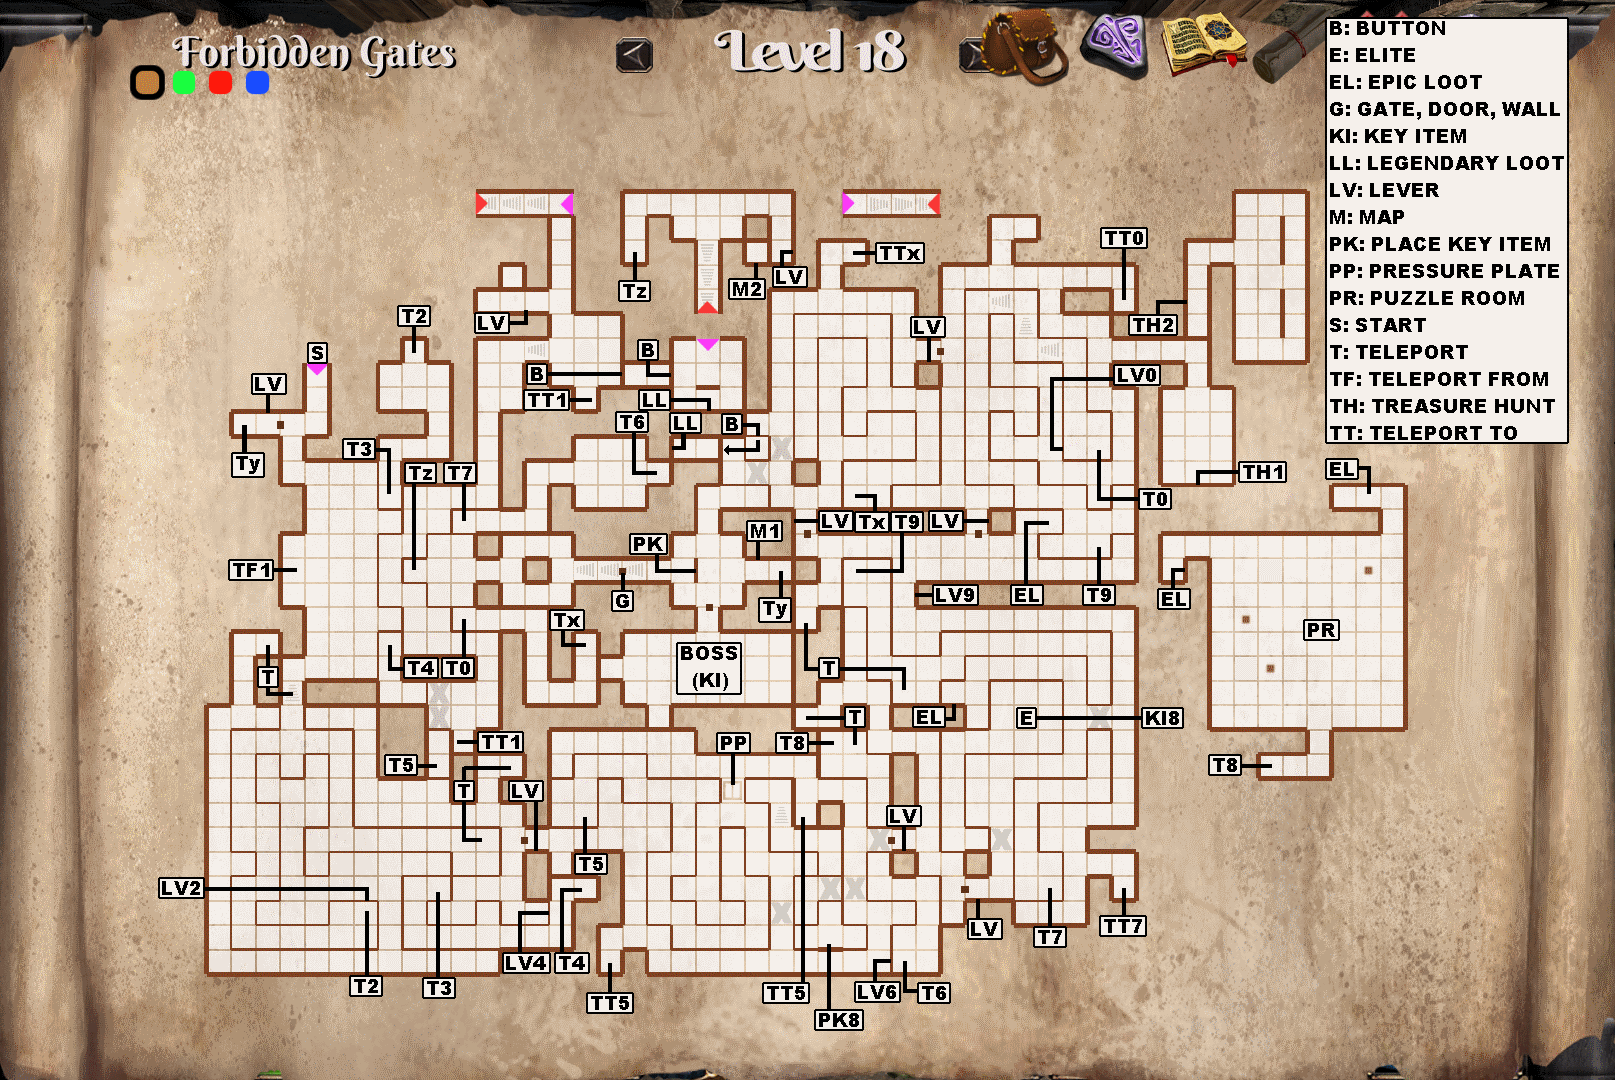
I hope you like teleporters. In several places you'll have to drop down to the lowest floor to flip the numbered levers to activate the teleporters with the corresponding numbers.

There are 2 legendary items (LL) on this level. Picking up the boots will unlock the LEGENDARY BOOTS achievement.

Weighing down the pressure plate (PP) will close the trapdoor directly above it. There are rocks nearby.

To activate the (T8) teleporter to the puzzle room, you must place the emerald (KI8) you got from defeating the elite on the pedestal at (PK8) and remove the note already on it.

The boss drops a strange skull (KI). Place it on the pedestal (PK) to open the door (G) leading to the last teleporter (Tz).


Elites

Ash Basilisk (1): Its abilities are Sludge Spit, Fireball, Rip and Punch. Interrupt Sludge Spit.


Puzzle Room

It's a teleporter maze.

Hint: There are 2 loot caches.

Solution: From the start to the first cache: forward (north), right (west), forward (east), left (west), left (west). To your left (west) is the corridor to the first cache.
From the start to the second cache: right (east), left (north), forward (south), forward (north), right (north). To your right (north) is the corridor to the second cache.


Treasure Hunt

Put the 'family' note from Level 7 (via the Level 17 warp) with the skeleton in the wall at (TH1) and the wall behind you will open. Pick up the 'nothing' note at (TH2).


Boss

Her abilities are Night Cloud, Shadow Curse (stacks up to 5 times), Shadow Armor (50% damage reduction) and Wand. Shadow Armor lengthens the battle, but Shadow Curse could actually kill your tank. If you think your tank will be fine until the next Kick or Pommel, interrupt Shadow Armor, otherwise interrupt Shadow Curse.

To dodge Night Cloud, stand back from her but not all the way to the wall and sidestep the projectile. Staying away from walls is important because it does splash damage on impact.
Level 19


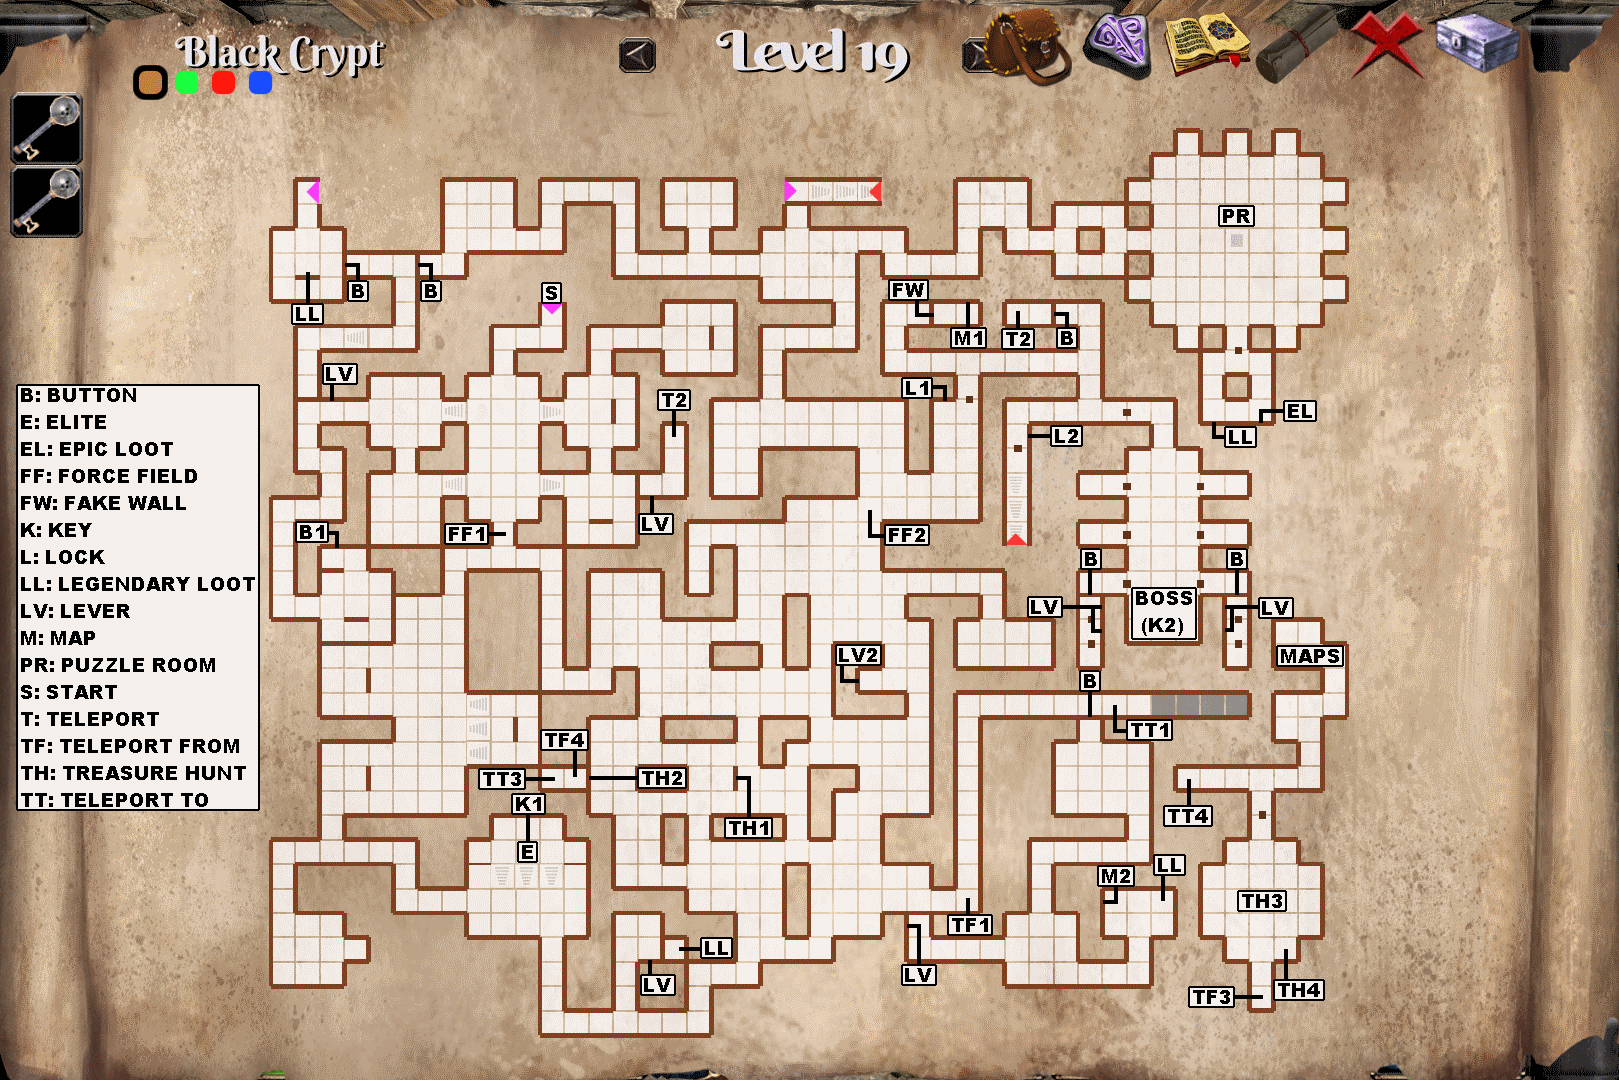
The square marked (TT1) will sneakily teleport you back to (TF1) with no visual or audio effect. To avoid getting caught in the loop, do not walk on the square with the torch on the wall after turning the corner. Instead, stop just before it and turn south and find the button on the wall.


Elites

Skeleton King (1): 30% armor. Abilities are Shield Bash, Rip, Smash and Slash. Slash hits your whole party but by itself doesn't do a lot of damage. Still, it's used very often so the damage adds up.


Puzzle Room

5 targets for light balls to hit and 8 levers to spawn "teleporters" to redirect them. Stepping on the pressure plate in the middle of the room starts the show.

Hint: Only 3 levers need to be used.

Solution: From the pressure plate, move 1 square north then go all the way east and pull the lever on the wall. Turn around and go all the way west and pull the lever there. The last lever is 2 squares east and 2 squares north from the 2nd one.


Treasure Hunt

Place the 'nothing' note from Level 18 on the pedestal at (TH1) to open the wall at (TH2). Go through the revealed teleporter (TT3) and prepare to fight the treasure hunt boss (TH3). The fight is made complicated by traps that shoot fireballs. The (TH4) square is a safe spot if the boss is standing to the north of it.

As for the boss, he has low health for a boss and 20% shadow resistance. His abilities are Pierce, Double Smash, Swipe and Heal. You'll want to interrupt Heal. Dodge Swipe but be careful of the fireballs so you don't end up taking more damage than Swipe would have dealt and be especially careful of not losing the safe spot.

The (MAPS) room contains the 2nd map of every level that only had 1 map, so Levels 8, 9, 13, 14, 15 and 16.

Completing the treasure hunt will unlock the TREASURE HUNTER achievement.


Boss

Huge health pool but no resistances. This is counterbalanced by the purple halo square that grants a 60% damage buff for 1 minute. The green one is a 45 second delayed group heal. His abilities are Super Nova, Lightning, Swipe and Punch. Dodge Swipe if the boss is alone, otherwise I would say it's preferable to interrupt it so you don't lose your positioning and get cornered. When he channels Super Nova, move 2 squares away from him.

Doors will periodically open to release mobs. It's important to kill them all ASAP or you'll lose maneuverability and be unable to dodge the next Super Nova. Do not be greedy with potions, this is a long fight you won't be thrilled to start over. Only go for the buff squares if the opportunity presents itself. Do not get cornered. If you keep the boss near the north side of the room, you can go for the buffs every time he Swipes, assuming he's alone.
Level 20


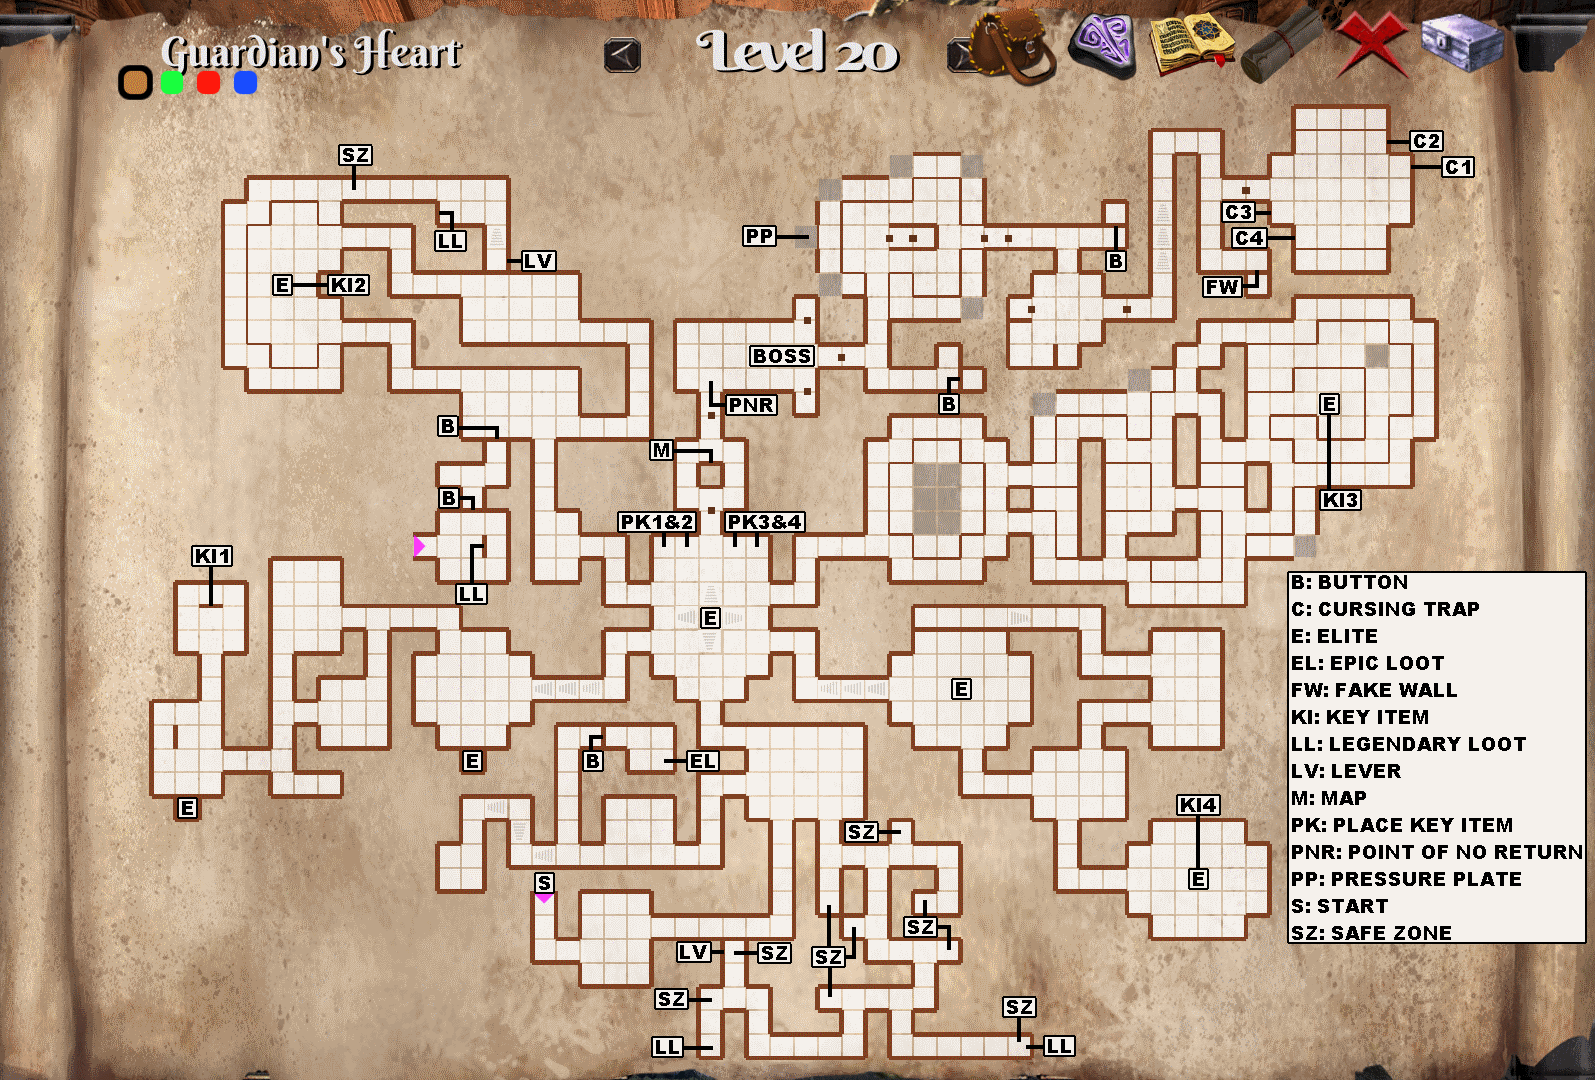
The southern corridors are filled with deadly gas. You can run through at the cost of health to collect the loot it hides. The safe zones where you can stop to heal up are marked (SZ) on the map.

Picking up (KI1) will free 2 elite gargoyles that you will encounter on your way back to the central room.

The (PNR) square is the point of no return. Make sure you did everything you wanted to do before stepping on it.


Elites

Soul Crusher (2): Low health, no resistances. Abilities are Fire Meteor, Soul Ban, Double Smash and Swing. Interrupt Soul Ban.

Gargoyle (2): Lightning, Scorch and Harpoon. Interrupt either Lightning or Scorch.

Ash Basilisk (1): Sludge Spit, Fireball, Rip and Punch. Interrupt Sludge Spit. A protector can also Spell Deflect it.

Elder Wyvern (2): Fire Flood, Rip and Harpoon. Dodge Fire Flood, interrupt Rip.


Boss

Get ready for a final boss with *4* phases. Before initiating a new phase, always make sure your talent points are distributed the way you want. If not, then respec. The first 3 phases are similar, damage him enough to make him teleport to regenerate and walk into the blue energy field to stop it. In the 2nd phase you'll have throw a rock on (PP) to raise a gate in the way of the energy field square. Quicksave before you throw.

His abilities for the first 2 phases are Energy Blast, Energy Shot and Slime Bomb. You can dodge Energy Blast by moving 2 squares away from him. You can also dodge Slime Bomb but it's very difficult to do so since it's a slow moving homing projectile. Your best bet is getting something between your party and it.

The 3rd phase adds Burning Hand and Fire Armor to his abilities. Interrupt Burning Hand.

The 4th and last phase is different. The boss will regenerate in combat when he drops low and the only way to stop it is to kill him before he heals. Unfortunately you won't have enough DPS by yourself to do that. You have to manipulate him into being hit by the curse shooting traps. With 10 stacks of the curse and with your party DPS on top of it, the damage he takes will outpace his healing and he'll die eventually. Make sure to never lose the curse stack.

The cycle for the cursing traps is (C1) (C2) (C3) (C4) before looping back to (C1) to start over. The best time to reposition between curses is when he's channeling Energy Blast. I suggest quicksaving every time he gets hit by a cursing shot.
Loose Ends
THOROUGH achievement

I'm not sure exactly how or when I unlocked it so I'm just going to translate what Sp@wned's guide said about it:

Originally posted by Sp@wned (translated):
If you're starting from Level 20, 19 or 18, here is the path to follow:

- Unlock the secret wall on Level 20, 19 or 18 that contains a room that directly leads to the room on Level 17 as a shortcut.
- Walk from the shortcut room on Level 17 to Level 16 the normal way.
- Take the warp on Level 16 that leads to the Level 13 warp room.
- Take the shortcut stairs from Level 13 to Level 9.
- Take the warp on Level 9 that leads to Level 1.
- Walk without stopping from Level 1 to 8 using the shortcut stairs.
- Walk normally toward the northeastern exit on Level 8.

As soon as you approach the Warp leading to Level 9 you will have a party conversation and the achievement should unlock.


THERE'S NO TRY achievement

Originally posted by Viveroth:


In general: You always RUN full spead ahead. You stop at GREEN points. You continue running instantly when the fireball from the same RED letter will pass in front of you.
Example:
X - U start here and move yourself to letter A without any harm. When fireball from RED A shoots, you run to point B without stopping. Then when the fireball from B will pass in front of your eyes, you run to point C. Sometimes the stop takes 0,5 second. Sometimes its 3 seconds. Its always the first fireball.

Green H + J are on the same spot
Red C + J are the same fireball face.

Important: Y is the end of first part of the run. You have to go there for half a second after point C. Point D is the first one in the coming back route.
Credits
ManuTOO for making the game, answering a lot of questions and some of the insights in the Choosing Gear section.
Sp@wned for an excellent French maps and achievement guide.
Bob for playtesting and giving helpful tips.
Viveroth for the detailed solution to the THERE'S NO TRY achievement.
Samseng Yik for info on loot cycle manipulation and class analyses.
19 Comments
cagedmercury 1 Jun @ 9:42pm 
Very appreciative of this guide! Mostly only using it when I got stuck but saved a lot of running around in early levels. Really fun game, thanks @ManuTOO for creating it! I'd love to see some xpac or other content since the engine is really nice.
Runetek 16 Dec, 2023 @ 3:47pm 
Great Work on the guide.
ShadowTigerZC 17 Oct, 2023 @ 2:16am 
A fantastic guide, and I thank you for it.

Real quick - The solution to the Level 17 puzzle room should be changed from
4E 2S 1W 1S 1W 1E.
to
4E 1S 1W 1S 1W 1E.

I drew a little MSPaint map and everything as to why the first one failed, but then just changed the 2S to 1S and it worked fine on the first try. Awesome.
Grandmaster of Pwn 15 Jan, 2023 @ 6:39am 
wow, this is really awesome. thanks for your time and effort. exactly what i was looking for. i love the gaming community cause of ppl like u
BigRowdy 18 Apr, 2022 @ 8:26pm 
Normaly I like to figure stuff out myself but I have quit many times out of frustration. So thank you. I know it was a lot of effort.
MugiwaraKaisoku 20 Oct, 2021 @ 9:56am 
Great guide, thank you so much. I am on level 20 now and still enjoying it :-)
Morte 5 May, 2020 @ 4:24pm 
Thank you very much :)
Knightowl975 20 Jun, 2019 @ 6:37pm 
Great maps and tips here man! These have been super helpful at letting this game fill my Grimrock craving! I did find a secret missing from your map on level 14 though. Your map is filled out there, so I assume you just forgot the markers for the Secret Button and Epic Loot there. It's for the C shaped section toward the lower right center of the map. It's about 13 squares up from the bottom and 8 to the left. :)
Oz 5 Apr, 2019 @ 11:25pm 
Brilliant guide, saved me several times. Thx :praisesun:
Caitlyn Clarks' Glorious Bush 16 Feb, 2019 @ 5:35am 
whoa! what a guide. Dont forget the little guys when you get your Pulitzer one day. :steamhappy: