Killing Floor 2

Killing Floor 2

559 ratings
Dedicated Server Secrets, Tips, Fixes, Tutorials, & More
By zachjd
The ultimate guide for new and existing Killing Floor 2 server owners! In depth tutorials and explanations on hosting multiple servers, setting up multiple admins, installing custom maps, installing mutators & gametypes, fixing mismatch & opening file errors, web admin modifications, exporting & importing bans, enabling chat logs, easy updating, general server tips, server settings and much more. Look no further.
2
9
3
   
Award
Favorite
Favorited
Unfavorite
Item State & Warnings Explained
After adding Workshop custom maps to your server config PCServer-KFEngine.ini, you will begin to see Item State on your server console. You may also begin to see different warning messages and I will explain those as well to the best of my knowledge. If you have any information on these, feel free to share.

Item State Explained
  • Item state is 4 - Means the custom map is installed and up-to-date.


  • Item state is 0 - Means the custom map is not currently installed and will begin to download it for the first time.


  • Item state is 12 - Means the custom map is currently installed but requires an update. It will begin to download it and replace the original file.


  • Item state is 20 - Likely means the custom map(s) failed to be checked for updates and/or temporarily lost connection to the Workshop. Restart the server if you see this and make sure your connection is stable.


  • Item state is 8 - Unknown but it could mean the server is having an issue with the download or checking its status, similar to Item State 20. Will update this if I find more information.


  • Item state is 36 - Unknown but always goes away on it's own. No noticeable problems were found from this item state. A pattern was found that each map that had this state were all from the same Workshop uploader, with the exception of a few others. Not sure if that means anything.


Warnings Explained
  • Warning: Warning, Workshop: Steam does not appear to be running. Unable to check Workshop.
    Means the server has no connection to the Workshop and it can't check any of the Workshop ID's.

    You can fix this by closing and re-opening Steam through your taskbar and then re-launch your server. Make sure your server is up-to-date. This warning can also occur if you launch your server twice by mistake.


  • Warning: Warning, Workshop: Unable to download workshop item <Workshop ID>
    Means the Workshop page for the ID you entered was set to private or taken down. It can also mean you entered an invalid Workshop ID in your config.


  • Warning: Warning, Workshop: Attempting to check if item <Workshop ID> is installed without having downloaded it.
    Means the server is checking to see if the map already installed so it doesn't have to download it from the Workshop. I will explain further below.


    You will see this warning after adding new maps to your config and launching the server. Remember, the workshop installs custom maps under TWO different locations in your server files. The server will check to see if the map already installed in the first location:

    C:KF2ServerBinariesWin64steamappsworkshopcontent232090

    If the map is installed to the first location above, it will automatically copy that map file to the second location below without the need to download it from the Workshop.

    C:KF2ServerKFGameCache

    If the server finds that map is not installed in the first location, it will go to an Item State 0 and download a new file from Workshop. Once it finishes downloading the custom map(s), it will copy them to the second location and will result in a Item State 4.
Update Your Server Easily
Here's how you can easily and quickly update your dedicated server(s) just by simply launching an application. Here are the steps to get it set up.


  1. Right click SteamCMD.exe (the application you use to create and update your server) and create a shortcut.

  2. Rename the Shortcut to "Update Server". You can place this shortcut anywhere you want.

  3. Right click the Shortcut, click Properties, then find the Target field.

  4. Paste the following at the END of the Target field in the properties window.
    +login anonymous +force_install_dir ./KF2Server +app_update 232130 +exit

    IMPORTANT: you may need to alter the +force_install_dir path above so it knows the location of your current server or it will create a brand new server instead. You can use an absolute path as well (force_install_dir c:KF2Server) As long as it can find your KF2Server folder that contains KF2Server.bat and all other files, it will update your server corretly.

  5. Finally, when there's an update for Killing Floor 2, just launch that application and let it do the work. It will close automatically when it's done. No need to login and type in everything every time.
Notes:
For regular updates: updates app_update 232130
For beta updates: app_update 232130 -beta preview
To validate your servers files: app_update 232130 validate
Understanding Server Icons
Ranked Icon - Means the server is ranked and stats/xp are enabled. This type of server is not running any mutators or custom server settings. Custom maps will not de-rank a server unless it uses scripts.

Ranked Stock Icon - Means the server is customized but stats/xp are still enabled. This type of server is likely running a whitelisted mutator or a game setting like friendly fire has been enabled.

Unranked Icon - Means that the server has stats/xp disabled. This type of server is running a non-whitelisted mutator/mod OR the custom map loaded uses scripts of some sort like spawning extra Zeds.
Creating Multiple Servers
Here's how you can create multiple servers that share the same server files but use different settings for each server.

Results


This will eliminate the need to set up a second server using SteamCMD.exe. That would waste a lot of time and consume more of your hard drive space. With this method, you can simply update your server once like normal and all of your servers will be updated together because they share the same files. The only files they don't share are on the configuration files, that way they each have their own settings and server name. I recommend you have at least 16GB RAM installed if you plan on playing on the same computer you host on. If not, 8GB will suffice but always check Task Manager to see how much you're using.

  1. Create a copy of KF2Server.bat and paste in the same location as the original. Rename it to KF2ServerHoE.bat or any other name as long as it doesn't match the original.

  2. Right click KF2ServerHoE.bat and click edit. You will now add -ConfigSubDir=HoEServer at the end and save. I'm using the name HoEServer as the example, you can put whatever.

    Here's what my KF2ServerHoE.bat looks like:
    start .Binarieswin64kfserver KF-BioticsLab?Difficulty=3?GameLength=2 -ConfigSubDir=HoEServer

  3. Launch the KF2ServerHoE.bat that you made. KF2ServerHoE.bat will now create a new sub folder titled HoEServer in your Config folder.

    This sub folder is for the settings of your second server. The config files for your first server will still be in the Config folder as shown below.


  4. Open the folder HoEServer that was created and open PCServer-KFEngine.ini. At the very top under URL, you should see Port=7777. Change it to Port=7778

  5. Inside the HoEServer folder again, open KFWeb.ini. (This will be for accessing Web Admin) You should see ListenPort=8080 in the config. Change it to ListenPort=8081

  6. Last but not least, forward the new ports in your router.
    Ports to forward:
    7777-7778 UDP (Game Port)
    27010-27019 UDP (Query Port)
    8080-8081 TCP (Web Admin)
    20560-20560 UDP (Steam Port)

    IMPORTANT: Make sure to keep -ConfigSubDir=HoEServer in your KF2ServerHoE.bat so the server knows which config files to use. You original server (the main) does not need anything.


Overview of what we did
  • Created a sub folder using -ConfigSubDir= which generated the configuration files for the second server.
  • Your second server's config files were modified to have Game Port 7778 and Web Admin Port 8081 so it's different from your first server. The ports on your original server should be unchanged.

    Example Server IP Address After Completion
    209.249.95.195:7778 - HoE Server
    209.249.95.195:7777 - Suicidal Server

    209.249.95.195:8081 - HoE Server (Accessing WebAdmin)
    209.249.95.195:8080 - Suicidal Server (Accessing WebAdmin)
Setting Up Multiple Admins
Here is how you can enable MultiAdmin for your server in Web Admin and how it works in detail. This allows you to create new separate logins for each of your server admins. You can also choose what options in Web Admin they're allowed to use or not.

  1. Navigate to C:KF2ServerKFGameConfig in your server files. Your server location may be different.

  2. Open KFWebAdmin.ini using Notepad and add the following under [WebAdmin.WebAdmin]:
    AuthenticationClass=WebAdmin.MultiWebAdminAuth

  3. Launch your server and it will create a new file in the same location called KFMultiAdmin.ini.

    Leave this file as is. It contains the login information for each Admin which will be added later through Web Admin. Do not create Admins through this file or set passwords, it usually will not work. I only recommend editing this file to delete Admins.

  4. Open the Web Admin page of your server. Login with username Admin, not admin. Use your original password.

    Important: MultiAdmin takes priority over standard admin login. Although the new "Admin" account provided in KFMultiAdmin.ini will still use the original admin password you set in the PCServer-KFGame.ini. As mentioned above, login in with Admin and not admin. The standard admin login (without MultiAdmin) is not case sensitive. Admin, admin, aDmiN, are all the same. With MultiAdmin username logins, they are case sensitive.

  5. Once you're signed in, you should now see the new section Administrators.


  6. Open Administrators and click Create Administrator. Give the admin a username. This will be the username they sign into Web Admin with.

    Note: The account titled "Admin" is the default Admin account you normally sign into Web Admin with. You can disable it or leave it as is, however, it will not affect the in-game Admin login. (adminlogin <password>)

  7. Enable the account, set a password, and set a display name. The display name is the name that players will see if the Admin chats via Web Admin. It is not the username to sign in with.


  8. Now you can configure what your Admin will have control over in Web Admin using the Deny/Allow Patterns. For example, you can create an Admin that is only allowed to change maps but not have any control anything else.

    Access Order
    Deny, Allow - This means you deny some Web Admin features but allow the rest.
    Allow, Deny - This means you allow some Web Admin features but deny the rest.

    Drag drop from the Navigation Preview to select what you want enabled or disabled, based on the Access Order you selected above. I highly recommend you disable Administrators so only you have access to managing accounts.


  9. Save then log out to test the account.

Deleting Admins

There's no button to delete the accounts you create so you'll have to edit the config to do so. Open KFMultiAdmin.ini and delete the entire section for the admin you wish to remove.

Example:
[zachjd MultiAdminData]
DisplayName=zachjd
Password=
Order=DenyAllow
bEnabled=True
Port Forwarding & Static IP
One huge struggle server owners face is making their dedicated server discoverable in the in-game server browser. I'll do my best to help solve this problem and explain what I did for mine to work properly.


Before you're completely positive your server is not discoverable, check to see if your search filters are open so you can see all the servers accordingly. Then sort them by lowest ping and see if you can spot your server. You can also try giving the server IP address to a friend and see if they are able to connect via console. If not, continue on.

Finding Your IPv4 Address

First step is to find the IPv4 address your machine currently is assigned by using Command Prompt. In Windows search in the bottom left of your screen, type CMD and enter. Now type ipconfig and enter. You should now see your IPv4 address along with other information. Once you know your IPv4 Address, this is the IP address you will forward your ports to.


Make Sure Your IP Is Static

The IPv4 Address of the machine you're hosting from must be static not dynamic.There's no point in opening ports for the IP Address of your machine if it's going to be assigned a new IP later. You can set your IP to be static under your router settings or you can do it from your machine following the steps here https://portforward.com/networking/staticip.htm after choosing an operating system.

Port Forwarding

Once you have have a static IPv4 Address, it's time to make sure you opened all the following ports correctly to that IPv4 Address.[/b]

If you're uncertain on how to portforward, visit https://portforward.com/help/killing-floor-2/ Then click "Port Forward Killing Floor 2 on PC" and find the router you use. It will then give you step-by-step instructions with pictures to port forwarding.

Name
Port
Protocol
Description
Game Port
7777
UDP
"This is the main port the game will send connections over."
Query Port
27015
UDP
"This port is used to communicate with the Steam Master Server."
Web Admin
8080
TCP
"This port is used to connect to your servers web admin page."
Steam Port
20560
UDP

The following MAY or MAY NOT be accurate. Still testing these things.

Game Port not forwarded correctly can cause your server to not show under both the LAN tab and the public server browser.
Query Port not forwarded correctly can cause your server to not show in the public browser but the server may show only under the LAN tab.
WebAdmin Port not forwarded correctly can cause you to be unable to access Web Admin or you just forgot to enable WebAdmin the KFWeb.ini

Setting The Ports

Let's make sure the ports you forwarded match the ports your server is set to use.
  • Method 1 - Config Files

    Open PCServer-KFEngine.ini and make sure you see Port=7777. The default game port is 7777 already so you shouldn't have to make any changes here.


    Open KFWeb.ini and make sure you see ListenPort=8080 and bEnabled=true. The default web admin port is 8080 so you shouldn't have to make any changes here.


  • Method 2 - Port Switches

    You can also set port switches in your .bat launch file, they do take priority over whatever you have set in your config files in Method 1. I personally don't use them but if you're having problems then it's worth a try.

    Right Click KF2Server.bat and add the following to the end.
    -Port=7777 -QueryPort=27015 -WebAdminPort=8080

    Should look like this:

Server Still Not Showing In The Server Browser?
  • Check For Mistakes
    Check over all your ports, IP addresses, or other settings to ensure you made no mistakes. Reboot your router if you make any changes, it usually does it automatically anyway.

  • Set Different Game Port
    You don't need to use the default game port 7777. Try something different like 7780 and see if that helps at all.

  • Enable DMZ
    Try temporarily putting your IPv4 address onto the DMZ in your router settings and see if that works. Do not leave it on the DMZ though, use it only for testing purposes then remove when done.

  • ISP Blocking Ports
    You may need to contact your ISP (Internet Service Provider) let them know what you're doing and that port forwarding is not working. They could potentially be blocking them because this has happened to people before.

  • Software Blocking The Server
    Sometimes firewalls or antivirus may have features that can block your server. I personally experienced features of AVG, possibly AVG Tune-Up, that blocked my servers entirely even with everything else set up correctly. After disabling and/or uninstalling, my servers were back online instantly. Windows Firewall (Public Network) can also block your servers so disable that or allow the servers to bypass that.
Show Perk Levels (WebAdmin Mod)
Ever wanted to know the perk levels of each player on your server by using Web Admin?
Here's how!


IMPORTANT: Be sure to backup the files that will be edited in case of anything. If you mess something up and have no backup, validate your server files. You do not need to shut down your server to do this. This will not derank your server or have any other effects, it's for your own viewing. As a result of this guide, perk levels will be added to both the Server Info page and the Players page of Web Admin.

Let's begin.

  1. Go to the following folder located in your server files: (yours may be different)
    C:KF2ServerKFGameWebServerAdmin

    Note: Here are the files in order we will be modifying using Notepad. Back them up just incase. I'm using Notepad++, it's free.


  2. Open the first file current.html then search for Players or scroll down and you should see the headers Name, Perk, Dosh, Health, Kills, and Ping.

  3. Add the following new header and place it under the Perk line. Then save and close.
    <th>Level</th>

    It should now look like this. I highlighted the text I added.


  4. Open the second file current_players.html Right away you should see the headers titled Player name, Ping, IP, Steam ID, etc. similar to before.

  5. Add the following 2 new headers and place them under the Player name line. Save and close.
    <th>Perk</th>
    <th>Level</th>

    It should now look like this. I highlighted the text I added.


  6. Open the third file current_player_row.inc and add the following line under %player.perk.name% Save and close.
    <td class="right"><%player.perk.level%></td>

    It should now look like this. I highlighted the text I added.


  7. Open the fourth file current_players_row.inc and add the following line under %player.name%
    <td><%player.perk.name%></td>
    <td class="center"><%player.perk.level%></td>

    Be sure to also change %player.ping% class from "right" to "center". Save and close.

    It should now look like this. I highlighted the text I added.


  8. All done! Refresh Web Admin and check it out.

    Credit to Patros for his helpful comment that pointed me in the right direction with this.
Endless Wave Counter (WebAdmin Mod)
Here's how to replace the timer with a wave counter for Endless Mode


IMPORTANT: Be sure to backup the files that will be edited in case of anything. If you mess something up and have no backup, validate your server files. You do not need to shut down your server to do this. This will not derank your server or have any other effects, it's for your own viewing.

  1. Go to the following folder located in your server files: (yours may be different)
    C:KF2ServerKFGameWebServerAdmin

    Note: Here are the files we will be modifying using Notepad. Back them up just incase. I'm using Notepad++, it's free.


  2. Open gamesummary.inc and you should see the following code:

    <div class="gs_mapimage"><img src="<%map.image%>" alt="<%map.name%>"/></div>
    <dl class="gs_details">
    <dt class="gs_map">Map</dt>
    <dd class="gs_map"><%map.title.safe%></dd>
    <dt class="gs_players">Players</dt>
    <dd class="gs_players"><%rules.numplayers%>/<%rules.maxplayers%></dd>
    <dt class="gs_time">Time</dt>
    <dd class="gs_time"><%time.elapsed%>/<%time.timelimit%></dd>
    </dl>

  3. Replace the two lines regarding time near the bottom with the code below.

    <dt class="gs_wave">Wave <%wave.num%></dt>
    <dd class="gs_wave"><%wave.monsters.dead%>/<%wave.monsters.total%></dd>

  4. Your gamesummary.inc should now look like mine in the picture below. I highlighted the text I added which replaces the timer. Save and close.


  5. YOU'RE DONE! OR you can continue to add a Wave counter to the Server Info page as well. As shown below


  6. Open current_rules.inc and at the very top, add these two lines.

    <dt>Wave</dt>
    <dd><%wave.num%></dd>

  7. Yours should now look like this. I highlighted the two lines I added. Save and close


    Note: If you're missing the code for Difficulty, add that in as well under Players as shown above. If you already have it, disregard this.

    <dt>Difficulty</dt>
    <dd><%rules.difficulty.text%></dd>

  8. All complete. Refresh your Web Admin page and enjoy.

Thanks Stephen for the help tweaking this!
Cache Map Folder Explained
When you join a server, all custom maps are downloaded to the following location:

C:UsersYour UserDocumentsMy GamesKillingFloor2KFGameCache

But what do all these numbered folders and files in the Cache folder mean? You may also see these folders in the Cache folder of your dedicated server as well, it's the same thing.


  • The folders with numbers such as 643383080 indicate the Workshop ID number for a specific map that you downloaded when you connected to a server hosting Workshop custom maps. Notice the ID at the end of the following Workshop map URL http://steamproxy.net/sharedfiles/filedetails/?id=643383080

  • The .uxx files are the map files downloaded from a Redirect when you connected to a server. You may see something like this
    60CA77E2462B1A651F8CB2AAB650C39D.uxx
    These .uxx files are the ones specified in the Cache.ini config file.
  • The Cache.ini file keeps a list maps downloaded from a map redirect and assigns it a unique identifier. If you open the file, you will see something like this
    [Cache]
    60CA77E2462B1A651F8CB2AAB650C39D=KF-HorzineStorage_Test-V2
    You may even see multiple listings for the exact same map which indicate different file versions.

  • The .tmp files are just temporary files created when a player connects. They will disappear after they connect or disconnect completely.
Welcome Screen Explained
The server welcome screen is something that has been slightly dysfunctional for some time. I will show you how you can work around some problems you'll face and explain how everything works so you can make an awesome welcome screen.
  1. Welcome Screen Banner
    Must be a .PNG file. Some have reported the image must also be more than 8 bits color depth or it won't show up. The image dimensions are not too important because I think it will autosize it. If not, use 720 x 361.

    If you created your own banner, I recommend uploading it to a website like Imgur. Then use the direct link to the image for the welcome screen banner.

    Your image may appear much darker in-game, so you will need to up the image brightness/contrast for it to look normal in-game. This could take multiple attempts to get it right.

    For example, here's the image I use:


    Here's how the image looks in-game:


  2. Website Link
    Add a link to your website, Steam Group, or anything you like relevant to the server.

  3. Clan Motto
    This is the message that will be centered right under your image.

  4. Message of the day
    Write details of your server or rules. The text will scroll but there will be no scroll bar. There is also a character limit

    You can start a new line of text by using n Use two nn to make a line break.

    Example MOTD:

    Welcome to zachjd's KF2 Server (Hell on Earth) for Public & Organized GamesnnThis server is managed frequently and kept up-to-date with the latest KF2 build. Custom maps are consistently monitored for any opening file/mismatch errors. Please report any broken maps or other issues using the link below.nnBe kind and respectful to all players. Sharing money, healing others, and dropping weapons at the trader is common Killing Floor courtesy.nnEnjoy the server? Add it to your favorites and join my group below. Be sure to check out my Suicidal server as well. Thanks for playing.

  5. Text Colors & Formatting
    You can format the text in your Welcome screen message by using HTML tags. The color picker in Web Admin does not work. Here are some you can use, there may be more but I haven't tested all of them.
    <font color="#B22222" size="24">Welcome to zachjd's KF2 Server - Hell on Earth #1</font> <font color="#B22222">Test</font> <font size="25">Test</font> <b>Test</b> <i>Test</i> <u>Test</u>

    Use this link here[www.w3schools.com] to pick colors you want to use.

    Check out these examples:


    Credit to Stephen & the_z for bringing this up.
Importing & Exporting Bans
So you've banned many players from your server and now you're looking to back them up and quickly import them later. Once you know all the steps shown here, importing bans will save a lot of time so don't have to ban each player one by one all over again.

Exporting Bans
  1. In Web Admin under the section BANNED IDS, click the Export button and save the server-bans.json file to your desktop. That's it.


Importing Bans
  1. Right click the server-bans.json file you saved and open it with Notepad. You will see your server name with a timestamp and all of the banned ID's. Copy the entire contents of the file.

  2. Go to https://gist.github.com/ You can remain anonymous but I recommend you sign-in so you can always access all your gists.

  3. Type in the filename server-bans.json where it says "Filename including extension..." Below that, paste the contents of the file you copied in step 1. Click Create secret gist when you're done.

  4. Click Raw and you should now see your server-bans.json file on a blank web page.Copy the URL of this web page.

  5. Paste the URL into the URL text box under Import Bans.

     
  6. Click Import and you're done!

Notes
  • If you have multiple servers, simply copy and paste same URL into each server Import Bans URL. Update your gist as often as necessary.

  • If you're getting errors like "Downloaded file did not contain valid JSON data.", be sure you paste the correct URL or else it can't fetch the data it needs to import.
Enable Chat Logging
Here's how you can enable chat logging on your servers and how to check your check logs. Also, chat logging now tracks team chat messages <TEAM> and not just <ALL> like before.

Setting Up

Inside Web Admin, go to WEBADMIN SETTINGS then click the CHAT LOGGING tab.
  • Chat Logging - Enable or disable chat logging here.
  • Append Timestamp - Adds a date and time to the chat log filenames.
  • Force Unique - Chat log filenames will be made unique.
  • Filename - Name of the chat log file. You can put your own filename of choice such as sui_chat or use the following place holders:

    %i = Uses the server's IP
    %p = Uses the server's Port
    %c = Uses your computer's name
    %v = Uses the engine version
Once configured, click Save Settings. All done.


Checking Chat Logs

You will find your chat logs in the same location as your server logs under
KF2Server\KFGame\Logs
They will be .log files, open them with notepad.

Server Settings Explained
Here are most server settings and what they do. Some of these are in Web Admin but some are only found in the PCServer-KFGame.ini config file.

The following settings will not de-rank or make your server custom if modified.

ReadyUpDelay=90 (Seconds)
The time you must wait when all players are set to "Ready Up" except one player.

GameStartDelay=4 (Seconds)
The very short delay you wait after all players are set to "Ready Up". Lowest value you can use is 1. Do not use 0 or game cannot start.

TimeBetweenFailedVotes=10 (Seconds)
The time you must wait after a kick vote has failed before initiating another kick vote.

VoteTime=60.0 (Seconds)
The time it takes for a kick vote to end if not enough votes are placed in time.

MaxSpectators=2
The maxium numbers of spectators allowed.

KickVotePercentage=0.66 (Percentage)
How many players it will take to pass a kick vote.
0.50 = 50% is 3/6 players, 0.66 = 66% is 4/6 players, 0.83 = 83% is 5/6 players, etc.

bDisableTeamCollision=False
This enables or disables players to be able to walk through each other during the game.

bEnableDeadToVOIP=true
If set to false, players that die will not be able to voice chat until they spawn back in. Not sure if this affects normal spectators at this time.

bAdminCanPause=True
Allows admins to pause the game for all players using the console command: adminpause. If game is paused, players will still be able to connect and join the server.

bDisableVOIP=False
Enable or disable voice chat entirely.

bDisablePublicTextChat=False
Enable or disable text chat entirely.

bDisableMapVote=False
Enable or disable map voting screen after a game ends.

MaxIdleTime=0.000000 (Seconds)
Set the maximum time players can idle before getting automatically kicked. Maximum is 300 seconds. Players will be notified via text chat if they're idling too long.

bDisableKickVote=False
Enable or disable the ability to cast a kick vote.

bSilentAdminLogin=False
When you login as admin in-game, it will not announce to everyone "PlayerName has logged in as Admin"

bPartitionSpectators=False (Only talk to spectators)
If true, spectators will only be allowed to talk with other spectators. This does not affect text chat.

bUsedForTakeover=False (Allow Takeover)
This allows players to join and modify your server's game settings to match the game settings they search for in matchmaking. E.g. If they want a 4 Wave game on Normal difficulty, it will change your server to those settings. They can even set a game password on your server. This is enabled by default and I suggest you disable it unless this is the type of service you want to provide.

bEnableMapObjectives=True
You can disable the Stand Your Ground map objectives with this. Search for the command under
[KFGameContent.KFGameInfo_Survival] or [KFGameContent.KFGameInfo_Endless] but leave the one under [KFGame.KFGameInfo] to True.

The following settings will not de-rank your server but will change your server to custom (Ranked - Stock) if enabled

bDisablePickups=False
Enable or disable kevlar and weapon pick ups. You will still see ammo boxes though.

FriendlyFireScale=0.000000 (Percentage)
Enables players to inflict damage on their teammates.
Workshop vs Redirect For Maps
Ups and downs for Workshop maps versus Redirect maps

For anyone that doesn't know: This is a custom map redirect server: https://www.skillzservers.com/kf2-redirect/ and this is the Steam Workshop
You can use both a redirect and workshop at the same time. You do not need to use one or the other.

Workshop Custom Maps
File compression Yes ✓ (Map file will be compressed after uploading)
Fast download speeds Yes ✓ (Maps download quickly even at larger sizes)
Automatic file updates Yes ✓ (Authors can update their map and server will download it)
Less control (Maps must be made public on the Workshop to work on a server.)

Redirect Custom Maps
No automatic file updates
No file compression
Slower download speeds (Depends on service but generally always true)
More control (If you own your own redirect, you'll feel more in control of your maps)

The Verdict
The Steam Workshop is the way to go for most reasons due to speed and file compression. You're less likely to encounter download errors too but not entirely immune. If a Workshop page is taken down, it does "break" the custom map and players won't be able to join your server to download it. Using maps from a redirect can eliminate this problem.

Some prefer using a redirect over the Workshop so they have full control of what maps are added or replaced. Certain custom maps may never be uploaded to the Workshop so a redirect can be a good choice for those.

All in all, you should utilize the Workshop for installing custom maps because it's a better experience for players joining your server.
Efficient Custom Map Management
There's many different ways to manage and organize all your custom maps to make things easier for you and others playing on your server. I will demonstrate and explain a few here.

Add Comments To Workshop Map ID's

When adding Workshop maps to your server config in PCServer-KFEngine.ini, it will help you to place a comment next to each listing containing the map name. This way you can easily identify and search for the workshop maps you added. I recommend placing the newly added maps at the top if you have a lot of maps because the servers reads the list from top to bottom.


Remove Redundancy In Data Store

When adding custom maps into PCServer-KFGame.info, you can leave out certain lines in the data store that you don't need.

How it's commonly done:
[KF-BikiniAtoll KFMapSummary]
MapName=KF-BikiniAtoll
MapAssociation=0
ScreenshotPathName=UI_MapPreview_TEX.UI_MapPreview_Placeholder

How it can actually be done:
[KF-BikiniAtoll KFMapSummary]
MapName=KF-BikiniAtoll

MapAssociation is not needed for custom maps since it pertains to Official Tripwire Interactive maps and Official Community-made maps.

ScreenshotPathName is not needed since map previews will not work either way at this time. Hopefully custom maps will able to use preview images in the future.

Search Cache Folder For Only Map Files

You open your Cache folder and want to check each Workshop map file that installed but there's so many folders to open. Don't waste your time opening all those folders. Just search for kf-*.kfm


Managing Many Custom Maps

If you plan on installing a large amount of custom maps, I recommend keeping a proper list of them in a Excel or Google spreadsheet. A spreadsheet will allow you to easily sort your map list or use filters to check for filename changes. You can do many other things using formulas as well. This saves a lot of time and effort. Ask me if you want to know more about this.


Credit to Outfaller for introducing this to me.

Sort Map Cycle Alphabetically

If you have many custom maps installed, you may want to keepp your Map Cycle sorted alphabetically so players can quickly find the map they want to play. You can do this using Excel as well. You can also organize maps in categories as show below.

Organize Map Cycle By Categories

Instead of all your maps jumbled together in the map cycle, there is a way you can categorize the maps you have. The only downside is that players are able to click the headers but if they do it will load the default map KF-BioticsLab.

To add categories, open PCServer-KFGame.ini and search GameMapCycle

Now add a new map to the Map Cycle manually but instead of a map name, add a title like the following:
———————KF1 Maps———————

Here's how it looks in the config:
GameMapCycles=(Maps=("———————KF2 Maps———————","KF-BurningParis","KF-Bioticslab","KF-Outpost","KF-VolterManor","KF-Catacombs","KF-EvacuationPoint","KF-Farmhouse","KF-BlackForest","KF-Prison","KF-ContainmentStation","KF-HostileGrounds","KF-InfernalRealm","KF-ZedLanding","KF-Nuked","KF-TheDescent","KF-TragicKingdom","———————KF1 Maps———————","KF-KF1_Farm","KF-KF1_Foundry","KF-KF1_Manor","KF-KF1_West_London","KF-KF1-Arcade-Gas-Station","KF-KF1-DefenceB2","KF-KF1-LilBigClot-Kitchen","KF-ClassicBioticsLab","KF-MountainPass_zfix","KF-Biohazard"))

Now just organize your maps to fit under the categories to your liking.

Credit to "ATi RaDeoN" for this awesome tip.

How It Will Look:
Workaround Custom Map Limits
If you install too many custom maps on your server, you will run into problems at some point. Regardless if you're installing Workshop or Redirect custom maps and how much hard drive space you have, you will be affected. Here is how you can fix or work around these issues.

Bypass WebAdmin MapCycle Limit at 170-180 Custom Maps

After around 170-180 custom maps, you'll discover that your Map Cycle in Web Admin cuts off your list maps and won't save any further maps. Here is how you can fix this.

Open KFWeb.ini located in KFGame/Config of your server. Change the following values:

From this:
[IpDrv.WebConnection]
MaxValueLength=4096
MaxLineLength=4096

To This:
[IpDrv.WebConnection]
MaxValueLength=999999
MaxLineLength=999999

Bypass/Workaround Server Crash at 519+ Custom Maps

If you install more than 519 custom maps into your server config PCServer-KFGame.ini, the server will crash if using Web Admin. This occurs when you click either "Change Map" or "Map Cycle" button. Unfortunately this is no fix for this bug, however, you can work around it with my solution.

  1. Using MultiAdmin, create a new Admin account. I have a tutorial for this in this guide if you're unsure how to setup and use MultiAdmin.

  2. Disable the Change Map and Map Cycle buttons under ADMINISTRATORS so you don't accidentally click them and crash your server. To do this, copy and paste the following to DENY PATTERNS and make sure ACCESS ORDER is set to Deny, Allow

    /current/change
    /settings/maplist

  3. You will now change maps using the Management Console in Web Admin.

    The following command will switch maps: switch KF-MapName
    The following command will restart the current map: restartmap

    You can use additional variables as well like: switch KF-MapName?Difficulty=3?GameLength=2
Installing Custom Maps
How to install custom maps onto your server using a Redirect or the Workshop. I wasn't going to add this section to the guide due to many other tutorials out there but I feel this will complete it.

Note 1: When a player connects to your server, the map file will download from either the Steam Workshop or a file redirect site. Players do not download map files directly from your computer.

Note 2: You can use both Workshop and redirect maps at the same time incase you want some maps from one and some from the other. Workshop takes priority over a redirect though so keep that in mind.

Installing Custom Maps (Redirect)
  1. Find what redirect site you plan to use. Probably the most widely used redirect is https://www.skillzservers.com/kf2-redirect/ Save that URL, will use it a bit later.

  2. Open the redirect URL and simply download the custom maps you want to install. Press CTRL+F to search and try to find the latest version if possible.


  3. Go to \KF2Server\KFGame\BrewedPC\Maps and create a new folder called CustomMaps This step isn't required but I recommend it for organization.

  4. Move all the map files you downloaded into the new CustomMaps folder.
    If you didn't want to create a new folder, just move the files into the Maps folder instead.


  5. Go to \KF2Server\KFGame\Config and open PCServer-KFEngine.ini
    Search for RedirectToURL= and paste the redirect URL after that. Save.


  6. We now need to add a data store and add the map to the Map Cycle. Instructions for this are below under the section Custom Map Data Store & Map Cycle

Installing Custom Maps (Workshop)
  1. Open PCServer-Engine.ini located in \KF2Server\KFGame\Config

  2. Add the following under [IpDrv.TcpNetDriver]
    DownloadManagers=OnlineSubsystemSteamworks.SteamWorkshopDownload
    This will allow players to download the Workshop items from Steam when connecting to the server. Make sure you place it above other "DownloadManagers=" lines if there are any.

  3. Add the following to the bottom of the file.
    This is where we will subscribe the server to custom maps on the Workshop.
    [OnlineSubsystemSteamworks.KFWorkshopSteamworks]
    ServerSubscribedWorkshopItems=

  4. Go to the Workshop for Killing Floor 2 and find a custom map you want to install. Copy the Workshop ID number from the URL.


  5. Paste the Workshop ID after ServerSubscribedWorkshopItems= that you added earlier.
    Add two forward slashes // to add a comment so you know what Workshop item that is.


  6. Launch the server so it can download the map automatically. Check if it downloaded successfully to \KF2Server\KFGame\Cache but do not make any changes here. Close the server.


  7. We now need to add a data store and add the map to the Map Cycle. Instructions for this are below under the section Custom Map Data Store & Map Cycle

Custom Map Data Store & Map Cycle
  1. Open PCServer-KFGame.ini. We will now add a data store so the server can see the custom map you installed.

    A data store looks like the following:
    [KF-Default KFMapSummary]
    MapName=KF-Default
    ScreenshotPathName=UI_MapPreview_TEX.UI_MapPreview_Placeholder

  2. Add a new data store using the filename of the custom map and place it under the official maps.
    [KF-BikiniAtoll KFMapSummary]
    MapName=KF-BikiniAtoll

    You do not need to add a screenshot path because it will not work either way at this time. Also note: For Redirect maps, names are case sensitive. For Workshop maps, names are not case sensitive.


  3. With PCServer-KFGame.ini still open, add the custom map to the Map Cycle so players can vote for the map. Search for GameMapCycles= and add the map to the current list of maps.


    Alternatively, you can accomplish this using Web Admin under Map Cycles.


  4. All done!
Installing Mutators & Gametypes
Mutators and Gametypes explained and how to install them. These modifications disable XP and stats of your server unless whitelisted. When players connect to your server, the mods will download from the Workshop to their computer so they can run the mod as well just like a custom map. Alongside the installation instructions here, always check the author's instructions as well incase there's different steps required.

What Is A Mutator?
"Mutators are mini-mods. They have limited functionality as defined by the Mutator class." - Tripwire Interactive.
Read more on mutators here.[wiki.tripwireinteractive.com]

What Is A Gametype?
"A gametype is what determines the rules of the game: how the game starts, how scoring or other events are handled, what conditions must be met for the game to end, and any other elements of the game." - Tripwire Interactive.
Read more on gametypes here.[wiki.tripwireinteractive.com]

How To Install
  1. Copy the Workshop ID from the URL of the mutator or gametype you want to install.


  2. Open PCServer-KFEngine.ini and scroll to the very bottom. Paste the workshop ID number after ServerSubscribedWorkshopItems= to subscribe the server to the mod just like a custom map.


  3. Launch your server so it can download the mod. Close the server and check your Cache folder to be sure it downloaded successfully.


  4. Now to tell the server to run the mod upon launch. You can do this adding the mutator/gametype to your KF2Server.bat launch variables as shown below.


    Important Note: Check the author's instructions for the command line you need to use to run the mod because they are all unique. Examples:

    Unofficial Endless Mode: ?Game=EndlessM.EndlessM_Main
    Controlled Difficulty: ?Game=ControlledDifficulty.CD_Survival
    Legs & Backpack Mutator: ?Mutator=FPBackPackMut.FPBPBaseMut
    Infernal Nightmare Difficulty: ?Mutator=NightmareDifficulty.NightmareMutator?Difficulty=4
    Server Extension Addons: ?Mutator=ServerExtMut.ServerExtMut
    Boss Only: ?Mutator=OnlyBossMut.OnlyBossMut
    Classic Scoreboard: ?Mutator=ClassicScoreboard.ClassicSCMut
    MaxPlayers: ?Mutator=KFMutator.KFMutator_MaxPlayersV2?MaxPlayers=15?MaxMonsters=64

  5. Re-launch the server and enjoy.

Using Multiple Mutators

You can use multiple mutators together by separating the commands by commas. Here is one example using the Boss Only Mutator combined with the Legs & Backpack Mutator.

?Mutator=OnlyBossMut.OnlyBossMut,FPBackPackMut.FPBPBaseMut

Important Note: You may need to check with the author's notes to see if certain mutators are compatible together.
Fix Mismatch/Opening File Errors
I have written a full guide on this topic below with every possible fix I know.

http://steamproxy.net/sharedfiles/filedetails/?id=817357757
Server Tips, Secrets, Etc.
Some quick tips for server owners and any other information that doesn't fit into other sections.
  1. PREVENT KICKING ADMINS - If a kick vote is cast on a player logged in as Admin, the player cannot be kicked even if the vote passes. In addition, you cannot kick a player signed in as admin even when using Web Admin.

  2. SESSION BANNING - If you Session Ban a player, it will ban them until the next map loads then automatically unban them. You should use this over the the standard kick because the player can join back into the same game after a short period of time.

  3. RANDOM MAP VOTE THEORY - If no player votes for a map postgame, the server will just load the next map in the map cycle. It does not randomly select a map as many people think it does.

  4. BYPASS GAMEPASSWORD WITH ADMINPASSWORD - When your server is password protected, you can use either your the game password OR your admin password to enter the server. If you use the admin password, you will be signed in as Admin upon entering the server.

  5. FASTER ADMIN LOGIN Bind the command "adminlogin <password>" to a key so you can easily login as Admin each map without the need to utilize the console. You can set the bind in KFInput.ini located
    C:\Users\Name\Documents\My Games\KillingFloor2\KFGame\Config
    Add the following line to the bottom and change 123 to your password. Set a key you want to use or keep it as NumPad 1.
    Bindings=(Name="NumPadOne",Command="adminlogin 123",Control=False,Shift=False,Alt=False,bIgnoreCtrl=False,bIgnoreShift=False,bIgnoreAlt=False

  6. PREVENT PLAYERS BLOCKING DOORS - Disabling Team Collision in Web Admin will allow players to walk through each other thus preventing trolls from deliberately blocking doorways.

  7. PREVENT WINDOWS AUTOMATIC UPDATES - Stop your PC from automatically updating so it will not auto reboot when you're away. This is incase you don't want your servers unintentionally shut down and continue to run 24/7. Set active hours to cover as much time as possible and enable a notification so it can let you know it will restart and give you an option to postpone.

    If you want to get technical and completely disable Windows updates, run the "Services" application in Windows. Scroll down to Windows Update, click properties, click Disabled. Your PC will no longer update automatically but be sure to turn it back on temporarily when you do want to update.

  8. WEB ADMIN NOTES - Copy and paste useful information like below into your Web Admin Notes so you know what each number means incase you haven't memorized them.
    Difficulty: Hell on Earth = 3, Suicidal = 2, Hard = 1, Normal = 0
    GameLength: Long = 2, Medium = 1, Short = 0
    If you have multiple admins, you can also leave notes for them to read next time they sign in.

  9. CONFLICT SOFTWARE SERVER CRASH
    Some windows applications installed on your computer can conflict with your dedicated server even if that application is not running. It can cause your server to randomly crash.
    Known applications that cause conflict: Microsoft Visual Studio

  10. CHANGE THE DEFAULT MAP
    If players vote for a map that the server can't find, it will load the default map BioticsLab. Change this by opening PCServer-KFEngine.ini and modify ServerLocalMap=KF-BioticsLab to a map of your choice. Update: This may not work for some reason and continue to load BioticsLab. Still investigating.
Closing Statements
Hope this guide was useful. If you have a question or feedback, let me know. I'm always looking for ways to perfect this guide. Add it to your favorites and leave a Like!

Thank you to anyone that helped give suggestions to make this guide better. I did place names of people the end of a section if I felt they deserve some credit.

225 Comments
Sombric 18 Jun @ 7:41pm 
I have the same problem as @Leppie, all the levels appear at 25 :trolol:
Sharki 27 May @ 5:16pm 
Hey, I was wondering how other servers we're able to use this mod and allow for players from epic to join. I have a couple of my buddies who want to do this and I want to really get this working as soon as possible
good guide bud, but web admin wont work, i've spent over an hour trying to log in, changed the password a ton of times and nothing, read 3 other different guides and the official and it just wont let me log in, i literally want to play with a server to pause the damn game but... shit happens i guess
Stephen 22 Mar @ 5:38pm 
They removed the functionality from WebAdmin to combat servers with a perk level requirement with an automatic kick script if below the level threshold.
Leppie 6 Mar @ 3:42am 
Very nice guide, thanks for that.

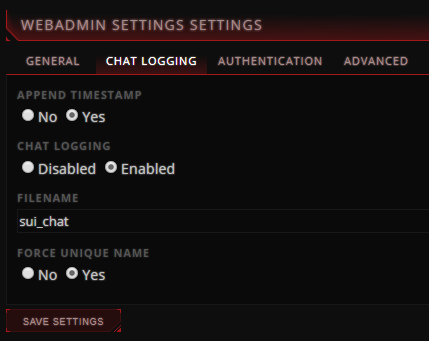
My WebAdmin recently started displaying perk level as 25, independent of what the players' actual perk levels are. Has there been an update that changed the variable or is it just no longer allowing access to the perk level?

It used to work fine, and since I hadn't played for a while I do not know when exactly this stopped working for me.
I've booted up an old VMWare image (on which the perk level worked fine), but it just shows "25" no matter what the player's real perk level is.

Any suggestions/ideas to what causes this issue?
And hopefully a way to solve it?
medeiros 1 Mar @ 6:42am 
I was about to ask what the user below said, the admin on these servers somehow found a way to bypass the ranked server system and they're full or custom zeds, weapons, trader, etc.
Deko 17 Nov, 2023 @ 3:51pm 
how to use non-whitelisted mutators and still stay ranked? I see a bunch of servers using many non-whitelisted mods and they still stay ranked.
zachjd  [author] 26 Oct, 2023 @ 7:12pm 
Forgot to mention, you could add the password you wanted too, should work.
zachjd  [author] 26 Oct, 2023 @ 3:45pm 
Here's the completed I wrote up real quick. lol.

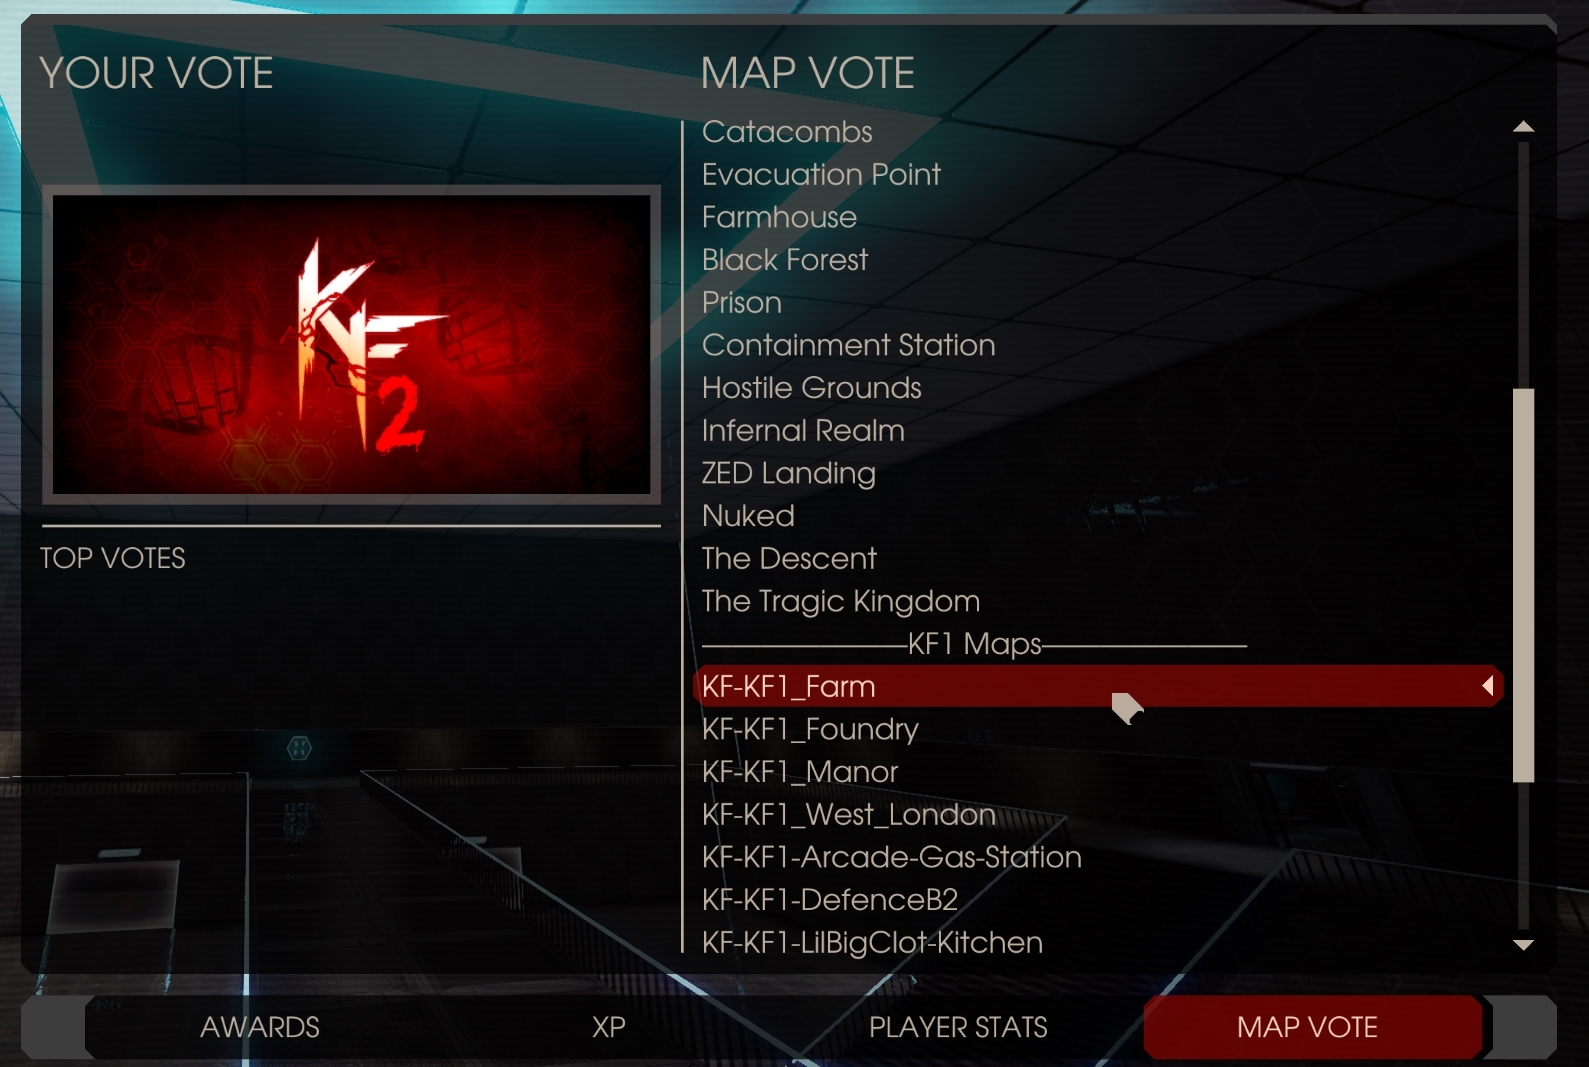
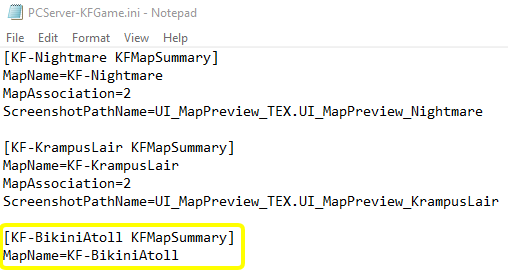
# Selecting random map
$Array = @("KF-Map1", "KF-Map2", "KF-Map3", "KF-Map4")
$RandomMap = $Array | random

# Modify KF2Server.bat to use random map
$Launch = "start .\Binaries\win64\kfserver $RandomMap`?Difficulty=2?GameLength=2"
Set-Content .\KF2Server.bat $Launch

#Launch the KF2Server.bat
Invoke-Item .\KF2Server.bat


So paste that to notepad then save it as a .ps1, the icon should change.. Make sure it's in the same location as your KF2Server.bat file. Double click and enjoy a random map. :cta_emo2:
Also, modify the script $Launch variable instead of the .bat file from now on.
zachjd  [author] 26 Oct, 2023 @ 3:43pm 
You could also do a random map selection at start up with Powershell. Never tried it though but should work fine. E.g. Launch a script that modifies the server .bat file with a random map name and then launches it. You'll get a different map every single time.

In the script, you would have an array of all the map names you'd declare.
$Array = @("KF-Map1", "KF-Map2", "KF-Map3")

Or have the script pull it from a list in notepad.
$File = C:\Maps.txt
Get-Content $File


Select a random from the list:
$RandomMap = $Array | random

...