Rising Storm 2: Vietnam

Rising Storm 2: Vietnam

102 ratings
Commander for Dummies
By Nunk and 1 collaborators
Found yourself playing commander? Here’s a rundown on the absolute basics.
5
   
Award
Favorite
Favorited
Unfavorite
Intro
You shouldn't be playing commander if you don't know what you're doing.
Unfortunately, RS2 has no commander tutorial, so lots of people don't know what they're doing.

This guide hopes to add some form of competence to new commanders.

P.S:
If you teamkill >3 teammates with fire support, that's your own fault, not your teammates.
Myths
Myth:
Commanders should be sitting at the radio for most of the game.

Wrong:
You can "tap and go" for all the commander abilities requiring a radio ingame. You run to the radio, press what you want, and go back to the frontline shooting people. Just make sure you stay alive for the next 15~ seconds so what you call in actually happens.

You're playing commander because you're better than the average player on your team. You are way more useful shooting people, than sitting at a radio waiting for cooldown or using recon when your team is attacking.

---
Myth:
Commanders are dependent on marks from SLs.

Wrong:
You have your own pair of binoculars, get your own marks. It's not difficult, use vertical objects to mark the location of arty that you want.

---
Myth:
Commanders lives cost <x> tickets, where <x> is greater than one.

Wrong:
One life = one ticket. It doesn't matter who you are. SL, TL, or regular grunt - one life is one ticket.

---
Myth:
If you have arty, you *have* to call it *somewhere*.

Wrong:
Bad arty is always worse than no arty. Don't call in fire support if there are no useful marks.

---
Myth:
Arty is used to clear out objectives.

Wrong:
Arty is used to cut off reinforcements to the objective. Napalm is what you use if you want everybody in a certain area to die and die now. If you use arty on the objective, you are wasting it and helping the enemy team because your own team cannot get into the cap.

---
Myth:
Ambush / fast deployment costs more than one ticket per life.

Wrong: One life = one ticket. Only exception is when VC Ho Chi Minh Trail is called in, which makes one life = 1/2 ticket.

--
Myth:
You need a radio to cancel fire support.

Wrong:
You can cancel fire support at anytime by just opening your map and pressing T (by default this brings up the cursor on the map) and hit the cancel fire support button.

---

*WIll add more as I see more dumb things said ingame*
North Vietnamese
Since they changed radio locations on all the default maps to be one cap back, it's heavily recommended that you have two radiomen running around. They don't need to follow you, they just need to be relatively nearby in case of Spooky.

This section of the guide is written assuming that NVA is playing defense.


Ambush deployment:
This ability spawns everyone dead on your team at your current location. When used well, it will flip a cap and send the GI home. When used poorly, it will spawn your team 2 objectives away and tick everyone off. You don’t need to be at a radio to use this, just press N.

How to use:
Use this when there's a lot of dead people on your team and when you’re on an objective. Similarly, use this when the objective is more than 50% capped and you’re on the objective. It doesn't matter how many people you're forcespawning as every man counts. Never use this at spawn, even when your entire team is dead. No one wants to run 150 metres instead of spawning at a tunnel.

Scout Recon:
An invisible scouts teleports around the battlefield spotting GI. You need to be near a radio to get spots. You cannot switch radios, you need to stay at the radio you called it in at.

How to use:
Call it in about 40 seconds before barrage so you can hit them accurately. Otherwise, if you have radiomen around, you can call it is often as you want. You just need to be near the radiomen, about 15m will be fine.

Honestly not as useful as the other abilities. I rarely use recon on defense, maybe to prep a barrage if I'm not sure where the main bulk of the enemy team is.

Ho Chi Minh Trail:
Halves respawn timer and ticket cost for people spawning in for 60 seconds. Actual duration of HCM depends on the map designer so it can vary.

How to use:
There's no reason not to call it in as often as possible. The moment it comes back online, call it in again. This ability is pretty good, as it eases up ticket usage very well.

Barrage:
Blows everything up in tile around the mark for four salvos, which is slightly under a minute. This is your most important ability, followed by ambush.

Its important to know the difference between the National Liberation Front (NLF) and Peoples Army of VietNam (PAVN) since their Barrages aren't the same. The NLF barrage consists of mixed ammuntions that includes Mortars, Artillery, Rockets and White Phosphorus a.k.a Willy Pete. This Barrage has a much larger spread (random deviation) from the center mark than any other artillery in the game so random teamkills might occur. PAVN artillery in comparison is just a standard strike with fair accurcy and high consistency.

tl;dr:
NLF barrage = highly randomized spread, mixed munitions
PAVN artillery = moderate spread, explosive shells
Be careful when placing NLF arty marks.

How to use:
On the first objective, call it in as soon as you get it, way outside the objectives near American spawnpoints or near American high-traffic areas. You will get some kills and halt any pushes that the Americans have been making. If you accidentally TK with this first call, that is entirely on you.
Here's an example:


If you aren’t sure of high traffic areas or spawnpoints, call in your scout recon, place your own mark, then blast the Americans. You should not be killing any teammates with this artillery.

After the first call and cooldown, hold it for counter-arty. This means that when Americans drop arty or spooky, wait a few seconds, then blast them back with your barrage. VC barrage has a larger killzone and faster recharge than American artillery, so it’s a tool used for “I want everything in this area dead for the next minute” rather than area denial.

If the Americans are pushing up rather quickly, use a mark closer to the cap. For example, here's a mark for counter-barrage or when you're losing the point:


If the Americans haven't been making any gains, you can blast their spawn entrances again.

Anti-air:
Dedicated anti-spooky, kills bad pilots as a bonus.

How to use:
Hold it until you hear American Spooky (AC-47 gunship). That’s literally it, if you use it for anything else you have lost a cap for your team when Spooky gets called in. Napalm may kill you once but Spooky will kill you and your family for several generations.

After you kill Spooky, you have a one minute window to call in AA again before Spooky recharges. Spooky has a 7 minute recharge, AA has 3. I usually call in SAMs again the moment it comes back online, in hopes of shooting down Napalm.

Playing against Australians, keep AA up as often as possible. They don't have Spooky, but two of their fire support abilities rely on airplanes, so spam AA as often as possible.

On Supremacy, keep AA up as often as possible. The Cobra+Hueys are way more dangerous than Spooky or Napalm could ever be, especially since the maps are this large. Don’t expect to kill good pilots with SAMs, but at least you’re giving your team a chance to shoot back when they're forced to fly low.


Other remarks:
The importance of you staying alive is way more than the American commander. You need to react well - ambush deploy if you’re losing the cap or call in SAMs if the AC-47 comes in. However this doesn’t mean that you sit at a radio all game, just use your common sense as to when you can poke your head out and shoot at stuff.

Unless there's lockdown, don't try to preemptively guess when napalm is coming in - their recharge after getting shot down is faster than your SAMs coming back online.
South Vietnamese (United States)
On Territory maps, you are the most important player on American teams. I find American TL much more fun than VC TL, simply due to how powerful and flexible your fire support options are. Make sure you smash that N button every 2 minutes or so, or time it with large pushes with lots of dead people.

You don't need radiomen - they are convenient for sure, but the static radios work just fine.

NVA barrage kills everything in the area and stops, while American fire support works as area denial - it lasts way longer than NVA barrage and is more accurate. Arty and Spooky are designed to destroy tunnels or to cut off reinforcements, while Napalm kills everything on an objective so your team can move up.


Rapid deployment:
Force spawns everyone at the spawn they have chosen. You don’t need to be at a radio, just press N.

How to use:
Just call it in the moment you get it, so long as there’s more than five people waiting to spawn. You'll be calling this quite often, as there are zero downsides.

Aerial Recon:
A plane flies over the map, automatically spotting everything it sees accurately.

How to use:
Quite honestly useless on attack. You know the enemy is in the cap, you know there are tunnels behind the cap, you know the entrances to the cap. Recon isn't helpful, not worth the time calling in, and can warn the enemy team that you are about to call in fire support.

Maybe you can use it if you don't know the maps, or if the VC commander keeps spamming AA and you want to see if SAMs are up before you call Spooky. VC players can also hide from your recon by staying indoors or using "Stealth" by simply remaining crouched or prone without moving but shooting breaks "stealth".

Artillery:
Fires five salvos that is a mix of regular and airburst arty (Airburst explodes as the name implied in the air and can kill enemies hidding in trenches or behind cover), destroys tunnels easily and has a larger radius than Spooky. This is the strongest fire support you have as American, and your first choice when choosing support to cut off an objective.

How to use:
At the start of each match, there is a two minute cooldown on all abilities. Artillery should always be the first fire support you call in. It’s the strongest tool in the American arsenal and cannot be countered by SAMs. Be aware that anything in a half tile will die, including your own teammates.
The mark should never be touching the objective you are trying to capture, otherwise you will always be killing your own teammates.

Here’s an example of a mark on CuChi:


Spooky:
More accurate than arty, lasts longer than arty, and just as deadly as arty. However it usually gets shot down after the first salvo by competent enemy commanders.

How to use:
Place your marker behind the objective you are trying to capture. Do not place Spooky on the objective you are trying to capture! You are only hindering your own team while making it easier for the VC to reinforce it from behind. It can share the same mark as Artillery.

Napalm:
Kills everything on the mark, only sticks around for 10~ seconds or so. Extremely accurate, be cautious when using on marks that are on elevated ground. A bit of RNG is involved because the plane will choose its own vector (direction its coming in from) and the napalm will mainly spread in that direction I.E if you are attacking from the south, and the napalm comes in from north to south, there is a good chance you will hit your own team.

How to use:
Place it on objectives your team is trying to reach and haven’t gotten close to. For example, if you’ve captured A+B on Hue City, quickly place a napalm mark anywhere along the C wall. It’s free kills. Otherwise, it’s very useful when clearing the backs of objectives you are trying to capture.

An important note is that Napalm will burn itself through structures so bunkers and houses don't provide cover or shelter. Objective G on Cu Chi is a great area for Napalm, as it kills everything inside.

Here's a nice one when taking CuChi:


Other remarks:
You are the most important player on Territories maps, substantially less so on Supremacy. Your goal with Spooky and Artillery is to blow up enemy tunnels and to deny reinforcements to the objective, as your team can kill people on the objective by themselves.
Your abilities have a long cooldown so make sure you use them well, call fire support to the objectives your team is trying to push - look at your map constantly to judge which would be the better choice if there are two different caps.

Spooky and Artillery can share the same marks with great effect, but do not use them on marks meant for Napalm. Again, Spooky and Arty marks should never be touching the objective.
You should be on the frontline most of the time, and only using the radio to touch and go. You can carry up to three smokes (bugged in 1.09 so you can't) and your existence on the objective captures it faster. You don’t need a radioman up your ass 24/7 either, just call him over on the mic when you need him.

Spooky is more accurate than Artillery (the kill radius is smaller), so I prefer to place Spooky marks a little bit closer to the objective than normal. However, you can honestly share marks between the two no problem.
South Vietnamese (Australians)
Australian commander plays a bit like the US commander except your fire support is downgraded in almost every way. It is easily the worst faction in terms of fire support.

You still have Napalm, but your artillery is worse and your Canberras aren't actually that great.

Unlike other South Vietnamese commanders, you should spam recon to know when SAMs are up. You don't need to sit at the radio, just touch and go recon and if you hear the tell-tale whistle of AA, don't call anything in for the next 45 seconds.


Artillery

Your artillery is not as powerful as the US version, it has no airburst munitions and a smaller splash radius with the same cooldown (numbers may vary as this is up to map maker). Generally you want to place them in the same kind of locations as the US commander.

On Long Tan (the raining night map), you have no Canberras or Napalm but your Artillery has a 40% faster cooldown.

Bombing Run

A strike that delivers around 12x bombs in a line of your choosing, but unlike Napalm you can decide the approach vector. Choosing a bad vector might decrease effectiveness, but since the bombs go straight down it isn't too much of a difference - just draw a line across as many tunnels as you can.

It doesn't go through buildings, doesn't have any staying power, and has a smaller radius than Napalm. It is fairly inadequate and its main use is blowing up enemy tunnels, using it to stop enemy pushes will usually end up in mild disappointment because of how small its explosive radius is.

Easily the worst fire support in the game.
South Vietnam (ARVN)
Army of the Republic of Vietnam or simply ARVN, yet again plays very similar to the US Commander with minor differences. Probably my favourite faction because they always play defense with full fire support. Extremely easy to farm kills as commander and mildly overpowered to be perfectly honest.


Rapid Deployment
Same as US commander, use N to use. Spam every two minutes or time with large pushes.

Mortars
Mortars can be just as effective as Artillery if used correctly, they shoot repeatedly and hit a medium sized area. No airburst munitions but it hits fast and hard with little time between salvos. Not as good as area denial as American Artillery, but if you're playing defense, who cares? It completely oblilerates pushes and makes big booms.

Napalm
Again a copy of the US Napalm, the only difference is that the F4 was replaced by a Bearcat, which is completely cosmetic.

My personal favourite to call on ARVN, it comes in quickly and nukes any kind of gains VC has made. Because it goes through buildings and stays around for a short while, it's even more effective than Mortars.

Spooky
Yet again literally the same as the US Spooky. No differences.
Miscellaneous Info
Artillery
Arty size varies by faction along with munitions used.

American artillery is easily the strongest, it hits a medium-large area consistently with airburst munitions. Airburst is stronger than any other munition because it can hit through light overhead cover and kill people inside trenches.

NLF artillery is the largest, most random area of effect and uses mixed munitions of white phospherus and HE. WP is effectively HE when used here, so it's really just cosmetic. Arty marks with NLF require the most care because the radius is so large and random.

PAVN is regular artillery, regular HE, large-ish area of effect. It does its job well, nothing special.

ARVN mortars is small-medium radius, regular HE. It does its job, and because ARVN plays defense it doesn't matter too much.

Australian arty has the smallest radius, regular HE. Pretty much the worst artillery in the game.

Weaponry
All South Vietnamese faction commanders have access to the M16, which is easily the best gun in RS2. However, it's boring, so why not use faction specific weapons as commander? You're not a tryhard, right?

NLF commanders don't have access to the AK anymore, so you're forced to pick between the Mat-49 and SKS. Mat-49 is better for medium-close range, SKS is medium-long. M1 Carbine is garbage but is getting a recoil buff soon. Use whatever you feel like.

PAVN has the AKM, so there's no point in using anything else.

More weapons for NVA when? AMG pls

Radiomen
Don't think it needs to be said, but you need to stay at the radio to see enemy markers; Hence why it's not that good on attack - you're better off shooting people on the frontlines instead of camping a radio.

Radiomen are convenient for South Vietnamese factions but mandatory for NVA. I don't agree with static radios being removed from the objectives which was a change made a few patches ago.

Please use 3D proximity chat when calling radiomen over, the entire team doesn't need to hear you.

Recon
NVA recon is less accurate than American recon, but honestly it doesn't make much difference.

American recon cannot spot people inside tunnels or people who are crouched or prone. It's not that effective and usually a waste of time actually using it as recon.

However, Bird Dog is not used for recon, but as a canary to see if SAMs are up. Bird Dog has a life expectancy of under seven seconds on Hill 937. Bird Dog has had a hard life.


--More will be added when it comes up--
End
If you have any questions about the guide, anything you want to add, or any kind of feedback, feel free to type in the comments.

Snuake will respond (probably).
32 Comments
Shaddeh 25 Nov, 2023 @ 8:32pm 
how kill enemy?
Nunk  [author] 1 Oct, 2021 @ 7:14pm 
F is default, yeah
Original Mid-Sneke 1 Oct, 2021 @ 2:59am 
what's the bloody use key? F?
Guts 14 Jul, 2021 @ 5:19pm 
thank you so much :fh4crown:
Nunk  [author] 14 Jul, 2021 @ 10:19am 
Go to a radio, press use, click on SL2's mark on the map that pops up (you may need to press T to free your cursor), click artillery on the top right of the pop up.

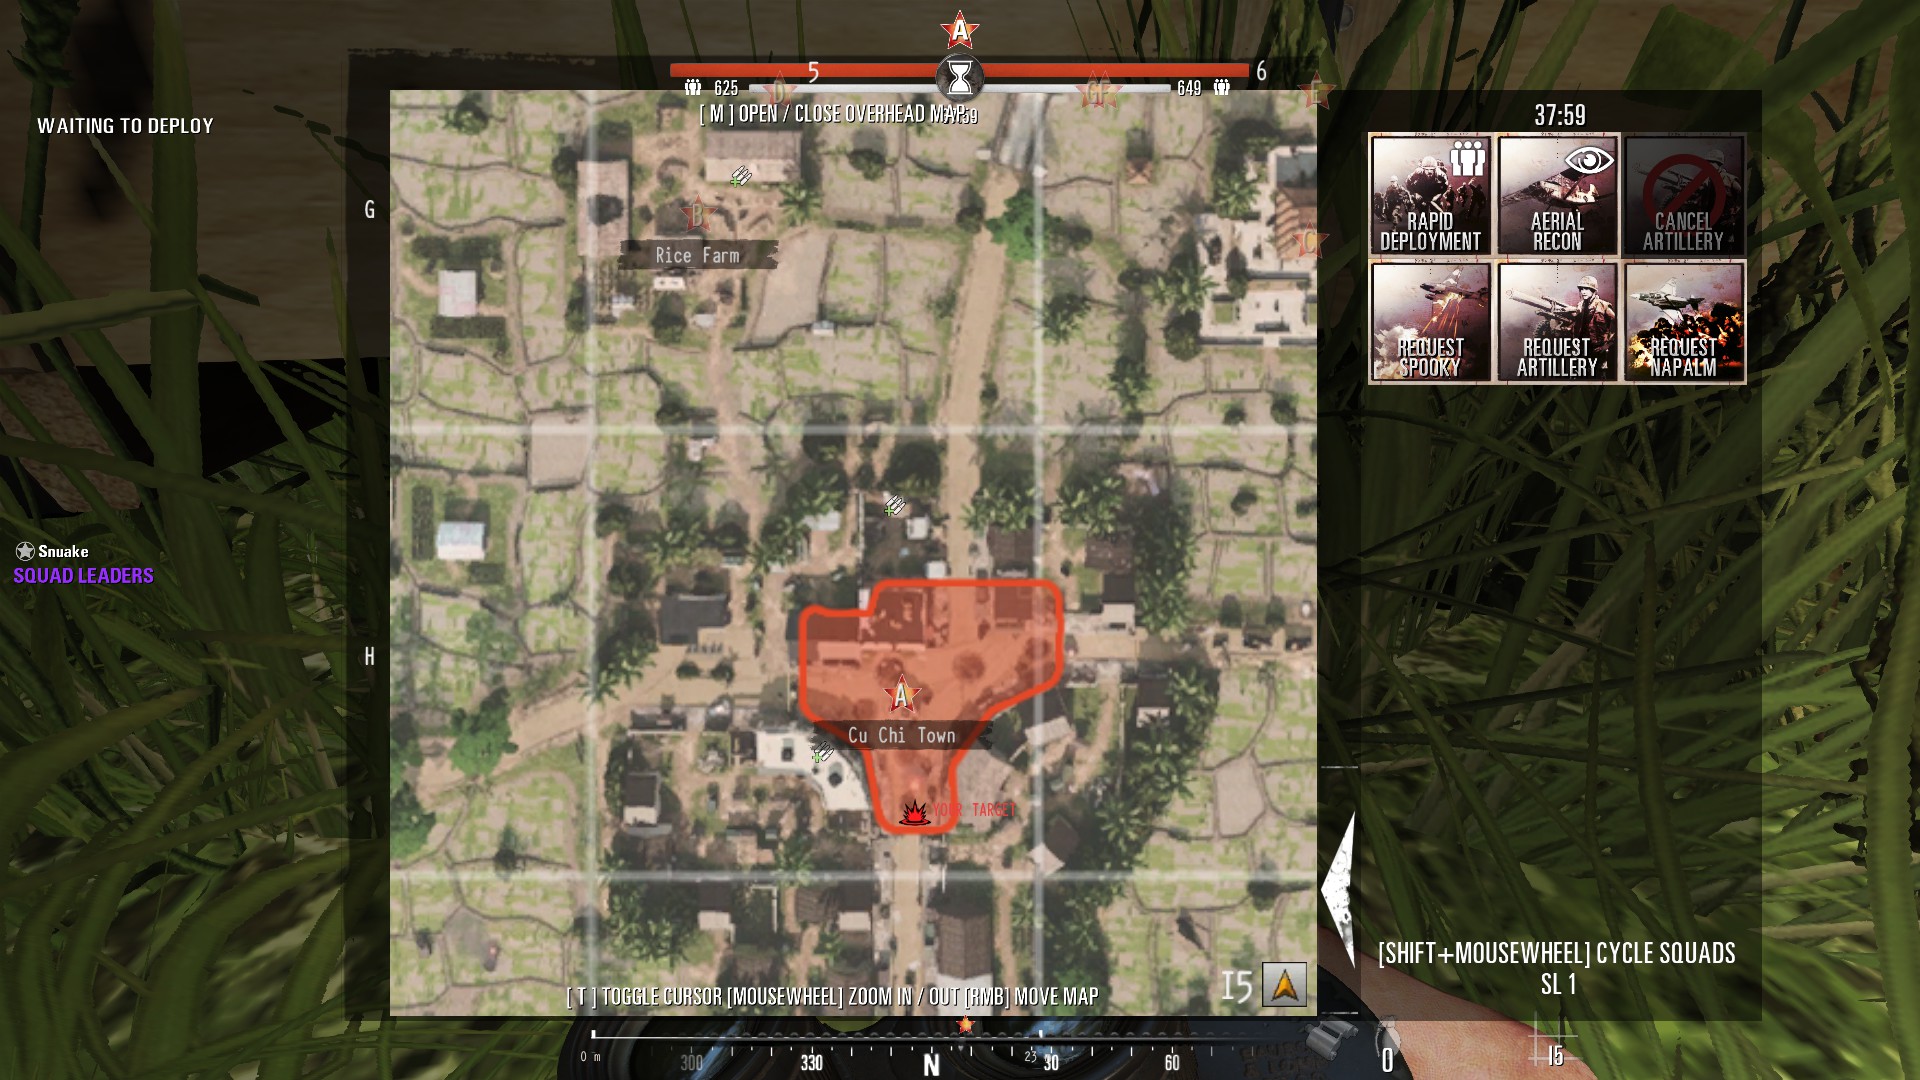
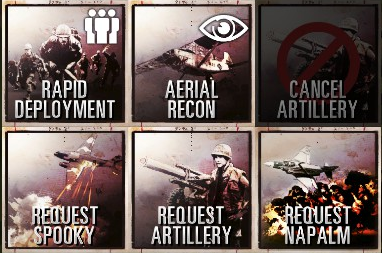
Bear in mind you cannot use call-ins for a minute or so at the start of the match.
Guts 13 Jul, 2021 @ 12:44am 
guys, anyone please answer this: I am the commander let's say. I want to use arty, and I have five marks including mine. So, how do I choose among those marks (let's say that I want to use sl2's mark?)
MathiasCZR01 18 Jun, 2021 @ 9:21pm 
Great Guide. I wish more people would view it, a lot of inexperienced players just pick the role without standing it.
Corsair831 18 May, 2020 @ 4:27am 
Good guide however you're wrong about VC recon; it accurately displays every single enemy's location to every single one of your players for 30 seconds. It's basically a free wall hack for your entire team.

You may average 7-12 kills with a decent VC artillery barrage, but giving what amounts to a free wallhack to 31 team mates easily surpasses that number of kills if they know how to use it. Also as a primarily MG player I can't tell you the number of times recon has helped me set up in a spot where I've been able to mow down lots of enemies, which simply wouldn't have happened without the recon. Also also, it has a much lower cooldown than artillery.

If you're fast you can effectively have 1/4 of the entire game with recon (free wallhack) for your entire team (2 mins cooldown, 30 seconds duration).
[40-1] SturmTurm 5 Apr, 2020 @ 1:46am 
Good guide overall - there is always some tactical finesse that could be covered but most veteran TL´s keep those ideas for them self :p If i might add just one important thing for the TL is that the grid changes from map to map. Use the scale at the bottom of the map when calculating distance and spread of ordonance.