Left 4 Dead 2

Left 4 Dead 2

97 ratings
(OBSOLETE) Rigging/Using different survivor's animation on custom survivors
By N7Legion
A detailed tutorial on how to use a different survivor's animation on your custom survivor models for Left 4 Dead 2. This guide is aimed to people who are experienced with Source and worked with Blender before.

Special thanks to ZeqMacaw for his files and the tutorial on his page.
   
Award
Favorite
Favorited
Unfavorite
Introduction
If you aimed to use a different animation (such as using Bill's animation on Nick) on a custom survivor and write differently on the .qc file, then you will end up having your custom survivor being T-posed on multiplayer. This is because you need a lil' bit of knowledge what causes behind it.

A detailed explanation from ZeqMacaw:
"In online multiplayer campaigns, many of the animations will not show correctly. This is actually worse than seeing a man's animations for the woman. The problem is that each survivor's set of animations are listed in a different order in the mdl file, and the server says which animation to play based on this ordering.


I'll give an example to show the problem. Keep in mind this is simply the gist of, and not exactly, what occurs. The server says to each client player, "play Nick's reload shotgun animation", and each client knows this simply by receiving the number "3", meaning "play the third animation". If Nick is replaced by a custom woman using Zoey's animations, then the client will play Zoey's "third animation", which is not the "reload shotgun" animation."


This guide will show you step-by-step how to work with the issue.
What you need
Blender
with
SMD Source tools for Blender[steamreview.org]

ZeqMacaw's Survivor Animation Swap files[sites.google.com]

Crowbar

Basic knowledge of Blender and Source
Getting ready
So, first off, you want a custom survivor, therefor you need a custom model. You should just import your model to Blender and it's done. This guide, I will aim making this model to L4D2:


Now, we need a survivor who will replace the animation on our vanilla animation. Let's say, you want to replace Rochelle's animation with Zoey one, then you will have to import Zoey's model and so on. For this guide, I will aim replacing my survivor's animation with Bill. Therefor, I will import Bill:

Make sure you have two Blender applications open with each of the model imported!


Due to Blender having difficulties at determaining which armature should it use when importing, we will have to remove the armature (skeleton) of Bill.

This can be done by selecting the armature (can be identified by the figure icon) then right click > "Delete".


Now, export the model in any location since we need it again. The export panel is under "Scene".
Be aware that you don't replace the decompiled .smd files as we need them for later.


That's all we need for now.
Rigging/Posing
Once, you exported the mesh of Bill's model, it's time to finally begin our main steps.

Step 1:
Import Bill's model (without any bones/armature) with your main custom model:


Don't forget that you should not connect Bill's model to any armatures or parented to any groups

Step 2:
Pose the model exactly like Bill's T-Pose:


Once done, you can hide Bill's model by clicking the eye icon next to their object name:


Step 3:
Applying the armature. Follow these:

1.) Apply the armature


2.) Add another "armature" modifier.


3.) Select the skeleton once again.


After you done it, your model will be screwed up a little:


This can be fixed by pressing CTRL + A in then click on:

"Apply Pose as Rest Pose"

Step 4:
Renaming bones.

If you are still under , select the custom model and goto . Right-clicking any bones with the mesh being in this mode, will reveal the bone's weight painted mesh. This can be very useful to see which weight are associated to limp/bones.


If you have any bones that aren't named as ValveBiped.Bip01, you need to rename them correctly. You can help yourself by importing Bill's model (with armature) and rename/copy the bone names to your custom model's armature.


Step 5:
Adding selected bones weight paint from unused bones.

If you have any unused bones that are still weight painted, you can add the weight paint to the selected bone. For example, this toe area with two bones, but not weight painted at the end:


Now, goto the modifier panel and add a new "Vertex Weight Mix" modifier:

From there, you will see Vertex Group A (bone weight that should be changed), and Vertex Group B (bone weight that makes changes to A). We will choose the "ValveBiped.Bip01_L_Toe0" on the group A and the unused bone "l_toe" on group B. Then we will have to change Mix Mode to "Add" and Mix Set to "All".


Once done, apply the modifier and the final result should come out more like this:


This action should be repeated until all unused bones have been used.
Replacing the armature (skeleton)
Once you completed all the above steps, you have already finished the difficult part. Next, we will look into how we use Bill's skeleton.

Before that, make sure you create a save of your project.

Step 1:
Apply the armature again.


Step 2:
Delete the armature.


You should now have the model without any armature.


Step 3:
Import Bill's model with his armature.


You can now delete Bill's model, but keep the armature.

If you are getting an error after importing, you will need to make all hidden objects visible.

Step 4:
Connect your model to Bill's skeleton.

Select your model, then go to the modifier, add a new "armature" modifer and connect Bill's armature.


Now, parent your model to Bill's skeleton.


Step 5:
Export the model.


Using Survivor Anim Swap files
If you reached this far, congratulations! You no longer need Blender, unless you need to make few improvements.

Open up your edited .qc file with Notepad.


Now, get your survivor swap files that you downloaded and extract them on a random folder.

From there, we need only one file. ZeqMacaw was really nice and named all files properly and user-friendly, so it's less confusing.

What we see here are files with random survivor animation swap script. More detailed:

RigTo<survivor> = The survivor pose you have been posing to. For example, we posed Bill and used his armature. Therefor we will take RigToBill

Replace<survivor> = Which survivor you wanted to replace. I wanted to replace my model with Nick, so we will choose ReplaceNick.


After we chosen the designated file, we will copy and paste it on our "compile" folder.


Copy the .qci file name and open up your .qc file.

From there, you need to add a new line before any $sequences.
Write:
$include "<.qci file>"
Editing the Swap .qci file
Open up the survivor swap .qci file with Notepad:


From there, follow these instructions until Step 4.

In Step 4, we will see that there are both $sequence listed.


Change only the name in "survivor_gambler_reference" and keep the rest unchanged. We will have to rename them with our ragdoll and idle .smd files. You can get those files from Bill's decompiled folder.


After you done renaming them, save and close the .qci file.
Compiling and Viewing
You came this far. Now, you deserve a reward.

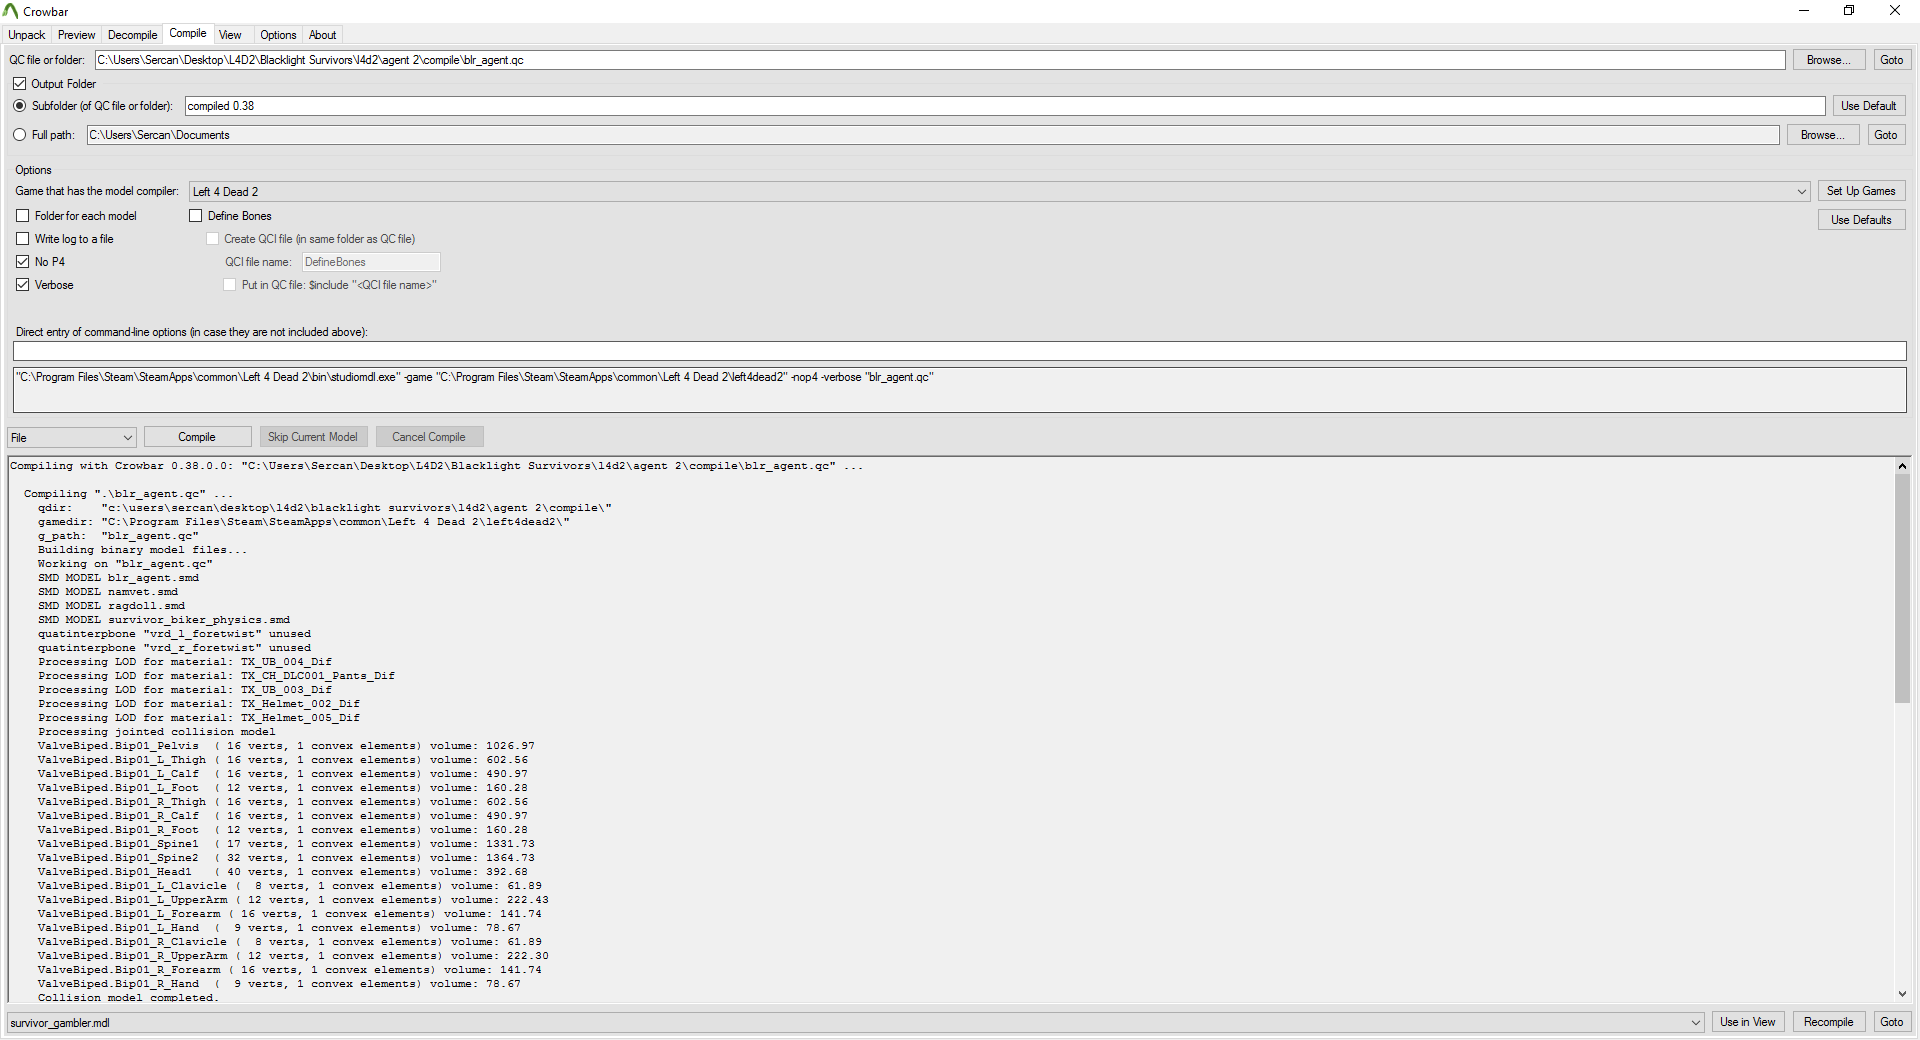
Open up Crowbar and go to the "Compile" tab along with your chosen .qc file to compile.


After you are done, you can view the model by pressing in Crowbar "Use in View"


which will get you on a different tab, then click on "View As Replacements"


To see if it's really added, it should contain a lot of different sequences and so on.


If the model has pink/black checkerboard textures, it means that you didn't put the materials in the L4D2 directory.

The results (Screenshots)
Once, you done everything, you can make it as an addon and finally use it ingame.

Here's few screenshots how the animations are changed now:


Final words
If you have any questions, post a comment below and I might answer them.

However, if you have questions about doing this method on Max or Maya, sorry, I can't help you, but you can join the "Dead 4 Mods" Discord and ask the questions away either to Splinks, Rocky, or others.


Apologies if there are any grammatical errors. I am not that great in english.
79 Comments
The Brock 9 May, 2023 @ 7:27am 
Is there one for Dummies, cause I don't understand any of this
N7Legion  [author] 30 Dec, 2020 @ 12:13am 
Blender uses different key shortcuts and UI on the latest version which is why this guide is outdated. You could still follow it, but you might come into an issue
Private Hazzard 29 Dec, 2020 @ 5:58pm 
In what way is this obsolete? does it no longer work at all, or is there simply a better version of it out there?
Fork9 7 Jan, 2020 @ 2:18am 
Secondly, 2.79 was not seem to be working in my computer, so I just using current version right now... Maybe that would be a problem?
Fork9 7 Jan, 2020 @ 2:15am 
Yeah, but I already read that one. I thought it was about reskin, Not change the animation. All I need is about change the animation in original model, tho. Nothing special.

Also, I can't really read all of them by myself, at some point, I don't know what I can do with it, this guide looks more suitable for me, because, you know, it only has some key point, Not all guide with ignoranced detail at my "progress" are great. While I really wanna save some time.

I'm sorry if this comment freaked you out, don't know where to write it down, so I just leave it here. You can delete it if you want.

And yeah, when I tried to search my problem about one line thing in the Blender, nobody seem to having that kind of problem and I can't use my computer for like hour because my older brother take over it.
I tried really hard for doing this if you didn't noticed. No offense
N7Legion  [author] 7 Jan, 2020 @ 1:07am 
It's better for you to read a different guide at this point. I can't really teach you the basics in the comment section when you could've searched some other guides/tutorials or try to look up the issue on the web by yourself in the meanwhile.

There is a different guide that also explains the same thing, but it's more detailed and informative except it's in 3ds Max. However, the methods/procedure in this guide applies the same in Blender:
https://steamproxy.net/sharedfiles/filedetails/?id=142457190
Fork9 6 Jan, 2020 @ 10:15pm 
but my qc file appear as one line just like i showed ya.
N7Legion  [author] 6 Jan, 2020 @ 6:47pm 
Import them to Blender.
Fork9 5 Jan, 2020 @ 10:23pm 
what next?
Fork9 4 Jan, 2020 @ 6:58pm 
Okay, I decompile them, now I got namvet_anims folder and namvet.qc file.