Assetto Corsa

Assetto Corsa

340 ratings
Mr Deap's sim racing introduction guide
By Mr Deap
Good starting point for anyone completely new to sim racing, how to car setup & get an unexploited rough idea how to drive to win effortless.
Focused to reduce the time wasted on the learning curve & get to the fact.

By the way, feel free to share your progress in the comments.
2
7
   
Award
Favorite
Favorited
Unfavorite
Introduction
Default PSI[en.wikipedia.org] & camber[en.wikipedia.org] can make the tyres run too cold or too hot... You can be ridiculously off pace whatever your performance due to improper contact surface & can't make the tyre be up to temperature for cornering. No matter how hard you tweak your suspension or aero... Proper alignment, tyre pressure & very specific tyre temperature determine your cornering speed & improve greatly your lap time effortless.

Your target(obviously within the possibility...)

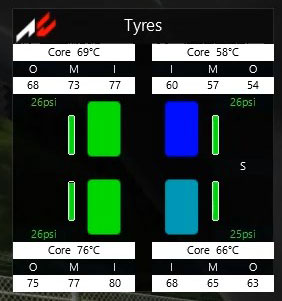
All pressure & tyre temperature is bright green, meaning you will obtain ideal grip, because you're on the sweet spot.

To have access to the tyre app, move the mouse arrow on the right side of the screen on track. You will see a taskbar with many apps & activate the tyre app from there.

Air temperature affect a lot how the tyre compound perform & the aerodynamic efficiency of the whole car body. Different type of tyre compounds do better & how wings value change, depending of the track condition(air/track temperature). Due to the temperature window that is optimal for the compound, it will result a much better grip & lap time. Some work better than other due to their specification. Soft compound generally work better on cold temperature than hard compound. Setups is created to adapt to the specification of the tyre compound to the track condition(air/track temperature) & layout to have an unfair advantage/win easy effortless.

I recommend to completely avoid real life racing contents. Mainly focus on engineering sampling & car data to get the most out of current racing simulators.
It will reduce the time invested on the learning curve. Racing simulator is not real life & won't be for awhile, although they include all the various simulations within the car physic to be as close as possible to the real thing.


Aristotelis Kunos Simulazioni:
Do NOT practice without studying first. Driving fast IMHO is 50% technique, 25% reflexes and 25% talent[www.racedepartment.com]
Note: IMHO mean "in my humble opinion" This quote do not takes account of the setup & only about driving. The percentage requirement for talent is actually very very small, thus little to do with actual driving skill to pull a decent lap time.(something closer to 5%)

Taken from racingcardynamics[racingcardynamics.com] about simulation in racing

One thing that engineers must keep in mind is that simulation is only a tool, and should be used as such. Therefore, the users of this tool must have an understanding of how it works, what it can and what it can’t do.

I know, I know, there's a lot of read...
https://www.youtube.com/watch?v=KxGRhd_iWuE
Basic exploit, PSI adjustment (undocumented & kept secret from reputable source)
It's important to know that the optimal pressure is more important than having your tyre in optimal temperature generally. Having the correct pressure on road car will make you literally cut over a second on very very small tracks, win effortless & drifting much easier to manage.
https://www.youtube.com/watch?v=3kyNZ9t1dyQ
The purpose is to get optimal contact for the tyre patch while driving. Each wheel doesn't travel at the same speed while cornering around the track. It leads to different temperature at each one which need different PSI's in the initial setup to get even result on track. If left all equal, it would result totally different grip between all 4 tires & result terrible lap time. They usually start to settle around 1 1/2 lap if you use the tyre blanked. At the second lap it should be settled(normal size track). Even adjusting the tyres pressure is favorable even when drifting as it make the car much more predictable to control.

EVERYTIME THE AIR TEMPERATURE CHANGE, YOU HAVE TO CHANGE YOUR TYRES PRESSURES TO PROFIT TO HAVE AN UNFAIR ADVANTAGE & WIN EFFORTLESS.
(It can even goes up to 10sec faster a lap when set correctly depending how much the default value is not optimal)

If you're on console, you can get most cars optimal tires pressure & temperature spectrum in a notepad file(taken from tire pressure engineer app for Tire Model 10[www.assettocorsa.net], by the way it's a great app "measure of your average understeer or oversteer" useful to show this guide work as intended").

Viewing via google doc, can be downloaded can also be downloaded as notepad:
Car list optimal tires pressure & temperature for tire model 10[drive.google.com]

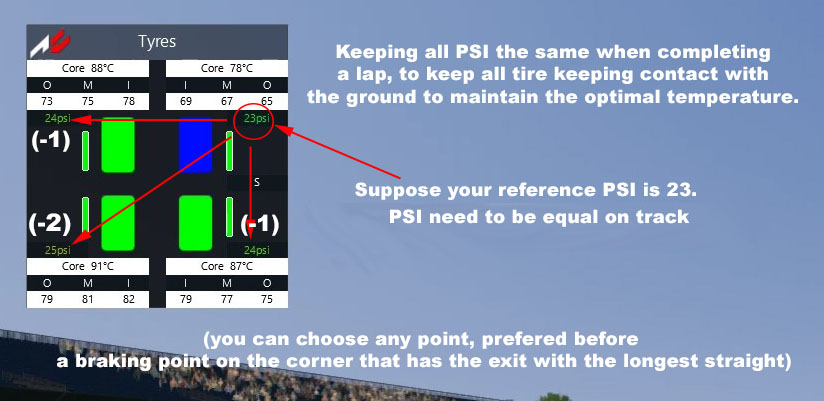
Depending of the track configuration & your driving style(actually there's only one way to correctly drive in sims & also hints how you should drive using someone else setup) you'll end up with different pressure on you tyres with multiple laps. The PSI climb will differently depending how much friction each tyre get. You have to change the PSI unevenly in the setup to get an even distribution on track.

PSI need to be equal on track(you can choose any point, preferred before a braking point on the corner that has the exit with the longest straight). Uneven PSI will result of erratic driving performance & slower lap time.
It's important to readjust the PSI everytime you change setting in the setup as it affect how the tyre heat up which affect the tyre pressure.

I highly suggest to keep all your PSI equal(very green number"ideal") at each lap. You're more likely get the most out of the available traction(make the car faster) along with a much more stable driving.
Tyre temperature, slip angle & toe
The General rule for choosing compound
Lower Air Temperature
Softer Tyre Compound
Last less long, but have massive advantage
Overheat at higher air temperature
Higher Air Temperature
Harder Tyre Compound
Last longer, but have massive advantage
Stay cold at lower air temperature

https://www.youtube.com/watch?time_continue=1&v=dxcAc54ezLM
Mass is (among other properties) an inertial property; that is, the tendency of an object to remain at constant velocity unless acted upon by an outside force.[en.wikipedia.org]
Tire compound bounce by nature. A higher mass have more tendency to remain at a constant velocity. To allow more friction even with downforce it need that constant velocity to promote heat on the tyres.

Basically the rubber compound work about like this.(smoother isn't always better, sometime you need quick steering to get to the grip level(ref: Tire load sensivity), but smooth on the sweet spot to stay longer on it while taking the shortest route)
The empty glasses represent the tyre being cold which benefits less grip. As the glass fill up, it obtains energy which progressively grip better. Once past that point the glass is spilled which cause a sudden loss of grip(kind off... >_>).

Toe & Slip Angle
If you wonder what slip angle is, you can watch this short video(slip angle is not drifting):
The effect of steering direction/traction from the tire flex.
https://www.youtube.com/watch?v=rbhkfD1Dxo4

Performance cornering efficiency increase with a specific toe setting, depending of the car traction, rear wheel steering, wheelbase, width of the car, weight distribution & very important the suspension geometry goes together & adapt to the tyres slip angle. It require a specific setting for maximum cornering efficency based on the Ackermann Steering geometry.

Basically matching the slip angle is faster, I guess you would get similar trajectory as when the tyres are completely cold with the wheel FFB being heavier to get the correct matching by driving feel.(use the telemetry app"it's default or a bit lower")
https://www.youtube.com/watch?v=O2ONv5MrpFg
If you're drifting, you match the slip angle when you are sideway. Because of the suspension geometry, while countersteering, it may require high change for the front toe default setting, resulting much better front respond. In most case on the default setup, the toe is optimized & aligned while cornering, if the setup is left unchanged. Due to the suspension geometry, toe change largely when it get high suspension compression: General rule to take advantage of the behavior due to the suspension geometry, in most case stay within the negative or positive value: More grip(whatever increase suspension compression), reduce the digit toe from default Less Grip(whatever reduce suspension compression), increase the digit toe from default

There a simple FAQ page[www.assettocorsa.net] about temperature have some insight in how to take advantage to always get the optimal grip.

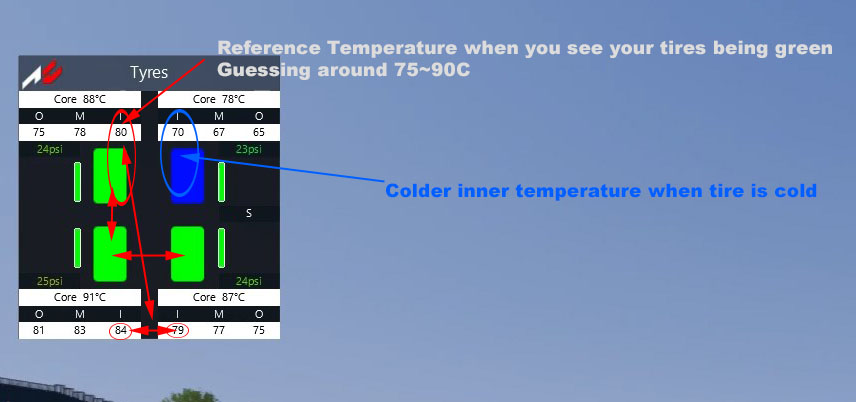
The temperature window is often around 20C from the blanket starting temperature(or use FAQ page[www.assettocorsa.net]). Use the inner temperature to be in that target while cornering. If you're past that temperature the car will have less traction & if it's below it will also have less traction from the contact patch. In most cases the inner part of the tyre is always in contact to the ground. It is totally normal this part is hotter than the rest of the tyre when lapping & should be used as a reference for the temperature window to get the best cornering performance.

"Temperatures are also vary quite widely from straight to inside a turn, so optimally you need a tyre that stays at the lower end of the optimum temperature just before the braking zone and at the higher end of the optimum temperature at the exit of the turn.[www.assettocorsa.net]"

Use the inner part of the tyre temperature is almost always in contact to the ground. Use it to stay in the optimal temperature on track.

There's some true that you up the PSI, it heats less fast. If you lower the PSI it will likely to heat more easily. It mostly works well with some F1 car as the PSI number is always climbing hard, as it get over to optimal PSI, it heat up very easily. Even if it has camber, the tyre balloon to the point that the middle temperature is gettting hotter while the extreme inner part cool down while cornering.

Target window temperature("Inner temperature circled")

If you take the picture above as example. Optimal PSI is better, but something useful that can happen in rare situation, like using the wrong compound at specific air temperature):
-If you increase all the PSI over optimal, all tyres turn blue.(decrease in rolling resistance, better top speed, terrible cornering speed)
-If you decrease under optimal, all the PSI the blue tyre turn green & the others turn red(increasing in rolling resistance, terrible top speed, terrible at cornering speed). At a certain level, too low can actually make the tyre not heat up.

General rule, optimal PSI is better & faster.

The PSI bright green color is the optimal contact patch pressure. Having the right PSI is more important than the tyre temperature.

Very important to know, Suspension, alignment & aero setup affect how the tyre heat up & can help to keep the target window temperature, Shared setup are specific on track condition. If you have trouble to keep the tyre into temperature, you have to tweak the setup. Also, it's important to scroll the mouse over the setting on setup menu & read what it does.

"Temperatures are also vary quite widely from straight to inside a turn, so optimally you need a tyre that stays at the lower end of the optimum temperature just before the braking zone and at the higher end of the optimum temperature at the exit of the turn.[www.assettocorsa.net]"

If you keep all your PSI equal at each lap, you're more likely get the most out of the available traction along with a much more stable driving. The PSI climb differently depending how much friction each tyre get. Depending of the track configuration, driving style & change in setup you'll end up with different pressure on your tyres with multiple laps.

You have to change the PSI unevenly in the setup to get an even distribution on track.

General scenario for tyres temperature work around. Although may lead the car to be difficult to drive, although useful to know.(recommended to look at the camber & setup section for better balancing)
Tire temp work around
Tendancy to be cold
Tendancy to be Hot
In most case what to do
(Note: It require different static negative camber value in the alignment depending of the suspension compression)
Limit Camber change thus (decrease suspension travel to force the tyres to get into optimal temperature)
Increase Camber Change
(increase suspension travel to slow down the tyres to get into optimal temperature)
In most case what setting to change
Higher Spring Rate Value
Higher ARB Value
Higher Bump Value
Lower Spring Rate Value
Lower ARB value
Lower Bump Value
Driving realistically gaining nothing out of it
The most important point to understand how to profit around a driving model vs thing on planet earth. It's very important to remember that it's not planet earth & it's all alien handling. Since it's simply simulated(simplified version of planet earth model), driving realistically get you nowhere, thus the requirement is a different skillset/approach to make fast laps & profit to win easy & effortless.

In racing video game you can't feel the G force. Some have more or less simulation value. Technically a realistic game would be totally undrivable, because you would insert too much input or lack of precision in the input. It would make the car fly off the track, because you can't sense the G.

If all games would be ultra realistic, they would all handle exactly the same, but they are not. In a nutshell, it target how the car will kind of feel like & provide proper placebo as a tool. None of them are truly accurate to model the one from planet earth & only placebo matter.

To truly enjoy the game & use it for the right purpose... You have to play how the game is meant to be played & throw realism out of your mind. It's about adapting to the virtual world(not earth, thus alien) & turn it into one entity. There's no actual point to try hard & drive realistically as it more likely hurt the placebo value out of a racing simulator. Role playing which is shameful way to play games is a different entity than a sport & some may use it as a fake sect to gain a unfair advantage & win easy.

The first thing is to understand & explore the different behavior behind the driving model of the game & see how comparable it is in comparison to planet earth.

Does the car fall on 2 wheel when you turn hard?
https://www.youtube.com/watch?v=fekg75XbjBg

Does it still turn when the front fully lose traction while attempting dive bombing, does it goes straight?
https://www.youtube.com/watch?v=TQdJTUgRJj4

Does the car still turn when steering over the limit?
Does the rotation from inertia behave the same?
Does the traction control/ABS/stability control behave realistically(is it even remotely possible)?
Does the car lift-off oversteer?
https://www.youtube.com/watch?v=tXxc3xCSDyY

If your answer is mostly a "yes" based on the questions above, I highly suggest you don't waste you time into this guide.

Setup will matter at a point, but sometime you have to look beyond the threshold & think about how different is planet earth to win easy/effortless. You can even setup the virtual car based on every flaw possible & even reach impossible result. The most important thing to understand that the value is kind based on the real spec of earth to get that simulation value.

Racing simulators are games & are no different from any other racing game, beside the added or less value as a whole. Simulator or arcade being a different entity is a fallacy.

The advantage of playing game branded as racing simulator is to win easy & have an unfair advantage. It's the only genre where using assist is promoted & entitled as skill in contrary to pure arcade racing games. That's why as soon as the car oversteer under braking or oversteer off throttle(lift off oversteer) without assist, it is branded as arcade & drift should be massively slower than grip according to the sim philosophy.

Old video, skip to 6:34
https://www.youtube.com/watch?v=xZw4xaWbJiw
Yes, the car do tail out during the exit phase & hardly lose less than 0.5sec on a single corner while in videogame physic you would easily lose over a sec from doing it.
Acceleration & Brake Input
(Work in all racing simulators!!!!, professional sim racers technique)
Between the fast & the slow players(phony expertise & behavior exposed),

You can gain a lot of time on sims by cutting corners and doing things that you can't do in real life. Some racing line may be very different from the real line, some technique may be completely different, some may be irrelevant or make you massively slower. Drivers with real life experience may find this part extremely useful. Simulators is a racing tool. Throw away real motorsport technique. It makes no sense.

Forget about balance, weight transfer, driving style & mostly focus to be able to turn while disengaging the brake slower, deeper & turn with it. Simply adjust the brake balance accordingly & be on the racing line(brake gamma to 1 make it even easier). This allow you to brake more late & carry more speed for turn-in while staying on the racing line.

The general rule is to always time your accelerator right on the apex or after. If there's no braking involved or mess up, just retain deceleration momentum at all cost.

If you accelerate before the apex, the car will get a slow exit, since it will be thrown in the wrong direction & fight it, even if you are right on the ideal racing line. The more late you accelerate, the more you can mash it.. If you feel that you can somehow retain the racing line by accelerating before the apex... It mean you are UNDERDRIVING the car during the entry phase, thus you have to brake more late & retain brake pressure thorough the whole entry phase.

Drive on the ideal racing line, Slow-in, Fast-out is the most unsportmanship, evil-intentioned & fallacious tips when the new player lap time is way off pace.
First reason, you have to abuse the hell out of bomb diving with the brake(kind of look like trail braking, but different) & It's the complete opposite of slow-in, because if you don't carry enough speed with the brake pressure during the entry phase, to turn, to get front load... The car will understeer. You also need heavy input on both steering/braking & you have to retain a constant deceleration rate thorough the whole entry phase until you meet the apex. Second reason, to get the optimal cornering speed you only lose speed before the apex & gain speed after the apex. Third reason, If you input too much throttle before the apex, it gives acceleration force in an unwanted direction. The time penalty is super harsh, resulting a 4 wheel drift understeer with bad acceleration for the exit. Recovering from bad entry & missing the apex lead to an unsymmetrical racing line, being late on the accelerator is faster, which is the only reason to drive slower at the entry.

Watch any fastest lap shared on any sims on youtube & look on all the data(rare situation, inputs is shown). Most of the time, they hide them due by fear of being exposed, because it is easy/forgiving/effortless to drive like that with assist.

I recommend to use the G meter[www.racedepartment.com] to understand better the driving model.

What's important is to have that ball remain over the horizontal bar at the apex to confirm that it is done correctly. Or use the in game G meter that the "lon.(longitunal)" stay in the deceleration side(left).

Deceleration Force before the apex & Acceleration Force after the apex(balancing phase nonexistant)
***If you tend to press the accelerator early(feather the throttle before the apex must be avoided at all cost)... You have 3 option before meeting the apex
****LIFT-OFF MOMENTUM is the most important technique to master in sim racing**** ^_^"
-Trail brake longer(recommended)
-Understeer by steering over the limit while lifting off(ride the invisible rail technique)
-Simply Lift off, when you screw up(profit due to no lift off oversteer)
Steering over the limit is obviously slower, but the cornering & speed penalty is very little. If you don't steer enough & you may never know how much you can actually corner. Steer at the correct input with trial & error for maximum efficency
(They're basically overdriving exploit). Once you are at the apex, you can feather the accelerator.) Repeat until you get it down using the correct racing line by looking at your delta time.


Because of an ideal scientific math physic model at the wheel, if you're in a deceleration force just before the apex during the entry & the corner lead to the opposite direction... The deceleration force become acceleration force alongside you add throttle force over it, which drastically improve your traction for corner exit. Basically to control oversteer on exit, it's more about timing rather than modulating.
https://www.youtube.com/watch?v=JjCcFsGLpaM

Even research show this result between real data(pro driver) vs simulator(Alien).
(Telemetry at page 21 in the PDF "Comparing and improving steering forces in a race car and race simulator to increase simulator fidelity"[repository.tudelft.nl])
According to the data research with the Formula 3 on Catalunya, the simulator doesn't have lift off oversteer. The alien can simply lift off & wait to reach the apex with a On-Off technique with the accelerator. It also show the ridiculous brake pressure mid entry phase in the corner with the brake. Pace is completely unrealistic, especially during chicanes.

Pressing the accelerator early is slower & a bad advice, because it lead to unnecessary understeer & also a case of underdriving the car during the entry phase due to incorrect transition, if you get acceleration force before the apex.

In most cases, you need to use it just right at the apex or even more late, since the car mostly remain stable at the entry. Making setups on the car by driving like that makes setup much easier with only 2 phases to consider(Entry & Exit). It's all about driving with the deceleration force before the apex(example: you can go as short as 1% braking input) & acceleration force after the apex. The penalty from steering over the limit is little & quite useful on uphill corner.

One of the lessons taught to novice drivers in real life is to separate braking from cornering. That’s because mixing the two can lead to a spin(drifting, aka arcade/hard & unrealistic for sim racers)... Although, you can't spin from not pressing any pedals after trail braking in a racing simulator & that's why you end up with different inputs than from real life onboard laps. If the car is stable, you don't need to be early on the accelerator or being smooth. Most casual driver on the street do it at a stop light everyday & it doesn't require any skill whatsoever to feather down the brake as you turn in...

There is exceptions to use the throttle, like downshifting or reduce the rear wheel braking deceleration from overheating to promote stability during trail braking. Although using those method do not affect the deceleration force of the car at the entry.

It is crucial to not have acceleration force before meeting the apex, to get the maximum cornering performance for the car. Although, It's possible to press the accelerator early & not get acceleration force, but if the car doesn't lose traction, there's no point to do it.

Pro tips: For dual apex, you can tap the accelerator after the first apex to intentionally get deceleration force for the second one & re accelerate on the second apex.
Brake Bomb Dive technique(exploit, skillset adaptation, breaking the law of physic)
Kind of look like trail braking, but it's not...

Old parody from 2009 found on youtube
https://www.youtube.com/watch?v=Gj013CkPrTk
Surprisingly some may make you focus on corner exit or racing line whatever.., but hide the most obvious aspect of how to play sim racing game & profit to get an unfair advantage

Late apex is not about the line, but more about the driving input. The driving line is still symmetric. I recommend to read "The Physics of Racing by Brian Beckman" part 17, Advanced Analysis of the Racing Line. Slow in, fast out is related to the racing line. not the driving input which is commonly used for malicious intend with this reference). Separating deceleration force before the apex & acceleration force is the effective technique according to the book. By reading the rest of the method, it will make more sense.

There's a difference between dive bomb & bomb dive. -Braking late & not caring about balance -Retain brake pressure & turn at the same time -Constant deceleration rate until the apex(balancing phase doesn't exist) -Use brake to turn & not to balance

The most common fix for new players is to brake more late, deeper into the corner while releasing the brake slower to retain more front load at mid entry phase & turn with it(overlap inputs) which is a case of under driving the car in the driving sim model. Basically you use the brake pressure to turn instead of balancing & keep the same deceleration rate all the way down to the apex.

You will have to brake way past the apex of first corner during chicane, due to lack of lift off oversteer.

It's normal to be stupidly confused with many term used in sim racing that contradict a normal person would envision, although hold 100% true outside planet earth. Don't blame them, because whatever is on earth is not realistic.

It's all about profit with the front tire load some species outside earth loves & the complete opposite of being smooth, pretend it has lift off oversteer physic. The gain in entry cornering speed is far too exaggerated by exploiting the bomb dive technique. I recommend to try this method, especially if your lap time is faster(or car feel better) by increasing slightly the front spring rate or damping with your usual method while still slower than the rest, because if you watch any motorsport they suggest to do the opposite. Sim racing is a racing tool & the car suspension geometry is probably targeted to be as realistic as possible.

The exploit behind gaining cornering speed by bomb diving with the brake...

-In most scenario, have the brake at 100% at the start of the entry phase -If the car somehow can make the corner, but can't keep the racing line, brake during mid entry & also increase steering rotation at the same time.

Force the car rotate by itself first with the brake by holding the pressure before starting to turn the steering(lateral force need to be as neutral as possible in the opposite direction of the corner.). On most cars you need to steer a bit first, after you release a tiny bit of pressure. Hold the steering angle & after you turn in(it happen in millisecond). It's kind of similar to handbrake drifting which is easier to let the tail move first & after you take control of the direction by countersteering while being on full throttle.

Being on sync like string is bit misleading & confusing. It's more like a specific rate the load allow you to overlap the steering by holding pressure to force to rotate the car & increase with more steering rotation after, rather than be on sync as slower the car gets. It's more of a timing thing & about getting used to it

Always maintain the opposite of being pro active with the steering(meaning you hold the pressure & turn at the same time) while have in mind that players who can't drift are doing just fine & it's modeled that way.
As the creator of the guide I have all the right reserved to insert my opinion. It gives a comprehensive grasp at mastering this exploit.

The method is to kind of want to "push in, steering angle, in delay" with more rotation at every step you release the brake pressure as slower the car get. Allow & feel the tail end move first by forcing deceleration & use a bit of steering while holding the pressure. Target a specific load before adding more steering rotation. If you release the brake at the same speed you turn in(I mean the way you don't want to provoke imbalance, like brushing "Trail Braking"), you basically lose turn in efficiency, because the goal is to force that rotation. You can hold the same brake pressure longer & steering angle. "Steer in" in delay, after release one notch of the brake & delay, more "steering angle". The gain in cornering speed is not really fair using this method, because the time cut is far too exaggerated. Brand Hatch & Silverstone are good tracks to practice this maneuver.

I also recommend the brake gamma to 1 in the control option for easier control of the 25% to 0% when slowly releasing the brake mid corner until the apex to get a linear load while cornering. It also help to avoid sudden oversteer mid corner & better control for turn-in. Force the brake more(holding the same pressure), let the car rotate, turn after while maintain the traction. The brake input & steering input don't have to be in sync to profit on the slip angle. Same goes for the accelerator.

The placebo is a recommended practice to get an idea how hard to know how much you can brake & turn mid corner. You can actually make gold time in the Special Events by driving placebo, but I admit it's not the fastest way around, but it give a fair result & a great skillset for sim handling racing game. The penalty of doing so is very little, but that's approximatly how it look.
The maximum steering input should be similar as if you're driving slow with all tire at 100% grip without slip angle(greatly reduced).

There may be slight variation in some situation where you are forced to hold the brake at 100% & turn the steering at the same time until halfway of the entry phase
A good example would be at "Spa, Turn 7 Les Combes" (it's fair to not call it trail braking, it's a skillset outside planet earth) Although you have to retain the same pattern for the rest of the corner. Once you somehow understand the pattern you can explore & exploit how fast you can turn the steering & retain grip In rare situation the car doesn't carry enough speed to use 100% brake input during the braking phase. At this point the brake input start in the middle of the entry phase.

Quote from a professional sim racer who inspired me to bomb dive
https://www.reddit.com/r/simracing/


There's a reason why there's a difficulty labelled "alien" & not hard, because it's about doing stuff that simply wouldn't work in real life. It's also the most constructive & comprehensible tips he made in his entire life that is 100% efficient.

Basically due to the limitation of the driving model used in racing video games in general... There are plenty of tricks that would never work in real life, because simulation is not real life. It's a video game, and like all video games, it can be exploited to behave outside of actual real life physics. There's no such thing as driving style, especially in a simulator.

Looking at videogame telemetry is key for profit

Pro tips: Maximizing entry speed & focusing on cruising the apex while being more patient with the accelerator on exit is faster.
Driving style is a myth
VIdeo worth more than 1000 words
https://youtu.be/_ezCFx8kdXE

Sure there may be a driving style, but the diffence of input is so minime that I'm presuming it's worth to share there's no such thing as one. It's either you're on it or not. This is true for both sim & real life.
Usable Technical Driving Inputs
Few exceptions can be useful to use real life as resources, but in most cases, you shoudn't except for the basics, because simulation is not real life....

Fast start on race cars
Droping the clutch is not always the fastest way. On some race cars you have to slowly depress the clutch to allow the tyres to spin.(I think overheating clutch is not simulated....)

How to not screw up when changing gear on the H-Shifter
Only touch the shifter when you shift & try to drive with both hand for most of the time.

When you shift...(next movement is up or down)...
For 1st & 2nd gear you push the shifter on the left
For 3rd & 4th you leave to neutral
For 5th & 6th gear you push the shifter on the right

Rev matching
https://www.youtube.com/watch?v=FnXLZg_O1rk

Heel & Toe
https://www.youtube.com/watch?v=MhuLnE6iJSc

How to handle the clutch faster like it's like second nature while shifting gear during various situation
There are various way to press the clutch, but a good way to get the process faster... Is simply to press the accelerator everytime you shift up & down when disengaging the clutch pedal.

Small video to handle oversteer in a controlled manner
Recommended practice if you have problem with the car fishtailing, wheels locking up and general lack of control... You may be become better than the die hard drifting fanboy who refuse to use the handbrake in a world where lift off oversteer is a myth.
https://www.youtube.com/watch?v=85zavYo39SA

Having an ideal rev on different cornering elevation
https://www.youtube.com/watch?v=8etqDZL5abU
Racing line
Hitting the apex
Don't use the nose of the car as a reference to hit the apex. The correct way is to use the pivot point of the car to hit it. Late apex is a myth & it's symmetric based on the apex. Symmetric based on the ackerman geometry. It will be slightly less or more wide depending from a perfect circle of how it pivot.

Recommended to focus on a perfect circle at the beginning, because the difference is very small & adjust accordingly.

Find the correct radius & apex"approximative target but still symmetric"
The bigger the radius, the better. In most scenario the biggest radius goes to the exit of the chicane.
It's important to have the car face in the right direction at the entry point of the radius. Positioning before the entry phase point, the beginning of the exit phase(apex) & the end of the exit phase is a useful skillset using the pivot point of the car.

Overhead view simplify a lot what line to take, when to decelerate & accelerate in most case, it look symmetric in a nutshell. Looking at the plane view, the elevation make the racing line more difficult grasp.

You can also draw squares that perfectly fit the entry & exit point. You can pin point with this method the apex as a reference to know when to accelerate & to decelerate(based on the G meter).

Deceleration mean you sim trail brake(aka Bomb Dive in my term), lift off or steer over the limit. Elevation actually interact with the force & that's why you should use the G meter. The most important part is to stay within that phase on the racing line, especially close the apex(in case you use a slow car). Depending if you start or exit beyond the white line, the apex point may differ. Although it is alright to understeer or oversteer, during the deceleration phase, as long as it follow that line... ^_^" General rule for simulator: -During the braking phase, the lateral G need to be as neutral as possible which allow you to always hold it at 100%(ABS) or at the threshold for car without ABS. -The start of the entry phase must have 100% brake input. In case it's too slow to even brake in a straight line at 100%, use brake pressure mid entry. You can do some play with double apex, like tapping the accelerator to get acceleration force after the first apex to get more deceleration force before the 2nd one while retaining the racing line.

You can drive over rumble strip or put 2 wheels outside the line as long if it doesn't slow down the car & adjust an ideal radius accordingly. Always experiment different spot & crash intentionally to get good lap time. You will learn eventually.

The funniest part is to run to the track in reverse(recommended practice), you can use that exact same method while reversing the acceleration & deceleration phase. If done right, you will eventually get about the same lap time & a very very fast lap time.

Use the whole width of the track
Kind of obvious to say, but applying can be harder to stay concentrated to target the optimal radius. The car lateral force need to be as much as neutral & pointed straight before entering the corner.

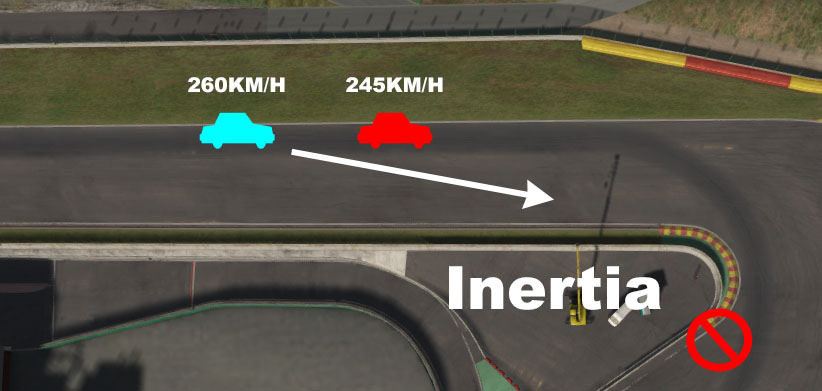
You have to be careful to make sure that the car nose is straight before applying the brake & not facing slightly in an angle outside the direction of the corner. Once the inertia is thrown with the brake(especially during the start of the trail braking phase), there's no way back.

You can always practice & only drive over the white line to get used to knowing the car distance limit based on your driving view.
Camber?(Critical to know even when drifting)
In most cases lower spring rate & bump value than default would result the need to increase the negative camber value due to higher spring movement while cornering. Basically every single change in value on your setup affect the camber & toe to retain a correct alignment while cornering. If the alignment is left unchanged, you get lost of cornering performance, due to unoptimized contact patch & the nature of the suspension geometry. This section is important to understand.

One data fact:
Another hint for tyre temperatures, as in real life, use more camber to heat faster a part of the tyre tread and then this dissipate to the rest of the tyre. More camber, more heat, less camber, less heat.[www.assettocorsa.net]

If the camber is optimal, there's more surface touching the ground during suspension compression thus the core should heat more easily if it's set correctly without abusing the traction, given no other change have been made in the setup. Although change in the setup/track condition/compound promotes more or less grip & change how the car lean in the corner which need different camber value.

The goal is to adjust the camber to get the best contact surface while cornering & stay within the temperature spectrum. If you follow that hints above, technically the core temperature should be higher when the camber angle is set correctly. This allow the tyres to retain the temperature, get it ideal for the whole race.

The inner part of the tire is always in contact to the ground & it's the first part to lose traction. It is totally normal this part is hotter than the rest of the tire when lapping & should be used as a reference to look at the temperature spectrum in case of under & over the optimal traction.

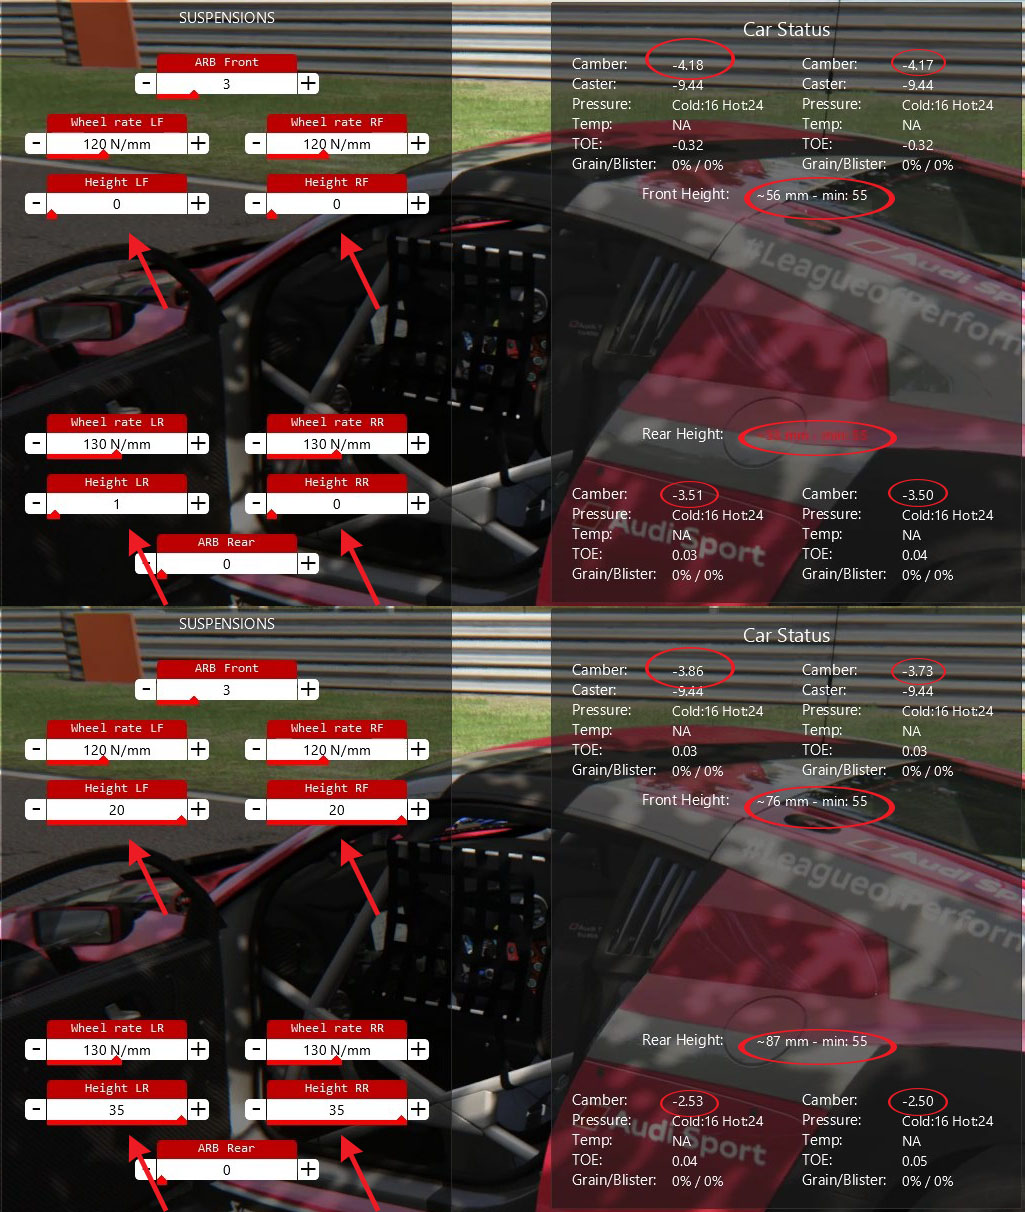
If you reduce the height to reduce drag, camber & caster value change due to the suspension geometry.
-Increased positive caster, increase the negative camber as you turn the steering
-Increased negative caster would result a decrease of negative camber as you turn the steering

Exploit: Most sport cars, SUV, car simply need max negative camber) due to heavy compression by the factory suspension being too soft for **semislick** grip & the suspension geometry aren't designed for racetrack use.

Although, limiting the camber requirement within the suspension stiffness at an acceptable level is more ideal on heavy cars(vintage car).

Having equal temp on the whole tread on the pitlane & doesn't work on all cars is simply due to the suspension geometry. The camber angle & toe doesn't remain static when the suspension move up & down. Even when you change the height in the setup, the camber value change due to how the whole arm is connected. On race cars, the chassis sit lower than the control arm. Instead of seeing the negative camber increase under suspension compression, it decrease due to the geometry by itself. On very low car the control arm angle is above the floor & it decrease during compression when cornering.

General Value in consideration over default from changes, to retain correct alignment(in big it is based on how large is the suspension travel, nothing too difficult).
Lead to Lower negative camber & toe change
Lead to Higher negative camber & toe change
Higher Spring Rate Value
Lower Spring Rate Value
Higher ARB Value
Lower ARB value
Higher Bump Value
Lower Bump Value
Higher Height
Lower Height
Less Tyres Grip(less cornering force)
More Tyres Grip(more cornering force)

Depending how strong the spring is compressed(suspension softness, height related) you need negative camber from default while for the toe is reversed to re obtain correct alignement.(obviously if you don't mess with the ARB)

You simply need to be aware while driving that the camber angle will tend to lean in the positive side in compression on low car rather than increasing in negativity in comparison to normal height road car that increase during compression.

The more stiff the suspension, the less negative camber change is require in the setup. The more the suspension travel, the more negative camber change is required, thus lead to run very high negative camber in setups that has large compression(more grip, more compression, less grip, less compression), which result better lap time effortless.

Understand what the tyres are doing when you corner, like how the car roll, how much it compress while cornering, while driving on the racing line to get the most out of it. The camber negative angle & toe requirement will change from changing single digit in the suspension setup. Use the default value as a reference to know if you need an higher or lower negative camber value or use the placebo calculation below.

---------------------------------------------------------------------

Hypothesis on finding the average optimal value based on a completed lap...


Technically when you corner, one side of the tire have to stay flat while the other is on the toe. I suppose optimizing the core temperature has to be put in priority. The inner is always optimized & you simply need to optimized the temp for the middle. Some placebo formula I came up with. When you finish a lap with the correct tire pressure you simply take a pic of your tire app & use the formula. This will lead to an ideal negative camber value required for a whole lap. Very good for racing, but doesn't point out the exact camber requirement for a specific corner.

[RF] Middle / core = Right Front Middle Efficiency
[LF] Inner / core = Left Front Inner Efficiency

Difference [RF ME]-[LF IE] = [RF FLAT]

[LF] Middle / core = Left Front Middle Efficiency
[RF] Inner / core = Right Front Inner Efficiency

Difference [LF ME]-[RF IE] = [LF FLAT]

([RF FLAT] + [LF FLAT]) X 22.5=Angle that need to be corrected on both side for the front

For the Rear same thing...

[RR] 'Middle / core = Right Rear Middle Efficiency
[LR] 'Inner / core = Left Rear Inner Efficiency

Difference [RR ME]-[LF IE] = [RR FLAT]

[LR] 'Middle / core = Left Rear Middle Efficiency
[RR] 'Inner / core = Right Rear Inner Efficiency

Difference [LR ME]-[RR IE] = [LR FLAT]

([RR FLAT] + [LR FLAT]) X 22.5=Angle that need to be corrected on both side for the rear

The 22.5 is a random number, but shortcut to get there as it is not a correct way to calculate a whole suspension geometry. A correct alignment give a significant increase of cornering speed. If done correctly, the result would give near 0.00 on the Left + Right FLAT result if the PSI is always optimal during cornering, because you get an efficient temperature for the middle of the tread while cornering. You can repeat the formula & you will eventually reach 0. Although only fixing the camber is not the proper solution to take advantage of the car cornering performance. If you have arb, damper & spring available to setup, use them to allow you to get optimal alignment advantage on the full suspension travel spectrum.

Pro tips.
If the tyres tend to overheat, you tweak the setup with more suspension travel possible for the heaviest side of the weight distribution. It must not past the maximum negative camber possible within the suspension geometry. Although, the rest of the car need to be rebalanced.
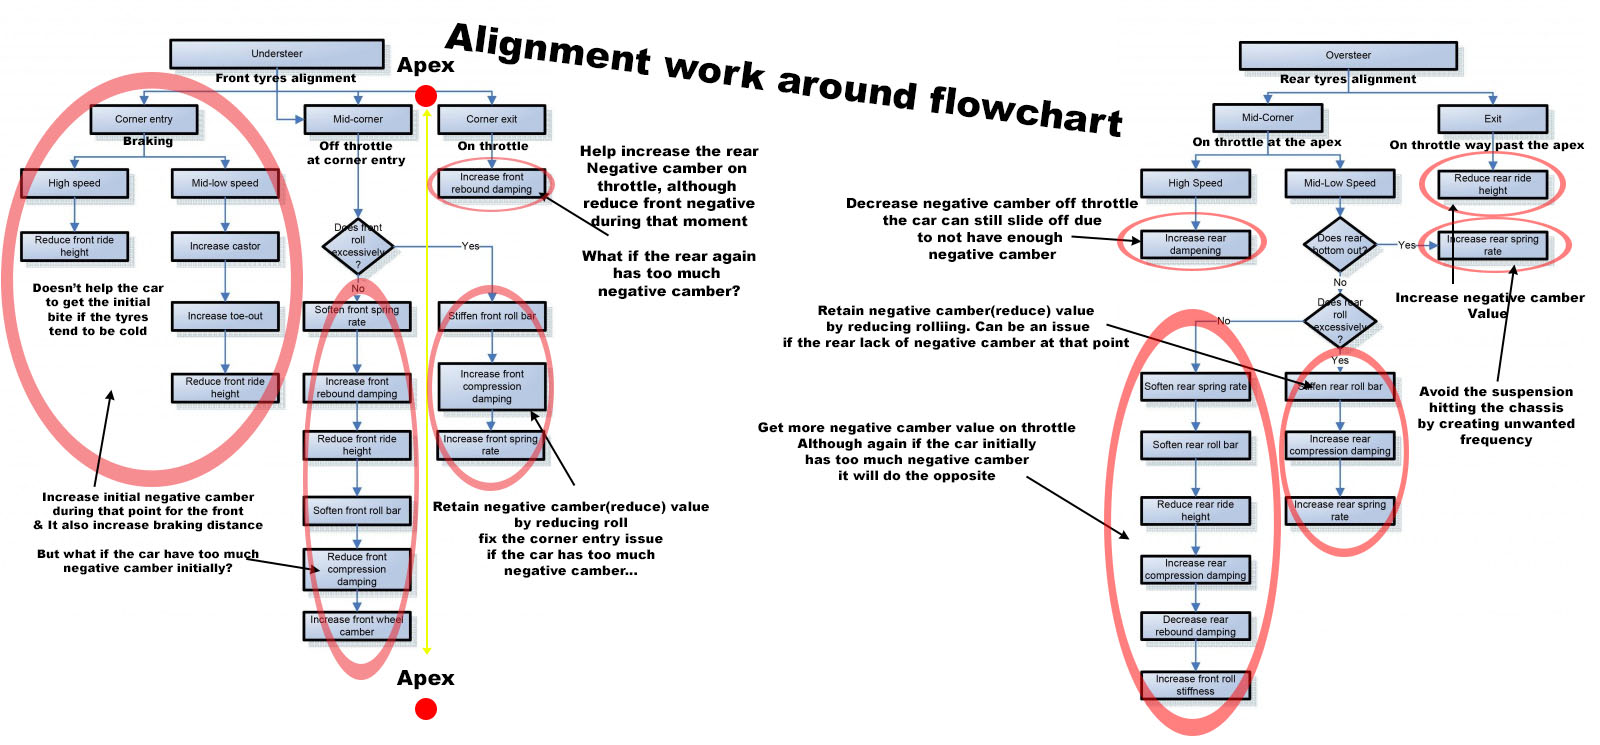
Flow chart & WINGS
Understanding the flow chart
(Personally I just don't, probably build for another video game title, especially broken for Spa & Monza at low temp)

Flow chart & ultra rare placebo situation.

The biggest flaw about this chart is it screw up the wings, because it will change the overall car downforce & on some cars you can actually lose front downforce, screw up the diffuser, don't take account of the traction layout, suspension geometry, nor weight distribution of the car. It lead to unusable natural frequency, make you insert ARB value at the wrong place, etc. It can even screw the efficiency of the wings if you lower the front height too low & get more drag than you should. Race cars come with wings & that's mostly where you explore the setup. I would also note that tweaking the setup to provide oversteer/understeer is extremely misleading.

To have access to the wing app(optional): Look at the section
General Driving Tips "App, setting how to profit"

Tested on a flat mod track with the wing app(default setup)

Obviously in this situation if you lower the front you increase drag & reduce efficiency since you already have more downforce than at higher temp while maybe you want more straight line speed.

I increased the front by 2mm at 10C & it actually reduced the drag. The angle of attack is completely different & the downforce & drag result is closer to default at 36C.

Evidence show that in general rule the default setup is broken in nearly all situation & it's easily done by using an air temp that make it worst.

The coefficient of lift(CL) usually have static number & if it drop, it mean it doesn't have enough Ground Height(GH) to be effective, that's when you have to increase the height to get the reaction between the low & high pressure to get the wing to be 100% functional(the diffuser on those 3 pictures were all differents).

Although by increasing the height by 2 mm, you reduce the front default negative camber. The increase of the nose height actually reduced the drag. Since SPA & GT3 is the most populat combo at low temp while some people make a large disparity of lap time... The setup flow chart in my view in a nutshell---> >>>CLICK HERE<<<

Height setting in sim racing hold near or nor important value in racetrack driving when it come for mechanical grip, since the settings are limited in millimeters for race cars that already is low by default. It highest purpose is for aerodynamic use(adjusting the angle of attack) & alignment limitation. What affect the most the downforce/drag is the angle of attack of the body. Although mostly on road car, lowering it may contribute for better mechanical grip.

Different Air temp = Different Air Density

No air, no lift or downforce.
https://www.youtube.com/watch?v=g8-pxkaipcg

Air density is based on the game value, but when you view downforce, you kind of need to not focus about air going through an object & watch wind tunnel on the internet, which will lead you to confusion. In aviation, the air doesn't head through the object. It's the object that head through the static air & will still lift from it. Different density will give a different result.

To understand how lift or downforce is created, you need to know is that in a specific temperature the air want to retain a specific pressure(aka current air density).
If you attack(plow) with an object on the static air by disrupting them(example, puching the air), you expand the air molecule, like heating(although since there's no heat involved, it can't retain that energy). Because of that, It create vacuum effect with turbulence around it behind that object in motion. When the expended air(low pressure) meet the original ambient state from separation, it will try to return to it's original state. As long as the object still moving in that direction, it will create a constant creation of an empty field(or suction) behind & it will get stronger depending of the size & speed it goes. With an object with different shape, you can promote the suction in different manner. Basically downforce, lift & drag is all created by the source of suction due to the difference of air pressure behind that object. With more speed, size & angle behind that object, it create a force strong enough to deviate the current object state of motion(inertia) depending how heavy it is. What's make the wing downforce or lift from the Angle of attack (AOA) is not from the oncoming air. The cause is from the suction power behind the wing, since the wing current inertia direction put force & add pressure on the angle of the wing...The low pressure favor the suction of higher pressure over the ambient pressure. And the only path for the high pressure accumulated to reach easily that power suction is from the angle of the wing. The suction happen for both object & high pressure air which force the change of the object motion state. The function of a wing is to accumulate ambient pressure(lead to high pressure) with the force of inertia to get draw by the expended pressure behind the wing while in motion & return to its orginal state. Newton’s third law of motion states that, for every action, there is an equal and opposite reaction. Angle of attack (AOA)[www.boldmethod.com] is the angle between the oncoming static air and a reference line on the airplane or wing.

Basically lowering the car does not reduce drag. It only reduce the center of gravity, but the default value is already low on race cars.
The pressure accumulation can be worst on either of the angle which can lead to more drag by rotating that change the angle of attack. Only changing the shape would reduce it, but not moddable. Race cars come with aero dynamic floor, thus do not get drag from mechanical components underside on the vehicle.

You can read a bit about fuel economy about drag: http://illumin.usc.edu/252/drag-reduction-the-pursuit-of-better-fuel-economy/

Race car come with different wings size at different place within the body. Since wing size come in different sizes & flavors... All of them act differently on different air density(or air temperature). You got to adjust them to get better efficiency for the track layout. It's also the reason why car setups are specific on air temp, since it lead to different load value for each tyre during cornering & straight line, not to mention that compound effectiveness result different suspension compression.

Half the air density = Half the coefficient of downforce"aka lift for planes since cars have reversed wings"(CL) = Half the coefficient of drag(CD)[www.grc.nasa.gov]

Aero Balance video:
https://www.youtube.com/watch?v=Y68hebQ4npE

Basically you have to try to get similar tire load(not totally true, but close) while adding downforce on the wing to promote stability to get maximum efficency on the mechanical grip with the wings setting. If you have too much downforce at the front it will oversteer & if the car has too much downforce at the back end, it will understeer. Keeping them balanced is better & faster.

I usually start to increase front wing first to see if I can make the corner without oversteering since the back wing usually lead to massive drag. There's different track configuration, although height change the whole wing package & suspension affect how the wing read the downforce.

Learning some basic about mechanical grip is recommended before leading to more wings info...
Role of setting up cars
The role of the setting up the suspension is to make the compression to align the camber to get an ideal traction level thorough the corner based on the compound ability to grip. I suggest adjusting the camber so that one tyre has to be perfectly flat at a critical point when the suspension is fully compressed when it has to support most of the weight of the car(meaning the whole load transfer all on a single tire). Getting progressive camber value shared between tyres is ideal in how the inertia behave on the whole suspension geometry to promote a more core temperature on the tyre. As long as it is respected it can be either hard or soft if aerodynamic value isn't involved. Although the tyres temperature will mess you a bit with it in extreme value.

Tire alignement while cornering is what make cornering speed. It's either it grip or grip less. Some guide make promote you to fix oversteer or understeer, but simply help to the car behavior by intentionally ruin the alignement & lose cornering speed at the process to force everyone who's clueless about suspension geometry to be slow & gain an unfair advantage. Sadly setup preference is a lie. Only sweet spot matter & all the component work together to be at spec for track use.

To get the maximum cornering ability when the tire tend to overheat, the car need to roll, because it promote better mechanical grip due to the suspension geometry & how the alignment behaves behind it. The only reason to reduce the roll, is due to the limitation of the suspension geometry(maximum negative camber the car is allowed to do during compression). When it past that limitation(the suspension geometry along with the maximum negative camber value), it is known as excessive roll.

The tyres temperature can be used as a visual cue to figure if the car understeer(cold) or oversteer(hot) with the correct alignment. You can guess a bit the weight distrubution of the car when cornering by lifting off during cornering or simply braking hard with ABS on a straight line on a flat surface. Elevation changes affect the load difference based on the inertia of the weight distribution.

The picture is greatly exaggerated & has no accuracy value nor have anti roll bar. Numbers are random, but you get the idea... Same goes for the slip angle.

https://www.youtube.com/watch?v=qCE54-H2zkM
Negative numbers mean the suspension is lifted while the other is compressed from weight transfer transition. How camber value interact on the control arm will be different depending of the suspension geometry & the initial height with the mass of the car. In most condition, The suspension simply need to have similar suspension travel(or speed"Natural Frequency") & load(load & friction coefficient based the tyre temperature) all around the car to get the optimal mechanical grip.

Inertia play a great role to find balance
https://www.youtube.com/watch?v=jgEt5kBjnTA

More heavy, mean it want to resist more to change in force which require more force to move that change. Weight distribution play a large factor in car setup. To find it you can look at tyre load using the telemetry on a flat spot or look at the real car spec hidden on the internet.

I'll be using often the word inertia.
wiki: Inertia is the resistance of any physical object to any change in its state of motion. This includes changes to the object's speed, direction, or state of rest.[en.wikipedia.org]

State of motion varies with mass, this include the movement, pitch, grip, speed & vibration, elevation change, etc...


The weight distribution of the car(lead to different inertia acted at the wheels) play a huge role at setting up your suspension. More heavy need more force & less heavy need less force to get both at the same level of body movement(velocity). (for more info: Asymmetric setup, Symmetric & Balancing section)

The heaviest side of the weight distribution lead the resistance from the G force, while the lightest side will less likely to resist & you have adjust the setup based on that difference to obtain balance.

Example: You increase the downforce. Thus increase the overall tire load sensitivity, thus result more grip. If you don't change the stiffness of the suspension, the car will roll more than it should be(same if you put better tires, alongside by increasing the downforce). So the remedy behind it is by either increase the negative camber or limit the suspension travel by stiffening it to retain the alignment to gain an ideal contact patch while cornering(if the car doesn't 2 wheel or roll over).
Springs, ARB & Damper
Mechanical Grip
The purpose of the car setup is to adapt the tyres for optimal condition(makes the car simply faster). Changing the setting of the spring, the wings control the general energy(force) to distribute it to the tyres.

More overall load(or hold), more roll, takes longer to make change in direction(or load transfer) & less tyre heat.(May need more negative camber) Less overall load, less roll, takes less time to make change in direction(or load transfer), but promote tyre heat.(May need less negative camber)

Also having a good base in how the alignment work, around the small setup changes, is also an important factor(easy, you get less traction & you simply fix it).

The default damping value is balanced at the stock form. Mostly start to perform changes in it from change in spring rate value.

Do not confuse damping(bump, rebound) & spring rate.
The bump value limit by force the movement of the strut during compression...The rebound value adjust the limit of the damper when it revert back to the initial position on the strut(some car suspension can have them reversed & not mentioned anywhere). Although if the value is too high, it will restrict the motion of the spring rate function to supress the vibration in a smoother way(overdamping). (Read the Asymmetric setup, Symmetric & Balancing(hypothesis) section for more detail)

Anti-Roll Bar(ARB) setting change how the car use torsion mecanism by using both pair of suspension while cornering(result slight increase negative camber on both side during cornering due to suspension geometry movement), although doesn't interfere on straight line compression. In a nushell, it reduce contact patch when the car lean to gain similar velocity.(ex: more ARB value lighter side for balance, to obtain parity in velocity, based on the tire width & inertia)

ARB doesn't really prevent body roll from the inertia, it prevent suspension roll, basically if you add ARB value on the heavy side, you automatically lose grip from the main inertia of the weight distribution... Basically it's about matching the velocity of the inertia of the difference in weight distribution based on the contact patch resistance of the pair of tyres. . Remember that car doesn't come with the same tire width front & back. ARB will intentionally reduce contact path when cornering to retain balance based on the weight distribution of the car for cornering grip.

Spring rate(or fixed vibration pattern)(higher value = more stiff, less= more soft). It increase the stiffness of the damper due to the higher rate & ARB while decreasing the suspension movement & also increasing the speed it can move. When you're way off the optimal temperature spectrum(due that it lead to incorrect alignment), it is recommended to adjust this setting. Adjusting the spring rate unstretch or stretch the spring on the strut by making it stiffer or softer the suspension in much higher level which lead to different height, camber & caster value.

Note: infinite velocity
High value: Higher speed(resolution increase), less suspension travel(cannot read large change)
Lower value: Lower speed(resolution decrease), higher suspension travel(can read large change).


Damper(reduce vibration) is used to reduce compression & decompression movement in the fixed rate(spring rate) in the interval. Limit what the suspension read in correlation to the force(speed or velocity) & suspension movement reduce as fixed rate goes on. See it more like controlling the pitch of the car after the first compression.

Note: infinite velocity

Bump reduce the positive side of the amplitude Rebound reduce the negative side of the amplitude Note: Damper only redirect the velocity of the energy while retaining the same frequency wavelength. So in theory if one side as high reduction damping amplitude, instead of both, the undamped side will more likely have a longer exponential decay[en.wikipedia.org] oscillation while retaining the same frequency worst than not damped. https://en.wikipedia.org/wiki/Harmonic_oscillator Depending where you target on the center of the spring with the damper, it will create different result. The compression of the suspension is a source of velocity but not infinite & the amplitude will reduce naturally. Basically if you have high bump & low rebound, you will get a stronger energy pushing downward due to the velocity of the line that will more likely make the car jump a lot at a slow rate trying to stick out. If you have high rebound & low bump, you will get stronger energy going upward thus make the car more likely to stuck bottom out. Damper directly impact the alignment, thus the ability to grip during cornering.

^^^Just in case those trace line make no sense to you, I recommend watching this short video
https://www.youtube.com/watch?v=ej7CRAIGXow
Remember that the goal is to reduce vibration to retain the load on the tyres from the mass inertia & also taking account of the weight distribution. By having a closer natural frequency between the front & back will ease the damping during acceleration, braking & cornering.

Important to understand, the "mass inertia" reduce the movement speed of the spring specification, thus having similar spring rate on a different mass will result different natural frequency. Knowing the weight distribution(of the sprung mass) & load transfer(gforce X mass) of the car is important to get a balanced oscillation between the front & the back, thus result effective synchronisation & damping(damper). In most case you want to get similar natural frequency for the front & back while adjusting different stiffness.(It is dependent to the "sprung & unsprung mass" of the weight distribution & load transfer, but you get the idea)

Seeing spring rate as stiffness value is partially incorrect as it is dependent to the mass(inertia), but the reason is due to the resolution increase which make the tire more likely to hold on to the road more effectively & will make it heat in correlation to the force acted on the mass, which lead to tire distortion[en.wikipedia.org].

Make sure to adjust the height the same as default when playing with the spring rate to keep the whole suspension geometry intact to avoid unwanted result.(affect the alignment during compression)
-Positive caster, increase the negative camber as you turn the steering
-Negative caster would result a decrease of negative camber as you turn the steering.

It's important to understand that if you have a limitation of camber when you steer, you have to limit your steering input to obtain better cornering speed for high speed corners. It may require to go around it by creating fake steering input by using weight transition & increasing the negative toe.

The bump stop is a rubber they stick at opposite location on the strut to the spring. Without it, it would create extra unwanted frequency from the chassis & would provoke instability. (useful when the suspension is very soft & help to retain the energy of the weight transition while bottoming).
Natural frequency sychronisation(important)
Inertia, spring rate & natural frequency.
-Lower mass at same frequency leads to higher amplitude due to inertia -Lower frequency lead to higher amplitude Adjust damping(serve to control the amplitude range limit, more like spring zone limit) & change accordingly

Recommend to search keyword on google. for best result, avoid motorsport content(mostly by simracers) & focus on the very basic: Pendulum newton, Harmonic Oscillator, Mass inertia, Damping, Velocity, Anti Squat(use default damping value as a reference)[polebicycles.com]

Being aware of the weight distribution & how to play with the natural frequency help to not break the whole balance of the car. In theory by stiffening the spring rate on a big mass have less impact than stiffening it on a small mass. It's recommended to adjust the suspension stiffness by ratio to retain the same frequency based on the weight distribution. You should also take note that elevation result different weight for the mass & may change the weight distribution result especially during braking & accelerating. Although for side to side movement is more consistant.

What is amplitude & wavelenght. Damper setting will determinate the center of the of the oscillation or target range. You can place it anywhere depending of the spring rate value.

Lower wavelenght result of higher resolution(or rate).

Different amplitude require difference negative camber requirement obviously. It's also important to take note of the bottom & upper curve section of the graphic show increase in energy redirection. The long continuous variable section in the oscillation result no redirection

The compression will generate a different amplitude & although create a wavelenght at rest. Targeting similar wavelenght is more ideal for the front & the back. So even if the amplitude is different, a correct wavelenght between both side result stability during acceleration & braking as it will pivot from the center of gravity. Knowing the weight distribution of the car play a large factor in how to tune it correctly.


The natural frequency in most cases is never perfectly in sync, also have strut lenght limitation & you can compensate the drawback with damping tweaks.

Hitting a bump would result a complexe reading from the suspension as both end won't hit it at the same time(tuned for a specific speed), which result the need of a slightly lower natural frequency in the back than the front to reach sync. http://www.optimumg.com/docs/Springs&Dampers_Tech_Tip_1.pdf Although for only braking & accelerating, targeting closer natural frequency is more ideal as the compression & decompression between both end happen at the same time space.

The reason to do this is to avoid unnecessary vibration going to the body since all 4 springs work together in coordination making the body less likely to wobble randomly. It result stability & a controlled result for the inputs. You have to at least allow the suspension to do at least a cycle when damped or allow more to play safe.

The best way to simulate the vision around this is example: You're at full braking which result compression at the front. That force(velocity energy) from the inertia. It will retain positive amplitude on the front suspension & the back end suspension will get the opposite energy resulting negative amplitude. As long as it retain it, it will stay there, because it still feed energy to retain that amplitude(as long as they are about equal). Once at rest, the velocity slow down & generate a frequency(aka vibration). That's where you got to be careful to get the tyres to retain contact on the road during that transition. Obviously there's a certain resistance for the max amplitude, depending of the force added, due to the spring rate value. Damper also act another function to supress the amplitude while retaining the frequency by redirecting the velocity. The spring is made with a wire that has a different tickness & length. The velocity pass through it. Different force on a different mass result a different amount of velocity.

Spring of harmony, 1935 (I especially like the lever part, although this is the result of no damping).
https://www.youtube.com/watch?v=Twgnuqm8hro

Stuff you have to avoid.

Example you go on full braking, amplitude goes up for the front & the back down... you change phase...
As bad as it seem, the rear bounced 3 time in the air while the front is compressed from braking which result less traction overall due to the energy parity. Even by trying to damp it, it will still result instability, unless you overdamp(you know, like the movement of an anti roll bar on uneven surface). Chance it would result more air time, thus total loss of traction & tyres damage probably.
Note: Downforce & elevation setting change the requirement of an ideal rate.

Play with camber value alignment during cornering first, because that's what makes the car corner faster for mechanica grip. Sometime the spring aren't compressing enough or too much making bad contact due to the inertia of the car.

Change & balance the spring rate accordingly afterward & realign the alignment. Understanding a bit the how to use the frequency is useful in sim racing.

The general rule, quick succesion corners require higher natural frequency setup than slow & long corners for optimal performance.
Inertia vs contact vs suspension geometry(or suspension design)
The confusing use of an Anti Roll Bar

Basically(increase cornering respond):
-If the front roll(heaviest part of the weight distribution), you have more ARB in the back.
-If the back roll (heaviest part of the weight distribution), you have more ARB in the front.

Obviously, if the car has too much respond, you increase the natural frequency, reduce ARB & reduce the negative camber value based on the weight distribution(heavy side will roll) of the car.

When ARB is used it make both spring compressed & due to the suspension geometry, both get negative camber & doesn't remain flat on the road. Without ARB with roll, one get compressed(result negative camber) & the other decompressed(result positive camber). Correct alignment is what make the car corner faster effortless. In big you want larger contact patch where it is heavy on the car & less where it's less heavy during cornering to obtain similar velocity based on the weight distribution when cornering.(kind of need to consider how the suspension geometry change during the entry & exits phase)

In a nutshell:

Suspension roll allow the car to retain full contact patch, thus promote more traction. Remember the mechanic of ARB make the other side to compress when the car lean, leading to less grip & should never be more aggressive on the heaviest side of the car.

Remember that inertia is different from the weight distribution. You work with it like aero balance. When we talk about velocity, it mean obtaining similar movement of the mass between the front/rear with resistance of the tire(or contact patch) during cornering.

There are car with wider tire in the rear while most of the weight is at the front of the car. They're build like that to promote better acceleration on a straight line(it work, due to load transfer along with the load sensitivity), but the problem come down when cornering for side force. The rear tyres is too wide thus would too much grip over the front since it has less weight to manage for the back end. The easy fix to match the velocity to obtain a balanced cornering behavior is to purposely reduce grip where it is lighter to match the heavier side of the car. You kind need see it as a different entity between the front & the back. That's the use of a anti roll bar. Sure you can increase damping & rate, but it would result instability for straight line.

Basically understeer & oversteer come down to which has higher velocity(weight vs contact patch based on the pair of tyres width that result a different velocity).

A good example of a race car that use this method is the Nissan Delta wing.

Some car has solid rear axle where both wheel always remain in parallel while independant suspension have their own change when compressing & decompressing. Understanding the suspension geometry & other suspension design is a must in racing simulator. How the suspension change during compression. It's never the same, but the default value help a bit to have an idea of the suspension design of the car.

In a nutshell, more suspension travel result more toe change & more camber change.
Use the default value as a reference.
If you reduce the suspension travel, you use less aggressive toe value & camber value. if the suspension travel increase, you use more aggressive value. The whole point is to get how the geometry is designed to have that target specific toe & camber change when the car is leaning when cornering to win easy & effortless. Tyre max traction & optimal temp spectrum will also affect the behavior on the default value suspension.

It gives you easy win, especially if you insert assist over it. Obviously... whoever share to you that ARB setting is a small change is a liar. It completely change the contact patch result from the combination of the suspension geometry when cornering.

Adjusting the ARB setting is pretty much a sweet spot value to obtain balance as the goal is to retain similar velocity between the front & the back when the car is circling the corner, but for the most part, heavy side should have more suspension roll to promote max traction as it is the main source of inertia of the car.

(work in progression...)
Relation wings & suspension, height
You have to experiment different aero & suspension setting to set faster lap time. Remember that having more grip(better tire or more downforce) will make the car lean more, if anything else have been changed in the setup which screw up your tyre contact due to bad alignment(lead to less traction), because you in how the suspension geometry is designed to be used.

If you set the wing too high & the tyres get cold, it is due that you're not stressing the tyre enough, due to too much load. It allow you to use less wings or stiffer the spring. If the tyre get too hot, you can increase the wings or you can simply tweak for softer suspension.
(Important to note: soft, more negative camber <---> stiffer, less negative camber)

As long you are within the alignment during compression, your tyres are green, get the core temperature at an ideal spectrum, have the correct sync with the ARB & weight distribution, you won't lose too much pace. Although wings do not affect inertia from the weight distribution of the car & only the load on the tyres, which is important to be aware when making changes. Since wings promote more grip & the suspension is left unchanged, it will lead to more suspension compression & you lose the tyres alignment contact during cornering. Basically, you get less cornering speed.

Each time you change aero setting you have to balance the suspension, PSI & alignment to align the optimal temperature of the tyre compound since grip level during cornering affect how the suspension compress from leaning. In most cases scenario to keep on the same margin of temperature of the tyre;

The general rule(50/50 weight distribution)
Aero
Bump
Rebound
Spring Rate
Negative Camber
Anti-Roll Bar
Top Speed Value(Low downforce)
Lower
Lower
Lower
Lower
Higher
Higher
Default Value
Default
Default
Default
Default
Default
Default
Cornering Speed value(High downforce)
Higher
Higher
Higher
Higher
Lower
Lower

Aero & suspension is dependent to each other when balanced. It's possible obtain similar, slower or better lap time, but will have a different pace depending of the sections on the track. Often with strong aero setting, the suspension tend to be very stiff that the car will react more over rumble strip which may compromise you to use a different line on certain parts of the track.

Height hold near or nor important value in racetrack driving when it come for mechanical grip since the settings are limited in mm on low race car. It highest purpose is for aerodynamic use. In rare scenario the car has limited suspension setting. It may require you to lower the car to get the maximum negative camber possible as long as it doesn't hurt speed if it bottom & some rare situation of them you gain from mechanical grip, especially for old cars.

For long straight track you may want a soft suspension setup to promote more straight line speed while retaining grip for tight corners(using arb to retain camber value). The reasoning is due to the wings as under acceleration the nose lift(result less drag) & during braking the nose dive(result more downforce, more drag). You can pratically play with it & get the best of both world.
Brake Bias, Differential, Toe
Brake Bias can also be setup related to the tyre temperature.You can set them 50% to 90%. Higher value put more braking power to the front. Depending of the tyre temperature before the braking point, you can set more toward the front or the back. If the front tyre temperature tend to be lower than the back, the slider will be closer to 50%. If the back tyre tend to be less hot than the front during the braking point, the slider will be more toward 90%. If set correctly you can hold your brake very long near the apex point by releasing it very slowly without much impact in the balance of the car. You can always combine a tiny bit of acceleration input near the end of the trail braking(or bomb dive) to avoid the car to lose the rear end while retaining a specific brake bias to reduce the compromise. The brake balance also hints how much is the percentage of load transfer you get at the front during braking.

The different level of lock would likely help the inside tire to heat up & get extra grip or get into temperature(Can actually help to avoid oversteer at higher cornering speed since you get extra grip from the inside tire, due because it reach the optimal temperature). With an open differential, all the traction & heat is focused on the tire that has traction. (if you have no idea what the differential do, search on youtube-> "Around The Corner (1937) How Differential Steering Works ")
Remember that the inside tyres doesn't travel at the same distance & speed as the outside tires, thus you can play with instability to promote optimal temp, but stability within the tyre temp spectrum is better.

The differential power lock when you're on the throttle & the differential coast lock when you're off throttle. The differential preload lock depending how much force the wheel receive & can overcome the differential power & coast depending of the input you put in the setup. Increasing differential lock doesn't make the car oversteer if the inside tire tend to be too cold. Seeing both tyre being green at the back is better than only one which promote better cornering speed. Obviously too much will create the opposite effect as the inside tire getting higher heat than the outside back tire. You got to follow the ackermann geometry[en.wikipedia.org] within the temperature spectrum. If the inside has higher temperature or equal, it mean you got too much locking power.

Use the right panel "car status" of the the car to see the actual toe data of the car on a flat surface. Warning, some pits are not flat & may give false reading as a reference of the actual toe & camber.

Neutral toe promote...... Slower performance & allow people who have this setting right, have an unfair advantage.... Unless the car has bad top speed, but I see no reason to have neutral toe...
https://www.youtube.com/watch?v=zIMgoxa80Ic
Basically the toe increase as the suspension compress due to the suspension geometry. When the car lean when taking a curve one side increase, while the other one decrease. It's recommended to get them on closer to rail on the circle path & win effortless. Basically is you target within race spec from change in suspension setting, you increase the setting when you have stiffer spring(less negative camber value) & decrease the setting when you decrease stiffness(more negative camber value).

Performance cornering efficiency increase with a specific toe setting, depending of the car traction, rear wheel steering, wheelbase, width of the car & weight distribution based in how the linkage of the suspension geometry that affect optimal slip angle direction. It require a specific setting for maximum cornering efficency based on the Ackermann Steering. Basically matching the slip angle is faster, I guess you would get similar trajectory as when the tyres are completely cold with the wheel FFB being heavier to get the correct matching by driving feel.(or be a fat cheat & simply use the telemetry app)
https://www.youtube.com/watch?v=O2ONv5MrpFg
If you're drifting, you match the slip angle when you are sideway

Important: For those who have issue with oversteering car, changing front toe setting is the proper solution. Although it is important to maximize the sync on both toe in the back to maximum grip to reduce chance of oversteering & probably reduce or reverse the front toe to promote easier correction as the front end is the only one that create a large difference of direction during an oversteer solution for minimal constrain in the mechanical grip.

Performance cornering efficiency increase with a specific toe setting, depending of the car traction, rear wheel steering, wheelbase, width of the car & weight distribution which affect the slip angle which require a specific toe setting for maximum cornering efficency based on the Ackermann Steering. Basically matching the slip angle is faster, should get a feeling being more on rail basically.

Be careful that some car come with rear wheel steering & your steering input may contribute to something you don't want. Although, you can compensate by adjusting the toe and to promote less front steering input to promote the rear wheel to not go against you by adjusting it so the rear stay somehow straight.
Setup progress general
If you drive with the ideal set of tyres, you shouldn't mess too much with tyres temperature & mostly focus to reduce the vibration on the body as much as possible. Alignement of the tyres while cornering is what make it grip based on the change from compression in the suspension geometry & promote more heat on core temperature of all tyres when exploiting the driving model, because more tread touch the road whatever you do. It's either that tyres has more grip or less grip, but spot on is optimal. Insecure players that usually rely on assist will refute the obvious, but correct alignement & pressure make a huge difference in lap time.

Setup general idea is to adjusting the stiffness of the suspension to promote optimal tyres temperature for the track condition where is the main source of the mass of the car. You should primary focus to get similar wheel rate(meaning allowing the tyres always in contact to the road) for pitch "acceleration, braking" & roll"left & right") based on the weight distribution of the car & the relation with inertia. In most scenario the force to accelerate is a lot weaker than braking & turning, which end up often having equal or higher spring rate at the front & force requirement to handle the inertia is multiplied.

The temperature of the tyres based on the camber value hints a lot what kind of change you need to do. It's important to be aware that wings value change during suspension compression.

You can use the dev app telemetry to see the weight distribution based on tire load on a flat surface & see the actual spring rate value with the engineer app to have a approximation of the default value or use the brake balance for car that has this option as setting. I suppose once you get used to it, you can go by feel...

The level of resistance of the tire that resist the body Inertia when you corner is what makes the car roll. Depending of the temperature/compound/downforce will result a different level of possible force that will make the car roll & you have to ALWAYS adjust the setup to make it stay within spec for the suspension geometry. The weight distribution of the car doesn't make the car roll at the same rate due to the mass difference & how the inertia interact within the body. Since a lighter mass is less likely to resist & follow the racing line direction... ARB is mostly used to fix this issue by combining both spring stiffness to get equal load transfer speed for cornering(the correct pattern is more of adjusting the yaw in coordination with the heavy side due to inertia by reducing the grip, it's a bit like when you adjust downforce between the front & the back). The higher spring rate side should always have less ARB than the side with that has less spring rate. To get cornering speed, you have to allow the car roll as along as it doesn't exceed the maximum negative camber possible during suspension compression. You end with grip limitation on either end of the car & you reduce the value to promote easier handling.

You can target for more top speed or more cornering speed to optimize lower lap time with the wings while being aware it completely change the suspension requirement due to different grip level & interaction with the aerodynamic(Downforce(drag) that exhibit different value during braking & acceleration depending of your suspension stiffness). There's a play between ARB vs Spring rate to promote wings efficiency. Be careful that the body of the car has the highest coefficient of drag. It can be either stiff or soft & the mechanical grip will still be effective as long as you keep them balanced with the right alignment.

After you balance the subtle change from the velocity(or amplitude) & frequency acted on the body(reduce vibration) to promote stability with the damper & find ways to improve wings(wings app) efficiency while retaining that balance.

In every change in the setup, the alignment & pressure need to be readjusted due to different compression value & level of grip influenced by the tyres. Often make changes based on ratio from the default value as there may be hidden influence of the suspension geometry.
Asymmetric setup, Symmetric & Balancing(hypothesis)
Asymmetric setup
Often questions came & what to do to to deal this.(I'm assuming you're following the guide correctly)


You can either lower the spring stiffness to spread the energy & run less aero, but make the car a bit more challenging to drive or go with an asymmetric suspension setup or just live with it.

As mentioned previously, camber value change during compression & change in spring rate affect the height which can be rectified by re input to the default height after the change.

Setup is about adapting the compound while also keeping the balance of the whole car. You need suspension motion to handle the optimal tyres temperature while also keeping the balance. It's possible to hold the load priority to one side.

In theory you can hold the energy to the other side of the car.

Transfer the hot & cold to even(You're not doing ovals, don't go overboard to the point of using positive camber). Playing with frequency vs amplitude.
Over the optimal temperature
Under the optimal temperature
Purpose
Decrease Bump Value, increase negative camber due to higher suspension travel
(lower resistance)
Increase Bump Value, decrease negative camber due to less suspension travel
(higher resistance)
Decreasing the energy absorption of the tire on one side while increasing the absorption to the other
Increase Rebound Value
(Higher transfer)
Decrease Rebound Value
(lower transfer)
Transfer the suspension energy from the other suspension
Reduce Spring rate
(level by increasing the height to default)
Increase Spring rate
(level by decreasing the height to default)
concentrate the level of energy(amplitude) by multiplying(frequency) it

Obviously you may get excessive roll to one side which maybe adding ARB value may help to keep the wheel camber to be in angle to the road to optimize to contact to the surface for better traction.

Symmetric & Balancing
The default setup aside from the PSI is somehow a reference of a balanced car, but often not suited for the track layout. The usual change requirement to rebalance the car.

The general rule(50/50 weight distribution), track layout generally more or less flat
Aero
Bump
Rebound
Spring Rate
Camber
Anti-Roll Bar
Top Speed Value(Low downforce)
Lower
Lower
Lower
Lower
Default or higher
Higher
Default Value
Default
Default
Default
Default
Default
Default
Cornering Speed value(High downforce)
Higher
Higher
Higher
Higher
Default or lower
Lower

The spring rate need to be set correctly based on heavy difference of the weight distribution of the car. In most scenario you can't have a high spring rate on the lighter side of the car. Unless a specific elevation will affect the inertia that will lead to a different balance solution. The whole point is to obtain similar traction based on the energy created from the amplitude & frequency on all tyres during the cornering transition. You can use some damping magic like on the asymmetric setup to obtain subtle result & retain a certain balance(example, a specific corner that has elevation).

Spring Rate vs Anti Roll Bar
Actually both actively increase the load transfer speed on the tyres & reduce suspension travel. The biggest difference between both is that the anti roll bar won't act, if both suspension are compressed at the same time, which happen on straight line acceleration & braking.

Although, how inertia act with the mass, the lighter side of the weight distribution have less resistance to change is state in motion & to have equal parity with the heavier side, it has to use a lower spring rate in most cases during acceleration & braking. Without ARB resistance, it can't promote similar load during cornering. The only reason to use it is to not past the maximum negative camber suspension can reach. The lighter side it has less resistance & you use more ARB to sync the side weight distribution to sync the load transfer during roll.

ARB also can be used to have control of the angle of attack to reduce drag during straight line acceleration & still somehow get downforce during cornering. As long as you get the tire load equal & have the correct alignment. The mechanical grip is near optimal, if the tyres temperature is within the spectrum.

Downhil & uphill corners may change the weight distribution change in tyre loads. This may change how you adjust the balance of the spring rate, ARB & damper. You can use also use the brake balance when it give out as a reference.
weight distrubution
Front Suspension
Rear Suspension
Brake Bias
Mostly at the back
RWD
low Spring Rate
High Bump
Low rebound
High ARB(alright to 3 wheels if it doesn't do it during chicanes)
high Spring Rate
Low Bump
High Rebound
Low ARB
Near 50
Mostly at the front
FWD
Low Spring Rate
Low Bump
High Rebound
Low ARB
Medium Spring Rate(high speed corner) May need downforce
low Spring rate(tight corner)
High Bump
Low rebound
High ARB(alright to 3 wheels if it doesn't do it during chicanes)
Near 90
In most scenario, Low ARB is combined with High Spring Rate & High ARB is combined with low spring rate. It's a way to promote balance in how the inertia act with weight distribution of the unsprung mass

Basically the gamer is the one controlling the force during steering, braking & acceleration. A proper suspension setting function like a squirrel playing limbo. You simply need to consider the proportion of the weight distribution(the mass more likely to hold that force"aka inertia") & the type of traction when changing the spring rate & damper. In most case the default value is always broken & you have to accept that fact.

The general idea
Amplitude=Velocity Energy(energy never lost only transformed or redirected)
Impact on the compound=Emit amplitude which result wavelenght cycle
Amplitude from the impact on the spring = frequency from the spring rate
Tire heat come from the viscoelastic in relation of how large the amplitudes is given(from the inertia) & how quick the frequency is made.
The damper(bump) reduce the amplitude from the spring(can also be viewed as holding energy by the fixed frequency rate)
The rebound free up the amplitude energy get closer (also used to have that amplitude energy travel to the other springs)
Higher frequency from the spring rate do less suspension travel.
Heaviest side of the weight distribution resist more to the state, resulting higher amplitude from change of direction
Lightest side of the weight distribution resist less to change of state, resulting less amplitude from change of direction
Lower frequency from spring rate within the same mass do more suspension travel(higher amplitude)
Higher downforce promote more suspension travel(if the rate left unchanged) & rolling due to higher tire grip
Downforce lead to less viscoelasticity due to increase load on the tyres as it increase amplitude & lower the frequency

You have to consider the steering, gas, brake input that also add lateral longitudinal acceleration &
have to consider the time it travel between each suspension with the general above
Tyre pressure & temperature Overview

Even if you tyres are Green, not enough PSI will not provide optimal grip due to less optimal contact patch, meaning you won't grip as much if your PSI are on optimal. It's better to have them green all the time.


Blue mean being cold will provide much less traction & will tend to slide easily.
The usual cause...
-No tyres blanked, need to heat up by driving more
-Too Hard compound, go to softer one.
-Inner, middle, outer temperature is under the "optimal temperature window"(too much downforce , too soft suspension or incorrect alignment)
(note:Proper PSI & camber will make the tyre heat up faster "to optimal temperature" due to proper contact patch. Sometime you're stuck driving with cold tyre & you can compensate a little with suspension setup)


Too much pressure make the tyres not getting traction not last as long as optimal & most likely make you not getting the traction while exiting a corner due to unoptimized contact patch.
-Beware that F1 have a different way to handle the pressure as the tyre width is quite large & you may forget the inner temperature to use the middle instead during cornering as the PSI increase over optimal during race pace. Although for qualification optimal PSI is better & you can abuse the softer compound.


-Inner, middle, outer temperature reach over the "optimal temperature window"(too much suspension stiffness or not enough aero)
Tyre is too hot, provide no traction & slide easily. If they turn red too easily, you can go with harder compound which allow you to get better performance for the track condition.

Tyre temperature rise while cornering
PSI rise as you corner as the tyre temperature rise
Friction provide heat
Heat mean more molecules movement & expand from it, thus PSI increase

-If you add camber, it will cool tyres faster on the straight, but will lose traction for braking
-A straight toe also reduce the tyres to retain heat during straight.
-Higher PSI than recommended will reduce the contact of the tyre patch. it also make the tyre hard meaning less deformation on the straight while having camber which reduce gaining heat on straight.
-There's constant friction at high speed, even on the front tyre from side to side from constant change of g force due to small bump, aero, light steering change.
-Lower Fuel make the car lighter-> Better acceleration & top speed.
-Lower Fuel affect the car weight distrubution & the inertia(tire load, suspension compression) depending where the fuel tank is positioned on the car.

Temperature is important to get the most traction, but there's also the size of contact patch to take in consideration. Combine both & it will make you magically faster effortless.

If you go by single tyre, understeer is caused by temperature under the optimal meaning the compound doesn't absorb energy fast enough to grip. While oversteer is caused by temperature being over the optimal meaning the tyre cannot take more energy & could go as far to release them(lose control). Although... if you understeer at the entry in term of car movement, it could be caused by being either over, or under the optimal temperature.
App, setup setting how to profit
Adjust your brake bias
The brake bias setting alone is a big deal to get cornering speed. You can brake harder while trail braking a cornering at a certain temperature depending of the brake bias. You can even use the accelerator to compensate to promote stability during trail braking, if the car tend to oversteer close to the apex. You have to abuse the grip to the maximum, while a real car would simply spin out & in the game it will still holds on.

Careful when lowering the car
Lower center of gravity can lead for better cornering & top speed, but you get no gain whatsoever to do it in most scenario as it play in millimeter for mechanical grip purpose on race cars that is already low. Although mostly on road car, it may contribute for better mechanical grip. Race car usually have clean shape with minimal mechanical drag(not sure if it's simulated...), it's a non issue. Angle of attack make the most change in most cases which affect the drag the most. You can use the Wing app by enabling the dev app[www.racedepartment.com]. Too low may result loss of wing efficiency during suspension compression.[catsonslicks.wordpress.com]

Lower Fuel
Lower Fuel lead to better lap time due to less mass, but also mean it affect the inertia. It can lead to balance instability. The suspension need to be rebalanced to get similar suspension travel giving the target fuel load you want the car to perform best. The density of gasoline ranges from 0.71–0.77 kg/L[en.wikipedia.org]

Do not only use the cockpit view
Experiment different views while turning off the g force effect in the view setting. View the track in all sort of angles, even drive the track in reverse. Only limiting to cockpit view will limit your performance of your spatial visualisation of the track, nor does not help you to reduce the time to learn the learning curve. It help to choose an ideal line in advance in various situations & make you learn the track faster. If anyone promote you to only use the cockpit is simply for profit to have an unfair advantage & have no idea of the usage of a racing simulator.

Racing simulator is a tool
Racing sim is a tool for making setup & analyze placebo inputs. Removing the HUD & add-on 3rd party apps contradict the use of a racing simulator. Without it, it's not an usable simulator as placebo.

Use electronic aids. Driving assist is a simracing thing
Factory electronic aids, ABS allow you to corner faster(like holding the brake at 100% & turn at the same time until mid entry on high speed corners). ABS automatically adjust the brake pressure level for each brake when cornering the corner faster effortless & win easy, while without ABS you will more likely to lock the inside front tire no matter how good you are at braking, thus driving skill in videogame was a thing. The driving physic in sims game promote a large disparity of advantage at cornering speed performance in the usage of ABS by abusing bomb diving.

Enable dev app
**Program Files (x86)\Steam\steamapps\common\assettocorsa\system\cfg\assetto_corsa.ini

Change the value of "ENABLE_DEV_APPS=0" to "ENABLE_DEV_APPS=1"
It give you access to telemetry, tire load, chance seat position, camera, etc... To get an unfair advantage.

Within that same file you can also "ALLOW_FREE_CAMERA=0" to "ALLOW_FREE_CAMERA=1" which allow to freely move the camera with the F7 keyboard switch.

Use the arrow & mouse to move the camera, hold shift to slow down your arrow input.

Use overhead cam or 3rd person to judge your cornering
For 3rd person, it's recommended to turn off the g-force effects in the graphic setting

For quick overhead cam, use the arrow & mouse to move the camera, hold shift to slow down your arrow input.
**Program Files (x86)\Steam\steamapps\common\assettocorsa\system\cfg\camera_onboard_free.ini
You do the change in the ini file-> SPHERICAL_COORDS=0.1
SPHERICAL_COORDS is the F5 view

It allow you to judge if you really use the whole width of the track correcly in a symmetric way while abusing trail braking till the apex.

Know the car feature
Some car have boost button, DRS, feature brake steering, rear wheel steering, the position of the gas tank to make your setup around it since it affect the center of gravity, know where the car center of gravity is, the caster position, what type of suspension it use, a special way to handle the tire pressure, type of drivetrain, turbo power pressure, etc... Some may shift better at certain RPM to provide better acceleration(look at power graph). As silly as it seem, just that can cost you a sec or two a lap on a normal size track.

Adjust the FFB strength so it doesn't clip while driving
It's the 4th bar in the pedal app. Make sure it doesn't go red. You may be lacking of detail & will prevent you to judge how hard you can go into the corner. Although, you can still do alright without adjusting it, but easier.

Recommended 3rd party app from racedepartment
Helicorsa[www.racedepartment.com]
3D map[www.racedepartment.com]
Camber Extravaganza[www.racedepartment.com](my placebo formula is not that efficient using the app is better)
G Meter[www.racedepartment.com]
Racing Etiquette
Some basic features that have to be used before going online in multiplayer races
I recommend to use the mirror by pressing F11 on the keyboard to activated it before even starting to play online.

You can also download Helicorsa[www.racedepartment.com] that act as a radar to spot players in proximity. It also help you to spot clean to dirty drivers by color if the server run Minorating. Also since it has a limited proximity, it is recommended not to stay to far from the radar distance as many online regular use them.

Trackday practice
Try to pass mostly on the left side & if you let someone pass, stay on the right side.

Avoid staying too long idle as it can lead you being banned from the server. Also server are owned by individual which Kunos has no control over it.

Don't do drifting if there traffic nearby behind

How to avoid collision during racing or trackday
The good old dive bomb mistake to avoid. Also useful in real life & the reason to leave gap while driving in traffic.

If you carry more speed, it mean you also carry more velocity with the same inertia, thus your braking distance is longer even if you brake before the car in front.

In most scenario passing side by side before a braking point is recommended.


Avoid sudden change of direction just before the braking zone. Especially during defending, even if you didn't do your single move on the straight. If you move during the braking zone, leave one car space width to avoid unnecessary incident.

If you crash... Perception of the racing line is like the highway
If you crash avoid getting back to the racing line. Racing line is like the highway & if you want to come back in a safe manner, you have to be at speed before getting on it or you'll suffer from unnecessary consequence. There's a reason why there's a minimum speed limit. To avoid being getting crashed due to large disparity of speed. It allow others on the racing line to have time to react & make a correct decision to avoid incident.

The one move rule
On each straight, you are allowed to only move once during races if there's drivers behind you

If the track width shrink
You're on a side by side battle, you have to move to leave space for the other driver on your side to stay inside the track when the width shrink. Every drivers has to stay inside the track.

Don't impede the flow of the pace of the racing line. Patience & common sense will lead to clean racing
If you spot a player that lap many seconds faster a lap than you consistently, let him pass. The usual scenario is because his car corner vastly faster without even trying. Due to the difference in car performance, there will be a high chance she will likely dive bomb you if you keep defending. It's not worth to fight for position.

If you're faster than your opponent, pass him on the straight or when he does a driving mistake to avoid incidents. No point to takes risk if you're massively faster.

Most road driver don't like left lane camper, the same goes for racing. If you're massively uncompetitive, don't empede the racing line.

Avoiding sticking you nose to slow your opponent down without being sure of gaining position. Be aware that fighting for position without gain for too long, slow down the flow of the racing line. You have to put in your mind that racing is not hollywood & still somehow some sort of endurance hotlapping. Only do it if your laptime disparity is very close to your opponents.

Netcode doesn't represent the actual position of the player.
The position of other drivers you see on your screen will never be accurate due to lag compensation. You may even clip the other players without even be aware. Although racing need to be close, the higher the disparity of ping, the more I recommend to leave a safe distance. Avoid using wifi, wireless internet connection or download/upload high bandwidth questioning materials while playing online for better gaming experience.
https://www.youtube.com/watch?v=hiHP0N-jMx8

Flags
Blue flag mean to not disrupt the race & avoid getting on the racing line. It is recommended to slow down & let the leader pass before the braking point if possible.

Yellow flag mean someone has crashed. It has no value whatsoever, although you can still pass unlike the real rule(beware that some roleplay hard... better ask before or take your time to read the rules of the lobbie in question). Although you may see someone getting back in the racing line in an unsafe manner due to bad 3d spatial awareness.

White flag mean you're at the last lap, so keep going

Checker flag mean the ended the race, although avoid getting any contact even if the race is completed in servers that use Minorating(if it still exist or something equivalent) as you will lose rating.
Purpose of this guide
Setup make the car vastly easier to drive in a race. Players with the default setup or a bad one along with using common sense real driving technique are at massive disadvantage. Time lost is exponential & the one with the better setup along with driving exploit are allowed to make many mistakes on track without much impact for the whole race. A car with a good setup & driving wrong(learning curve) is much easier to get result while also get a better understanding how to effectively improve lap time. The time cut is exponentially effortless.

The biggest issue is finding how to make your own setup on race cars which many people want to learn & you may be giving tons of bad advice including setup guides that only people who know about 99% know how motorsport work, along being aware of the stuff that make no sense, share setup that doesn't work & using real life driving tips to use in a simulator to intentionally make you slower. They will try to make you believe it's driving skill or different driving style as long everyone don't know & doing all sort of doubtful activity for profit like most guide that never explore the very base of car setup such as tire pressure, suspension geometry & inertia. Sometime you get nice advice, but it's quite rare.

I hope you will gain great result from this guide, unlock the puzzle on creating your own setup & being able to exploit the physic of Assetto Corsa or any other racing sim titles available on the market.
https://www.youtube.com/watch?v=SiMHTK15Pik

“People think that practice makes perfect. But if you are practicing the wrong thing, you will be perfect at doing the wrong thing. Perfect practice makes perfect!”[www.worldtimeattack.com] – John Boston

NOTE: If there's something missing you want to know or something that doesn't quite work out, I'll look for solutions. Could be some few misaligned tips & example by trying to keep it simple, but it's about right. just leave a comment & it will be added gladly be on the guide at good will.

Remember, it's a public guide, so there's no copyright & you are free to do whatever you want.(I mean you are free to copy the whole thing & write it in your own word).
Mr Deap's Q&A
Why PSI is so important?
Uneven PSI on track lead to erratic driving input & the car just don't corner(not mentioned in most racing simulator guide & it's fascinating). With improper PSI you can't setup the car & balance it either.

Why having the correct alignment is so important?
Because the car corner faster without even trying, thus require no skill to reduce lap time by many seconds. Better tyres or downforce need a different alignment if the suspension haven't being modified due to the suspension geometry.

Why race track air temperature is an exploit
Because you can't choose your temperature in real life & tyre compound grip spectrum advantage is greatly affected by it.

Should you learn to drive the car with the default setup before exploring the setup?
No. The tire pressure & alignment need to be adjusted first. Once done, yes, you will get a better idea how to profit by driving unrealistically. After that you can explore the car setup.

Does a setup improve driving skill?
No, only drifting improve your driving skill. Setup in the other hand simply improve your lap time & make the car magically faster.

Does changing FOV can improve your performance?
Nope

Sure there is a mathematical correct FOV, but only to increase realism on a ultra large screen(higher than 72 inch) with a distance of less than 2 feet. Some may swear to change the FOV, but the main problem is due to bad 3d spatial awareness. The game handling doesn't change at all from changing it.
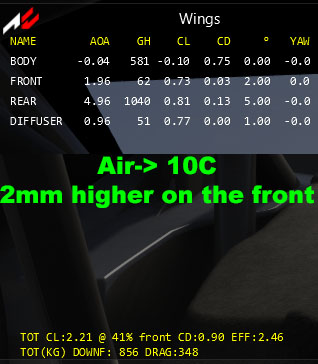
Does reducing or removing FFB, reducing steering rotation improve your performance?
It's placebo result from driving wrong due to lack of response. It doesn't change anything in the driving input.

Steering over the limit is forgiving & the car doesn't fully understeer. You can use auditive clue as a reference from even tire noise from both entry & exit phase to be sure you're not underdriving the tyres.

Does learning to setup your own car improve your driving skill?
Yes, if you know how to exploit the car feature & physic, you have a lead advantage, because it help to grasp the driving model of the game easier & It is the right way to practice. People who first try a sim, usually have the perception it's not realistic, because it's simply a fact(Kind of obvious, but need to be pointed out >_>).

To get that excitement you need to know where it lack of grip. Without it, you're doing it blindly without much result.

If there's a simracing guide that feature how to fix lift-off oversteer, would you read it?
Nope

Do you need to practice to get good times?
Yes, the more you exploit(brake wrong, use assist & have faster setup), understand the learning curve, the better is your lap time.

Driving or setup?
Both, if you don't understand how to exploit the learning curve & have a good setup, you can't improve your lap time.

Driving skill or exploit?
Only drifting require skill. :P

Refute it is an exploit or lack of sportmanship?
It's based on skill as long as people don't know, brag about it & makes pretender feel better with complete refutal a different skillset is require. This guide alone is an prime example that getting better lap time is all about better setup & understanding the game odd mechanic. Performance improvement is guarrantee without even trying hard, especially for those who are way off pace & actually have a good basic of driving a car on a track.

Sim racing has a long history of unsportmanship, glitches & exploits with easy win as long as the rest aren't aware.

Is exploit cheating?
No, it's within the game physic model. Although for pure sportmanship... Well it's up to you to judge... Everyone has a different opinion about it.

Although it's funny once you understand the suspension geometry & how it interact with the alignement which make the car grip. Lowering the main grip & make the car easier to drive is something I really don't appreciate to see.

Simcade vs Sim?
Simcade doesn't really exist as the correct term is only simulation. It's mostly about the number of types of implemented physics simulated. Some feel more realistic, some may feel less realistic. Mario Kart(feature lift off oversteer) is a sim while it may not feel so realistic. It's mostly about how driving is like and attempted to base that handling and steering on it. Profit around that idea & never look back. That's actually the point of a consumer simulator running on a potato & not on a quantum one. Simulation is not real life & it's a compromise. The appeal to realism, a logical fallacy. Some may take sim racing too seriously & may see glitching as realistic.

Is there such thing as driving style?
Obviously by reading this guide... Nope, It's a known method to fool people to get an unfair advantage.

If the player is 10sec off pace in a normal size track, is it due to driving skill?
No, It's more about sim racing being not real life & doesn't perfectly recreate what you have in mind nor match real life onboard inputs at all. It's mostly about understanding the learning curve of the driving model & the setup. Being able to take advantage of it & take a certain type of driving input to be effective.

Why make this guide?
Racing sim isn't harder than arcade game & it still a racing video game. Both kind of games simulate physic on whatever platform; PCs, smartphones or consoles. It doesn't make you more mature, masculine, doing some sort one of a kind heavy workout sitting on a chair being a warrior in front of a screen using a laughable driving technique & hide important aspects of the game mechanic to get an unfair advantage & easy win. Some may level up their pride around it & may never understand the cause of why the genre is so niche...

If it's not totally realistic does it still worth to drive?
Like all games, perfection is a sport. It's all about being productive & have a good sportmanship. Monopolizing and hiding tricks is uncompetitive, not manly, toxic & not healthy. I personally don't know how to describe paying a subscription to learn exploit in a videogame.

In my opinion racing sim are great to learn new tracks. Exploiting the handling & the best setup with the same car on a same track is not productive. Racing against other while trying new tracks & new cars without crashing itself on various type of corners improve quick adaptation. It help to develop better 3d spatial awareness on a perfectly recreated track created & shared by individuals. It doesn't need to be the official content as it all gets to a similar result.

Inputting value & understand the driving model have it's purpose to the real deal. It avoid doing idiotic thing you can do on a real toy

example:
-Cutting spring just to lower the toy
-Insert random suspension from previous model year
-Swapping sway bar
-Run excessive camber
-Run better tyres & made those modification above...

Race Simulator is more about understanding car setup around the driving model of the videogame & 3D spatial awarness. Any conflict assessment is a source of entertainment.

Does sim racing improve you skill in the real thing?
There's no such thing as being good at something & bad at other. Although it can result placebo( treatment that in some cases can produce a very real response).

Is it stupid to compare which racing simulator is the best?
Yes & even from the technical driving method. None of them are very accurate & often end up in a garden of troll, although trying all of them will decrease the chance of bad respond of the placebo(including Mario Kart which is a sim). Yes... Sim racing is all placebo.
Special thanks to the enlightenment for the creation of this guide
Dyr_gl PSN youtube channel Managing tyre temperature(Had to be a console user... shame on you)

Lord Kunos[www.assettocorsa.net] DEV from AC official support forum about Brake Bias.

Aristotelis[www.assettocorsa.net] DEV from AC official support forum & Game&Track youtube channel; PSI, suspension stiffness along with the relation of aero & stiffness.

The sim community that can't see the PSI being part of the car setup nor include tyre temperature to as a clue to setup car since release & trying to teach me that large disparity of time is due to driving skill(serious BS) which lead me to create this guide.

The Nasa about aerodynamic[wright.nasa.gov] & the aliens who visited planet earth, Isaac Newton, Galileo Galilei, etc...

Kyle Engineers for general race car engineering

Engineering Explained for basic engineering bits

The University of Winsconsin with the Inertia Ball

If something helped you from a reference that I used in this guide, you should thanks the reference & not me.
51 Comments
werm 3 Jul @ 10:44pm 
Bought this game today and have been going in blind. Skimming this guide was overwhelming but very helpful. Thank you for taking the time to make it!
Mr Deap  [author] 22 Jul, 2021 @ 8:42am 
@randomdudesimon
Most of the tips are more or less the same for all the games. AC use somewhat the same the same handling. Racing games are full of quirk, sim or not. That's why I used the simracing in my title & not specifically toward AC.
kavings 22 Jul, 2021 @ 7:18am 
I really should think before buying AC shouldn't I
Mr Deap  [author] 24 Nov, 2020 @ 5:13am 
This video explain why GTsport is the pinnacle of esport for racing game(note: it's in french, might use translator, but a must watch for those in denial).
https://www.youtube.com/watch?v=YaftmLBNJrs
Mr Deap  [author] 19 Apr, 2020 @ 2:17am 
"Villeneuve: They're simulators, but also games. Those small differences gives you bad habits..."
https://www.youtube.com/watch?v=4z7Hqvn4KeE

In a nutshell to be fast you have to learn those bad habits.
Mr Deap  [author] 25 Feb, 2019 @ 9:39am 
Yes, because the very base of this guide is to be aware the alignment, roll affect the suspension geometry, [contact patch vs "inertia of the weight distribution"] what make the car corner faster effortless.

The only part that is exclusive to AC is bomb diving with the brake which require a learning curve. The odd brake/acceleration transition & the whole setup thing work pretty much in every sim due to videogame physic.
Tomcatus 25 Feb, 2019 @ 9:18am 
Does this guide apply only to AC or will this work in other games like PC2, rFactor etc?
bluesman 4 Jan, 2019 @ 2:45pm 
Hi, I'm new to Assetto Corsa although I've used Project Cars 2 quite a bit. I'm set up using Oculus Rift with AC and have assigned all the controls to my Thrustmaster wheel and pedals....seemed good to go but once I started driving a test lap in a vintage Masserati when I shifted up from 1st to 2nd the program kept downshifting back to 1st by itself so I couldn't get very far in 1st gear. I looked for some setting in controls but saw nothing that might be causing this issue. Can anyone assist? Thanks.
bbnk88 3 Dec, 2018 @ 3:20pm 
Amazing!!!