Darksiders Warmastered Edition

Darksiders Warmastered Edition

899 ratings
Darksiders: Warmastered Edition: Collectibles
By Psychedelic Adventurer
A guide detailing the locations of every collectible in the game.
*Maps Included*
19
3
3
   
Award
Favorite
Favorited
Unfavorite
Intro


Hi all, and welcome to another one of my guides!

I'll be covering every single collectible in the game, and have included a map marked with the location of the item. Also I have included a Legend for every image so you won't get have to scroll back to the top to check which one you need to get.

This is a re-upload of the original Darksiders guide I did for the other, last generation, version of the game. If there is any discrepancies between the games, please comment down below and I will endevor to update this guide.
http://steamproxy.net/sharedfiles/filedetails/?id=492210896You can follow me, and see the rest of my guides here:
http://steamproxy.net/id/StarSide/myworkshopfiles/?section=guides
The Rundown
Ok, so Darksiders has it's fair share of collectibles; some easy to find, others gratuitously difficult.
All the important character building items you will find I have marked on the map, save for things you can buy at the vender, and Boss rewards.
So, without wasting time; here is the rundown of what things you should be looking out for:

Lifestones
In order to max out your health, you need to collect an additional 9 lifestones. There are 16 lifestone shards in the game. Every four that you collect will give you a lifestone. An additional complete lifestone is awarded each time you defeat one of the first five bosses. Obtaining all lifestones will unlock the Full Power trophy. A video guide showing the locations of all lifestone shards can be found here.


Wrath
In order to max out your wrath, you need to collect an additional 8 wrath cores. There are 20 wrath shards in the game. Every four shards that you collect will give you a wrath core. An additional three wrath cores can be obtained by buying it off Vulgrim, trading in the overlord artifact and opening a chest at Twilight Cathedral. Obtaining all wrath cores will unlock the Wrath of War trophy. A video guide showing the locations of all wrath shards and cores can be found here.


Artifacts
There are 27 artifacts in the game; 20 soldier, 6 champion, and 1 overlord. You can check how many of each type you have obtained by hitting and navigating to the final tab. Trading all artifacts with Vulgrim is required in order to obtain two lifestone shards and one wrath core.


Abyssal Armour Pieces
There are 10 pieces of the abyssal armour. Apart from the one awarded after clearing the curse in the Drowned Pass, they are all found in the environment. A cool thing about the armour is that you can choose to carry it over into a fresh new game regardless of the difficulty. Collecting the full set of armour will unlock the Legendary Form trophy. A video guide showing the locations of all armour pieces can be found here.


Serpent Holes [Occasional World Hub]
Note: Serpent holes are not available until after defeating Tiamat in Twilight Cathedral. In order to use a serpent hole as a shortcut to another area, you must have found Vulgrim in that area.

Twilight Cathedral
Lifestone Shard
Requirements: Mask of Shadows & Shadowflight
Activate the Mask of Shadows just prior to the exit portal to reveal a glide point and a new path. Follow the path around until you reach another glide point. Use this to reach the chest and collect your shard.

Anvil's Ford
Wrath Shard
Requirements: Abyssal Chain
At roughly midway through the serpent hole, you'll see some grapple points on the left. Use them to swing over to the secluded platform and grab this shard from the chest.

The Dry Road
Wrath Shard
Requirements: None
Once you enter the serpent hole turn around and follow the path to a chest which contains this shard.
Vulgrim Items [Essentials]
Vulgrim is the merchant of the game and appears once in each area apart from the prologue. Once you have located him, his location will permanently be marked by his symbol on the map of that area.

Wrath Shard
Requirements: 2500 souls
The first or second shard you are likely to obtain. When you are comfortable spending 2500 souls, talk to Vulgrim. When you have enough, I'd advise buying this immediately.

Wrath Core
Requirements: 10000 souls
Same goes for Wrath cores. This can be left for a while; from a gameplay stand point Wrath isn't that useful in my experience. Regardless you'll need to pick it up eventually.

Wrath Core
Requirements: Overlord artifact
Once you have acquired the overlord artifact, talk to Vulgrim and press to trade it in. You will be rewarded with a wrath core. For details on acquiring the artifact, refer to the Ashlands section of the guide.

Lifestone Shard
Requirements: All soldier artifacts
When talking with Vulgrim you can press to trade any artifacts that you have collected for souls. Once you have given him all soldier artifacts, he will give you a lifestone shard.

Lifestone Shard
Requirements: All champion artifacts
When talking with Vulgrim you can press to trade any artifacts that you have collected for souls. Once you have given him all champion artifacts, he will give you a lifestone shard.
Crossroads
1. Artifact: Soldier
Requirements: None
In the western area of the map is a set of steps. Heading down these steps will eventually take you to a small pond. This artifact is found at the bottom of the water.

2. Lifestone Shard
Requirements: None
After entering the main section of the library, drop down to the patch of water. Swim through the tunnel and to the other side to find a chest which contains this shard.

3. Artifact: Soldier
Requirements: Shadowflight
Once you drop down into the main section of the library, climb the broken shelves opposite. This artifact is found on the other side of the broken bridge. From the edge of the current side, glide across and you should just about make it.

Tip: the first soldier artifact can be gotten without shadowflight, if you've purchased the air dash upgrade. just double jump to the beam sticking out of the platform and air dash to it.
~Thanks to Doc Sloth for the update.

4. Wrath Shard
Requirements: Abyssal Chain
Just above the broken bridge, you'll see a grapple point on a pole. Use it to swing over the gap, walk round the corner and open the chest containing this shard.


Scalding Gallow
1. Abyssal Armour Piece
Requirements: None
Near the beginning of the area is a bomb attached to some growth that is blocking the way up. Lob a car or use your crossblade, if you have it, to destroy the growth which will also knock a pillar down. Climb up the pillar and open the chest to receive your first piece of the abyssal armour.

2. Wrath Shard
Requirements: None
From Vulgrim's position, turn around to find some growth. Climb the growth and open the chest on the ledge for the shard.

3. Abyssal Armour Piece
Requirements: Shadowflight
From Vulgrim's position, peer over the edge and you will see a narrow path spiralling around where you freed Samael. In order to land on the path, you will first need to perform a single jump and then start gliding when you are roughly half way across. The chest at the top of this path contains the armour piece.

4. Artifact: Soldier
Requirements: Chronomancer
On your way to The Dry Road you'll need to get past a fast closing gate. Activate the chronomancer point to slow down time, then the gate lever and quickly run underneath the gate. Follow the path and steps round until you reach a climbable wall. Climb as far as you can and then jump away from the wall to land in a pipe. Turn around and the artifact will be right in front of you.

5. Artifact: Champion
Requirements: Abyssal Chain & Shadowflight
Before using the fan, it would be a good idea to activate the panel in the hallway before the fan, so that you can easily knock out another collectible after this artifact without backtracking too much. Onto the actual artifact.

While riding the rotating fan, look for a gap in the lower walls. Just after the blade you're standing on passes this gap, jump or glide through it and press when the prompt pops up to grapple up to the ledge. Use the glide point to reach the much higher ledge and you'll see this artifact floating in the air.

6. Wrath Shard
Requirements: Abyssal Chain, Shadowflight & Voidwalker
In the hallway before the room with the fan is a ledge which is too high for you to jump up. It's also where this shard is. On the ceiling is a voidwalker panel, activate it now and head into the fan room. While riding the rotating fan, look for a gap in the lower walls. Just after the blade you're standing on passes this gap, jump or glide through it and press when the prompt pops up to grapple up to the ledge. Walk forward slightly and look up to see another panel. Activate it and use the glide point to fly through it and onto the previous inaccessible ledge. Turn around and you'll see the chest which holds this shard.


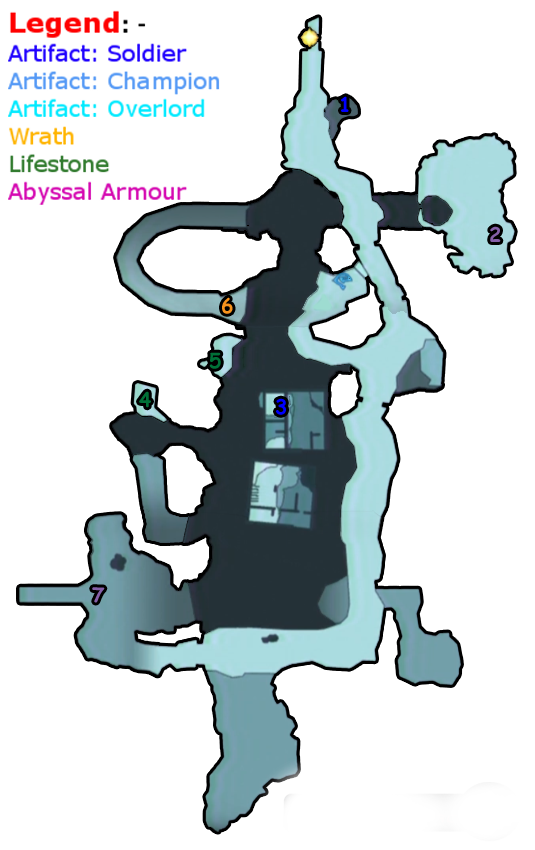
Choking Grounds
1. Lifestone Shard
Requirements: None
Destroy the seven cross tombstones and a chest will appear near the entrance. Open the chest to collect this shard.

2. Artifact: Soldier
Requirements: None
Nearby the chest that appears after destroying the tombstones are three stone blocks. Drag the middle one to reveal a set of steps. The artifact is in the room at the bottom of these steps along with several enemies.

3. Artifact: Soldier
Requirements: None
In the eastern area of the map, just past the Vulgrim location, is a set of steps. Descend the steps and find the artifact at the back of the room.

4. Wrath Shard
Requirements: Shadowflight
Just prior to the cursed demon is a hole in a wall. Jump down and follow it through to reach a destroyed building which also contains an armageddon shard. Use the glide point to reach the next floor and and open the chest in the corner for the shard.

5. Lifestone Shard
Requirements: Crossblade & Tremor Gauntlet
Just prior to the cursed demon is a hole in a wall. Jump down and follow it through to reach a destroyed building which also contains an armageddon shard. Use the glide point to reach the next floor and then use your crossblade to tag the fire & dormant bomb to allow you to climb this growth. After climbing the growth, you'll see a blue rock formation nearby. Smash it to find a chest which contains this shard.

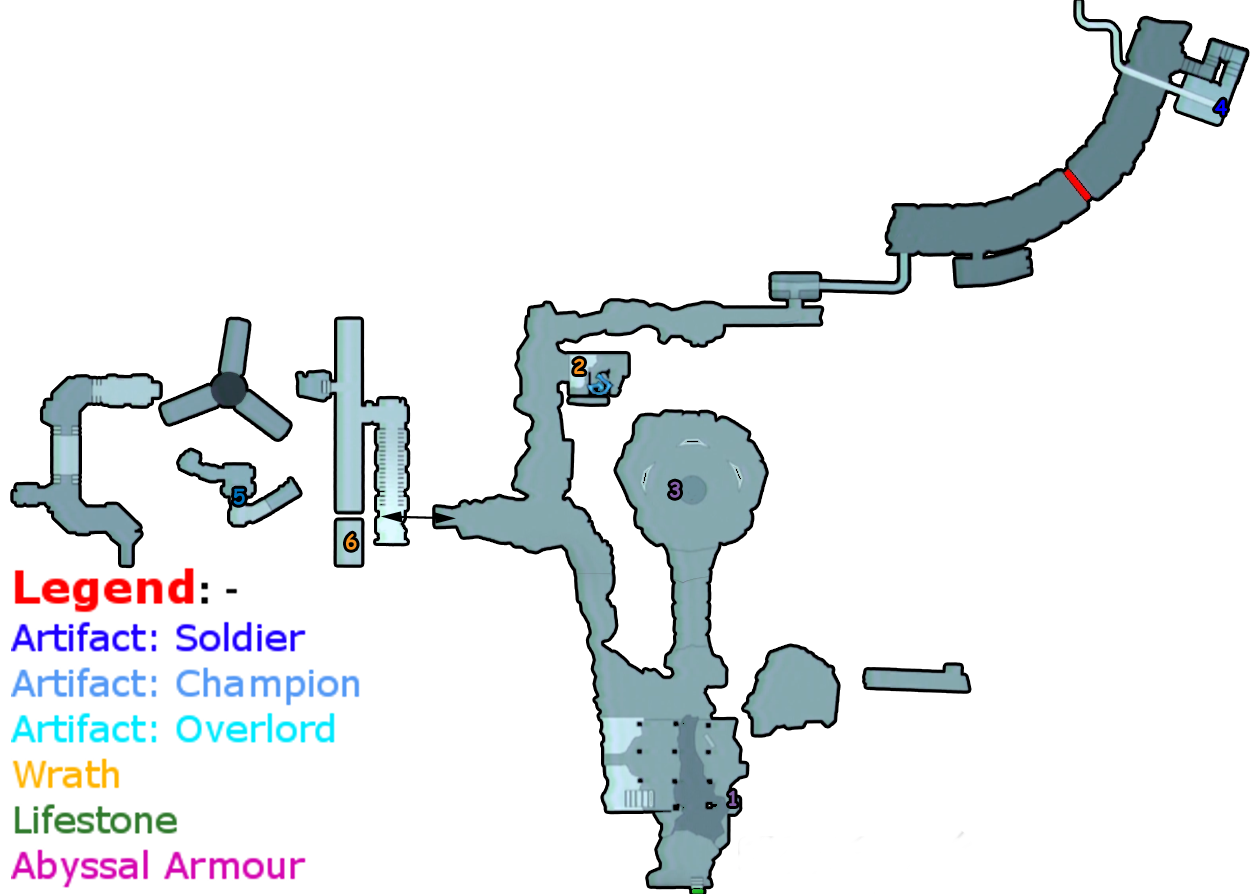
6. Artifact: Champion
Requirements: Tremor Gauntlet
When travelling to The Broken Stair, you will pass through a tunnel with bats, two glide points and a blue rock formation. Jump down to the rock and smash it to reveal the artifact.


The Broken Stair
1. Artifact: Soldier
Requirements: None
Near the entrance of the area is a collapse on the right wall. Walk through the gap and you'll see the artifact at the edge of the debris.

2. Lifestone Shard
Requirements:: None
Descend the steps with the swinging Vulgrim signs and take a right to find a pool of water. Swim through to the other side and open the chest for this shard.

3. Lifestone Shard
Requirements: None
While using the two glide points to reach the highway, you should see a glowing chest in the distance behind some cars. You'll find the shard inside.


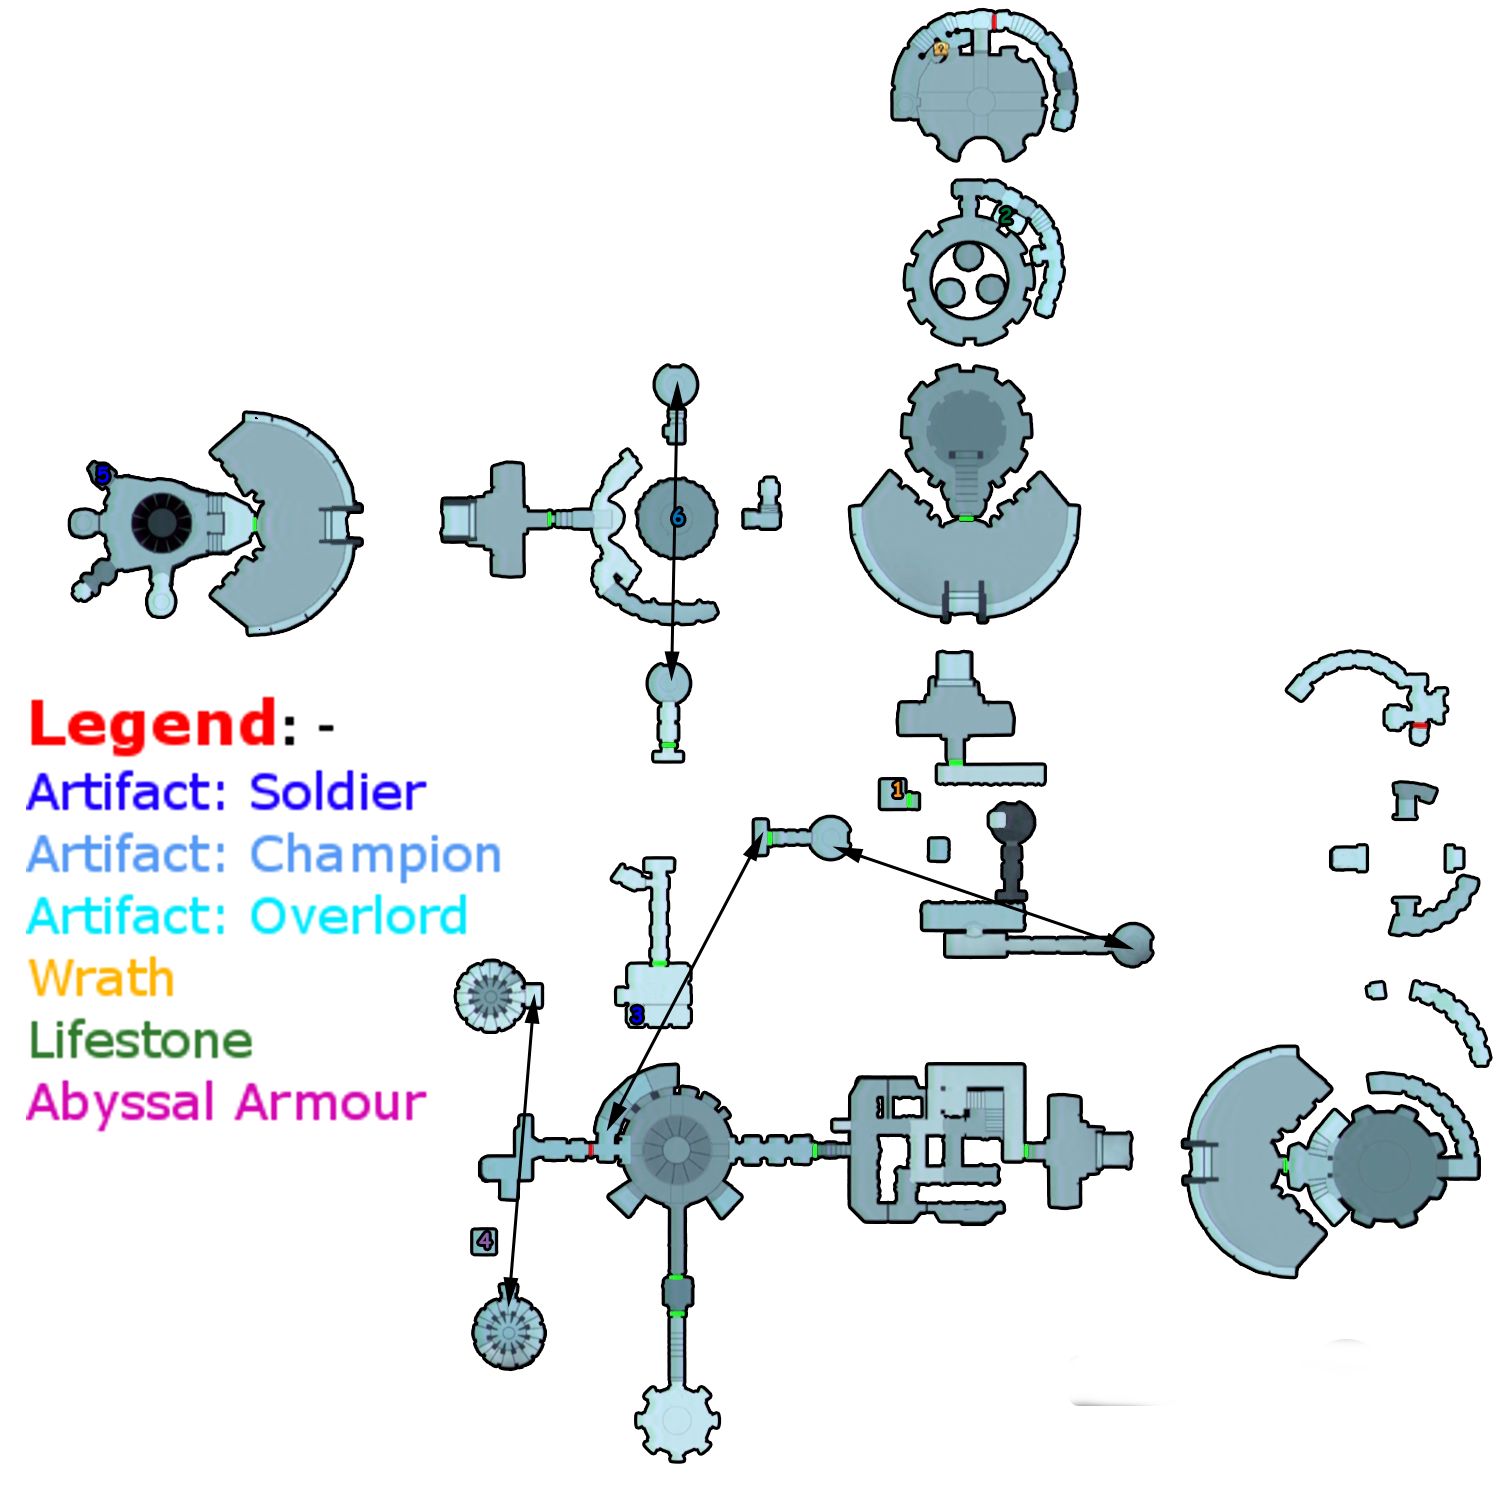
Twilight Cathedral
1. Artifact: Soldier
Requirements: None
After pushing the statue off the ledge, the already damaged ground below will fall through. Jump down the hole and explore this new area. When you find yourself at the top of some growth, jump away from the wall to hopefully grab the artifact which is floating in the air.

2. Lifestone Shard
Requirements: None
In the room that contains the locked gate that leads to Tiamat is some growth that must be bombed. Grab the bomb, quickly press , move the cursor over the growth and lob the bomb at it to destroy it. A chest which contains this shard will be revealed.

3. Artifact: Champion
Requirements: Shadowflight
In a small room with lava and two glide points is an artifact floating in the air. Use the glide point to hover up into the air and collect it.

4. Artifact: Soldier
Requirements: Shadowflight
One of the three sword puzzles contains a rotating bridge. Make your way to the center and glide down to the lower right ledge where the artifact is resting.

5. Wrath Shard
Requirements: None
After inserting the second of the three swords, the door on this level will unlock. Inside this room is a chest on the right which contains this shard, however, as you approach it the chest will sink through the floor and some enemies will spawn. Defeat the enemies and the chest will return.

6. Wrath Core
Requirements: Crossblade
After inserting the final of the three swords, the platform will rise. Using the block that you pushed earlier, climb up to the ledge where the Goremaw is hanging. Throw your crossblade at it to stun it and quickly run through to the next room. Jump down to the lower level and open the horned chest to collect this core.

7. Abyssal Armour Piece
Requirements: Crossblade
After inserting the final of the three swords, the platform will rise. Using the block that you pushed earlier, climb up to the ledge where the Goremaw is hanging. Throw your crossblade at it to stun it and quickly run through to the next room. At the far end of the ledge is a chest which contains this armour piece.

Lifestone [BOSS]
Requirements: Defeat Tiamat
After beating the boss of the level, Tiamat, you will be awarded a lifestone.

Drowned Pass
1. Artifact Soldier
Requirements: None
As soon as you enter, walk forward and jump into the lake. Turn around and swim up to the small patch of land where this artifact can be found.

2. Abyssal Armour Piece
Requirements: None
As soon as you enter, walk forward and dive into the lake. Swim through the cave on the left to find a chest that contains this armour piece.

3. Artifact: Soldier
Requirements: None
On the lowest level of the underwater ruins is a set of steps that you can climb, or rather swim up. You'll find the artifact on this new floor.

4. Lifestone Shard
Requirements: Crossblade
Near the underwater ruins is a tunnel. Swim through and dispatch the enemies in the cave. If you peer off the edge you will see a structure just underneath the water. Throw your crossblade at the blue crystal and it will rise. Use the platform to reach the chest on the other side and collect this shard.

5. Lifestone Shard
Requirements: Abyssal Chain
From Vulgrim's location turn around and you'll see a grapple point. Use it to swing over to the ledge and collect the shard from the chest.

6. Wrath Shard
Requirements: Tremor Gauntlet
As soon as you enter, walk forward and dive into the lake. Swim through the cave on the right and follow the path round until you reach the blue rock formations. Smash the first one to reveal a chest which contains this shard.

7. Abyssal Armour Piece
Requirements: Complete the shadow challenges
After talking to the cursed demon, he will reward you with an armour piece.

Anvil's Ford
1. Wrath Shard
Requirements: Tremor Gauntlet
After exiting the tunnel from Drowned Pass, you'll see a blue rock formation wedged between a grate on the right. Smash it and continue down the path. On the left is a small section with a chest that contains this shard.

2. Wrath Shard
Requirements: None
After killing all of the enemies, climb the growth at the end of your side. On this higher level there is what appears to be a small patch of growth. Grab onto it and shimmy round to the ledge below where a chest that holds this shard is found.

3. Wrath Shard
Requirements: Abyssal Chain
Not far from the area where you defeated the last of the Angels is a small island by some waterfalls. Use the grapple point to swing over and collect the shard from the chest.


The Hollows
1. Artifact: Soldier
Requirements: None
After destroying the red rock formation in the room with the gas pipes you will come to a room with a massive hole in the middle. Dive to the bottom to find the artifact.

2. Abyssal Armour Piece
Requirements: None
Early on in the level when an orange gate temporarily blocks your progress, a Gholen will eventually crash through a wall. After defeating all the enemies, open the chest from where the Gholen crashed through for this armour piece.

3. Wrath Shard
Requirements: None
When you are swimming through the underwater tunnels, one section will be blocked with a fan. Swim through to the other end of the lower tunnel until you reach a small room with the fan controls. There is a chest in this room that contains the shard.

4. Artifact: Champion
Requirements: None
After destroying the red rock formation on platform A, you will eventually be in a room with some cylinders. There is an artifact in this room but you cannot reach it until you raise the water in the next room. Once you have raised the level of the water return to this room to find the centre of the area flooded. Swim to the bottom, through the tunnel and then upwards to collect the artifact.

5. Artifact: Soldier
Requirements: None
Shortly after acquiring the tremor gauntlet, you will be in a large room where you must punch a block across three platforms to reach a higher level. To the right of the final platform is a hole in the wall. The artifact is inside.

6. Lifestone Shard
Requirements: None
This is found on platform A. At the back of the two trains is a chest which contains this shard.

7. Wrath Shard
Requirements: None
In the canyon you will need to raise the level twice to progress. Once you have done this, return to where you smashed the last piece of blue rock and turn round. There is a chest on the other side. Glide over to collect the shard from the chest.

8. Lifestone
Requirements: Defeat the Griever
After defeating the boss of this level, the Griever, you will be awarded with a lifestone.


The Dry Road
1. Lifestone Shard
Requirements: None
When you enter the area keep an eye out on the left for a few layers of broken pavement. Follow the path around to find a chest containing this shard behind a broken wall. You can also try jumping up.

2. Artifact: Soldier
Requirements: None
Near where you are attacked by the angels is a building in ruins. You'll find the artifact on a ledge behind this building.


Ashlands
1. Wrath Shard
Requirements: Abyssal Chain
Just prior to reaching the giant worm you will need to pass a room with three Goremaw's hanging above a wire. Instead of crossing over to the other tunnel, glide over to and climb the growth on the right. Look above and you'll see a red grapple point. Grapple up to it, jump across to the ledge and follow the path around to the chest that contains this shard.

2. Lifestone Shard
Requirements: Tremor Gauntlet
Just prior to reaching the giant worm you will need to pass a room with three Goremaw's hanging above a wire. After emerging from the exit tunnel turn around and you should see a piece of the blue rock formation poking out. Walk up to and smash the rock to reveal a chest which contains this shard.

3. Artifact: Soldier
Requirements: Shadowflight
Just a bit north from the first tower is a cliff. Walk round and use the glide point to get up there. There will be some growth nearby. Climb it to find the artifact.

4. Abyssal Armor Piece
Requirements: Abyssal Chain
Just a bit north from the first tower is a cliff. Walk round and use the glide point to get up there. Walk to the end of the cliff and use the two grapple points to make it across the gap. As you are walking up this cliff, look on the right for another grapple point, however, you will not be able to reach it from here. Jump or glide towards it and press to grapple onto it and jump onto the walkway. Walk around to find a chest which contains this armour piece.

5. Wrath Shard
Requirements: Tremor Gauntlet
In the north eastern section of the map, not far from the glide point, there is a blue rock formation. Smash it and climb the ledge ahead to reach the chest which contains this shard.

6. Artifact: Soldier
Requirements: None
After stopping the central drill, drop down the hole that it made to land in a lake. Dive straight down and you'll see the artifact just in front of you.

7. Lifestone Shard
Requirements: Shadowflight
Not long after jumping through the hole that the drill made, you will enter a room with several Goremaws. Just ahead of these there is a glide point. Use it to reach the platform and open the chest containing this shard.

8. Artifact: Soldier
Requirements: None
After defeating the giant worm you'll need to pass through a set of tunnels separated by a body of water to reach the Stygian. The artifact is found near the bottom of the pool.

9. Artifact: Overlord
Requirements: Abyssal Chain
You may have spotted this artifact after dropping down the hole the central drill created, but found it agonisingly out of reach. In order to reach it you'll first need to climb to the top of the central drill. Once up here you'll see a grapple point inbetween the two drills. Swing across to the next drill and activate the control to shut it down. Jump down the hole the drill made and follow the path round to reach the artifact.

Lifestone
Requirements: Defeat the Stygian
After defeating the boss of the level, the Stygian, you will be awarded a lifestone.


Iron Canopy
1. Wrath Shard
Requirements: None
After you cross the bridge it will collapse behind you. On the left as you are walking down the alley are some wooden fences. Smash the first one to reveal the chest that contains this shard.

2. Wrath Shard
Requirements: Crossblade/Mercy
This is found in the room with the Goremaw and movable block. Move the block underneath the Goremaw so that he grabs it. Then with your crossblade or gun, hit him so that he drops the block. Before he recovers, grab onto the right side of the block. Once the block is raised again, jump onto the rafters and open the chest on the ledge.

3. Artifact: Soldier
Requirements: Shadowflight
After defeating the Shadow Warriors and Broodlings in the alley, climb up the broken fire escape. The artifact is straight ahead, on top of the small building. Glide over to collect it.

4. Abyssal Armour Piece
Requirements: Abyssal Chain
In order to obtain the second beholders key, you will need to use the chronomancer and grapple points to get past two Goremaws. In the small room with the chronomancer point, look up and you'll see a grapple point. Grapple up there to find a chest which contains this armour piece.

5. Artifact: Champion
Requirements: Abyssal Chain
After defeating the second Loom Warden head into the next room where you previously defeated several enemies. Go through the door on the left and grapple up to the ledge. As you walk round the corner, you'll see the artifact at the edge.

Lifestone
Requirements: Defeat Silitha
Awarded after defeating the boss of the level, Silitha.

6. Artifact: Soldier
Requirements: Crossblade & Abyssal Chain
During the cutscene after you defeat Silitha, you will both crash through a few floors. Once you regain control of War, activate the platform with your crossblade and grapple onto it as it raises. Jump off at the next floor and grab the nearby artifact.


The Black Throne
1. Wrath Shard
Requirements: Voidwalker
This is found in the opening area of the second tower, the area with no permanent floor in the center. Before exiting the room, look to the gap on the left and you'll see a voidwalker panel. Use your voidwalker power on it and then jump through the last activated panel to reach the area. There is a chest here which contains this shard.

2. Lifestone Shard
Requirements: Voidwalker
After using the beholders key in the room with the weights, use the glide point and walk up the stairs until you come across the first voidwalker panel. Activate it and then slowly walk back down the stairs whilst looking upwards until you see another panel. Activate this one and jump into the previous panel to teleport up to the ledge. Climb up another small ledge to find a chest which contains this shard.

3. Artifact: Soldier
Requirements: Shadowflight & Voidwalker
This is found in the opening area of the third tower. There are two voidwalker panels here. Activate the panel on the ceiling first and then the one on the wall. Jump through the portal on the wall, glide to ensure that you land on the ledge and collect this artifact.

4. Abyssal Armour Piece
Requirements: Abyssal Chain & Voidwalker
After descending the cylinder of stairs, you will have to use the rotating platform and portals to get across to the other side. Once you have made it across, you will see a portal and a bomb in this room. Activate the portal now. When the activated portal on the rotating platform is directly opposite you, quickly grab the bomb with your abyssal chain and throw it through the portal you just activated. It should land on or near the crystal and destroy it. When the platform has rotated back to where the crystal was (you'll see a panel), jump through to find a chest which contains this armour piece.

5. Artifact: Soldier
Requirements: None
This is found in the area where you need to switch the water using the voidwalker panels. The artifact is in the section where the water currently is. Swim down to collect it.

6. Artifact: Champion
Requirements: Shadowflight & Voidwalker
This artifact is found in the area where you fought the Rot Maulers and buddies, but you won't be able to obtain it until you redirect the beam through this room. Use the glide point to make it to the ledge and use a voidwalker shot on the panels on the right to climb even higher. Look across to the platform to find another panel on top. Use a charged shot on this panel and jump through the previous panel to shoot up and collect the artifact.

Lifestone

Requirements: Defeat Straga
After defeating the boss of this level, Straga, you will be awarded with a lifestone.

Eden
1. Wrath Shard
Requirements: None
Whilst walking up the steps, look to the left and you'll eventually see a waterfall. Drop down into this area and walk around to find the chest which contains this shard.

2. Abyssal Armour Piece
Requirements: Shadow Mask
After crossing the bridge, walk through the lake instead of heading up the steps. In the north eastern area is a waterfall that you can walk through. You'll see an outline of a chest at the back. Activate your shadow mask to completely reveal the chest and collect the final armour piece.

Final notes & Disclaimer
Done!
Hope you all found this guide useful! drop it a like & fave; it really does help!

If anyone want's a basic summery of this guide in video form I strongly suggest you look at this Steam Guide:
http://steamproxy.net/sharedfiles/filedetails/?id=166716986

Caution: The link above is a guide which was made for the original game, not the updated version.

I'd like to thank Several members from Achievements/Trophys.net for providing a overall detailed discription of the location of the items. Also several enemy defintions have been used in the name of parity.
Each of the images was cut, edited, and added by myself.
However, all images and artwork is the property of Vigil Games and THQ (RIP).
[Optional] Donate!
If this guide helped you out, and you would like to say thanks,throw something my way.
Of course this is not necessary however; It just gives me a little more insentive to write and edit more in the future!

https://steamproxy.net/tradeoffer/new/?partner=38602821&token=A3SrzMse
29 Comments
ryderdude2012 24 Oct @ 2:50pm 
truly amazing and super helpful:steamthumbsup:
darkfuryXL 4 Mar, 2023 @ 7:31am 
This is extremely well made and very helpful. Thanks so much!!
One possible improvement would be to add locations of 6 vessels (life essence, rage, possession) currently missing.
Keep up the good work & again big thanks! :lunar2019grinningpig:
Mboope 17 Sep, 2022 @ 12:17pm 
Turns out my missing one was on the serpent hole to Anvils - you need the chain to reach it. Thanks Buster I remembered picking up 2 in them so seeing you mention 3 helped me finally finish that
Buster 13 May, 2022 @ 8:58am 
He didn't mention (as I see) but there are 1 life and 2 wrath cores in the portals. Life core is in Twilight Cathedral porta which is reachable with Mask of Shadows; 1st wrath core is in Anvil's Ford portal which is reachable with Abbysal Chain and 2nd one is in The Dry Road portal. When you enter the portal turn back and follow the path.
2J丶 4 May, 2022 @ 12:21am 
Good Guide!
ManOfCulture 7 Apr, 2022 @ 3:41am 
Thanks bro!
Mboope 15 Feb, 2021 @ 2:05pm 
Do you know if the wrath cores are different to the original version? I've got all of them except 1 and I can't figure out where I've missed it or if it's bugged. All the maps I visit are chest free (except the one on top of the building in the water in the drowned pass which I think is actually bugged)
Dirty Fart Goblin 16 Nov, 2020 @ 7:50am 
What Commander Supreme said.
Iwardoff 4 Nov, 2020 @ 6:33pm 
Dude... You're a psycho... And i love u
COMMANDER SUPREME 29 Jun, 2020 @ 12:19pm 
was lovely to read whilst masturbating