Euro Truck Simulator 2

Euro Truck Simulator 2

244 vurderinger
Improving Your ETS Screenshots-Everything You Need To Know
Av TrapGod
Hey there fellow mates and truckers. Ever wanted to show the world your magnificent trips in an unique way? Look no further, because in this guide, I'll explain and provide everything that you need to make your Euro Truck Simulator screenshots more interesting, besides a drop of creativity.
   
Utmerkelse
Favoritt
Favoritter
Fjern som favoritt
Learning To Take Great Screenshots
Hello, mates!
This guide's goal is fairly simple: to help my fellow truck drivers express their artistic selves by teaching you the basics of properly taking screenshots and even some mods to help you boost their potential by improving graphics.
I hope you'll enjoy, and sorry for any mistakes, it's my first guide!
Settings That Need Tweaking
Before I start explaining about Photo Mode, for the best results take some time to tweak the following settings:

Firstly, scaling. It can be found under the Options -> Graphics tab. Press "Advanced Graphics" if you haven't done so previously and there you have the scaling adjustment option.
What this does is basically adding more overall scenery on-screen, for better screenshot results. Be warned, tough, it is performance-hungry. In my opinion, anything above 200% will guarantee fine results.

Then, for both immersion and screenshots, I'd reccomend tweaking the probability of rain, found under the Options -> Gameplay tab.
This will (you guessed it) change the weather algorithm based on how high you set it. Be sure to have functioning wipers, mates.
The Proper Way Of Taking Screenshots
I must start by saying, don't do THIS:
HUD is still there, it's taken from inside the truck, it's overall ugly.

Even if the camera is outside of the truck:
It is still hideous, don't lie.Taking them using the good old F12 simply isn't enough in this game, even if you remove the HUD.

Don't fret! For all your problems, I present to you Photo Mode, the proper way of taking screenshots in Euro Truck Simulator 2.

So, how does it work? Simple! When you come across a scene that you consider has good screenshot potential, just pause the game (Esc) and look for your Personal Status on the right side of the screen, and choose Photo Studio:


Then, this option menu should appear:


  • The Image Spotlight lets you browse pictures shared on World Of Trucks, for inspiration.
  • The Screenshot Manager is the tool you are going to upload your screenshots to World Of Trucks, if you wish so, once we are done taking them (I'll explain it in one of the next sections).
  • And finally, Photo Mode is your all-in-one cinematic camera control mode for taking the GOOD screenshots.


Click on it, and you should be prompted with a screen that looks something like this:
Understanding Photo Mode
Let's dive right in! Most of these are basic knowledge for users of software regarding image manipulation, but for anyone out there that's confused by these settings, I'll give you the proper examples and situations for each of them.

I'll explain the options, one by one:


In the first tab, you are met with the Field of View slider. This determines how much scenery your camera can take into one screenshot. Without changing the initial position of the camera, here are the comparisons:

FOV- Mid

FOV- Min

FOV- Max

Then, you'll see the Depth of Field category. They are all centered around the overall bluriness of the image. They allow you to tweak the intensity of the blur, soften or harden the transition to clear areas and change the focus zone (determine where the blur starts and stops).

After that, there is the second tab:


This mostly goes around the colour pallete of your screenshot.

Firstly, Saturation will either make your image a lot more colourful and vibrant or turn it black and white. Adjust this depending on what kind of feeling you want your screenshot to give off:

Saturation- Mid

Saturation- Min

Saturation-Max

Lastly, there are the Color Balance sliders, which you're free to play around with depending on what part of your screenshot you want to draw the most attention towards, here are some examples:
  • If you want the vegetation to be more colourful, adjust the slider towards green.
  • If you want the sky to be more colourful, adjust the slider 1 or 2 times (very slightly) towards blue and more towards cyan.
And so on.


What Photo Mode Can Do For You
All of the images below are taken by me (yes, I know they're not the best):

Mods for Graphic Perfection
You might have noticed, my game may not look the same as yours. It's not the graphics options that I chose, but the mods I installed.

Currently I am using a combo of Fael Environment v2.8;


And Graphic Mod v2.1;


With this load order priority:


Both of them can be found on the Steam Workshop and produce amazing environments in this combo.
The explanation is that Graphic Mod v2.1 is a complete graphic retexture, while Fael Environment simply excels at vegetation textures, so my load order prioritizes Fael first, basically letting it overwrite the vegetation textures of Graphic Mod and producing the results seen in my screenshots.
Uploading to World Of Trucks (Optional)
Now that you're happy with the screenshot you have taken, you will go back to the Photo Studio and choose Screenshot Manager.


Once you've done so, select a screenshot you're pleased with then choose Upload to Selected Slot. That's it!

Now, if you'll check your World of Trucks profile on the official site, the image has been uploaded there.

P.S: I don't know why my ETS 2 stats aren't updated but, oh well.
Thanks for reading!
I really hope this guide has been helpful to you!

Don't forget to leave a rate and maybe even a favourite if it helped, and all the screenshots used here and more are on my profile if anyone needs inspiration. If there are any problems or there's something you don't understand, feel free to add me or comment on my profile and we'll try to solve your issue togheter.

Happy trucking!
22 kommentarer
[VIVA] [BG] Vinnie P.B. 15. feb. 2020 kl. 7.25 
Cool tut, thanx!
ANT0SHKES 19. nov. 2019 kl. 6.06 
:104::cozybethesda: great tutorial
cliftut 7. nov. 2019 kl. 10.29 
A good guide for the photo mode functions. If anyone wants to know more about how to plan good screenshots, do some research about good photography, it's the same kind of thing.
Andy Gaw 23. apr. 2019 kl. 4.16 
Nice guide!

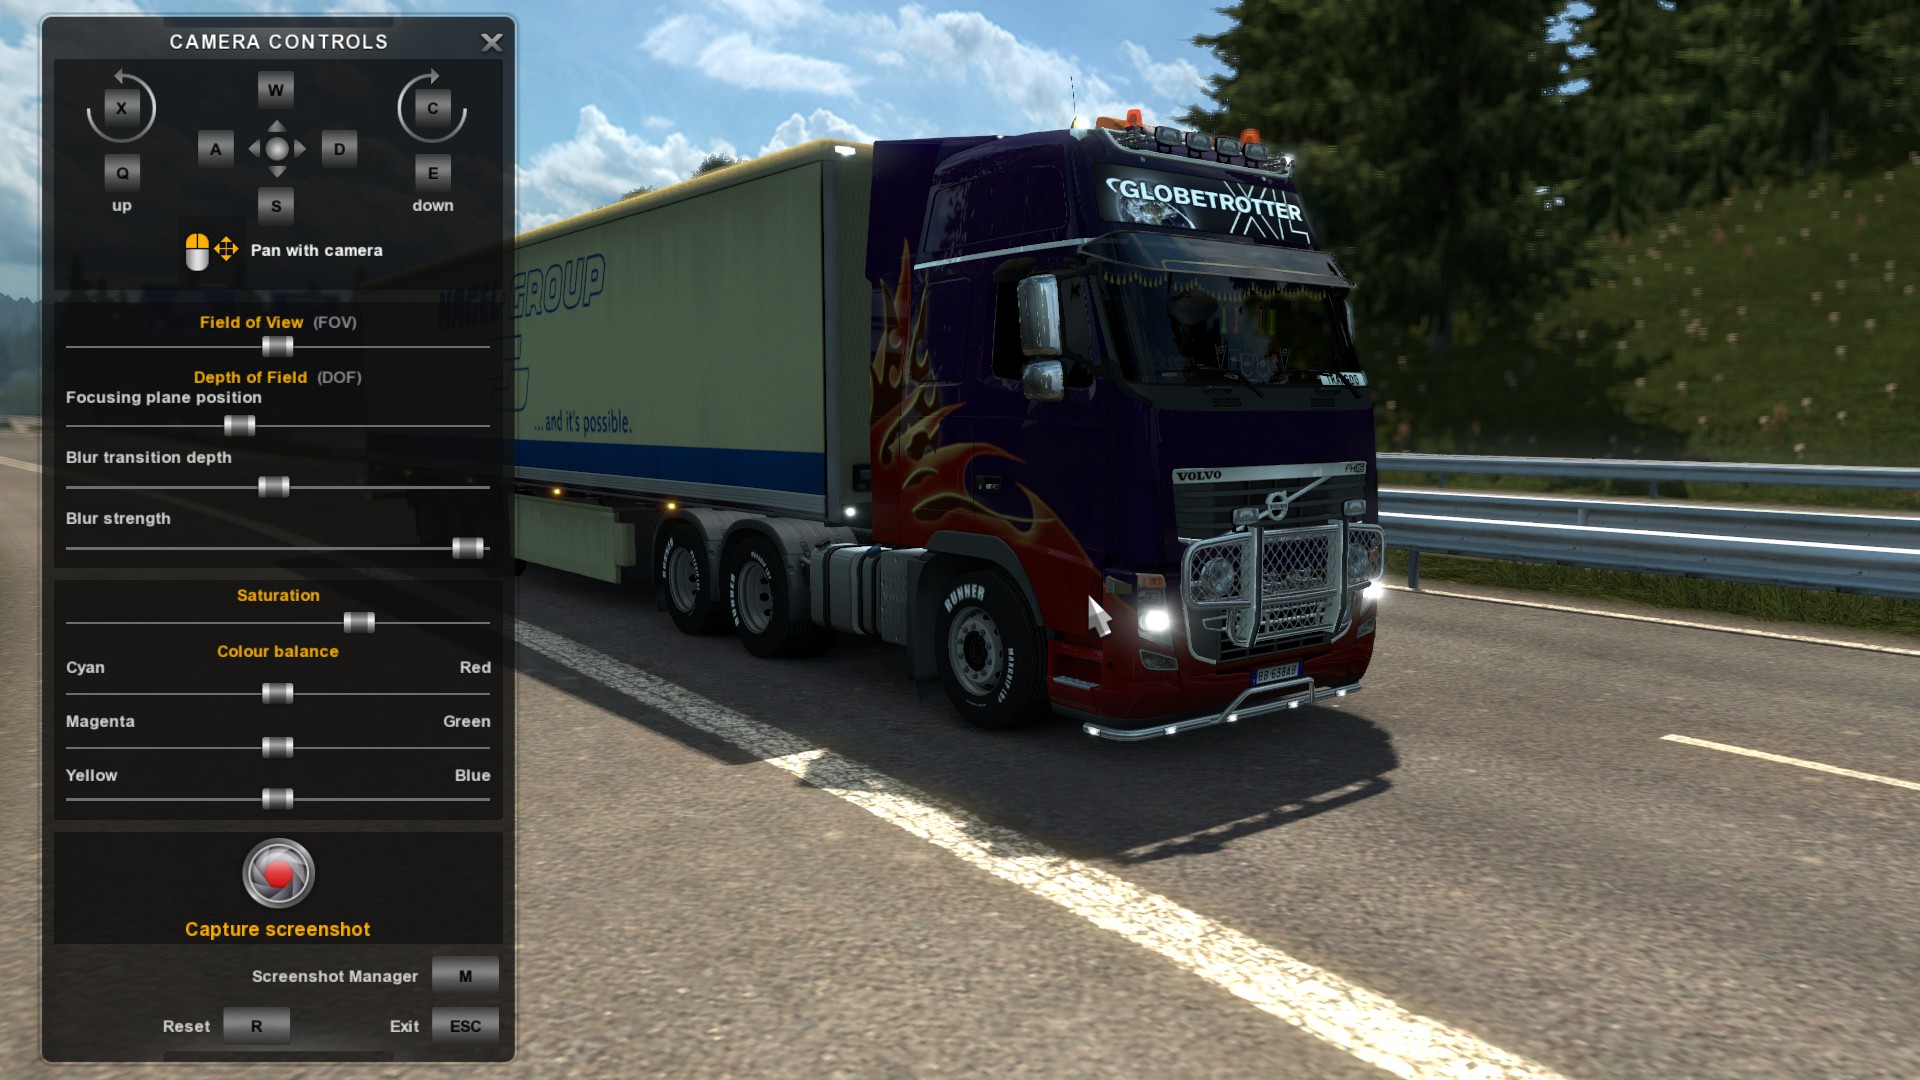
In case anyone wants to get really clever, the shots are saved in folder C:\Users\USERNAME\Documents\Euro Truck Simulator 2\screenshot (replace USERNAME with your windows username). They are in PNG format, and can be edited with whatever you care to use. I recommend GIMP - free and very powerful.
TrapGod  [skaper] 9. juni 2018 kl. 5.46 
Glad I could help, mate! :D
PunkSteve 9. juni 2018 kl. 5.20 
Awesome info, thanks very much. :ss13ok::cybereye:
I was wondering why everyone on the Activity Feed was taking pics that were so much better than mine. Now i know to stop using the F12 & to start using the In-Game Camera options. :steamfacepalm:
Maximum Balling 26. jan. 2018 kl. 12.51 
Nice guide, great! Thank you!
VILLA1N 26. feb. 2017 kl. 2.05 
Nice guide!:happy_creep::zombiethumbsup:
BelaME23™ 16. jan. 2017 kl. 6.17 
Nice guide (for me nothing new here)! What I miss is a declaration to the DoF settings, I think that would be certainly interesting for newbies! But , it is a good Guide , thanks for the Work !! :thumbalift:
ver0nica ♡ 6. des. 2016 kl. 2.54 
Nice one! Thanks:)