Alien: Isolation

Alien: Isolation

486 ratings
Alien: Isolation - Survival Guide
By PhantomRaptor
Detailed guide to Creative Assembly's Alien: Isolation, including a partial (incomplete) walkthrough and information on tactics and helpful tips to get you through your time on Sevastopol Station.
5
10
   
Award
Favorite
Favorited
Unfavorite
Survival - Basics
This section of the guide aims to teach you the basics of staying alive whilst you play Alien: Isolation, because trust me. There's a lot that doesn't want you to.

FORMS OF MOVEMENTS
You have 3 main speeds of getting around Sevastopol station. The general rule of thumb is, the faster you are travelling, the more noise you will make. When you can hear the Alien creaking about in the vents above you, make sure you NEVER run, otherwise it will be alerted to your presence almost immediatley. When nothing is around, crouching will slightly decrease your chances of detection, however not considerably enough to offset the loss of speed, when nothing dangerous is in your immediate area, you'll want to be walking - staying in the same area for long enough can be just as deadly as staying on the move.

STAYING OUT OF SIGHT
If something hostile is in your immediate area, in most cases your best chance of survival is to keep yourself on the other side of a piece of furniture or large-ish object, anything that can break the line of sight between you and your would-be assailant. Either that, or find a hiding place. Mind you, hiding places will be of little use if you are seen climbing into one...

INTERACTION POINTS
In most instances, to progress in the game and its story you will need to travel from one location to another, activating switches and hacking systems along the way. However, whilst performing every one of these activites, you are completely vulnerable to attack and suffer from a restricted view. Interaction Points count as anything that you can interact with that then requires or allows you to perform a certain action or minigame.
VENT SYSTEMS
There are a huge amount of vent systems around Sevastopol station, all of which are good ways to travel around. However.. the alien thinks so too, it can and will follow you into them. It can also drop down from ceiling vents, or kill you instantly if you walk under one that it is currently residing in (look out for the drool and canned hissing!).

Survival - Advanced
This second survival section aims to educate you in slightly more advanced ways of manouevering around the station, some of which require more skill than others.

PEEKING
Whilst simple, peeking is an incredibley useful tool and will probably save your life a fair deal. On pressing the peek button, you will be given full control of Amanda's view with the WASD keys, which you can use to peek over the top of structures, or around them. This considerably lowers your visibility compared to the other option, stepping out around the corner slightly - which can often lead to your imminent death. You can still be seen when you are peeking, so try to only do so when you need to, mainly, when the hostile is too close to use the motion tracker, else they will hear it.

HIDING PLACES
The station is absolutely littered with places and objects you can use to hide in, some of which however, are more reliable than others.


Lockers
These are the most obvious hiding places in the game, but I typically wouldn't advise using these unless as a last resort. The Xenomorph can investigate them, in which case you will need to lean back and hold your breath with the currect button prompt, too slow, you're dead. Lockers are risky.
==============================================================================

Cabinets
I would advise using these even less than the lockers, as the Alien always seemed to be able to detect me much faster and easier when I was using one of these, the same mechanics apply however if it inspects your hiding place, lean back and hold your breath.
==============================================================================

Hiding under Objects
Whilst it may seem the weakest, this is actually the best way to hide from the Xenomorph, as it does not have particularly strong peripheral vision, however, the Working Joes and Human Survivors do, so I would recommend simply crouching behind furniture for them.
==============================================================================

SECURITY CAMERA SYSTEMS
Security Cameras can be a pain in the butt. They are small, wall/ceiling mounted and make rhythmic clicking noises as they scan a grid of the area, which can be seen as a projected light on the floor. If you walk into or very close to that grid, it will set off the alarm which will more than likely attract at least something that wants to brutally murder you. There are two ways to deal with these cameras, if you want to risk making noise (i.e. there are no hostiles yet) you can smack the cameras with your Maintenance Jack. Otherwise, you can sometimes find Seegson Security Bypass Points which can be used to disable the camera feeds.


==============================================================================

DUCK AND COVER
Just because an enemy makes a noise that implies they have been alerted, does not always mean they have fully detected you, it is sometimes possible to quickly duck behind an item in the world and sneak off quietly. This can also be done by holding the Flamethrower or Molotov out to keep the Alien momentarily at bay, but can be very risky.

HAVING THE ALIEN FIGHT FOR YOU
During the course of the game, you will come across several situations where you will have to deal with a large group of human survivors or synthetics. You have 3 choices, completely avoid them, which can be difficult, kill them all (which will likely attract the Xeno) or use a device or weapon to bring the Alien to your position to deal with the pesky enemies for you.

This is most effective if using a Noisemaker, however a Flashbang, Pipe Bomb or smacking the wall with the Maintenance Jack will be more than sufficient to attract it if it is present on the current level. Just make sure that it doesn't know where you are when it's done with the survivors, you may think you're watching from a safe position, but quite often you won't be...
Know your Enemies - The Xenomorph
Amanda certainly isn't alone on Sevastapol station. Almost everything she meets will want to kill her, and everyone will have an agenda. There are 3 different types of enemy in the game, and all of them have to be approached in different ways to effectively deal with then...
The Xenomorph is the most dangerous enemy present on Sevastopol and will be hunting you down for the majority of the game's (roughly) 25 hour playtime.

UNPREDICTABLE AND DEADLY
It has incredible hearing, and has intelligent and adaptable Ai. Once you travel to a new area that the Alien is present in (listen out for movement in the vents) it will search the area randomally for any sign of a target, be that you or other survivors. Once it finds a trace, it will start investigating the area. If it has detected the player, then it will start to hunt you. If you stay in just one hiding place, it will eventually find you. You need to be moving from hiding spot to hiding spot to survive encounters with the Alien. If it ever gets hold of you, you're dead. Dont let it get hold of you.

Just because it has moved away, does not mean it has left. Sometimes, the Alien will turn right back around, especially if it thinks it caught a glimpse of you in the area. This creature is smart. The second you underestimate it is the second it kills you.

YOU ARE NEVER SAFE
Whilst you are safe from attacks from other enemies if you manage to climb into a vent before they get to you, you wont be safe from the Alien. It uses the vents to move around, and could drop down into your 'safe' little hole at any moment. Open vents in the ceiling can be a death trap, make sure you don't wander under them if you see the thin stream of saliva dripping from above, or it's game over for you.

IT CAN'T BE KILLED
The Xenomorph living on Sevastopol Station is invulnerable, the weapons that Ripley posess can do nothing more than simply harm or scare the creature. Firearms can be used to scare the Alien off momentarily, whilst more suited weapons such as the Molotv or Flamethrower will send it running - just be careful not to be caught reloading.

However, try not to use the same hiding spots repeatedly. Over the course of the game, the Alien learns with you. As you start to watch its behaviours, so will you. If you over-use lockers, it will begin to check lockers with increasing frequency, thus being much more likely to detect you, the exact same thing will happen with other methods of hiding, such as hiding under a desk. The same thing goes with weapons, the more you use a certain weapon or type of gadget on the Xenomorph, the more used to that type of deterrant it will get, making it less effective.

...BUT IT CAN KILL FOR YOU
The Xeno isn't all bad news, however. It can be an effective way of dealing with troublesome human enemies that also inhabit the station, throw something that creates an audio distraction, or provoke a survivor into firing in your direction. If the Alien is in that part of the station, it will come running to investigate, normally killing everyone in the process.

The Alien will pay no mind to synthetic enemies however, as shown by several corpses littered around sevastopol, it has long since discovered that they are simply robotic - imitations of life.
Know your Enemies - Synthetics and Survivors
Amanda certainly isn't alone on Sevastapol station. Almost everything she meets will want to kill her, and everyone will have an agenda. There are 3 different types of enemy in the game, and all of them have to be approached in different ways to effectively deal with then...

==============================================================================
You always know a Working Joe
There signature catchphrase is actually surprisingly accurate. If you find a Joe that has white glowing eyes, then it'll be working. If you just see cold, red glowing eyes staring back, thats when you have a bit of a problem. Androids with glowing red eyes are hostile, and will follow and attack you on sight. These cheap, mass produced Seegson androids are slower than you, but they sure are persistant - a threat that should not be taken lightly.

Joes can take a lot of punishment before they fall, on Hard difficulty, it takes 2 headshots with the Shotgun to dispose with them, or a full clip of 6 rounds from the Revolver.

Hitting them won't work
Unlike human survivors, you can't just run up to the Working Joes and start beating them down with your Maintenance Jack, consistently. Whilst you certainly can kill a synth using the Jack, after a hit or two, it will normally catch your weapon mid-strike and push you back, causing you damage and allowing the android to gain the upper hand. Attacking them directly with the Maintenance Jack is only advised when they are stunned from either a Stun Baton or EMP Mine.

But if you stun them first...
The best way to deal with Working Joes is to stun them and then lay into them with the Maintenance Jack. For this, you can use either the Stun Baton or EMP Mine. After using either of these two items on the Joe, you can then smack it about with the Jack, as long as you finish it off before the stun duration is out, you should be perfectly fine. The Stun Baton is most effective against a single target, whereas if there are groups you will want to use the EMP Mine, so you aren't attacked whilst beating down another android.

It's worth noting that the tougher, slower versions of Working Joes that show up later in the game (especially around the APOLLO core) are immune to all types of stunning.

==============================================================================
Not everyone is out to get you
Not all survivors on Sevastopol station are out to kill you, to guess whether you are about to walk in on a group of kill-on-sight survivors or not is to approach quietly and listen to the conversation. From that, you should get a pretty good idea of their attitudes to others.

But most of them are.
Unfortunatley, most survivors will ineed be hostile. Most survivors are armed with Revolvers, and will be able to kill you in 1-2 hits. You'll have to use cover and peek out to try and get shots off. The Revolver is probably the best weapon for this, as ammo is fairly plentiful and its a one-hit kill if you shoot a survivor in their unprotected head. Alternatively, if you can get close enough without being shot, you can simply run up to a human and bash their skull in with your trusty Maintenance Jack.

Police Brutality
Seegson Security forces are a different matter. These survivors are glad in standard-issue, SWAT Team-esque body armour and helmet, and commonly carry Shotguns instead of the weaker Revolvers. These survivors will always shoot at you on sight, so show no mercy back. The same method for dealing with other human enemies applies here, however due to their shorter range, its best to keep a distance and to try and get headshots with your Revolver. It'll take two headshots to be fatal through the Riot Helmet they wear.
Weapons
Whilst Ripley is not a fighter, she will defend herself when neccessary. The Xenomorph in the game cannot be killed; only distracted or deterred, however the human or synthetic enemies on Sevastopol are certainly able to be defeated by her arsenal of weaponrary.

==============================================================================
- The Revolver is the weakest weapon in the game, however the ammo is plentiful. Most human enemies carry this weapon on them, so their bodies can be looted to refill your ammo supplies.
- Due to the frequency of ammo, it is also useful as an attractor for the alien, if you don't want to deal with a group of aggressive/violent survivors yourself.
- If used offensively, it can be of some use against survivors, as it will only take 1-2 shots to the head to deal with them. Synthetics will be more problematic, as it does not do much to stop their assault and it will require 4+ shots in the head from the Revolver to off them.
- The Revolver has little to no effect when shot at the Alien, and will only serve to p*ss it off slightly more when it comes to punch through your skull.
- Each round has to be loaded into the Revolver individually, which means the reload time is long and extremely impractical if you still have enemies after you. A single round can be loaded into the Revolver by tapping [R] once, or you can hold [R] to continue loading the remaining shots.

==============================================================================
- The Stun Baton is very effective against lone human or synthetic targets. One zap with the Stun Baton and a human will drop to the ground, completely stunned and effectively 'dead'.
- When used on a lone android, it will allow you to dispatch with the android fully by following it up with a combo of Maintenance Jack strikes. The Working Joe will not retaliate if the first blow was landed whilst it was stunned by the Stun Baton.
- 5 Charges can be loaded into the Stun Baton at any time.
- It is one of the few items in the game that has absolutely no effect on the Xenomorph, no matter how much you try, using the Stun Baton on it will yield no results. Unless you call death a result, in which case you keep on doing that.

==============================================================================
- The Shotgun is the middle-most effective weapon to use on human and synthetic targets, resulting in instant death for a human survivor if shot in the head, whilst androids will take a little bit more punishment; as per usual.
- Ammo is not as frequent for the Shotgun as it is for the Revolver so using it as an attractor for the Alien is generally not recommended.
- The Shotgun can be used to deter the Xenomorph from attacking you, however it is not very consistant at doing so, as such it should only be used as an absolute last resort.

==============================================================================
- The Flamethrower is the most important and versatile weapon in your inventory, and will be your key to surviving in a multitude of different situations on Sevastopol.
- Fuel is in semi-regular supply, however it is burnt through extremely quickly when the Flamethrower is in use. Due to its ability to deter the Xenomorph effectively, I would not recommend using it on any other target.
- Once you have used the Flamethrower on the Xeno at least once, it will start to act much more cautious when you have the weapon out, reluctant to approach you. This can be used to your advantage if you find yourself by a door that is sealable - or possibly to quickly duck into a room and jump into a locker or sneak under a table.
- Fire is not particularly effective against androids, as they wil usually just keep walking towards you, so it is best not to waste any fire-based weapons on them.

==============================================================================
- The Boltgun is the most powerful weapon in the game, and as such ammunition for it is relatively sparse compared to the other weapons.
- Every time you fire a shot with the Boltgun, it has to be charged up first - making it less practical once you are already being attacked at close range. Due to this long charge up time, it is ill-advised to try and use this weapon on the Xenomorph, as it will most likely reach you before you fire off a sufficient deterrant shot.
- It is a waste to use up this powerful gun on lesser human enemies (only as a last resort) and it instead should be kept mostly for dealing with the Working Joe synthetics, that will appear with great frequency near the end half of the game.
Tools and Gadgets
Tools
These tools are given to you over the course of Alien: Isolation's story mode and are required to progress, thus they are unmissable.

==============================================================================
Undoubtedly the most iconic and useful tool in your arsenal, the Motion Tracker will help keep you alive from the moment you first pick it up. When held out in front of you, the tracker will beep to display moving targets, and if close enough, a small dot will appear on the cone-shaped grid; however this is only if the target is in front of you. If the blip is behind you or to the sides, small

pieces of a circle below the grid will light up, displaying where the movement is taking place.
However, whilst it is useful, it can also be responsible for your demise - you'll need to remember that it's not just you that can hear the beeping from the Motion Tracker. In the bottom left of the tracker's display, it will display the distance between you and the nearest target. Enemies such as the Xenomorph or Working Joes have a chance to detect the beeping from your tracker at a range of about 20-25, but good general adivce is to try to not have it out below 30, to be safe.

Occassionally, the tracker will encounter interference, and the screen will become distorted. This makes the distance reading and motion blips much harder to read and interpret. The tracker encounters this interference when combined into a short space, such as inside a vent. The basic rule: "The more you are in hiding, the less you can use your tracker".

Craftable Gadgets
Over the course of the game, components can be collected from areas or containers that can be used in crafting. These Gadgets can be crafted from the radial menu once you have found the applicable blueprints for them. Further blueprints can be collected to upgrade them.

==============================================================================
Flares are fairly useful visual distractions, however they can be difficult to use as it takes a few seconds to activate and throw the Flare. It creates no noise, however it acts as a good visual distraction and will cause any enemy to investigate it if it is thrown into or sometimes across their line of sight.

==============================================================================
Medkits are fairly easily craftable gadgets that can be used to restore a section of Amanda's health and are very important. The use of a medkit to top-off your health could be the difference between you living and dying in the next Working Joe or Survivor encounter. The Medkit can be upgraded by collecting more advanced schematics to be more effective.

==============================================================================
Noisemakers are gadgets that you can either throw or place on the ground, once used, they produce a high-pitched static noise that attracts all types of enemy in the game to its location. They are particularly useful during the opening stages of the game when you don't have as many weapons to defend yourself with, as they can easily be used to get enemies out of your way, or to attract the Xenomorph to a different room so you can perform the required actions.

==============================================================================
Smoke Bombs are one of the least useful gadgets in your inventory, but they can be helpful in getting around; like the noisemaker, primarily during the opening stages of the game. The Smoke Bomb does not create an audio distraction but it does block enemies line of sight, allowing you to sneak past them much easier. Smoke Bombs effect all enemies, including the Xenomorph. They will also move slightly more cautiously through the smoke.

==============================================================================
Flashbangs can stun every enemy in the game, albiet for only a few seconds. I didn't need to use these gadgets as often as other ones, however it is an effective last resort if something or someone is on your tail.

==============================================================================
Pipe Bombs are powerful explosive devices that are especially effective against groups of Survivors or Working Joes, particularly the latter. It can be used on the Xenomorph to fend it off, however it is fairly expensive to craft so other methods of fending it off are typically much more practical. It can be extremely effective later on in the game when groups of Working Joes are following you, if you can get them to bunch together you can take out several in one Pipe Bomb.

==============================================================================
Molotov's are your second best method of fending off the Xenomorph, and should be kept for such encounters. Molotovs are very effective against human survivors, but due to the cost of crafting it is definitley best advised to keep them for the Alien. They do only little damage to synthetic enemies either.

==============================================================================
The EMP Mine is another effective way of dealing with basic Working Joe units (it has no effect on the more advanced ones that don the Hazmat Suits). It can be thrown or placed and when activated, sets off an EMP pulse that temporarily disables all Working Joe synthetics in its medium range. It has no effect on the Xenomorph or human survivors. It is best to use this against a group of Joes, before smacking one of them until it short-circuits with the Maintenance Jack. The shocking effect may not last long enough for you to finish off two synthetics using this method, however, but it will stop others attacking you whilst you do so.
How to use the Walkthrough
The playthrough I did for completing my walkthrough of the game was on Hard difficulty, so the information in the guide should suffice for any difficulty level (bar Nightmare, there may be some differences there but most differences in the gamemode are gameplay-based, all collectibles and objectives will remain the same).

Collectibles including Nostromo Logs, ID Cards and Archive Logs will be displayed in BOLD!
Items that are required to progress through the game will be displayed in BOLD and UNDERLINED!
Codes used to access locked away areas or files will be displayed in ITALICS!

This way, if you are looking only for collectibles you can quite easily skim through, looking out only for the bold sections.

[This walkthrough is not complete and will likely never be finished, sorry! I hope what's there can help you get through the beginnings of the game :)]
Mission 1 - Closing the Book
"When this job first came across my desk, I read the case history. I know why you've been working in the same region she went missing. You're still looking, aren't you Amanda?"

Upon waking from cryosleep on the Torrens, head over to the monitor situated in front of you to log in. Make sure to loot all the containers in this first room before heading out into the corridor.


==============================================================================
After doing so, go into the first room on the left and continue through that into the Bunk Room. On the right of the entrance to the Bunk Room is a terminal, which can be interacted with to discover Archive Log 1. Loot all containers in the room on your way to the locker in the far back-left of the room. Interact with that to get dressed. On one of the walls of the Bunk Room is a registration point, or save station. Make sure to save your progress there whenever you see one. Head out of the Bunk Room and continue down the corridor.
Computer Terminals Terminals such as this one in the Bunk Room can be interacted with to access Archive Logs or to activate certain utilities (story-related). There are 151 archive logs in total, and you need to find 100 of them to get the achievement "Voices of Sevastopol"
Continue through the room containing the retro spacesuits next to the airlock, and head straight ahead to medical. Turn right into that room and speak with Samuels. Go back to the room next to the airlock and take a left to go to the Galley, where Taylor is sitting. Speak with her, then go to the left of the room and interact with the computer terminal to find Archive Logs 2 and 3.
When you're done there, loot the cupboard in the Galley and continue on to the bridge to meet Verlaine (its the other door that just opened up in the Galley).


==============================================================================
After meeting with Verlaine, collect your briefing document off the table behind where she was just standing to complete the mission.
Mission 2 - Welcome to Sevastopol [Part 1]
"Yeah, somethings on this station. Something you wouldn't believe..
...a killer, you get it!?"


When this mission starts, you'll be aboard Sevastopol Station in one of the Torrens' EVA suits. Head over to the container on the left and change out of the suit to continue exploring the station, head forwards out of the airlock and into the first circular room of the Sevastopol Spaceflight Terminal. Wait for the lights to click on, and head over to the registration station to save your game.
Collect the resources to the left of the save point and then head through the door on the right of the room and take another right. A flame will erupt from the floor ahead of you. Make note of the open cieling vent above you, you'll want to avoid walking under those as much as possible once a certain someone arrives. Head through the vent next to the flame, and travel through it to the other side.


==============================================================================
Take a left upon exiting the vent and travel into the second spherical room, make sure you interact with the computer terminal there to collect Archive Log 4. Next, you'll want to go across the rickety looking planks that bridge the gap between the two sections of floor.
Unsurprisingly, they weren't suitable enough to walk across, and Amanda falls down to the bagging area below. Once she gets on her feet, you can continue forwards and collect the lone flare sitting ontop of the yellow boxes. The game gives you a tooltip demonstrating how to use the flare, but dont. There are much better uses for such an item than light. Continue onwards and crouch through the opening, pushing through the dangling pieces. Once you move through, take a left and walk up onto the raised platform. Continue along the grafiti-filled area, and get to the ladder at the end, this will take you to a new room on a new floor. Collect the scrap atop the box to the left as well as the SCJ Injector in the room.
Map Terminals Make sure to always interact with these glowing terminals when you find them, as they unlock the full map for the area you are currently in!

==============================================================================
Run through the next room; Departures, and climb to the top of the stairs. Grab the map for the area from the Map Terminals at the top of the stairs. Also at the top of the stairs is a room you can go into, activate the power by interacting with the generator to the left in the room. Despite some creepy ambience afterwards, you are still safe. Activate the computer terminal to find Archive Logs 5-7 (REMEMBER! You always have to listen to audio-archive logs to make them count!). After doing so, go to utilities and activate POWER JUNCTION D-13: DEPARTURES. Observe the room lighting up for a moment, casting light across the scaled down model of the station.
Run back down the stairs to the door just across from the one which you entered with, and type the code 0340 to unlock the door and grab some nice extra supplies as well as the Medkit v1.0 schematic! You won't be able to enter the passcode if you haven't looked at the archive log that contains it first, however. You can use the supplies you found to craft a Medkit, if you wish.

Loot the two containers in the short corridors either side of the Departures room for some extra stuff, then run back up the stairs and through the newly openable door. Continue forwards, making sure to duck under the sparking electircal cable, it hurts! Enter the Passenger Lounge and travel up the stairs, across the raised level and back down the stairs to get to the other side, enjoying the sight of the gas giant that Sevastopol orbits through the windows.

When you get to the floor on the other side, run over to the left and collect the flare on the Ice-Hockey table, before activating the generator in the same room.
Run back along to the door at the bottom of the stairs, which you can now go through. On the table in one of those rooms is Archive Log 8 which you'll need to play. You can also access a computer terminal in there to find Archive Logs 9-11. You can save your progress at the registration point, before dropping down into the openable floor vent in the centre of the room.


==============================================================================
Travel through the vent and climb out the other side to access a new area. Move forward through that area, you can press a button on the back of the Harold Hoover-bot to get him to scoot over a bit, so you can climb through the collapsed vent section and get to the other side. Keep moving into the Baggage claim area, which is filled with bodies. Run to the door on the far side of the room and just before it you'll find Archive Log 12 sitting on a small trolley. Head over to the door on the right side of the room and go through it. Keep going into the next room and take a right, activate the generator on the far wall to illuminate the place a little more.

Go back to the Baggage Claim area and head to the left of the clamped door, heading up the stairs. Move straight through the room at the top of the stairs to access another, and collect Archive Log 13 sitting on the side. Go back to the previous room and go into the door to the left. Take a right and keep on going to the far side of the room, on the left there is a vent you can go through to get into the room with the body, a Maintenance Jack, Archive Log 14 and ID Tag 1, all of which you will want to pick up.


==============================================================================
Mission 2 - Welcome to Sevastopol [Part 2]
"This is about survival. Do you understand?"

Use your new Maintenance Jack to remove the clamp on the door and leave. Go out of the room, and on your way back to Baggage Claim, remove a clamp on a door to your right. Explore that room to recieve several components and Archive Log 15. Before unclamping the door in Baggage Claim, you can run back to where you powered up the last generator and explore the upstairs, there is a door you can unclamp which leads to a room filled with various components.
When done, go ahead and approach the clamped door to meet Axel.

After the cutscene, go ahead and unclamp the door and follow Axel through the following areas, on the way there is a registration point you can use to save. When you get to an elevator, do as he instructs and press the button to go down to Freight Shipping. Once the elevator ride ends, follow Axel out. When you hear the voices of other survivors, quickly duck behind some form of cover and wait for them to pass.


==============================================================================
Follow Axel through the vent as he instructs once your not-so-friendly fellow survivors have passed, and you'll climb out into Axel's den. Collect all the components you can find there, including the Flashlight and Flashlight Batteries. Travel through the vents and into the next dark room. When there, travel through the doorway to your immediate left, take another left and find Axel's own ID Card resting on a vent, ID Card 2. On the opposite side of the room is the vent you need to find, go over to it and wait for Axel, then follow him through.


==============================================================================
Save at the next registration point and crouch down, following Axel. When you get to the next room with the hostile human survivors, hug the back wall and travel over to the door on the far right. Turn off the generator, listen to the talk between the survivors for a few seconds before ducking down into the floor vent to the right of the generator. Travel through and hop out the other side before making your way back to Axel. When he runs, run for the doorway with him. Follow Axel through the corridor, make sure you grab the SCJ Injector on one of the barrels.

Save your progress at a registration point if you wish, then run through the door to the right. Keep going through the area and access the computer terminal to collect Archive Logs 16-18. Keep going onwards with Axel, and head back to the other switch on the other side of the glass when he instructs you to. Follow his instructions and press the button. Watch as the enemy survivor grabs Axel, as soon as he does, run round to the other side and smack him with [LMB], after which Axel will shoot him in the head.


==============================================================================
Follow Axel once again as you run away from the other survivors, and watch the cutscene. After the cutscene, you'll need to walk over (do NOT run!) to the right and activate the transit by pressing the button. Get on quickly when it arrives and the door opens to complete Mission 2.
Mission 3 - Encounters
"I'm warning you, stay back!"

When the mission starts, step off the transit and into the transit station. For starters, run up the stairs to the right, move round and unlock the brace on the door to the other set of stairs - this can come in handy later. When you're done there, go to the left side of the room and head up the stairs, go through the door at the end and take a left to the only open door.

When you reach the top of the stairs through that door, a woman will be trying to hack into the elevator door, as soon as she turns around, walk back down the stairs and crouch to avoid getting hit by the few shots she'll fire at you. When you hear her call out to her group, its safe to go back up the stairs. Head to the central desk area and loot the drawers and cabinets there, as well as pick up Archive Log 19 and ID Tag 3.


==============================================================================
Head over to where the woman was tinkering earlier and pick up the Security Access Tuner, unfortunatley, it's missing a Data Cell. Once you do, the previous owner is going to return, with friends. The group of 4 hostile survivors will appear on the right walkway, so as soon as you collect the Access Tuner, run up the stairs to the left. Crouch down behind the banister and move to the room positioned above the door you came in. 3 of the survivors will follow the woman downstairs to search for you, and one will linger on the right side of the room above the door, before entering it. If you're quick, you can move through that room (all whilst crouching) and quickly smack him with your Maintenance Jack before he can shoot you. Quickly loot his corpse, then run through the door ahead of you and down the stairs. Once you do so - you'll hear the two of the survivors appear at the door, but decide not to go after you.

The Fighter's Way As soon as they finish their short discussion, they should linger with their backs turned to the stairway for a while, you can run back up there and smack them both to death with your Jack, but expect to get shot about once, so make sure you aren't low on health. You should then be able to locate the remaining survivor and do the same to them, leaving you free to explore the area at your leisure.


==============================================================================
Just before the bottom of the staircase you'll come to an open door that you can go through, the Xenomorph can be spotted in the office up the stairs in the room, but as long as you walk dont run in this area, you'll be completely fine. Head up to that office, you can use the Registration Point to save your progress if you wish. On the desk, are 2 items, pick up both the Revolver and Keycard. Walk through the door in the office and use the keycard on the next door. When you walk into this next room, ID Card 4 can be found to the right, on a small desk. There are several containers and components in this room; as well as the blueprint for a Smoke Bomb, so make sure you grab them. When you're done, head through into the room furthest from the door you cam in. Watch the small in-game cutscene, when the alarms start rining, press the green buttons on the moveable shelves until you find a small box that contains the Data Cell, pick it up and use your Access Tuner to open up the door to the room.

Once you get out, head through the door to the right and keep on going. Loot the dead guy, and collect the Flashbang blueprint off the wall there. Hack and open the door to your left on the way out - ID Card 5 is on the desk in that room, as well as Archive Log 20.


==============================================================================
Next, head back out of that room and through the raised office, follow the wall-mounted sign to the Tech Workshop, which is through the doorway and down the stairs to the right. Hack through the door and head over to the Terminal to collect Archive Logs 21-22. Loot all containers in the room, then head over to the keyboard on one of the desks, interact with it to disable the lockdown.


==============================================================================
Surprise! Now you have more than just survivors to worry about. The metalic noise you hear after the Xenomorph exits the room is it travelling up into a vent, so its perfectly safe to leave. Go out the way it did, and unclamp the door with your Jack. Make your way back up to the room with the survivors to find the Alien mercilessly slaughtering them. Wait for it to go back into a vent, then carefully make your way back down to the elevator where you found the tuner. Hack the door, and use the elevator to finish the mission. If you killed the survivors, the Alien will most likely be searching in the middle of the room. The strategy is the same - wait for it to go back into a vent.
Mission 4 - Seegson Communications [Part 1]
"You are becoming hysterical."

When you arrive at Seegson Communications, head over to the glass booth to be greated by a less-than-helpful android. Make sure you dont appear hostile yet... aiming your weapon or firing it can be seen as a hostile action and may cause the Working Joe's to attack you.

Run down the long corridor (dont worry, the Xenomorph is not present in this mission atall) until you eventually get to a room with an open door. Head inside and collect the Motion Tracker. Loot the area for components and then access the terminal to collect Archive Logs 23-26. Whilst you're there, de-activate both Lighting and Air Purification, this is certainly going to help you out later in this mission.


==============================================================================
Activate Door Access via the terminal, and go through the door that just opened (its the one just outside the terminal room). Run up the stairs, at the top of which is a Registration Point. Go through the door on the top of the stairs and head to the left door, detach the clamp and explore the rooms, which contain a few components and the blueprint for a Noisemaker, a very important gadget. Head through the other side and you can open the door with a lever to get another access point to the corridor. Further along the corridor, there are two small conveyor belts that can be activated to give you access to some more components.

Travel to the end of the corridor and use your Access Tuner on the door, there are a few things you can collect in here, but to progress you'll need to travel through the vent.


==============================================================================
When you exit the vent, feel free to loot the body of poor Hughes, he won't be needing that stuff anymore. Avoid the security camera's search grid and follow the hostile android into the room. Go to the right and access the terminal to find Archive Logs 29-30. Travel up the stairs in that room, making sure you're crouched, as there are a lot of Joes there. On one of the desks is ID Card 5. Go over to the big green monitor and interact with it to disable the camera systems. Its also worth turning off the Air Purification via the box in that room.


==============================================================================
Now that the cameras are off, you can head back to the elevator and take it up. When you head out of the elevator, grab the map terminal to the right and note the Registration Point on your left. Head through the door to the left and up the stairs, making sure not to run. At the top of the stairs, head through the doorway and take a right. In this room are several components as well as a terminal which you can hack in to, to unlcok Archive Logs 31-33. Head back out the room and go in the opposite direction and interact with the monitor in that room.

When you're done there, head back down the stairs and make sure you save. You'll now need to head straight down the centre of the large room at the bottom of the stairs, fighting off the Androids is possible, but a waste of ammunition.

Crouch and walk down the centre area of the room, wait for the andorids to both be as far away as possible before moving past the area that connects both of their work stations together. Head to the far side of the room and travel to the right, only move past the android and into the open doorway/corridor when he is not looking, as it will otherwise most likely spot you, however it is also possible to simply distract it with a flare.


==============================================================================
Move along the corridor, listening to Samuel's message as you do, the room it is emenating from you will go to later, so don't bother exploring it now. An Android will be in the next corridor, so wait for it to move away before following it at a distance. When you come to the next room, loot the few components within, making sure not to take your eyes off the floored android, or else it will grab you as you try to move away. Access the rewire and turn off everything, then turn on Door Access. Head out of that room and hide in the lowered area. The Android will return and walk down and into the previous room, so make sure he doesn't run into you when he does.

Continue down the corridor to the left and enter the room on your left again. On the floor should be ID Card 6. Exit that room and go straight into the vent on your left, travel through it and you'll come to a locked off room with a terminal that contains Archive Log 34.


==============================================================================
Mission 4 - Seegson Communications [Part 2]
"Seegson's got this place locked down tight, their synthetics are killing people!"

Go back out the vent you came into the room from and enter the big room to your left, head to the far side of the room and collect the blueprint for the EMP, there's also a save station there. Head over to the central raised area containing several desks with monitors, and interact with the glowing monitor thats set into one of the desks. Complete the 3 activities to progress and trigger the next cutscene.


==============================================================================
After the cutscene is completed, alarms will start blaring and 2 Androids will make their way over to the room you currently stand in. You don't really want to be there when they do, so find a place to hide, a good place is to back into the room with the save point and watch and wait for them to leave through the window, if they see you then there is a vent in a connected room which you can quickly climb into, you can travel through to get to the room where you found Archive Log 34. Use the vent in that room to get back to the corridor, make sure both androids have left the previous room and are at least walking down the corridor ahead of you before you begin to move.

Now, you'll need to head back the way you came, make sure to use the lowered sections of the corridor to avoid detection. One android will tend to linger annoyingly in one position, so try using a Noisemaker or a smack of the Maintenance Jack to attract him away. It's possible to run through this section, but you'll need to grab more collectibles, which you wont be able to do with andorids chasing you.


==============================================================================
Alternatively, if you are fast enough you can use the vents to travel back to the corridor, make your way to the lingering android. You can use a noisemaker to distract him into investigating the lowered area behind him, and you can sneak past back to Comms Control. Take care to avoid the androids there, as they have decided to take a little wander. If spotted, run and jump into a vent or one of the floor vents in the area. The floor vents in particular are great for escaping as long as the androids are not right behind you.

Once you've got past the androids, you can make a mad dash escape to the elevator. Take the elevator down, and go back through the area Hughes was murdered in and down the stairs. When you get to the bottom of the stairs, be careful, there will be androids patrolling all areas from now on in this mission.


==============================================================================
Head down that corridor and take a right into the big room filled with desks and monitors, be careful as there will likely be an android staring into the room. Go through the room and down into another through an open doorway and access the Terminal for Archive Logs 27-29. To the right of the Terminal is ID Tag 7. Carry through the passageway at the far end of the room and go back to the corridor. Head into the room to the left just ahead, being mindful to avoid another staring android. In that room on the left is Nostromo Log 1. To the right of that is ID Card 8 resting on the side. From there, exit out the right side of the room and sprint for the exit, taking the elevator back to the Lorenz Systech Spire.


==============================================================================
Once you exit the elevator, head straight ahead, through the doors and back to the transit station, a transit car will arrive on the left harbouring two friendly survivors. Dont linger though, as the Alien is once again a threat. Head into the open transit car on the right under the sign 'Scimed Tower' to complete the 4th Mission.
Mission 5 - The Quarantine (WIP)
"I thought it might be there, there's a difference!"

As soon as you step off the transit car, go to the seats to the left and pick up ID Card 9, before heading over to Samuels and Taylor. You are instructed to go to Medical and see what you can find to help Taylor, head through the door and up the stairs to the right of the pair, make sure you grab the area map off the map terminal to the left. Head through into the room to the right, as you do the shutters will begin to open. Go up the stairs. A strangers voice comes over the intercom, when he opens up the elevator, climb aboard and take it up.


==============================================================================
When you arrive on the new level of the station, go to the left of the new room and travel through the vent there, you'll need to climb up the ladder within. Once you drop down from the vent, you should grab the map terminal directly beside you and head through the only open doorway. Head forwards and have your first proper meeting with Dr. Khulman. If you turn and look directly behind you from facing him, you'll see a vent, travel through it and it'll take you to a room that contains ID Card 9 as well as a map terminal, the room connects back to just before Khulmans office.

Head through the door at the end of the room where you meet Khulman (you'll need to slam your first against the emergency override button), keep going through this new area and take your first left, then a right into the Day Room. In there you will find Archive Log 38. Head out through the door ahead of you and take a left, you should be able to see a small cell with a very unfortunate patient inside, fortunatley for you ID Card 10 is also contained within.


==============================================================================
point of no return- dont continue through this point until you have explored the remaining accessible areas for crafting materials and saved at the save point in the day room - you are about to trigger a story event that makes this area... much more dangerous to explore.
Follow Khulman's directions and he will lead you to Morley's office, there isn't much in here apart from the terminal on his desk, so interact with that and you'll be able to find Archive Logs 35 to 37 at this terminal, one of which contains a passcode you'll be needing soon: 1702. Once you find this code however, alarms will soon start blaring about a quarantine breach. Don't panic - you're fine for a moment, and can continue to read the logs on the terminal at your leisure.
Guide Info/Q&A
Does difficulty affect the walkthrough?
The difficulty you set the game on will not affect the reliability in the slightest, as the difficulty does not change the layout of items, interactions or the station. Instead, changing the difficulty simply adjusts the enemy count as well as how astute their sense are.
This guide has been written/based on a Hard difficulty playthrough, so therefore all content in this guide will be applicable if you are attempting a Hard playthrough or easier, eventually I will add an additional chapter for Nightmare Mode, however I have not yet attempted it myself.

Note from 'Migi the Apex' - Just a heads up. All of the major item locations remain untouched, but Nightmare difficulty very significantly lowers the chance of finding things within random loots containers. Figured I'd throw that in there to help with the Guide Info QnA accuracy. Additionally just for your own info. Nightmare mode comes with a few additional challenges. There is no map, although the map terminals are still there. The motion tracker is buggy and innacurate, but still semi-reliable. The Xenomorph is more intelligent, has more acute senses and better peripheral vision, is more persistent and returns to vents less frequently and for less time. You take more damage from none-instant-death attacks, and the normal HUD isn't present. This means no indication to health, ammo, or flashlight battery. Ammo and crafting materials are VERY sparse compared to Hard mode (as mentioned above) and the Flamethrow is nerfed (fuel burns faster) on top of the ammo being rarer. To be honest, although it sounds rough, it's honestly REALLY fun. It seems more in tune with how a space station in disarray might be. I'm on my second Nightmare playthrough and it's been great! Give it a shot sometime.
104 Comments
PhantomRaptor  [author] 8 Jun @ 6:32pm 
@εїзsʜᴀʀᴋɪᴇsʜᴀ™
I'm glad it could help! Thx so much for letting me know~ :Redgi:
Thank you for putting all the effort into this that you did!! It was immensely helpful when first starting the game and helped make it a little bit less scary lol
PhantomRaptor  [author] 3 Jun @ 3:55pm 
Im not doing any further work on this no - walkthrough will remain incomplete
Jzolt 3 Jun @ 6:12am 
Are you still working on this?
FlankGod 24 Mar @ 2:57pm 
Nice. This is very useful information for a beginner like me. :steamhappy:
Septyrikon 6 Oct, 2022 @ 11:33am 
@kitsunexe

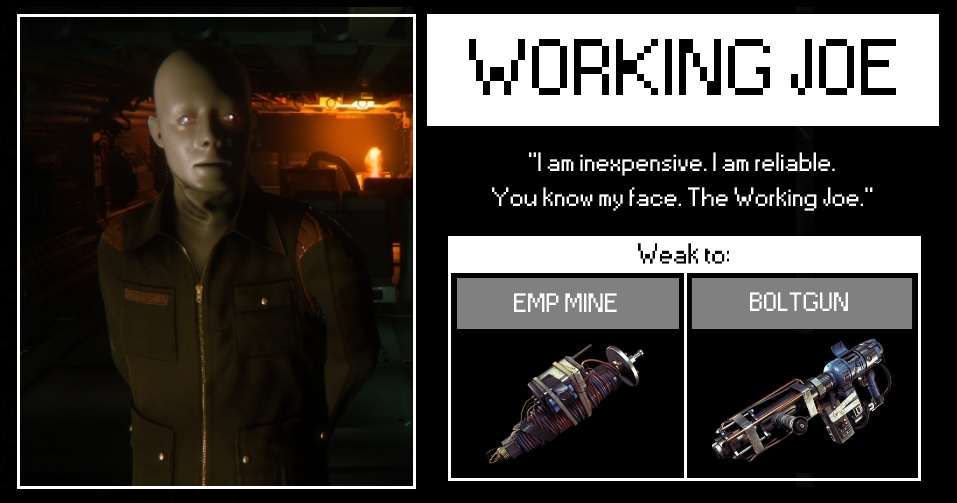
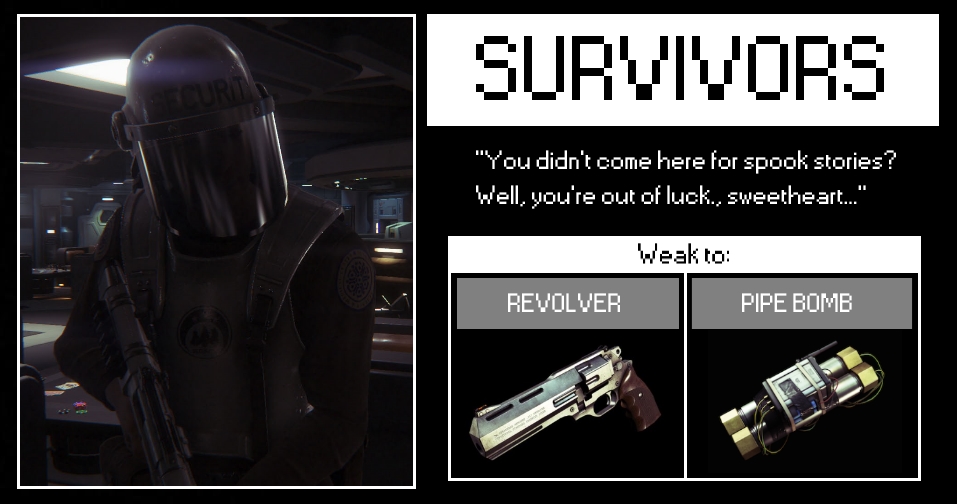
A charged bolt gun shot to their face kills them instantly on normal. Not sure how much tougher they are on hard difficulty.
John Fortnite 6 Jul, 2022 @ 3:18pm 
how to beat hazmat synthetics?
PhantomRaptor  [author] 30 Aug, 2021 @ 8:38pm 
@General Zimpok
Thank you and you're very welcome!
I do wanna keep working on this at some point its just hard to find the time these days!
General Zimpok 29 Aug, 2021 @ 12:04pm 
Thank you OP! Great guide!

For all of those whining it's not done, WIP stands for Work in Progress. He labels those sections as such and will be updating later.