The Last Door: Season 2 - Collector's Edition

The Last Door: Season 2 - Collector's Edition

185 ratings
TLD:S2 - Full walkthrough and not-so-full achievement guide
By SkyDivingL
Stuck on a puzzle, lost or confused? This guide has got you covered.
2
6
   
Award
Favorite
Favorited
Unfavorite
General information
This guide has been translated to Simplified Chinese by Steam User 秋林箭. You can find their translation here:

http://steamproxy.net/sharedfiles/filedetails/?id=936066949

or here: https://steamcn.com/t275271-1-1

I've tried to keep the amount of spoilers as low as possible.

Wherever it's possible (or inevitable) to get an achievement, I've marked it down in this guide. Some achievements require multiple steps over a long period of time (see: The Good Doctor)

If I've made a mistake anywhere (like doing something where you're supposed to do something else first, item names which are different in-game or simple spelling mistakes), please let me know.
Achievement disclaimer
Not all achievements are in here (yet). This guide is missing:

- The Whole Story
- Playwright

Steam users have figured out how to obtain these achievements (specifically, how to obtain Playwright), and Steam user Fox! has put all this information in his guide:
http://steamproxy.net/sharedfiles/filedetails/?id=595590083
In the future, I will add these achievements to this guide in the order they can be obtained. Until then, go over to Fox's guide.
Episode 1 - The Playwright
Prologue

Interact with the broken furniture.

(Cutscene: Keep moving to the right)

Travel to East Hill.

East Hill (1)

Move through the gates, then left. Speak with the painter to receive a key.

Enter the asylum and move upstairs. Speak with the lady at the table.

Move to the left to find the mirror room. Interact with the jar on the table to find a coin. Interact with the window to find a piece of metal.

The Good Doctor is an easily missable achievement. You have to examine the mirror in the mirror room on four occassions (you will be told when).

Examine the mirror. (The Good Doctor: 1/4)

Move back to the street. Give the coin to the boy to receive a newspaper.

Move back inside the asylum. Hand the newspaper to the nurse.

Move into the hospital archive (left of the nurse). Use the key on the locker retrieve the drawings. Examine the right cabinet to unlock a new location, Paul Street.

Move back to the painter. Hand him the drawings. Pick up the cards from the table.

Travel to Paul Street (at the carriage).

Paul Street

Move to the left. Pick up a candle from the altar.

Move further towards to the left and enter the hole. Keep moving to the left to enter a different hole.

Pick up the medal from the fireplace mantel.

Safe Cracker (or Locksmith in-game) is a missable achievement. You have to open the safe without using the clues found in the same room. Start off by turning the dial clockwise until you hear a sound which is slightly off from the other ticking sounds (you will know when you hear it). Then, turn the dial counterclockwise until you hear the same sound. Repeat again for clockwise and counterclockwise. The code to the safe is 6-1-4-5.

Enter the passageway in the safe. Examine the person in the room. Pick up the mask.

Travel back to East Hill (at the street).

East Hill (2)

Move back the mirror room in the asylum. Examine the mirror. (The Good Doctor 2/4)

Move to the room to the right.. Show the medal to the man staring out the window. Speak with him to start a cutscene (Cutscene: keep moving to the right). You will receive a photograph and unlock a new location, St. Giles.

Show the mask to miss Kohne.

Move back the mirror room in the asylum. Examine the mirror. (The Good Doctor 3/4)

Move to the inmate quarters. Enter the first room.
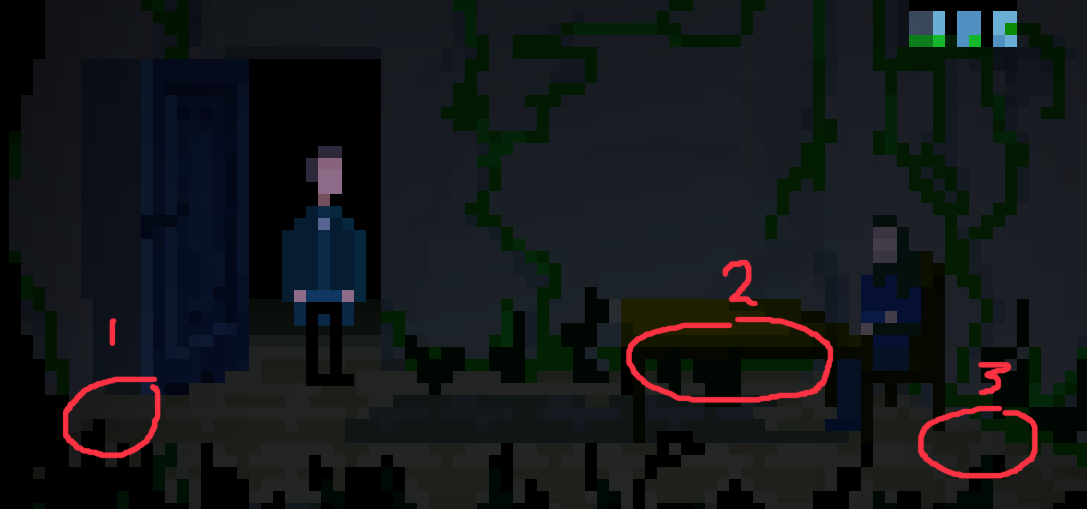
Neophyte is an easily missable achievement. Do not speak with the man in the room. You have to walk around the room and you need to listen for sounds resembling the sound of stepping on cracks. After making this sound a certain amount of times, the man will start speaking to you.

From experience, three areas in particular seem to recreate this sound: the wall near the door (1), behind the table (2) and next to the man (3). (This could just be my imagination; It would probably be a good idea if other people check this too)


Show the man the cards.

Move to the second room. Pick up the pendant from the dresser.

Move to the third room. Move the bed and enter the tunnel. Use the piece of metal on the tile which is half light/half dark (below the bed). Pick up the glass eye.

Move back the mirror room in the asylum. Examine the mirror. (The Good Doctor 4/4, will unlock once you leave the room)

Move to St. Giles.

St. Giles

Move to the right until a man approaches you. Hand him the glass eye. Go further to the right and enter the doorway.

Speak with the lady near the bunkbed to receive a vial. Speak with the man holding a slate. Give him the photograph and the pendant. Move to the now unlocked room.

Use the vial on the man behind the screen. Speak with him to unlock a cutscene.

Go back to the previous room for another cutscene.

Epilogue

Move the chair in the room to reveal a hole in the wall. Pick up the matchbox from the table. Rip a shred of the blanket on the bed. Ignite the shred using the matchbox and use the burning shred on the hole. Pick up the ruined blanket from the bed and use it with the window.

(Cutscene: keep moving to the right)
(Final cutscene: keep moving to the right)

They Are Coming will be unlocked after the cutscene has finished.
Episode 2 - My Dearest Visitor
Prologue

Pick up the dynamite, place it on top of the collapsed mineshaft entrance and ignite the fuse.

(Cutscene)

Investigate the ashes in the middle of the house, the chalk circle around the ashes and the boarded up windows.

Travel to Wright Manor.

Wright Manor (1)

Go to the corridor on the right.

Go downstairs. Enter the living room. Pick up the tin soldier on the mantelpiece.

Return to Dr. Wright. Show him the tin soldier.

Return to the living room. Examine the shelves next to the fireplace to read the "Book of Travels". Interact with the globe.

Globe puzzle: Traverse the path over the buttons as described in the Book of Travels. Pass over the buttons in the following order:
(Note: between #3 and #4, you have to go over #2 again. follow the arrows shown)

Pick up the letter which has been revealed. Show it to Dr. Kaufmann.

Go back downstairs, enter the corridor on the right below the stairscase and pass through to enter the kitchen. Pick up the old teapot from the shelf next to the oven. Pick up the matchbox from the other shelf. Ignite the woodstove with the matchbox. Put the teapot on the stove.

Quickly bring the teapot upstairs to the bathroom to the right of Dr. Wright's room. Use the teapot on the mirror.

Interact with the painting under the right staircase. You will pick up a golden key

Go upstairs and use the golden key on the door to the attic, to the left of Dr. Wright's room.

Look out the window. Examine the differently coloured tree.

Go downstairs to the kitchen, and go outside. Interact with the differently coloured tree. You will pick up the feather key

Go back to the living room. Use the feather key on the door to the right.

Interact with the bust. Pick up the cloth covering a cage.

Go to the front of the manor. Interact with the lion statue to the left of the entrance.

Move to the corridor upstairs and keep going left into the now visible passage.

(Cutscene: you will receive the basement key).

Interact with the frames on the left wall.

Silhouette puzzle: You need to turn over the frames such that the plaques' descriptions match the silhouettes depicted. Turn over the 1st, 2nd and 4th frame to get the solution, then move the mechanism below the plaques.


Interact with the ball mechanism that has now become visible in the wall so that it looks like this:


Go to the kitchen. Use the basement key on the door on the left. Enter the basement.

Use the matchbox to move to the right. When you run out of matches, keep walking.

You will fall into a hole. Pick up the lever. Pick up the lantern.

Go up the ladder, back into the basement. Interact with the ball mechanism in the wall so that it looks like this:


Leave the basement.

(Cutscene)

Move to the backyard. Go to the left to enter the statue garden.

Pick up the compass at the feet of the middle statue.

Move back to the attic. Use the lever on the electronic device and interact with it. Turn the dials in the following fashion:


(Cutscene)

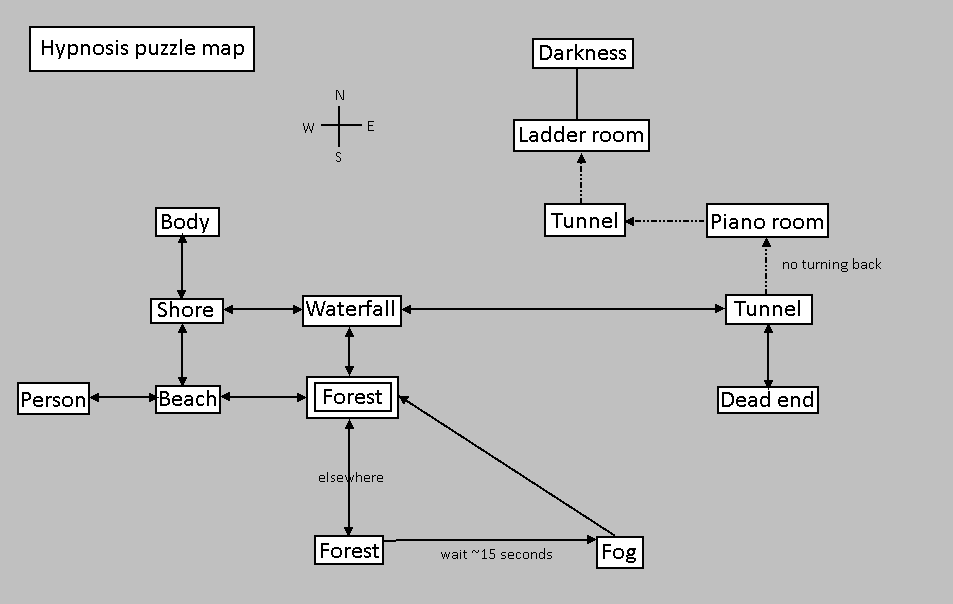
Hypnosis puzzle: You must lead the hypnotized Dr. Wright to a certain room with a ladder.

Master of Hypnotism is a missable achievement. You will get it once you've visited every area during the hypnosis puzzle.

(Cutscene)

(Cutscene: go through dialogue options)

Travel to the town square.

Town square (1)

Talk to the woman behind the window - stay close to the wall when approaching the window, and when right next to it (but not in front of it), talk to the woman. Go through the dialogue options. You will receive a flower and the graveyard will now be unlocked.

Travel to the beach to the left. Keep moving to the left and pick up the bell near the shipwreck.

Go back to the town. Enter the Fisherman's Lodge on the right.

Speak with the captain sitting at the table near the wall. Go through his dialogue options. Give him the bell.

Leave the Fisherman's Lodge. Return to the shipwreck and speak with the captain. He will give you his telescope.

Leave the town square the way you entered. Go to the graveyard.

Graveyard

Lost in the sea is an easily missable achievement. Shoutout to kaseteufel for showing how to unlock it! In order to unlock the achievement, follow the steps below:

(1) Lay the flowers on the first grave.

(2) Quickly head back to the town square. Go to the beach.

Town square (2)

(3) Wait at the edge of the beach in front of the entrance for a few moments. A necklace will wash up on the beach. Quickly pick it up before it washes away again.

(4) Go back to the town and give the necklace to the woman behind the window.

The final step to unlocking the achievement will be shown later on in the story.

Enter the church on the left.

Speak with the priest and go through his dialogue options, You will receive a picture, and Wright manor will be unlocked again.

Leave the town square. Go back to Wright Manor.

Wright Manor (2)

Head to the kitchen via the backyard. Enter the corridor to the right and enter the now-opened passageway.

Pick up the cloth from the bird cage. Interact with the chest by the bed to get a key.

Go upstairs. Use the key on the door to Dr. Wright's room and enter the room.

Pick up the book from the floor.

Go back to the room with the bird cages. Put a cloth on the Hoopoe cage (Upapa Epops) (left cage on the table in the middle) and the Robin cage (Erithacus rubecula) (rightmost cage).

Go back upstairs. Enter the room on the right.

Interact with Dr. Wright. You will receive a fragment of a figurine.

(Cutscene)

Leave the room. Travel to the graveyard.

The graveyard

Examine the fifth grave. You will pick up another fragment of a figurine.

Walk to the right. Speak with the man at the edge of the cliff. Go through his dialogue options, then give him the telescope. This will unlock the cliff.

Go back and travel to the cliff.

Cliff

Enter the house.

Combine the two fragments to create a figurine. Place it into the fireplace slot. Enter the revealed passage.

Read the note on the floor. Keep going to the left.

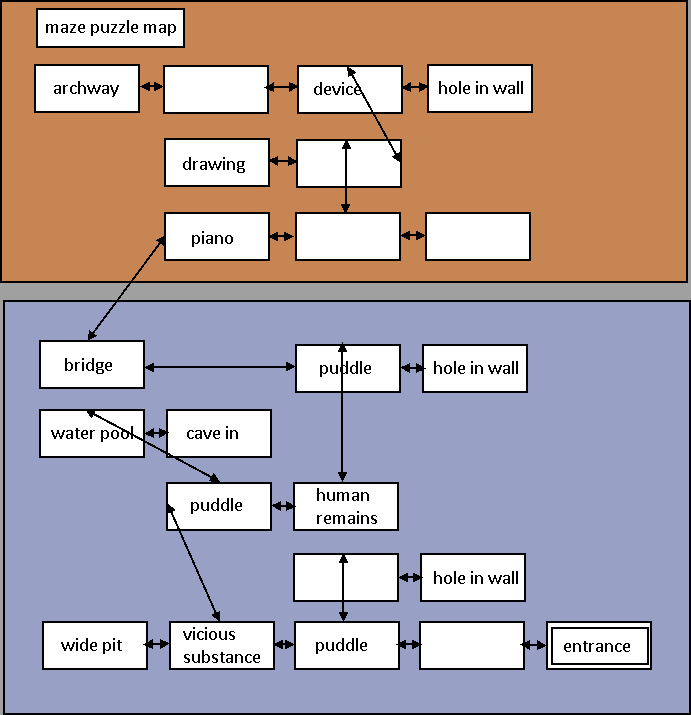
Final step of Lost in the Sea: examine the human remains in the maze.

Maze puzzle: Lead Wakefield to the end of the tunnel system.
Read the note on the floor. Examine the clothes on the floor. Examine the archway. Leave the room.

(Cutscene: move to the left)

Fear Itself will be unlocked after the cutscene has finished.

Episode 3 - The Reunion
Prologue

Interact with the chalk. Interact with the candle. Walk to the archway.

(Cutscene)

(Cutscene: keep walking to the right)

Village (1)

Walk between the two houses at the far right.

Examine the wheel on the left. Pick up the cog.

Return to the village. A man should approach and give you a letter. This will unlock Donnán Manor.

Go to the back of the village behind the house next to the elderly man. Walk down the road. Travel to Donnán Manor.

Donnán Manor (1)

(Cutscene)

Examine the paintings on either side of the room, the carpet and the statue. Speak with the person sitting across from you (Lord Donnán) and go through the dialogue options.

You Seem So Certain will be unlocked after you've finished answering Lord Donnán's questions. There don't seem to be any rules on how to answer -- you can say anything you like and the achievement should still unlock.

(Cutscene)

Hills (1)

Walk towards the right. Speak with the persons on the left. Go to the right and travel to the village.

Village (2)

Go to the graveyard on the right. Keep walking to the right and enter the schoolhouse.

Examine the trashcan and pick up the drawing. Speak with the teacher behind the desk and go through her dialogue options. Examine the note on one of the tables. Interact with the table to pick up a screw. Leave the schoolhouse again.

Open and pass through the gate nearby.

Examine the boat and pick up the umbrella.

Return to the house next to the graveyard. Pass through the door on the left, then through the gate. Walk to the left to where you first arrived on the island. Examine the bottle floating in the water. Use the umbrella on it and you will pick up a bottle and a note.

Go to the back of the village and travel to the hills.

Hills (2)

Show the drawing to the person on the left. Examine the house in the bottom-right corner. This will unlock the solitary house. Now travel to to the solitary house.

Solitary House (1)

Examine the mailbox behind the house. Pick up the envelope which contains a letter and a ring.

Enter the remains of the house. Open the trapdoor to the basement at the back. Enter it.

Examine and pick up the brace on the left. Examine the chest to find a diary. The old abbey will be unlocked.

Leave the basement and head to the front of the house.

The Wicker Man is a missable achievement. You have to find and examine all burning wickermen. There are 4 in total scattered over the island.

Examine the wicker man. (The Wicker Man: 1/4)

Leave the area and head to the hills.

Hills (3)

Head to the shore. Use the brace on the barrel, then use the bottle on the barrel. Your bottle will then be filled with oil.

Head to the right, then to the left where the people first were. Examine the mask and try to pick up the ribbon.

Head back to the shore and try to pick it the ribbon up again. Follow the path to the left.

Examine the ribbon on the tree. This will unlock the lighthouse. Now, pick up the ribbon for real.

Head back to the entrance of the hills and travel to the lighthouse.

Lighthouse (1)

Go to the left and head up the lighthouse.

Examine the pipe. Interact with it when you see a figure behind the window.

Go back down. Enter the lighthouse.

Speak with the lighthouse keeper. Go through all the dialogue options. Pass through the door on the right to go to the lightroom.

Use your items on the mechanism on the right: first the cog, then the ribbon, then the oil. Examine the battery slot of the lamp. Take out the battery.

Head back outside and travel to Donnán Manor.

Donnán Manor (2)

Walk through the gate north of the front door. Examine the bike leaning against the wall and pick up the broken chain. Combine the ring and broken chain to get a fixed chain. Use the chain on the bike. Now use the battery on the bike to charge it.

Examine the mechanism next to the spinning wheel. Insert the screw into the mechanism.

Head back to the front entrance. Travel to the lighthouse.

Lighthouse (2)

Go up to the light room. Insert the battery back into the battery slot of the lamp and switch on the power.

Head back outside. Examine the wicker man. (The Wicker Man: 2/4)

Travel to the village.

Village (3)

Head to the graveyard. Dig up the mirror.

Enter the schoolhouse, and go back to the graveyard. Leave the graveyard on the left.

Move a bit further to the left. You will leave for Donnán Manor.

Donnán Manor (3)

Go back to where the spinning wheel was. Enter the house.

Pull the lever. Walk to the stage.

Examine the mask. Pick up the disc below it.

Head back to the front entrance. Examine the wicker man (The Wicker Man: 3/4).

Travel to the old abbey.

Old Abbey (1)

Pass through the gate on the right.

Move to the left. Examine your shadow as it hits the wall.

Mural puzzle: Solve the puzzle to unlock a hidden passage. When the lighthouse hits the wall, light will be reflected. Examine this light when it's visible.


Insert the disc into the lowest light (the mouth) when it gets reflected.


Head back to the entrance of the old abbey. Examine the wickerman. (The Wicker Man: 4/4, will unlock once you leave the entrance)

Go back to where you just came from. Enter the passageway. Walk through the passageway on the right.

Enter the doorway at the end of the tunnel.

Examine the coffin in the center. Interact with it.

(Cutscene: keep walking to the left)

Under the Mask will be unlocked after the cutscene has finished.
Episode 4 - Beyond the Curtain
Prologue

Walk to the right. Examine the stage.

(Cutscene)
(Cutscene: keep walking to the right)

Zha'ilathal


Speak with the man on top of the stairs on the right. Keep going to the right.

Pick up the poster from the wall. Then go back to the right.

Move to the left, and go north from when you get the chance. Go to the left and enter the house. Move to the left again.

Examine the birdcage and pick up the root inside of it. Go through the door on the left.

Keep walking to the left. Examine the cage, and then examine the shadow inside of it.

(Cutscene)

Pick up the rusty key from inside of the cage.

Head back to the previous room. Use the rusty key on the locked door and go through it.

Examine the figure sitting on the bed. Take off the hood.

(Cutscene: examine everything in the room)

Pick up the slate disc from on top of the bed.

Head back outside. Go right.

Use the slate disk on the gramophone. Head back to the house.

Head to where you found the shadow. Examine the dead cat and pick up the golden key.

Go back up the stairs and enter the door which has appeared. Interact with the wax statue of the lynx to get a jaw. Use the golden key on the hatch.

(Cutscene: speak with the people that appear)

(Cutscene)

Pick up the mask piece from the ground. Move to the right, move to the right again and enter the house on the right.

(Cutscene)

Go back to the shore. Travel through the mirror. Enter the cave next to the staircase.

Pick up the piano key.

Go back outside and head up the stairs. Enter the house on the left.

(Cutscene)

Pick up the music sheet from on top of a desk.

Walk through the mirror. Leave the building, go to the left and enter the cave.

Place the sheet music on top of the piano.

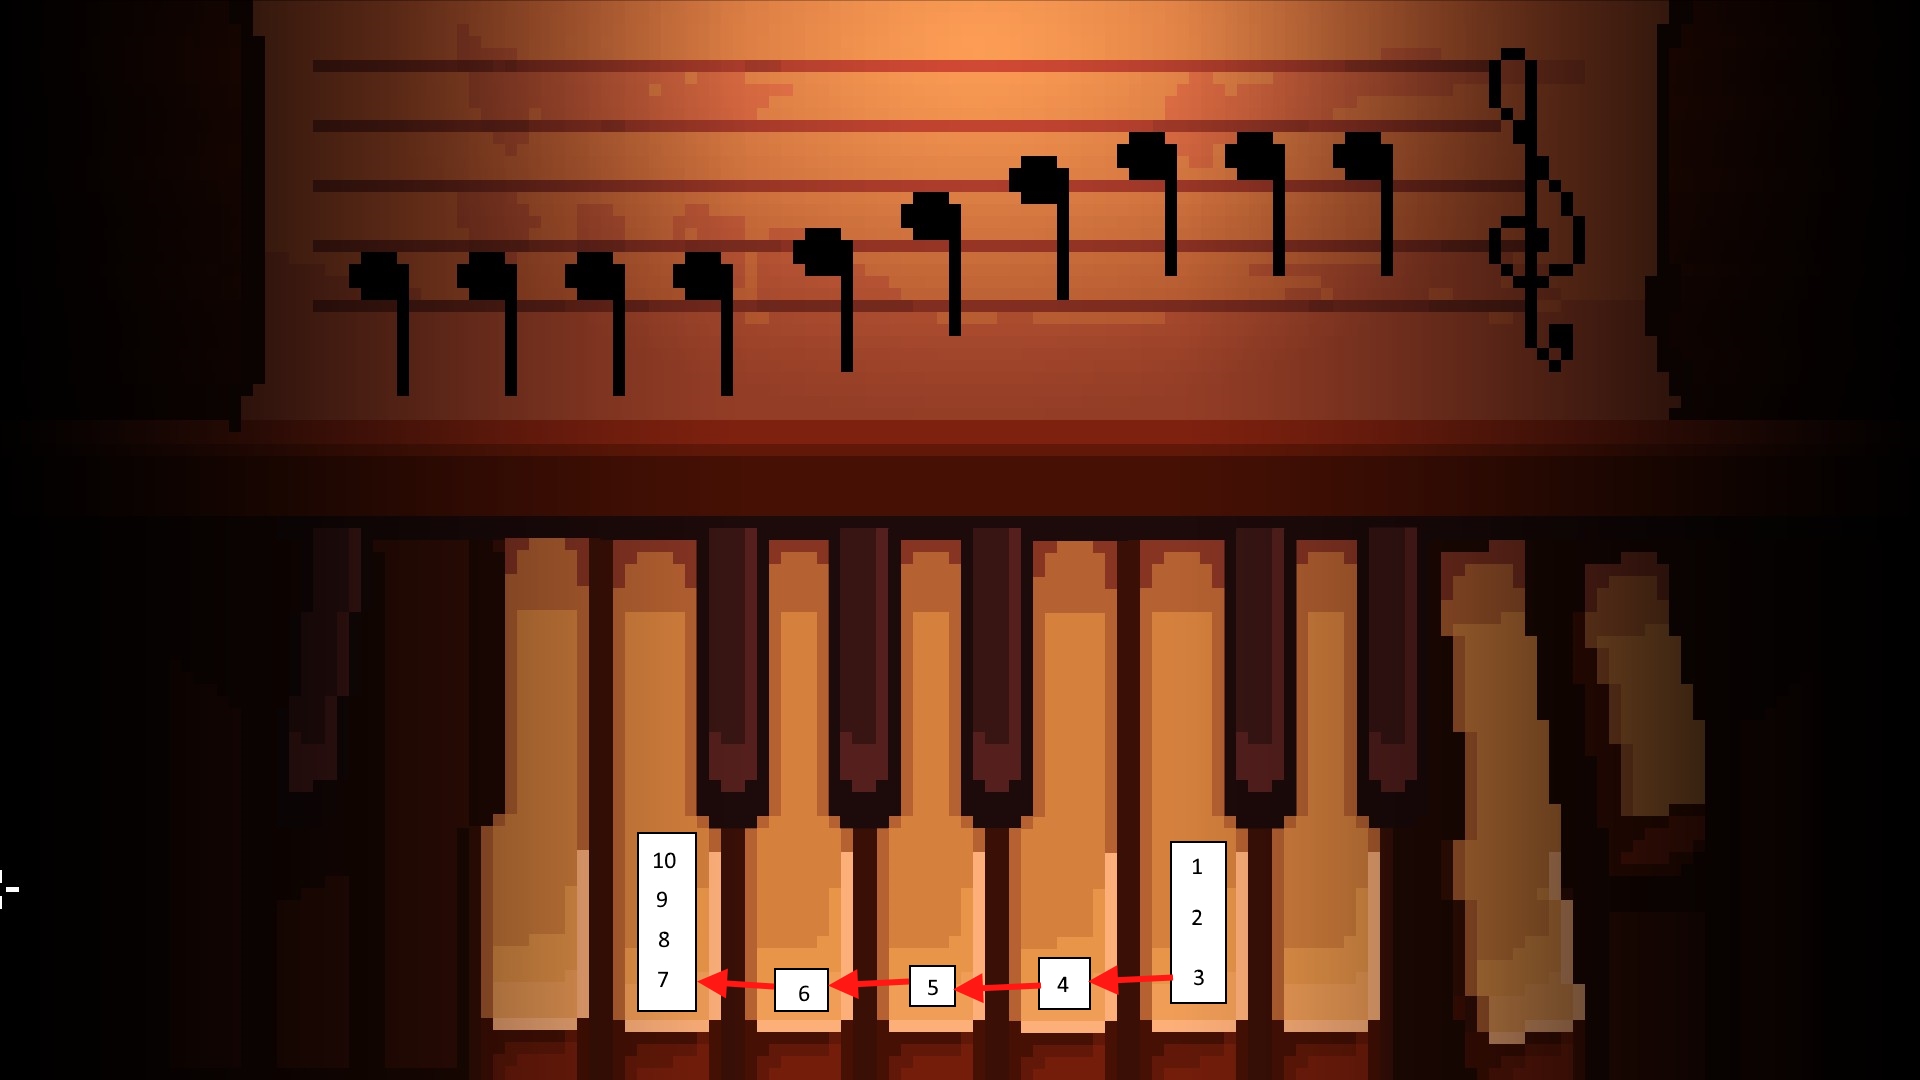
Piano puzzle: Play the tune depicted on the music sheet. The music sheet is mirrored, so you will have to play the following notes:

Performer is a missable achievement. You will unlock if when you play the notes correct the first time you play the piano.

Move back outside. Go through the mirror and enter the other cave.

(Cutscene)

Pick up the mask piece from the ground. Go between the trees. Walk towards the right.

(Cutscene)

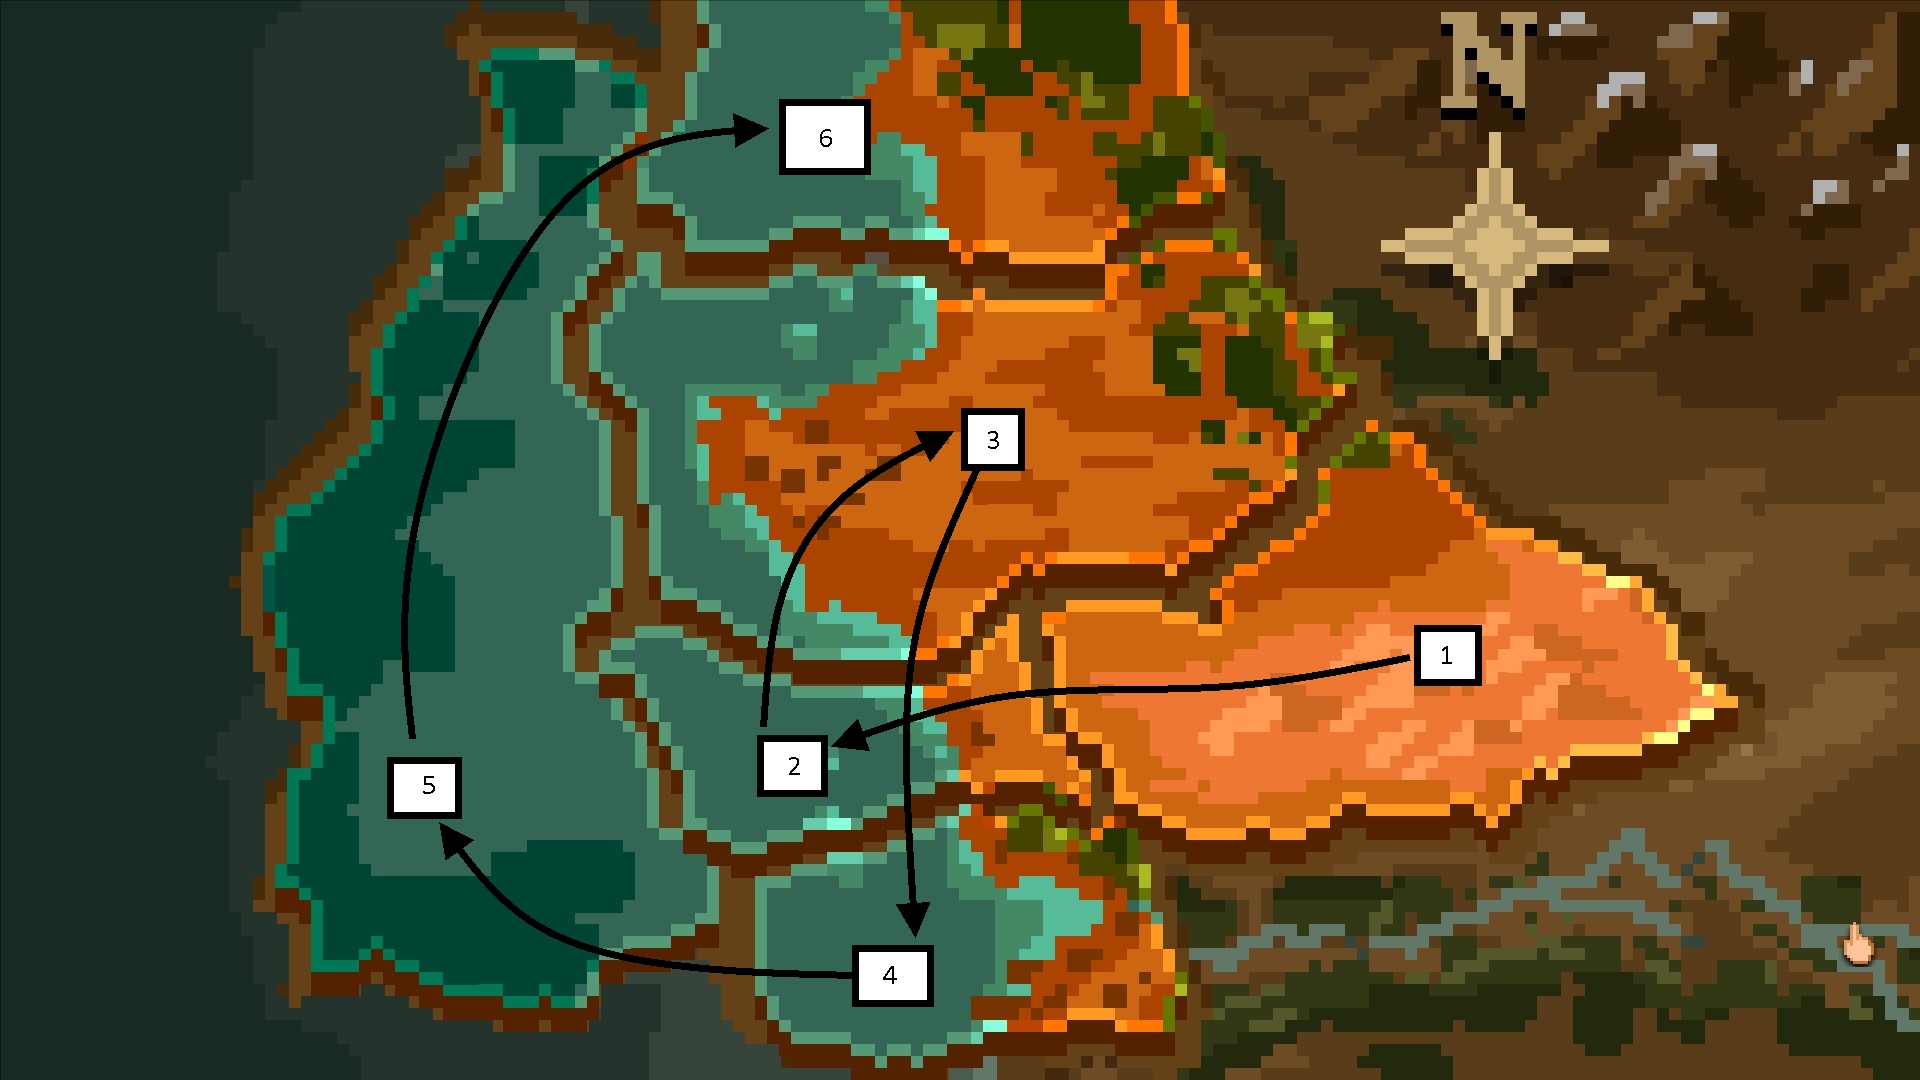
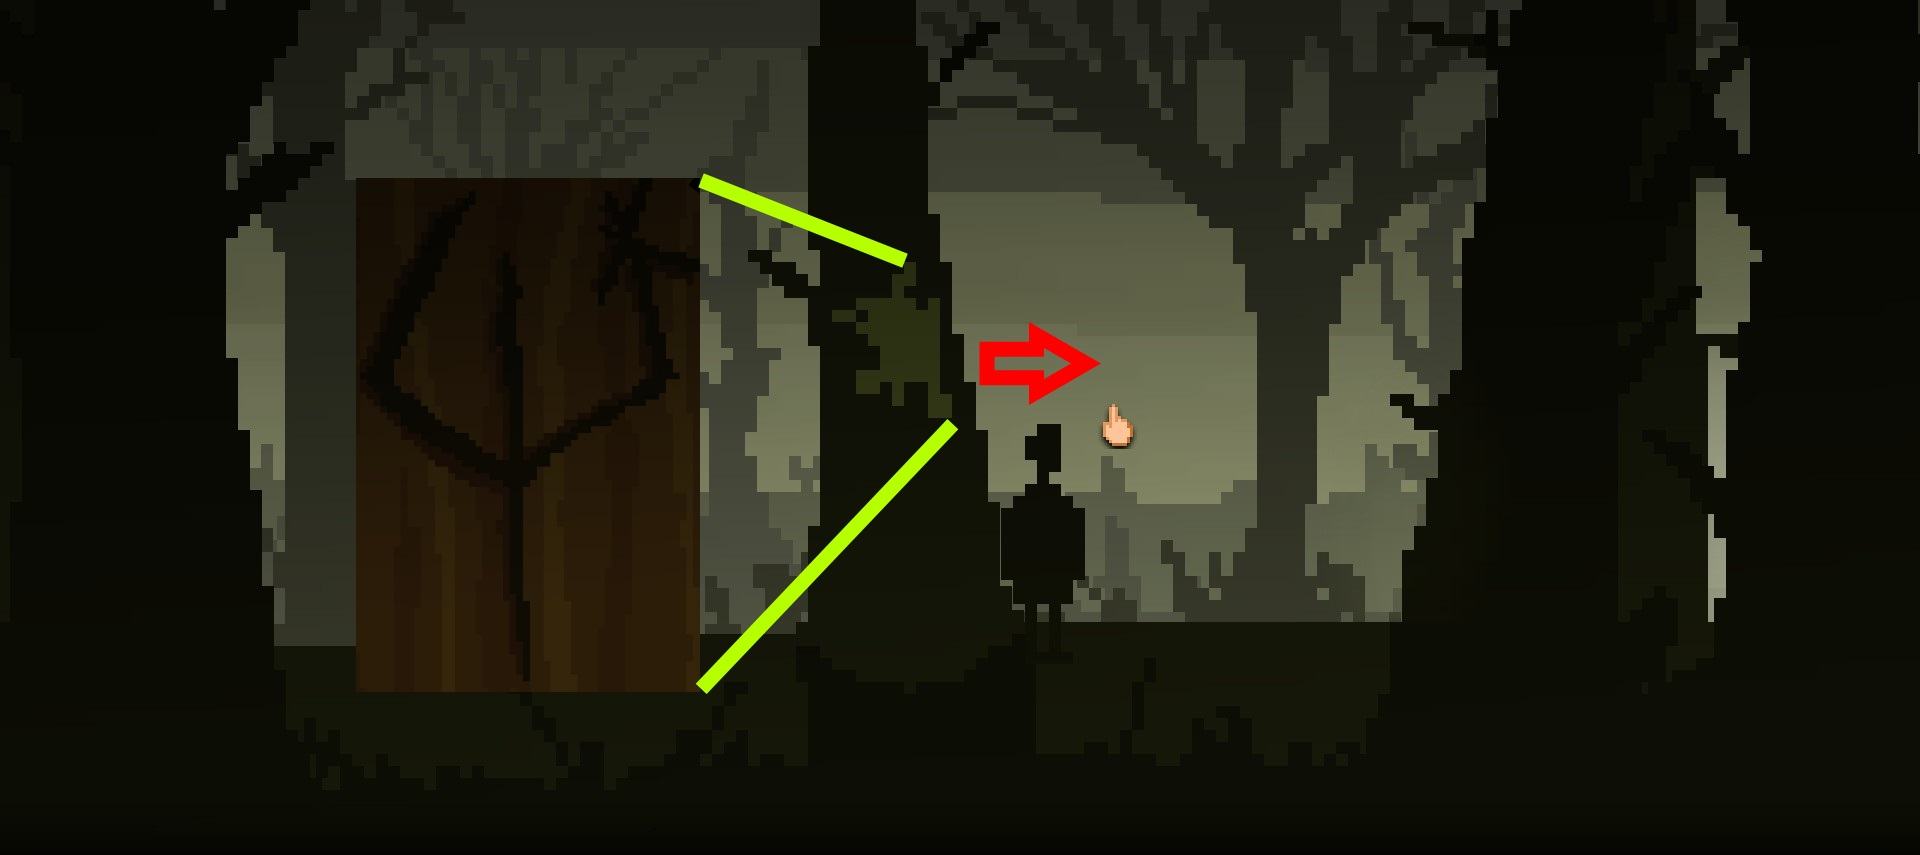
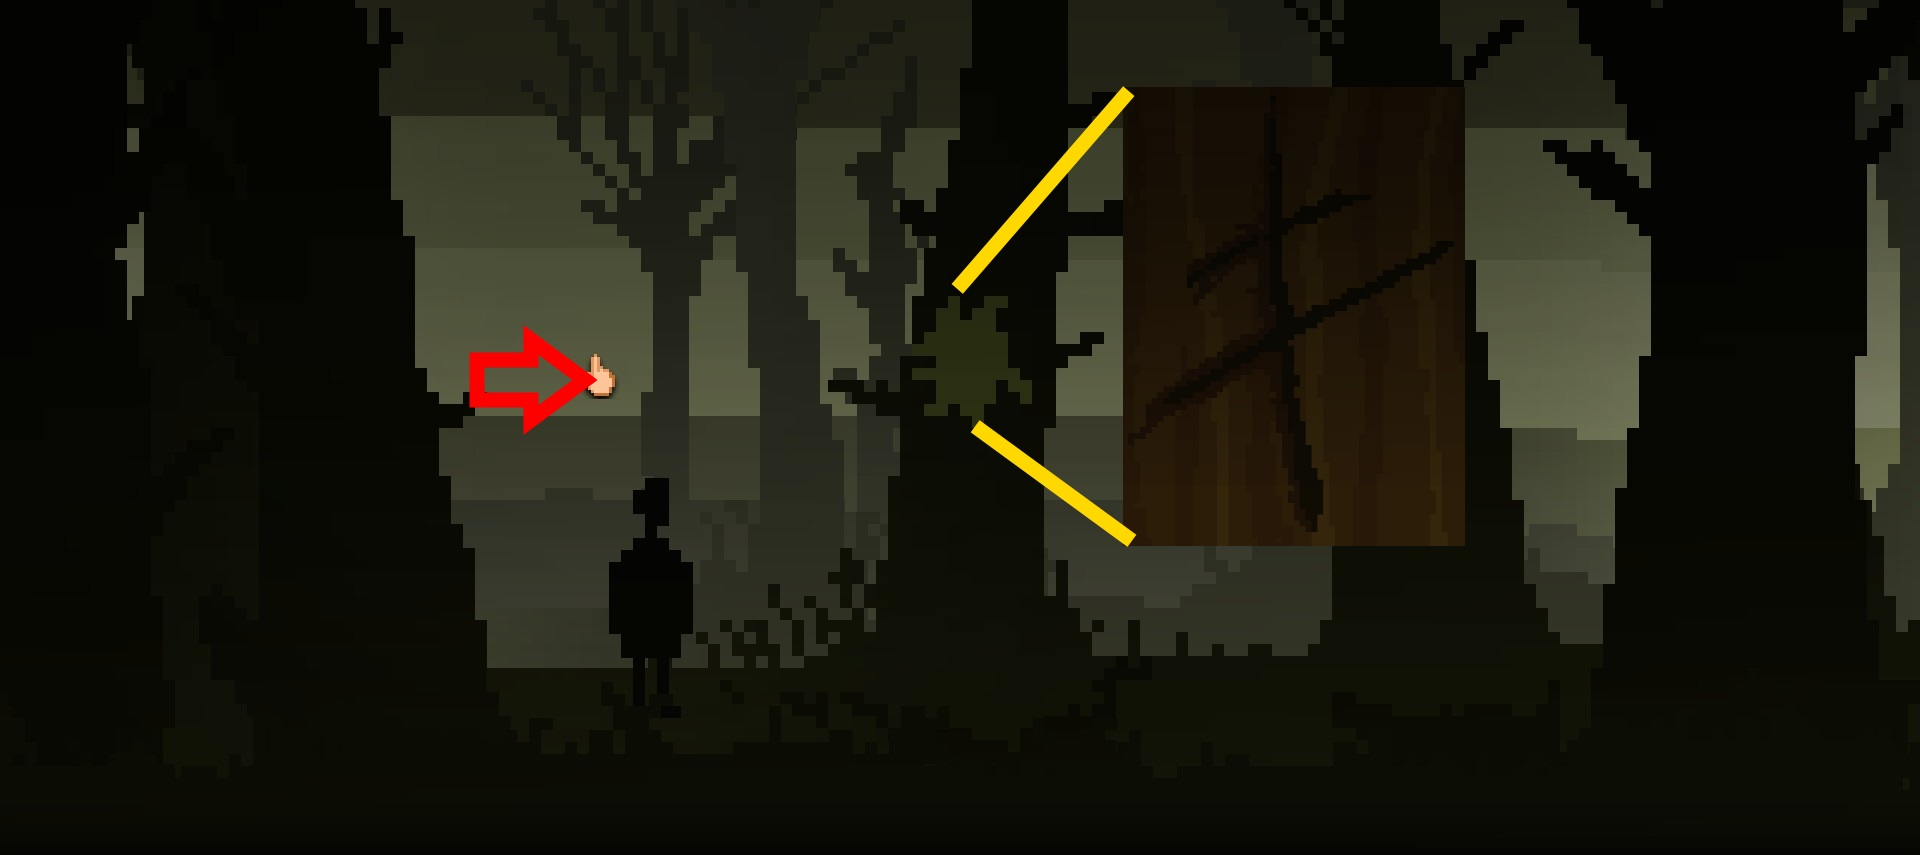
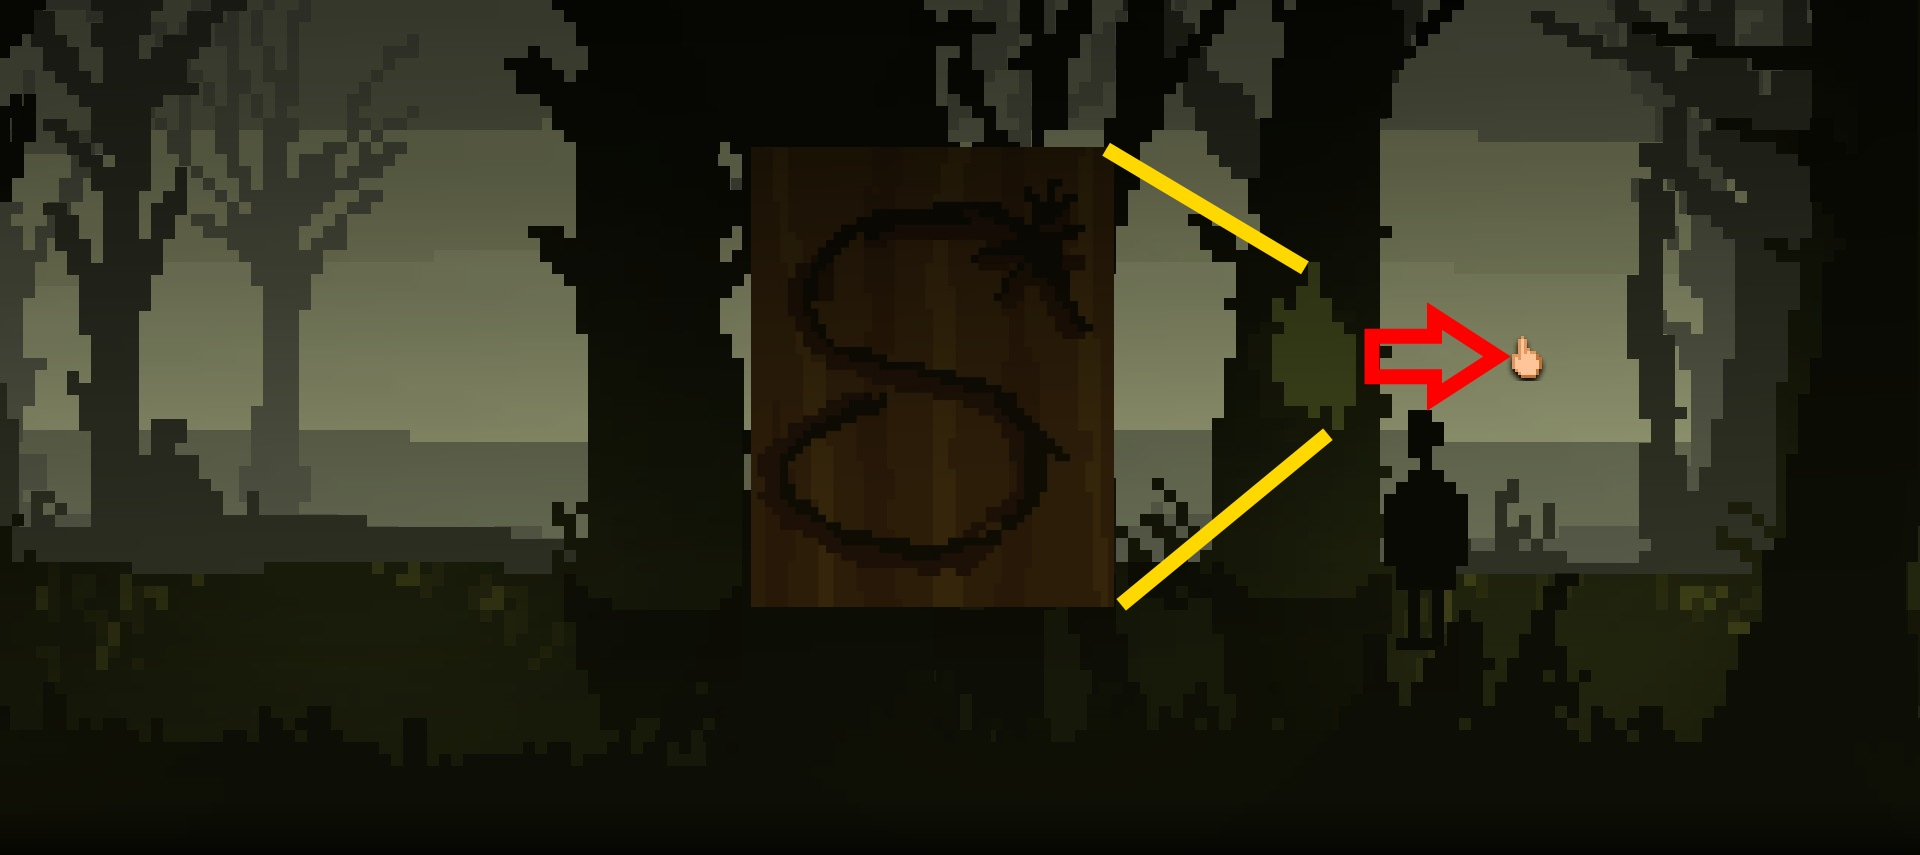
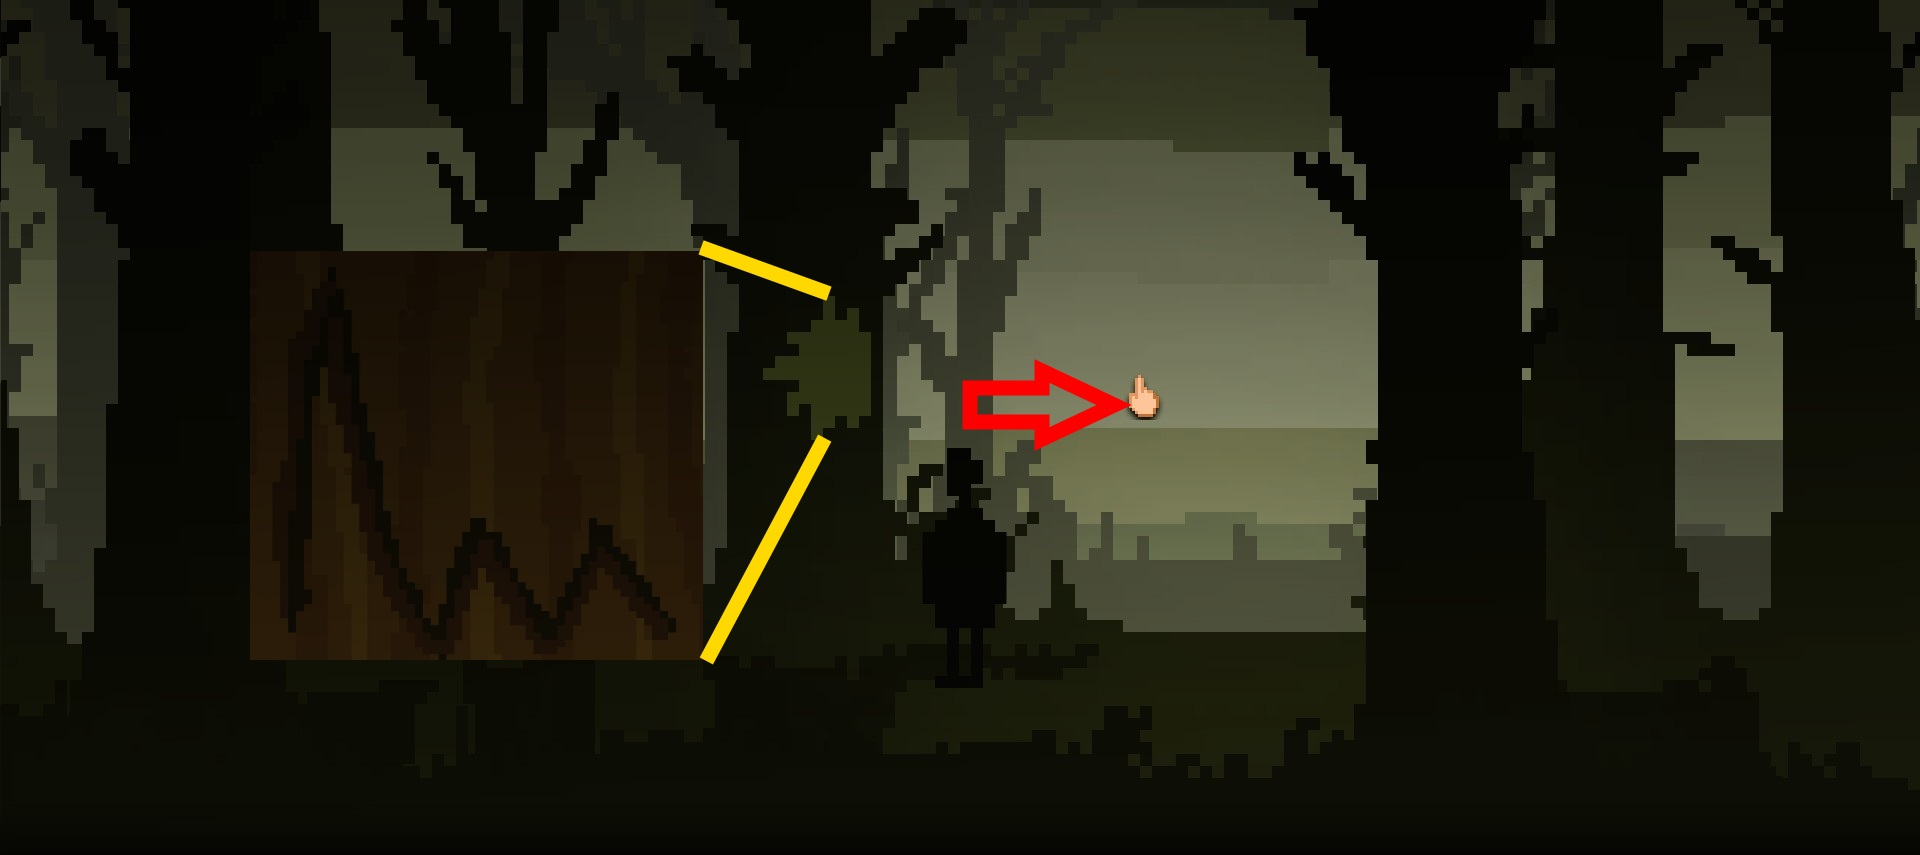
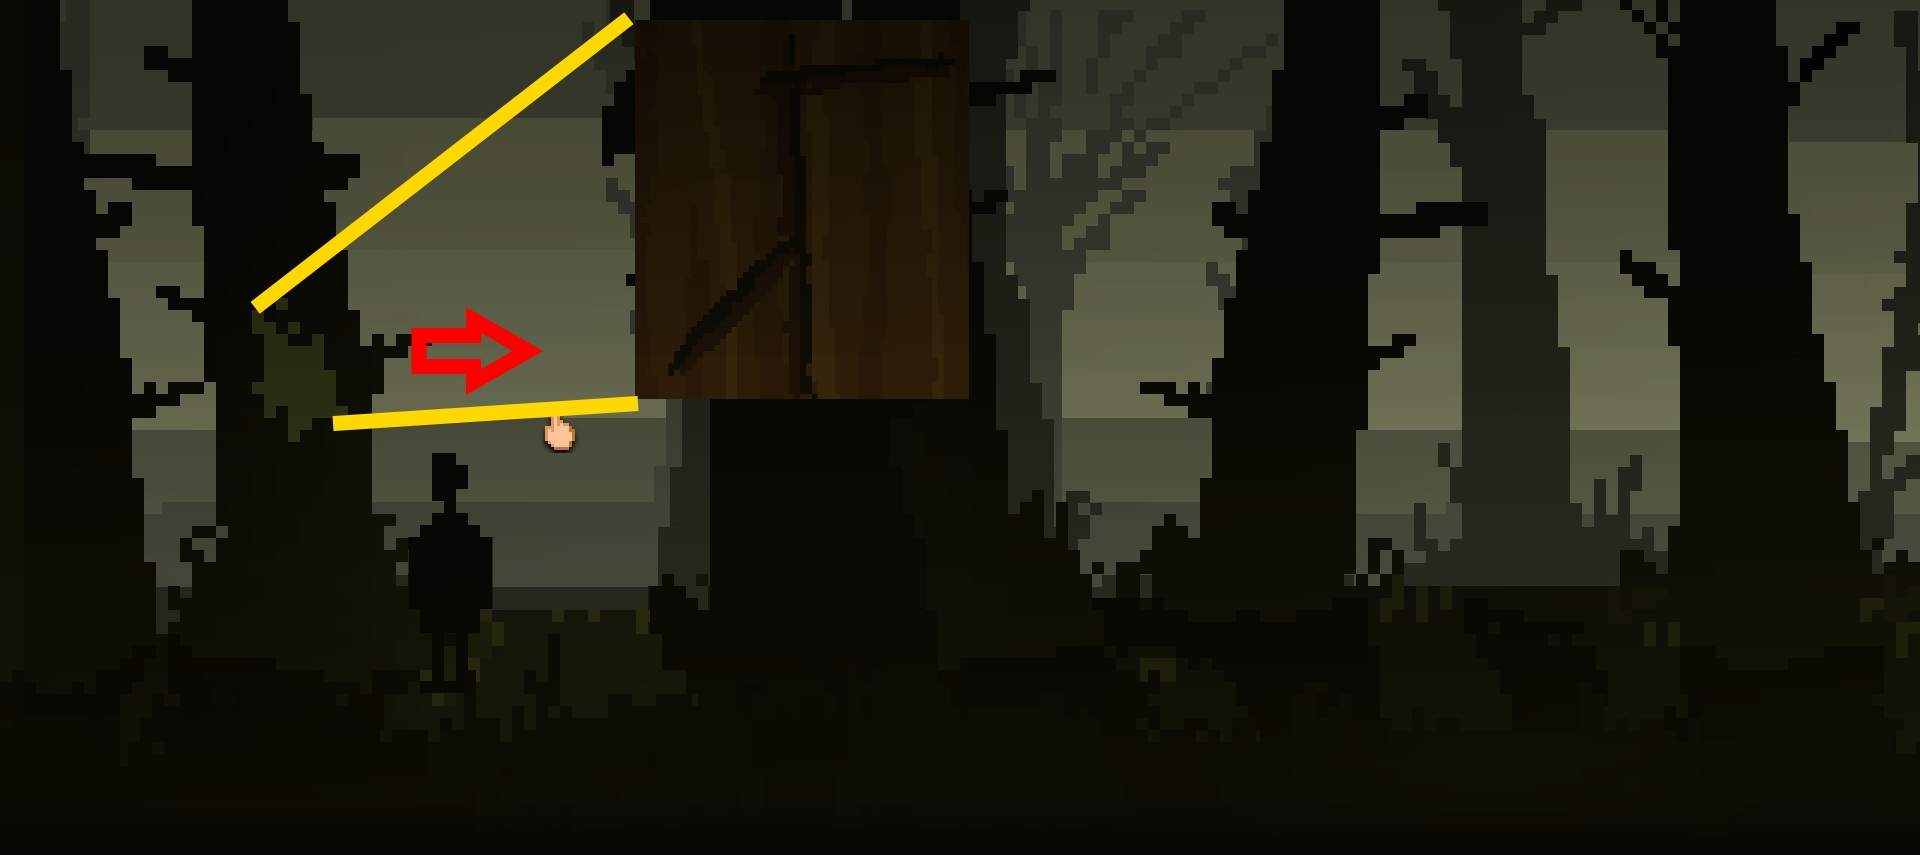
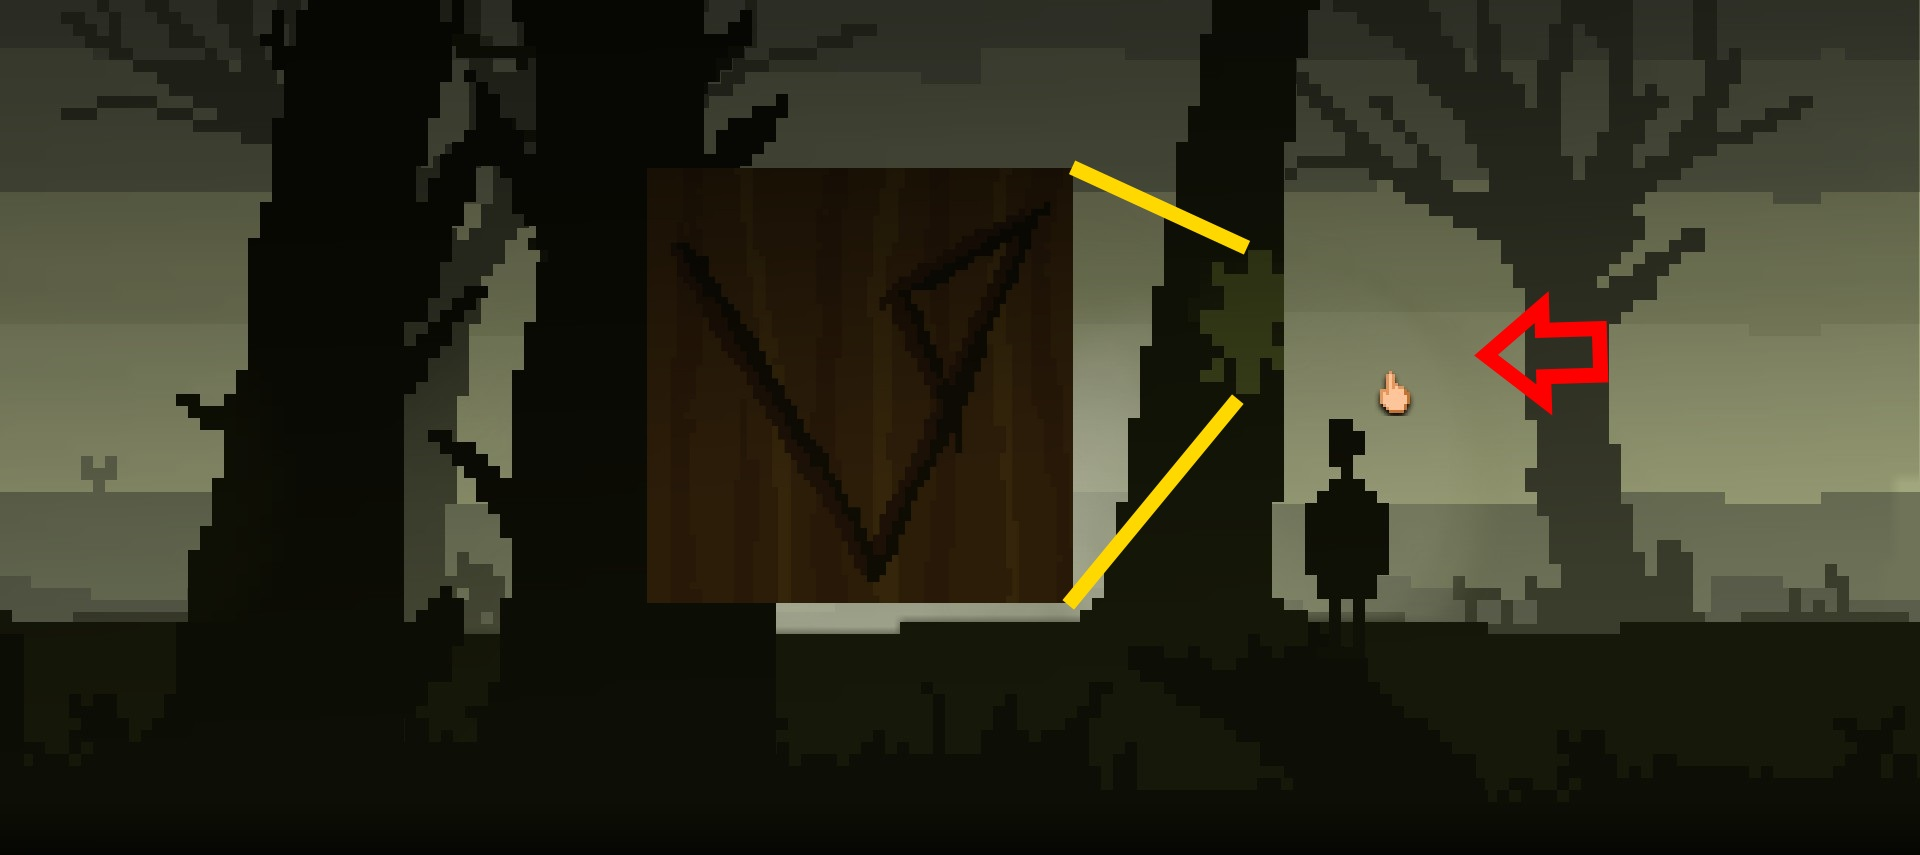
Forest puzzle: Get to the end of the forest. Take a wrong turn anywhere and you will be back where you started off. Take the following paths:
1.
2.
3.
4.
5.
6.
(Cutscene)

Walk towards the ruins in the distance. Walk up the stairs on the left, then keep walking up the stairs.

Examine and pick up the black feather. Leave the area.

(Cutscene)

Pick up the mask piece from the ground. Combine the mask pieces to create a broken mask.

Head back to where you found the poster. Put on the broken mask.

Walk to the left. Go through the dialogue options.

(Cutscene)

The following choice will award you one of two achievements:


Wakefield's Fate will be unlocked if you leave the stage or wait long enough for the curtains to close.


Devitt's Fate will be unlocked if you go behind the curtains.

(Cutscene)
Minisode - The Mask With No Eyes
(Cutscene: wait)

Pick up the torch, and ignite the four. Move to the center.

(Cutscene)

The New Bearer will be after the cutscene has finished.
48 Comments
Meat-King, The Ultimate 14 Jan, 2023 @ 4:07am 
Thanks for the guide. Your effort is worthy of an award.
Legend 22 Mar, 2020 @ 6:28pm 
thanks's you
S.T.A.R.S Leon S. K. 2 Mar, 2020 @ 1:59am 
Thx 4 the guide
ShonaNingyo 26 Mar, 2019 @ 11:55am 
Don't listen to Wig Bang, you can trigger the man talking by following the photo directions for the bugs. #1 just needs to be a bit higher. Hug the wall and try to walk up and down to the corner of the door. For #2, walk behind the table all the way to the right and you should get that one, too.
elisabeth23_psy 6 Jan, 2019 @ 2:08pm 
To add to my previous comment, apparently I cant go back to the mirror world to copy the middle bit of the code onto the poster, so I guess it has to be done before leaving the mirror world.
elisabeth23_psy 6 Jan, 2019 @ 2:05pm 
@Kijame
After I discovered what the madrake was for and reading your comment, I looked around to figure out what to do with the wax. I ended up using the wax on the poster, which said "reminds me of a way to reveal old carvings by rubbing wax on the paper", i imagined the first two codes needed to be copied from something illigible somewhere.

After collecting the mark from the piano monster/trembling kid, go back to the gramophone. The rubble has disappeared from the back wal of the house, revealing the first two symbols. Use the poster on the wall, then the wax jaw to copy the symbols on the poster.

I've done this after planting the mandrake root, unsure if it matters. I guess the poster and wax just let you copy all 6 symbols for easier reference when crossing the forest.
Azzurra 6 Jan, 2019 @ 9:17am 
GOOD GUIDE , Thanks for the help :2016villain::vcb_gamepad::simplepinkheart:
CBwz 19 Aug, 2018 @ 8:22am 
rather place "THE IMPORTANT BITS" before ! they need to be read rather than after ! .. also , avoid using words It This That There, and say the the actual Object or Place or Direction, Thanks .. Missed a few things . got confused . not even gonna bother .. moving back on to Borderlands 2 ..
il padre 1 Jan, 2018 @ 2:29pm 
@Big_Macintosh it plays a role in the "Wakefield's Fate" ending
Kijame 26 Dec, 2017 @ 12:27pm 
Like Mac said down there, the root can be buried in the treehole. I didn't do this during my first playthrough of episode 4, but during my second one, and noticed it gives you the middle part of the Forest Maze Solution (the final part which you can see on that rock when you enter the foret).

Makes me wonder if and where there is a first part and how to find it. Or if there is anything you can do with the bird feather and the wax jaw.