Rebel Galaxy

Rebel Galaxy

313 ratings
So you want to fly a spaceship?
By LowFatMilk
This guide will simply break down some very basic parts of the game so you can easily understand them before you fly off into the black void, and allow you to know what to fight and what to run away from.

Don't read this is if you want to figure it all out for yourself.
9
   
Award
Favorite
Favorited
Unfavorite
Setting the scene
Rebel Galaxy is a lot like Freelancer, the 2003 space epic RPG that really hasn't been beaten yet in terms of open world flying. Also, for you fans of Firefly, you can be your own Malcolm Reynolds in this game, and the soundtrack will remind you fondly of the opening theme tune... you can't take the sky from me.
You fly around warping from place to place doing missions, upgrading your ship and blasting other space captains out of the sky, with really impressive visuals and gameplay mechanics.

This guide will just go over the basics like HUD, moving, combat and a few menus, and also give a few tips to help you start off the game.

I won't go into the storyline of the game, you'll find that out for yourself.

Rebel Galaxy got me like
Simple moving and the HUD
Moving around is a simple yet effective mechanic in RG. You control your ship with WASD, Q and E, and the mouse. The HUD is also pretty solid and isn't invasive. You'll learn most of this in the first 10 seconds but hey I'll chuck it in cos I'm a nice guy.

W is your booster
A and D are banking port and starboard (we're using ship talk here get with it people!)
S sort of slows you down, but not really.... if you're in sublight speed then it takes you out of it. You'll understand when you play.
E increases your engine power from 0-4. You need to be at 4 to reach sublight, and once you're at sublight you can enter warp speed, which is how you'll be moving around a lot.
Q decreases engine speed, simple. Slower speeds make turning easier.
The mouse controls the camera. When you're in broadside mode it's very easy to use. If you swap to a turret then you receive a mouse reticule that can make it harder to look around when you're just cruising, but in combat is incredibly useful.

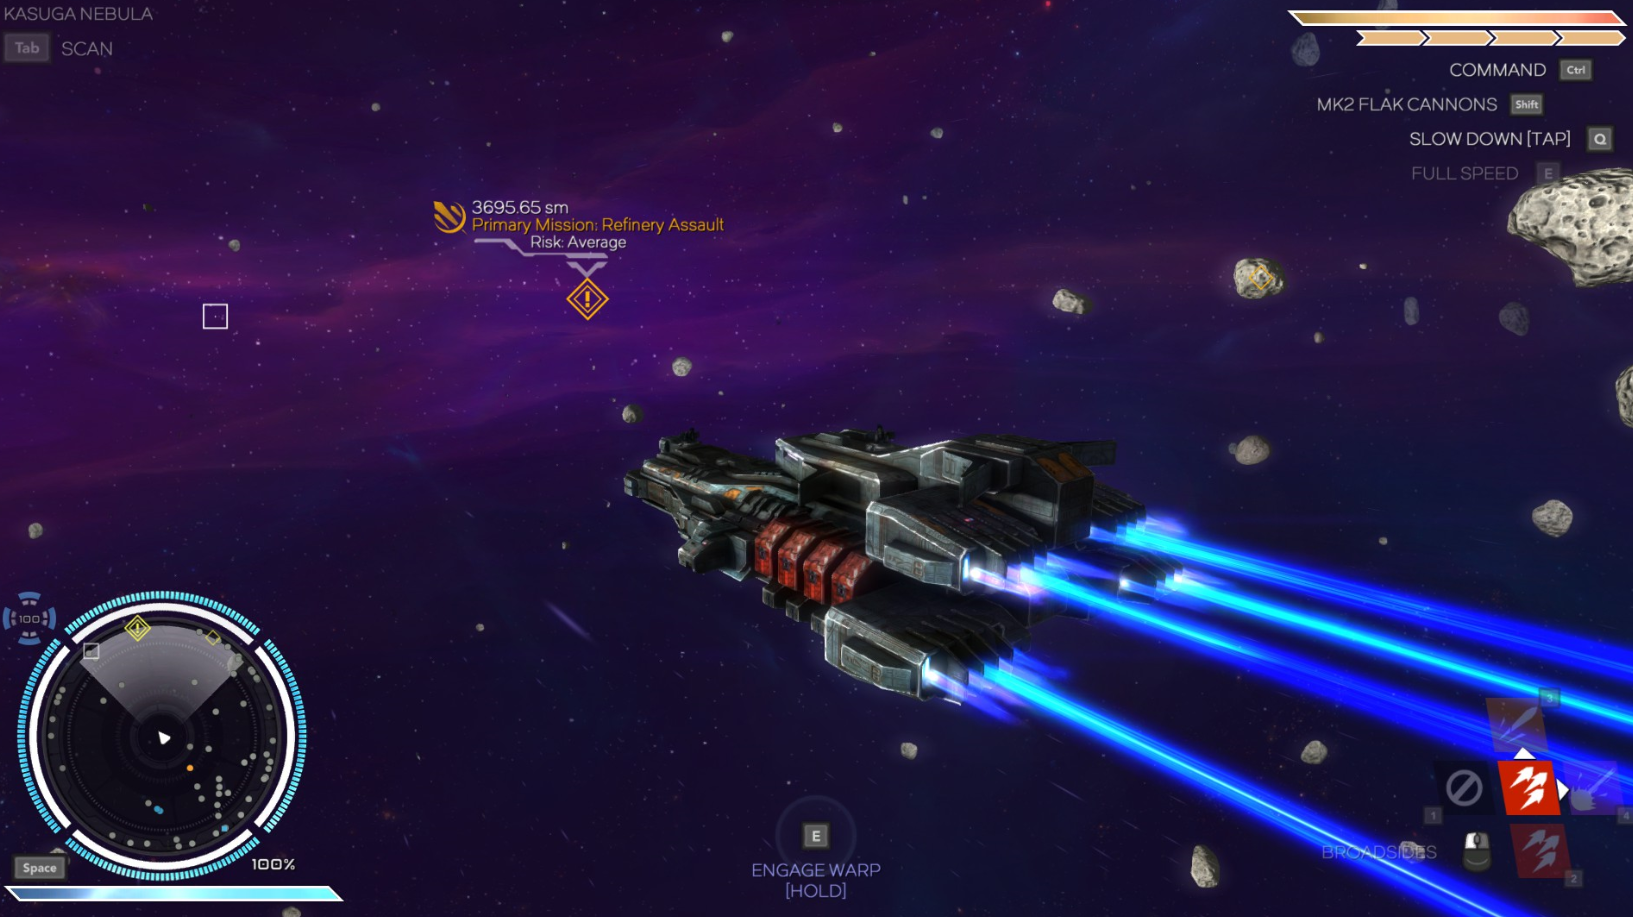
This is what you'll see when you're flying around the place.


Now I'll break down what each of those icons in the corners mean.

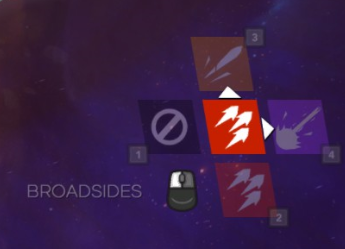
This is where your weapons and guns are.


They are broken into categories 1, 2, 3 and 4, and pressing the correllating number swaps to that gun. Depending on how big your ship is determines how many guns you'll have, therefore how many of these will be full. I have 1 Broadside, 2 Scatterguns and 1 Mining Laser, but because the Scatterguns are the same kind of weapon, they are both controlled with 3, so you can have multiple guns under your direct control.


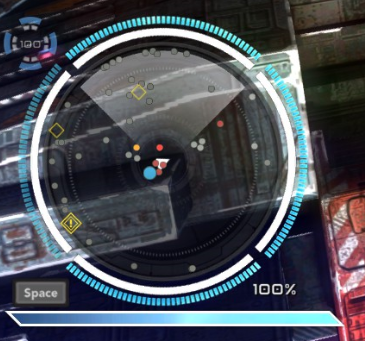
This is your minimap


Your ship is a white triangle in the middle, with your field of view cone.
Your hired mercenary (if you have one) is a yellow dot.
Allies are blue dots.
Enemies are red dots.
Asteroids or space junk are grey dots.
Small fighters, bombers, raiders, harriers and other small craft are smaller dots.
Capital ships like frigates, destroyers and command ships are larger dots.
Yellow triangles are your objectives. Ones with a ? in them are unknown objectives, and the one with a ! in the middle is the main storyline.
You'll see others eventually but this is keeping it basic.
Around the edge of the minimap you can see 2 circles; a white one and a blue one. The blue circle represents your shields. These will recharge after they stop taking fire. The white circle is your hull armour. They do not recharge (unless you have a special ship component) and must be repaired at a station. Once an enemy has breached both your shield and your armour, they start to damage your hull and systems, potentially knocking them out. Your total ship health is the white 100% at the bottom right. Obviously when it's 0, you die.
These 2 circles are also broken into 4 areas, fore, aft, port and starboard. They represent the sides, front and rear of your ship. Moving your ship around fights and exposing stronger sides can prevent damage. If your shields are down on 1 side, turn your ship around and present your full shields and allow the others to recharge. You can only damage hull and armour in the areas that there are no shields. The same applies to your enemy.
The blue bar below the map with the SPACE above it is your Deflector shield. It is a different item to your actual shields, and is activated by holding space (go figure). It can be used to take and possibly reflect damage away from your ship instead of your primary shielding or hull. You can use this when you need to cover up exposed ship armour while you are turning, or if a particularly nasty group of missiles comes your way.
Finally in the top left is a little 100 with its own armour and shield circle. This is your mercenary's health. You don't start with a merc right away but the first guy is cheap as chips, but will be discussed later in the guide.


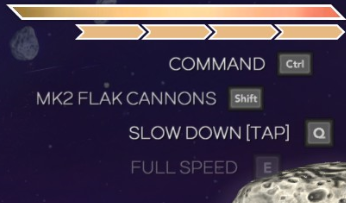
Commanding and ship engines are seen up here in the top right


Here you can view commands to give to your mercenary, or if you are close to another ship it may change to Hail, allowing you to speak to them. When you press control a wheel menu comes up allowing you to choose different options, such as sending out pulse waves to detect items or ships.
Hitting F or clicking it from the command menu fires a pulse that detects ships, mineable asteroids, cargo and cargo containers. Cargo containers are shown as a purple square with a ! in the centre and can be salvaged for some cash and items or even a ship component or two. These are usually found floating in junkyards or dropped by larger, named enemies. Special cargo containers can also be found on occasion with special items worth thousands of credits, although this is incredibly rare.
Shift is your secondary broadside weapon. These weapons fire dumb (meaning you don't control where they go or what they aim at) but can still be useful in a fight. For example I have FLAK cannons set up allowing me fire them off in a similar way to flares which prevents missiles hitting my sides. They also do damage to any small craft stupid enough to fly close. You can also put things like EMPs and your own missiles here.
Slow down Q and speed up E are very self explainatory.
The top bar is your booster (W) which recharges by itself.
The four bars under it are what speed you are currently going at.


Top left of the screen is your location in the current galaxy


Really simple, where you are (Kasuga Nebula)
Also press TAB and you can scan other ships, items and debris. I'll cover that later.


Your E button also pops up down the very bottom


This may change depending on your situation. It may be change to warp speed, accept incoming transmission, pick up items or gather resources.
Combat
Epic space lasoorrzz!!!!! PEW PEW ZOOM WAPEEEW.

Combat in Rebel Galaxy is actually quite similar to naval combat in the 1600-1800s. You fly alongside enemy capital ships and open up with your broadsides to do as much damage as possible. You can change to other weapons and optimise your ship for long range engagements, but that's the basics of it.

As mentioned previously, you select 1-4 to get your big guns out WOOHOO.
The bigger your ship the more guns you have and the more slots you can fill up with different cool stuff. You have a whole range of guns to use, Pulse guns, Scatterguns, EMPs, missiles, Flak, Tachyon guns, warheads, magma mines and Laser beams.Future updates will hopefully add more.

What makes combat so much better is when you're in 1 weapon mode, the other weapons are taken over and fired by the AI. You can change target priority in the AI menu (Escape) which will be covered later.
The only weapon that isn't fired by the AI are your broadside weapons, including the dumb fired weapon (shift key). These must be controlled by you. However as you're controlling them, your other guns fire automatically.


Broadside mode
Your basic attack really, you can fire it in 2 ways.
1) just left click, this will fire off a volley to either side of your ship similar to the dumb fire of your shift key. You probably won't hit anything but it looks cool.
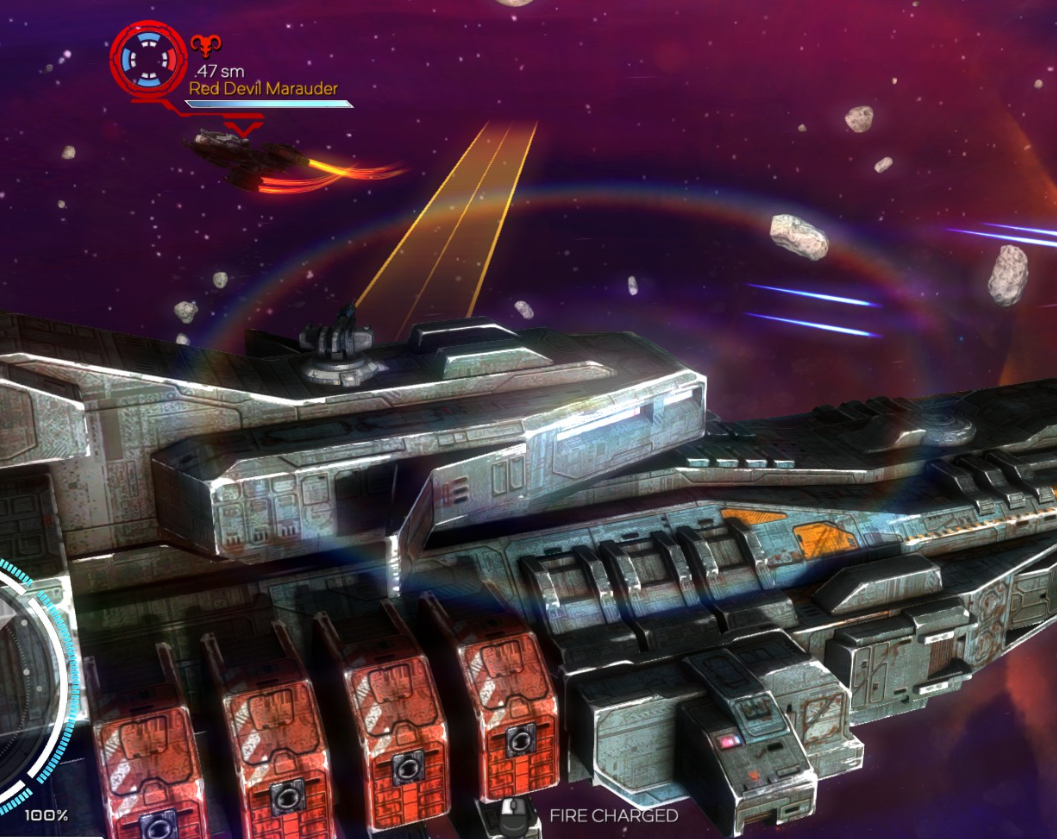
2) manual aiming, this is the serious damage dealer. You hold right click which will send out a little aiming beam thingy (as seen in the picture below) that locks onto enemy ships. When it is fully charged it will be accurate and deal maximum damage, and the beam will turn orange like so. (note the FIRE CHARGED in the bottom of the picture)


Then you simply fire it and really mess up the other person's life.
Locking on this way you can sometimes hit fighters and smaller craft if they're close enough.
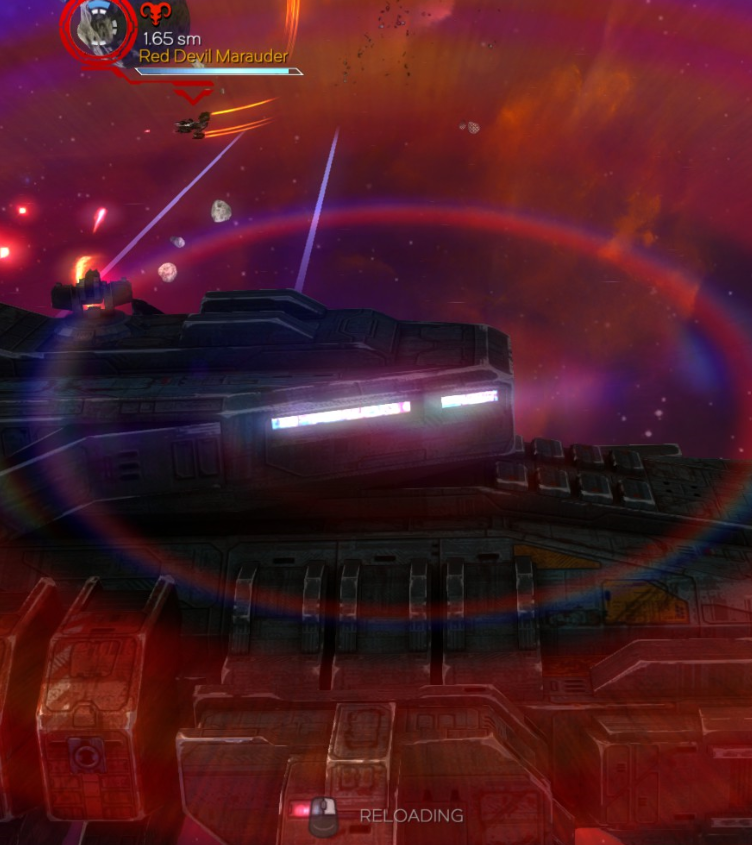
When you haven't locked on and fully charged the beam thingy will instead look like this (Note the RELOADING in the bottom of the picture).


You can actually still fire like this, but the rounds will be less accurate and deal way less damage. It always pays to charge it up first. This depends on what kind of broadside you have but really isn't any longer than 2-3 seconds.

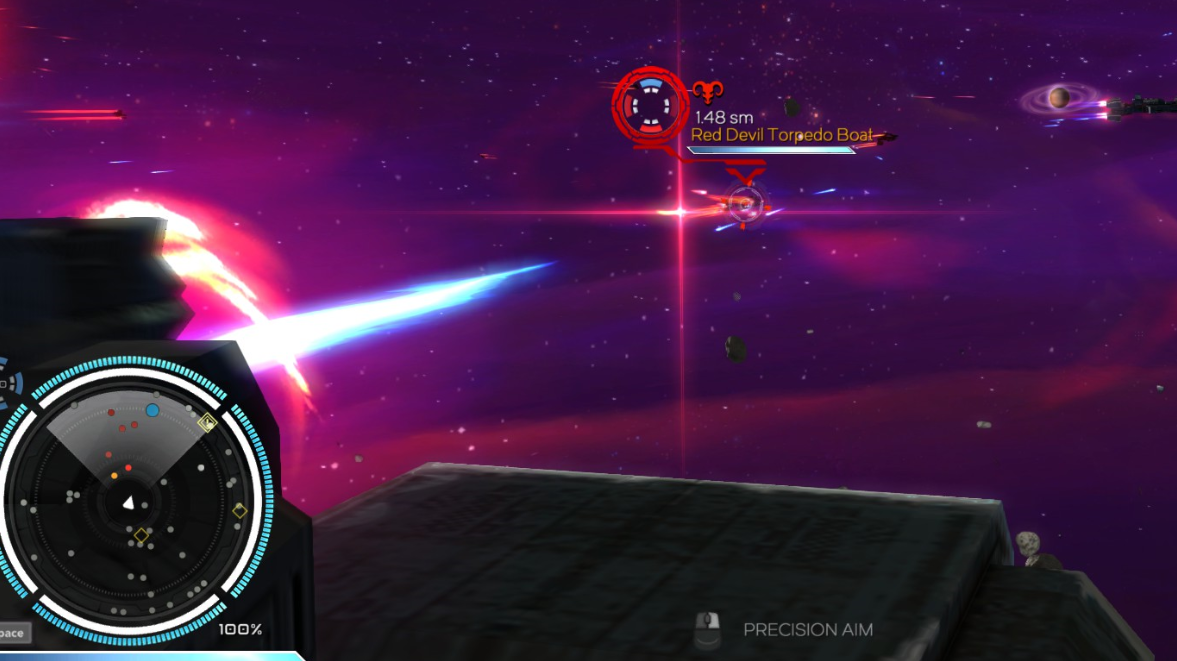
When you're using a different weapon like Scatterguns or Beam weapons etc you will enter a mode where you receive an aiming reticule that you move around and shoot at enemies. If you move it over an enemy it locks on automatically, allowing you to just hold the fire button and follow them around. You can also hold right click to enter precision mode which zooms in and lets you choose targets more effectively, such as mines and containers of munitions or asteroids:


Note that as you are firing from this position, your broadside will not be used by the AI. You can still fire the dumb broadside with shift however. Any other weapon will still fire automatically, but the whole group you are now using will be controlled manually by you. Uusually you can fire much faster and at whatever you want, as well as recharge the guns better.

Different weapons may have different reticules for locking on with missiles or area of effect guns, but you can figure that out as you buy them :)
Also, please note that your turrets are in fixed locations. If a turret is on the bottom of your ship it may have a harder time firing at an enemy that is above you. It makes sense really.
Station menu
You dock at stations by flying close to them and holding E when prompted. Don't worry you can't crash into them, it auto-docks for you if you get too close.

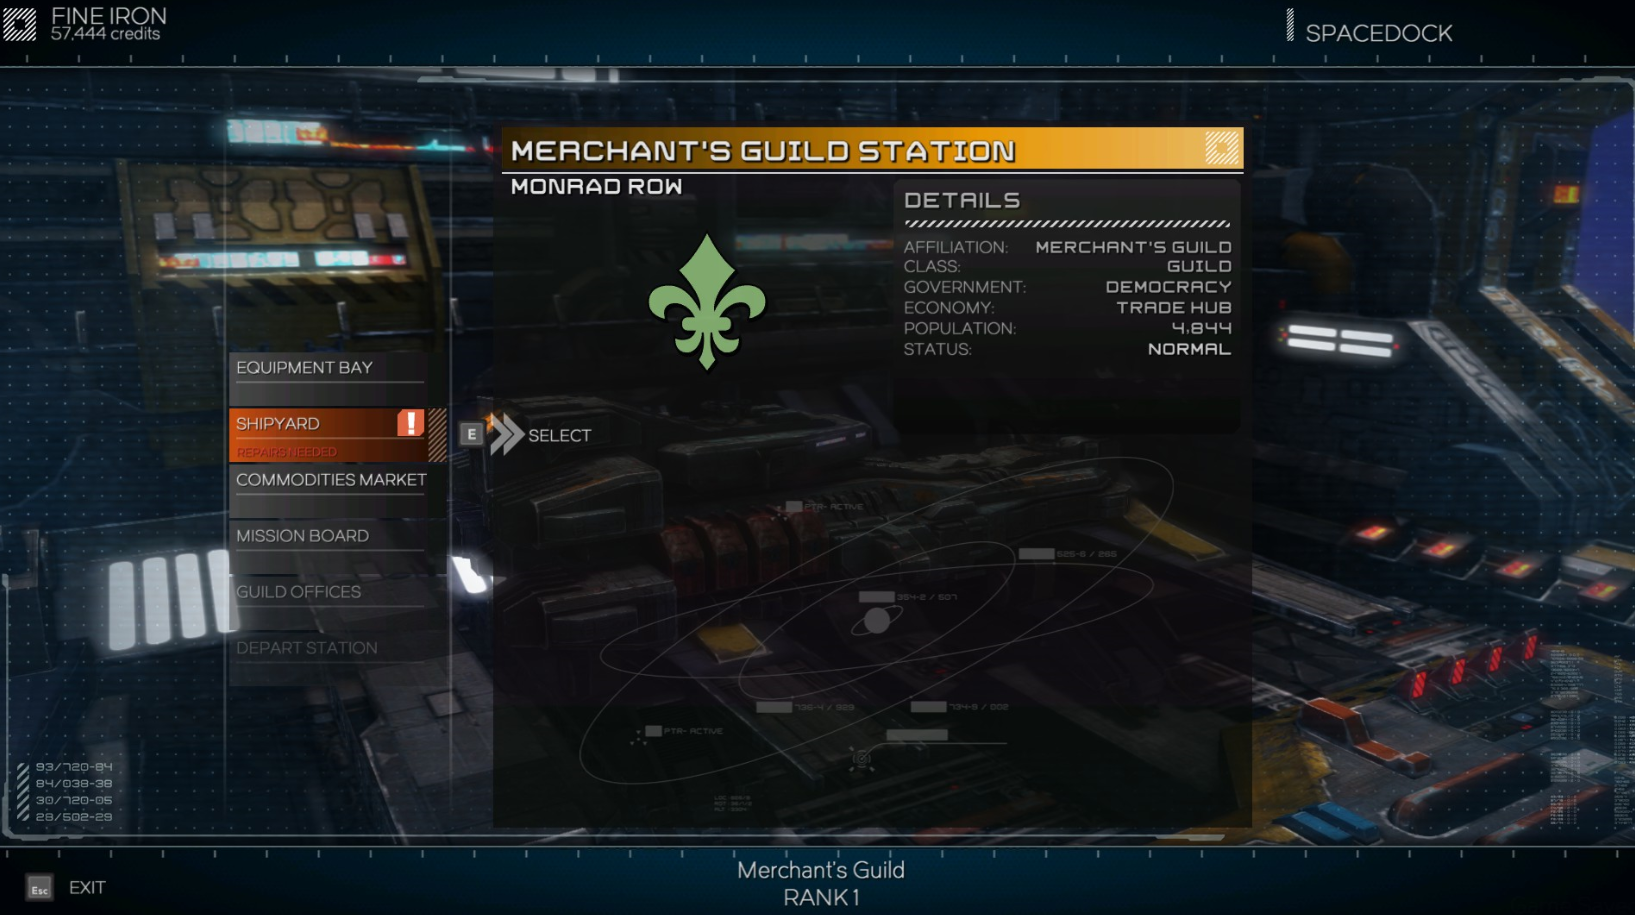
When you're in the station a menu like this will appear (these may vary depending on what faction you have docked with and what type of station it is).


Here you will see all the relevant data about this station. Next to the faction symbol is basically the name of the station (Monrad Row) and who it belongs to (in this case the Merchant's guild). The Affilitation, class, government and economy may influence what kinds of trade goods are available to you, and their prices. For example stations owned by the Militia (sort of like the space police) won't store illegal wares, but stations owned by pirates will have things like slaves and bio waste.

On the right hand side are the menu options for you.

REMEMBER!!!! Your weapons, defenses, components and ship DO NOT lose value over time. If you buy a Mk2 Scattergun for 16,500 credits, you can sell it for the same price! Use this to your advantage when you want to test out new weaponry.

Equipment bay is where you purchase, sell or change over parts of your ship. Weapons, defenses and components.


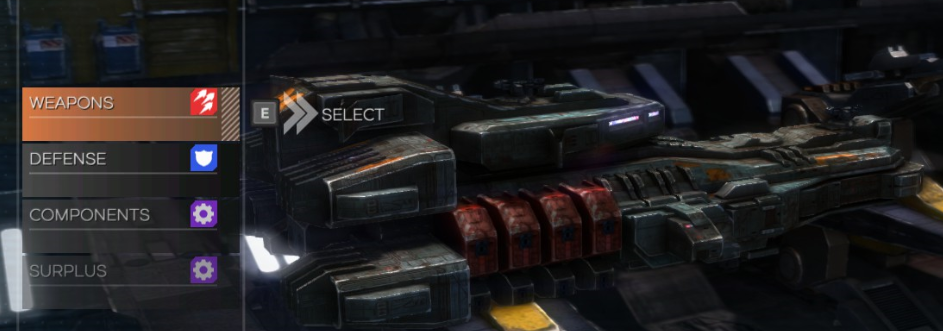
You select the menu icon which in turn takes you to the appropriate sub menu.
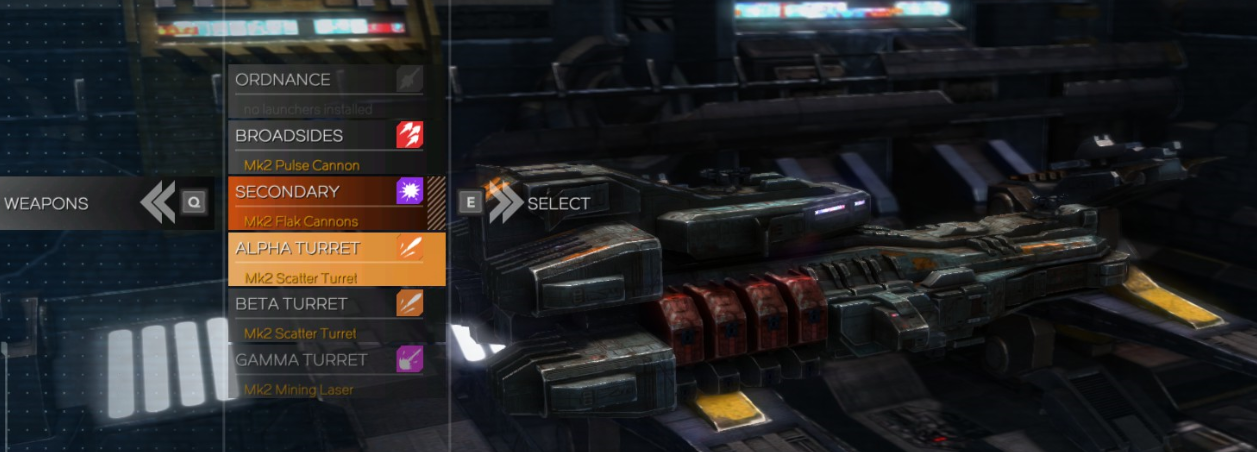
The weapons tab lets you add in weapons to your slots. Ordnance is usually locked until you have a larger ship with the correct mods on it. You then have your primary broadside (in RED) which you control manually.
Your Secondary is your dumb broadside which you fire with shift (PURPLE)
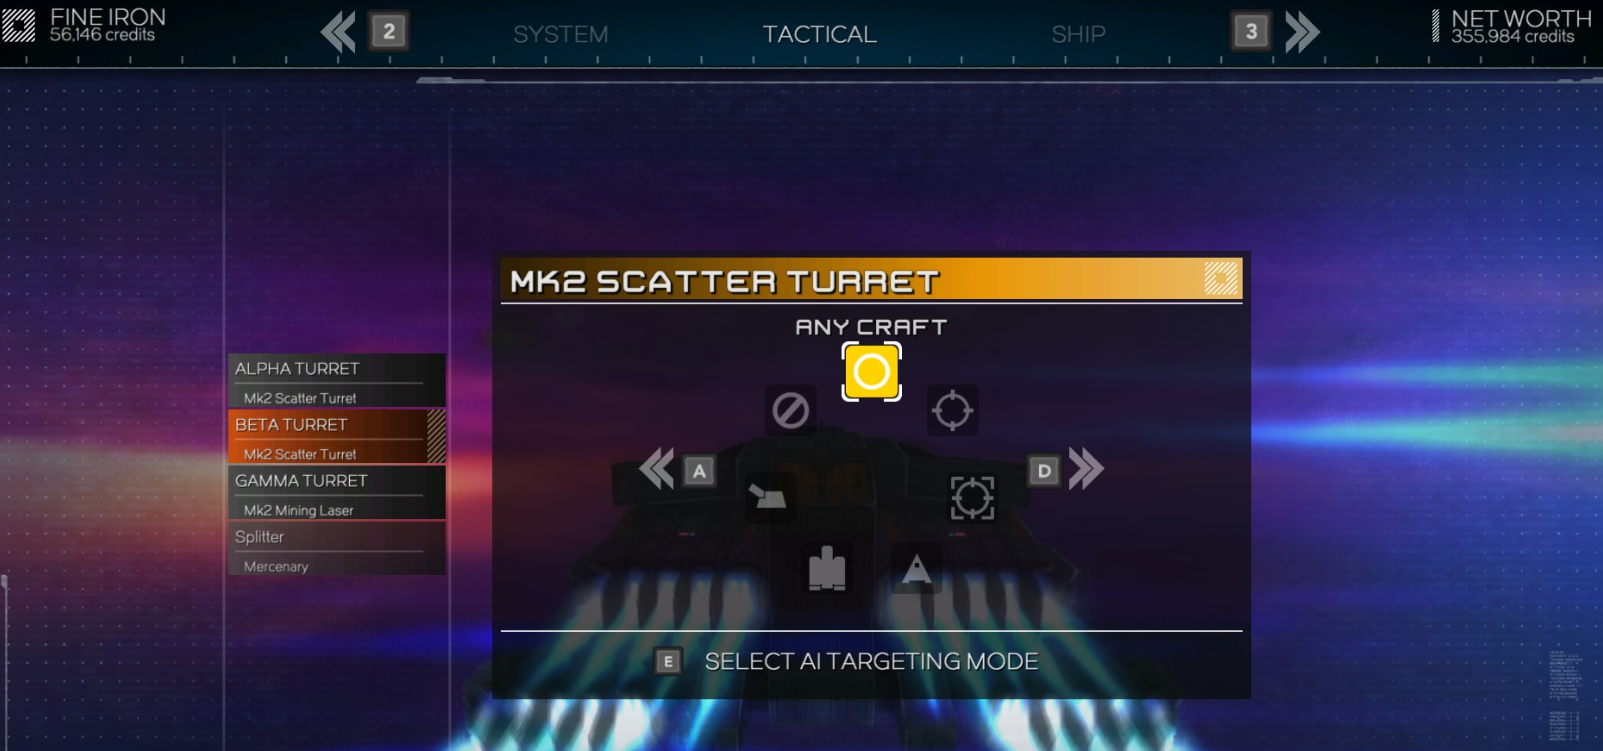
Then you have your Turrets. Bigger ships have more turret locations. As you can see, I have a Mk2 Scatter Turret in my Alpha and Beta turret slots. This means when I press 3 to change to them manually, I fire 2 of them. However in my Gamma slot I have a Mining Laser, which I control with 4, which then makes Alpha and Beta fire automatically.
Some weapons need amunition to be fired like missiles or mines. These weapons may run out of ammunition in combat, leaving you one or several guns down. You can pick up ordnance crates from junk fields or from defeated enemies, but these are rare. Be careful not to overcrowd your ship with too many ammo hungry weapons. Thank you to darktoes for this information.
Other weapons have a cooldown if they overheat too much.
Also note that when you have selected a weapon slot, a little white square will appear on your ship model, showing you where that gun will sit on your ship. Bear this in mind when adding in weapons that may require lock-ons or open fields of view to fire.
Finally, if you are purchasing a new weapon or piece of gear to replace an old one, you will be asked afterwards if you wish to sell your old gun at the same time. If you cannot afford an item, the price will be in RED, but if you can afford it with the trade-in, it will be in ORANGE.


The defenses tab has your shields, hull armour and deflectors. Really simple, the higher the number the longer it takes for you eat space. Some shields and deflectors behave differently so read up before you purchase.


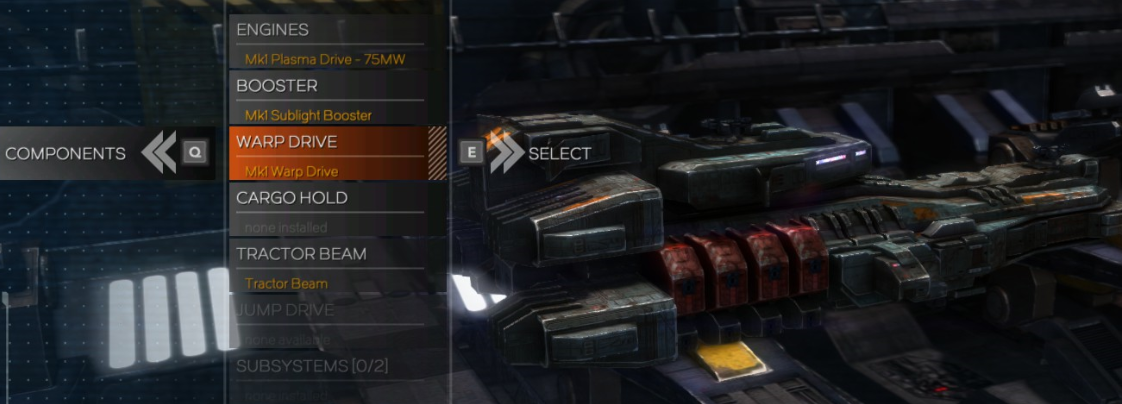
The components tab has all the rest of your ship's gear. Engines, your booster, warp drive, cargo hold upgrades, your tractor beam (if you have one), your jump drive (needed to travel between galaxies), your subsystems which upgrade specific parts of your ship and the special slot which will be revealed as you play the story.


Moving back to the main station menu, the shipyard tab is where you repair your ship and purchase new ones. Some factions must be joined to unlock specific ships. The massive cargo ships will only be available from the Merchant's guild, and the best fighting craft only from the Mercenaries' guild. This is a basic menu so I won't go into more detail.

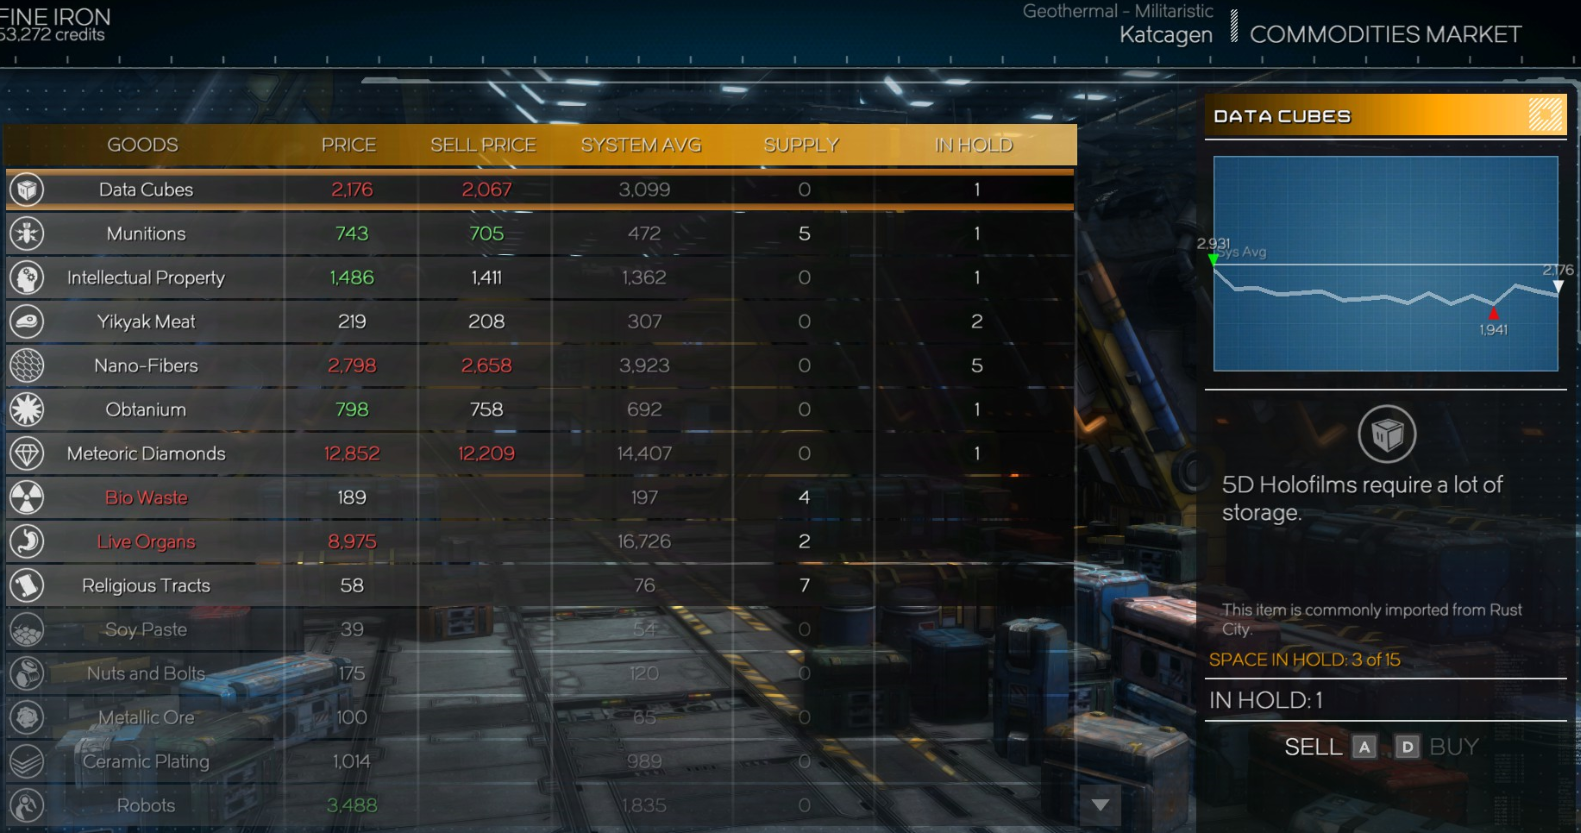
Then you have the Commodoties Market. This is where you buy and sell items you have picked up on your travels. Your cargo hold depends on how many you can carry (duh).
There is a trade market that changes depending on supply and demand. Sieges and blockades may lower or raise the prices of goods. You can make money being a merchant and trader.
The goods list shows what item is available.
The price is how much it costs YOU to buy it.
Sell price is how much YOU get for selling one.
System AVG is the average price of the item.
Supply is how much the station currently has for purchase.
In Hold is how many you have in your cargo.
If the prices are in RED, it means you will be buying and selling the item for less than the average. This is a good time to buy obviously.
If the prices are in GREEN then they are higher than the system average. Sell sell sell.
The right menu also shows the history of the prices, how many you have with you, your available hold space compared to maximum, and sometimes the common area to where this item is sold (usually indicates you'll make a good profit from selling there).

A quick note: FINE IRON (top left) is the name of my ship, not an item you can sell. Underneath is how many credits I have, and to the top right is my location.


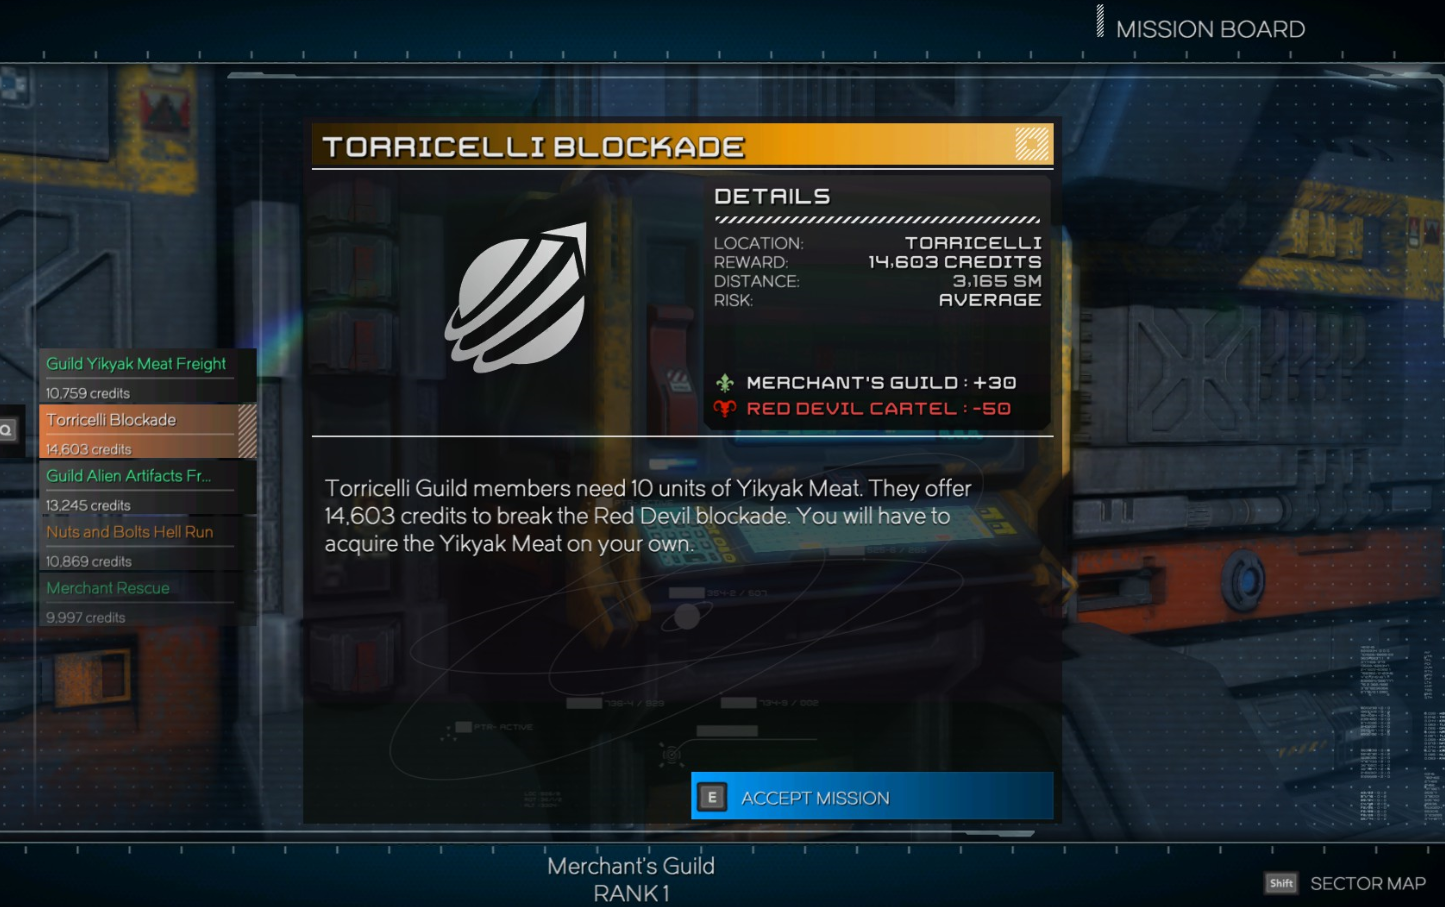
The mission board is where you get side quests and tasks that can be completed for cargo, money and faction relations. You can choose missions from the left hand side, and they rank in colour depending on their difficulty. The risk factor goes like this:
Blue = Very low. Green = Low. White = Average. Orange = High. Red = Very High. The higher the risk, usually the more credits you get.
Then the middle information will tell you where abouts the mission is, how far away it is from this location, and then who will like you more for completing it, and who will like you less. As you can see, if I complete the Torricelli Blockade mission I gain decent favour with the Merchant's Guild, but lose favour with the Red Devil Cartel. Choose your missions carefully, as annoying too many factions too early can cause you grief. Pressing shift also brings up the sector map so you can look around and see how far away things are from you and the mission location.


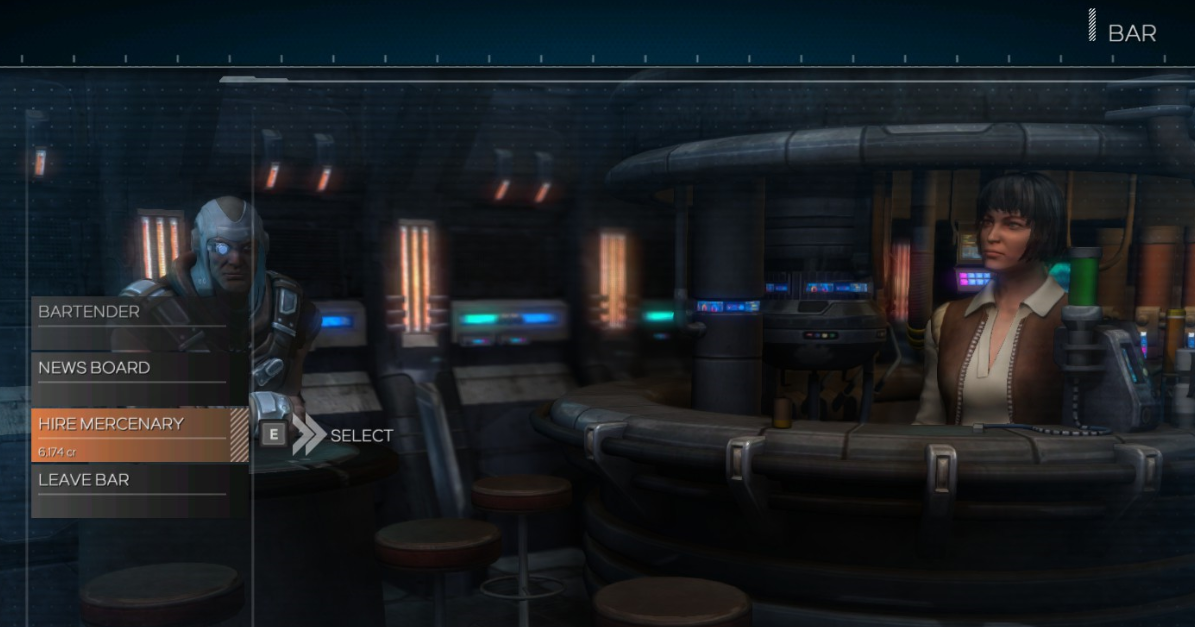
The Bar tab (sometimes replaced with the Guild Offices tab) sends you to a local source of information. Here you can read the local news to see any significant changes to the galaxy (like price crashes, sources of interest, new wars or sieges etc). Speaking to the bartender can also gain you information like bounty locations. This info isn't free however....
Finally you can hire or dismiss a Mercenary who will fight alongside you. This is a one off payment, once you buy them they stick with you until they are killed or you dismiss them at another bar. In simple terms, the more expensive the merc, the better they are. Their behaviour and target priority can be changed in the AI menu


Finally, depart station is.... so... simple. Yeah.
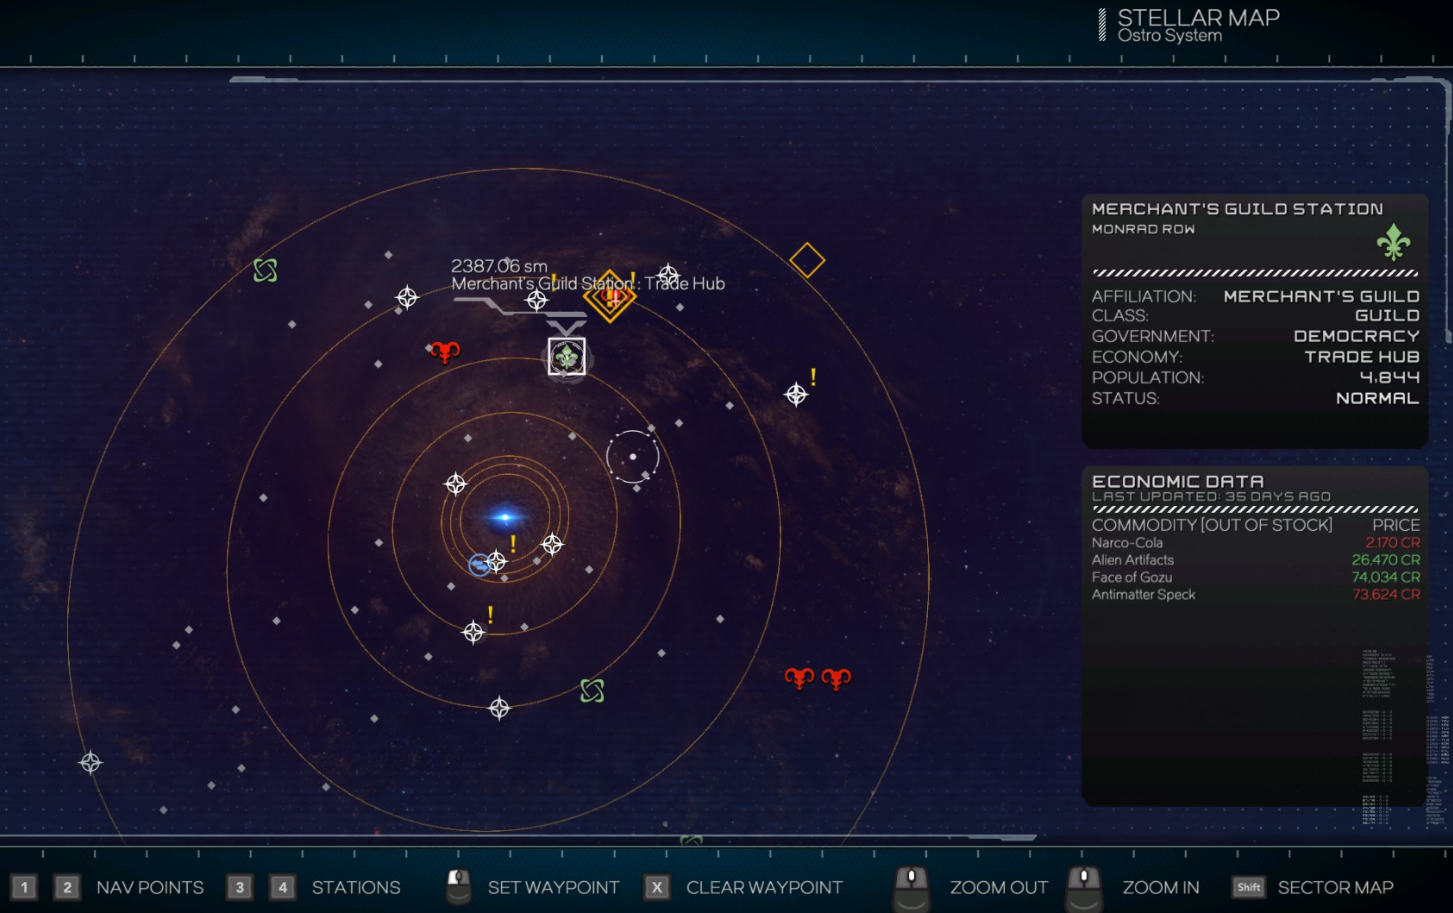
The Stellar Map
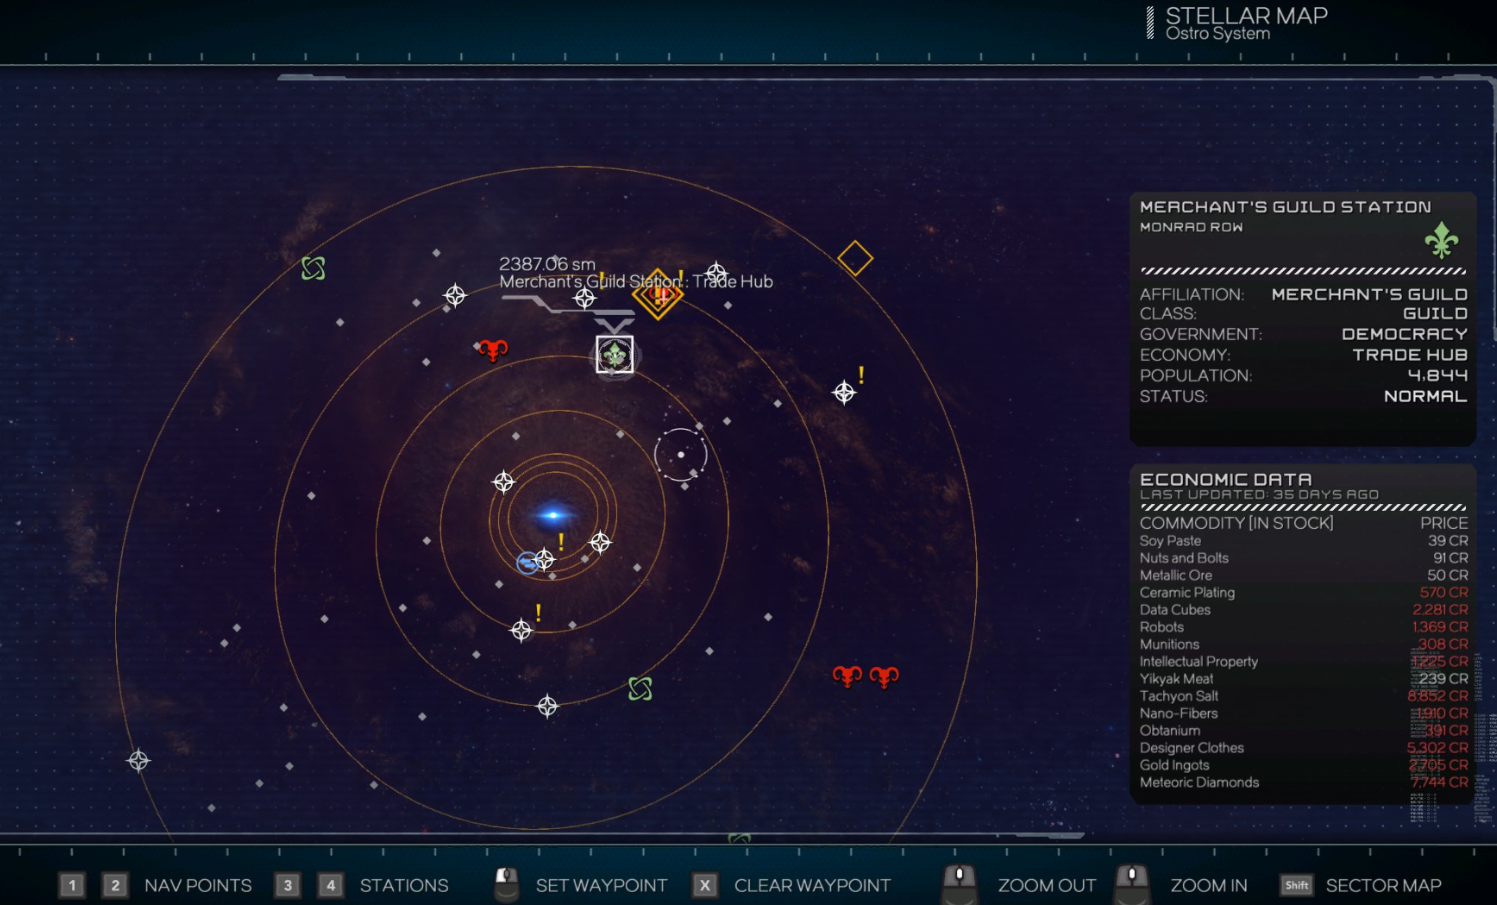
Pretty simple really. Press M to bring it up and check it out. Left click adds a waypoint and you move around with WASD. Scroll the mouse wheel to zoom in and out.
Press the Shift key to view the entire game map and see each individual sector, their threat level and how to get to them.

The top right tells you which system you are currently in.
There is no legend, but you get decent information just by hovering your mouse over an icon.
The stations are also shown as the faction icon of the dominant faction.
I have hovered my mouse over the Monrad Row station, owned by the Merchant's Guild.
It gives me all the same infomration about the station that you get when you dock there.
But the most beneficial part is that it gives you the latest economic data about that station. Here you can see what they have in stock, what they don't have in stock, and the prices related to the system average. Bear in mind that the information will only be as recent as the last time you visited the station. You can see the prices listed are from 35 days ago (game days, not real days. Don't ask me how long a game day is, it's space for gods sake). There are other ways of finding out economic data, like news boards or travelling merchants, and other devices you may find in space that instantly give you the entire sector's exact data. But I'll let you find them yourself.


Compared to the commodoties NOT in stock

Scanning
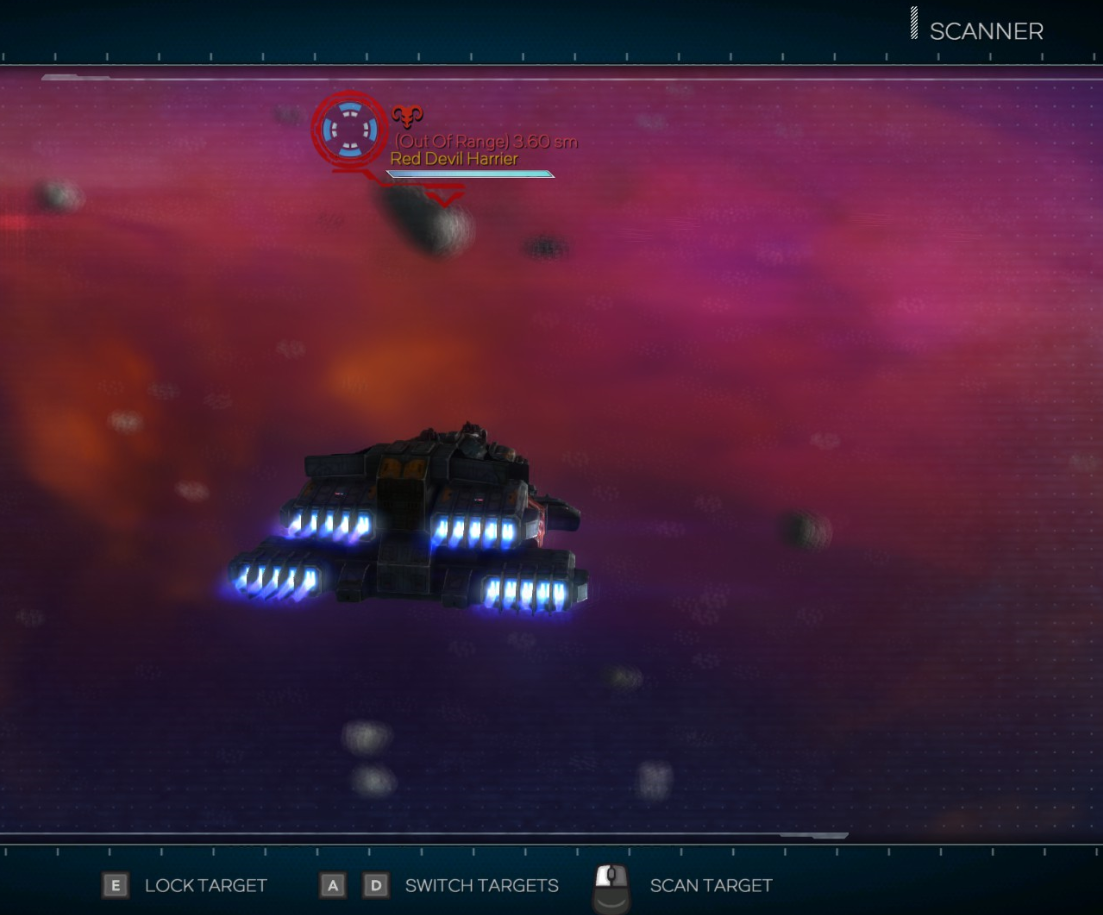
Scanning is a little tool you can use to determine the status of another ship, and allows you to zoom on them and lock in. It pauses the game which can give you a bit of a breather to assess the situation and find out exactly where other ships are. This can be particularly handy if you're in a complex dogfight and there is a particular ship you want to prevent escaping, or an ally that needs protecting. You use the A and D keys to change between targets and the E key to lock onto them, which tracks their progress in real time. Press TAB to scan, which brings up this screen.


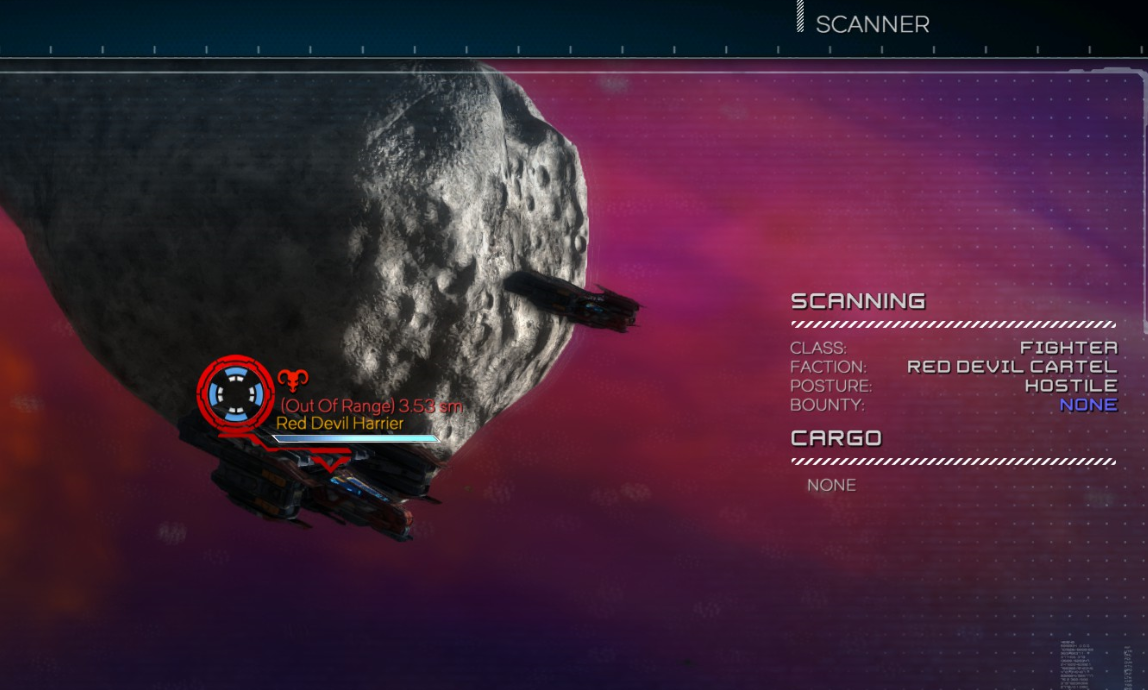
You press the left mouse button to scan the selected target, which then zooms in and gives you this information:


Ship name
Faction
Shield and hull strength
Class of ship
If it is friendly or hostile
If there is a bounty on this ship
Is it holding any cargo

This function is most useful for bounty hunters or pirates, as you can see if attacking this vessel is worth the risk and consequences.

If bounty hunting turns out to be your main source of revenue, it would be useful to obtain the Detail Scanner Sub-Component, available at Merchant/Mercenary Stations(?). This helpful item automatically marks if any ships have cargo or a bounty, allowing you to easily pick out which targets to take out before you can leave. Or just slaughter everyone. Both good. Thank you to Double Deuce for this information.
Warping
Warping is how you will cross vast distances between objectives and stations. If you feel like it you can fly normally, but this will take a very long time.
Distance in Rebel Galaxy is measured in SM. I'm unsure what that exactly means so I call them Space Meters. Some objectives may be over 9,000!!!!!!! space meters away from you, so warping gets there pretty quick. There are a few things to remember when warping:

You can only warp once you have put a bit of distance between you and any other object. Anything that can appear on your minimap has the potential to interrupt your warp, and you will be notified with a Stellar Mass Detected message. This also counts towards enemies who are close behind you, so get some boosters going.

You cannot warp if there is anything in front of you. You simply fail to warp.

If you're about to hit anything during a warp, it will automatically take you out of warp. This can be slightly annoying as even a tiny little bit of space debris will stop you. Just maneuver around it.

You CAN still move from side to side while warping. This allows you to avoid really obvious obstacles, like planets or suns. You know, huge things.

When you are coming up on a nebula or asteroid field, your warp will slightly slow down which gives you the options to steer around it or stop to investigate.

You can leave warp at any time by pressing E.

When you warp you automatically swap to your broadsides.

Purchasing and installing better warp engines decreases the time it takes warping to charge up, and increases the speed at which you warp.

Mercenaries and followers will warp with you, even if they are in the middle of combat.


Warping past a blue sun
The in-game menu
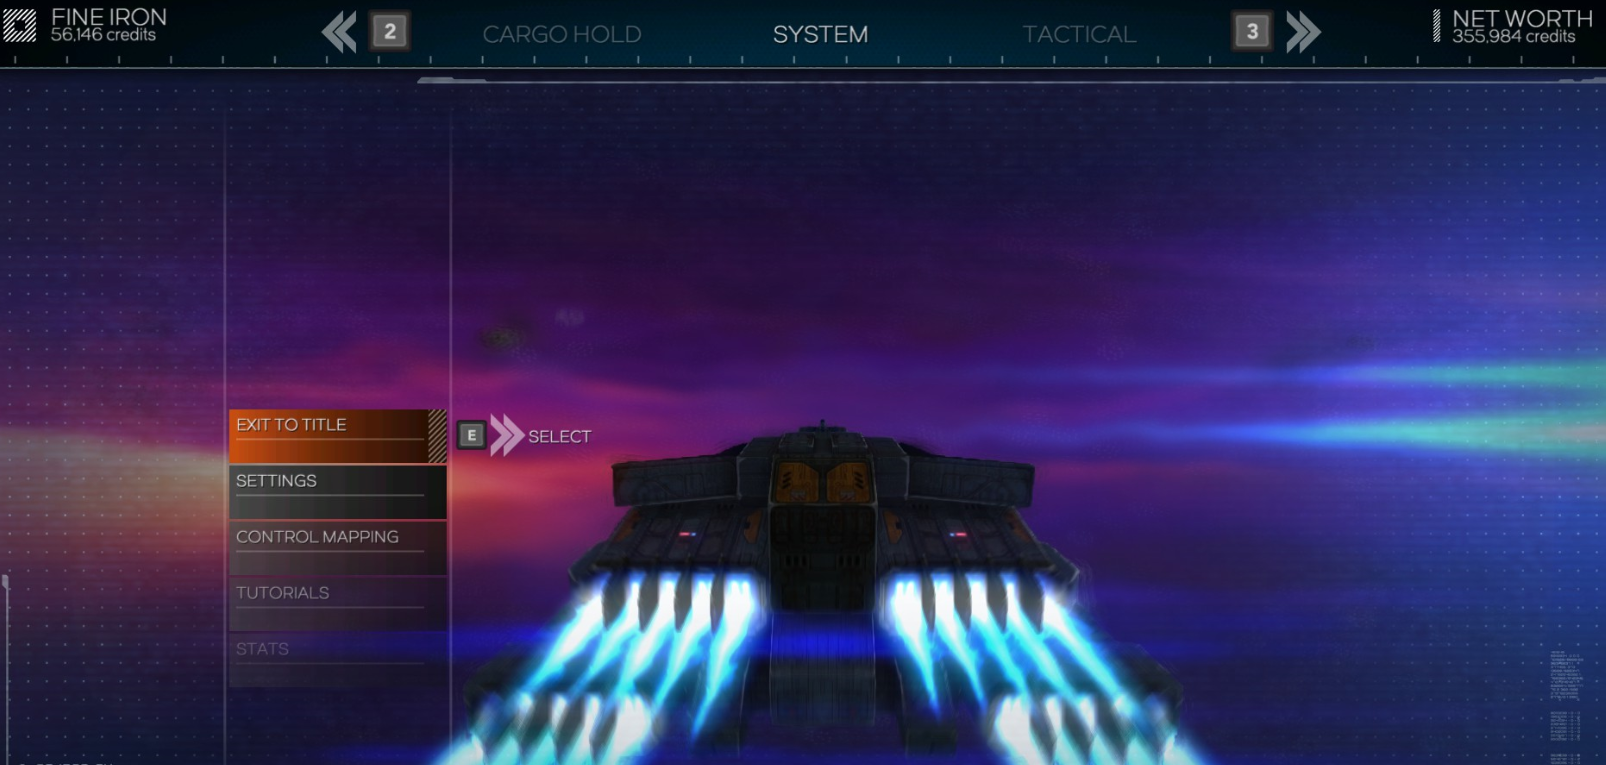
OK so it's fairly simple, press Escape and you can quit, change graphics, check your stats, view tutorials and stuff like that. But what can sometimes skip your attention is the wheel menu at the top of the screen, like so. This is called the System menu.


At the very top are further menus, you can navigate them using 2 and 3, or by clicking the arrows left and right.

Tactical menu
This menu allows you to change the AI behaviour of your turrets, guns and mercenary. You can change it to target only certain ships, like fighters or capital ships, you can change it to attack the same ship you're locked onto, to target its own ships or to priorities ships directly attacking you. You can change each turret individually as well. The mercenary behaves in the same way.


Ship menu
Basically shows you what gear you have equipped currently in your weapons, defense and components slots. You also have a 4th option called Surplus, which is all the gear you have but have not equipped yet. You may pick up guns or equipment through salvaging cargo or defeating enemies.


Mission Log Menu
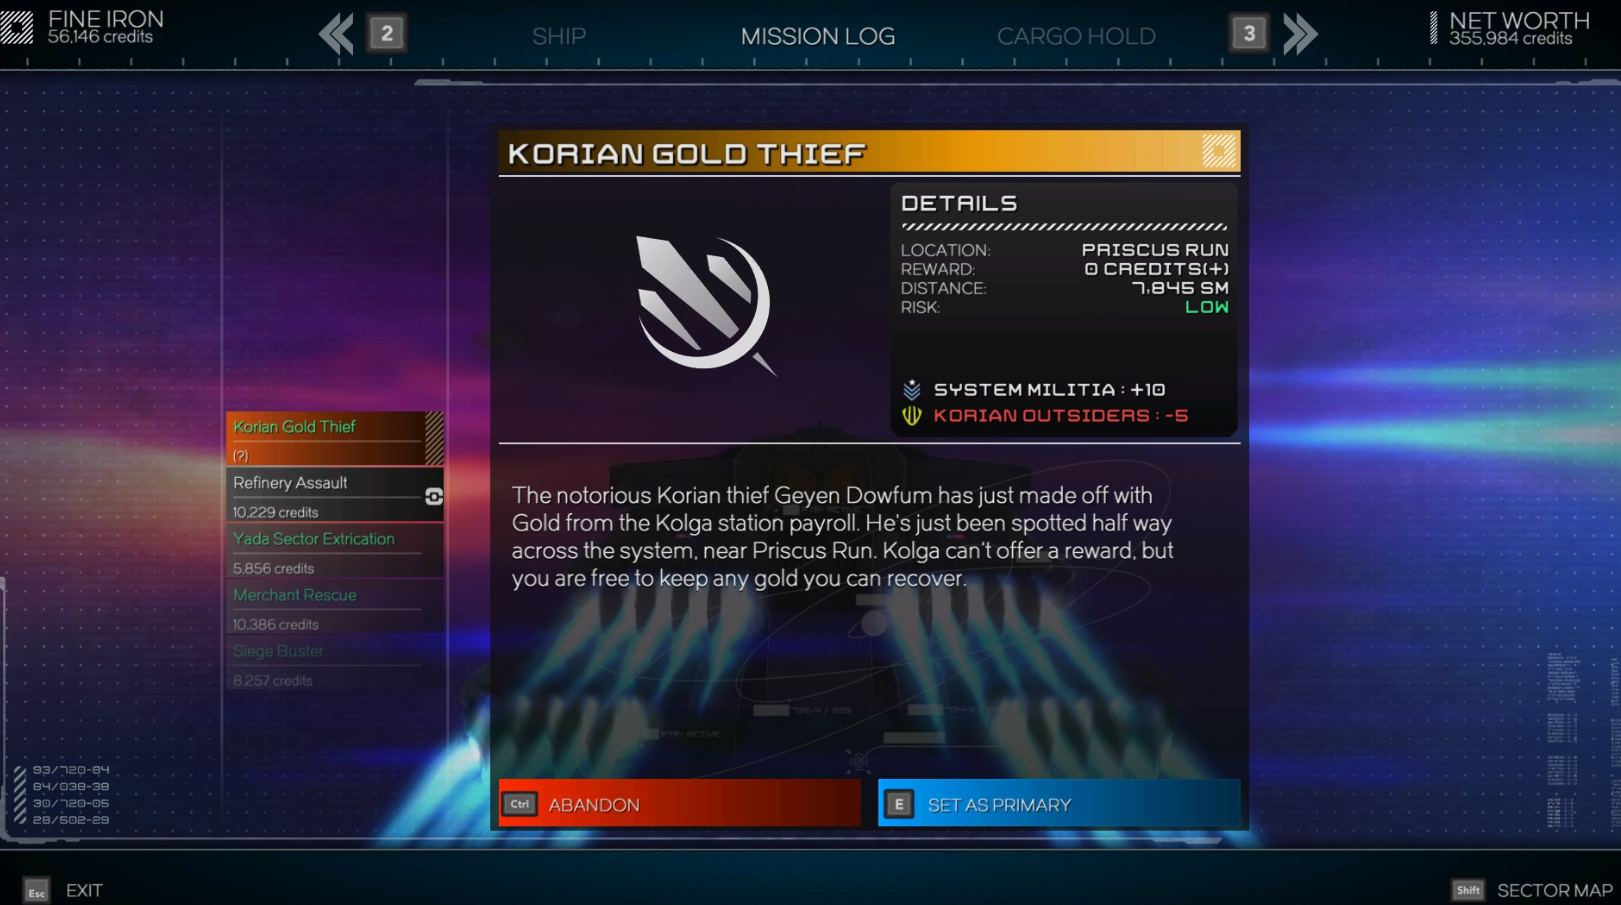
Shows you all the current missions you have tracked. You do have a maximum number of missions that you can track at the one time, so if you feel like one is too hard or too easy, or maybe not worth the time, you can abandon them here. Everything you need to know about each mission is shown here, and you can set one as your primary mission which changes the icon on the minimap and on your HUD.


Cargo menu
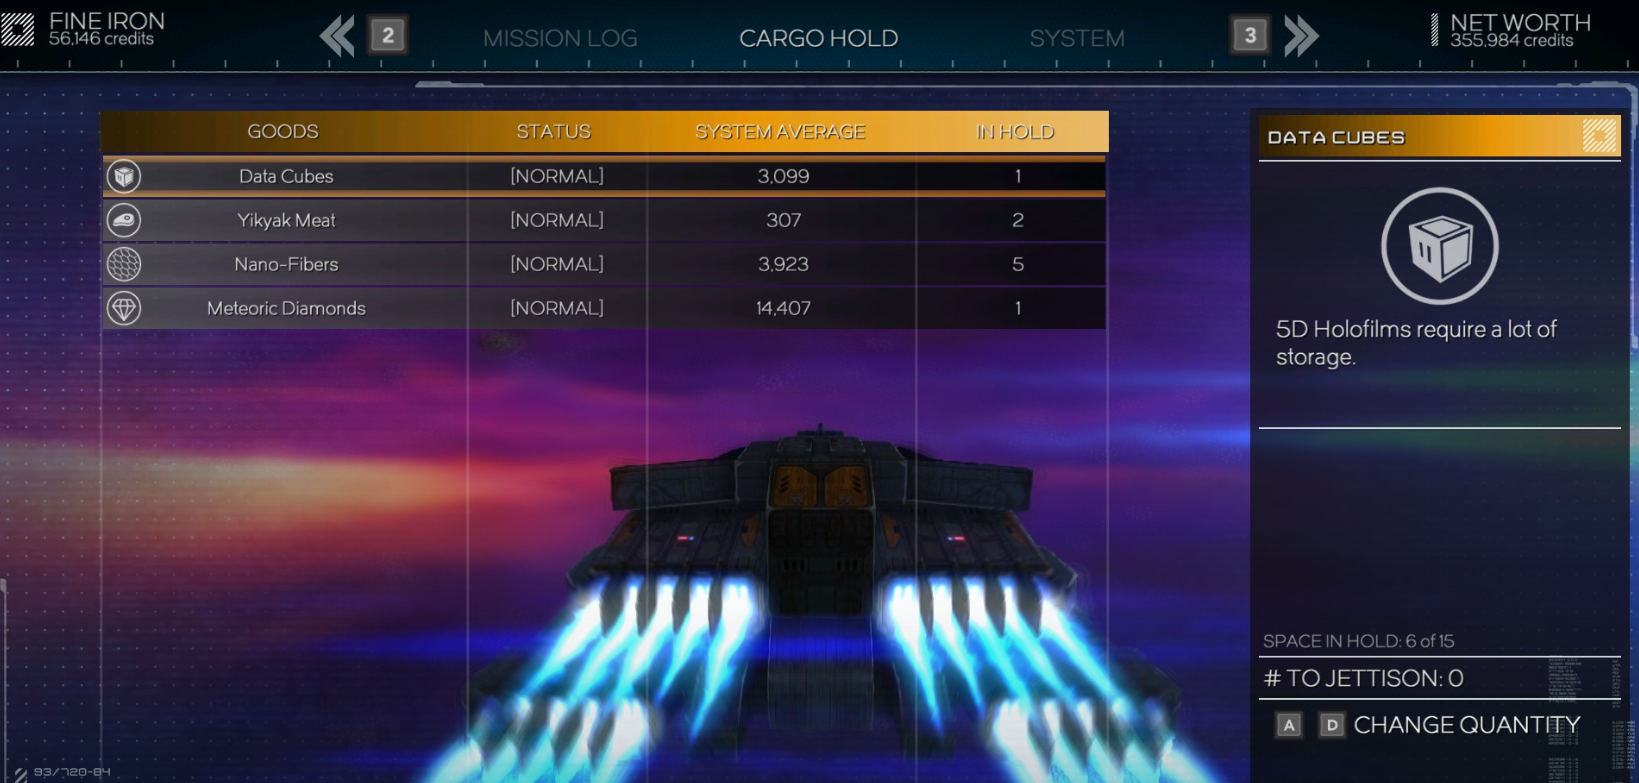
This menu is a list of everything you have in your cargo, and what legal state it is. Some cargo is considered illegal, and will be shown in red. Certain stations won't buy illegal goods, and any Militia craft will attempt to hail you if you fly too close in order to sieze your goods.
If you have too much of an item, want to make room for better cargo or have accidentally picked up illegal goods, you can press the increase or decrease buttons (A and D) to select a number to jetison back into space. This frees up more space and means you won't be stopped by militia. You can pick things up again after you jetison them.
Note that any surplus weapons or gear you have that is for your ship does not count towards cargo space.

The who's who of Rebel Galaxy
So far there are 7 factions the first sector of Rebel Galaxy. More are found in later sectors, and they are quite dangerous. I have broken them up into groups to show alliances.

Militia - like the space police, think of them as the Alliance from Firefly, the Republic from Star Wars, the UNSC from Halo. Big ships like Dreadnaughts and very powerful guns. Having a high relationship with them gives you access to heavy Militia destroyer craft and dreadnaughts, and you can bribe them at a lower cost with a higher success rate.
Citizenry - Usually traders or mining vessels you find around the place, bascially just general population. Unless you're a pirate, you'll maintain a high standing with the Citizenry, and they have the most stations in the sectors. The higher your standing the more credits they'll pay you for rescuing them, and you have access to a wider variety of ships.

Korian Outcasts - Not allied to anyone really, although you will find friendly Korians. They usually hang out around dead drops or asteroids and have powerful frigates and beam weapons. These guys are usually the faction who lay siege to places. Allying with them will allow you to purchase unique Korian weapons such as the Viridian Laser that is a more powerful Particle beam that doesn't have a weakened effect against shielding.

Red Devil Cartel - Druggies! They mostly have fighters and bombers with a few light frigates in support. They hate everyone. Ally with these guys if you want to be a raider and a pirate. You will gain access to fast ships with great speed and turning, and be able to sell your illegal goods for higher prices. Also, merchants will be more likely to drop their cargo for you.

DoubleJacks - Pirates who are often attacking traders and mining tugs who are also hated by everyone. They have a few decent ships like Advanced gunships, missile corvettes and berserkers which aren't particularly strong individually, but grouped up they can decimate you, especially if you're in a small ship. Allying with them yields similar rewards to the Red Devils.

Merchant's Guild - Not necessarily allied with the Militia and Citizenry, but all of their quests will usually be aiding or benefitting these two factions. But they always put themselves first. You can join them for 10,000 credits and then receive special merchant missions.
Be careful when accepting these missions as they can be dangerous. You may be sent into another sector you are too weak for, or be carrying 40,000 credits of goods and be followed and attacked the entire journey so make sure you're prepared for the journey. Thank you to snowshine for this information.
Mercenaries Guild - Allied to nobody but work for all. You'll get missions from them that can have you helping the Militia destroy a Red Devil fleet, then the next will be the DoubleJacks destroying Citizenry mining boats. Be careful working with them.

To see what your relationship with a faction is, raise the Command menu (using control) and look to the right to view your standings with the factions, and the left to see your ranking with guilds. Thank you to DoubleDeuce for this information.
General helpful tips for a newb
These are just a few little tips I've picked up while playing so far.

When you first start out, your ship is a pathetic little b*tch. You usually get romper-stomped by everything. The game will prompt you to purchase a few items at the start, otherwise upgrading your ship is totally down to you.

Dock at stations to save your progress.
However you can exit to menu and then click the Continue button to keep progression, useful after a tough fight. Thank you to Kadera for this information.

Priority should be on getting the next ship; the Mastodon. This ship is 43,500 credits which seems like a lot, but missions can give around 4,000-9,000 each. You will also get credits for selling cargo you pick up and destroying bounties. It might take you several hours but getting the next ship is very do-able in a rather short timeframe. Just make sure you dock at stations every few missions to save.

Be careful about getting too close to enemy Capital ships as their broadsides can open up as effectively as yours can.

Get to know the maximum and minimum ranges of your guns and turrets. Just because you can fire your broadside doesn't mean your turrets can fire as well. Move in to reach full combat positions.

At the start, take missions with a low risk, you usually get decent credits from them anyway.

If you are warping and get an incoming distress signal, divert course and check it out. It can be 1 of 2 things; pirates setting a trap for you, which you can destroy and take any cargo they drop, or a Trader being attacked by pirates. Killing the pirates will net you money as well as + relationship with the Citizenry faction. If you want you can then demand the trader gives you their own cargo and get more money and loot, although this will make you unpopular pretty fast.
You could also hail the trader and ask to do business, which usually offers a small but beneficial trade option for you. Thank you to Kadera for this information.

A few story missions in you get the option to have a free Tractor Beam or free Deflector. Choosing the tractor beam allows you to obtain cargo that you can then sell for more money. The Mk1 Deflector isn't that expensive anyway.
Both are 4,500 credits and are necessary for your game, so make sure to purchase the one you didn't receive as soon as you can. Thank you to Kadera for this information

Mk1 Scatter turrets are actually decent, but Mk2 really shreds lighter aircraft. Buying 2 for 16,500 each can give you a superior attack early game.

Militia ships that find you with illegal goods can be bribed to look the other way for credits. You can also just hand the goods over resulting in a small - relations. Attempting to flee or swearing at them results in a -50 relationship and a lot of powerful ships that now want to kill you.

A mining laser doesn't do as much damage as an actual combat laser, but it is somehow superior against armour, as well as letting you mine for ore to sell.
If you purchase a component called the Fault Tracker for 19,500 credits, scanning asteroids reveals red marks on them which are 'weak points' that you can fire your mining laser at for increased resource gain. Thank you for Kadera for this information.
That's it so far!
But the game has only just come out, so more will definitely be released later. Until then I'll update the guide every now and then, however nothing too complicated yet, as this is a simple guide for beginners. If you have any questions drop a comment below.

I'll be making a more advanced guide in the future with the aid of darktoes and anyone else who wants to contribute, this is just a beginners guide set in the first Sector to give people an idea on how to start :)

If you wish to continue reading, this more advanced guide will give you information and tips about the game once you have left the first sector.

So you want to rule the galaxy?

Thanks for reading and happy flying Captain.

63 Comments
Jeffreyac 24 Jul, 2020 @ 9:43am 
Coming back to the game after beating it once years ago - and this refresher was just what I needed to make sure I hadn't forgotten the basics! So, I know this has been here a while, but take a late thank you for the work! (and, yes, awesome references in the pics!)
DeathB4Dishonor 22 Mar, 2020 @ 3:16pm 
OK, you get MAJOR bonus points for the first pic being from Firefly. Browncoats Rule!!!
V4D4RS F1ST 28 Feb, 2018 @ 5:59pm 
You should ass that the traders often offer to buy your goods at high market prices. I just sold 2 organs for 45k
Allexio 30 Jun, 2017 @ 11:37am 
Yeah thats so awesome, thanks for the reply ;)

Btw just got the 172.000 ship just by trading in 2 hours and 30 minutes. I really recommend trading around in the middle 6 stations of the first sector ;)
Allexio 30 Jun, 2017 @ 10:34am 
Also I should probably mention that I got 140.000 in two hours of play from simply trading. not a single second of combat.
Allexio 30 Jun, 2017 @ 10:29am 
just to check if I understod this correctly... if I buy a 140.000 ship I can sell it a week later for 140.000 ?
jkite51 25 Jun, 2017 @ 11:43am 
Thank you for the guide. It was extremely helpful as I started this game. I did find that the text over the images was sometimes hard to read but that aside, great job and thank you.
Goddess Ilias 25 Jun, 2017 @ 2:49am 
Mining tip: you can only see the faults from the asteroids with the scanner installed and set shadows at least to medium
kschang77 16 Jan, 2017 @ 3:18pm 
One additional tip: Watch your radar, don't fly into the thick of it all and get nailed by everyone. Nibble around the edges, get a couple enemies to follow you, afterburner away, chew them up, then go back in for more. There are no time limits on most missions (except the "escort the main ship" missions) so you can take as long as you want and wear them down.

The simplest rule: If you are taking internal damage (i.e. that little circle to upper left of your radar) shows red and less than 100, time to run.
Sytonis 27 Dec, 2016 @ 4:41pm 
i cant find the part that says when to run cuz im struggleing with combat right now im eather destroying or being destroyed sometimes ill go mission will say blue but the enemy will be red and ill get destroyed so im very confused as to how to decrease the threat or lack there of.