Garry's Mod

Garry's Mod

93 ratings
An introduction into source engine particles
By Hedron
A simple introduction into particle system creation.
   
Award
Favorite
Favorited
Unfavorite
Introduction
Particle systems are large collections of small objects that create pseudo-3D visual effects such as clouds and beams.
You have surely seen them, even if you don't know yet.
The vortigaunt's beams for example are based on multiple particle systems.
As engine particles can be more complex and way more detailed then gmod's lua particles, I'd like to show you, how to get into the matter of particle system creation.
This guide however, will be very minimalistic.
The editor
Setup
Particles can be edited in the source engine tools.
You can access these tools by launching a source engine based game with special parameters.

hl2.exe -sv_cheats 1 -sv_lan 1 -tools -nop4

You can either start Garry's Mod with the parameters above or use games like Half-Life 2: Episode 2 as particle editor base.
At this point, it should be noted, that gmod more likely to crash then hl2ep2 when launched in tool-mode.
Gmod automatically adds addon paths, as well as ALL mounted games.
If you decide to use an ep2 base, you have to edit the gameinfo.txt and add the file paths manually.
You can find it in the ep2 folder, located in *steam/steamapps/common/Half-Life 2/ep2/*
All you need to do, is adding the file path pretty similar to this:

game+mod "C:\YourSteam\steamapps\common\GarrysMod\garrysmod\addons\YourAddon"

After this, start ep2 with the start parameters I mentioned above and you'll be good to go.

The Interface

First, pick "Particle Editor" in the tools section in the upper left corner.
Then you'll see an interface, similar to that one you can see on the picture above.
The upper left panel shows you the list of particle systems, saved in the currently loaded particly library also known as the .pcf-file.
The upper right panel shows you the current ingame scene and the lower right panel shows you a preview for the current particle system. This doesn't actually need that much explaination, right?
The lower left panel shows the components of the currently loaded particle system.
Those are differed into different sections:
  • Base Properties
  • Renderers
  • Emitters
  • Initializers
  • Operators
  • Forces
  • Constraints
  • Children
Getting started...
Creating a New Particle System

In the following tutorial, I'll explain, how to create a basic spark particle.
So don't expect too much...

First, click the "Create" button in the library panel and enter a valid name.
Keep in mind, that other modders may use some not-so-unique names.
The given name should also be logic.
If you create particles for a weapon, you may call it "myweapon_particle001a".
Just a suggestion...

Now, define the texture, the particles should use.
In this example, I'll use a basic spark texture from the Half-Life 2 base.

The next thing to do, would be to reduce the maximum particle count in the base settings.
In this case, I've set it to 32.
Note here, that the maximum particle count will be used by the engine, to determin, how much memory should be allocated for this particle system's rendering opertion.
Lower numbers => better performance.

The next thing to do, would be adding a renderer. Pick "Renderer" in the properties, right-click on the function field and pick "render_sprite_trail".

Now, switch to "Operator" and pick "Movement Basic" in the function list.
(again, right-click and stuff)
To add gravity, select the "Movement Basic" function and change the gravity vector.
The value on the z-axis represents the force, that pulls the particle towards the ground.
In this example, I use -60.

Next, add a "Lifespan Decay" function, so the particle can die. This is more or less something you'll have to do with every particle.

Now for spawning the actual particles.
First, switch to "Emitter" and add an emission function.
For effects, that just appear once, like this one, pick "emit_instantaneously".

Now, we should give the particle a spawn position.
Switch to "Initializer" and pick a positioning function.
In this case, I use "Postion Within Sphere Random".
The engine will automatically try to start at the control point 0, which equals the particle's local (0, 0, 0) position.

We also need to add some velocity.
We could either do that by adding an actual velocity or force generation or by adding a position warp.
In this case, I'll do the second thing.
Add the "Position Modify Warp Random" function

For now, values like -16 to 16 in all directions should be a good starting value.

The particle will look more realistic, if we add more randomized elements.
Adding a randomized lifetime per particle is a good way to start.
Switch to "Initializers" and add a "Lifetime Random" function.
You only need to set the minimum and the maximum values.
Min. 2 and max. 4 should do it.

Another aspect of realsim would be collisions. As collisions are an aspect of physics math, they can have a heavier impact on performance.
Switch to "Constraint" and add a "Collision via traces" function.

Set the collider's collision mode to 3.
This is important, as this is by far the best solution between performance and graphics.
Also, set the collision group from NONE to DEBRIS.
The collision group NONE collides with everything, DEBRIS is exclusive to world geometry.
The collider computes the collision with bounce and slide.
For sparks a bounce value of 0.2 and a slide value of 0.4 are a good starting values.
Now, your particles will be able to touch the world.

Something I'd recommend, especially for sparks, is adding a "Radius Scale" operator.
This function will multiply the radius of every single particle of the current particle system and scales it dynamically between a set start and end time.
For the end time, use 1. As start scale, use 1.2 and for the end scale 0.1.
With this, the particles should spawn relatively large and should become smaller over time.

To make the sparks less obtrusive, I reduce the maximum trail length in the renderer function.
(remember, we used a "render_sprite_trail" function in the "Renderer")
Simply set the maximum value to 8 (or another value, that's a matter of taste or something).

You're done. Congratulations, you've created a particle systems.
Now you just need to save it to a .pcf file.
Editing Existing Particles & Learning Resources
A lot of things in the field of modding are hard to learn from cratch and it can sometimes be very helpfull to have someone else's work as an example to learn from.
However, this does NOT mean, that you should go out there and re-release other people's work.

Feel free to use my particle resources for learning

You may copy some of the existing particles and edit them.
Keep in mind, that the Source engine loads content in alphabetical order and will override duplicate content.

To prevent unintended override/replacement scenarios, try to give your particles unique names.
For example "grenade_explosion" will most likely be already taken, however "myaddon_grenade_explosion" should be unique enough.

If you end up using any of my content, please credit me appropriately.

Usefull links
https://developer.valvesoftware.com/wiki/Particle
http://wiki.garrysmod.com/page/Global/ParticleEffect
http://wiki.garrysmod.com/page/Global/ParticleEffectAttach
http://wiki.garrysmod.com/page/game/AddParticles
http://wiki.garrysmod.com/page/Global/PrecacheParticleSystem
http://wiki.garrysmod.com/page/WEAPON/DoImpactEffect
Implementation
What you should keep in mind
Particles can have a very heavy impact on performance.
(or in short, kill your fps)
One very important thing is to avoid "overdraw".
Overdraw is a scenario, with a lot of pixel changes between two frames.
To avoid this, you should use less transparent particles and not too high emission rates.
The engine's particle renderer will work more performant, if you add particle systems as childs to a parent system and spawn the parent only.

Adding particles to your Lua addon

-- These two lines should be added to your precache operations game.AddParticles( "particles/myparticles.pcf" ) PrecacheParticleSystem( "MySparks" ) function SWEP:DoImpactEffect( tr, nDamageType ) if ( tr.HitSky ) then return end -- Do not draw effects vs. the sky. ParticleEffect( "MySparks", tr.HitPos, tr.Normal:Angle(), self ) -- spawn the particle return false end

You'll have to precache the particle library in the lua addon's startup.
I'd recommend to do this in the autorun.
In this example function, I use the particle we created before as non-overriding impact effect for bullet traces.
Examplary works
Now it's up to you :)

This tutorial is very, very minimalistic, but I gave you the basics to create high detailed effects for your lua addons.
And it's not as difficult, as I might seem to you now.


(energy explosion effect)


(particles on items with dynamic lens flares)


(laser impact with spark emission and rope-based tracer)


(particle base muzzle flash)
91 Comments
MesoMesoMeso 20 May, 2023 @ 1:08pm 
how to group particles
Gothferatu 9 May, 2023 @ 7:16am 
Excellent guide, would you perhaps consider making one for creating bullet tracer effects? Or at least point me in the right direction to material to learn tracers specifically?
originalname 4 Mar, 2023 @ 9:39am 
thanks man! i'm trying to make the TF2C particles work in gmod, and i have NO IDEA how to get only the green and yellow teams out of it. This helped me be able to get rid of the red and blu particles! thanks
Falko 27 Feb, 2023 @ 1:24pm 
thanks you
Hedron  [author] 27 Feb, 2023 @ 1:23pm 
@ Falko :
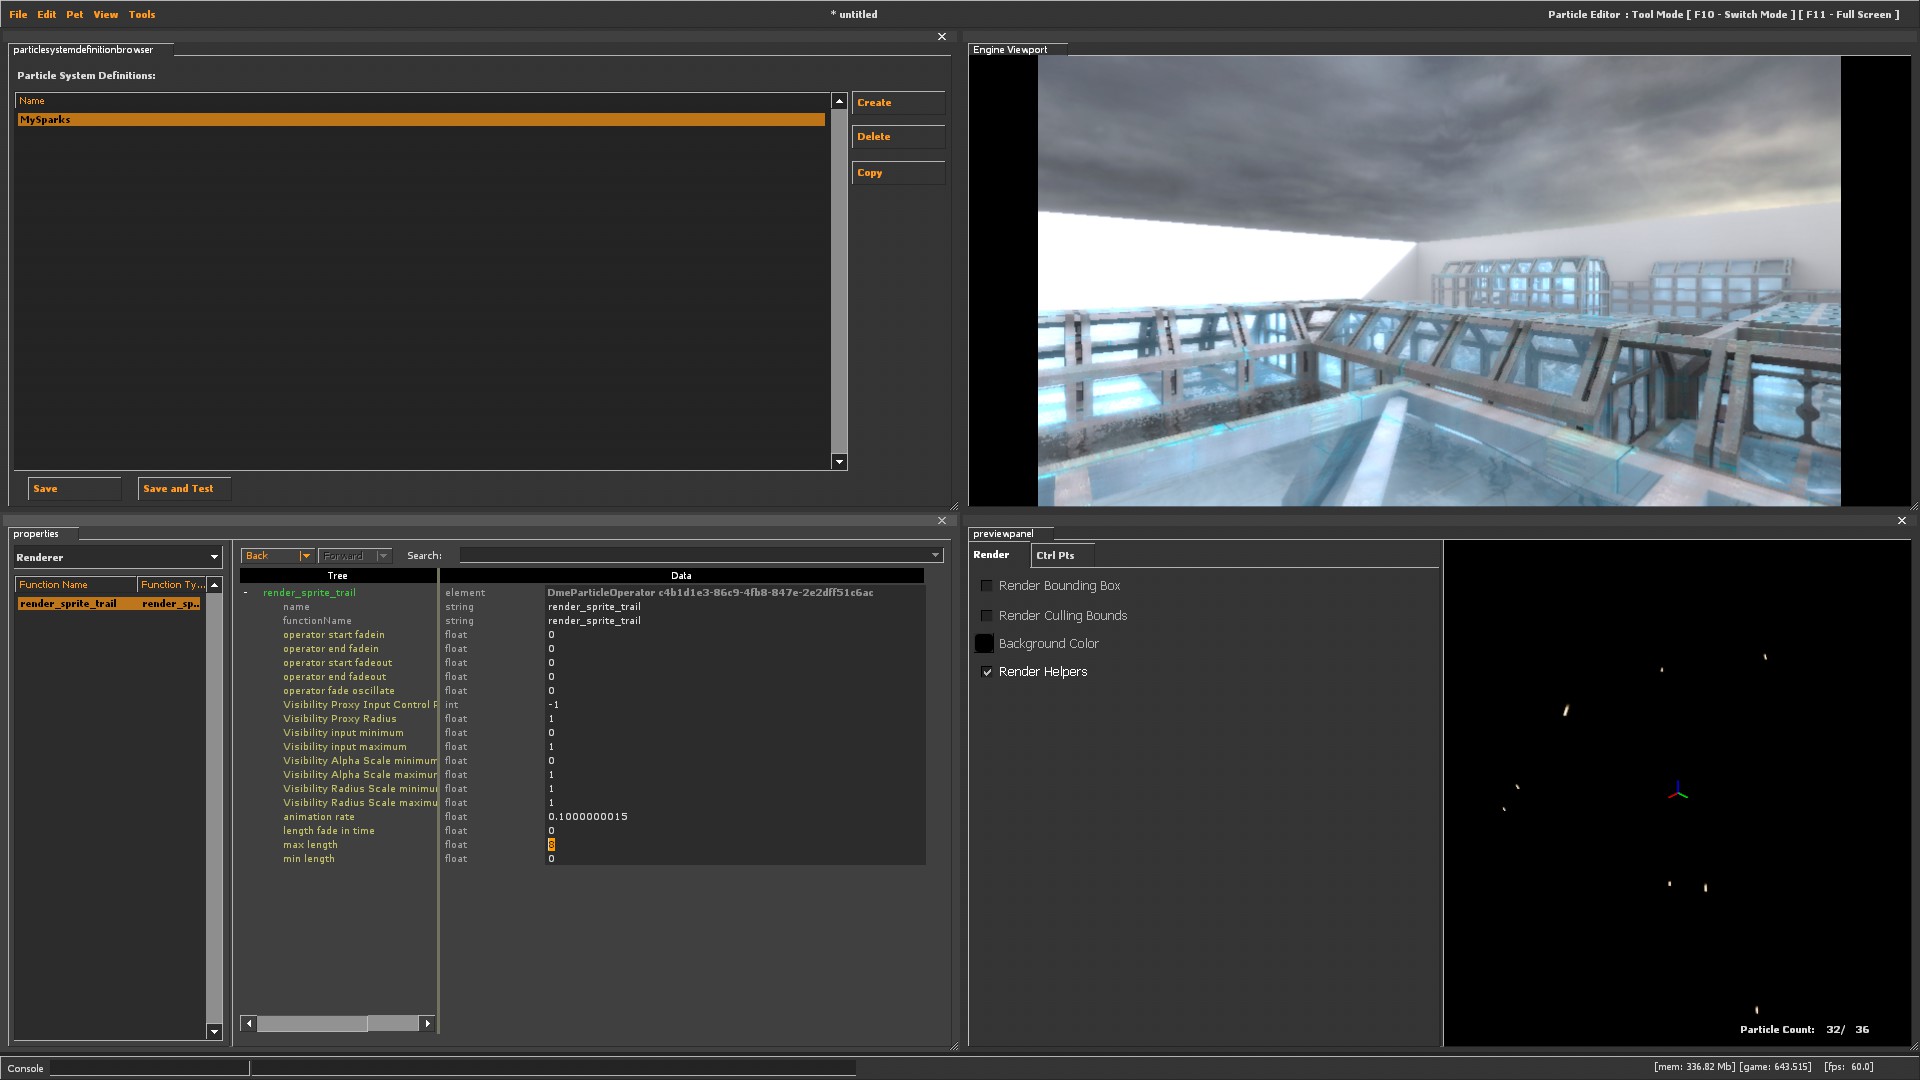
Your particle's material needs to use the SpriteCard shader. The texture needs to be properly baked, not just copy-paste a flipbook into a .vtf file.

For the particle setup, use the render_animated_sprites renderer. You can adjust the playback rate via animate rate setting.

You can find additional information here: https://developer.valvesoftware.com/wiki/Animated_Particles

A good example of flipbook usage are particle/fire_01.pcf from stock half-life 2 assets.
Falko 27 Feb, 2023 @ 12:17pm 
someone know how to do a particle with flipbook ?
TheArtemMaps 25 Dec, 2022 @ 11:35am 
i figured it out now its was the problem in x64 branch. it work now
Hedron  [author] 25 Dec, 2022 @ 7:59am 
@ TheArtemMaps :
Are you using the x64 version of gmod? -tools is disabled in that branch.
If you just drag the "hl2.exe" from gmod's main folder into a command line and add " -tools", does it launch in editor mode?
TheArtemMaps 24 Dec, 2022 @ 1:01pm 
particle editor wont open
AN Rebel 8 Dec, 2021 @ 5:52am 
Ok it works! Holy cow that took me 2 days to figure out