Cities: Skylines

Cities: Skylines

260 ratings
Making Maps with Mr Miyagi - Guide, Tips and Resources
By MrMiyagi and 2 collaborators
PREFACE: This guide is quite old and contains techniques and ideas that are really dated. I encourage you to watch YouTube tutorial videos, since most of them are more recent and are more clear in presentation.

2021 - BAD NEWS: terrain.party is dead.
GOOD NEWS: NOW IT IS MUCH EASIER TO GET A HEIGHTMAP AND OVERLAY! heightmap.skydark.pl is the replacement for terrain.party and is worlds better!

1. Go to Cities: Skyline map generator [heightmap.skydark.pl].

2. Download Heightmap

3. Download Map Image (Tip: "Change Map Style" to get satellite version too.)

4. Import Height Map in Map Editor

5. Subscribe to Image Overlay 2 by Mbyron26 or Overlayer V2 (but not both!)

6. Import the saved heightmap.

7. Trace trace trace!


Whether you're new to the guide or not, I highly recommend watching this individual's clearly presented, excellent video as an introduction to the basics. Watch here: https://youtu.be/JATE5My-bSs

I've been unable to make the video tutorials promised, so here's some gems I've come across:
BonBonB is in the middle of a series where he walks you through his journey of making a map! https://www.youtube.com/playlist?list=PLOdJfwm1gxphoQozNt1gXGwW1k9OF2JaA While a there's a lot of information in this guide that is handy, there's also a lot missing. For me there's nothing quite like learning visually, so do go search for more youtube tutorials and walk throughs like BonBonB's.

Also check out BonBonB's What Map? map review series, because every review has taught me something new. He's got an eagle's eye and improves my map making every time!

Check out this 2018 helpful article about map making by Vladimir Mijatovic https://distrita.com/terra-forming-in-cities-skylines/


--------------------------------------------------------------------
GUIDE INTRO

Because I've gotten some requests from people who like the styles of my maps, and want to start making their own maps. I'm making this guide, which hopefully will be more comprehensive than just a video. With this guide I hope to share some basics of what I already knew about cartography that's found in CS, and all the technical things and tips I've learned about making maps in CS. My aim is to have as helpful a guide as possible.

This guide aims to cover making maps from the most basic level to the most advanced, and you can even combine different techniques from all levels! In making my maps I've used various combinations of all of these.

This guide is a long term project. It is by no means complete, but there's enough here to get you started and gives you a few more tools than just the game's map editor to work with!
2
   
Award
Favorite
Favorited
Unfavorite
Before We Begin - Topography
...First some basics....
Topography is a field of geoscience and planetary science comprising the study of surface shape and features of the Earth and other observable astronomical objects including planets, moons, and asteroids. It is also the description of such surface shapes and features (especially their depiction in maps). - Thanks, Wikipedia.

You may have seen maps like these two before, but just in case, here's two topographical maps. In the first, each different color mean the next elevation level - this kind is a lot easier to use since it tries to reflect real life terrain colors. If you see a sudden change from brown or yellow to suddenly sea colors (or near white to black), then that is a cliff. Our heightmap example actually has dramatic cliffs in it, but that's for later
The second image is the kind that uses lines to indicate the next level of elevation (like every 100 feet elevation is a new line or color, or a new line, some of which have a number indicating what level that is). Both concepts are used in the game and in Wilbur, so it's good to know this first:


--------------------------------------------------------------------------------------------------------------------------
In game, when you're in the map editor you can view any map in its topographic view... it's purply and might make you crave cheap grape soda, but unlike cheap grape soda it can be really helpful to you.


All About Heightmaps
Heightmaps
The game uses "heightmaps", which are highly detailed image files that have shades from black to white, like a topographical map, representing different elevations. Unlike topographic maps, these use different shades that gradually, smoothly progress from dark to light, and create a 3d world once imported into the game.

I encourage you to take a look at this how-to guide on importing heightmaps from terrain.party into the game. https://en.number13.de/cities-skylines-how-to-import-heightmaps-in-the-editor/?fbclid=IwAR0qMRONiqVXaUhAvuM-f51EhO6uTFdxKDtE414gWNQ14ffzKhr2FTdW2_Y

This is the heightmap of my Dragon Bay map. Yes, CS can export your finished maps into a heightmap, even ones that were hand made ingame from scratch.
Cities Skylines (henceforth CS) has a wonderfully easy system for importing and exporting heightmaps, but we'll get to that soon enough.


IMPORTANT REFERENCE: The Specs of maps within Cities Skylines


CS uses the following specs for heightmaps (although the game is even capable of nifty things like doing the work of resizing a heightmap that doesn't conform! That's awesome, CO!)

  • PNG image file
  • Black and White
  • 1081 pixels by 1081 pixels
  • "16 bit" heightmap, whatever that means. :D Wilbur can help you with that, he's cool.


Although not necessary for anything but advanced, I highly recommend an image editing program like
1. GIMP, which is free, open-source (that means cool geeks get together and collectively make a finger gesture to giant evil monsters known as multinationals :D ) ... the only thing that is a slight proble is that GIMP is moderately challenging to figure out in the beginning
2. Photohop - If money is no object, this is a great program... and incidentally I'd love to be a humble recipient of a magnanimous expression of your appreciation (lol, joking)
3. Other program this old man is unaware of (MS Paint won't work)
How do YOU pick a location or scene?
Everyone will approach this differently, and why not! Just remember, you need as much playable (flat, mostly flat and gently sloped) land within the playable squares as possible. Having beautiful mountain islands with NO space at the foot / sea level for settlement is... well.. not going to work at all for this game.

Personally, I first find a location by photos... somewhere I've been, some random landscape photo that I saw on the Internet... and I go to that location on Google Earth or another topographical or sattelite view page. Not all locations will work for this city game... some locations just won't hold a nice city in the center, BUT we can still a nice feature you want to have (a famous mountain, lots of islands, etc), even if we decide to put them right outside of the playing squares. Having your location as a nice background feature can look great, and I'll show you ways to make it stand out more!

After you've done a few maps, you'll get a feel for what can work.

For the map in this guide, I liked the pictures I saw of the area around Ortigueira in Galicia, Spain. I picked this for the demo because there's a lot of work to do on it. We will be adding a lot of land and changing a lot of terrain, but let's go grab it and make sure the nice cliffs are just within the squares, so they can be seen while in game.

Step 1 - Heightmaps: You need one, but where to get them?
The Cities Wiki now has a quite decent page on more advanced techniques of obtaining heightmaps. Check it out here: https://skylines.paradoxwikis.com/Heightmap#Difficult:_Get_Your_Own_DEM_and_Convert

TERRAIN PARTY
Type in terrain.party into your web browser, Nov 2018 type "terrain" and "party" into a google search, then click that result. For whatever reason, doing it this way instead of typing terrain.party into the browser or using your bookmarked terrain.party link leads to no heightmaps available when you try to download. So, use the google search / click link result method.

Many of you will already know of Terrain Party, but if you don't, go to the web page http://terrain.party the discussion about it and the creator's advice is found here at the Reddit: http://www.reddit.com/r/CitiesSkylines/comments/2y6yr4/ This amazing individual made this for the CS community. It takes geological data from all over the world, with a guide grid so you can see how it would fit into the game squares, and gives you a perfectly sized heightmap with all the specs like 16bit... ready to go for the next steps!

**************
NEW OCT 2016

MAKING PRECISE MAPS OF REAL LOCATION: If you want to simulate a real life location that's precisely accurate, first go to get yourself an overlay mod, I use OVERLAYER 2.0 since you can use large image sizes (I use 2048x2048 pixels), and the overlay image coats the terrain instead of remaining a flat image! Cool!
https://steamproxy.net/sharedfiles/filedetails/?id=662933818

(partially completed Caernarfon Wales map using overlay to make fields just like real life. See bottom right of bottom right image to see uncompleted section compared to satellite)Yeah, yeah, my little stream is off slightly from the real location. Bla bla bla :P

Now go to terrain party, find your location and *in addition* before you move your mouse, make a screenshot of exactly where the entire 81 grids lie over the heightmap of where you're just about to download. Cut it into a square that follows terrain.party's big blue box. Like this:

FLIPPING HEIGHTMAPS :D - Wait, that's UPSIDE DOWN! Yes, if you're taking a heightmap to simulate a real location, the sun in Cities Skylines' default themes, and many workshop map themes, the sun rotates West to East. O.o Don't ask me... anyhow, you have two choices:

Find a map theme (or make your own) that has the sun rotation set to normal. Hadece's guide to map themes https://steamproxy.net/sharedfiles/filedetails/?id=875340826 shows you the slider settings to apply in order to turn your theme into one that has a normal East to West sun track.

ROTATE YOUR OVERLAY IMAGES 180° so South faces the TOP of the image
ROTATE YOUR HEIGHTMAP 180° to match this, too - do this rotation in Wilbur because in most other image programs, some compression will occur, even at 0% compression in GIMP it has very annoyingly visible defects once imported into the game.

What next: I use Google Earth to make a zillion screenshots of satellite overlays, and then very carefully paste them all together like a puzzle, with the terrain.party screenshot of the map location.... in a semitrasparent state. After you piece together all the parts from the satellite, then use that terrain.party overlay as your guide to resize and adjust the location of your satellite collage. I'm sure there's a higher tech way to do this, but... well that's where I'm at technologically ;). If you're interested in roads precision while in-game you can always do an overlay of just roads instead of a satellite map. I focus on the natural things found in the location, so that's why I use the satellite.

Like this:


That's right, don't forget to tip it!

Transparency: If you want to see through your Overlay images while you're working on your map, just take them into GIMP or Photoshop and set the transparency level to whatever works for you

******************** END of New Section

But wait! There's More!

Now just a heightmap from terrain party, as overwhelmingly awesome as terrain party is, isn't why you're here. Importing a terrain party heightmap is a great place to begin, whether you're making a real location or not! No matter what, you will need to do a lot more to the map once it's in the map editor, otherwise you just have a mess that's not effective as a game map at all.

Look at what we can do with just a few clicks! Yes, read on!


NOTE: You do NOT have to choose an area that has ocean or river for your base heightmap. I hear that buzzing around out there. You could pick the top of the Andes and make some islands out of it :D Except for Advanced Level, with fully imaginary self made maps, what we're doing here for ease of teaching is taking a base of a terrain.party heightmap and working it over a lot, learning how to put in rivers and other features not found at the beginning. and then of course altering it even more in order to make it game ready...

So when you open the terrain.party zip file... there will be a few PNGs there. if it's not USGS (48 states and Hawaii), I usually select the one with the name "merged" at the end.... and it (along with the edit in Wilbur we will make) into the following place (note, AppData is a hidden folder, so make sure you select "show hidden folders" if you haven't already)
C Drive, Users, (your user name), AppData, local, Colossal Order, Cities Skylines, Addons, MapEditor, Heightmaps
(phew, that was long)

Here's what I'll be using for the Wilbur tutorial, the northernmost point in Galicia, Spain. It has some coastline already there and has some nice high terrain in the non-playable sides of the map, as well as a cool bay. Since we are making this into a fantasy location and just using this heightmap for the cool coast outline, no need to rotate it.


OTHER OPTIONS

If you want something unique, or if terrain party is no more, not to worry! It is really easy to make your own (thank you again, CS), with the right specs of a png image that you need. We'll cover that in advanced. In this scenario of no more terrain.party yet you want to create a precise, exact replication of a real city... eh, for that I'm sure there's a way but I don't know how.
Who is Wilbur, Why is He So Cool and Where do I find Him?
If your terrain.party download included either a USGS or the SRTM3 v4.1 heightmap, you can skip everything about Wilbur. Although you will have to do some touchup on the shores, you'll still have a realistic map and terrain of the location you downloaded.


Check out the new Create a Map series by Sunesha, which includes an indepth exploration of Wilbur for Cities Skylines


Wilbur is simply the most awesome program out there, if you're a map geek. It's a freeware geological modeling program that is actually kind of old at this point. It's not big, and if you can run CS, you can definitely run Wilbur. When you start up Wilbur and run a geo modeling algorithm, your computer look at its fingernails and ask, "Is that all you got?"

What's amazing is that this little program can take your heightmap, whether you made it entirely by yourself or obtained in terrain.party, and model millions of years of geological activity... with one click. (Well, okay, a bunch of clicks). What used to take days in the CS in-game map editor can now be done in about 10 minutes, with uniform and realistic looking results.

Here's what the creator says what Wilbur is:
"Generates synthetic terrains using plasma or procedural texture algorithms. Has direct sample-level editing and global manipulation features. Can read data in USGS DEM format, generic binary format (you specify the data), and others. Outputs in DXF and in various image formats."


Umm... like.... that sounds great... 'n stuff.

No worries, we'll walk through running a heightmap through Wilbur together. You can go all out with Wilbur, but we'll keep it more simple and focus on how it can apply to our maps.

Wilbur can be found at: http://www.fracterra.com/software.html There is a 32 bit version and a 64 bit version of Wilbur available.
Tutorial PDFs (very helpful!) and the discussion of Wilbur at a Map Forum: http://www.cartographersguild.com/showthread.php?t=29412&highlight=wilbur&p=260401#post260401

ADVANCED FULLY HAND MADE MAPS: That section isn't yet written, but If you want to jump ahead and make your own from scratch before I finish that section, you can! The really easy, thorough tutorial PDF of "Fun with Wilbur" will walk you through the whole process of making your own heightmap with Photoshop and running it through Wilbur in a more extensive process than that which follows.
Step 2 - Take your Heightmap into with Wilbur!
For simplicity's sake, start off choosing an area with at least one mountain / high area anywhere in the heightmap. These come out great with Wilbur.
(For lovers of flat land: if you put a low elevation area's map into Wilbur, it will look crazy. Use this simple fix: open your boring (lol) flat heightmap in GIMP/Photoshop, put a light grey spot on an unimportant part of the heightmap, save, and then open into Wilbur. After using Wilbur, you can remove this artificial peak in the CS map editor. But anyway, who wants a flat map?)

Open Wilbur, within Wilbur select File, Open, then your heightmap ...

(By the way, I'll just be using the default Wilbur settings for each process to do this, more complex operations are possible in the Fun with Wilbur guide available at both links in the Who Is Wilbur section)


This image below is a very minimal amount of Wilbur alterations to a regular non-USGS map. Maps in terrain party that are outside the US and Denmark really need some Wilbur, since the quality can be lower.
In order to smooth the middle play area, I selected by height elevation from 2600 to 15000 and did a Gaussian Blur to it. Just like we did to the coast. That way, there will be a little less work smoothing once I open this in the ingame map editor. Keep playing with the elevation numbers to find the right level. Also, you can "reverse selection", so instead of 2600 to 15000, click that and with one click it has everything below 2600 and everything above 15000. a neat option


Now your heightmap will be ready to take in to the In Game map editor to see if you like the changes by Wilbur, or if you want to make more.


Save the new wilbur edited heightmap with a slightly different name, in case you want to go back and do the Wilbur process differently. Save the heightmap into the game's heightmap folder... the location mentioned earlier.
Step 3 - Import your Heightmap into CS & Planning The Map
SEE THE WIKI AND THE NEW MAP MAKING TUTORIAL SERIES BY FLUXTRANCE! REALLY GOOD FOR THE CS MAP EDITOR CORE BASICS

So, I don't want to reinvent the wheel here. What I will be going over are things not in the wiki: some unusual planning and tips that are not in the wiki. But for now, go to the Wiki for the CS map editor basics, then come back for the steps I go through and things to watch out for. http://www.skylineswiki.com/Map_Editor

MY FIRST STEPS

You don't have to do things in this order, but here's how I go about the process.

IMPORTING YOUR HEIGHTMAP

Open the game, then tools, map editor, new, choose a climate theme....

Once the blank map opens, HIT PAUSE right away, and on the bottom left are a few buttons. Choose the Import heightmap button... there at the top should be your new heightmaps... choose the one you edited in Wilbur.

Any time you open your new map and you haven't finished up the water steps, just hit pause for now, otherwise you'll have ocean tsunamis all over the place, especially if you make land changes in the water... we'll get to water soon.

If you want to see just how much more improved your map is, you can import the old one, and then import the Wilbur edited one, and you'll see!

PLANNING
Tadah! Okay, now the first thing I do is take an overall visual assessment of what we've got here from a purely functional perspective. Visual eye candy assessment and improvement later. Take a look at the grid. You want:
  • As much playable land as possible, including a large area or areas that are totally level
  • To plan a shoreline or river through the starting square that has moving water
  • Make sure the starting square has lots of flat space to allow the players to get a good start
  • Still have some interesting terrain inside the playable area
  • Plan most every square so that it has playable area (sometimes I leave just one or two unbuildable, but most should ideally have some way of being played


COMING UP: WATER, MAKING TERRAIN BY HAND
Outline:
Brushes
Shroomblaze slope gif: http://i.imgur.com/zB0gdRv.gif
Brush Strength tips
Plan Plan Plan!
Elevations
Min and Max
Space for Tunnels


Another source is the development diary about the map editor and water from the game's Devs https://forum.paradoxplaza.com/forum/index.php?threads/cities-skylines-%E2%80%93-dev-diary-6-map-editor.822199/
....
Step 4 Water - You'd think it'd be easy, but maybe I should have taken Physics instead of Geology O.O
RIVER / WATER PLANNING

Nov 2018 new tip from VecchioChristo When working with height maps, I have found it useful to place water and streams in a seperate photoshop layer and blur at 0.5%. You can also set it to multiply at about 50% opacity and it will give you smooth water bank edges that follow terrain elevations. You can also place a gradiant map on the bottom most layer to establish overall water flow, place your height map above this gradiant and set to screen, and then a levels adj layer above that to adjust brightness and contrast. Using this arangement you can establish good water flow in your height map without all the work trying to establish it in the map editor. I find far easier to do it in photoshop.

My first video, how to make a little lake. It's easy! https://youtu.be/nm-9Dj1QdnU

A computer geek looked over my shouder while I puzzled over CS's water and exclaimed "Wow! Those guys actually programmed realistic physics into the water!"

Oh no, thought I... Geology, Cartography and Earth Science have been serving me very well so far.... Curse you, Physics!!!


Well, worry not! We can easily learn how to manage water flow very easily thanks to topographic maps and the concept "water flows downhill", which.. I hope we all know? No calculations needed! YES! Take that, physics!

RIVER PLANNING

You don't always need a river, but people like them... they're a bit tricky, but I'll try to make it simple. if we turn on the topographical view, we can see we already have a few interesting candidates for river runs in there thanks to our Wilbur erosion...


And so here it is, a very good river bed that flows out through the map to the direction of the sea. Let's keep this in mind for our land we will make by hand, the water spawn process will be even later.


SEA LEVEL PLANNING


4. We're not done with raising land from the sea, so let's not hit unpause...
Step 5 - Forming and Perfecting Land
PLANNING
Yey, Planning again. But hey, we are going to be spending a LOT of time on this map, so why not make sure it's perfect?

So here's how I strategize the next part, making more land inside the play area. Make sure you keep in mind what you'll need for the game. like enough flat level land for major buildings like an airport and a "downtown" or main city center where you can place a stadium and other special buildings that require flat land. I usually put a generous amount of this type of land in the start square and the surrounding squares, to help the city get off its feet.

Take a look at your grid and start figuring out where the features will go.


Sculpting out the land. See image for text. So far I'm just making rough land shapes.


Don't worry, we'll be taking care of the mountains mess soon enough...

Assigning the Start Square


Great resources on beach and coast formations (sand erosion) and other coast related ideas and tips
https://opentextbc.ca/geology/chapter/17-3-landforms-of-coastal-deposition/
https://sharkresearch.rsmas.miami.edu/assets/pdfs/learning-tools/high-school/MODULE%201%20Ocean%20and%20Coastal%20Habitat%20-%20SECTION%208%20Barrier%20Islands.pdf
Pay Attention to These As You Go Along
Advanced Map - Your Own Creation
ADVANCED FULLY HAND MADE MAPS: That section isn't yet written, but you can already jump ahead and make your own from scratch by following the really easy, thorough tutorial PDF of "Fun with Wilbur" found in the Where can I find Wilbur section. That pdf will walk you through the whole process of making your own heightmap with Photoshop and running it through Wilbur. They even give you ideal numbers to input, so you won't have to do all that nasty math stuff :D.

MAP MAKING with Fluxtrance Part 1


MAP MAKING with Fluxtrance Part 2


MAKING MOUNTAINS BY HAND by Fluxtrance
Transportation
This section in progress. A quick tip for now about strategizing your map for reducing totally unnecessary traffic that the game loads up on your cities. Unless you like this challenge, of course. :
Traffic not even destined for your city can clog up your highways. In this game, vehicles find the shortest route from point to point at the START of their journey. Enter map, decide on shortest route point to point, proceed mindlessly.

You can plan your map's infrastructure to help out players! Make a ring connection and try to avoid having connections that are directly opposite one another. Any connections that are opposite one another will start sending their traffic through the center of your map

In this example I've shown both - neighbor connnections that are close to one another, and also two that are at opposite sides of the map., most neighbor connections will remain on the outer ring, unless you provide them with a shorter route between the two destinations, which would change in this case two connections It is still half the useless volume you would get without this ring system.

You can alternatively have all your connections in one corner, connected to one another with a ring,. Counterintuitively, peninsulas make for great traffic-friendly CS maps, with all the neighbor connections on one edge of the map, all preferring to use a ring (well, less than a semicircle) that you connect them each with.

Resources and finishing touches
Visual Eye Candy: Using Perspective
Custom Terrain Brushes!
Whether you'd like to add a distinct touch to your hand made terrain-shaping in the CS Map Editor, or you wish to proceed with an advanced level, from-scratch map as outlined in the Fun With Wilbur PDF file, you will want some custom brushes.

Custom brushes must be transparent background PNG format, and the image is only 64x64 pixels. They are placed here:
C:\Users\YOURUSERNAME\AppData\Local\Colossal Order\Cities_Skylines\Addons\MapEditor\Brushes

Here are 12 custom brushes I made with sharp squares edges in squares and rectangles at various angle turns, which are great for making very sharp land edges like the land on harborfronts. There are many angles because your terrain brush cannot rotate. Also included are mountain brushes made by OWL which are the most amazing things since the invention of ice cream :D https://www.dropbox.com/sh/kufurdu02hjaa6p/AAB-wkVJauoUsD9xZk0Vziu2a?dl=0
226 Comments
MrMiyagi  [author] 19 Apr, 2023 @ 3:31pm 
Awesome, thanks Elder Brother!
Elder Brother 7 Apr, 2023 @ 4:22pm 
(Basically) A "How To" video of these instructions: Make a Real Location Map for Cities Skylines
danyvody 19 Apr, 2022 @ 12:37pm 
https://ibb.co/album/Wvf2k0?sort=date_desc&page=1
@Himmelslinien I can't understand how you can download these beautiful brushes from this site? There is no "download" button.
Thank you in advance!
MrMiyagi  [author] 30 Jan, 2022 @ 11:59am 
Hey @DB, thanks, I forgot to copy/paste what I had written on my guide to making overlays. That's a great site, isn't it?
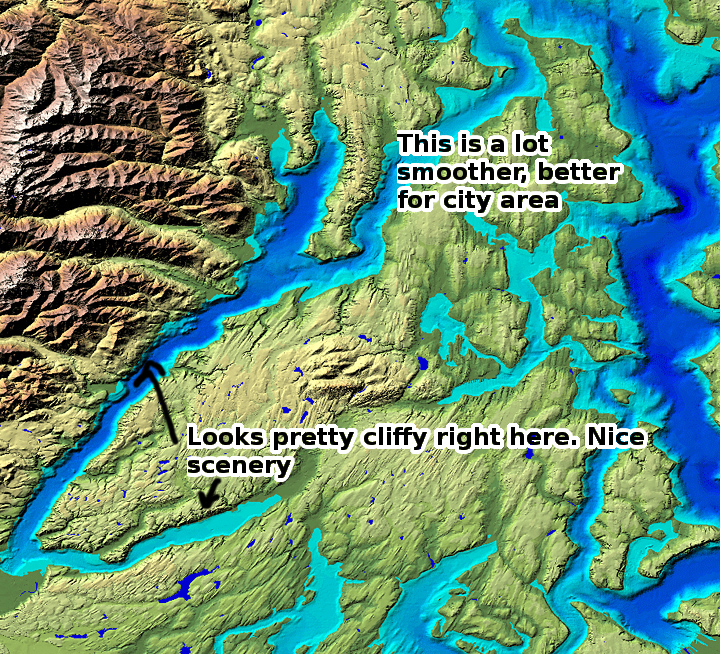
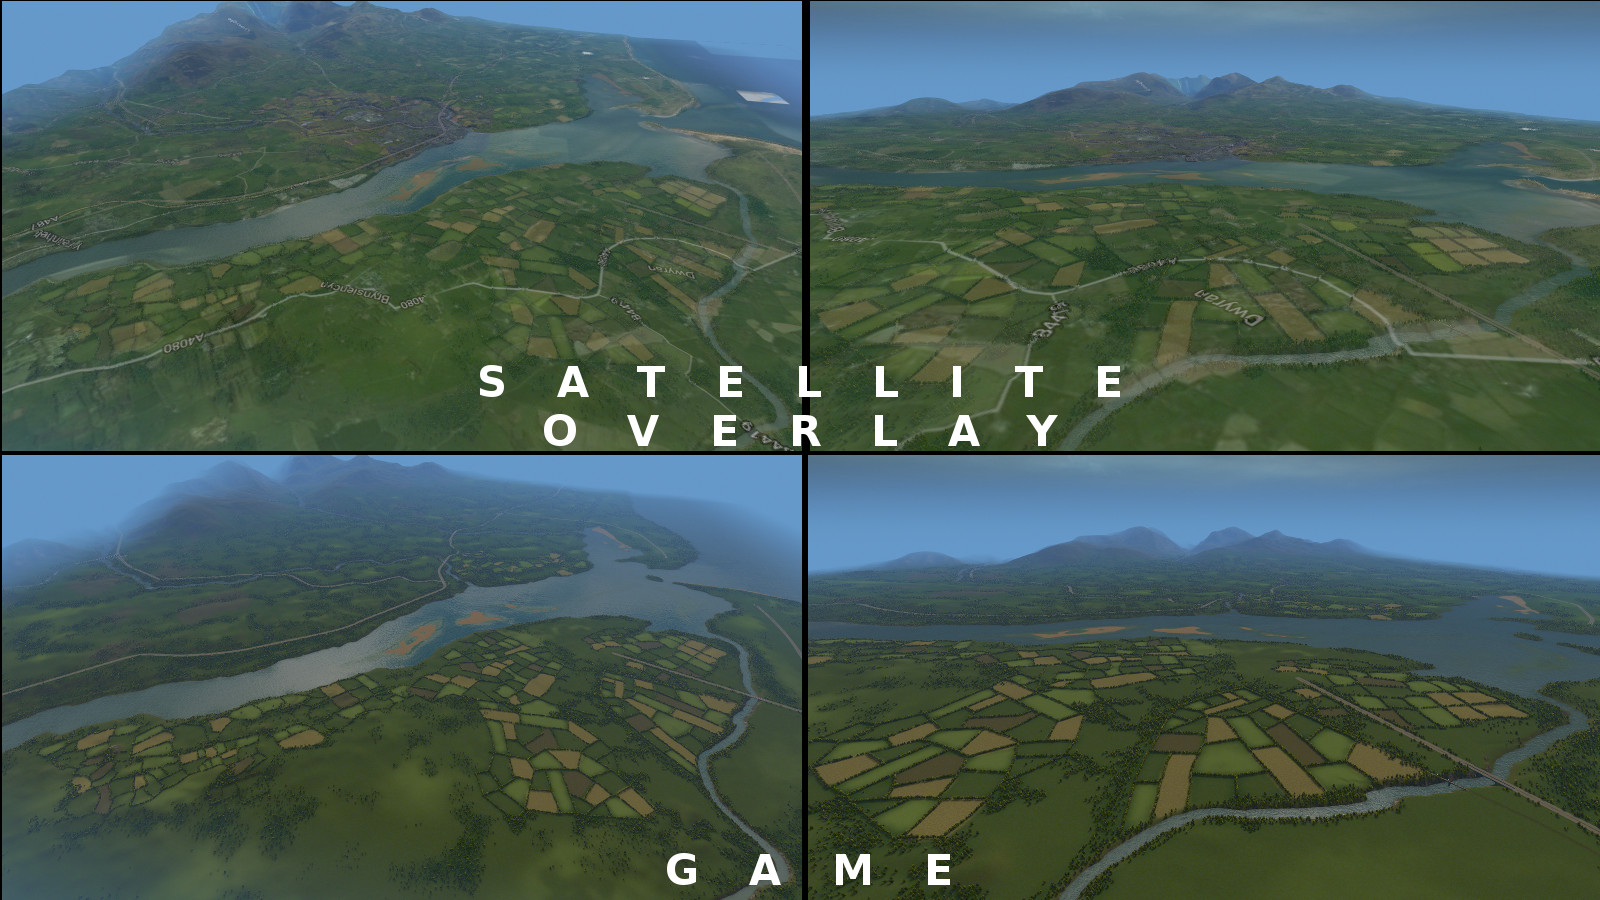
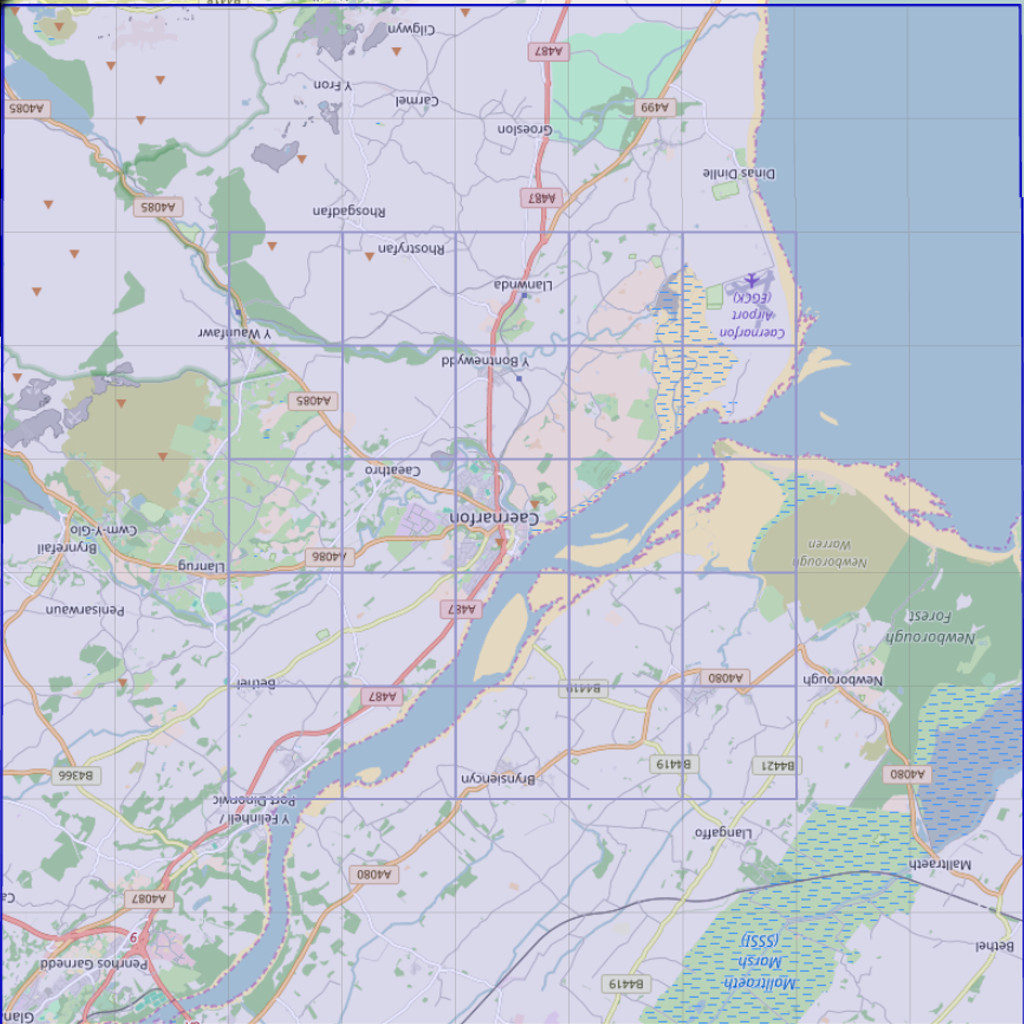
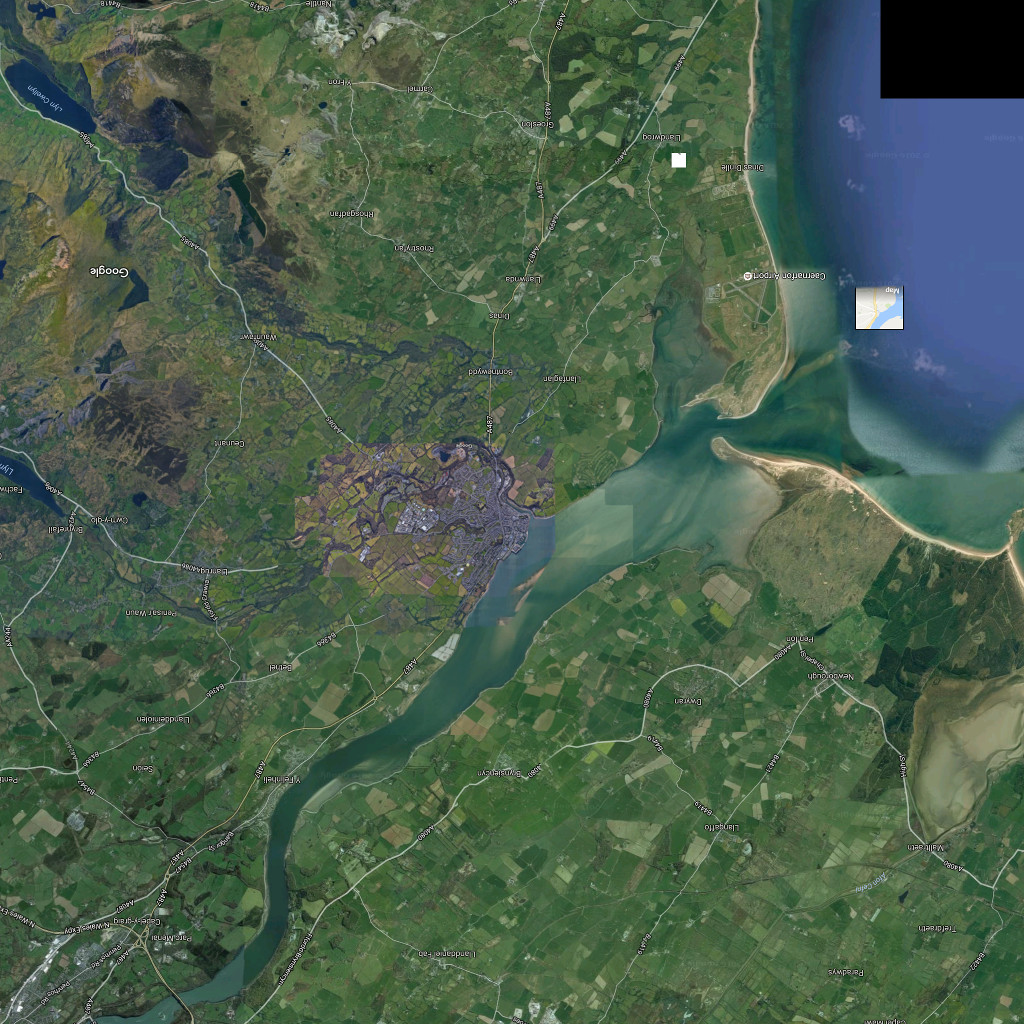
Oh yes, maps take a huge amount of time. :D It's very addicting, though.
DB 29 Jan, 2022 @ 11:52am 
Don't know if anyone has mentioned this before, but you can use https://heightmap.skydark.pl/ to replace https://terrain.party/ I've just started making my first map. Wow does it take time, and I've barely started.
abslinzag 30 Sep, 2021 @ 8:59pm 
I'm sorry, I don't know how to do my own.
MrMiyagi  [author] 27 Feb, 2021 @ 1:13pm 
Cool! Thanks for sharing those @Himmelslinien
Himmelslinien 26 Feb, 2021 @ 5:34am 
Thank you Mister Miyagi for this helpfull guide!
And for your brushes!
I made more brushes too. One side with a hard edge, other side with soft transition. In 24 different rotations (in 15° steps).

Download: https://ibb.co/album/Wvf2k0

Preview: https://twitter.com/himmelslinien/status/1365292704305971205/photo/1
MrMiyagi  [author] 4 Dec, 2020 @ 1:24pm 
Hi @craig1878price! Indeed there is - here is a mountains tutorial from a true master. My best tip is to keep the brush strength very close to 0, especially for the even tool - that allows you to draw the shapes in a slow, steady manner. TPB's rotate brush mod is also a really excellent help in making mountains if you're using custom brushes. https://youtu.be/f9pKXmSWnYA
craig1878price 30 Nov, 2020 @ 1:59pm 
Hello MrMiyagi.
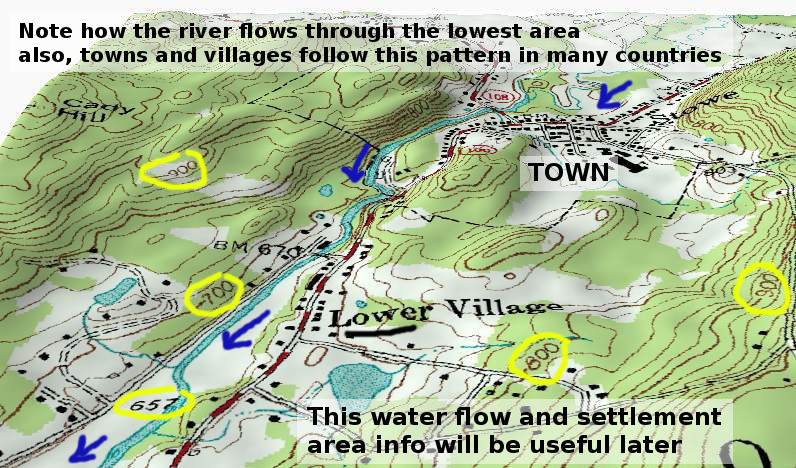
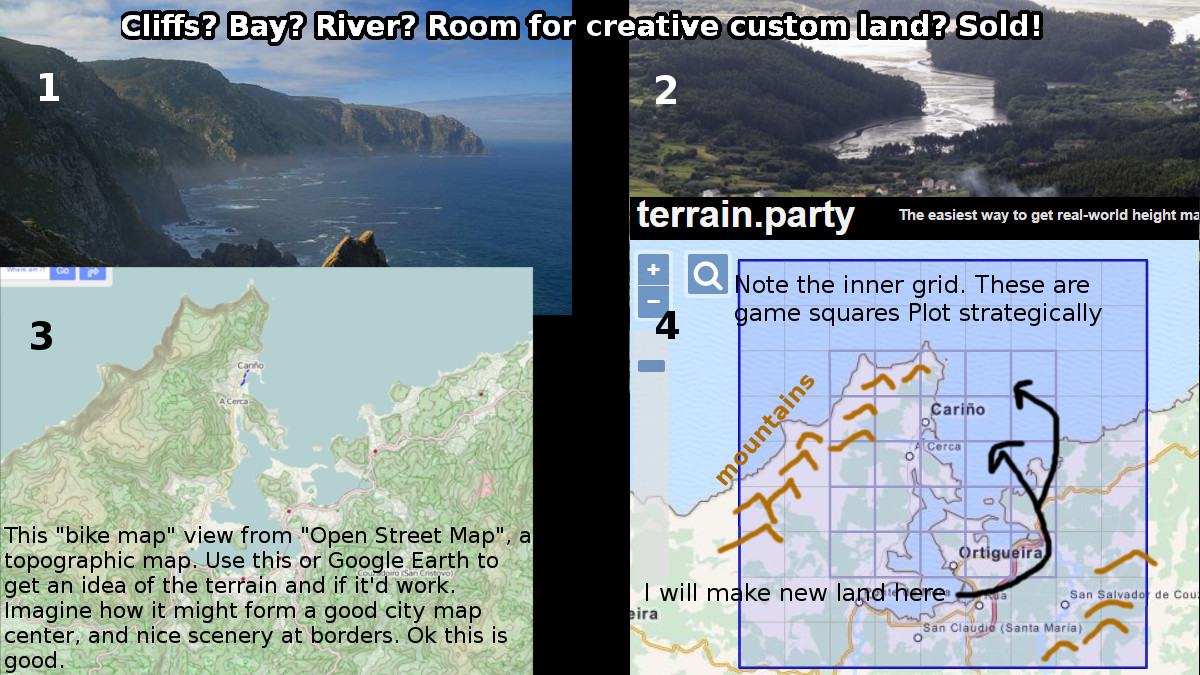
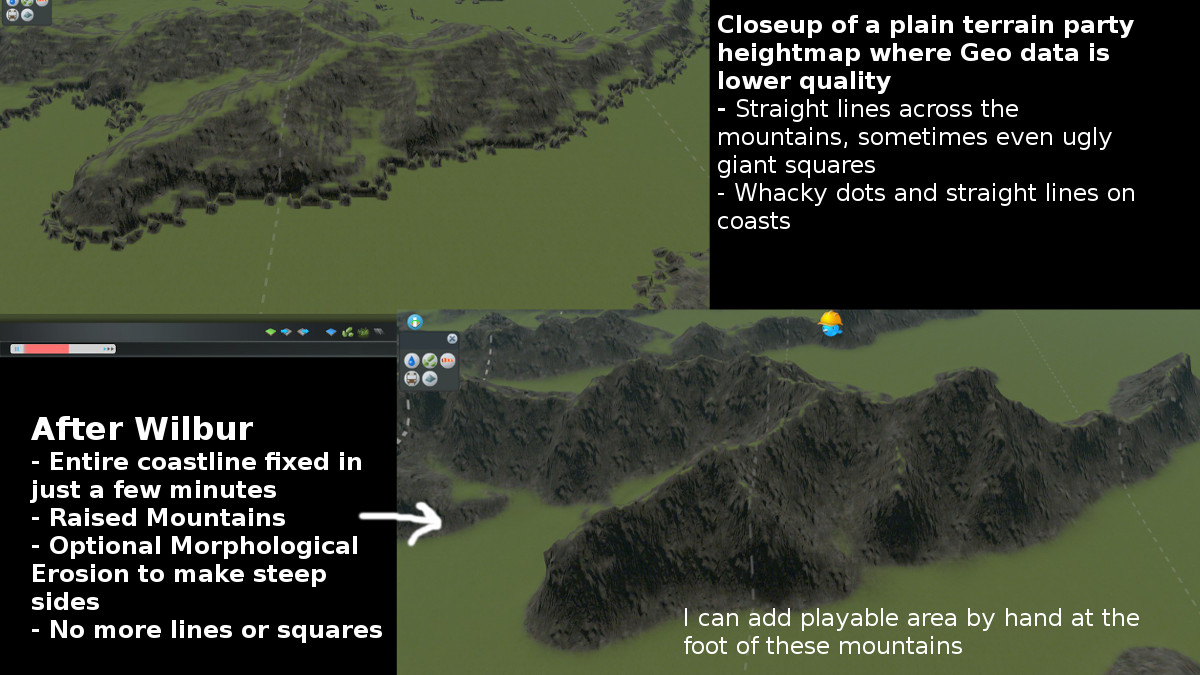
I really enjoyed your tutorial and found it a great help. However I can't seem to find the section on how to creat mountains and mountain ranges. Do you have a link to a video or a step by step guide on how to do this. Thank you