Cities: Skylines

Cities: Skylines

60 ratings
How to repurpose workshop-assets
By LegionOfMe
   
Award
Favorite
Favorited
Unfavorite
0. Why would I want to repurpose an asset?
I have seen many great assets on the workshop, and in many comment sections I have read people saying "I would have liked this one better as a park instead of a Unique Building" or "Why didn't you make this a cemetery?"

So, help is on the way in form of this guide.

With this guide, you can just edit a workshop item, and for example change it from unique building to a park. (Note: You will not be able to turn a prop model straight into an asset or vice versa)

I will describe here, how I repurposed many of the items on my workshop.
1. What you will need
You will need all of these mods:
Asset ItemClass Changer by Snow_Cat
Building AI Changer by Cerebellum
Asset UI Priority Changer by Snow_Cat
Mod Tools by BloodyPenguin/nlight
UI Category changer by SnowCat

If the respective workshop item that you want to repurpose doesn't have an icon (asset_thumb) or tooltip (asset_tooltip), you will also need:
(Asset thumbnail) Sprite Changer by Snow_Cat
Toggle Asset Properties Panel by Snow_Cat
...and an image processing software (photoshop, gimp, paint, etc.).

Before you start, make sure you haven't just subbed to the mods mentioned here, but also marked them active in the content manager.
2. Creating the new asset
From the main menu, go to tools, select asset editor and click on "new".
Select a map too (which one doesn't really matter as all props, and therefore all kinds of trees will be loaded).
In the next UI, go to "building", and select the asset that you want to repurpose. Click on "load" and confirm to import the standard model.
3. Changing the item class
In the asset properties UI to the right side of your screen, you can now click the green arrow (no pun intended, it is what it is) and select the new item class. Parks, for example, are listed as "Beautification item", as can be seen in the screenshot.
4. Changing the UI category
Click the green arrow next to the UI category and select the new item category.
This decision can seem a little bit tricky, as many UI categories are not known to the common player by their designation, since the UI category includes sub categories.
Important:
When you are unsure which UI category to pick, either choose "default", or even better: Load another asset that already is right in the UI category you want your repurposed asset to be and select the same.
5. Selecting the UI Priority
First of all, you need to understand what the UI priority does.
The UI priority is a number that determines the order in which your assets will appear within its respective UI category. So if you want to have certain items to be listed first or last you do that with the UI priority.

The way it works is this: The lowest number will be the first item to be displayed within each UI category. The item with the highest number will be the last item to be displayed within that UI category.

So let's say you made 3 items in the Parks category: A small park (UI priority -1), a medium park (UI priority 0) and a large park (UI priority 1). Now when you are in the game and open the UI to place a park, those 3 parks will be displayed from left to right in the order small, medium, large.

So in order to make it easier for everyone, you should definitely assign a rather unique UI priority, which means: Don't pick numbers with less than 3 digits.

If two assets have the same UI priority (many have 0 or 1), they will switch positions among each other upon every load.

So, it makes sense to have all your assets have a similar UI priority, let's say your first one gets UI priority 346 and every new one within the same UI category gets +1. This way all the items you created will be next to each other (Unless you are unlucky and someone else picked a number inbetween your assets, this is why you shouldn't pick low numbers) and therefore easier to find.

6. Adjusting the stats of your asset to the new class
At this point you might have already noticed that despite having adjusted the Item class from "Unique Building" to p.e. "Electricity Wind Turbine", the stats of your asset are still those of a unique building (or whatever kind of asset it was before).

Therefore, you must enter the new AI manually by typing it into the text input field marked in red.

In order to know what to type in here, check out this List of valid AIs by Snow_Cat.

After typing hit enter and the AI will change. You will now be able to adjust the fitting category's stats.

7. Adding icon & tooltip
Sometimes, an asset that you want to edit might not have a tooltip or an icon. The more workshop items you gather, the more annoying this gets. Therefore, please make sure your item has both before you release it on the workshop. Also, don't forget to add a snapshot.

In order to assign a new tooltip or icon, this is what you need to know:
  • Icon and tooltip are located in the same folder and currently - if at all - can only be accessed via the folder-button in the "save asset" dialogue.
  • The icons have the name "asset_thumb.png" and are 109x100 pixels. (Mouseover variation files are created automatically.)
  • The tooltips have the name "asset_tooltip.png" and are 492x147 pixels.
  • In general, it is possible to use png-file with larger measures, BUT: There is a size-limit for these files, which, if exceeded, will prevent you from uploading your asset to the steam workshop. I don't know the exact limit, therefore I recommend sticking to the measures provided above.
  • Assets that are missing thumbnail (icon) and tooltip will not display the button to open the secret folder. For assets missing only one of the two, the folder can be opened, but the asset will not save the thumb/tooltip graphic to the new asset and instead keep the original thumb/tooltip, even if one of these doesn't exist.

So after you finished creating your tooltip and thumb pictures with your image processing software, create a new asset (when you create a new park asset, the button for the secret folder will always be displayed, and tooltip/thumb will always be saved) and just save it with the images you want to assign to your other, incomplete asset.
Then click on "Copy" within section marked red in the screenshot. Load your other asset, and click "Paste". Now your new tooltip/thumb will be saved when you save the asset.

8. Determining the conditions under which your item may be placed
Most items have to be placed along a road.
There are however some assets which you might want to place somewhere else. Just somewhere not along a road, or even on water.

For this, we will utilize Mod Tools by BloodyPenguin/nlight.

While the asset is loaded in the asset editor, press F7 to start the Mod Tools UI.

Now choose your placement mode from this list and copy the code into the text input field of the mod tools console (left of where it says "Run").

  • On Ground (=Anywhere on ground)
    ((BuildingInfo)GameObject.FindObjectOfType<ToolController>().m_editPrefabInfo).m_placementMode = BuildingInfo.PlacementMode.OnGround;
  • On Water (=Anywhere on water)
    ((BuildingInfo)GameObject.FindObjectOfType<ToolController>().m_editPrefabInfo).m_placementMode = BuildingInfo.PlacementMode.OnWater;
  • Roadside (=Anywhere along a road)
    ((BuildingInfo)GameObject.FindObjectOfType<ToolController>().m_editPrefabInfo).m_placementMode = BuildingInfo.PlacementMode.Roadside;
  • Shoreline (=Needs to have both water & ground)
    ((BuildingInfo)GameObject.FindObjectOfType<ToolController>().m_editPrefabInfo).m_placementMode = BuildingInfo.PlacementMode.Shoreline;
  • On Surface (=Can be placed on water and on ground, but doesn't need to have both)
    ((BuildingInfo)GameObject.FindObjectOfType<ToolController>().m_editPrefabInfo).m_placementMode = BuildingInfo.PlacementMode.OnSurface;

When you copied the code into the input field, hit "Run". Then save your asset.
Appendix: Personal note
Please do consider:
I am not involved in the development and/or continuation of these mods.
This guide is from 2015.
And I haven't played the game in years and am rarely online in Steam.
So...
If you do have any questions feel free to ask them here, someone else might be able to help you out, but it's unlikely I can help you.
44 Comments
NamedForValor 12 Mar, 2023 @ 3:32pm 
This guide still works, but not with the current mods.

https://steamproxy.net/sharedfiles/filedetails/?l=romanian&id=2930517551&searchtext=
https://steamproxy.net/sharedfiles/filedetails/?id=2930517551&searchtext=

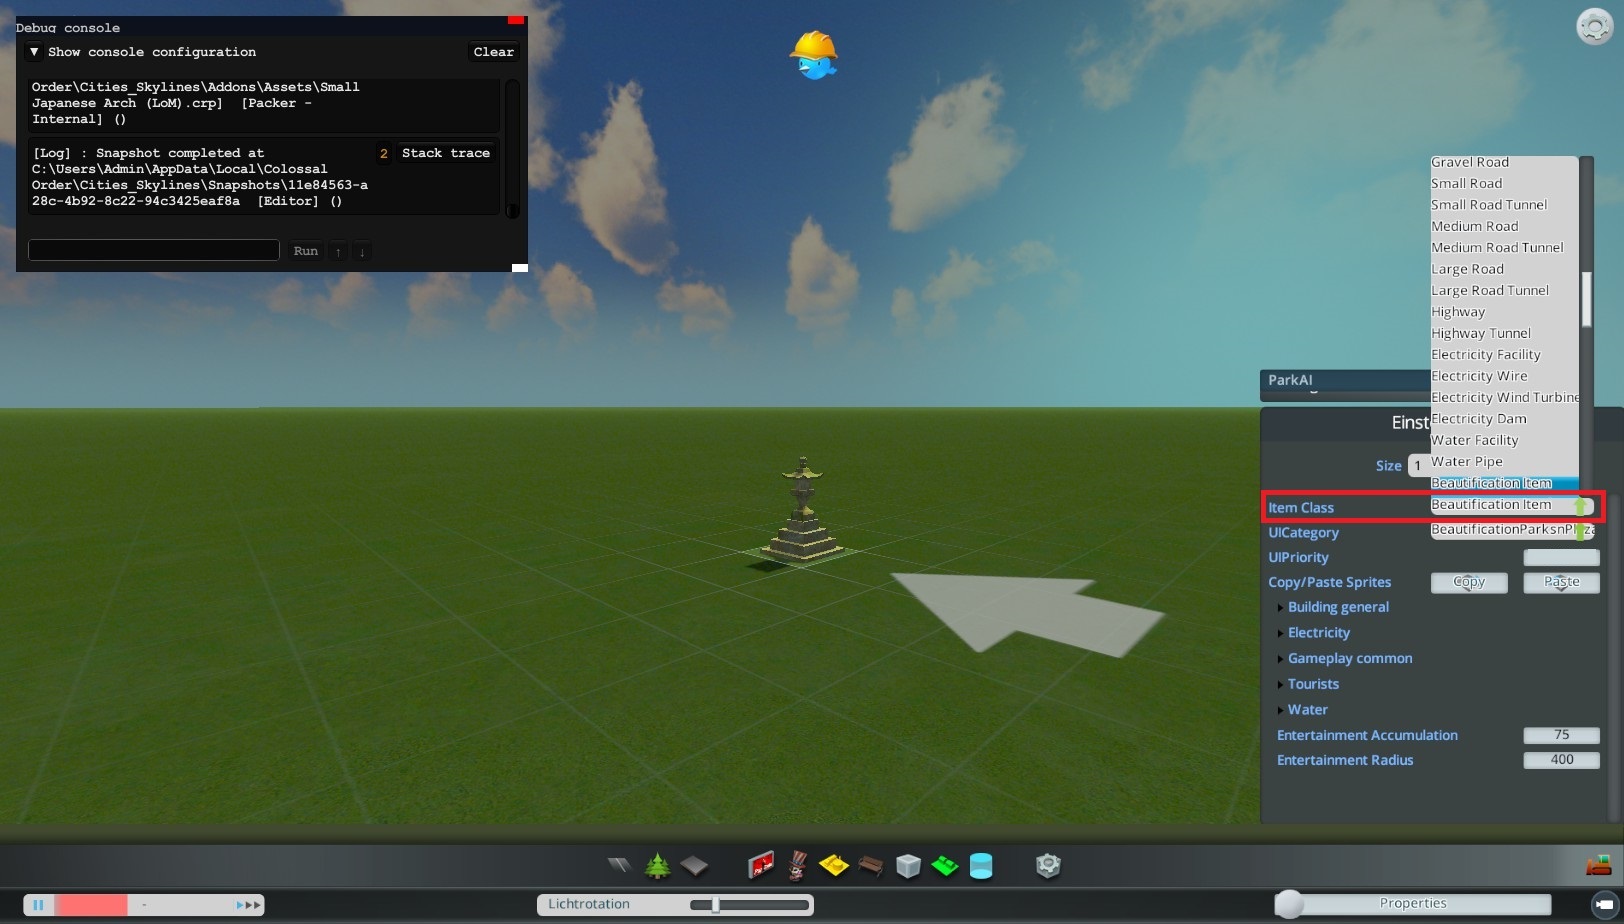
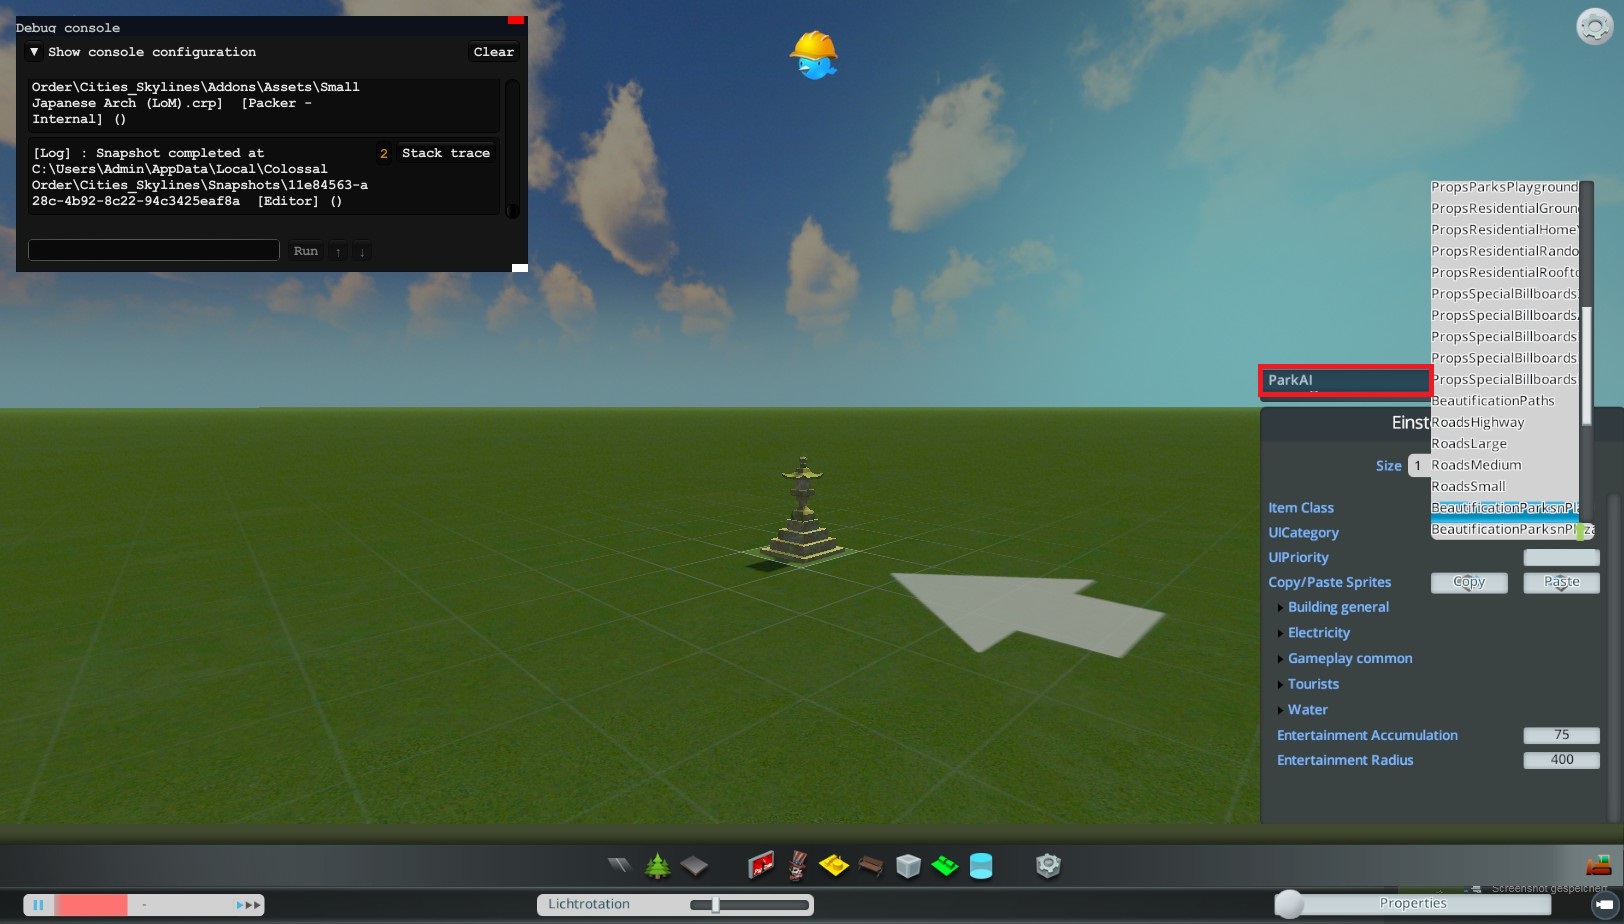
These three mods will work. I've just done it, changing a unique building to a university. Essentially, follow this guide- Change Class of Building, Change AI of editor, and Change Location of asset in game. From there, save your asset under a new name with a new thumbnail and you should be good.

I will say I only did this through the "new asset" option, I didn't try through load asset.
Neverminder 13 Aug, 2022 @ 12:18pm 
anyone know an updated version of this guide
Ryan23961 24 Dec, 2020 @ 3:20am 
Thanks :D

I've already figured how to use mod tools to re-purpose the assets I wanted.
rajwarrior 14 Dec, 2020 @ 4:58pm 
@Ryan23961, If you're using this guide with the mods mentioned, you are not creating Industries DLC assets. This guide, along with most of the mods (exception: ModTools) were created in 2015. What you are making is an old specialized forestry industry asset.
Ryan23961 30 Nov, 2020 @ 4:07pm 
I've uploaded some screenshots on my steam account which show my problem. Hopefully that may convey my message better.
Ryan23961 30 Nov, 2020 @ 3:58pm 
Hey guys,

I am having an issue with converting some assets into Industries DLC assets for my industry area.

I have set the correct Item Class, AI and UI Category correctly (by using the default industry buildings as a reference).

Item Class: Player Forestry
UI Category: IndustryForestry
BuildingAI: ProcessingFacilityAI

But when I tested these re-purposed assets in game I came across 2 problems. The first was where it should've said converts Logs into Paper on the building tab, it instead said converts None int None. Also, it should have said "Freight trucks in use: 0/30" but that part wasn't even there at all.

If anyone has any answers to my problem, I'd be very grateful.
OneCasualBoi 13 May, 2020 @ 3:57pm 
@macluk yes. The mods have been updated and now you can just select from the other dropdowns.
macluk 13 May, 2020 @ 8:02am 
You know that part 6, where it says "Therefore, you must enter the new AI manually by typing it into the text input field marked in red"
... in all those screenshots there is that field but when i download those mods i can't get that field at all. Has it been removed?
LegionOfMe  [author] 7 May, 2020 @ 12:58pm 
byongtomaton 22 Mar, 2020 @ 9:53am 
The AI dropdown is not visible for me... I am trying to change a vehicle into a bus. I've downloaded everything required. Plz help