Tabletop Simulator

Tabletop Simulator

91 ratings
Adding Custom Models
By Kitten
An in-depth guide on how to go from concept to implementation for adding custom models into Tabletop Simulator. (Note that custom Decks, Figurines, and Tables are slightly different. See any respective guides on how to bring those into the game.)

This guide was written for v4.9, and updated to work with v5.0.1

This is an updated version of Stickman's original guide. Credit goes to him for posting the original that helped me learn the process myself. It's been awhile since v1.7, so I figured an update would help out newer modders.
2
   
Award
Favorite
Favorited
Unfavorite
1) Install necessary programs
If you already have the mesh object exported to .obj format, skip ahead.

If you are brand new to creating models, you will need to install some software to do it.

3D Modeling Software. You will need a program that can create the 3D object. The two most popular programs I see mentioned are:

These aren't the only ones you can use. In fact, there are entire articles[www.hongkiat.com] and a wikipedia article[en.wikipedia.org] for these programs. Check out the respective user manuals, discussion boards, and YouTube videos on how to use 3D modeling tools.


Image Software. If you want your objects to have a custom skin or color, you will need to create what's called a texture. Textures are the images that you are applying to the object - the skin. Textures are entirely optional but recommended, and are essential to differentiate multiple models with the same structure.

Popular choices for creating textures include, but not limited to:
  • Photoshop
  • GIMP

Most operating systems come with a default paint program, if you prefer to use that over another program.
2) Create the object
In this example, I'm using Blender.

Here we see an object I've made in Blender. Each of those squares is a face.


For a majority of the objects you'll create, you will have to triangulate those faces. What this will do is convert the square faces (or 'quads') into triangles (or 'tris') This is required of irregular objects so that Tabletop Simulator can render it properly.

  • Select all faces (Blender shortcut: A), then triangulate them (Blender shortcut: CTRL + T)
  • After triangulating, you must then normalize the object (Blender shortcut: CTRL + N).


We are now ready to export it.

When exporting , make sure to export it to the .obj file type.
3) Create the texture
Now that you have an object, you can now create a texture for it.

Much like creating an object, there are a lot of ways to do this, depending on what you want to do.

Some 3D Modelers have built-in support for adding textures in the program (Blender and Wings 3D both have this support), but if you prefer to add the textures in a program with better tools, you can export the layout.

Regardless of how you want to do it, the next step is to unwrap your object. This will take your selected faces from your object and lay it out on a flat, 2D surface.

Tip: Before you unwrap your object, you can create seams. What seams will do is separate your object into seamed sections when you unwrap. If you have a lot of unique features that you want to distinguish when you unwrap, placing seams on the edges of unique features is the way to keep it organized.

For my example, I will be using seams to distinguish the circular holes.


After placing these seams, it's time to unwrap. Make sure you're selecting everything (Blender shortcut: A) before you unwrap (Blender shortcut: U)


To view the unwrap, you will need to switch one of your windows to UV Editor. In the image above, there are two windows active: the main 3D window, and a minimized window at the bottom. The far left icon of that window switches the editor mode, and can be switched to UV Editor.

After unwrapping the object, you'll see the 2D representation of your 3D object. If the unwrap is too messy for you to understand, add in seams to separate important areas and unwrap it again.


You can move pieces around in the UV Editor to better organize it, as well as scale them down. This will not affect the 3D model, and can allow you a larger degree of freedom when applying your texture by allowing you to organize pieces to your liking.

Once you have your desired layout, you can then export the layout to a third party program, or use any built-in editor.


For now, I will paint it entirely red.

Note: As of right now, Tabletop Simulator only supports .JPG and .PNG image file extensions, so make sure you save your texture in one of these formats.
4) Store the files online (third party)
There are two ways of storing files - third party sites, or cloud storage.

For third party sites, we will use:
Object/Mesh - Pastebin
Textures - Imgur

Pastebin: You will need to open your .obj file in Notepad (or other text program), and then copy and paste it into their website as a New Paste. After submitting the paste, look at the top, where it should list options that include 'Download' and 'Raw'. Click on Raw to be taken to the raw data. Copy and save this URL, as this is how Tabletop Simulator will get your object data.

Imgur: If you don't have an account already, create an account. Upload your texture, and look for a public link.

Be careful with other image hosting sites, as some use their own frame to host the image. You will need a direct link to the image. (In Chrome, you can right click the image and choose "Copy image URL".)
4) Store the files online (cloud storage)
This is my preferred method of storage, as you can keep all the files in one place, and organize them if you decide to do multiple mods.

Objects/Mesh - Dropbox
Textures - Dropbox

Dropbox: If you already have a Dropbox account, you can create a new one for this purpose. Upload the .obj file into your Dropbox. If you are not on the Dropbox website yet, log into the website on a web browser.

Hover over the .obj file you uploaded, and click on the "Share" button that appears. This will produce a public link to your .obj file. Copy this URL down but, before you save it, change the ending of the URL from "dl=0" to "dl=1". This is required, to allow Tabletop Simulator to download the object file.

For textures, use the same method above.

If you are using another cloud storage service, you must ensure two things:
  • You can create a public link to your file
  • The link will directly download the file or produce the raw data.
5) Import files into Tabletop Simulator
Now that all of your files are saved online, we're going to import them into the game.

Start up Tabletop Simulator as you normally would. When you get to the main screen, choose Singleplayer. When testing out your objects, I recommend an empty table.


Go under Host, and choose Chest.

A new window called Chest will pop up. From there, choose Custom. At the bottom of your screen, choose Model.


Now you will paste the direct links that you saved from the last step. This window also allows you to determine the characteristics of your model and the behavior. The Materials tab on the right allows you to choose even more characteristics.

If you want to change properties after you click Import, simply right-click your new object and choose Custom. This will bring you back to this window.

If you modify one of your imported files, you must create a new object in-game and import the files on the new object to see the changes reflected.

If this model is for a Workshop Submission: once you're done, you can go to Menu, and choose Workshop Upload. All of your uploads to the workshop will be done straight through the game.


Here's the final result of the example:
Common Problems
My mesh doesn't look right when I import it! It's transparent/weirdly colored.

Make sure that you Triangulate and Normalize your mesh before exporting to .obj.


I keep getting the error "Loading Mesh Error: Object Reference not set to an instance of an object."

Check the size of your model, and make sure it's in a reasonable scale. Also check the number of tri's you have - larger tri's mean higher quality, at the cost of lower performance, and, if too high, Tabletop Simulator won't be able to run it.

You will also get this error if your URL is invalid for your .obj file. Check the URL in a web browser; it should either provide a direct link (or the raw data in the case of your .obj file), or it should immediately download the file when you enter the link.

Note: When you update an .obj or overwrite an .obj of the same name, your cloud storage might generate a completely new public URL. If you're using cloud storage, you might want to re-copy the public link and try again.
Supplemental Reading
For further resources, see below. (Note: some references may be outdated. Please check the dates when these references were posted before using them.)

Blender

Wings 3D

Sketchup
In Closing
If this guide helped you, please leave a comment or a rating. If it didn't help you, I enjoy constructive feedback.

If there are any resources or tips that you think would help other people, attach a link in your comments to any discussions/tutorials/videos and I will add them into the guide.

Get lost on a step? Let me know where you got lost and I'll try my best to clarify it or provide some resources so you can keep going.
19 Comments
Luka 16 Jan @ 8:37am 
could i store my files locally if i only wanna use them for myself?
[NS] zu Pferd 31 Jan, 2020 @ 8:44pm 
Well Done !!!
ElectricDragon 11 Jul, 2017 @ 9:17am 
Great! You covered alot of the basics! I personally use Maya for modeling and photoshop for textures. You did neglect to mention bump and depth map, and you forgot the first-poly mesh rule of color tinting, but overall a good guide!
The_Q 12 Apr, 2017 @ 11:52pm 
you sir are amazing ty for your time posting all this. and your instructions are great! 10/10 would read again :D
Brynjar 5 Nov, 2016 @ 3:31pm 
Could you explain how to add a custom made table? I have been running into dead ends on the forums with unanswered questions. I think it would help a lot of people if it was included in this guide. We need bigger tables!
Kitten  [author] 3 Oct, 2015 @ 4:10pm 
You could physically make the window larger, but that's the only thing I can think of, besides shrinking the pieces down.

I would say shrink, then export. I'm not sure what level of resolution Blender interprets images, but you might be able to introduce a level of detail in the pieces using external image editors. Not entirely sure what the limitation is on that; I'd recommend checking the manuals.
mutie 3 Oct, 2015 @ 3:59pm 
thank you for taking the time to help me with this, i'll try experimenting with units and scaling tonight

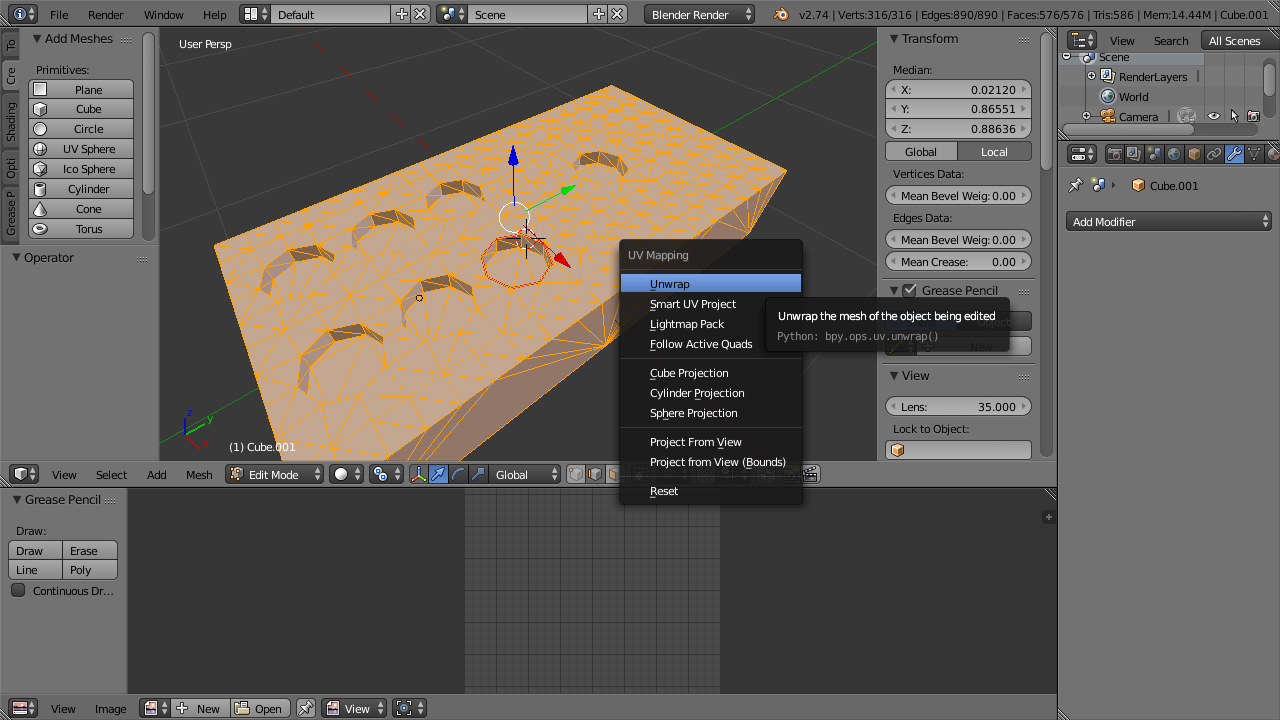
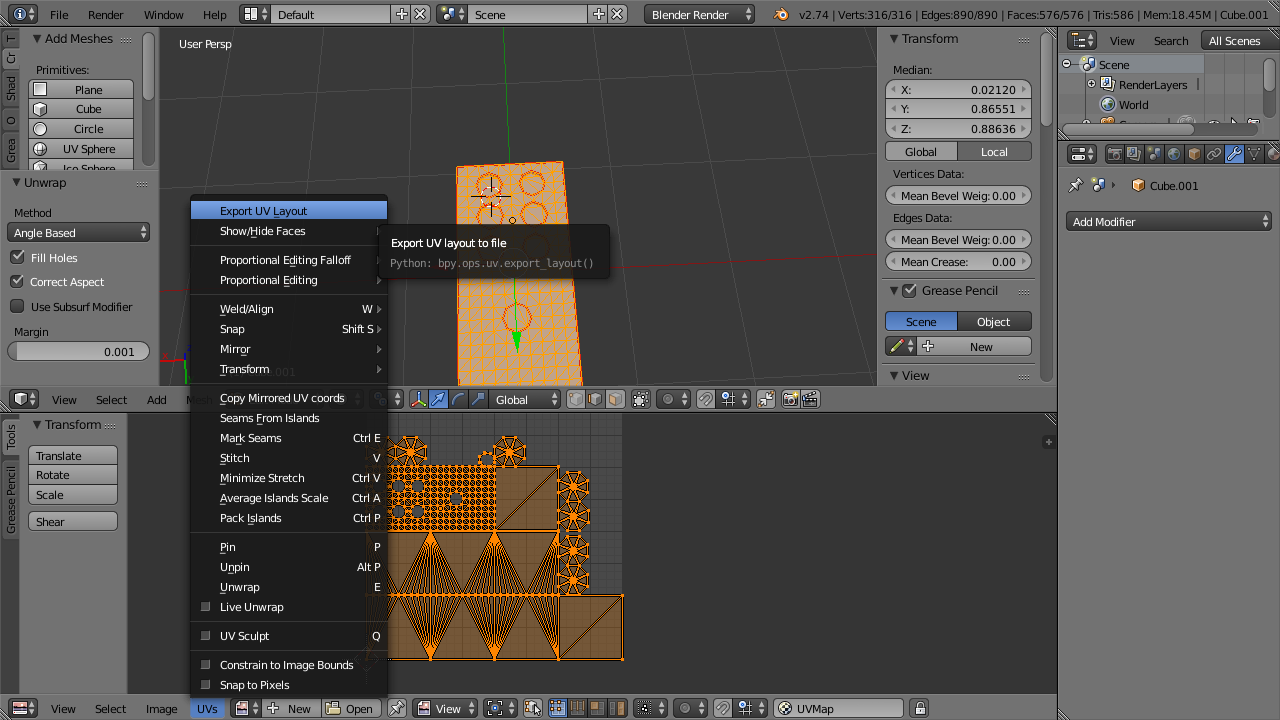
Can I ask you about UVs? Once i've unwrapped my model and I am looking at the unwrap in the UV/image editor window - Is there a way to increase the grid "canvas" that you're given? (for the times when having additional space to arrange all the peices is helpful) Or is the only option to scale down the individual peices themselves to create the extra space I need?
Kitten  [author] 1 Oct, 2015 @ 5:43pm 
I'm not 100% sure, but doing a quick search and looking at the properties, my best guess is this:
* Go to the Properties window
* Click on the Scene tab
* Under the units tab, chose Metric or Imperial (default is None)

The units are in meters and feet respectively, so if you have objects smaller than the base unit, use the scaling option to scale to your units.
mutie 1 Oct, 2015 @ 12:31pm 
Hiya kitten, thank you so much for making and maintaining this guide. I've been trying to get a grip on blender for years and yours is the only guide that has actually helped. One of the last few things that's preventing me from moving forward is designing to scale, if my real world object is say 10cm x 10cm - what is the best way to create an object in blender that matches those dimensions?
Vizzy 21 Aug, 2015 @ 4:40pm 
Oh okay haha thank you *is a dumbo*