GemCraft - Chasing Shadows

GemCraft - Chasing Shadows

371 ratings
Extreme end game guide v1.1
By BilboCGL and 2 collaborators
The acclaimed extreme end game guide reloaded, source of all the information for the hardcore players.
This is an improved version of this guide at Armorgames[armorgames.com]
4
3
   
Award
Favorite
Favorited
Unfavorite
Introduction
First of all, this guide is applicable only by level 1000+ players with all skills unlocked who also know how mana farms work and can be fully followed at level 2000+.
The most time consuming parts of this guide (gem recipes bigger than 32s/16c, WoE/freeze locking, GE shrine) are probably not worth it before level 5000+.

If you are lower level it’s better to check out either the Fast way to high wizard level guide[armorgames.com] or the No-MP Guide to WL 300 for GC-CS[armorgames.com], both courtesy of BilboCGL[armorgames.com], though reading also this guide sure won't hurt.

To know more about the game before following this guide there are lots of other information sources spread on the internet.
A pretty useful one is the GemCraft Wiki[gemcraft.wikia.com]. It provides information about the Mysterious Compass[gemcraft.wikia.com] or Grey Trees[gemcraft.wikia.com], a nice list of fields[gemcraft.wikia.com] useful to choose the best maps and much more.
Another one is the Gemcraft sticky at armorgames[armorgames.com] which lists lots of topics to get useful information from, much more than a single guide could contain.
You should check them out!

Prototype-autobombing and batch-bombing are your friends – use them to anger waves faster and with no strain on your fingers :).

In this guide, several abbreviations are used:
  • g: stands for gem grade, typically used as g1, g28, g45 and so on. A number in front of g stands for the amount of gems of the indicated grade. 100g1 means one hundred gems of grade 1
  • y yellow, 2y means a yellow gem of grade 2
  • b black
  • o orange
  • r red
  • or orange/red - or is the same like 2or, both means a gem grade 2 red/orange.
  • yr yellow/red
  • br black/red
  • obr, bor, rob, orb, bro, rbo would all mean “a gem with orange, red and black” aka managem.
  • ybr, byr, ryb, yrb, bry, rby would all mean “a gem with yellow, red and black” aka killgem.
  • So g45yb stands for a gem grade 45 with yellow and black.
  • Spec, speccing, specced or just 16s, 32s and so on stands for a gem built by a special recipe from a certain number of g1. The grade of this gem is usually lower than the one expected from the cost.
  • Combining, combined or just 16c, 32c and so on stands for a gem combined by a special recipe, where the resulting gem has a lower grade than just upgrading the gem with ‘U’, but better stats.
  • WoE - Wake of Eternity spell
Skills
You should have 45 or more levels (+ your talisman) in the following skills, ranked in descending importance:

Tier 1: True Colors (TC), Fusion, Bloodbound (BB), Mana Leech (ML), Traps
Tier 2: Critical hit (CH), Amplifiers, Fury
Tier 3: Resonance (Res), Freeze, Masonry
Complementary: Barrage, Wake of Eternity, Slow, Mana Stream
Not needed: All other colors, Beam, Curse, Ignition
Depending on the way you play, Demolition could be useful.

How to distribute your skills?
In short: TColors≳BBound>MLeech>Traps>CritHit>Reson.
More lengthy: As the math behind that is truly beyond the scope of this guide, we’d like to refer to the skill guide:
https://steamproxy.net/sharedfiles/filedetails/?id=486419356
courtesy of 12345ieee
Map to choose and difficulty settings
The easiest places to set up a mana farm are maps with a single entrance and space for amps and traps.
Good fields are i.e. E3, P3, R1, R6, Q4, Q7, and U1.

You should choose Haunting difficulty, all traits maxed except Hatred. It gives a huge 69.7x XP multiplier.
If you consider mana-lock too annoying, feel free not to use it, but be aware that you throw away 13.75% of your xp outcome…

Hatred is not recommended (unless you can finish Haunting endurances, but then you don’t need this guide) because it raises monsters HP too much and results in less waves beaten and overall less exp.
Exception, if you do not have the Magician’s pouch (Flash version only) use Hatred at 10, all the waves will still be beatable and yield more XP.

If you wish to beat endurance for the first time (it ends at wave 999), It is recommended that you play on a low end HP field, such as B4, I5 or J3.

To check out the max-hp of a specific field with specific traits, you should make use of 12345ieee’s great spreadsheet that can be found here[docs.google.com].
You can download the sheet and use it in any office program you like.
Gem combining methods
Building a gem with, let’s say, a g2 leech gem, a g1 bloodbound gem and a g1 red gem and just upgrading this gem using ‘u’ is nice at the beginning of the game but as soon as you want a little more, more mana gain, more gem grade, more waves beaten, more xp-outcome and therefore more wizard levels to get even more of all this, it is not the best strategy.
To get the best out of your gems you have to build them in a special way (called speccing) and upgrade them with a special technique (called combining).

So when you see something like 128s/64c, this means you use a base gem built from 128 spec, then keep improving that gem using 64c on the gem gotten from the spec/last combine.

There are countless ways to do speccing and combining but some recipes are superior to others, proven by computing trillions of recipes and comparing them.
The results of these calculations can be found at the gem-recipes repository[github.com]. This link goes to the readme, read it, then scroll up for the recipes.
Generally longer recipes are more powerful than short ones, at the expense of more time and difficulty in the execution. However, some exceptions exists.
Here we will see some commonly used (and reasonably simple) ones.

If you have never seen something like this, don’t be afraid: Process from left to right and from top to bottom. The brackets indicate that you have to do what’s inside before proceeding.
Speccing is only to be done once in every run. It gives you the initial base gem.

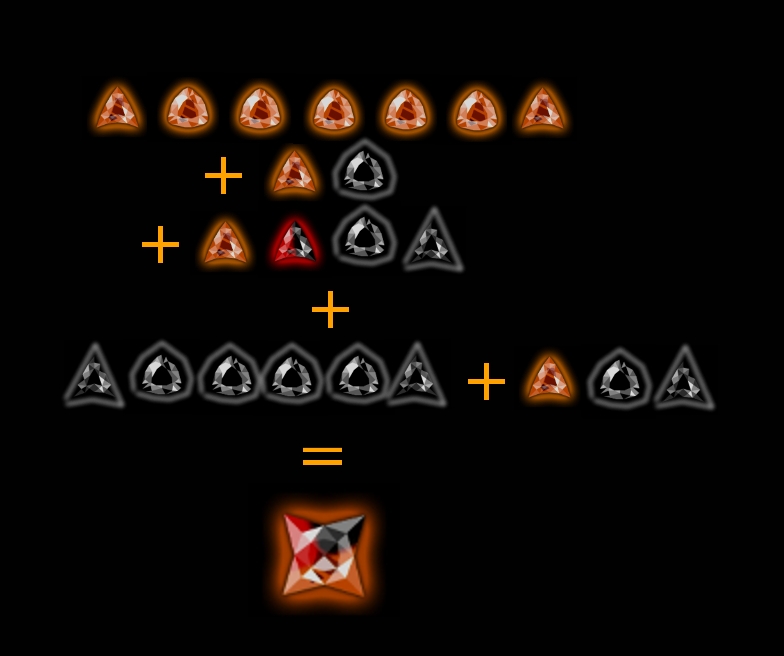
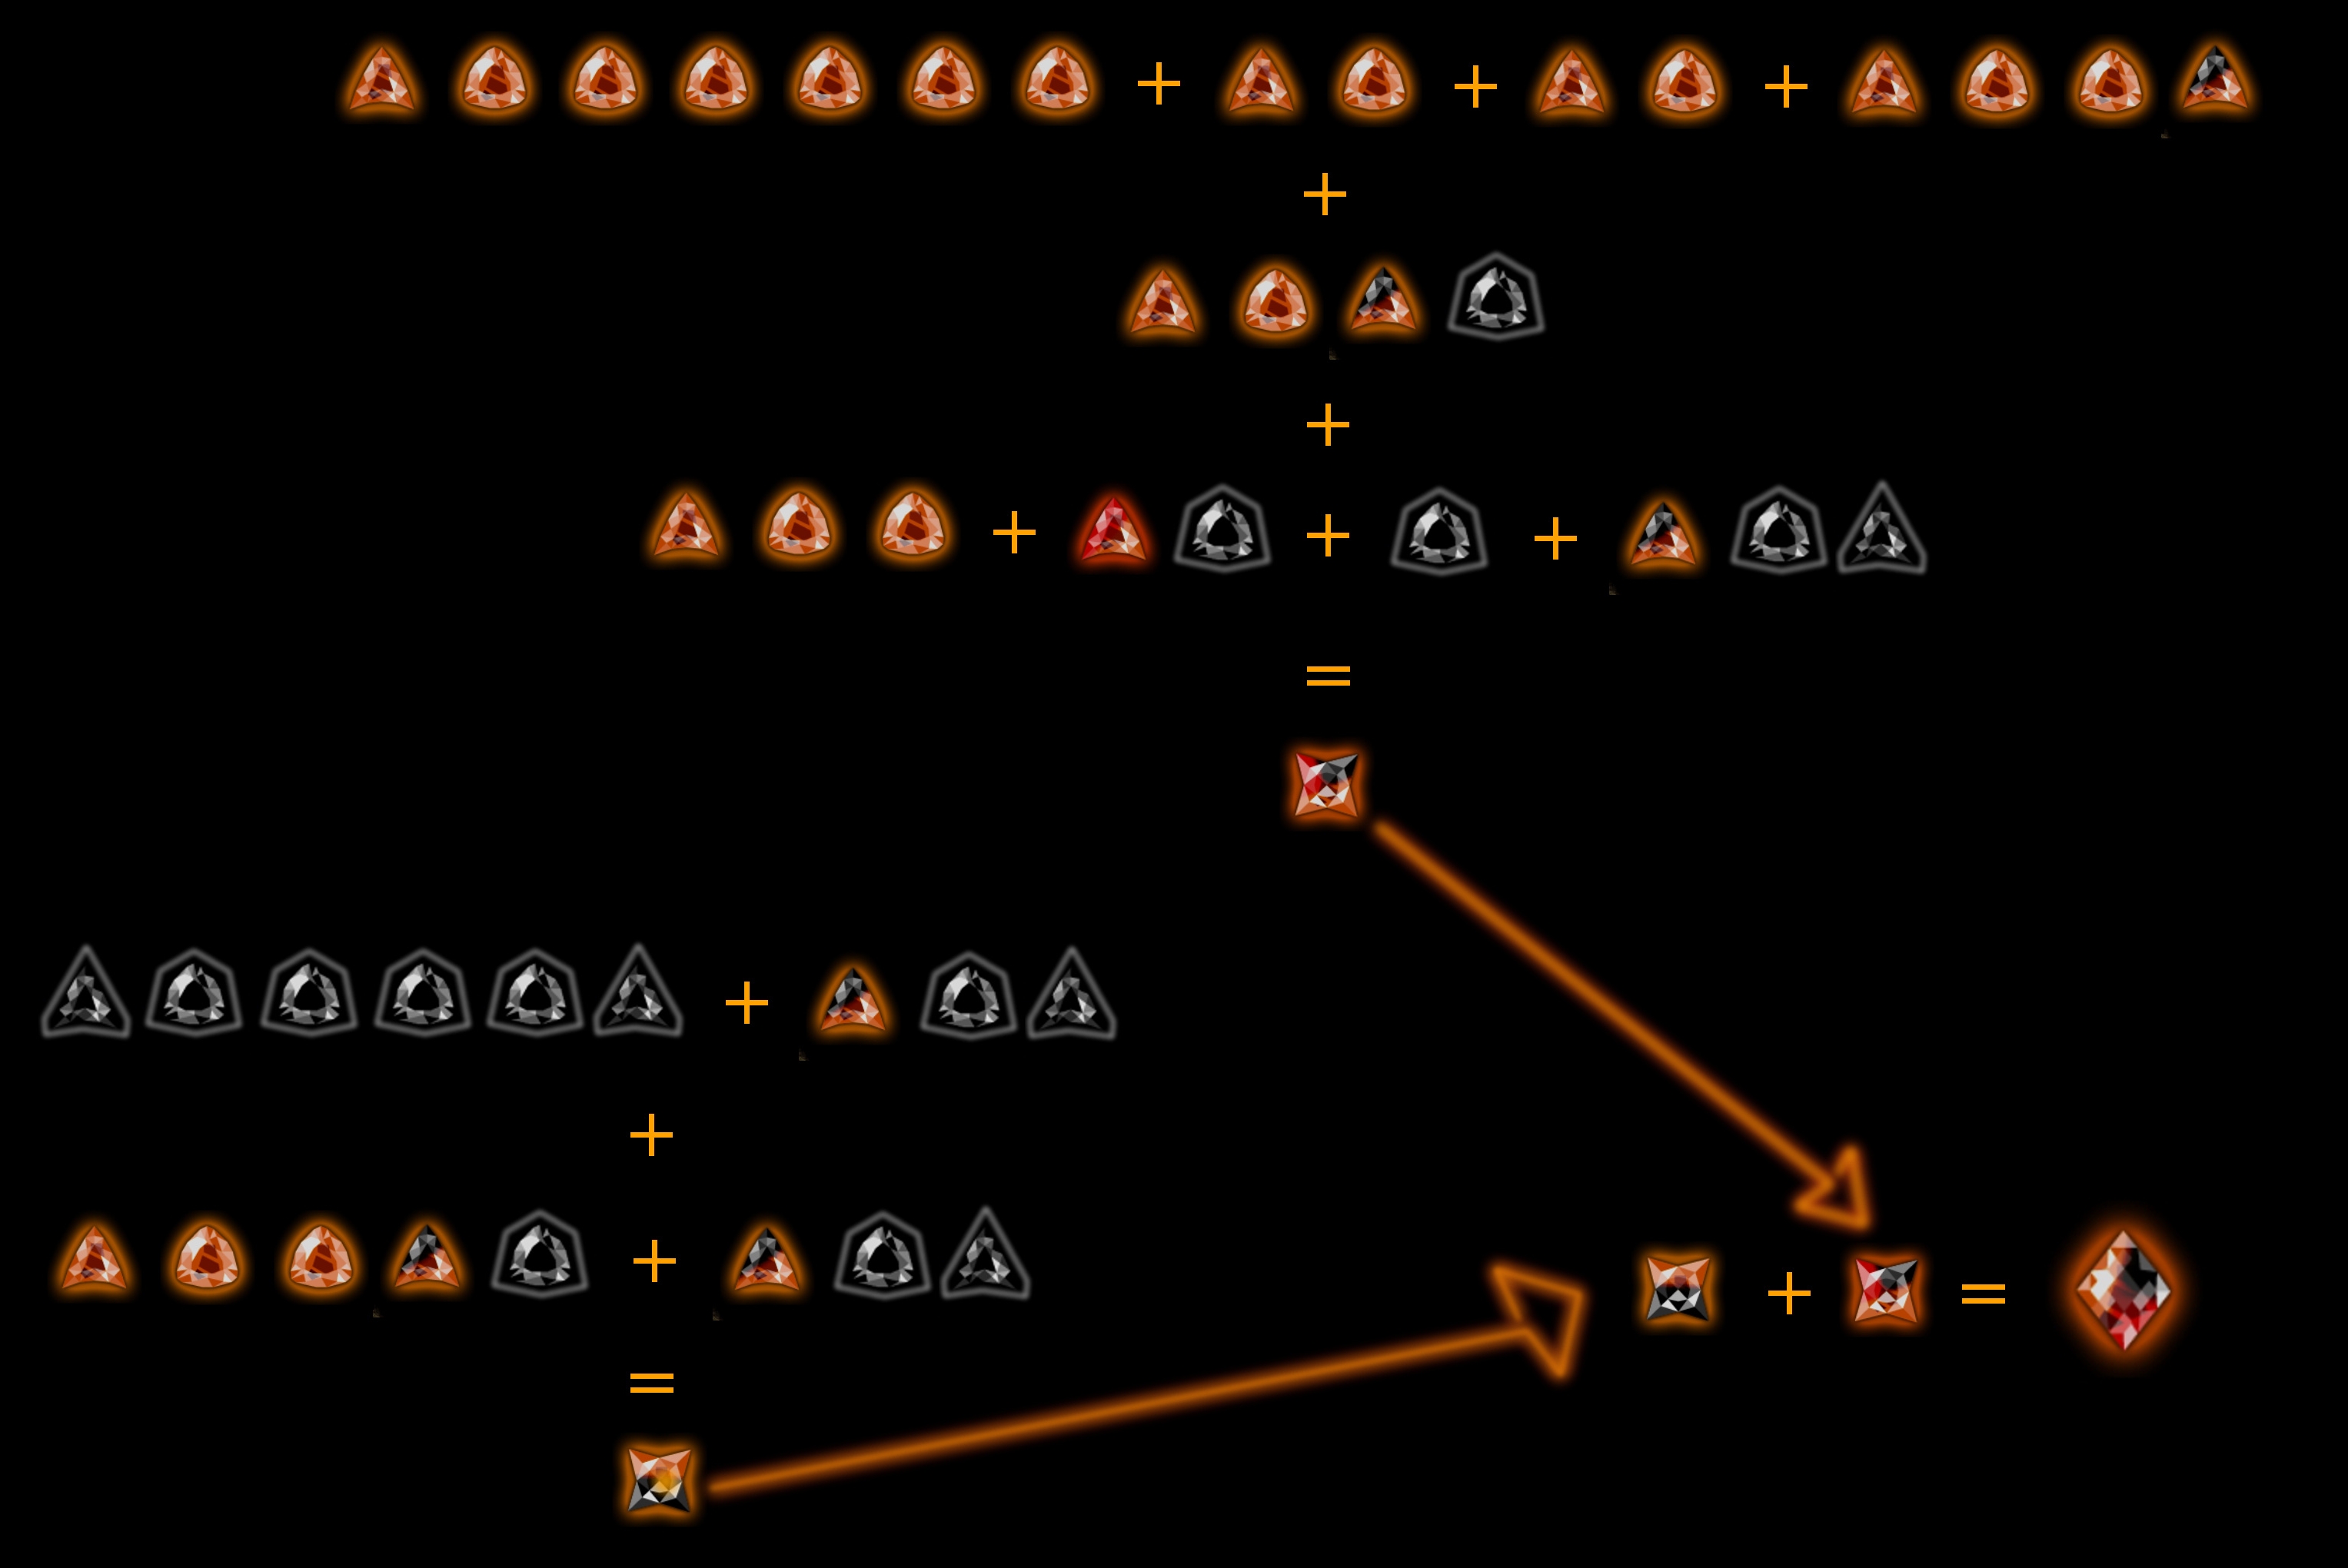
Managem speccing scheme 32
2o+o+o+o+o+o+2o+(2o+b)
+(2o+(o+r)+b+2b)+
(2b+b+b+b+b+2b+
(2o+b+2b))

Let’s see how these lines are used: There are five grade 2 orange gems (2o), four grade 2 black gems, six grade 1 orange gems, seven grade 1 black gems and one grade 1 red gem. Those are thirty-two grade 1 gems, so it is truly a 32s.
We start with the last line.

  • Build a g2o (grade 2 orange gem), a g1b (grade 1 black gem) and a g2b (grade 2 black gem).
  • Combine the g1b in the g2o, combine it with the g2b resulting in a g3ob (grade 3 orange/black gem).
  • One line higher: Build two g2b and four g1b.
  • Combine the four g1 in one g2, then combine both g2, again resulting in a g3 gem.
  • Combine both g3 gems to a g4 gem.
  • One line higher. Build a g2o, a g2or (orange plus red g1 gems), a g1b and a g2b.
  • Combine g2o with g2or. Combine this gem with the g1b.
  • Combine that gem with the g2b.
  • This results in a g3rob (grade 3 red/orange/black gem).
  • Put it next to your g4 gem - DO NOT COMBINE THEM.
  • Build three g2o, five g1o and one g1b.
  • Combine the g1o in the first g2o.
  • Combine this g2o with the second g2o, giving a g3o gem.
  • Combine the last g2o with the g1b and combine it with the g3o gem.
  • Now combine the two g3 gems in your inventory together to a g4 gem.
  • At last combine both g4 gems to a g5 gem.
  • Btw: I only started with the last line as it was easier to write


But even the best description is nothing compared to a picture, so here you are:

This image (and all the following) has to be processed as follows:
  • From left to right
  • From top to bottom
  • In other words: Just like reading a book


Mana amplifier speccing scheme
2o+o+o+2o

A 16 combining scheme, suitable for managems and amps

2o+o+o+o+o+o+2o+2o+(2o+o+2o)

The orange g1 in the picture below represents the base gem you are using this combine on, not a literal orange g1.


There is also an alternate version, with the same exact result:
2o+o+o+o+o+o+o+(2o+o)+(2o+o+2o)


So, now you know how to setup a 32s/16c mana farm. With some practice, this can be done by hand pretty easy and gives you several more gem grades in the end.

But all the managems are worth nothing without any killgem… So here we go

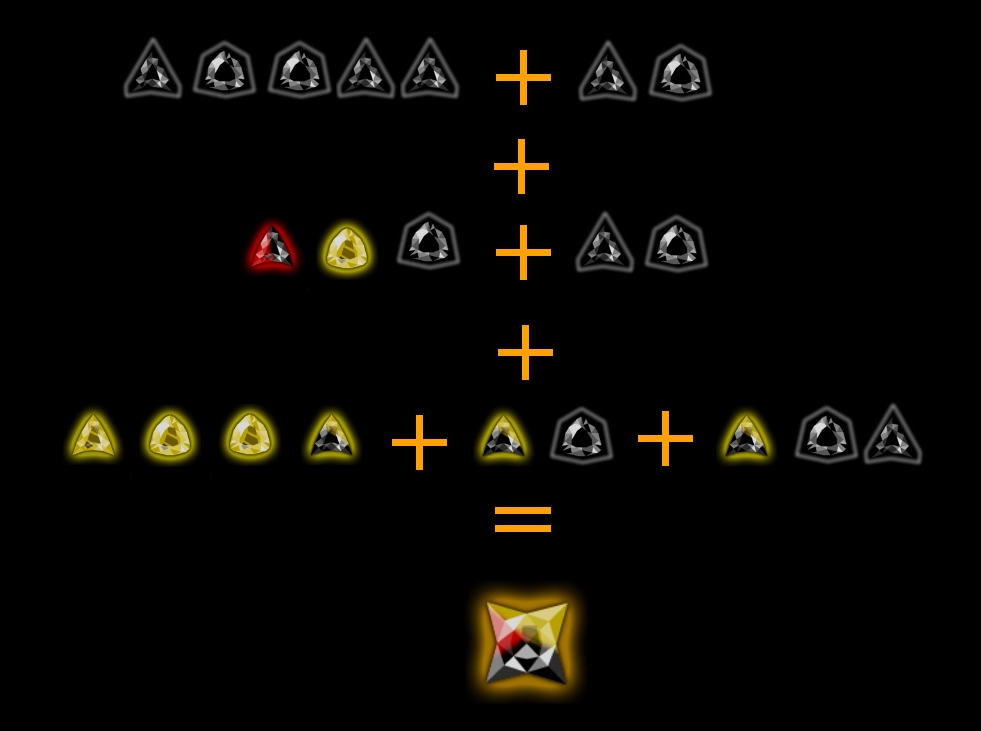
Killgem speccing scheme 32:
The recipe reads like this:

2b+b+b+2b+2b+(2b+b)+
(rb+y+b+(2b+b))+
(2y+y+y+yb+(yb+b)+(yb+b+2b))

Where yb is a grade 2 gem consisting of one grade 1 yellow and one grade 1 black.

And the picture to this scheme is this:


Amplifier speccing scheme:

2y (yeah - it’s true!)

Killgem and amplifier 11-combining scheme:
In fact, the 11-combine is better than the 16-combine for killgems and their yellow amps. So it is not only less work but also better:

2y+y+y+y+2y+(2y+2y)


If you prefer using 2^n combines for some reason (to keep having a well defined equivalent grade, maybe) here is the 16c version for killgems and killgem amps:

2k+k+k+k+k+2k+(2k+k)+(2k+k+2k)

Early gameplay
The first six waves are the hardest...
At first, you have to set up your map. To follow the description on a run with manalock, make sure that you have at least 40.000 starting mana.

In general, you need a manafarm and a killarea. The final manafarm consists of a slowing gem in front of one to four managems and pure orange amps surrounding the managems. The final kill area has two slowing gems and two killgems but for the start, one killgem is suitable.

  • Use traps for your gems.
  • Build a killgem having 100.000.000 damage (max damage x crit), a grade 8 or 9 should do this.
  • The killgem should be a simple 15y/16b/1r ‘u’ upgraded gem.
  • Enrage all (reaver and swarmling) waves with up to 100-250 g1 gems to get a lot of monsters per wave.
  • A g8 killgem can handle a wave of about 500 monsters - if you get more, you have to slow monsters down before they reach the killgem or use a higher grade killgem.
  • When you use so many g1 gems that your armor exceeds your killgems damage, your bolt spell has to be charged before the monsters get to the killtrap.
  • If your bolt spell does not charge fast enough, use only as many g1 gems that the monsters armor+hp does not exceed killgem’s damage. Probably less than 150.
  • A giants wave would need 500 g2 gems, that’s expensive and gives a lot of hp. So it is recommended that you enrage any giants wave within the first six waves with as many g1 that your killgem still can handle the monsters.
  • Build one (or more) managem, use a specced gem from the start.
  • You should take care about beacons that might spawn next to your defense. To do so, either build some walls in the environment so there is no free space left for beacons, have enough mana for gembombing the beacons or build a tower that can shoot these beacons.
  • Build one slowgem (Black-Blue-Red) in front of your killgem, later another one behind the (first) killgem.
  • If you can afford, build amps next to your managem(s).
  • If a shadow appears, try to gembomb it or put your killgem in a tower till the shadow is shot.
When you have survived till the first manalock opens, things get easier.

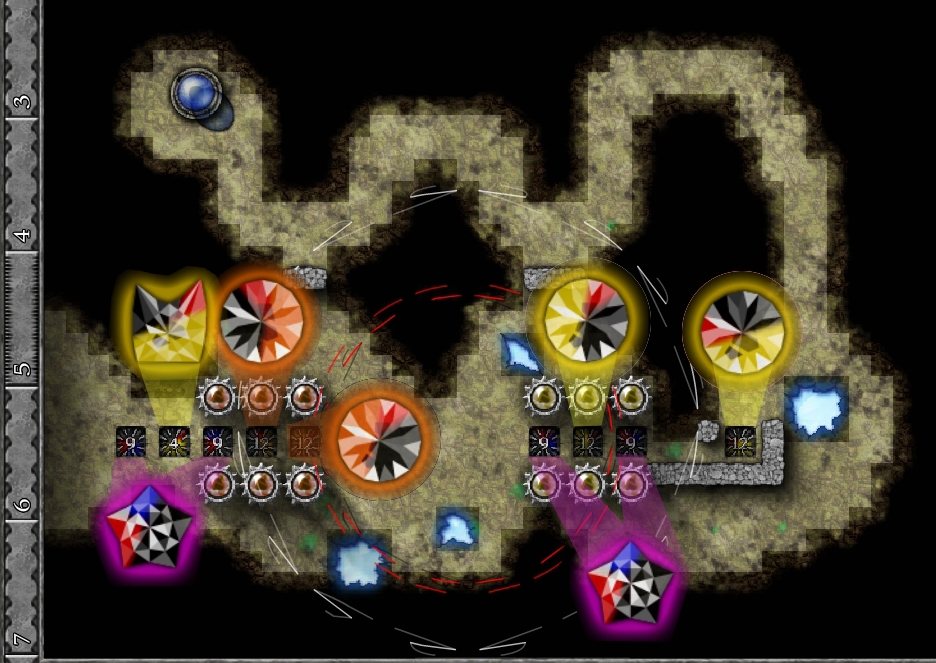
Here you have an example of a battlefield-setup:


In this picture, you see a distance between the manafarm and the killgem, the freeze range and the WoE range. Here you are able to freeze the monsters on the manafarm and use WoE right before the monsters reach the killgem, this way:
  • you get more mana due to having more monsters on your managem(s)
  • a fifth of the monsters will be banished by WoE before reaching the killgem and therefore they run over the manafarm again.
Be careful, the more monsters you keep around, the worse lag gets, balance freeze and WoE usage with your lag tolerance.
You can also use more than one managem, just build them next to each other so they can share amps: the best strategy would be to cover the field with them, but the lag (and management difficulty) becomes unbearable. One up to four is a reasonable compromise.
If you really hate lag, ditch some additional slow gems (but the first) and build the manafarm and the killarea next to each other, you lose the possibility to use WoE, but you keep less monsters walking on screen.

  • Upgrade your killgem, it should now reach grade 28 or higher
  • Enrage every wave with ie 500 g1 gems (giants with g2 or more g1, if you can handle that)
  • Use bolt on your killgem and barrage on your managem
  • Upgrade your managem with a combine of your desire and patience. The higher, the better.
  • Start to build the gems for your managem amplifiers with a suitable spec/combine.
  • For the gemforce managem specs, make sure the amplifiers are three grades lower than your traps, since they were designed for those amplifiers.
  • Upgrade you slowgems to g20 (in the long end, g30 is enough). Use barrage, too.
  • Spec the killgem and put it in front of your manafarm so that it will farm hits.
  • Build a tower for shooting beacons and flying ones (i.e. a g20 yellow/black). This tower should not kill any monsters.
  • As soon as your beacon tower has reached g28, you don’t have to care about beacons anymore. They are shot before they can do any harm.
Late gameplay
By this time you should have several thousand monsters passing through your mana traps at every moment.
You have to keep upgrading your managems and your amps the whole time. Get them as high as possible. Make sure you try to keep your managem higher than the amps, so first upgrade your managem, then the amps if you don’t have enough mana for both.
Use any prism spark (maxed with a grade 30) to reload your freeze spell. If you’ve picked a map with a focus shrine (H2, N7, R1, C3), a couple of prism sparks can get you up to 500+ seconds of freeze time since you get multiple freeze spells per spark – one set of spells from the initial recharge, and several more (depends on talisman) from using the focus shrine.

As mana gain slows over time, it is recommended to change the upgrade system to a cheaper one.
You could use partial upgrade for your mana traps and amplifiers, making sure you know your favorite gem scheme enough to formulate your own upgrade steps. From our 64c example, you find i.e. the 8c as an intermediate upgrade, then the 8c+(2+1) and so on.
If you don’t want to spend too much time with a combine, you should change to a lower combine length i.e. 16c or 8c or even use ‘u’ in the end.

During this period of the game you should summon as many beacons as possible - beacon farming will be explained later in this guide. Or you have decided to avoid the lag, then you have to cover your map with buildings to avoid them.

Gem-resocketing giants
During the mana-collecting period, giants forcing gem-resocketing might disturb the manafarm. There are several ways to deal with that problem.
One way is a long distance between killtrap and manatrap so that the resocketing area won’t reach the manatraps.
If, due to map setup (or your hate of lag), such a buffer zone is not possible, you might want to enrage the giants to less hp, so you can use a tower with ‘target: least hit points’ to kill the monsters near the entrance, far in front of the manatrap.
When you have a real lot of monsters and make excessive use of the freeze spell, the only way to avoid a resocket of the managem due to frozen corpse explosion (that might happen when you have 40.000 monsters or more on screen) is, not to include the killgem in the freeze-range.
Killing gem building
After you have farmed whatever amount of mana you desire, build the final killgem, but this time, use combines optimized for killgems, since they are optimized for the best overall total damage.
Start from the killgem you previously specced and put in trap to hitfarm (if you haven't done that, just spec one now) and look for a killgem combine.
Pick any of those that are 11-value or greater, and combine away. For the amplifiers, make sure they are four grades lower than the gem they’re amplifying, since once again, the killgem specs were designed for such amplifiers.

In case you have a map with Gem Enhancement Shrine, hereafter named GES, (J1, H2, C3, U4, W5), you want to enhance the critical hit gems (and only these, bloodbound is not worth to be enhanced) before you build the killgem: Use the GES as often with as many monsters in range as possible as long as possible. You can get millions of max damage on a single g1 gem. Build your killgem and the amps with copies of this gem.
To hitfarm on these maps, you should use a g2 red/black gem instead of a complete killgem. So you can use this gem with a lot of hits and g1 yellow gems with a lot of damage in the killgem spec and you get the best of both worlds.
You should combine the effect of prism sparks/focus shrine with the GES: collect the monsters with freeze and WoE in range of the GES, in the best case your manafarm is in range of the GES.

When you are done with manafarming, you probably want to sell your mana traps and amplifiers.
No problem, just cover the map in beacons or buildings, dump all the gems into a shard spark, and get an extra 5% back for free!
Yes, you get the extra 5% even if the spark does not appear because the field is covered.
Even when you have finished manafarming and your killgem and its amps are built, you should throw all kill amps (but one!) in the manashard sparks you see after. The extra mana is worth it unless you are already on the edge of damage vs hitpoints. The one not thrown on the shard is for easy rebuilding after you got your mana back.

The final killgem is best placed in a tower (recipes are optimized for 8 amps), to hit the monster across the whole map.
Unless you are dealing with Swarm Hives, set the target to 'structure', to destroy as many beacons (see below) as possible.
XP gain
The goal of playing Gemcraft: Chasing shadows beyond the limits is to earn xp. To get the most xp out of every battle, there are some things to consider.

The Fury skill and enraging waves
Fury gives a one time bonus to monster XP for any gem used to enrage a wave – One grade 1 or ten grade 100 gems, or vice versa, will give you the same XP per monster. Obviously, killing 999 monsters gives more xp than killing only one monster so you want to enrage every wave to have 999 monsters.
This can be done by bombing a wavestone with either many low-grade gems or few high-grade gems.
Using many low-grade gems has the advantages of
a) getting lots of beacons (see further down)
b) being inexpensive
c) raising the armor much more than hp, so the monsters will not be killed by the managem(s).

Using high-grade gems instead has the advantage of raising monsters hp and armor much less for the same monsters number.

So you probably want to use low-grade gems as long as possible and switch to high-grade gems when the hp growth impends to exceed your kill power (max damage * critical hit).

In the end, when the unenraged monsters already have hp higher than your killgems damage, you can still try to enrage them a little. Your killgem can probably kill monsters having 100 times higher hp than the killgem’s kill power without too much effort.

When you can’t enrage any more (not even swarmlings) and the monsters are going to reach your orb, switch to low grade and enrage waves only to shoot the beacons for a little more xp.

But enraging is not only done for monsters… On most maps you get also beacons and they are really valuable for the xp-outcome.

Beacon farming
Shooting down as many beacons as possible can raise your xp outcome compared to only killing monsters by two or even three times, depending on the map. You have to be aware that beacon summoning makes lag worse.

The key to getting the most out of this strategy is to bomb each wave with a thousand grade 1 gems (on M5 and U1 you need even more) so you fill the map with beacons every wave. Make sure you’re using a killtrap enhanced with bolt to kill the high armor monsters.
To shoot down the beacons, use one or two yellow/black i.e. g45 (later higher) gems with target structure, you’ll have no problems with any negative effects of the beacons, they are shot down right before they can do any harm.
To see how many beacons can spawn in each field and get the most out of this tactic look at this table: https://steamproxy.net/sharedfiles/filedetails/?id=631039563, courtesy of satoshi.
You also might consider that every shrine appearing on the map reduces the amount of beacons you can farm. A shrine appearing on map at wave 50 steals up to 950 beacons plus some more for mass-explosion of beacon spawning giants. So you might want to avoid shrines.
A good way to do so is to fill the map with beacons, put any towergem in your inventory, call the next wave (the shrine spark) early and after the spark is gone, resocket your towergem(s).

Later on, after manafarming, put the final killgem in tower with target structure and let it handle both, monsters and beacons.

In the late game you will find it impossible to enrage giants waves with a thousand g1 gems. Therefore you should use high grade gems to raise the monster count per wave to 999 and throw additional g1 gems until you reach your hp-limit.

Sleeping hives and beacon farming
Farming beacons on maps with sleeping hives is dangerous. As these nasty things spit out a lot of very high hp beasts when hit by a high grade gem set to structure, you have to choose another strategy. You have to set up 4-8 beacon-killgems and reduce their range so that the field is covered but NOT the sleeping hive. Also pay attention to your main kill-tower.

Best way to handle beacon summoning giants
When you have beacon summoning giants (BSG), you do not want them to be killed at once due to chain hit of your main killgem as you do not have enough free space on any map to handle 999 beacons.
Use an alternative strategy to handle these beasts:
  • Enrage the waves to a lower hp than the other waves (drop more bombs on the waves around the BSG wave, always staying within what you can kill)
  • Use a killgem without red with target: least hitpoints
  • Use 1x speed (might differ on other computers, for me that works best)
  • Use 1 up to 4 beacon-destroying towers (the more, the more lag)
  • Make sure these towers do not kill the monsters (either you reduce range or the towers do not have enough damage for the beasts)
  • Real killgem can either be set in a tower with reduced range or in a trap
  • Once again: Have patience
  • If needed: Freeze the BSG before they get in range of a real killgem
Misc
How many gems do I need to reach 999 Giants (in fact: add 997 giants) in a wave?
(Grade|amount):
(1|997),(2|499),(3|333),(4|250),(5|200),(6|167),(7|125),(8|111),(9|91),(10|84),
(11|77),(12|67),(13|59),(14|56),(15|50),(16|48),(17|44),(18|40),(19|39),(20|36),
(21|34),(22|32),(23|31),(24|29),(25|27),(26|26),(27|25),(28|24),(29|23),(30|22),
(31|21),(32|20),(34|19),(35|18),(37|17),(39|16),(41|15),(43|14),(46|13),(49|12),
(53|11),(57|10),(62|9),(68|8),(76|7),(86|6),(101|5),(121|4),(153|3),(214|2),(381|1)
In general: ( grade | ceil(997./round(4*((grade-1)**1.2+1)/5)) )
Reavers are maxed with a single g100.
Swarmlings are maxed with a single g72.

Shrines
In general, shrines deal 1.35 (can be enhanced to 4 by enraging the shrine-sparks with G25) times of the gems damage, where that number is increased by 0.5 every time the shrine is used.
The charging time increases by 5% every time the shrine is used.
The charging time starts at 200 seconds for pre-built shrines and un-enraged shrine scrolls. For shrines summoned by a shrine scroll, this time can be reduced to 20 seconds by full enraging (G25).

What is needed to max sparks?
  • Prism Sparks: G30, +300% spell and shrine charge boost
  • Touch of Wisdom: G45, +50% to mana pool xp multiplier
  • Shrine scrolls: G25, 150% initial charge, +300% initial damage ratio, -75% charging time
  • Stone Supply: G65, -500% decreased building mana cost
  • Lockdown (Beacon): G50 for duration, amplified damage has no limits
  • Unearthed Shard: Unlimited
Final conclusions and other stuff like that
  • You don't have to follow this guide exactly, it's just an example.
  • Be aware: Maxing the xp will take up to 30-40 hours per map...
  • Feel free to leave comments, as we can use them to improve this guide.
  • The guide is published under CC-BY-SA[creativecommons.org] license.
Good luck in hardcore GC:CS gaming!
Information for true addicts
Managem 64 spec scheme:
(((2o+o+o+o+o+o+o+(2o+o)+(2o+o)+(2o+o+o+(o+b))+(2o+o+(o+b)+b))+
(2o+o+o+(o+r+b)+b+(o+b+b+2b)))+
(2b+b+b+b+b+2b+(o+b+b+2b)+
(2o+o+o+(o+b)+b+(o+b+b+2b))))


Amplifier 16 speccing scheme (to go with managem 64s):
Amps use the pure gem, so for mana amps, we take pure orange gems. To get best results, start again with building the base gem. For amps its way easier:

(2o+o+o+o+o+o+2o+2o) + (2o+o+2o)
resulting in a grade 4 gem
It is, btw, exactly the same as the 16c for managems seen above.

Managem and Mana amp 64 combining scheme:
((((2m+m+m+m+m+2m) + 2m + 2m + (2m+m) + (2m+m+m) + (2m+m+m+m)+
(2m+m+m+m+m+2m)) + ((2m+m+m+m+m+2m) + (2m+2m))) +
(((2m+m+m+m+m+2m) + (2m+2m))+
((2m+2m) + (2m+2m))))

‘m’ stands for “Managem” and means, you should use your base gem (or its last iteration).

As we have to do this quite often, let's have a look at the recipe to shorten it:
We see, that (2m+m+m+m+m+2m) and (2m+2m) both can be found four times in this recipe. So we define
8C = (2m+m+m+m+m+2m) and
4C = (2m+2m) indicated in the pic below as a g3 gem.

When we now rewrite this, it looks much more comfortably:
(8C + 2m + 2m + (2m+m) + (2m+m+m) + (2m+m+m+m) + 8C + (8C+4))+
(8C+4C + (4C+4C))

As a picture, it looks like this:


Let’s do the combine together. At first, we build all the gems we need. Put the original gem as base gem at the top of your inventory. We need:
  • Four times 8C: We build (2+1+1+1+1+2), dupe that three times.
  • For more clarity, build now two throw-away g1 of a different color. Next we need:
  • Four times 4C: (2+2) can be read as “use ‘u’ two times.
  • Again two throw-away-clarity gems…
  • Five time 2m, means u-upgraded copies of your base gem.
  • Again one clarity gem.
  • Then we need six times the base gem, so dupe it five times.


Your Inventory should now look like the Img 1.


  • Now we combine two of the 2m gems to the 8c in the bottom right corner (Img 1).
  • Next we do the combines (2m+m), (2m+m+m) and (2m+m+m+m) (Img 2)
  • We combine one of the base gems to the first remaining 2m, two of the base gems to the second 2m and the last three base gems to the third 2m. (still Img 2)
  • Now we get the bottom right gem, a 8C, and combine the first, second and third 2m gem in it (in this order!). (3rd image)
  • Now we get one the top 4C gem and combine it with the bottom left 8C (img 4)
  • After that, we take the bottom right 8C (the expensive one) and combine it with the bottom middle 8c and the resulting gem with the bottom left one.This is now a 44c! (img 5)
  • Now we combine the middle 4C to the left 4C. Then the remaining 4C to the remaining 8C. (Img 6)
  • Now just combine the same grade gems together, repeat and you’re done (Img 7)


Managem 128 speccing scheme:
((((2o+o+o+o+o+o+o+(2o+o)+(2o+o)+(2o+o+o)+(2o+o+o+o)+(2o+o+o+o+o+(2o+b)))+
(2o+o+o+o+o+(2o+b)+(2o+b+2b)))+
((2o+o+o+o+o+o+(2o+b)+(2o+b+2b))+
((2b+b+b+2b)+(2o+b+2b))))+
((((2b+b+b+b+b+2b+2b+(2b+b))+(2b+b+b+2b))+
(2b+b+b+2b+((2o+b)+2b)))+
(((2o+o+o+o+o+o+(2o+b))+(2o+b+2b))+
((2b+b+b+2b)+(2o+b+2b)))))

Where every line results in a grade 4 gem and the whole combine gives you a grade 7 gem.

This can be simplified in the following way:
We define (and build!):
Disclaimer: These here defined combines are only useful for THIS recipe and not to be used in other context

3C: 2o+o (four times used)
5C: 2o+b+2b (six times used)
6C: 2b+b+b+2b (four times used)
9C: 2o+o+o+o+o+(2o+b) (two times used)
10C: 2o+o+o+o+o+o+(2o+b) (two times used)

And get:
(((r+o+o+o+o+o+o+o+o+3C+3C+(3C+o)+(3C+o+o)+9C) + (9C+5C))+
(10C+5C + (6C+5C)))+
((((2b+b+b+b+b+2b+2b+(2b+b))+6C) + (6C+5C)+
(10C+5C + (6C+5C))))

Try, if you dare - for a picture, this recipe is too large...

Killgem 64 speccing scheme
(((((((((2b+b)+b)+b)+2b)+(2b+b))+((2b+b)+b))+
(((2b+b)+b)+((y+b)+b)))+
((((2b+b)+b)+((y+b)+b))+
((2y+b)+((y+b)+b))))+
(((((((2y+y)+y)+2y)+((y+r)+y))+(2y+b))+
((2y+b)+((y+b)+b)))+
((((2b+b)+b)+((y+b)+b))+
((2y+(y+b))+b))))

Kill amp 3 speccing scheme (to go with killgem 64s):
2y+y (Phew!)

Killgem and amp 56 combine scheme
Again, the best combine is not a 2^n number. If you do not want to learn different big combines, you do not lose too much if you use the 64c from the managems...

Here you get the 56c:
2k+k+k+k+2k + (2k+k) + (2k+k+k) + (2k+k+k+k) + (2k+k+k+k+2k) +
(2k+k+k+k+2k + (2k+2k)) +
((2k+k+k+k+2k + (2k+2k)) + (2k+2k + (2k+2k)))

The ‘k’ stands for killgem.

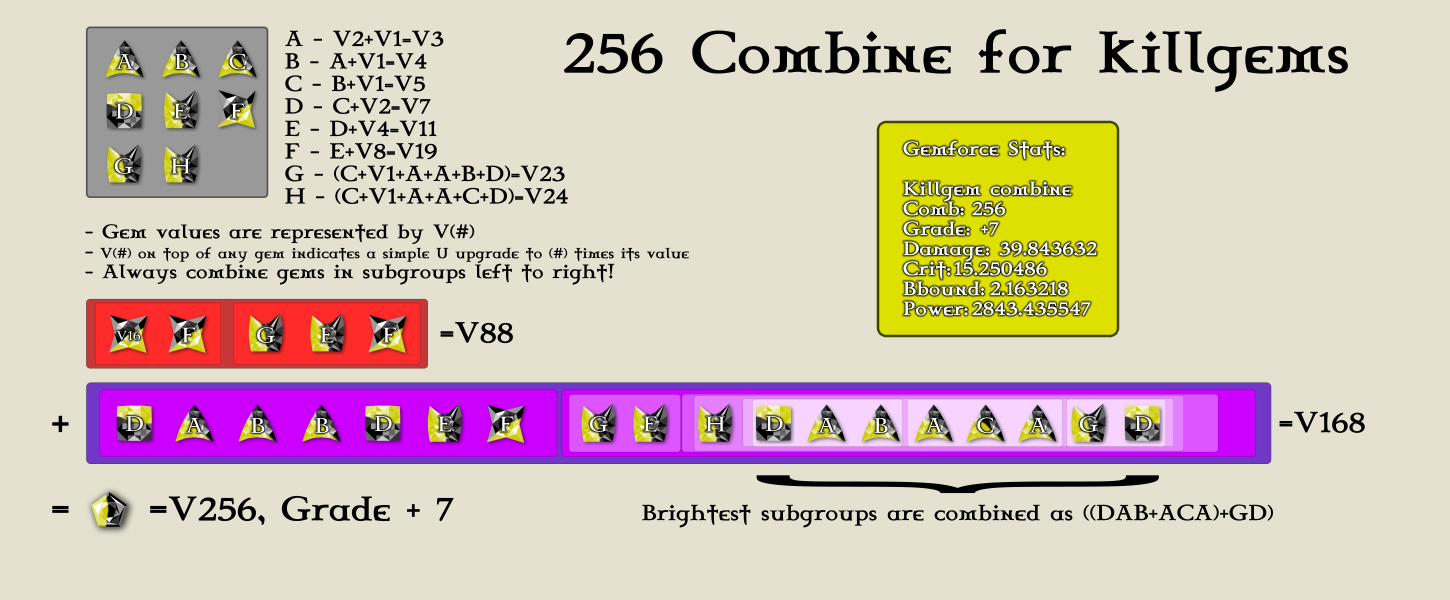
And, last not least, here comes a really big one:

Credits
This document was developed in close cooperation by
Note: Names in alphabetical order
External programs
Special addendum for Steam, as talking about external programs is forbidden on AG.

The community has developed a couple of tools to help with advanced gemcrafting, other than the huge amount of guides linked above.

  • gemforce: its results are linked above, it's the program that does all the hard computations to find the optimal recipes.
  • wGemCombiner: automatic gem combiner program, to actually perform huge recipes in-game automatically.

Both can be found on their pages at Github:
https://github.com/gemforce-team/gemforce#readme
https://github.com/gemforce-team/wGemCombiner#readme
130 Comments
Doroti 8 Nov, 2023 @ 12:48am 
Thanks for the guide!
It's great! The last time I felt myself this immersed in reading and theoretising was with Monster Hunter: World modding xD

Glad that links to the library and Combiner still work, as doing that manually was really time-consuming :steamhappy:
Sumatris 4 Jul, 2023 @ 4:46am 
I know that hardcore players often dig really deep into their favorite game's hidden math, but this guide is... phew ^^. Makes my fond memories of playing the original Gemcraft(s) as flash games back in the day feel kinda weird and innocent, considering how blasé we went about it in our youthful enthusiasm. Ah, good times ^^. Still, glad to see this amazing series still has such devoted fans. It deserves nothing less.
Nesurame 15 Aug, 2022 @ 10:06am 
You know... I thought I knew some strong strategies, but this guide blew my mind.

Is there a reason pool-bound isn't used for the amplifiers? even though the PB bonus doesn't transfer to the core gem, but the stat boosted by PB's bonus seems to transfer over to the supported gem. Are the 1k skillpoints or so better used as starting mana?
Architect Ironturtle 7 Jun, 2021 @ 9:17am 
I see. I am at WL 2k, I mentioned that in my post. I'll give the bloodbound another chance and see how it goes.
12345ieee  [author] 7 Jun, 2021 @ 1:40am 
@Architect Ironturtle: what you're seeing is normal at low levels, which is why the guide wants you to be at WL 2k.
You can check a pb vs bb comparison here: https://steamproxy.net/sharedfiles/filedetails/?id=550049738 , bb passes pb at around g30.
Architect Ironturtle 6 Jun, 2021 @ 11:43pm 
As a result, I use poolbound gems exclusively, and with a one each of crit/pool, chain/mana/pool and slow/chain/pool in traps at the start of the level I'm currently going through the world map hitting every tile on max difficulty and rushing all the waves right at the start, just because it gets through faster and as long as I focus on upgrading the mana gem first and the damage gem second nothing can touch me. my early game only consists of the time it takes to receive my first drop, after that I snowball out of control. This is with me at level 2213, btw. This is without using any of the cool gem building strategies present in this guide, and I bet I would get even more powerful results if I used them while swapping blood gems for pool.

So, would anyone care to explain why poolbound never shows up in this guide even once and bloodbound is considered top tier? I presume there's a reason I'm missing, and I would fascinated to hear the explanation.
Architect Ironturtle 6 Jun, 2021 @ 11:43pm 
Warning, comment chain: I'm puzzled. For the most part this makes total sense, but the one thing that I can't get my head around is the use of bloodbound gems over poolbound gems. I tested both head to head and poolbound wasn't just superior, it was overwhelmingly so. It scaled faster and harder and had larger bonuses attached, especially with a maxed out mana stream making each threshhold come sooner. What's more, dual crit/pool gems were superior to triple crit/pool/blood gems, mainly because the gems weren't relying on hitting their targets a lot of times. Blood honestly felt like it dragged any gem it was attached to down, that's how bad the comparison was.
nullmana 20 May, 2021 @ 2:34pm 
Check out the Unnamed Utility Mod Patch for GC:CS over at reddit. It's a mod with features for optimizing late endurance, including one-key gem gem combines up to 64O/56Y, a target 'only structures' for maps with corrupted shards, and some performance optimizations for the game to run a bit faster.
azmarco 7 Apr, 2021 @ 5:04pm 
man I wish I could even try to write a guide like that
BilboCGL  [author] 21 Jan, 2021 @ 5:01pm 
Five and a half year... and @Thaliviel is right! But I won't change the pic ;)