GemCraft - Chasing Shadows

GemCraft - Chasing Shadows

253 ratings
GC:CS Basic Strategy Guide
By xande1
Intended to be a compendium of hints for how to approach the game for people who don't want a step-by-step walkthrough.
   
Award
Favorite
Favorited
Unfavorite
About this Guide
Sorry that the promised guide updates haven't come through yet. I've been otherwise busy. No ETA on updates, but I feel like the most important stuff is there. I'll try to get back to filling out the remaining bits, but I can't make promises.

This guide is intended to give players new to the GemCraft series a leg up on the strategies that will help them succeed at GC2:CS. It is designed for players who want to find their own way in the game, but maybe want a bit of help with how to accomplish that. It aims to be useful from starting at Level 1 on field F1, through collecting skills, levels, and talisman fragments, and on until beating the final field of the game at Y6 (which usually happens around Wizard Level (WL) 110-170, although it can be done as early as 85, or not until after 300+).

What it doesn't cover is endgame play, doing super endurance runs to get WL 10,000+ (and even on up to 30,000+); see BilboGCL and company's Extreme Endgame Guide for that. It is quite possible to do endgame mana farming and reach insane WL well before finishing the "main plot", as long as you have unlocked the necessary skills, but doing so (imho) robs the main playthrough of a lot of its fun. I strongly recommend finishing the game first, and only then going on to ultra-high WLs, if you choose to.

With the exception of a brief outline of the world map near the end, it's not a walkthrough. I don't tell you, "Next go here and do this." Rather, this guide is a set of strategies and principles that can be applied to whatever situation you find yourself in.
  • Basic Strategies - covers some game mechanics, and how to use them to effectively to win
  • The Beam Trick - a non-obvious trick for "hitting above your weight"; short, but powerful, once you unlock it
  • Gem Types - more detail on gem types, and how to use them
  • Skills - discussion of the non-gem skills, how to use the spells
  • Battle Traits - how difficult each is; how to counter
  • The World Map - outline map of the game; my suggested path; shortest possible path

Also, I did most of the writing for this guide while killing time waiting for the Steam version of GC2:CS to be released, so it's necessarily based on the flash version of the game. That shouldn't matter too much, since we know from the developer's blog what most of the changes between versions are, but it does mean that the "map" of fields later on doesn't (yet) include the locations of the Orblets Trait or the Chain-Hit Gem Skill, since those were auto-awarded for buying premium in the flash version. I'll try to make updates once all that stuff is sussed out, but for the first while after release, I'll likely be spending my spare time playing, not guide-writing.

This guide is still under construction. Hopefully I will finish it Soon(TM), but I wanted to post what I already had for anyone who's having trouble.

Additional Resources:
These are based around the flash version of GC2:CS, but they should still have lots of useful information if you're looking for something not covered in this guide.
Gemcraft Wiki[gemcraft.wikia.com] Contains articles on most features of the game, a full list of fields (rather than the hextile-level outline I give), details on in-game secrets, etc.
Links thread at the Armor Games discussion boards[armorgames.com] Detailed walkthroughs of the game, the original version of the Extreme endgame guide, details on how to beat each vision field, discussion of in-game secrets.
Basic Strategy
Read the Tutorial Screens - They tell you important stuff about the game. Also read the tips that show while maps are loading.

Mazing - One of the most basic strategies for tower defense-type games is "mazing", or using walls, towers, etc. to make a long path the creeps have to travel to reach your orb. Also, bringing different entrances for creeps together so that they're traveling on one path for as much of the level as possible. Generally, you want to place your towers with gems such that they can cover the longest possible stretch path, thus giving them the most possible time to shoot at creeps before they go out of range. A long maze can mean the difference between creeps getting through to your orb ("leaking"), and killing everything and being ready for the next waves. Every map is different, and you'll have to adapt to what you're given. Also remember that making a maze longer in a place that's not in range of any towers doesn't do you any good.

Multiple Killgems - On the one hand, since creep armor is a flat reduction in damage per shot, a single, strong gem is the most effective way of dealing with heavily-armored foes (but see also the discussion of the purple (armor tearing) gem later on). On the other hand, a gem of the next higher grade costs slightly more than twice the cost of the grade below, while doing less than twice the damage, making lower-grade gems more cost efficient. Also, firing rate goes up slowly with grade, so small numbers of gems can have trouble taking out large groups of swarmlings. In general, you'll want multiple gems attacking creeps to take them down. The optimum number varies from map to map, but as a rule of thumb you'll want to start with 1-2 killgems, and end up with somewhere around 2-4 killgems per path to the orb you need to cover.

If you use too many gems, individual gems won't have enough damage to get through creep armor (even swarmlings can have significant armor in late waves). Too few gems, and you won't be able to kill swarmlings fast enough, and/or your total damage won't be enough to take out giants in later waves. As with many things in GemCraft, trial and error is the key to learning.

Gem Targeting - Right-click on a gem and drag in any of the 8 cardinal directions to change targeting for that gem. This can greatly increase the effectiveness of your gems. Some examples: Setting an armor tearing to "highest armor" helps it tear down creep armor evenly, instead of continuing to shoot a creep with no armor left. A poison trap near the entrance set to "swarmlings" will thin out their numbers a lot by the time they reach your kill towers, keeping the towers from being overwhelmed with targets. Having your 2nd or 3rd most powerful killgem set to "least hit points" helps ensure that you're at least killing some of the creeps, and thins them out, leaving just the healthier ones for your highest-power gem to focus on.

Traps vs. Towers - Learn when to use towers, when to use traps, and how to use them together. Towers have a long firing range and the best damage. Traps only hit targets on top of them and get a big damage penalty, but get a signficant bonus to special effects (poison damage, armor tearing, mana leech, slowing, etc.), and a small bonus to firing speed. Also, gem enhancment spells, which only last for a small number of shots on tower gems, last forever on trap gems (with different effects). So as above, a poison gem in a trap will deliver a lot of poison damage (which ignores armor) to most creeps passing over it, thinning out swarmlings. A critical hit gem should go in a tower to maximize its damage, and let it take multiple shots at each creep (especially important for killing giants). An armor tearing gem can go either way: in a trap, it will deliver a single (or a few, for slow-moving giants), large armor reduction to (almost) every monster passing over it, in a tower, it will reduce armor a lot less per shot, but may get many shots at the same creep, if your problem is a few, high-armor creeps, rather than everything having lots of armor.

Pure vs. Double and Triple Gems - In general, pure gems have more powerful special effects; double and triple gems get both a penalty to their special effects from not being pure, and also lose power because the "special power" of the gem is divided among multiple specials. Double (and Triple) gems get a small bonus (~+20%) to damage. So **generally**, you will put pure gems in traps and double gems in towers. There are, of course, exceptions. For example, a dual gem with a red (chain hit) component can make up for the loss in power of the other special with the extra hits it gets from chain hit (assuming you get it to high enough grade), and thus make an excellent trap component. If you're using a purple (armor tearing) gem in a tower, you might want it to be pure for more effective armor reduction.

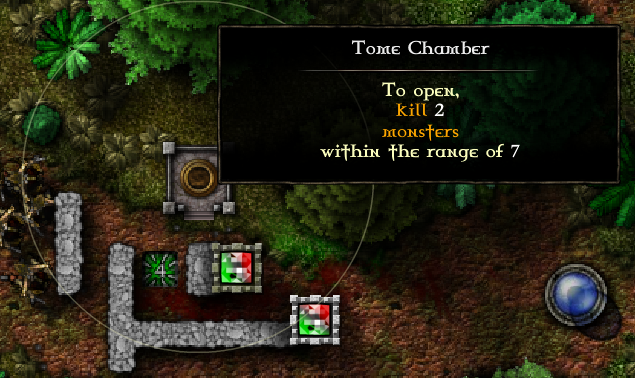
Open all Tome Chanbers (and Wizard Towers) - Tome Chambers grant new skills when opened, but it's possible to beat their levels without opening them; don't do it! Or if you do it, go back and re-beat the level while opening the tome chamber. (Wizard Towers usually grant new battle traits when opened, but it's not possible to beat a Wiz Tower map without opening the tower, so there's much less danger of missing things.) You will need those skills.

Early in the game, Tome Chambers are easy, just kill N creeps within a certain range. So mouse over the chamber to see the range, build your towers near the chamber, and build your maze so the creeps are all within that range when they die, and the chamber will pop open well before the level ends. Later on, though, Tome Chambers become trickier (e.g., Kill N cursed and frozen giants within a range of X), so you may have to put in some extra effort. Still build your kill zone around the tome chamber, but you may need to enrage waves (see farther down) to get extra creeps of a certain type, move your gem to your inventory until the maze fills up with creeps so you can catch them all with a single spell before re-socketing your gem to kill them, etc.

UNDER CONSTRUCTION - the following subsections are just my notes about what else I need to say, hopefully I'll finish this up Soon(TM).

Amplifiers - Amplifier math; mana cost effectiveness breakpoints for various scenarios.

Skill Distribution - starting mana vs. skills; points in reserve (usually 1/3-1/2 of total, or a G4 or G5 starter gem); where to spend (True Colors, Fusion, Mana Stream are priority, Mana Leech and Critical Hit next, other skills 3-6 if you want to experiment); rising costs and implications (table?)

Enraging - Skillfull enraging is what separates a good Gemcraft player from a great one. how far to enrage; beacons at 5 gems; Table: 15m/creep: G1; 45m/creep:G2; 72m/creep:G3

What to do When Stuck - reduce difficulty, rearrange skills, try a different part of the map, achievement grind, level grind (see next tip)

Replaying Fields for XP - traits (& difficulty), endurance, enraging; L65 on F hex only

Dealing with Special Enemies - spectres, shadows, spires
The Beam Trick
Short, but powerful enough if you've never heard it before that I thought it deserved its own section. You can start using this as soon as you unlock the Beam skill at D4; it's even better when you have the relevant gem skill to boost that special even more.

Gem (in tower) + Beam + Targeting = Super powerful special until Beam wears off, because the special gets re-applied approximately every frame.
  • Orange: Random target; huge mana gains
  • Green: Random target (or Flying Ones for shadow); huge poison damage - great for taking out shadows, super-tough giants, or anything with a ton of armor (since poison ignores armor)
  • Purple: Random target, or Highest Armor target (or Flying Ones for shadow); huge armor shred, great for shadows (which spawn with lots of armor, and gain it each second they're alive)

Beam also raises the hit counter on a gem very quickly, so it's great for improving black (bloodbound - gain power as they have more hits) gems quickly. (It's also good for getting the achievements related to having a low-grade gem with a lot of hits.)
Gem Types
Skills
Battle Traits
The World Map
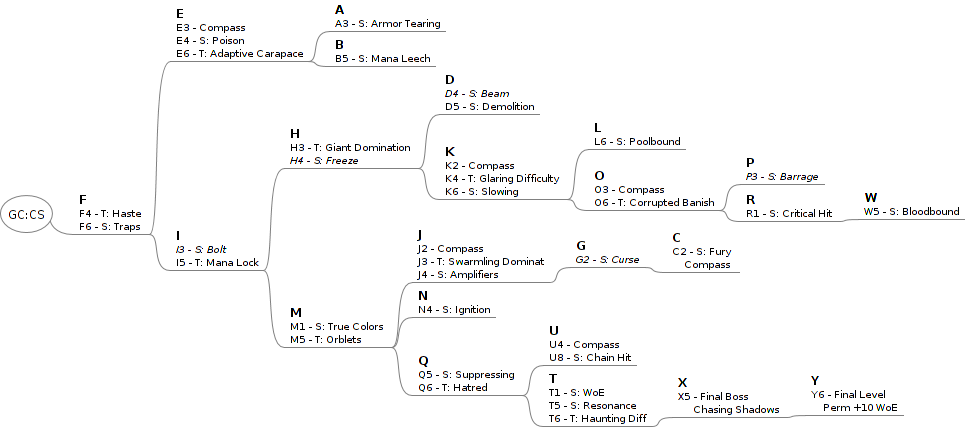
The graphic shows how hextiles connect to each other, and where skills (S) and battle traits (T) are obtained.


My Suggested Path

F>I>H>E>A>B>D>M>J>G>(C)>K>L>O>P>R>W>(N)>Q>U>T>X>Y

F>I>H To get bolt and freeze asap.
>E>A&B Loop back for poison, armor tearing, and mana leech.
>D Beam to syngergize with those 3 gems, or you can do this right after H.
>M For True Colors! Possibly the single most powerful skill.
>J>G (>C is optional, don't need Fury until late, it also has a compass field) gets you Amplifiers and Curse
>K (unlocks Glaring difficulty; replay time if you need to farm XP/talisman frags)>L>O>P>R>W Poolbound, Critical Hit, and Curse, by this point you have the vital skills to start endgame mana farming.
(>N is optional, don't need Ignition until endgame)
>Q>U for chain hit skill
>T>X>Y

Shortest Possible Path

Gets you to X5 (the end of the story), and then to Y6 (the very last field) in the smallest number of explored fields possible (55 at X5; 58 at Y6). Doing things this way is exceedingly challenging, and not for the faint of heart. Also, you'll miss most skills in the game, so if you want to do any extreme endgame leveling, you'll need to go back and acquire the necessary skills first.

I list field numbers too for this one, since this path avoids all unnecessary fields. Only skills necessary to proceed, or that you can't avoid getting are listed below. You have to have Freeze and Curse to get the Barrage skill at P3; you must have Bolt, Beam, and Barrage to get past the Wizard Tower at Q6. You can't avoid getting Wake of Eternity when beating T1. You can also pick up True Colors at M1, but it's not listed since technically you can complete the game without it (although not getting it makes an already difficult challenge even more difficult).

F:1234 I:123 (Bolt) 45 H:124 (Freeze) 53 D: 124 (Beam)
M:124356 J:123 G:12 (Curse)
K:1234 O:12456 P:13 (Barrage)
M:7 Q:1236 T:124367 X:12345 Y:456

29 Comments
Player Won 20 Jun, 2021 @ 3:33pm 
Just don't detour any more than needed, since any time an enemy spends away from your towers is time it can spend regenerating. Regeneration also makes focus firing important, and multiple but shorter passes tend to force towers to spread their attacks out, so it can be a good idea to compromise and set gems to "least health" when early on in the maze.
Player Won 20 Jun, 2021 @ 3:26pm 
"...making a maze longer in a place that's not in range of any towers doesn't do you any good."

Incorrect.

Towers get to shoot at a pack of enemies for an amount of time equal to the length of the pack plus the length of the pass they're making on a given section of path in the turret's range. Thus, doubling the length of the path does not double the amount of shooting time, and this is more dramatically the case the longer the pack is.

Forming multiple passes allows your tower(s) to whittle down enemy numbers gradually, but this only really helps if you make room of real estate outside the tower's range to let it finish shooting the tail of the pack on the first pass before the head approaches on the second pass.

Also, as the pack shrinks from one pass to the next, this effect will diminish. So it is wise to distribute length of passes to favor later passes(since you can only fit so many within a tower's range), and length of detours for earlier detours.
credburn 12 Feb, 2021 @ 6:20am 
:(
Chadbaru Goatsuki 4 Jan, 2021 @ 3:10am 
last online, 9 years ago intensifies
cooldude772 10 Nov, 2020 @ 10:47pm 
tip 1 use the light blue gem mostly
David Allen 2 Jun, 2018 @ 10:28pm 
A suggested update for the battle traits:
If you want more XP without adding too much more challenge - and you don't have the Fury skill - or want to compound it - then I suggest you play with the Haste and Orblets traits. Haste is the first one you get, while Orblets provides a small edge over the monsters provided you can keep your orb totally safe. Corrupted Banishment kind of works for this, because the effects don't happen unless the orb banishes them. It's more of a risk, given that you get stronger monsters as opposed to a second chance to kill them (but losing an orblet hurts much more.)

Also, on Bloodbound vs. Poolbound, the former is good for MASSIVELY powerful gems working solo, while the latter is good for still powerful, but less so, gems working in groups.

One more thing: Chain hit is a GODSEND against swarmlings, overcoming the issue with a singular "killgem" - Beam works well enough as a substitute in the even you lack the necessary skill (It's late-game).
trulez 24 Jul, 2016 @ 12:59pm 
@Troppamus I have WL 27k and I didn't know that :D
Thanks for the tip.
mihailalex68 3 May, 2016 @ 1:54pm 
I have beatten the fields K1, k2, k3 but I cannot find the field k4. Is there anything special to do for that of is an error?
Guy Ferrari 16 Jan, 2016 @ 2:11am 
When will this be updated again? Really keen on learning more about how to play the game :(
AzTech 2064 8 Jan, 2016 @ 3:53am 
bloodbound vs poolbound... well if you will get poolbound earlier to use on all maps, and if you dont have beam, poolbound will be most likely more effective (exspellialy if you have more than one killgem tower) but exspecially when you have a map where its easy to channel the enemies through one killgem (and a possible managem, aka orange;black/white;red) and have the beam power, always go with bloodbound, unless you have absurd wizard levels, and thus absurd starting manapool^^