Borderlands: The Pre-Sequel

Borderlands: The Pre-Sequel

91 ratings
Steaks. Robots. Lasers. All about Wilhelm. (WIP)
By KrewL
Get your eye lasers warmed up and laugh at those poor scrubs dying of Turbocancer. You are a cyborg badass who enjoys a good steak and robot punching bad guys into bloody ribbons. This guide will help you get the most out of your cybernetics, calibrate your killing skills, and get to know your drone BFF's: Wolf and Saint. Then we will look over some gear, and get in on some sneaky tips to get you armed to the teeth!

Hopefully, this wont end up as a huge essay like my forever WIP Zer0 guide... dear lord when I get on a writing binge...
   
Award
Favorite
Favorited
Unfavorite
Good at Fights!
Yes, he is very good at fights. Meet Wilhelm, one of the most balanced classes to ever grace the Borderlands. He makes his boss form in Borderlands 2 look like it sucks at fights! He may not have much to say, but he gets his message across when its his fist meeting their face. If you like to be able to walk though bullet fire without flinching and dishing out the pain in return, the Enforcer may be right up your ally. You also get two Drone buddies to lend you a hand, two modified surveyor drones on steroids! You should meet those two first!

"Ready to chew ass and spit gum! And I'm all outta ass."
The Dynamic Duo: Wolf and Saint
Did you HATE those pesky Surveyor Drones in Borderlands 2 Digestruct Peak? Well, now you got your own in one handy Action Skill, and their pesky powers are at your command! Meet Wolf, the damage dispensing badass, and Saint, your personal Medic! While Surveyor Drones both attacked and healed in Borderlands 2, here, their abilities have been divided between two bots.

A huge thing to remember with this action skill is you can hold down your action skill trigger to recall Wolf and Saint. Any remaining time will be added back onto the cooldown. You will get a feel for when or when not to recall the Drones. Some examples you cleared an area out and its a bit of a hike to the next one, or you want a certain Drones skill activated... more on that later.

"Now you've got the three of us!"


-Wolf follows the Surveyor attack patterns to a tee. He circles around firing laser bolts at foes.

-He has his own health bar and shield. You can see how much health and shield he has below the time bar on the Action Skill HUD.

-He also has no clipping, so he doesn’t get stuck on anything. You will find quite often that Wolf will fly into an adjacent room and kill foes before you even reach said room!

-He makes a great distraction and he is extremely tough to kill. Enemy AI tends to have trouble tracking him. There is only a few things in the game that can put Wolf down.

-Wolf also deals a surprising amount of damage for a pet and scales amazingly well with the games later difficulty levels... quite the rare thing considering pets in the Borderlands games.

-You can even make Wolf deal more damage by investing into some skills!


-Saint hangs around you and heals!

-He also heals your friends! Unlocked special abilities also benefit your friends too!

-He has a special eye shield up, making him invulnerable to damage.

-If Wolf dies, Saint will still remain for the full duration of the Action Skill.

-Saints healing is a bit lackluster with no skills sunk into him. You have to unlock a few ability’s to make Saint really shine! I feel its almost mandatory to sink some skill points into Saint, for the healing he can output is nuts. He will also be able to recharge your shields and give you quite a charge.

BUGS

-One rare occasions, Wolf may bug out. I have noticed he stops moving if something explodes on top of him... like an enemy moon buggy...


Uhh... *pokes with stick*


Wolf got stuck on its head...

-Wolf and Saint also LOVE to photobomb you when you least expect it!


Um... I'm trying to shop here


Dammit Saint I am trying to read that!
SKILLS TO BE GOOD AT FIGHTS
So, how do you want to upgrade your Systems? Do you want to dish out damage and make Wolf a murder monster? Are some Cybernetic enhancements on the menu, with a helping of LASERS? Want to be able to shrug off nasty damage and make Saint a buff machine?

No matter what way you go, you will still do well at the game. Wilhelm is just THAT balanced. Sure he's no insane damage dealer like some other classes, but when your good at fights like Wilhelm, you have other tricks up your robotic sleeves that make you nasty in your own special way. Besides, those other classes will die of Turbocancer eventually!

Welcome to robot punch city! Population: everyone’s face!


Here is how I roll! I am not showing you the best build. Wilhem has many ways to kick ass! How will you build him?

Offical Skill Tree to play around with Points[borderlandsthegame.com]
Hunter Killer
This tree focus on Wolf and Damage. If you want your Wolf to be a mean killing machine, look no further. Even if you don't want to put a lot into Wolf, there is some skills in this tree you still want to look at! Wolf can still do a lot of damage even with a small investment into this tree. Why do I say small investment? Well, there is one thing in here you should really get...

Afterburner
Wolf's Air Speed is increased by 12% initially, then 6% per rank.
Additionally, your Reload Speed and Projectile Speed is increased by 10% initially, then by 5% per rank


Make Wolf fly faster? Good! Increase reload and projectile speed? AWESOME! Fast reload is always good to have. It could mean life or death! Do take note that projectile speed increases can effect special weaponry behavior.

Fire Support
ncreases your Damage with all gun types by 3% per rank, and increases the Damage dealt by Wolf by 10% initially, then by 5% per rank.

Damage increase across the board for you and Wolf! What is not to like about this skill?

Venom Bolts
Wolf's shots have a 10% initial chance, and a additional 5% per rank chance for to be Venom Bolts, which deal Corrosive Damage. Additionally, you gain 2% per rank Corrode Chance and 4% per rank Corrode Damage with guns and grenades.

This one is very iffy. Once you reach the second play though and beyond, enemy shields will resist corrosive damage. While this skill can increase Wolf's damage, it also can reduce it! It also buffs your corrosive damage, yet there is not many armoured foes in this game.

Suppression
Kill Skill. Killing an enemy gives you a 6% per rank and Wolf a 15% per rank increased fire rate for a short time.

You may be getting this if your avoiding Venom Bolts. This Kill Skill combos very nicely with Targeting Scope.

Laser Guided
When you activate Wolf and Saint, or press [Action Skill Key] while they are active, Saint will Paint the target under your reticle. Wolf will focus attacks on the currently Painted target, and the target will recieve increased Damage by 25% from all sources. If a target is killed while Painted, 5 seconds will be added to Wolf and Saint's Duration/

THIS is a must have. You can set Wolf onto one target and it will focus on said target until it dies. It also increases Wolf's damage against said target and you get MORE skill time if Wolf lands the kill. Welcome to the laser painting mini-game of Wilhelm play! Having control of Wolf is just too good. For example, paint that pesky sniper in the back. Wolf goes to harass it, leaving you to deal with frontal threats. Also, paint targets that are near death, and have Wolf kill them. Bam, more time on your Action Skill! There is also another skill that ties into this laser minigame quite well, if you choose to go deeper into this skill tree.

Rolling Thunder
While Wolf is alive, you will gain a stack of Rolling Thunder every 5 seconds, each stack increases Wolf's Damage by 2% per stack, and increases by 2% per each rank.

The longer Wolf is out, the more damage it does. Remember the laser painting minigame I was talking about? Paint near dead foes for Wolf to kill. Time gets added to Action Skill. Thus Wolf is out longer and becomes stronger. Once the count gets near ten, Wolf may be killing things faster then you can...

Kill Switch
Whenever Wolf is recalled, runs out of Health, or expires, it will dive bomb enemies with an explosive effect!

This is a gimmick skill. Wolf pulls an EXP Loader and dive bombs into its target. This skill should switch the leveling scheme with Scramble. Making the explosion stronger may make this skill more desirable. Heck, it does nice damage and is hilarious, but you may want that point elsewhere.

Scramble
When Wolf is destroyed, it is replaced once for free, and 30% time will be added to Wolf and Saint's Duration, the time bonus increases by 5% per rank.

You will only need one point in this ever, if you want to take it. Wolf only dies to a slim number of scenarios. If you have Kill Switch, you could potently have two Wolf bombs. Also, you will have to repaint the target when a new Wolf is summoned.

Cold War
When you apply a Shock, Incendiary, or Corrosive status effect to an enemy, there is a 5% per rank chance for the target to freeze. Additionally, you gain 2% per rank increase status effect chance when using Cryo weapons.

This skill is absolutely NUTS. I think its borderline broken! Works on ALL your elemental damage, even environment barrels! Turn your grenades into duel elemental hell, especially Singularities or Vladof AOE's! You will be drawn to pure elemental weaponry if you go this route. Looking at the Maliwans now?

Escalation
Increase your Critical Hit Damage by 5% per rank. Additionally, Critical hits on enemies reduce the remaining Cooldown of Wolf and Saint by 0.6 seconds per rank. This effect has a 6 second cooldown at all ranks.

This skill combos well with Targeting Scope. The secondary effect is okay, but the critical damage is probably why you want this skill.

Omega Strike
Wolf periodically launches a deadly missile strike against its targets.

Wolf will occasionally fire a volley of missiles. He will announce when hes going to fire a volley. This is a capstone skill you don't really need. One thing it does synergize well with is Cold War. Frozen enemies take more damage from explosions. If your going Cold War, this skill will be worth it.
Cyber Commando
I like to call this tree the “gimmick” tree. It's a mix of damage, survivability and situational abilities. This tree also has the cybernetic upgrades witch change Wilhelm's appearance and voice, while giving him some odd yet extremely useful abilities, especially for the highest difficulty. All systems green? Then lets robot punch some badasses!

Laser Focus
Increases Gun Damage and Magazine Size with all Laser Weapons. Laser Damage : +4% per rank. Laser Magazine Size : +4 initially, then +2 per rank.

This is an extremely powerful skill if you want to maximize your damage output. Lasers are some of the strongest weapons in the game, and this would be the icing on the cake... or gravy on the steak... yeah Wilhelm likes steak better. We will be talking about lasers later!

Man and Machine
ncreases Shield Capacity and Maximum Health for you and Wolf. Maximum Health and Shield Capacity : +3% per rank. Wolf Maximum Health and Shield Capacity : +5% per rank.

If you played Borderlands 2, you would look at this skill and go... nope! While Pre-Sequel has better balance, we still kinda just look at this skill and go... nope! Why? Health Gate! I call this the “if you have the Legendary Enforcer Mod, put a point in this because it already boosts it.” One point for an okay health and shield boost, then its worth it!

First to Fight
Increases your Gun Damage. This bonus is lost 5 seconds after you deal damage, and is regained after 5 seconds of you not dealing or taking damage. Gun Damage : +8% per rank.

This is a tricky skill to use. It should be called “First to Cover!” Your going to be a cover lover if you want to get the most of out this. A lot of the boss fight areas don't have much cover either, making it a questionable choice.

Targeting Scope
Kill Skill. Killing an enemy gives you increased Accuracy and Critical Damage for a few seconds.
Critical Damage : +10% per rank. Accuracy : +5% per rank.


This is one powerful kill skill and can synergize with some other skills I have mentioned before this! The ironic thing is you wouldn’t think of Wilhelm as a Sniper. He can be quite good with Sniper Rifles, and this skill is one reason why!

Power Fist
Cyborg Augmentation : Arm. Melee Override. Press (melee) to perform an explosive punch with extended range. This ability has a 12 second cooldown.

Mother. Trucking. Robot. Punch. To get the most out of this, you need to know how to use it. The secret is Cryo! Since frozen foes take bonus damage from explosive and melee damage, and that’s what your power fist is, prepare to instantly ice chunkify any non boss foes! Your prime targets are Badass enemies. Freeze them with a Cryo weapon. Aim for their critical weak-spot, and ROBAWT PAAAWWWWNNNCCCCHHH! BOOM. DEAD... or close to it! This thing is a must have in Ultimate Vault Hunter Mode. It makes the super buffed badasses a joke! Seriously!

Shock Absorber
Cyborg Augmentation : Legs.
You can shoot while Sprinting. While doing so, you gain bonus Gun Damage, and suffer no accuracy penalties. Gun damage +20%


Robot legs! Running and gunning takes a bit to get used to. My beef is it can be hard to tell if your running or not. It needs to make a special sound or have a HUD icon when your running. Minus those little nitpicks, its worth a point sink. Plus you get to look even cooler now!

Emergency Response
Emergency Response is activated whenever your Shield becomes depleted, increasing your Fire Rate and Reload Speed, and Wolf's Fire Rate, for a short duration. Your shield must fully recharge between activations. Reload Speed, Fire Rate and Wolf's Fire Rate : +10% per rank. Duration : 15 seconds

Wilhelm has quite a few “oh crap” skills. This one doesn’t jump out as a must grab. We have other skills that do this already without any “oh crap” activation, and you most likely have put points into them.

Divert Power
When your Shields are depleted and your Health is low (30%), taking Damage causes you to gain massive Shield Regeneration and Damage Resistance for a few seconds. This ability has a 25 second cooldown. Duration: 3 seconds. Damage Resistance: +50.0% initially, +66.7% at rank 2, +75% at rank 3, +80% at rank 4, +83.3% at rank 5. Recharges 20% of your shield per rank.

Think of this as Heath Gate the second, with damage resistance! It can save your life! It's a one point wonder. I don’t see much use putting more points into it, unless you need to so you can advance further down the tree.

Meteor Slam
Increases the Damage Radius of your Slam ability.

Do I need to explain this one? It's pretty much a "nope" skill too... unless your REALLY addicted to butt-slamming...

Welcome to the Gun Show
You are better with guns in nearly every regard. Increases Gun Damage, Reload Speed, Magazine Size, Accuracy, and reduces Recoil. +3% per rank.

A good choice if your deep in this tree, and don't know what to put extra points in.

Vengeance Cannon
Cyborg Augmentation: Weapon. Whenever your Shield becomes depleted, you activate your shoulder-mounted Vengeance Cannon. The Vengeance Cannon fires Incendiary Laser Blasts in tandem with your equipped weapon for a short period of time. Your Shield must fully recharge between activations. Active Duration: 12 seconds

Do you like guns on your guns on your guns? We can have guns on your guns! The shoulder cannon will appear on the top of your screen when its active, and fires when you fire your gun. The only downside to this upgrade is the laser is a fire elemental weapon. If your not in the vacuum of space and can strip enemy shields easily, it can bring the pain! Armoured foes will still laugh at it though... If your deep in this tree enough to unlock this, might as-well!
Dreadnaught
Tanking? Really? Quite the unusual concept in a Borderlands game. Ultimate Vault Hunter Mode in Borderlands 2 turned everyone into paste, no matter how “tough” you were. Well, this tree will blow your mind. You CAN be a tank! You can laugh at bullets and elemental damage and stuff! This tree also has Saint's upgrades. One of them I find extremely mandatory if you want Saint to not be useless. Like the Hunter Killer tree, this one has some mandatory dips in my opinion.

Auxiliary Tanks
Increases Wolf and Saint's Duration by 2 seconds per rank, and Cooldown Rate by 3% per rank.

Can't go wrong putting points into this. More Wolf and Saint!

Fortify
Increases Max Health for you and Wolf by 3% per rank. Additionally, while Saint is active you deal increased Damage with all gun types by 4% per rank.

The gun damage increase is what your really looking at here. Not much else to say on this one. It's safe to put points into it if it suits you!

Energize
Saint will occasionally boost the Shields of you and your friends by 8% of your shield capacity per rank. Additionally, Saint gains an +0.6% of your Max Health / sec. bonus to the rate at which he regenerates your health per rank.

This is a pretty mandatory skill in my opinion. This will turn Saint into a healing hose, with an amazing shield charge too! You can even swim in lava while Saint is out!

Heatsinks
Improves Shield Recharge rate by 6% per rank and an initial -4% to Shield Recharge Delay, then a -3% per rank. This bonus is doubled while Wolf and Saint are on cooldown.

Give your shield some Tediore power! Combined with Saint's shield charge and help from a little piece of gear that I will mention later, you will have one heck of a shield! Defiantly worth some points if you want to be a hard as nails!

Termination Protocols
Fight for your life is replaced by Termination Protocols. During Termination Protocols you can walk at a reduced speed, fire your weapons, and you constantly shock nearby enemies. If the timer runs out, your power core goes critical, releasing a Nuclear Explosion.

Being able to walk in FFYL is HUGE. Plus the electricity shooting off you will eat away at enemies shields, and if you have Cold War, it may freeze them too! The Nuke if you fail to get up is lackluster in high difficulty’s though. One more reason why this skill is worth it... the fricken terminator like music!

Rapid Reinforcement
Kill Skill. Killing an enemy increases your cooldown rate for Wolf and Saint by 4% per rank, increases your movement speed by 3% per rank, and your Reload Speed by 8% per rank for a short time.

I swear this is the same as that other skill, but its a kill skill this time... not really worth it in my opinion, the same reasons as that other skill.

Zero Hour
When Saint is recalled or expires, he explodes, deploying a Healing Zone underneath you that lasts 12 seconds. You and your friends Regenerate 8% of your max health Health / sec. while standing in the zone.

This skill needs some serious rework... It's really hard to see when it goes off. You have to tell your friends were the healing zone is. Plus your getting healed out of the eyeballs by Saint anyhow... it just feels so out of place. When I was playing around with it, it was rarely handy. I feel the point is better elsewhere.

Hazmat Containment System
If you have a Incendiary, Shock, or Corrosive Status Effect on you, you and your friends gain an initial 17%, plus 12% per rank Resistance to that element. Additionally, you will occasionally spread that Status Effect to nearby enemies while it's active.

Gain the powers of an Adaptive Shield! Laugh at the elemental damage that normally can out right kill a player in higher difficulties. Best part is, your friends get the benefits too! An amazing skill, defiantly worth it! If you get Heatsinks too, you can turn your shield into awesomesauce!

Kinetic Armor
Increases your Maximum Health by 5% per rank. Additionally, close range attackers have a 5% per rank chance to be struck by Explosive Feedback. The closer the enemy is to you the more likely he is to be struck.

I have not tried this skill. I can see a little potential if the damage is indeed explosive and your using Cold War. I just don't see a way to squeeze it in when other tanking skills in this tree are far more interesting.

Hard To Kill
Whenever you are shot or struck by an enemy, you gain a stack of Hard To Kill (Maximum stack count is 100 at any/all ranks) reducing all Damage by 0.1% per stack, and a additional 0.1% per rank received. All stacks are removed after a few seconds of taking no damage.

At first glance, this skill looked very situational. I was not sure about this one, then Mistcutter's post in the comments made me take another look. So I tested this skill in the Holodome Badass Round on UVHM. In places I should of died, I survived, thanks to some high stacks of this skill. Attacks that would normally healthgate you get knocked down a peg, allowing you more time to adapt! This skill will shine in the highest difficulties because of that! To get this most out of this skill, you will have to combine it with other heavy defense skills, like Hazmat!

Overcharge
Immediately after being summoned, Saint will release an Energy Wave that will Overcharge you and any nearby friends for 10 seconds. Overcharged players gain increased Movement speed by 15%, Fire rate by 75%, Reload Speed by 75%, and Ammo Regeneration by +10

This is an extremely powerful capstone skill. Little lighting bolts will fly around the edges of your screen while the buff is active. So many buffs on top of insane ammo regeneration. It is also quite abuse-able too. You can just summon and dismiss your Drones quickly to continuously use this buff. If your just shopping around, you can do this “Overcharge Chain” to refill your ammo for free. I prefer to have Wolf out for a bit in combat situations. I really matters what situation I am in on how long I have the Drones out for. Other players do prefer the Overcharge Chain.
GEAR TO BE THE BEST AT FIGHTS: WIP
"I've got somethin' for EVERYONE!"
Lasers! PewPew!
Lasers are a new weapon type featured in the Pre-Sequel. Since Wilhelm can make excellent use out of lasers, I will cover them in more detail then other weapons. One thing that makes them quite unusual is they behave differently with body/barrel combinations. Also, lasers are always elemental, and do not explode, to Mr.Torgue's disgust.

Some unique and legendary lasers break the body/barrel rules, and one of them has its own weird “element”

The information below will start with the body, then the barrel per manufacturer. Only 4 manufacturers make lasers. Torgue will have nothing to do with things that shoot light witch does not explode because light does not explode and therefore is an abomination.

Dahl

These lasers have the ol Dahl gimmick of burst fire when scoped. They also come with a bonus ability: penetrating rounds!

The Dahl Blaster barrel fires like an assault rifle. I find this fire method the most balanced, as it deals decent damage, has nice accuracy, and has unlimited range.


A Dahl laser with matching body and barrel.

Tediore

For a company that's “Space Walmart” they do get their hands on some decent tech. Tediore lasers are a bit weaker damage wise. On the plus side, they have their infamous reload mechanic, but with a twist! You throw out a mini Tesla grenade! With Wilhelm's Laser Focus skill, you have a larger clip with lasers, and thus, your reloads can pack a punch. Just keep in mind laser ammo is expensive... I wish Tediore had a buy 2 get 1 free deal on laser ammo, but Marcus will have something to say about that!

As for the barrel, Tediore has created the all mighty laser shotgun: the Splitter! The barrel by default fires three shots in a spread. If the barrel is matched by a Tediore body, you get six shots! SIX! It does have it's downside. The range is limited, so don't use it as a sniper rifle! Its a LASER SHOTGUN BABY!


This is my baby... I mean this is a Tediore laser with matching body and barrel.

Hyperion

Hyperion is all about that accuracy ramp up, so expect these lasers to hit their mark, especially when scoped. They also have a huge critical hit bonus, witch can get higher with the right parts. I will not go into parts, as there is plenty of info on that elsewhere. This ain’t no mix/max guide!

The Railgun barrel fires a single extremely powerful shot that uses a bit of ammo. With a matching Hyperion body, you have a laser sniper rifle!


Hyperion laser with matching body and barrel. The weapon comes in different colours at times. I am guessing its what they call “a transitional phase” from the Borderlands 1 scheme to Borderlands 2.

Maliwan

The masters at elemental warfare would have to get their hands on laser technology and oh boy do they pack a punch! Maliwan lasers have a continuous firing bonus to damage. Hold down that trigger and watch your foes melt.. melt into an artistic pile of art because Maliwan claims murder is an artform! I am going to agree with them!

A Beam barrel turns the laser into a hose! I think they are treading into Vladof territory here for they have the title of damage hose! Massive damage does come with some massive downsides. Aiming these things can be rough, and they have a range limit too!


Maliwan laser with matching body and barrel.

Now that you know what does what, what combinations of parts would fit your style? What combos do you want to get your fingers on? Do you hate those flying armoured jerks? Find a corrosive Maliwan Blaster, and “pewpewpew” that armour away! Want to crit someones face off in close quarters? A Hyperion Splitter will defiantly do that! Gotta love the fun of laser mix and match!
Special Lasers!
Now, lets get to the unique lasers. These weapons tend to have unique behaviors. I will list ones that you should be on the lookout for! I had to split this off into its own section, because word count limit sad faces.

Bright Spadroon
The elegant way to be clumsy and random: Very high damage. Extremely low range. Laser shoots left side of the crosshair. High continuous damage bonus. Extremely large magazine size. Increased fire rate.

Complete "These are the Bots" for your very own lightsabre. It is pretty much a lightsabre. Doesn’t matter what side of the force your on here, your still going to kick some butt... if you get the hang of this thing!

E-GUN
Kills ghosts, apparently: Special element. All parts fixed. Incredibly high continuous damage bonus. No movement speed penalty when aiming down sights.

Screw Pickles “Green Grenade Mod” reward. Why in the heck would you NOT pick this reward in Sub-Level 13: Part 2. Use the inverter to repair the fast travel station! Schmidt will then let you keep the E-GUN. E-GUN is E-FUN. It is an extremely powerful laser. It's biggest quirk is its weird “element” Shields will resit it and I think it can trigger Cold War. Fighting bosses with multiple elemental resistances and/or phases? Hello E-GUN!


This special event boss resists quite a few elements. E-GUN it is! So E-FUN the laser... shoots... weird...

Mining Laser
PROTOTYPE - Authorized personnel only: Increased damage. Possesses railgun barrel but fires three projectiles in a tight spread at the cost of seven ammo per shot. Fixed triangular spread pattern.

Time to break that Infinite Loop. Disable CL4P-9000 and D4N-TRP will give you this weapon. This is what happens when a Railgun and a Splitter have a baby. It can come in any element and packs one heck of a punch.


I'm afraid I CAN do that!

Vibra-Pulse
Why not turn me on?  Always Shock. Fires a continuous beam which inflicts increasingly heavier damage upon a target and chains damage to surrounding enemies. A percentage of the damage inflicted by this weapon is returned as health.

I personally like this over everyone’s favorite unique laser. I will take the healing over more damage any-day! A huge plus is you can reacquire it infinite times, and information is in another section! There is a funny bug with the chain lighting effect though. If it has no foe to bounce to, it will go across the ENTIRE MAP and stay there forever...


It keeps going and going and going and going...

Ol' Rosie
Every thorn has its rose: Very high continuous damage bonus. HAX!

This thing was so bonkers it got nerfed! Everyone loves Rosie. It's a rape train with no brakes! A Shock elemental Rosie is just too good that it makes things rather trivial. I'm weird with liking the Vibra-Pulse over this, plus its less work to get! Many people will Alt-F4 the The Beginning of the End turn in to acquire a Shock Rosie. Some will even grind to max character level before starting said quest to get a max level Rosie. Yeah... its that good!

Min-Min Lighter
Approached but never identified: Always shock. Consumes 5 ammo per shot. Slow Fire rate. Shoots slow lightning balls that bounce off objects and deal damage to all enemies that near it in a great radius. Shooting the lightning ball with any other weapon results in a shock explosion.

Legendary lasers are really odd. This one does deserve a mention though. It takes a bit of getting used to, but once you do, its quite hilarious. You need to get your Fire Rate up, as this weapon fires at snail speeds. Wilhelm does have a few skills to help here, mainly Suppression and Overcharge. The lighting balls that fire out of this destroys shields and triggers Cold War quite often. Shoot the ball with another weapon to detonate it, causing even more damage! Your best bets for finding this weapon is in a Vending Machine or from the Grinder.

Excalibastard
Thou art most badass: All parts fixed. Increased critical hit damage. Perfect (100.0) accuracy. Critical hits have 100% chance to freeze targets with ranged and melee while wielding the weapon. Meleeing frozen enemies with this weapon generates a singularity that pulls enemies in close and then explodes into a Cryo elemental nova which freezes other nearby enemies.

This extreamly unique weapon is stuck in a stone at Stanton's Liver. It is found by jumping across several cliffs at the left edge of the map, as seen from the entrance, before crossing the bridge leading to the refinery complex. You can only pull one PER CHARACTER NOT PLAYTHOUGH when your badass rank is at 2500 and above. Apparently you can get it out of the grinder now, but I am unsure if that's true or not.

Well now. This thing can be borderline broken. 100% freeze on critical hits is... really silly as if Cryo wasn’t overpowered to begin with! Free singularity effect? Well now! I am mostly looking at that 100% freeze on critical and consider this more of a support weapon on Wilhelm. If you need extreme crowd control, this is your gun. Annoying missions like the turret calibration become a cakewalk with this thing! You can support your friends by insta-freezing everything for them to smash apart! Defiantly have one of these in your backpack! Even if its under-leveled, it can still insta-freeze on critical hits!


"Ice to meet ya! GET IT? ICE T-- forget it."

Laser Disker
Shazbot! Always explosive element. Fires a blue disk in a straight trajectory that explodes on contact with walls or enemies. Very high damage, low rate of fire.

Leave it to Tediore to put salt in Torgue's wound when it comes to lasers. Exploding lasers are a blasphemy! A beautiful beautiful blasphemy! This thing is insane! The only downside is its slow rate of fire. While this thing shreds mobs to hell and back, other lasers do better against high health pool bosses. To get one of these, you need the Claptastic Voyage DLC and some Grinder luck! A Howitzer COM could make this even more nutty too.

A thread on the Gearbox forum by johnrr6 brought up the throwing potential of this weapon. This thing can hit HARD with a full clip throw on a frozen foe!


It probably can do more damage then that with a combo of explosion boosting gear!

Thunderfire
Light 'em up. Shoots a small beam that emits a small fire nova upon hitting an enemy or object, reduced fire rate, consumes two ammo per shot.

Talk about... NUTS! Shred Shields and set things on fire at the same time! Athena may be drooling over this weapon more then Wilhem! Self-Loathing and Dispair have a chance to drop this in the Claptastic Voyage DLC. It is defiantly worth putting into your laser collection! If 3DD1.3 wasn't so must have, the Oxidizer may be worth looking at with this thing.
Shotguns
With how though Wilhelm can be, Shotguns are an excellent weapon choice for him! Get up and personal with your foes and fill them full of lead! Here are some Shotguns to look out for.

Torgue

Torgue brand shotguns are down right EXPLOSIVE! The slow bullet speed of Torgue Gyrojets are not a downside at all for these bang sticks! Keep an eye on the barrel type. To get the biggest bang for your buck, you want the Torgue Barrel, the Ravager! These things can blow apart anything that stands in your way! While the Ravager may be the strongest, the other models can also hold their own too, until you find that holy grail!

Hyperion

Hyperion has an odd take to shotguns. They feel like automatic short ranged rifles with their fast fire rate and accuracy bonuses. When you can use a shotgun like a sniper rifle, the weirdness, the super effective weirdness! If you manage to get one with a Torgue barrel, you have a machine gun of a shotgun... quite the Development!

Jacobs

And lets not forget Jacobs. These things can hit like bricks too, especially ones with a... you guessed it, a Torgue barrel! The Quad can empty a bucket load of shots into an unfortunate victims head. There will be no head left to tell the tale...


That is a Torgue barrel. It looks a bit like an engine block. Also, notice that vertical grip below it. That accessory gives you bonus pellets on your bonus pellets. Keep and eye out for it!

Shotgun Special!

While the above mentioned Torgue barreled shotguns in Purple rarity are pretty dang powerful, so powerful in fact that they can outdo Legendary ones, said Legendary ones will still get a mention! Here are a few special shotguns to keep an eye out for!

Flakker
Flak The World: Increased damage, consumes 4 ammo per shot, extremely large spread, rounds detonate after reaching a certain distance.

This thing was extremely hard to use in Borderlands 2, to the point of hate! It has come back with a vengeance in the Pre-Sequel! The low gravity environment makes it so much easier to use. Once you get the hang of the explosion range, things will fly apart. If you want to specialize in this shotgun though, I recommend using a Howitzer or Mauler Class Mod.

Striker
Fandir? Thirteen: 50% additive crit bonus and a 15% multiplicative crit bonus, added with exceptional accuracy and minuscule spread. Increased weapon zoom when sighted.

Do you like to be a Sniper with a shotgun? Now you can! Nuff' said! Just keep in mind this thing has nasty recoil, being Jacobs and all!

Viral Marketer
Fwd: Fwd: Fwd: Lol check this out guys: Always corrosive. Projectiles fired ricochet off surfaces. Increased accuracy and recoil reduction rate, decreased projectile count and reload speed.

It's basicly the Conference Call from Borderlands 2, but it only comes in corrosive now. Same bouncy bouncy fun, but, it's always corrosive. I thought I mention it anyhow even with its elemental drawback. You can put points into Venom Bolts if you want to make this thing hit harder.

Moonface
What a BOOMING smile you have: Projectiles fire in a smiley face pattern, with low velocity and a lazy sine oscillation trajectory through the air. Pellets deal non-elemental damage, with 50% explosive splash on impact.

You can get this weird shotgun from completing the mission Red, Then Dead. If you can get the hang of its firing pattern, you will be smiling as things explode with not explode damage... how does something explode and not explode? Well, this thing does!

Too Scoops
'Coz one's never enough! Always cryo element. All parts fixed. Fires two cryo-element, grenade-like spheres that travel for a few seconds, inflict damage to any targets in their path, then explode.

Shotgun grenade launcher of snow cone death and freezing! It is the mission reward for: Bunch of Ice Holes, if the mission is turned in to B4R-BOT!

Torguemada
THE HAMMER OF HERETICS! SUBTLE HISTORICAL REFEREEEEEEENCE! Fires three explosive projectiles that produce a number of smaller, delayed explosions on impact.

EXPLOSIONS? You bet! Smite that laser menace for Mr.Torgue in the mission Torgue-o! Torgue-o! Then you will get this boomstick!

Party Line
Excellent: Always incendiary. Fired projectiles explode like fireworks. When reloaded, the gun flies straight up into the air then explodes like fireworks.

Meet Flakker.Jr! You will need the The Holodome DLC in order to get this weapon. It is a possible reward for completing a round.
Oz Kits
O2 Kits, or what the locals call them, Oz Kits, are a feature that makes this game crazy fun. First, you need these to breathe on the moon right. Breathing can be fun and rather manditory, but its the air boosts that add a new element to combat! They also allow you to SLAM... and welcome to the JAM! The game already tells you all this, so lets get down to the nitty-gritty!

Oz kits come in two varieties: 3DD1.3's and Not-3DD1.3's. Not that you need 3DD1.3 early on but...

Lets look at some standard kits that fits Wilhelms style:

Juggernaut

Torgue makes something that doesn't explode? WHAT! Well, I guess it does make you more mainly, and Torgue likes to do that! This kit comes with one or more elemental resistances. It also has a more powerful slam, witch deals more damage and shatters enemies air-masks.

Acrobat

Or we can call this Hyperion's Areal Precision ROBAWT PAWNCH Enhancer Kit! It lets you have more control in the air, and gives you bonus melee damage in said air! When you slam, you also get a short speed boost!

Bomber

Okay, now we have a Torgue kit that causes explosions! A chance for a free grenade while flying though the air? Cool! It also increases grenade damage. While this kit ain’t the best for Wilhelm, its not a bad choice if you cant find anything else!

Clear Skies (of RK5)

If RK5 is giving you a headache, Vladof can help with that! More damage against RK5! That’s the only thing I am mentioning this kit for!

Now lets look at the unique kits! They offer more unique options and can be must haves most of the time. The best thing about unique Oz kits is you don’t out level them quickly!

3DD1.3
Beep boop beep. Unique voice module. In combat, there is a random chance for shields and health to rapidly regenerate. When damaged, there is a random chance to release shock tether, continuously damaging nearby enemies. Shock tether will also activate when in a vehicle. When killing an enemy, there is a random chance to release a care package, which provides health vials, ammunition and/or money drops.

This is the holy grail kit for Wilhelm! This guy turns him into an absolute tank! The shock attack can also trigger Cold War, leaving a free surprise Popsicle for you. The Shield recharge is insane. With Saint's Energize and 3DD1.3 recharging your shields all the time, your going to feel a bit invincible. You will want one of these! Once you feel the power of 3DD1.3, you will never go back... There is also no fear of out leveling this thing. Alot of its powers are NOT effected by its level!

Systems Purge
Emergency Systems Purge in 3... 2... 1... When your O2 is above 75, your next shot will consume 50 O2 and release a Shockwave, damaging and knocking back enemies. Provides O2upon killing an enemy.

Its a free boomstick on your boomsticks, or more power on the power fist! In no oxygen environments, it will be a bit tricky. In an atmosphere, laugh like a maniac! If you want this kit, you need to destroy CL4P-L3K in the mission "Eradicate" witch would sacrifice your farming source for 3DD1.3.

Support Relay
Multi-cored life support. Increases O2 capacity by 25 and improves O2 consumption rate by 20% each for every equipped Support Relay in the party.

This is the reward for the mission “To Arms”. It's another unique kit that can last a very long time, and gets stronger if team mates equip it too! Makes oxygen management easy and gives you a slight boost to gun damage for how much oxygen you have. A very solid choice for an early Oz Kit until you get something more decent.

Cathartic
You smelt it, you dealt it. Always corrosive. High slam damage, decreases damage received from various sources. Slam shatters enemy air masks. Causes a random farting sound effect upon performing a slam.

When Juggernaut Kits fart... Poop Deck always drops it, so its a freebee!
Shields
The Shield, made to protect your fleshy bits from nasty owies! Wilhelm is quite an expert with Shields, and quite a few of his skills boost them! Keeping that in mind, I will list Shields that work best with him!

Lets start with the standard shields. You can easily get though the end game and later difficulties with only standard shields! I used blue/purple rarity shields for a very long time due to how rare legendary ones are... or they are just really rare for me!

Adaptive

These Anshin beauties work quite well with ol tanky here! They give you more health, and resistance to the element you were last damaged by, per a set percentage! If you get Hazmat, you may be looking for a new shield, but there is no rush!

Shield

You would think Tediore would come up with a better name... They have low capacity, but an insane recharge time with hardly a delay! Purple rarity’s charge like lighting! You need Heatsinks and Saint's Energize to make this thing borderline broken. The only catch is elemental damage will mess with your rapid recharges, even with Hazmat.

Turtle

Pangolin makes a weird shield. It lowers your health but this thing holds a huge capacity, and I mean HUGE! With Heatsinks, Saint's Energize, and Divert Power, you can pimp that capacity hard!

Now for the crème de le creme! These prized pieces have some insane abilities. Be on the lookout for them, and keep any legendary ones you come across. You can always put them in the Grinder to get the Legendary you want!

Prismatic Bulwark
Full spectrum. Increased capacity and decreased delay. Has a high chance to absorb enemy lasers. Increases the user's laser damage and laser resistance.

A laser toting Wilhelm will drool over this baby! Hyperion created something beautiful here. The downside is its dedicated drop... the non respawning Zarpadon! There is a little note on how to get past this in Tips and Tricks! Apparently it drops from the Invincible Empyrean Sentinel too, but farming that can take some sweet time!

Reogenator
Are you alright, Isaac? Increased max health and health regeneration. High elemental resistance. Reduced shield capacity and recharge delay. Health regeneration scales inversely as damage is taken to the shield.

Did Anshin ask Tediore if they wanted to make babies, and this happened? Two in one shield power, and Wilhelm can make it awesomer, with all those skills I keep repeating in this section! This has no assigned drop, so check those random sorces and use that Grinder!

The Sham
Wow. I CAN do this all day. Extremely high bullet absorption chance. Greatly reduced shield capacity, reduced recharge delay. Cannot spawn with elemental resistance.

I did not mention Vladof Absorb Shields in the common section, as I feel the other common shield types offer more defense and synch better with Wilhelm's skills. The Sham comes with a pretty nutty absorb chance, that can get over 90% if the parts are right! Now think of that with those skills I keep mentioning, yeah near godmode... You have to check random sources or grind that Grinder to find one of these.
Grenades
Grenades, don’t leave home without them. Don't worry, they drop like candy, so you will always leave home with something! The funny thing with Borderlands grenades is that they are really REAAALLLY wacko, and that's why they are so fun!

There is two huge stats to look at when choosing a grenade. The delivery and the fuse time. The most preferred delivery methods are longbow and lobbed. All the other delivery types are a pain in the butt... homing will sometimes circle around a target for ages until it explodes, and rubberized is just annoying as heck if it misses... bounces all over the place. There is one other add on to deliveries, witch is the sticky mode. It will stick to whatever it hits. This can be a hit and miss thing, but don’t worry too much if you do get a sticky mod thrown into your grenade. As for fuses, the lower the better! If you get a 0.0 timer, it goes off instantly!

So, what types of grenades work with Wilhelm? Well, any one them can, but there is some that just stand out better then the others. When you get to higher levels and difficulties, you will get more picky with grenade types.

Vladof Area of Effect

These things are extremely nasty, and if your using skills like Venom Bolts and Cold War, these things get ten times nastier! They behave differently for each element. Fire ones spray fire cones around them, Tesla ones create a contained area of electric hell, and the Cryo/Corrosive ones create a lingering cloud dense in said element.

Hyperion Singularity

Crowd control in one handy package! When these detonate, they pull in nearby foes before exploding! They can also come with an element. Keep and eye out for Shock or Cryo ones! Then you can strip shields or freeze ontop of the croud control effect!

Maliwan Transfusion

It never hurts to have one of these on hand when your main grenade choice can't do much in situations like Boss fights. It goes boom, and gives you some life back too! Just keep in mind that the returning health packages can get stuck on objects, unless you find the legendary version...

And speaking of legendary versions... keep your eye out for these!

ALL the Vladof ones!

Stormfront
Sometimes lightning does strike twice: Deploys as a Tesla Grenade, then launches multiple smaller range, lower damage child Tesla grenades in an even distribution around the deployment point. Child grenades can stick to walls and other non-horizontal surfaces.

The most sought after grenade, due to its insane shield stripping capabilities on top of a HUGE area of effect. This thing is so strong that I ran with a level 15 one for a long time... it strips shields that good!

Pandemic
Spread the sickness: Always corrosive. After the grenade's initial explosion, three more homing grenades are spawned. The grenades spawned will home in on enemies and touch them, transferring corrosive damage and then seek out another target. This will continue until the grenades disappear.

Acidic hell in one handy package. Does an insane amount of damage with its contagious effect.

Fire Bee
Bees are coming! – Always incendiary. Spits fire in a circular motion. Additionally shoots small missiles of fire in a circular motion.

BEEEEEEEEEESSSSSSS! Incindiary may be the weakest element in the Pre-Sequel, but this is a Vladof nuthouse grenade! Plus.. BEEEEEEEEEEEEEEESSSS!

Four Seasons
Four seasons in one nade: Creates a random elemental area of effect  (Shock, Incendiary,Corrosive, or Cryo) that continually damages enemies within range. Shatters air masks. Always Lobbed.

The interesting thing with this one is its always a random element per toss. So you can possibly stack multiple elements with a few tosses. Badass Kraggons have a chance to drop these!

Quasar
E=mc^(OMG)/wtf: Always Shock Singularity Grenade. Reduced damage but increased blast radius (larger singularity pull and Tesla effect). Enemies pulled within blast radius suffer shock damage over time until explosion occurs.

The ultimate crowd control grenade, and it can strip those shields to hell with its Tesla effect. Like the Stormfront, it can last a rather long time too before you need to acquire a new one. Felicity has a chance to drop this but BEWARE! There is a magic item eating floor in the area. If she is going to drop it, it will toss out first. So get ready to play fetch with a Constructor!

Leech
A skilful leech is better far, than half a hundred men of war: Decreased damage and blast radius. All damage done by the grenade instantly restores allies' health.

Since it restores health instantly instead of launching those health globes, this one is very nice to have on hand. And since its Maliwan, its elemental!

Kiss of Death
It takes two to get one in trouble: Grenade homes in and sticks to the target's face. After sticking to an enemy it deals damage over time until the target dies or the grenade detonates. Upon exploding sends out life orbs that heal allies. Does not release child grenades upon detonation. Child grenade count reflects the number of life orbs released. Increased damage compared to standard transfusion grenades of a similar level.

This one gets a mention because its always available once Moxxi's Toy Chest is accessible. The thing that just murders this grenade though is... its homing! The plus side is that you can keep re-spawning the Toy Chest to get it in an element you want!
PESKY FOES
5H4D0W-TP: The Ultimate Badass (DLC)

Welcome to one of the hardest, if not, hardest non Raid Boss fight in all of Borderlands! The pain, the suffering, the retarded shield recharging, ESCPECIALY the bloody shield recharging! You are in for quite the grind.

I HIGHLY recommend the Dreadnaught Tree for this encounter. Take Axillary Tanks, Energize, Heatsinks, Hazmat Containment System, Hard to Kill, and Overcharge! Divert Power from Cyber Commando also gives you a good “Oh Crap” button!

The first encounter is pretty easy. Defeat the waves of baddies 5H4D0W-TP sends after you. After a few waves, 5H4D0W-TP will come out to face you. Stick Wolf onto him with Laser Guided and strip the shield away with a shock weapon. When 5H4D0W-TP teleports and creates decoys, the laser lock stays on the real him, so follow Wolf to were he re appears. He wont have a chance to recharge his shield if you keep onto him! Use a corrosive weapon once the shield is down.

Easy eh? Well, don't get too confident! 5H4D0W-TP goes all out BADASS MODE for round too. Hell, Wilhelm even swears when he sees 5H4D0W-TP become Eclipse! This phase brings some heavy firepower to the field.

Eclipse will announce any heavy attacks. Hug the bridge architecture to avoid said attacks!


I can has cover!

This boss has a LOAD of HP! If you have Overcharge, ammo shouldn’t be a problem. If you do run into ammo issues, there are Hyperion Ammo Stations along the bridge, and outer areas of the arena.

Use a shock weapon to strip the shield as usual. Eclipse has two critical hit areas. The front of his head, and a set of glowing red vents on his back. Eclipse will chase Wolf around, so take advantage of this, as you can hit the back vents!


Going to melt that overpowered smile of your face...


You can use the Jump Pads to get better shots too!

As Eclipse takes more damage, he gets more shooty. Keep using cover or use Jump Pads. The attacks are dodge-able. If you do go down, there are flying bugs that always spawn to get second winds off of!

Eventually, you will blow that smug 5H4D0W-TP out of his armour! But like all villains, they always have a FINAL FORM! 5H4D0W-TP transforms into EOS, a demonic looking version of Helios, for its final assault!

EOS has a BUCKET of HP, and shield recharging phases that will tick you off. EOS will patrol around the edges of the arena, unloading bullet hell into your face. He can also Moonshot viruses and other nasties onto the field. His ultimate attack unleashes the Eye of Helios.

Wolf gets obliterated at this phase. It's all on Saint now!

Use the high ground to get clear shots at EOS' eye, his critical hit spot, when it's open.


The Flakker is an excellent weapon for this fight! EOS is so huge that you're going to land the flak motherload!

Don't bother destroying the turrets along EOS' sides. They have too much HP. I wanted to see what happens if you do destroy the turrets, and it just spawns a new set of even stronger ones!

You will have to deal with the Moonshot Viruses. These things can deal a ton of damage unchecked!

When EOS announces that hes using the Eye of Helios, find some cover to hide behind!


He firin' his laser, I'm hidin' my cover!

If you took Hard to Kill, you will be running around with 100 stacks quite often!


100 stacks! I eat missles for breakfast!

As you damage EOS, he will become invisible and recharge his shield. He will do this twice I belive. I am unsure if you can damage him while hes invisible. I took the time to grab ammo.

Each time he recharges his shield, he gets more shooty. Suddenly, your dealing with missiles as well as bullets! Talk about bullet hell!

It's going to be a heck of a grind, but when your as tough as Wilhelm, you can weather the fire and take this jerk down!


Gotcha!

Enjoy your free Legendary!


Kill EOS with Flakker, get Flakker?! Hacks!
TIPS AND TRICKS: WIP
Alt-F4 Cheatorama
PC ONLY

Did that Legendary Grind epically fail? Did your unique mission item come in the wrong element or parts? Do you want to get an item from a Boss who doesn't re-spawn? Meet the cheat that does not register as a cheat! Many of us have shamelessly done this, and thanks to the Grinder, even more so in this game!

Save and exit, or hit a save point before Grinding, fighting a non respawnable Boss, or turning in a Quest. If the results are sad, press Alt-F4 to close the game without triggering a save. Reload game and try again!

Pro tip: Turn your status to “fake Offline” in Steam so your not spamming your friends with” YOU HAVE STARTED THIS GAME AGAIIINNN” pop ups!
Check those Vending Machines!
Vending machines have been buffed in the Pre-Sequel. Blues and Purples are more common now! Even better, Legendary items will appear more often too. Because of this, there is farming patterns to check as many machines as possible as quickly as possible! Concordia has quite a few. A lot of fast travel places have vending machines by them too. Here is a list of ones I can remember:

-Serenity's Waste
-Triton Flats
-Hyperion Hub of Heroism
-Research and Development
-Pity's Fall
-Titan Robot Production Plant
-Vorago Solitude
-Tycho's Ribs
-Eleseer
-Holodome (DLC)

Because of this increased awesome item chance, money in this game has a use! Save those pennies. Pick up and sell junk! You never know when you will come across something shiny! The more rare the item, the more it will cost. Weapons will always cost more than Accessories, and some weapon types will be more expensive then others!


Talk about expensive!
Mass Manufacturing Lasers
Because the Vibra-Pulse can be acquired infinite times, we can use them as infinite Grinder ingredients! This works best in Ultimate Vault Hunter mode, as the level of the weapon chest scales with you!

To get Moxxi's Toy Chest to respawn. Exit Concordia though her back door, then re enter. Walk back up to the bar and you will see the chest. Grab the goodies, save and exit, reload, and walk back up to get the goodies... rinse and repeat! You can sell the grenade and shield for extra money, or just grab the gun only. You need 3 guns per grind, so fill up if you want to do multiple grinds!


Toys, toys, toys!

Now head to the Grinder. Pop in 3 Vibra Pulses. The grind result is ALWAYS a laser! For a guaranteed Purple, use the moonstone grind. You also may get lucky with a luneshine. I am never lucky, I always get dumb luneshines! If you get Purples you don't like, you could always grind those for a chance at a Legendary!


I can has shiny result?
Farming for 3DD1.E
If you want to get your hands on this all-mighty Oz kit, your best bet is to set up this farming method. CL4P-L3K is a unique foe that has the 3DD1.3 assigned as a unique drop.

You need to get the mission “Eradicate”. You must have ALL the Quarantine missions completed for this mission to show up. When “Trouble with Space Hurps” is complete, you can return to the Bounty Board in Jacks office to get “Eradicate”.

With said quest active, return to the Veins of HELLio's for more jumping puzzles! You have to collect 3 robot parts. The first two are easy enough to get. The 3rd one in the back may have you scratching your head. Two jump pads can get to it, but the one that's easiest to describe here is at the exit of Central Maintenance, close to the Lunar Launching Station entrance. There is a jump pad a bit to the right. It launches you towards the Lunar Launching Station. Make a hard turn right when you launch off this pad. You will have to do an air boost to slow your approach so you can land on the tricky platform.

With all the parts, head-back into Central Maintenance and assemble CL4P-L3K. You must lock CL4P-L3K in the room and NOT destroy it in order for it to respawn. After you turn in the mission, you can return to the area to farm it!

As for setting up the farming run, first, you need to fast travel to the Lunar Launching Station. Exit out of this map at the lower right. This will create a save point.


Exit is easy enough to spot on the map.

From here, you only need to use ONE jump pad to get to Central Maintenance. It's down below. Jump down!


Here is a caption so this photo doesn’t feel left out

When you land on the platform, there is a small hole to the right. You will enter here. This will take you straight to the quarantine zone.


Photo one to make it more clear.


Photo two to make it even MORE clear!

You have three unique foes you can farm now. The main one here is CL4P-L3K of-course. The other two are Lazlo, who drops the Freezeasy, and Eghood, who drops the Blowfly. I tend to ignore Lazlo to make the farming run faster. I will kill Eghood though, as he's in the same room as CL4P-L3K. It doesn't hurt to get some Grinder materials! Once you make the kills, check for loot. Save and exit until you get 3DD1.3!


SHOW ME THE 3DD1.3!
DISCLAIMERTHING
Borderlands Wikipedia used for more detailed information

http://borderlands.wikia.com/wiki/Borderlands_Wiki

I have used pieces of in game and concept art throughout the guide. These do not belong to me. They are just badass and need to be shown off!
34 Comments
ILOVE2SHOVE 27 Jun, 2023 @ 9:09am 
Aye, I gotta chime in because I didn't like Wilhelm much, but then I came back to him and I'm in love.
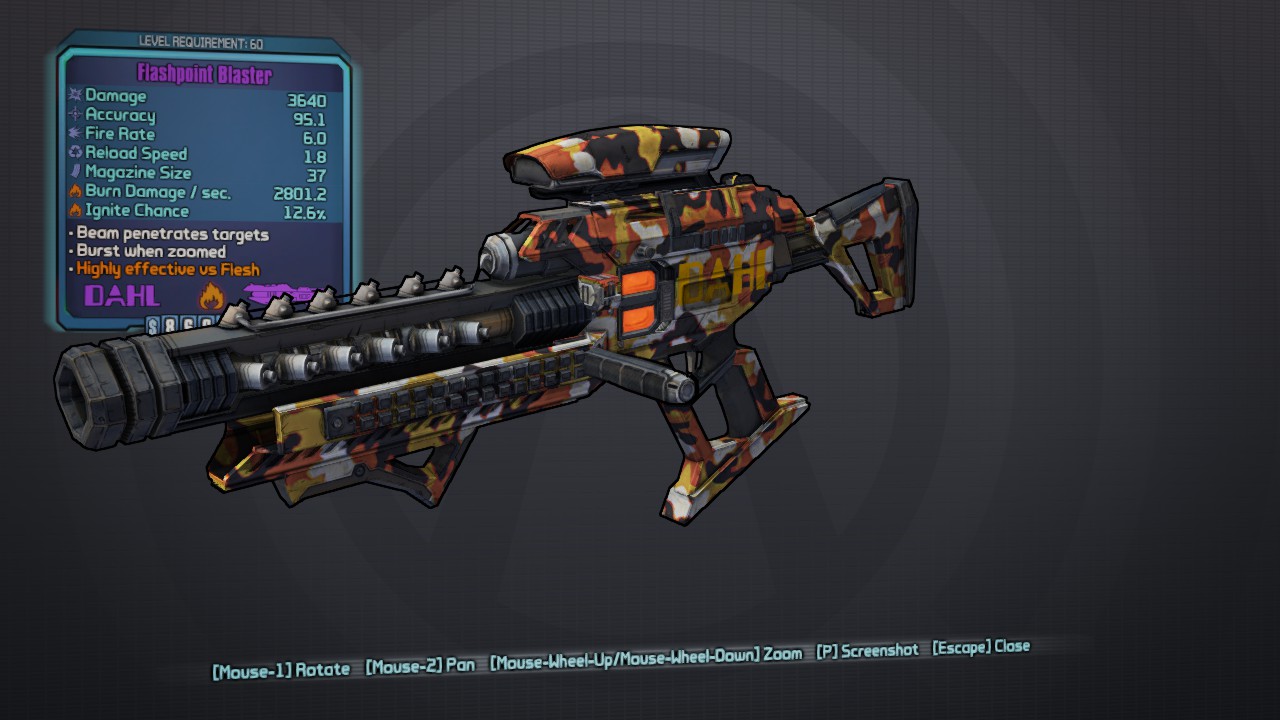
Vengeance Cannon is strong even if you don't build around it (Scorcher can bump it's damage to 200k per shot) that's because when VC is activated, you get zero recoil. Even with beams, which are pretty hard to control.

Wilhelm has skills that increase his health and/or shields, his damage reduction skill (which I'd say is very underrated, it stacks pretty easy) and the health regen from Saint, Divert Power (if you max it out, you get a free second charge of VC) as well as First to Fight and the run and gun skill spells out that Wilhelmis this this unrelenting unstoppable force that'll brush off your bullets and bury you in lasers.
Once you get used to playing as Wilhelm and his extremely aggressive playstyle, it's really fun and unique
TeamBoob 23 Jun, 2018 @ 11:55am 
"Hopefully, this wont end up as a huge essay like my forever WIP Zer0 guide"
*looks at scrollbar* well...
cobalt darkus 29 Sep, 2015 @ 6:47am 
thats cool i understand
KrewL  [author] 28 Sep, 2015 @ 10:51pm 
Nah it doesnt offend me. I defiatly missed that part of termination protocols. This guide still needs some work, its just im lacking the mojo to write.
cobalt darkus 28 Sep, 2015 @ 9:25pm 
hello there is one thing what you forgot to mention about termination protocols ther is also small chance to get second wind when timer counts to zero and sorry if this offends you
Papa Dragon 2 May, 2015 @ 7:38pm 
Maybe include the flakker nukem glitch, it can destroy eos in a few minutes
KrewL  [author] 10 Apr, 2015 @ 4:07pm 
Note to self, change 3dd13 farming note back. friend said it wont respawn if you destroy it in quest, even with boss respawn changes. sadface
Ancient Chaos Wizard 3 Apr, 2015 @ 4:24am 
Maybe see if you can get your hands on the new Tales from the BD season pass special weaponry, I wanna get the Naught on my hands, you know 3: Contsant purple-like tediore recherge 3:
KrewL  [author] 26 Mar, 2015 @ 9:21pm 
Throwing up an Eclypse/EOS section. Probaly the toughest non Raid Boss fight in all of Borderlands!
Papa Dragon 5 Feb, 2015 @ 5:43am 
great guide man love your guides! especially the zero one