Far Cry® 3

Far Cry® 3

27 ratings
Far Cry 3 Ultimate Guide how to play it in Win 10/11 (Downgrade for mods/ High Definition /Various tips) All in one!
By Les daltons
After several hours of research, I am writing you this guide to be able to configure your game step by step and have a Far Cry 3 experience worthy of a remaster in 2025
2
   
Award
Favorite
Favorited
Unfavorite
Prerequisites
First of all, thank you to everyone who reads this guide, I know that Far Cry 3 can be very difficult to mod due to the fact that Ubisoft has given its two cents and has therefore made many mods incompatible.

But rest assured, you can still use FarCry 3 in V1.05 and therefore make all mods compatible.

First of all you will need before starting anything:

- Gibbed Dunia 2: https://www.nexusmods.com/farcry3/mods/5
- HD Textures: https://www.nexusmods.com/farcry3/mods/291
- Ziggy's mod (Take the version you prefer in the section "Files") : https://www.nexusmods.com/farcry3/mods/63
- Mud's mod (Again, there's many versions, take one you prefer) : https://www.nexusmods.com/farcry3/mods/200

And a lot of patience beacause before playing we need to makes somes adjustements :)

ATTENTION ! ALWAYS BACKUP YOUR FILES BEFORE CHANGE ANYTHING, IN THIS CASE IF SOMETHING WENT WRONG YOU DON'T NEED TO REINSTALL COMPLETELLY THE GAME
Before downgrade the game
Ok so now for the first chapiter of this game, you need to install the original game and run it once, this will create a Gamerprofile.xml (C:\Users\Your name\Documents\My Games\Far Cry 3)
This file will be very important for the rest of the tutorial with the adjustments, once this is done we can continue.
Once you done this you can see these elements right here
Downgrading the game
Ok for the fist part of this guide before doing anyhing you need to downgrade the game, and for this part the steam console will come in handy:

To activate steam console press Win+R and type this line : steam://open/console


Once you have done this you should have a window like this :

If it's not you need to check the line you enter on windows menu.

After this we need to write this line in the console : download_depot 220240 220241 7362101836779063707 (Copy/Paste this line to make sure you enter the right line) and press "enter".

Entering this line will launch a ghost download in the console, in other words you are downloading the far cry 3 version of 2018 (1.05)
This may take some time as the game weighs 11GB, don't be worried if you don't see anything else after writing this line in the console, it depends on the connection you have.

After doing this you gonna have a message that says "Depot download complete" and a path where it was installed, so just go to this location and keep this folder open:
Once you have done this you should have a window like this in the V1.05

Before doing anything I advise at this stage to prevent Steam from updating the game, to prevent this, you have to go to the game properties / Update / Only update this game at it's launch (Option 2) :

After that all you need is to delete ALL the files you have in the original Far cry 3 (Make a backup first) and copy/paste ALL the file you have downladed with the steam console.

Congratulations you have downgraded the game to V1.05.

Tips: If like me you don't speak English, changing the original game to 1.05 will also have put the game in English with no possibility of putting it in another language.
To change the language of the menus and the UI unfortunately I have no solutions.

However, I have a solution for audio (Theses exemples are for french but also work in another language.):

Go to the main game folder

- In the Far Cry 3 folder, open the data_win32 folder

- Find the file "sound_english.fat" and rename it to something else, I just named it like this: "sound_1". Don't worry about it. Now you just need to rename the "son_french" to "son_english".

- Next, open the "worlds" folder, then the "fc3_main" folder. Here you need to rename 2 file types. The "fc3_main_***.dat" and "fc3_main_***.fat", simply do as mentioned above. Your language files should be named as the English ones. (fc3_main_french -> fc3_main_english)

- Once this is done, return to the "worlds" folder, and go to the "multicommon" folder. Same step as above, just rename the files "multicommon_***.dat and .fat.

These exemple are for french but also work in another language. You are good to go.


Add mods in the game
Ok now the game is in V1.05 (Note that you can still use the "play" button with steam to play this game) it's time to mod it

First of all open the folder "bin" of Gibbed Dunia 2 and and leave it open in a corner:

You must have this window

After this go to the main files of your game and take the "patch.dat" and "patch.fat" located to this path: F:\SteamLibrary\steamapps\common\Far Cry 3\data_win32
(F is my disk drive were i installed the game, you maybe have another letter don't worry)

Copy/paste theses files into Gibbed Dunia 2 :

(Size of patch depends with the mods you install so don't worry if you don't have theses sizes)

All you need to do now it's to select theses 2 files and drag them to : Gibbed.Dunia2.Unpack.exe a black window will pop up, and after this simply drag your "patch.fat" into Gibbed.Dunia2.Unpack.exe

You will have a folder that call "patch_unpack"


You can delete "patch.dat" and "patch.fat" we don't need it anymore.

After this we gonna install the first mod : HD Textures, open the folder called
"HD Texture Pack-291-1-0-1677850675" and you see, you have also "patch.dat" and "patch.fat" so you need to do the same process than before, that mean bring it to the bin folder of Gibbed dunia 2, take "patch.dat" and "patch.fat" TOGETHER first and drag them into Gibbed.Dunia2.Unpack.exe after just take "patch.fat" and drag it to Gibbed.Dunia2.Unpack.exe You must have noticed that this time there was no new folder that appeared at the end of the process and this is completely normal, because it was automatically added to your already existing folder.

You can now delete "patch.dat" and "patch.fat" repeat the same process with Mud textures mod and after the Ziggy's mod (This last one need to change the DLL files of the game simply drag theses files to the main folder of the game located in F:\SteamLibrary\steamapps\common\Far Cry 3\bin)

It should be something like this.

Alright, once you have unpacked the mods together it's time to recreate them.
To do this, you simply need to select the "Patch_unpack" folder and drag it to "Gibbed.Dunia2.Pack.exe" Once you have done this you will have 2 files "patch_unpack.dat" and "patch_unpack.fat"

Before continuing, make a backup of your original files.

Now you simply need to rename it to "Patch.dat" and "Patch.fat" then bring it to the original location of the game, you will be asked to confirm, you accept.

Congratulations you have now an HD Game with Mud and Ziggy's mod combined.

If you want other mods afterwards, simply do the same as before in this guide, they will be automatically added to the unpack folder, all you have to do is recreate the .dat and .fat files.
Various tips to adjust and get the most out of the game
Very good, you have arrived at this last part of this guide, just a few changes left and you will be able to enjoy a very good, well-optimized Far Cry3

The first tip is to block the game at 60 FPS in order to block the micro-stuttering which is especially present with DX11 (Version that we use with Steam)
I do not recommend using third party software such as Nvidia control Panel or RTSS, it is better to use a steam command.
Go to the launch options located in the game properties and put this line: -RenderProfile_MaxFPS 60
In this specific case we order Steam to block our FPS at 60, the optimal FPS limit for old games such as FC3, you can also add this command line : -skipintro this command gonna save you time everytime you open the game by skipping the intro of the game.


Second tip: You remember we talked about the gamer profile (You even had to modify it with a mod normally) We are therefore going to go back to it in order to modify a lot of things to enjoy a good experience.

In the ResolutionX= and ResolutionY= tab put your screen resolution, this technique is great if you have an ultra wide in my case it comes to ResolutionX=3440 and ResolutionY=1440

You can also change various graphical aspects that are not in the game menu itself, do CTRL+F and write </CustomQuality>
After this line write:
<Post>
<quality GameDepthOfField="0" CinematicDepthOfField="0" MotionBlur="0" FXAALevel="0" id="x" />
</Post>

Change the 0 to 1 according to your preferences.
Change the x of "id" to the quality of the postfx you want in the game (low/medium/high/ultrahigh)
In my case the line is as follows "id=ultrahigh"


Save the gamerprofile.xml and make it read only in the proprieties


We are now going to deactivate the ambient occlusion of the game because we can have a better HBAO than that of the game, to do this do CTRL+F and write "SSAOLevel=" delete the 1 in 0.
For users of Nvidia graphics cards, you will need to install Nvidia Profile inspector: https://nvidiaprofileinspector.com/

Select Farcry3's profile,
In the different lines:
-Change Ambient Occlusion compatibility value to 0x00090000.
-Change Ambient Occlusion setting to High Quality.
-Change Ambient Occlusion usage to Enabled.
and validate by pressing “Apply changes”


For non-NVidia Card users, you can use Better HDAO: https://www.nexusmods.com/farcry3/mods/219?tab=files
And select Better HDAO Optimal Patch, then simply add it like the tutorial with the mods above

The third tip will focus on the stability of the game under Windows 10.
You notice from time to time that the game crashes after 20 minutes (Especially when starting the game with the first observation tower)

In this case follow as follows:
Click Start, type "regedit" in the Search box, Browse to and then click the following registry subkey:
HKEY_LOCAL_MACHINE\SYSTEM\CurrentControlSet\Control\GraphicsDrivers
On the Edit menu, click New, and then select the following registry value from the drop-down menu specific to your version of Windows (32 bit, or 64 bit):
For 32 bit Windows:
-Select DWORD (32-bit) value.
-Type TdrDelay as the Name and click Enter.
-Double-click TdrDelay and add 8 for the Value data and click OK.

For 64 bit Windows:
-Select QWORD (64-bit) value.
-Type TdrDelay as the Name and click Enter.
-Double-click TdrDelay and add 8 for the Value data and click OK.


Close the registry editor and then restart your computer for the changes to take effect.

One last optional thing this time, I recommend using lossless scaling, which will allow you to enjoy this game with great fluidity : https://steamproxy.net/steamstore/app/993090/Lossless_Scaling/
This program is often updated and is very useful even for other games, select LSFG 3.0 and put in 2x, also select the HDR option if your screen is compatible and activate it in the menus of the game before playing. (The game must be in borderless windowed mode for LSFG to work)
You will then be able to enjoy this game in 120hz which is very fluid and pleasant to play.

And now we can finally enjoy the game, i took a few screenshots to give you an appetizer:


Conclusion
Here is the end of this guide and what, in my opinion, is the best version to enjoy this game in 2025
If you have followed the guide from start to finish you will be able to enjoy the game without any problem.
Good game, and see you soon for a new guide.


34 Comments
MK Ultra 13 Oct @ 2:56am 
oh sorry meant to say les daltons. He made this guide, not just chill.
DoMiNaNt_HuNtEr 12 Oct @ 8:44pm 
Ayo Just Chill, thanks for making this guide. There is a mod called Far Cry 3 Redux: https://www.moddb.com/mods/far-cry-3-redux The only thing I want from it is the holster weapon function. You press H to holster your weapon, which is great for immersion, casually moving thru villages without pointing your gun at civilians. Can it be added to this mod list?
Just Chill 24 Sep @ 11:15am 
Thanks.
I just hope I can get rid of the shivering NPCs.
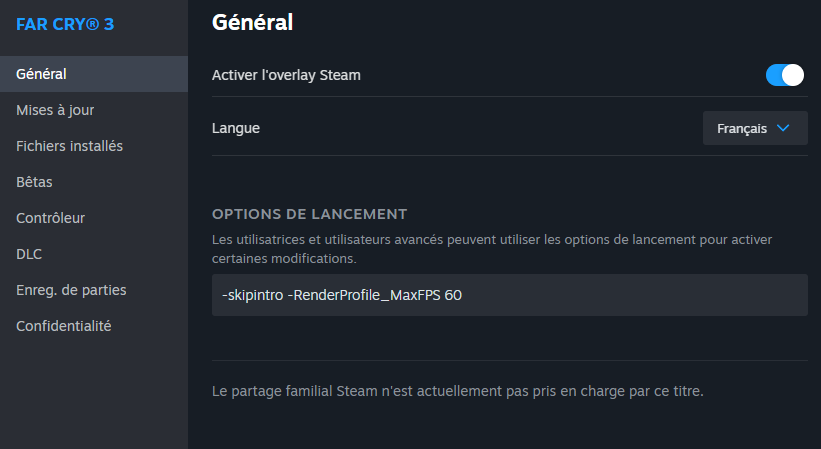
I've locked my frames and even activated VSync.
But I haven't tried "-norigidchars" in launch options. Last call now...
Les daltons  [author] 24 Sep @ 10:44am 
As you want if your game runs pretty well you don't really need to do it again :) have fun with this beautiful game
Just Chill 24 Sep @ 10:26am 
Thanks.
I did it one by one and was also able to play the game. :wellok:
But since you confirmed these errors are normal, I rather do it all over again.
Les daltons  [author] 24 Sep @ 10:12am 
Helo, thanks for your reply, yes it's the right thing to do, you need to select theses to files (Patch.dat and Patch.fat) together, you will see a black screen with some errors it's normal, after tou need to only select patch.fat to unpack

this method is strange in the first time but that s how it works, i think it's beacause Gibbed Dunnia 2 have a cache and need to have theses two files together first
Just Chill 24 Sep @ 5:47am 
Hey, thanks for that guide so far.

However, I've found an issue at "Add mods in the game".
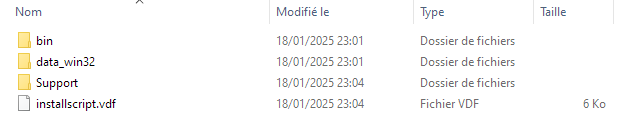
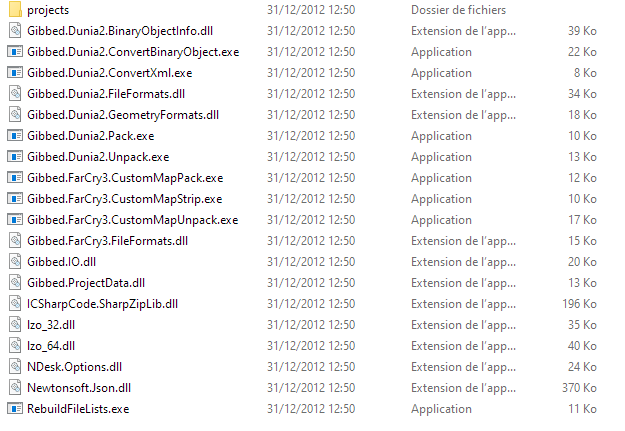
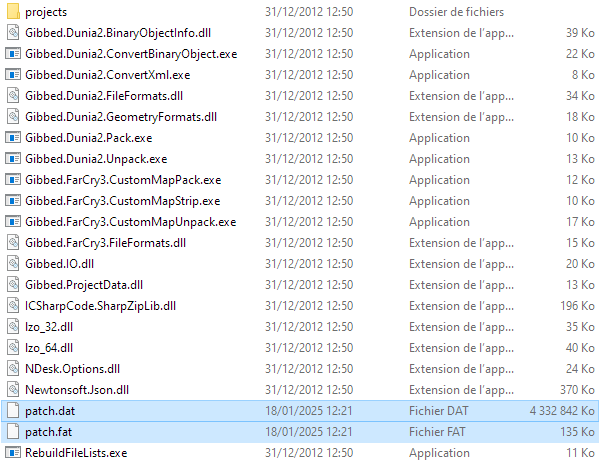
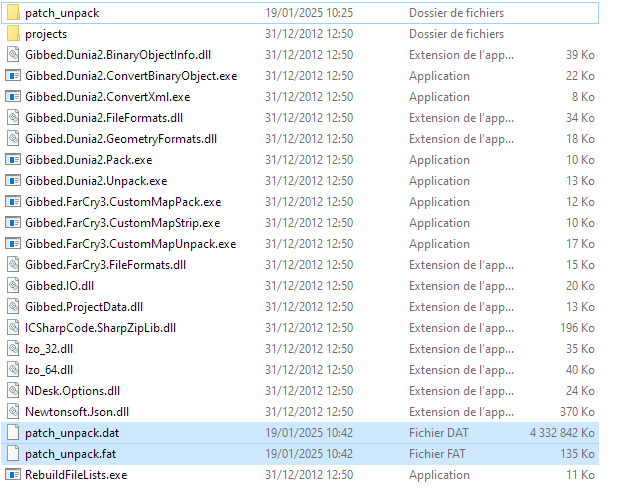
Quote: "All you need to do now it's to select theses 2 files and drag them to : Gibbed.Dunia2.Unpack.exe a black window will pop up"

Yes, if I add both files at once a black window pops up with a lot of Unhandled IOExceptions.

When I add the files one by one, it works.

Could you please clarify if we should add the files one by one?
As now it reads like we need to add DAT and FAT first and then FAT again.
Les daltons  [author] 20 Sep @ 12:38am 
Thnk you for your answer and yes, it's likely beacause you didn't tick the "Read Only" box, because the settings of the game itself dosen t show all the settings hidden in the "gamerprofile" in this case, when you don't set "Read only" you allow the game to revert back the max settings the game can by itself. and yes it's important to have the gamerprofile you have by the mud's mod and not the original because imo this one is optimized to run efficacely with all the changes, that's why i have wrote the changes of gamerprofile in the end of this guide :)

Anyway thank's a lot for your comment and enjoy the fresh new game with all the possibilities of mods like old times :)
ShyGuy120 19 Sep @ 9:54am 
after playing for a bit my save file broke, if anyone is having the same issue you should copy paste the gameprofile from MUDs mod and replace your current one, and then change all the settings you want + the SSAO = 0 setting, that should fix it, i think it happened to me because i didn't set it to "read only" but Im not sure
ShyGuy120 19 Sep @ 8:36am 
i wanted to play this game with mods since forever, now it finally works, thank you, the game still does crash, around every 2 hours, but its not that big of a deal