FOUNDRY

FOUNDRY

264 ratings
Foundry Compact Layouts and Misc Maths
By Falk
A bunch of maths and optimized layouts as a reference
43
28
4
8
4
12
6
2
3
5
4
2
2
2
   
Award
Favorite
Favorited
Unfavorite
Updates
2024-08-20
---------------
- Added Electronics layout ideas
- Added Circuits layout idea
- Added Machine Parts layout ideas
- Added Advanced Machinery Part layout idea
- Added Polymer Board layout idea

- Added current Early Access run base tour video to Preface (32SP/m)
Preface
I'd highly, highly recommend playing the game at your own pace/discovery for a start, since automation games of these quality don't come by all that often so why spoil yourself with someone else's homework, but I also get that some folks do want pointers/solutions w.r.t. factory game maths and layouts, so here they are.

On the flipside, I've obviously been staring at this game for a while so I may miss that certain things aren't immediately obvious to new players. Feel free to ask for clarifications/etc. and I'll probably improve the guide while answering them.

Usual disclaimer, highly WIP, etc. I know these diagrams probably aren't nearly as polished as my DSP guide from back in the day but they're also like 10x faster to make with Google Sheets so don't mind the hard hat construction zone vibe while I figure things out.

Here's my current Early Access/Update 1 playthrough that features many of the layouts in this guide. The point of progression is 32 science packs (1-to-5) per minute, although disclaimer that this run doesn't use blast furnaces (which is a really stupid thing to do unless there's a reason for it, lol) - to demonstrate some of the maths involved earlier in the progression
Initial Research Bootstrap
I personally feel that 8/m science is the sweet spot for progressing fast through the game, as any more than that and you end up spending time building a ton of infrastructure for the next science pack while your research labs sit idle because you've researched everything from the previous tier, while less than 8/m and you end up waiting for research to finish. (This is probably for runs where you're very comfortable with progression. Prior to that 4/m or even 2/m is probably plenty)

Here's a quick and dirty layout that'll get the run through SP2 research supplying only plates and rods.


The SP1 portion of it can be built with a couple Machine Part assemblers feeding into the SP1 assemblers, but still it relies on unlocking 2nd lane loader early, so make that a priority. Likewise, the setup technically needs Conveyor 2 to feed plates fast enough for the full 8min/sec but this can be temporarily alleviated by having a 2nd Xenoferrite Plate belt feed the machine part assemblers while the first feeds the Foundation assembler. After researching Conveyor 2, upgrade the plates and machine parts belt to tier 2 ASAP, the rest is fine being left as Conveyor 1 for a while.

Here's a screenshot of it in action, with aforementioned temporary 2nd plate belt feeding in. I skipped the belt storage for this run as I got my expansion hub's belt production up separately relatively fast. I also pre-built a 4th Machine Part assembler just because I'm pinching machine parts off the setup for handcrafting from time to time.


You'll also want to leave enough space above this setup, because it very conveniently segues into 8/min SP3:


(Yellow = Assembler II)

The upgraded setup is still relatively simple because it only requires adding a Steel and Concrete belt and it handles all the interim products within the layout itself to get through all SP3 research.

(references for mass producing Steel and Concrete are also part of this guide, look up the relevant sections)

Just for clarity, upgrading the Foundation to Assembler 2 isn't for research purposes so much as it is to just overproduce them faster so they fill up the storage for expansion. Taking a large amount of blocks out of the storage will slightly underfeed Machine Parts assemblers a little, but in my experience the overproduction and the internal output buffer of those assemblers make any drop-off negligible.

This layout technically can be expanded to also add SP4, but usually by this time I've moved from the bootstrap to a more permanent, scale-able build that'll allow going past 8/m. For what it's worth, SP4 needs components that pretty much are made separately because they're also used in a bunch of other things, so feeding a similar 4x Assembler 2 + 2x Assembler 1 setup as the SP3 row with those (circuits, cells, firmarlite bars) and then routing that back counter clockwise around the research labs will work.

God help you if you're attempting to add SP5 to this lol, but it's doable- first by upgrading the row of SP3/4 assemblers to 4x Assembler III (2x speed) to make room directly above the research labs so a 3rd outer belt can fit.

Effectively Mining Ore Patches with Drone Miners
Drone Miners in my experience tend to sit at 65-45/min output, depending on how far the drones have to travel to the ore, and this gradually depletes the ore voxels closest to the miners. Below 40/min the dropoff is so rapid that you'll already be shifting the miners soon anyway, so it's safe to assume 40/min is the practical bottom end of what a Drone Miner will output.

Therefore, it's safe to assume that you'll need 3-4 Drone Miners per Mk1 belt (160/min), and 6-8 per Mk2 belt (320/min), Or conversely with Mk2 Drone Miners which are exactly twice as fast, 3-4 per Mk2 belt and 6-8 per Mk3 belt (640/min).


Except for the earliest part of a run prior to Burners for automated power, it's probably always a better idea to 'tap the entire node', or to put drone miners on every side and then balancers on the belts. While it's a little more work initially (and power draw), it's going to end up less work in the long run because nothing is as annoying as the miners eating through one side of the patch and running out of ore in range and needing to move them. With miners on every side the ore patch will get depleted equally towards the center and rarely if ever actually need the miners moved rather than completely dismantled when the node runs out. This is doubly true of underground nodes - having to go back underground to move stuff around gets tedious, especially if it's only half-dug-out and the existing stuff needs to be dismantled to avoid being destroyed by explosives.

This is true even if only using a single output belt or less- the balancers will ensure the node is being depleted 1/4 equally on each side.


Alt with Mk1 miners into Mk2 belts or Mk2 miners into Mk3 belts. The belts in this case can actually potentially run through 8 miners apiece, although the point here is simply doing less work and not replacing stuff that doesn't need to be replaced - just running the new tier of belts on the output (and one new balancer) is sufficient. Additionally having it separated in groups of four and then merged via a balancer ensures that the ore patch is depleted uniformly from all four sides.
Belt Production
(This is separate from the Conveyor assemblers used in SP2 in the bootstrap simply because you need a ton of conveyors, and adding the stuff to upgrade them to ramps/splitters/T2/T3 gets bloated)

Can be built from left to right in segments as stuff unlocks.


It's pretty straightforward other than doubling up on the Conveyor I assembler since it's needed for both upgrading itself, as well as feeding into ramp/splitter production.

Since Plate/Machine Part/Electronics are used for a ton of early buildings, this can be integrated into a mall/hub producing them too. e.g. Smelters, Drone Miners, Assembler I, Small Power Poles, Wall Power Poles, Crusher I, etc

Prior to researching Logistic Container 2, you can just sub a belt going directly to the input of the next column.

It's worth mentioning the intermediary Logistic Container 2s were me thinking that you could use them as dumps, i.e. when upgrading belt runs, you could dump the old belts into the buffer container to 'recycle' them. Unfortunately, it seems that the game as of right now does not take from locked slots, so this is a design caveat that doesn't function. Hopefully in future though, lol
T2 Xenoferrite/Technum Smelting
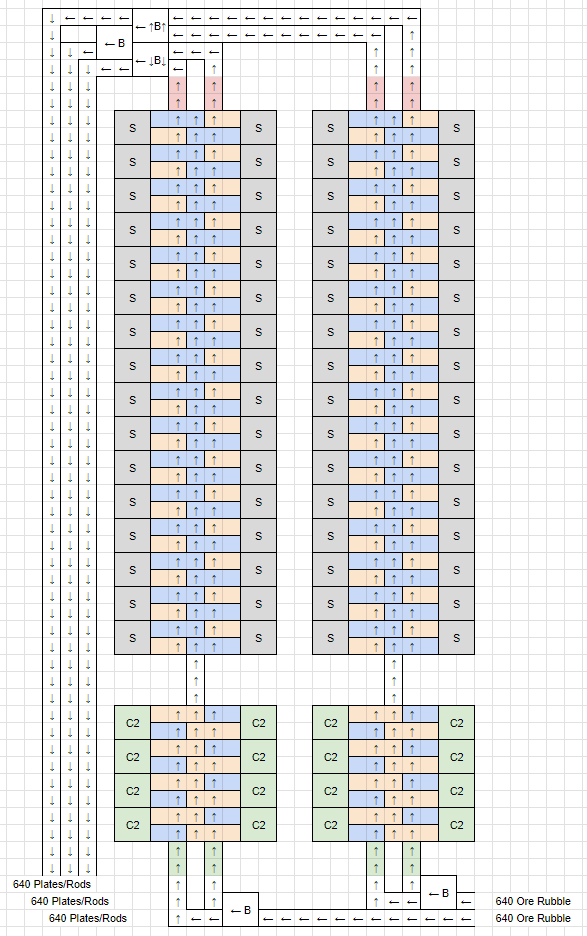
One of the earliest interesting parts of the game is how an additional process for the game's basic smelting reduces the amount of raw resource needed by 1/3. That is, crushers to process ore rubble into ore before feeding them into smelters results in 50% more output for the same amount of ore rubble.

This does make the maths for filling up full belts a little complicated though. The easiest way to simplify this (just going off very basic maths/logic) is that with 50% more output, 2 full input belts of ore rubble should result in 3 full output belts of Xenoferrite Plates or Technum Rods.

The trick, then, is how to divide up the machinery to accomplish this without oversaturating belts and creating bottlenecks. Assuming T2 belts (which is around the same time you unlock crushers via Steel Smelting and then Ore Processing that makes this possible anyway), you can adopt this layout and machine count.


Leave space above the arrays, since a later tech unlock doubles the count of smelters.

Take note of the three balancers here; they're what makes this setup work. Each of the rows of 8 smelters will use 160/min processed ore and output 240/min. The four belts of 240/min product (total 960/min) can then be condensed into 3 belts of 320/min. The two outer balancers should be set so their output prioritize towards the outside belts (which fills them up), with the remainder 160 (240 + 240 - 320) then combining into a third full belt in the middle.

p.s. there's obviously no need for the output belts to loop around to the left like in the diagram. I just have it this way because these are also my own personal reference for architectural shenanigans. Similarly, there's no need to leave space in between the two columns, although you DO need at least once space between the Crushers and Smelters, or the raw Ore Rubble will end up on the output belts too.

T2 Xenoferrite/Technum Smelting (SP4/Conveyor III/Crusher II)
While teching to SP4 unlocks an in-line upgrade for belts and Crushers to effectively double the throughput of the above smelting Array, the sidegrade for Advanced Smelters is a little disappointing. Because they're 3x3 (not even counting the increased height) vs the basic Smelter's 2x2 for only 50% faster processing, tile-for-tile they produce less product per minute for more power and building cost, with maths that doesn't play nice with full belts. Therefore in my opinion it's better to just lengthen the row of smelters to 16 each.


I would advise to only use Advanced Smelters where the game explicitly requires you to, i.e. recipes that aren't available in the regular Smelters, like T2 Steel smelting. (which is totally worth as it doubles Steel output from the same amount of resources)

Anyway, the same principle with the belts apply here in their upgraded form. Two full 640/min belts should result in three full 640/min output belts, and each row of 16 smelters take 320/min and output 480/min, which can be condensed via the three Balancers on the outputs.
T2 Steel Smelting (SP4/Conveyor III/Crusher II)
Just to clarify, this is *not* the initial Steel smelting unlock. Later on in the tech tree with Advanced Smelters, another recipe for Advanced Ignium Ore Blend results in 2x the amount of Steel, but also requires Advanced Smelters to be used. As Steel is a massive, MASSIVE Xenoferrite drain, this upgrade is pretty much mandatory to reduce the amount of nodes to be tapped by half, especially before fracking. I'll be putting together a separate section for initial steel in a bit.

I adopted this layout which has similar dimensions to the T2 Xeno/Technum Smelting above just so I can stack them interchangeably in the same footprint.


Pay careful attention to the configuration and number of Crusher IIs here. The Ignium Crushers share an output belt which feeds into both columns of Blend Crushers. Additionally, make sure the input Ignium Ore Rubble belts don't accidentally feed into the Advanced Blend belts going to the smelters. There's a 1-tile gap there for a reason!

Also just to clarify, there's technically more Advanced Smelters here than necessary. Processing 320/min Blend for 640/min Steel requires 21.3333 Advanced Smelters, rather than 22. In this case the last Advanced Smelter in each array working 2/3 of the time is fine; not the end of the world and tripling the footprint with some absurd belt combination shenanigans just to cut one smelter from 33 to 32 really, really isn't worth, lol

Electronics Production
After unlocking Loader 3, there's some cool stuff that can be done to have Rods processed to Electronics in an in-line manner. I prefer this as Wires literally only are ever used for Electronics, and to make Cable for laying HVG power lines, as well as automated Explosives (and you can have a little offshoot from the Technum being supplied to Research or Foundation production in the mall, for example to make this - so far Cable is not used as an ingredient in any manufacturing recipe)

So I highly prefer a black-box solution that just produces 1 full belt of Electronics directly from 2 full belts of Technum. No point transporting Wires around

Note the break in one of the Technum Rod input belts just as the Assemblers swap from wire to Electronics (5th from left) - that row switches from an input Technum Rod belt to an output Electronics belt, and you don't want the Rods overflowing into the output belt!


This configuration can also be upgraded-in-place using mk3 Conveyors and mk3 Assemblers to essentially double the throughput in the same footprint


Circuits Production
This is a very straightforward setup. One Polymer belt (I labelled it plastic by accident and cba to fix the image sorry please don't give me 1star), two Electronics belts in, one Circuits belt out.

This is more of a sanity check and quick reference for myself on the number of machines (28, or more precisely, 14 per row of 2 rows for futureproofing) required for a full Mk2 belt.


And, same as ever, it can be upgraded-in-place to Mk3 belts and Mk3 Assemblers to double the throughput. The four corner Assemblers being Mk2 are really for style points (and saving some kW I guess lol) - it's still sufficient this way for the full 640 belts

Machinery Parts production
There's a reason I put this after Electronics (and Circuits), lol

So, Machinery Parts are incredibly simple. One Assembler processes 40/min. So you need 8 per full Mk2 belt and you're done (8x40=320)


However, that leads to a footprint that's... rather short in comparison to most of the other builds.

I was wracking my head on how to more efficiently use up the space and make a longer line of Machinery Part assemblers and most of the ideas involved running multiple belts in parallel which just wasted space swapping them in and out.

Then I realized that while the tiles underneath Assemblers and Loaders need Building Blocks for power and to enable their operation, the tiles underneath belts could actually be removed, so I came up with this monstrosity (the second belt runs underneath the production) - this allows a single 'row' to service two full input and output belts in-line with a deficit of two tiles between the sets of assemblers for the belt swap


It's a little hard to understand just from the diagram, so I attach some screencaps too


And, of course, as ever this can be upgraded in place to Mk3 belts and Mk3 Assemblers to double the throughput

Advanced Machinery Part production
Similar with the Circuits diagram, there isn't anything special for this one, just good to have for quick reference/sanity check:

2 Machinery Part belts, 1 Steel belts in, 1 Advanced Machinery Part belt out. 24 assemblers to a production unit.

Concrete Production
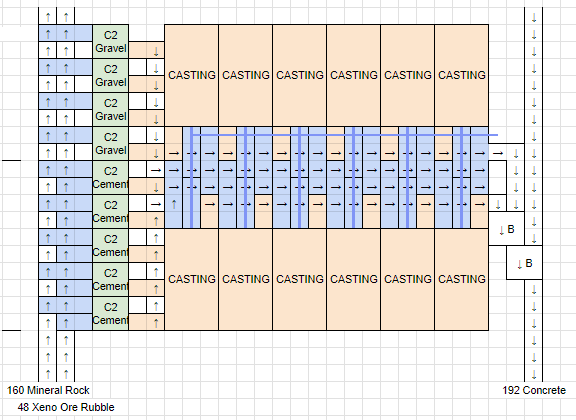
Came up with this ultra-compact, tile-able layout with Crusher IIs and Conveyor IIs


Sorry for the crap MSPaint of pipe representation here lol, still trying to figure out the best way to do this that doesn't obstruct stuff below the pipe since this is in 3D. Hopefully the intention is clear enough at least.

Couple quick notes:
- Calibrated to 192/min output as that's the amount required for 16/min Science.

- This uses 5 Cement Crusher IIs and 4 Gravel Crusher IIs, which technically is more than required. 12 Casting machines processing 192/min Concrete technically would need 3.2 Gravel Crusher IIs and 4.8 Cement Crusher IIs, but the simplification of having this layout tile indefinitely in an incredibly compact and understandable way otherwise is worth the slight space inefficiency tradeoff. In any case, after the system saturates and the last Cement/Gravel Crushers start cycling on/off, the system will draw exactly 160/min Mineral Rock per instance anyway.

- When tiling this setup to expand, I prefer to keep the Concrete outputs separate in multiples of 192 for the aforementioned reason that the SP3 assemblers need that much per 16/min science. That is to say, even with Mk3 belts I'd only combine them to belts of 384 to neatly siphon to specific groups of assemblers rather than saturating full belts only to have funky maths on the receiving end again anyway.

- Pay special attention to how the last Cement crusher outputs. It goes downward towards a belt that snakes underneath some of the Casting Machine input loaders. Usually this kind of T-merge without a balancer should be avoided as it causes throughput issues, but this belt isn't going to end up anywhere near full throughput anyway, so it's fine.


- The Casting Machine can be oriented either direction, but I usually want its water intake pipes inwards, above the input loaders, just so this setup can be tiled without any space in between. On that note, since water is pretty much infinite in this game I didn't really bother adding it to the diagram, but for completeness sake each set of 12 casting machines takes 960/min water.

example of tiling:


- Lastly, prior to SP4 and Crusher IIs, a preliminary version of this layout can be made with Crusher Is, except the output is only enough to feed 6 Casting Machines for 96 Concrete. However this is probably also generally going to be set up before Loader Lane 3 (SP3) is available, so a decision on how to juggle the input/output belts for the casting machines is necessary, which probably will require moving either the belts or the Casting machine after Loader Lane 3 is unlocked. I personally prefer to build the bottom row of Casting machines where they should be and just temporarily route Cement down below that row, then have Gravel occupy the belt (on Loader Lane 2 inputs) where Cement would have originally been. Reason for building this way is it makes upgrading to the version in the first image simply a quick switcharoo, as Crusher IIs can be upgraded in place of Crusher Is with a single click

Polymer Board production
Polymer Board isn't really needed in large quantities till needing Circuits in large quantities, which is generally when Firmarlite trading scales up (regardless drones or robots)

There isn't anything too fancy with this layout - I just wanted to get both the Distillers and Casting Machines in a roughly rectangular shape in a self-contained chain so it can be tiled reasonably neatly to seamlessly expand Polymer Board production.

640/min Polymer Board needs just under 22 Casting Machines and 3 Distillers


Energy Cell Production
Okay, this section is definitely WIP while I figure out a better way to represent the layout in a diagram. Still, I'm putting what I have here in case some maniacs want to try to decipher exactly what's going on, lol. Apologies. There are two elevated belts (the ones that feed Plates and Electronics) which are really hard to represent with these diagrams


This layout takes 200 mineral rock, 60 plates, 120 electronics, 96 Ignium Ore Rubble and 5000 Olumite to spit out 120 cells, and is tileable. The Chem Plants are fed from the middle and the Acid gets piped on the outside (top/bottom of diagram) to the Fluid Assemblers. There's a way to thread the Water/Gas pipe inputs into the Chem plants while also having the waste gas funnel without intersecting each other. (See below)

Since multiple different things use cells, I picked 120 cells simply because it makes slightly more than the ~108 required for a neat chunk of SP/m with some leftover that can sit in a couple buffers for whatever intermittent draw there is. This layout can also potentially be tiled 16 times for a total output of 1920 (which fills 3 mk3 belts) when pushing to megabase status. This common denominator makes most of the maths neat, the layout is reasonably compressed, and most importantly, as mentioned, it tiles.


and some pics of the pipes that probably explain it way better than a 2D diagram. Water gets fed by cross junctions level with the pipe intakes (since the water intake is the center one). Gas gets fed via T-shapes from the tile above the pipe intakes.


Waste from the distiller goes down to ground level before getting siphoned out to a flare stack. Water just needs a hole in the foundation literally anywhere, lol

Similar to Concrete, when initially spinning up Cells half of this can be built to begin with (all 10 smelters off Crusher Is just get routed to the same row of Fluid Assemblers temporarily.

Note that in the final product it's important that the short belt of Ignium Powder (running in between the chemical plants) NEEDS to be Conveyor III, or it's not fast enough for 4 Crusher IIs pumping out the prerequisite powder.
60 Comments
Timbadur 9 Feb @ 7:35am 
i may have an alternate layout for electronic components. https://steamproxy.net/sharedfiles/filedetails/?id=3424242093
سرطان البحر 1 Jan @ 9:00am 
When I was starting to m,ake my mega base i started with the mining sights first but in this post i see you have them on the side of the vein. I belive that you would only get about 160 mining blocks so when that vein starts to drie up some of youre minners will not work. To counter that i put the above the vein average about 190 to 220 minnable blocks. please check into this and tell me if there is something im missing
Tragic 24 Oct, 2024 @ 12:17am 
what is the white box with "b" written on it mean?
devinthedude 12 Oct, 2024 @ 3:36pm 
how do I format my google sheets to do the tiles like this for my own set ups?
BeardNFeard 31 Aug, 2024 @ 3:21pm 
Thank you so much for the update to this guide, I lived by version 1 and dont thing I would have progressed as far as I have without it.
Reggie 25 Aug, 2024 @ 10:49am 
Nice ! I needed that !
Thank you ! :)
Lexxy Fox 31 Jul, 2024 @ 7:37pm 
I love your factory layouts and how thorough your guide is.

An alternate layout I built for the SP2 factory: https://steamproxy.net/sharedfiles/filedetails/?id=3300686275
Krasje28 14 Jul, 2024 @ 11:52am 
Awesome layouts!
Sirabo 11 Jul, 2024 @ 2:00pm 
more please 😁
Turk 20 Jun, 2024 @ 2:13pm 
It's on the side.
Posted May 2 @ 10:30am
Updated May 5 @ 10:11am