Afterimage

Afterimage

98 ratings
Afterimage Achievement Guide
By Chaosmaniac
This Guide is a Port of a X-Box Achievment Guide :

https://www.xboxachievements.com/game/afterimage/guide/

Real Author : Necrophage33
-----------------------------------------------------------------------------------
Have fun collecting all Achievments ^_-
3
7
3
   
Award
Favorite
Favorited
Unfavorite
Road Map
Introduction:

Welcome to Afterimage, a beautiful 2D action-focused Metroidvania where you take on the role of Renee, a human who awakens with no real memories, but is aided by her companion Ifree to try to stop an ongoing war between humans and goliaths. This game has similar aspects to Ori games, such as platforming and exploration, the visuals, and beautiful music. However, it also takes a few pages from Dark Souls in that, if you die, your XP drops and you'll need to return to pick it up; healing at a Confluence point also respawns all enemies; and there is a heavy emphasis on boss fights, and the need to "get good" at them by learning their patterns and figuring out when best to attack. There are also heavy RPG elements, since you can level up to level 99, there are many different weapons, armors, and accessories to find, a Talent tree to build into as you level up, and more. Lastly, this game's map is absolutely massive. If you think you've played large Metroidvanias before, this one takes the cake. That being said, the gameplay is superb and very tight. Before getting into the roadmap and guide, also be aware that achievement pacing is absolutely terrible in this game. By that, I mean you'll spend the first 30-40 hours getting maybe four or so achievements, and all of the rest are late/end-game achievements. Stick with it though, as this game is fantastic! Let's get started.

Marking Your Map:
The first thing to cover, and one that will save you a ton of time, is the concept of marking your map. Nothing gets marked on your map automatically in this game, aside from the save points. However, this game has a feature that lets you put icons on your map to mark locations of various things of interest, ranging from NPC locations, to chests you can't reach yet, to doors you can't open yet. While it may seem a little annoying at first, once you get it down, it's quick to do, and it'll save you lots of time during mopup later, since you'll already have your map marked up with stuff that you haven't accessed yet. There are a bunch of icons to choose from when marking your map. I tried to use ones that kept it pretty intuitive: I used the bat-like icon for any places that needed the triple jump or super jump to reach, I used the lock symbol for any red barriers I needed to get through, I used the key symbol for doors that were locked and needed a key to open, and I used the scroll icon to mark NPC/quest locations. Feel free to do it however you wish, but just make it easy to remember so you don't backtrack unnecessarily.

Story/Area Progression:
One thing this game does not do well (it doesn't do it at all) is tell you where to go next, whether it's story or side quests. It just points you in some vague general directions. There are also a bunch of areas that you can access without needing any special abilities, and even though you can access them, it doesn't mean you'll be capable of tackling the enemies there yet. The developers have stated they'll be adding in skull icons for enemies that are higher level, to help indicate when you've entered a region that you're not ready for yet, but for now, it's important to have a general understanding of what order to progress through the areas, so you don't get one-shot by an enemy that's way higher level than you.

Here is the general order of progression through the areas:
  1. Rubiwood Desert (starting location)
  2. Rainbow Plains (head out the east side of Rubiwood Desert)
  3. Resting Town (head out the east side of Rainbow Plains)
  4. Resting Path (south-southeast of Resting Town)
  5. Field of Geo (east-northeast of Resting Town)
  6. Emerald Falls (east of Field of Geo)
  7. The Columns (south of Emerald Falls)
  8. Town of the Exiled (exit out the southeast of The Columns). Note that you'll likely encounter sections of this map where your screen gets covered by a purple mist and you can't really see anything. The way to combat this is to return to Resting Town, talk to the merchant there, and buy the Eye of Truth ability. You then need to equip it in the Afterimage tab at any Confluence. This lets you see through the purple mist
  9. After beating the main boss in Town of the Exiled, you'll get the Whistle. Head to the far east of Town of the Exiled, out the northern of the two eastern exits, into Ashen Canyon. The enemies will be way too high, so just keep dashing east all the way along the northern end of Ashen Canyon, across a giant bridge, and you'll come to the Manta Ray port. Here you can use the Whistle to ride on the Manta Ray and access a separate overworld. Collect pickups around the overworld area, then go to the island in the southwest. No enemies here. Climb and activate the lighthouse to open the rest of the overworld area, and activate the fast travel farther west. Head back on the Manta Ray and go to the shore in the far northeast to get to Whispering Forest)
  10. Whispering Forest (see above for reaching)
  11. Forest Foregone (can access the west end of this area from the Manta Ray landing on the shore on the far east, but the true way to access this area is to reach the robot in the center of Whispering Forest, then take the teleporter into Forest Foregone)
  12. Silent Coast (head out the east of Forest Foregone)
  13. Misty Waters/Field of Hydro (reach the southeast of Silent Coast to get to a ship. Ride it east. No enemies in Misty Waters or Field of Hydro)
  14. Holy Grounds (this is the large central land in the middle of the Manta Ray overworld that you can land on; you may want to come back later to beat the boss on the far east, who's very tough)
  15. Albedo Tower (head up and out the northeast corner of Emerald Falls)
  16. Sky Palace (head up to the top of Albedo Tower, beat the boss, and take the teleporter up)
  17. Heart of Veins (exit out the west end of Sky Palace; no enemies in this area, just a boss fight)
  18. Ashen Canyon (exit out the east end of Town of the Exiled)
  19. Goliathfall (head up and out the northeast end of Rainbow Plains)
  20. Scorchwhere (exit out the far west end of Goliathfall)
  21. Field of Pyro (exit out the southwest corner of Ashen Canyon; this is where some story endings are available)
  22. Sunken Depths (extra area on the southern tip of Holy Grounds; this is where more story endings are available)

    Technically, Sunken Depths is a lower level than Field of Pyro (and maybe Scorchwhere too), but trust me that this is the better progression. Sunken Depths is just boss fights to end the game, and you're better off being overleveled for them, so it's better to get more XP from enemies in Scorchwhere and Field of Pyro first.
General Tips
  • You can dodge-cancel anything in this game. This means that, if you're performing any action that isn't finished yet, such as a slow attack, a weapon skill attack, healing, etc., and you're about to get attacked, you can dodge to cancel your action and still get out of the way.
  • All enemies and bosses are a set level, meaning it's possible to overlevel yourself. You shouldn't need to go out of your way to do this, but if you incorporate exploration and backtracking to explore into your progression, it makes for a higher level that you'll be, and more likely to be able to take on whatever you encounter. That being said, it also means that if you find yourself overwhelmed or underpowered, don't hesitate to leave and come back later when you're a higher level.
  • I don't think the game did a good job of explaining this, since I didn't grasp it until much later in the game, but under your health and mana bars are glyphs that you'll obtain as collectibles. You can use these with lb.png to heal at any time (as long as you're standing on the ground), and they get recharged at Confluences. This effectively eliminates the need for healing potions once you have more, but be aware of that, and don't waste money on healing potions unnecessarily
  • Leveling up in this game doesn't directly increase your stats. When you level up, you don't automatically get more attack, defense, HP, etc. Stats are only increased via the Talent tree, so bear that in mind. If you are leveling up but aren't using Talent points, you aren't really getting any stronger.
  • I recommend deciding pretty early on how you want to build and min/max your Talent tree. There are more than enough Talent points in the game to fill the tree (I had 17 left over after filling in the tree), but early on you'll want to make the most of your Talent point usage to help you continually progress through newer, harder areas. New Talent skills unlock every five levels, so you don't want to spend Talent point unnecessarily. For example, when you reach a new multiple of five with your level, say level 25, you'll open up new Talents to spend points on. While you could increase main weapon attack, MP, and elemental damage with your Talent points, you're only going to see a slight improvement to your general strength to take on new enemies and bosses.
  • Unless you're actively using everything, it's far more impactful to focus your Talent points on specific paths in the tree, especially early on. For example, it doesn't make much sense to spread your Talent points across all six weapon types. Find one whose range, speed, damage, and skills work for you, and only invest in those one or two weapons. For me, I used the Whip almost the entire game, aside from the first few hours where I was switching between them all, and I never used swords, blades, and greatswords. I also never used mana attacks, so I didn't invest any points in MP and the like. I instead would save my points up, and every time I reached a new tier, I would invest all my points in main weapon attack, normal attack damage, weapon skill damage, HP, and defense. This allowed me to constantly be strong enough to take on every new boss and region, as well as always doing enough damage to quickly take out enemies. I'm not saying one path is better than another, but focusing your efforts on a couple paths instead of spreading your points out amongst all of them will make you more focused and stronger
  • Don't forget and don't be hesitant to enhance your weapons! Once you start finding the various "balms" in the game, those are for enhancing weapons. I didn't do it often because I was thinking I'd just eventually find stronger weapons, but then I finished the game with dozens of unused balms that I could've used to give myself a bit more attack strength along the way. You can enhance weapons at any time too
  • Always optimize your accessories and afterimage abilities. For example, if you're cruising through an area and want to equip stuff that boosts XP or dew gain, go for it, but remember that those won't help you with tougher enemies or boss fights at all, so don't forget to swap accessories to something more practical for tougher fights. I always went full into main weapon attack, weapon skill damage, and final damage, but focus it on your build. Likewise for afterimage abilities, it's definitely convenient to keep Eye of Truth equipped so you don't run into a mist spot where you can't see, but it's useless against enemies and bosses. Likewise for Treasurescope of Se if you're looking for collectibles or gear. Make sure you switch over at the nearest Confluence to a boss fight to give yourself the highest likelihood of success. For me, I always used the one that significantly reduces damage from behind, the one that speeds up healing with glyphs and makes them uninterruptible, and a couple others to improve survivability
Beating the Game, Endings, and NG+ Mode
Before attempting the endings, I recommend being at least level 75, but preferably closer to level 80. I was personally at level 83 when I was ready to tackle the endings, and I didn't really do any grinding. Do some mop of other achievements to help boost your level a bit if you're concerned about your skill level and the ability to beat the final bosses.

While Field of Pyro is technically a higher level than Sunken Depths, the three endings related to Ifree all take place there and, in my opinion, are far easier than Renee's endings. So, when you're ready to start unlocking endings, head to Field of Pyro and refer to Journey for how to quickly and relatively easily knock out all three of Ifree's endings, each of which has an achievement.

The next set of three endings are Renee's, and they all take place in Sunken Depths. Essential has much more information on how to unlock all three of her endings, as well as some tips on the boss fights. These can be two of the harder bosses in the game, especially if you're a lower level (at least 80 is ideal), so be prepared to put some work into these two boss fights. Once you've done at least one of Renee's endings, assuming you've already done Ifree's, you'll also unlock NG+ mode in addition to the ending achievements. Go ahead and wrap up all of Renee's endings before moving on though.

One other ending to mention before NG+ mode is a hidden easter egg ending that is only possible if you collect all eight Shenlong Glyphs. Once you've done that, and completed the quest with Se, you'll get access to this hidden ending. The Wall has much more detail on how to achieve this ending and its achievement.

With all seven endings done in the normal playthrough, it's time for NG+ mode. Unlike literally every other game, NG+ mode is this game is NOT a new playthrough of the same game. It's actually mode like side content/a bonus story. You will take on the role of '42' and play through ten individual chapters in this mode. The chapters are very short, either consisting of just dialogue, just a boss fight, or some simple traversal through areas you've already been. Its focus is on filling in gaps in the narrative from the main game. You'll unlock another story achievement in NG+ mode, and then Chapter Ten has two ways to beat it, resulting in two different endings and two different achievements. Refer to Waiting for information on how to obtain both endings. Note that these are significantly easier than the Renee endings.

With both NG+ endings done, you now have access to the True Ending of the game. This requires you to jump back into your normal playthrough, and there's a bunch of things to do to access the True Ending. Refer to World Flower for a walkthrough of how to reach the True Ending of the game, which will unlock a handful of other achievements along the way. Once that's beaten, which can be a challenge since it culminates in a series of three consecutive boss fights that you need to beat without dying, the hard part is done, and all that's left is mopup.
Miscellaneous Mop-up
Depending on how much exploring you did before, you may still have some NPC side quests to finish, and some collectibles to find (such as Divine Flowers/Leaves, Glyphs, Se Coins, weapons, armors, accessories, etc.). At this point, I think it's worth listing what you do and don't need, just to be clear, since there is a lot of stuff in the game.

What you DO need to do:
  • Open all gear chests. These are the round gold ones with some blue on them
  • Complete all NPC quests. Some are directly tied to achievements, some are needed to access some cuisines, and some are needed because the reward is a weapon, armor, or accessory. I'm not aware of any NPC side quests that aren't needed for one thing or another
  • Beat all bosses
  • Collect all Se Coins. These are needed to buy everything from Se's shop, which is necessary for the achievement for buying all shop items
What you DON'T need to do:
  • Open every regular treasure chest. These are ones that given you such things as health and mana potions, resting potions, etc. Opening these isn't required for any achievements
  • Break all of the dew containers. These are the blue containers you can smash to release dew, the currency in the game. However, even though these aren't directly linked to any achievements, you'll likely want to break as many as possible to help you afford all items from the shops for an achievement
  • Interact with all of those light echoes around the various areas. They give you XP, which is nice, but other than that they aren't needed for anything
  • Worry about filling in all the random drops from enemies. In your Beastiary, it shows what all enemies can drop, and leaves blanks if you haven't found some drops yet. That's not needed for any achievements
  • Reach 'Completion: 100%' for the various map regions. Don't worry about that percent, really. It includes chests and dew containers that are optional, so don't concern yourself with it unless you're really passionate about being a completionist. No achievements are tied to that completion percent
Conclusion & Credits
Conclusion:
Afterimage is, in my opinion, an absolutely fantastic game. It has beautiful graphics, excellent music, very fun platforming and exploration, tight and satisfying combat, really good enemy and boss variety, and tons of content. As long as you don't mind the achievement pacing, this game is a must-play for any fans of the genre. There is quite a bit to do for the completion, but it's worth every minute. Hopefully you enjoyed this game as much as I did, and congrats on the completion!

Credits:
Absolutely massive credit and thanks to demajen for putting an insane amount of work into creating detailed maps of the entire game, compiling tons of information on collectibles, endings, and quests. They put more work into the maps and guides than most people will put into this game, so thank you for that. All of his efforts, maps, data files, etc., can be found HERE[drive.google.com].

Huge thanks to Lightbearer over on Steam forums for assembling and posting tons of information related to the ten different endings. Based on my research, this was the first person to post significant information and explanations on how to achieve all endings. Also thanks to Lightbearer for, from what I could tell, being the first to compile and post information about NPC quests, as they were insanely vague in game, and the Steam posts helped tremendously. His original post on game endings is HERE and his post on NPC quest locations is HERE.

XBA would like to thank Necrophage33[www.xboxachievements.com] for this Roadmap
Afterimage Achievement Guide
There are 46 achievements in total
AFTERIMAGE

Unlock all other achievements to unlock this final one. Congrats on the completion!

Note: This achievement might not unlock immediately after unlocking your penultimate achievement. It didn't unlock for me, so I tried quitting to the title screen, and closing the game and relaunching, but neither work. I then quickly beat the game again, and it unlocked after the credits. However, I have had other reports that it took people five minutes or so to finally unlock, so it may have just been coincidence that it unlocked for me after the credits.
The Assault

Story-related; cannot be missed.


You'll fight Lush Wolf in the opening minutes of the game, and it's quite easy to beat him. Just dodge back to avoid the melee attacks, and keep hitting him over and over to beat him.
Broken Wings

Defeat Loss, the Broken Wings.


Loss, the Broken Wings, is the boss located in Heart of Veins in the far north of the map. It is accessible only by exiting out the far western exit of Sky Palace, and taking the wind tunnels across, eventually reaching a Confluence tree and then this boss fight.

Loss has quite a few attacks, but thankfully they're telegraphed pretty easily. He also leaves himself open to attack relatively often. Like all bosses, you're either going to need to learn the patterns to get good enough to beat him, or come back when you're a bit overleveled so you have an easier time.

Here's a video showing not only the boss fight but also its location. Full credit to the creator of the video. As you can see, you really want to get tons of hits in during the phase where he hangs out in the middle and then dashes down to the ground multiple times. This attack is really easy to avoid, and leaves him open continually.

Gimme Shelter

Defeat Agus, the Pyro Goliath, Aqil, the Pyro Goliath.


This achievement is worded a bit odd, with the word "and" missing in the description. There are two bosses you need to beat for this achievement: Agus, the level 76 Pyro Goliath, who is found in Scorchwhere, and Aqil, the level 78 Pyro Goliath, who is found in Field of Pyro. Neither boss is hidden, meaning you'll find both naturally as you explore and uncover your map in each region. However, you can obviously utilize the map in No Surrender if you deem it necessary to find these bosses.

As for fighting them, despite them being listed as level 76 and 78, I found them both around level 76 or so, and didn't have any real struggles. By the time you reach them, you should have the majority of the Talent tree completed, the majority of the Divine Leafs collected to extend your health meter, and many glyphs to give you more healings during fights.

Argus is a bit tougher despite being a slightly lower level, just because he moves around a lot, is fast, and has many attacks. However, he often pauses in the center of the screen, allowing you to do some serious damage to him. Just keep your distance when he's standing at each edge of the screen, and use those opportunities to heal. This is a fight where you'll definitely need to attack quickly and then dodge away, because if you stay stationary too long, he will punish you.

I found Aqil to be quite easy despite my being a lower level than him. He's huge, which is a good thing. His hitbox is massive, and I found a high level Whip to be extremely effective against him. The Whip's standard aerial attack is great for not only inflicting continual damage to his head but also for hovering off the ground to avoid attacks while you do so.
Darkside of the moon

Defeat Guider, the Shadow Moon.


Guider, the Shadow Moon, is the standard final boss for Renee's endings in the Sunken Depths below the Holy Grounds. You will have to fight and beat her for all three of Renee's different endings.

She is a small and fast boss, that attacks frequently and moves around very quickly. However, she also leaves herself open to attacks quite often once you learn how to avoid her attacks. She is only level 72, and if you work on completing the majority of the game and maps and collectibles and whatnot, there's a good chance you'll be somewhere around level 80 when you fight her, making it significantly easier. Also, fully exploring to ensure you have triple jump and the Crimson Cape (red dash) will make this fight significantly easier as well. The dash is especially useful, as you can just dash right through her attacks and then attack her during her downtime between attacks.

As you can see in the below video, it's pretty easy to do significant damage to her between attacks by using weapon skills. Additionally, you will notice that when she loses around a third of her health, she floats up into the air and enhances herself. She's invincible during this time, which is prime time for you to heal with LB to full health. She will likely also do an attack where she floats up to the center of the screen and calls in diagonal light beams across the screen. She is likewise invincible during this attack, so again use it to heal. As long as you stay aggressive, you can actually beat her quite quickly. Full credit to the creator of the video below.

For Whom The Bell Tolls

Defeat Karin, the Occult Prime.


This achievement is part of the NG+ mode, and is unmissable. At the end of Chapter 9, you'll have to fight Karen, the Occult Prime.

In my opinion, the fight against Karin is extremely easy. Just spam your standard ranged X-Button attacks and dodge when needed, and she should go down really quick.
She Is My Sin

Defeat Eseus, the Transcendent.


Refer to World Flower for more information.
Tomorrow Will Be Longer

Defeat Eseus, the Eternal.


Refer to World Flower for more information.
In the Name of God

Defeat all powerful existences


Powerful existences are apparently just a subset of the total bosses in the game, as I unlocked this achievement after beating a boss in Scorchwhere, and I still had a few bosses left in the game. So, refer to No Surrender for beating all bosses, and this achievement will unlock naturally along the way to that achievement.
No Surrender

Defeat all bosses.


Note that, despite the achievement description, you technically don't need to beat all bosses in the game for this achievement. You need to beat all of the bosses that are available on each map, and then the standard final boss of Renee's endings, Guider, the Shadow Moon. Other bosses related to other endings, and bosses in NG+, are all not required for this achievement. Therefore, if you're clearing your maps and completing them, by the time you beat the game and defeat Guider for Renee's ending(s), you should unlock this achievement there.

You will likely find every boss naturally as you explore and uncover each map, since pretty much every boss is not "hidden" in any way, aside from perhaps two: one in Holy Grounds on top of the western tall structure, and one on top of the castle in Rainbow Plains. However, all bosses required for this achievement are marked on the maps linked below. So, if you somehow don't have this achievement by the time you beat the game, refer to the maps for each region to see who you might be missing. You can cross check this against the Beastiary, which will display each boss you've beaten.

While each boss has their own attacks and patterns and whatnot to learn, there are some general tips that apply to them all:

  • Make sure your healing glyphs and heath potions are recharged at a Confluence before entering the fight, so you maximize how much you can heal during it. There is always a Confluence relatively close to each boss fight
  • Optimize your Afterimage abilities at a Confluence before each fight. For example, ones related to exploration, such as clearing purple mist or identifying nearby treasures, won't do you any good in the fight
  • Likewise, optimize your accessories, armor, and weapons for the fight. Ones that boost dew gain, XP, drop rates, etc., aren't going to help you win
  • Be prepared to die a few times before you succeed. Some of the faster bosses will definitely need to be practiced so you can learn their patterns, read their telegraphed attacks, and know when best to attack so you don't take too much damage
  • Worst case, come back later after you've leveled up some more. All bosses are at set levels, so it's very possible to overlevel yourself, making boss fights markedly easier
  • Equip a weapon suitable for the fight. For example, if the boss is aerial, use a weapon with good aerial attacks. For example, I always used the Whip for aerial fights as I loved the way it makes you hover and hit many times before falling. If a boss has tons of closer range attacks, weapons like the Dual Blades probably aren't the best choice, since they have barely any range. If you're fighting a very fast boss, probably don't use the Greatsword, since it's slow.
  • Prioritize weapon skills both in the Talent tree when you're using skill points, and when fighting bosses. Weapon skills are much stronger than just normal weapon attacks, in general, and so take every opportunity to use them during fights. For example, if a boss hovers just above you, use the Whip or Scythe spin attacks above your head to do significant damage while staying under the boss
In terms of locating all bosses, refer to THIS LINK[drive.google.com] to be taken to a Google Drive with tons of extremely useful maps and information about this game. As noted in the roadmap, full created to demajen for the insane amount of work they put into compiling all this information and especially for creating the 100% maps for every single region of the game.

There are a lot of bosses, so I won't bother posting Youtube videos of them all. Many will go down quite easily, but you can readily find fights of each boss on Youtube if need be.
Luxuriance

Collect all shards of Divine Leaf and Divine Flower.


There are 30 shards of Divine Leaf and 24 shards of Divine Flower to collect in the game. Collecting three of each raises your max HP and MP, respectively. Each one is a purple item drop, and they're locating in specific places (i.e. none are random drops). You won't start finding any until you get more traversal abilities, but they're almost all hidden well, often behind some sort of platforming challenge.

With that in mind, you will likely come across most of them if you explore and uncover all of your map, but there are a bunch that are hidden very well and you'll almost assuredly miss. To see where all are located on the maps, refer to THIS LINK[drive.google.com] to be taken to a Google Drive with tons of extremely useful maps and information about this game. As noted in the roadmap, full created to demajen for the insane amount of work they put into compiling all this information and especially for creating the 100% maps for every single region of the game.

Unfortunately, while you can see how many total of each you've collected in your Items tab, there's no way to know which region your missing ones are in. So, during mop up, you may need to check each region if you're unsure which ones you've missed. It's worth checking the early regions first, as those are likely ones where you didn't have enough abilities to reach/access them all.
Word Of The Primeval

Collect all Primeval Glyphs.


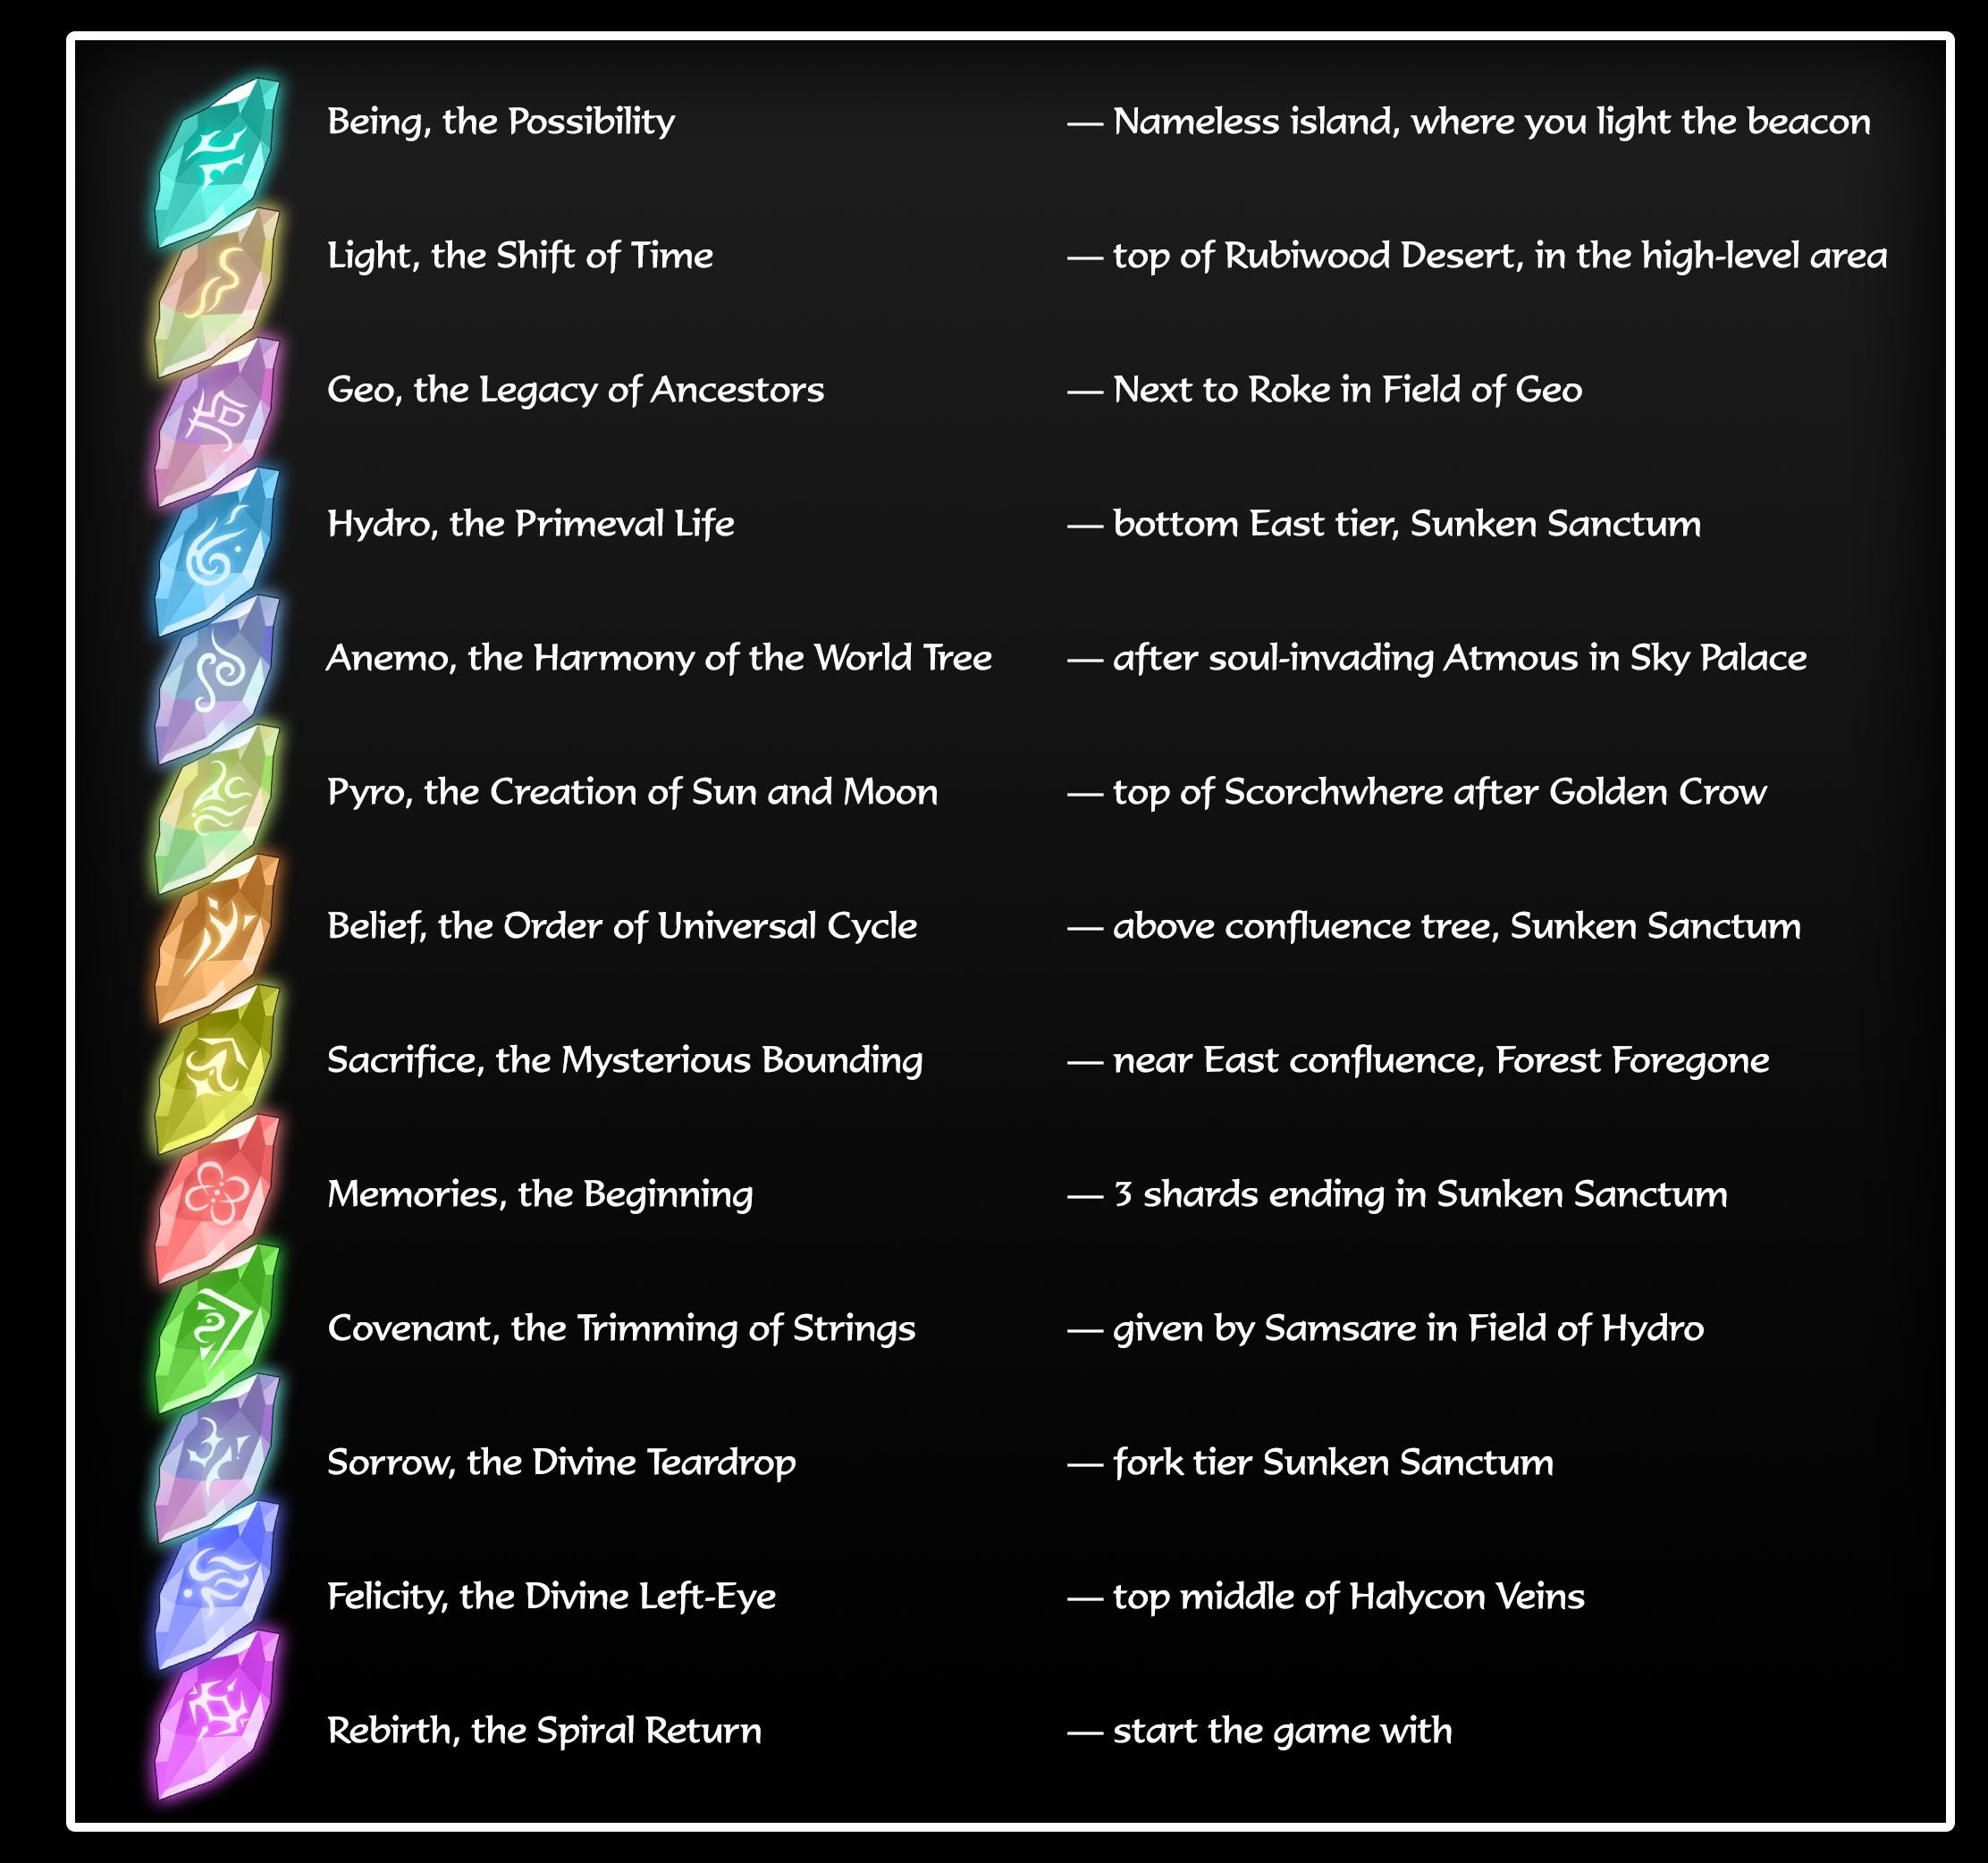
There are 13 Primeval Glyphs in the game. These are the large colored crystals you'll come across from either specific actions or in late game areas. Collecting one adds another glyph under your MP bar, and allows you to use LB-Button to heal another time.

For a list of where all Primeval Glyphs are located, refer to THIS LINK[drive.google.com] to be taken to a Google Drive with tons of extremely useful maps and information about this game. As noted in the roadmap, full created to demajen for the insane amount of work they put into compiling all this information and especially for creating the 100% maps for every single region of the game.

In that link, you'll find an entry called 'Locations - 13 Primeval Glyphs.' Opening that will just briefly tell you where each Glyph is located. You can then, if you need more information, jump to the appropriate map to see where exactly that Glyph is located on the map, and what ability you need to reach it. Note that the "final" Glyph is automatically obtained after beating Renee's full ending, which is achieved by inserting all three memory shards into the device at the end and then beating both bosses. Essential has more information on that ending..

Keen Hunter

Complete the Beastiary.


Note: The achievement won't be obtainable until after completing NG+ mode.

To complete the Beastiary, you just need to kill every enemy type in the game once. This is practically unavoidable, unless you are literally avoiding enemies and just not killing them for some reason. As long as you kill all enemies as you go, at least once, this achievement will come naturally as you progress. By the time you finish all endings for your normal playthrough, you'll be nearly done with the Beastiary. You'll then need to complete NG+ mode, whih is ten separate chapters to play. Once it's done, load back into your normal playthrough and now you can access Nigredo Tower from Albedo Tower. In Nigredo Tower are another five enemies you need to kill, which are essentially just dark versions of Albedo Tower enemies: a purple floating book, small melee guy, big melee guy, guy throwing giant orbs, and the laser guy. Once you've killed one of each of those, that should finish off your Beastiary.

Note that I'm unsure if bosses count towards this at all, because the achievement unlocked for me as soon as I killed a laser enemy in Nigredo Tower, before I'd fought and killed the multiple bosses for the true ending (which were added to the Beastiary after I beat them). So, it seems odd that the true ending bosses wouldn't count for this achievement, but all other enemies and bosses would be. Either way, you'll unavoidably be beating all bosses for other achievements anyway.
Gate Of Babylon

Collect all weapons and armors.


There are 121 weapons and 52 armors that need to be collected for this achievement, as well as 64 accessories needed for the Se's Apprentice achievement.

Note: There is only one accessory that can't be obtained until after completing NG+ mode - Black Rock Heart. All other weapons, armors, and accessories can be obtained during a normal playthrough.

Don't worry about these two achievements until you've gone through every area, as you'll collect the vast majority of weapons, armors, and accessories naturally by exploring, finding chests, beating bosses, completing quests, etc.

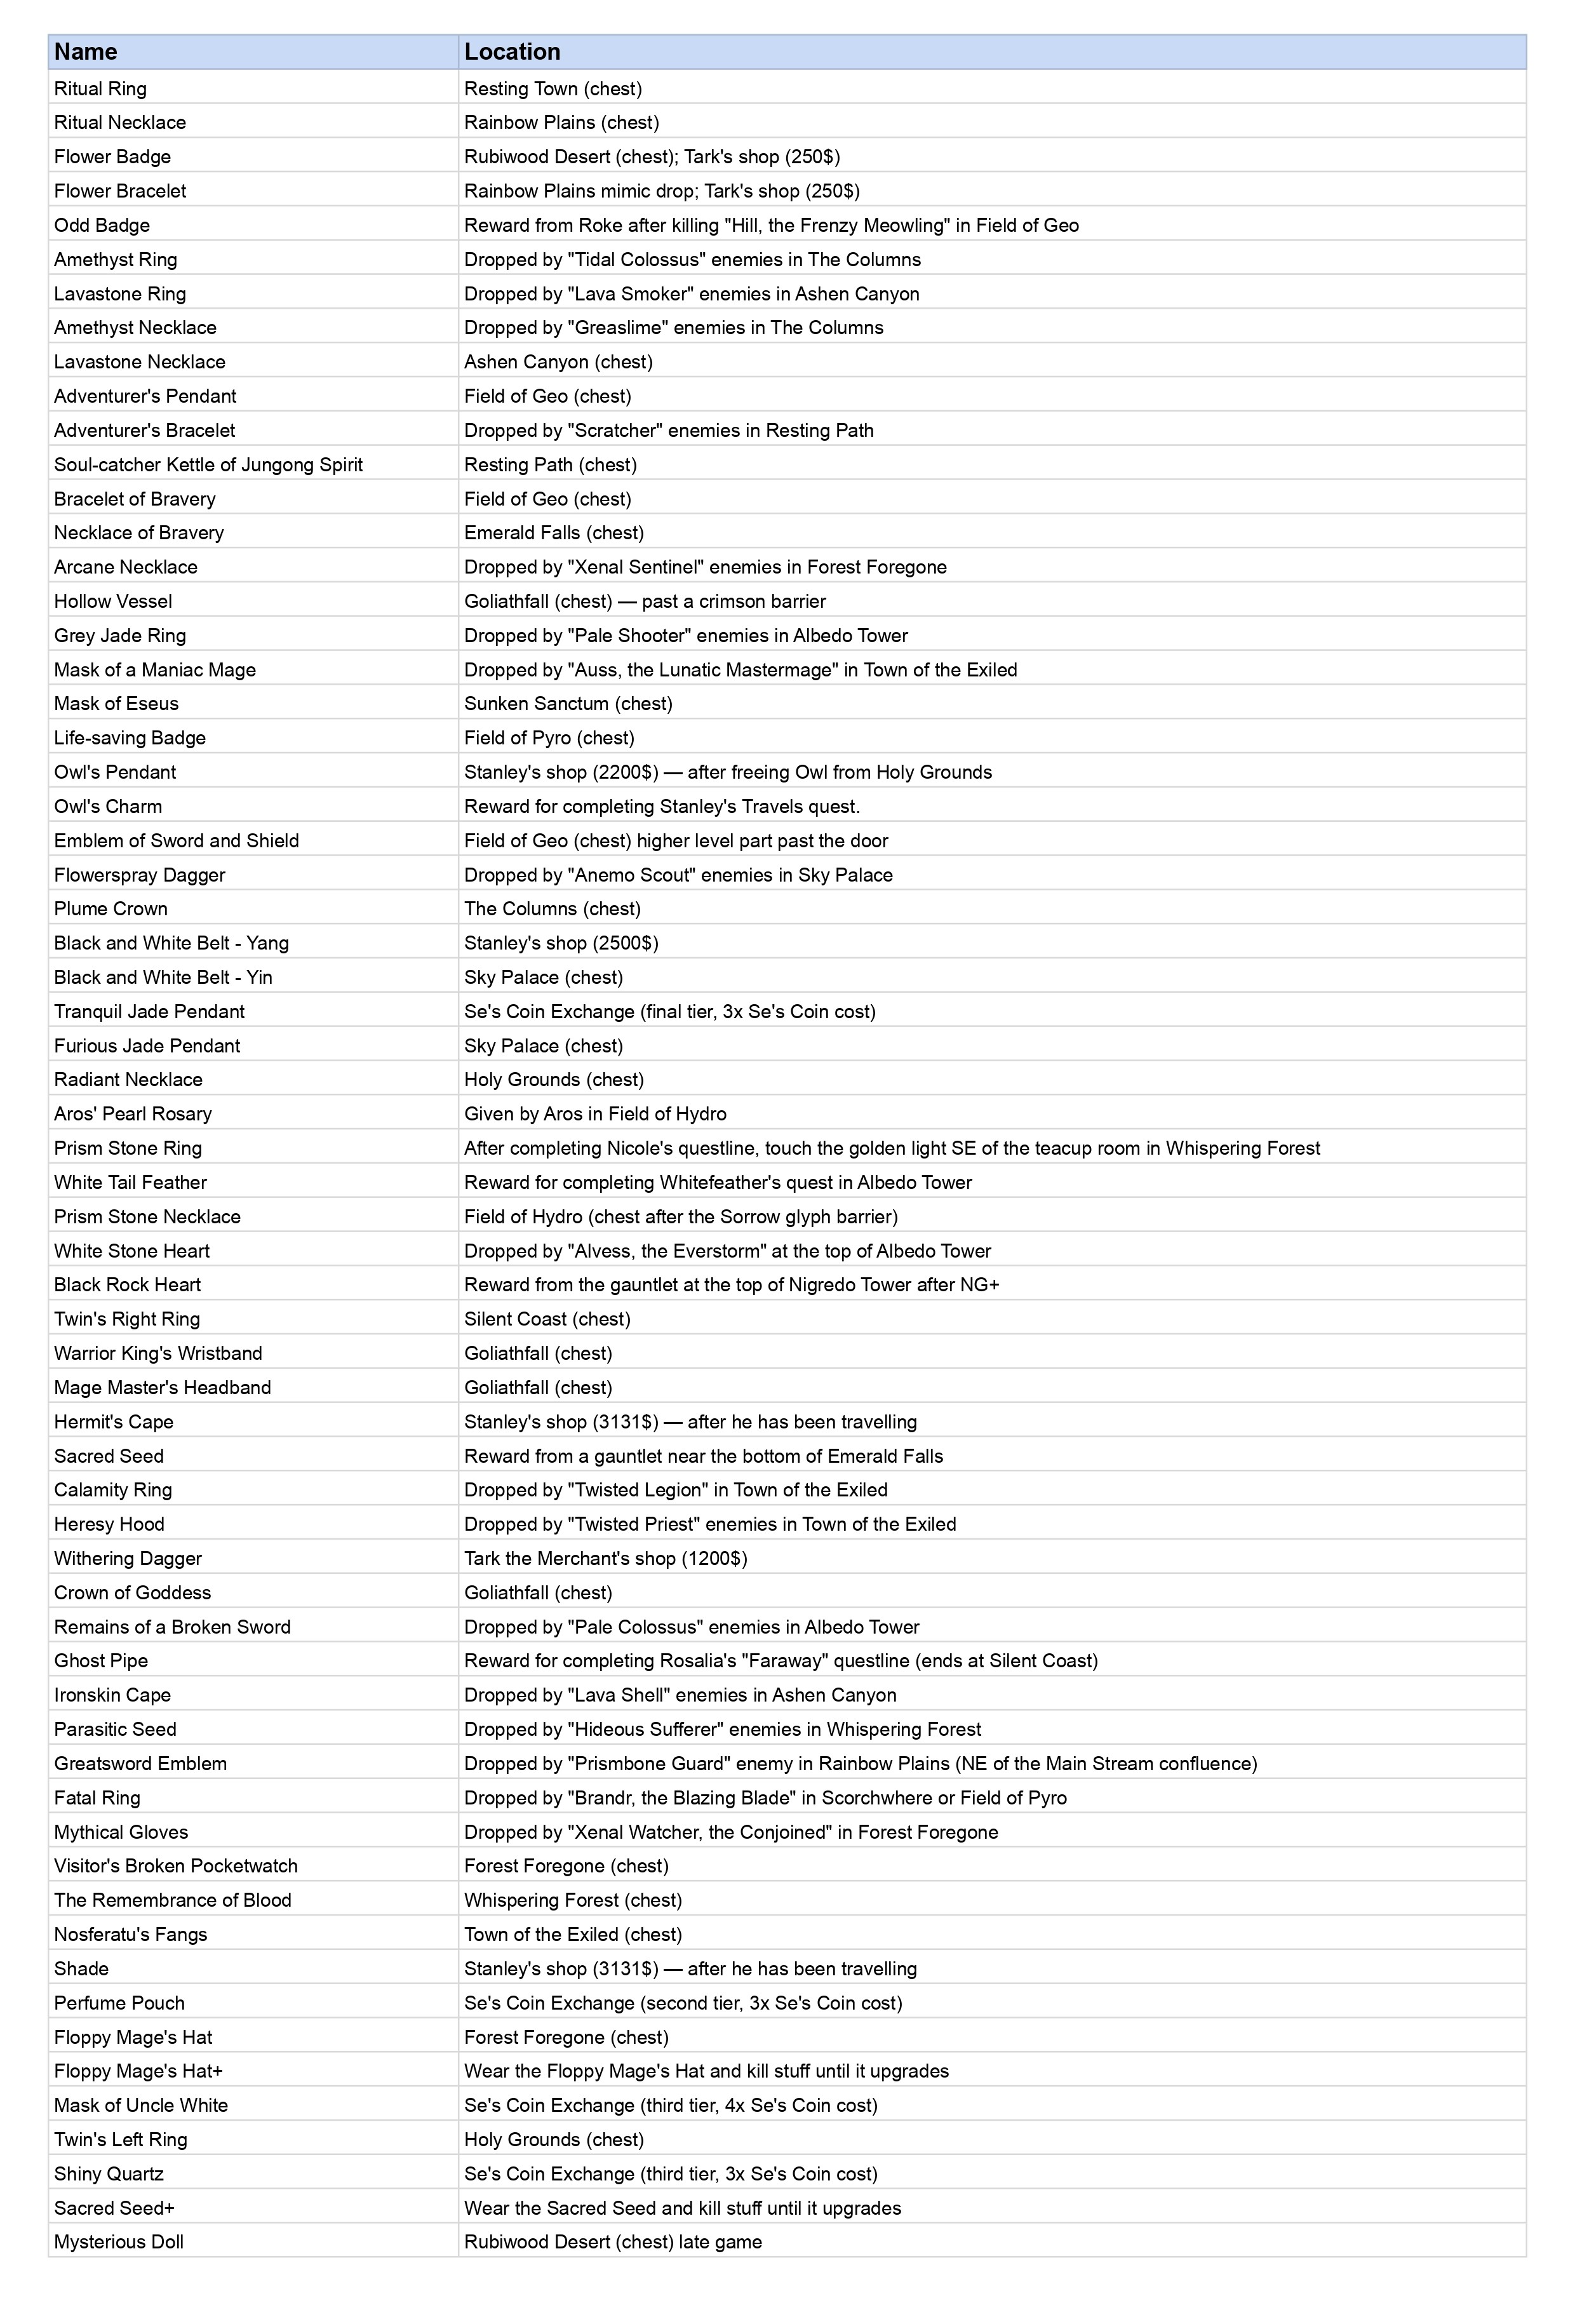
Once you're ready to mop up and complete this achievement, there is thankfully a handy way to see what you're missing. Head to Stanley's antique shop in Town of the Exiled (pictured below where the scroll icon is on my map), go inside, and head upstairs. There are three mirrors up there, and each shows either all the weapons, armor, or accessories you've found so far, as well as question marks for the ones you're missing, and a total count. What's nice is that these lists are in a set order, and as a result, it's easy to provide a master list of all weapons, armors, and accessories to compare against. Refer to THIS LINK[drive.google.com] to be taken to a Google Drive with tons of extremely useful maps and information about this game. As noted in the roadmap, full created to demajen for the insane amount of work they put into compiling all this information and especially for creating the 100% maps for every single region of the game.

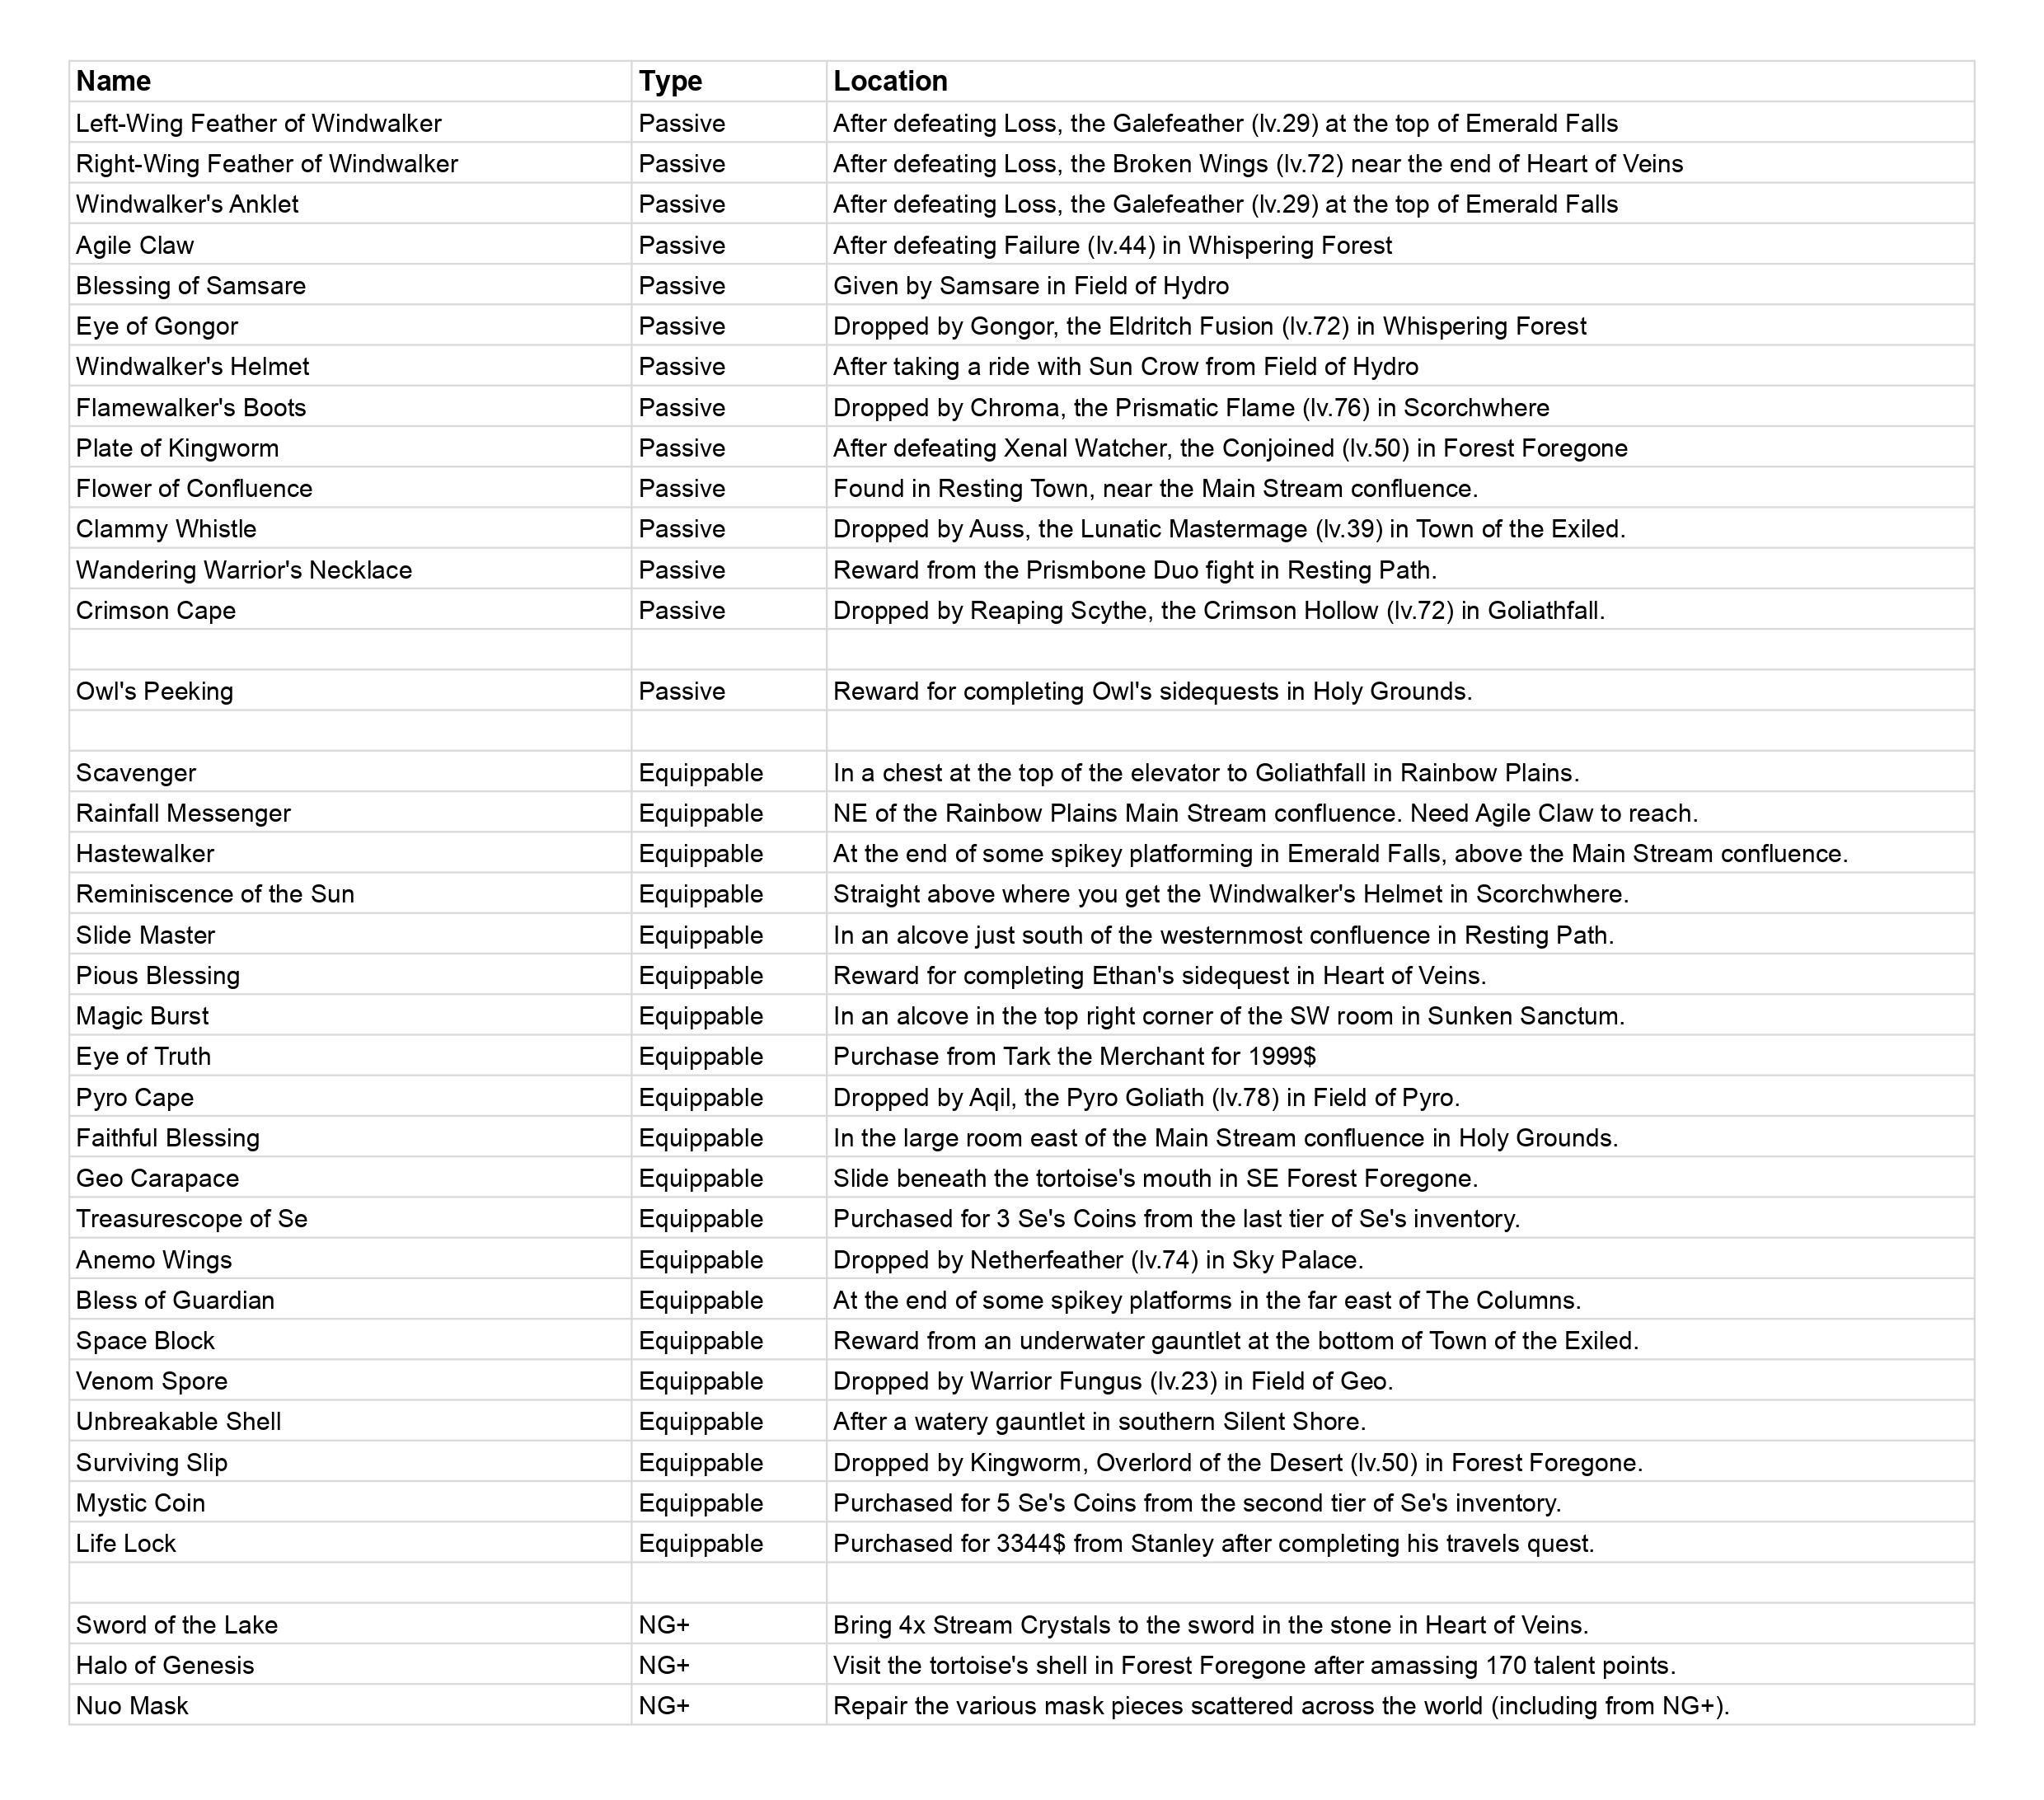
Scroll all the way down to the bottom of that Drive list, and the last file is a Google Sheet with tabs for weapons, armors, accessories, etc. Each tab lists them all in the order them appear in the game. This allows you to scroll through the lists in the mirrors in Stanley's shop and cross-reference that with the Google Sheet list to see what you're missing. Highlight the ones you're missing, and there's a column saying where to find each. Use the maps if the weapon, armor, or accessory is in a chest, to quickly find the chest on the relevant map, and head to it to collect it. There are some items that are only dropped from enemies. The Sheet mentions which region the enemies is found in. Your only option is to kill those enemies and hope they drop the item you need. However, you can speed this up by equipping accessories that boost Drop Rate and Rare Drop Rate. Stay near Confluences when you farm enemies, so you can kill nearby ones, quickly return to the Confluence to respawn enemies, and repeat until they drop what you need.

All Weapons :

All Armors :
Se's Apprentice

Collect all accessories.


Refer to Gate Of Babylon for more information.


All Accessories
Epicure

Taste all cuisines of Engardin.


There are a total of 30 cuisines that you need to use for this achievement.

This achievement is much more involved than it seems at a glance. Cuisines are meals that can be purchased/cooked with four different NPCs in the game: Alice, Emily, Doro, and Mia. In order to unlock this achievement, you need to complete each of these NPC's quests, which makes all of their cuisines available for purchase. Once their quests are complete, they return to Resting Town, making it easy to find them and make all the meals. Here is where to find them all.
  • Alice - this is the first NPC you'll come across, as she starts and stays on the east end of Resting Town
  • Emily - she moves all over the game for her quests. See below for more info
  • Doro - he spawns just to the right of the teleporter Confluence in Silent Coast, and he stays there for each leg of his quest
  • Mia - she spawns just to the left of the Confluence in Sky Palace on the west side. From the teleporter Confluence, head left and immediately drop through the bridge to the next lowest level, and head left to that Confluence. That's where Mia stays throughout her quests
There isn't really a need to go into much detail on Alice, Doro, and Mia, because they stay put, and you just have to revisit them when you've collected the required ingredients. In my experience, I always had plenty of each ingredient they needed, just from natural progression and exploration, killing all the enemies I see, and always picking up what they drop.

As for Emily, she's all over the place. Here's where she goes throughout her quests:
  1. She starts in Forest Foregone. From the teleporter Confluence, she's basically directly above it. Go left, straight up to the surface, then back to the right to find her under a ledge
  2. After completing that quest, she moves to Whispering Forest, at the Confluence all the way on the west closest to where you dock with the Manta Ray
  3. Her third location is in The Columns, right next to the rightmost Confluence
  4. Her fourth location is in Field of Pyro, right next to the teleporter Confluence
  5. After completing her quest there, as mentioned above, she'll return to Resting Town
So, you'll need to find the ingredients for each leg of each quest for each of the four NPCs. Each one allows them to make more meals for you, and you need to buy each meal (although not necessarily consume it) to progress to the next leg of the quest. Once you've completed all of the quests for all NPCs, and Emily, Doro, and Mia are back in Resting Town, and Alice's quest is done, talk to Alice again. She will rejoice that all of her siblings are back in Resting Town, and she'll give you one final quest to bring ingredients for a final dish. Do so to complete her last quest and make the last cuisine of the game available. Completing this final cuisine quest also unlocks Taste of Happiness.

Now that all cuisines are available to purchase/make, you need to do so and actually consume them all. I believe you must buy/make them all to progress the quests to completion anyway, so just make sure you actually eat them all in your inventory. They'll all be in the first tab, where your potions are, so you can't miss them. As a double check, you can check the stock of each NPC, and if you haven't eaten a meal yet, its first-time benefits will be green, meaning they haven't been applied yet since you haven't eaten that meal. If they're grey, you've eaten that meal. Consume them all to unlock this achievement.
Thoroughly Tempered

Reach level 99.


As the description says, you need to reach the max level of 99 to unlock this achievement. Obviously save any potential grinding until you've done everything else, since all of the exploring and whatnot you do will involve killing more enemies and leveling up more.

In my experience, I was around level 80-83 by the time I finished pretty much everything in the normal playthrough. before starting NG+ mode. Your mileage may vary, but I killed everything I came across, and did virtually no grinding along the way, and was around level 83 when I finished most other stuff and was ready to start doing all of the endings.

Regardless of what level you're at when you're done, it's pretty unlikely you'll be level 99 (or even in the 90s) when you're done with most other achievements. You'll likely need some grinding. Thankfully, there is a really quick way to grind levels: head back to the Sunken Sanctum and "Investigate the device" to trigger the basic Renee ending where you fight Guider. By the time you're level 80+, this fight should be relatively easy (and it will naturally get easier as you grind and have more experience beating her). It was only taking me 1-2 minutes per fight, and even with nothing equipped to boost XP gain, I was getting around two thirds of a level per fight. I went from level 83 to level 99 in well under an hour, just beating Guider over and over again. So, if you need to grind out levels (or just want to, at some point), this is, in my opinion, the most efficient means by far.

Of course, if you have a lot of difficulties with this fight, or just aren't a high enough level, then the next best option is to just fight enemies at the highest level possible. The "final" area of a normal playthrough is Field of Pyro, and you should be able to kill the enemies there relatively easily once you're done with everything else. Just go from one Confluence to another, killing all enemies in between, then using the Confluence to respawn them and to heal. You should also equip accessories that boost XP gain, and you can definitely gain a level in a single back-and-forth run. This is obviously much slower than the above method, but it's still a reliable way to get XP until you're a high enough level to be able to beat Guider quickly and reliably.
Omneity

Obtain all abilities and Afterimages, and reach level 99.


Note: Despite the description saying you need to reach level 99, this achievement unlocked for me as soon as I obtained all abilities and Afterimages. I was only in the 70s at the time, when this achievement unlocked. If this isn't the case for you, or it gets patched, refer to Thoroughly Tempered above for reaching level 99.

Afterimages all come from bosses, and so you'll get them all by beating all bosses (see No Surrender), but afterimage abilities are often treated like collectibles in that you'll need to track them down somewhere on the map.

Thankfully, demajen has already put together a list of all Afterimages and abilities, along with where to find them. Refer to THIS LINK[drive.google.com] to be taken to a Google Drive with tons of extremely useful maps and information about this game. As noted in the roadmap, full created to demajen for the insane amount of work they put into compiling all this information and especially for creating the 100% maps for every single region of the game.

Scroll all the way down to the bottom of that Drive list, and the last file is a Google Sheet with tabs for weapons, armors, accessories, etc. One of the tabs is for Afterimages. That shows you a list of all Afterimages and abilities, along with where to find them all. Utilize the maps if need be to track down their exact location, but this makes it very easy to mop up any that you're missing.

All Afterimages
Money For Nothing

Purchase all shop items.


This achievement is quite involved, as there's actually a lot you need to buy, from multiple vendors. Here is a list of each applicable vendor and what you need to buy from them.

Blacksmith - Resting Town
You need to buy every single item from his shop, even if it's wooden weapons and armor that you already got from random drops

Tark, the snail salesman - Resting Town (after rescuing him from Field of Geo above)
You need to buy all weapons, armor, and accessories he sells. You also need to buy one of each consumable item he sells

Alice, Emily, Doro, and Mia Cuisines - Resting Town (eventually)
Refer to Epicure for accessing all cuisines in the game. Completing all of the quests described in that achievement solution will involve you purchasing all cuisines in the game from all four NPCs, as well as the final one Alice provides once you've done all others. You need to purchase every cuisine once

Alice (normal shop) - Resting Town
In addition to the cuisines you can buy from Alice, she also sells ingredients if you just choose the 'Buy' option when you talk to her. From this list, you'll notice the last few ingredients have a number next to them for a set amount she has in stock. You need to buy out her stock of those last few ingredients. Also, you need to buy one of each of the unlimited items she sells.

Stanley - Town of the Exiled (see Gate Of Babylon for a quick screenshot of where his shop is, if you don't know)
You need to buy everything from his shop. Then, you also need to complete his entire quest line. See Come As You Are for doing that. Once the quest is started, you'll be able to buy a few new pieces of gear from his shop, and then after completing his quest line, he'll sell a bunch more gear to buy. You need to buy it all.

Ferryman - Scorchwhere, Field of Pyro, Rubiwood Desert (on the far western exit from all three areas)
You need to buy his Ticket he sells, as well as one of each consumable he sells

Se - Halcyon Veins
You need to find every Se Coin collectible hidden throughout the game, and then buy everything from Se using the Coins. Se has four tiers of items to buy. You'll need to use the Coins to buy out the first set of items offered, then back out and talk again to see the second tier, etc., until you've bought out all four tiers of items using every Se Coin in the game

Refer to THIS LINK[drive.google.com] to be taken to a Google Drive with tons of extremely useful maps and information about this game. As noted in the roadmap, full created to demajen for the insane amount of work they put into compiling all this information and especially for creating the 100% maps for every single region of the game. The good news is that the maps show the locations of all Se Coins in the game. The bad news is that there's no way to track which ones you've found and which you haven't. So, unfortunately, your only option during mopup is to check each one. Equip the 'Treasurescope of Se' afterimage ability (refer to Omneity if you don't have it), and then you just need to head to each one on the map to see if the ability activates, indicating a collectible is nearby. That's the only real way to mop up Se's Coins.

Lastly is dew (money) needed to actually buy all of these things. I found almost every single dew rock (those things you break that release lots of dew) in the game, spent probably 5000-ish on health potions over the game, and I was very short on dew to buy everything (by easily 10,000 or more). So, one option is to sell stuff. Unfortunately, for some strange reason, you can't sell weapons, armor, or accessories, even though many early ones are useless. The good news is that, if you go to your Items tab, and press rt.png over to the fourth tab there (I believe it's a picture of a backpack, after the diamond tab?), every single item on that tab serves no purpose other than to be sold for dew. So, go to any vendor and sell off everything in that tab. Then, and especially if you've already completed everything for Epicure and Taste of Happiness, you can sell ingredients from the second tab too. To be safe, I sold down to 5 of each ingredient in case I needed them, but I had dozens of some. Lastly, you can also sell potions if you don't use them. For example, I didn't use mana and MP literally the entire game, as I min/maxed entire toward weapon damage, and so mana potions were completely useless to me, so I sold them. As long as you don't waste dew during your playthrough by buying potions over and over, this should hopefully give you enough dew to buy out whatever else you still need for this achievement.

If not, there isn't a great way to grind dew. The best way is to equip the afterimage ability Mystic Coin, which makes enemies drop dew whenever you crit them. I was getting 10 dew per crit. Then, equip other weapons and armors and accessories to boost dew gain and/or crit percent. Then, equip a weak weapon and find enemies with high health, such as ones in later areas, and just hit them over and over. The goal isn't to kill them, but to hit them frequently, as each crit drops dew. It can quickly add up despite being a little bit at a time.
Geographer

Activate all Confluences of Stream.


Note: This achievement won't be obtainable until after completing NG+ mode.

Confluences of Stream are the save points/healing points you'll find (the white trees) throughout each area of the game. You'd be hard pressed to complete the game without activating all Confluences, but if you're somehow missing any, refer to THIS LINK[drive.google.com] to be taken to a Google Drive with tons of extremely useful maps and information about this game. As noted in the roadmap, full created to demajen for the insane amount of work they put into compiling all this information and especially for creating the 100% maps for every single region of the game. The maps show the locations of all Confluences. Small ones are marked with an apple, and teleporter ones are marked with a tree, just like in the game.

The final Confluences are at the top and bottom of Nigredo Tower, which is a secret area only accessible after beating all ten chapters of NG+ and then returning to your normal playthrough to access it via Albedo Tower.
Homecoming

Where is my mind?


Refer to Essential for more information.
Cradle

Down in a hall and I don't know if I can be saved.


Refer to Essential for more information.
Essential

Along the Tablet, seared by fate.


These three achievements are for each of Renee's three endings, all achieved in the Sunken Sanctum at the device just east of the teleporter Confluence. The name of each ending (which is displayed on screen when you complete it) corresponds to the achievement name.

For the Homecoming ending and achievement, you need to interact with the device and then choose the second option, to investigate the device. This will trigger a boss fight against Guider, the Shadow Moon. Beat her to unlock the Homecoming ending and Homecoming.

For the next two endings, you'll need one and all three Memory Shards, respectively, so you might as well just collect all three. They're all pretty easy to get:

  • One is given to you by Aros automatically when you reach her in Field of Hydro
  • One is located near the top of Albedo Tower, in a big square room off to the left just before the top, in the same room as a Stream Crystal. You'll need to be able to go underwater to get this Memory Shard, but it's just sitting there
  • One is located in Frozen Veins, under a floor you need to smash down through

For the Cradle ending and achievement, interact with the device and choose the first option, to insert Memory Shards into the device. Choose to insert either one or two (either option results in this ending). You'll have to fight Guider, the Shadow Moon, just like in the previous ending. It's the exact same boss fight. Once you beat her, you'll unlock the Cradle ending and Cradle.

For the Essential ending and achievement, interact with the device, choose the first option, but choose to insert all three Memory Shards. You'll once again fight Guider, the Shadow Moon, except after you defeat her, you'll have to fight against Red Renee. She is one of the tougher bosses in the game, because not only is she very fast and very aggressive, but she has all of your abilities. The main problematic one is that if she hits you, she regains a bit of lost health. You'll definitely want to keep your distance for most of her attacks, otherwise she will teleport around you and punish you with melee attacks. Refer to the video below to see how quick she is and when to attack. Remember, with the Crimson Cape you can dash through her attacks without getting hurt. Full credit to the creator of the video.

Hope

This fire is out of control...


Refer to Journey for more information.
Withering

...the hardest part of this is leaving you.


Refer to Journey for more information.
Journey

We're out on the road again.


These three achievements are all three of Ifree's endings. Note that, before you can do any of them, you'll first need to defeat the two Goliaths of Pyro, Argus and Aqil. Refer to Gimme Shelter for doing so.

With them both defeated, head to the southernmost point of Field of Pyro. There is a door there that only opens if you've beaten both Goliaths. Head inside to find an egg.

For the Withering ending and achievement, interact with the egg and choose "Let's begin, Ifree." This will immediately end the game and trigger the ending, as well as unlock Withering.

For the Hope ending and achievement, invade the egg and don't listen to Ifree when she begs you to stop. Keep hitting the egg until the boss fight starts. You will now have to beat Ifree. This is actually a really simple fight, since she only has one attack: she continually sends homing fireballs at you. All you need to do is dodge them and get in a hit here and there when it's safe. Don't get greedy, and stay patient, and this will be a really easy fight. Once she's beaten, you'll unlock the Hope ending and Hope.

For the Journey ending and achievement, interact with the egg and choose to Invade it instead. Once inside, attack it until Ifree asks you to stop. She'll ask you to stop two separate times before a boss fight starts. I believe you can stop after the first or second time she asks and still get this achievement, but either way, once she asks you to stop, do so. To leave the egg you've invaded, you either need to use a Resting Potion to teleport to the nearest Confluence, or just quit to the title screen and load back in. However you get out, return to the egg, and a dialogue will automatically trigger, giving you the Journey ending and unlocking this achievement.
Dream

Sweet dreams... are made of this?


Refer to Waiting for more information.
Waiting

Engadin is doomed and there's nothing I can do.


These two achievements are for each of the two NG+ mode endings.

In Chapter 10 of NG+ mode, you have two options:
  • Invade Karin and defeat Eseus in a boss fight. This unlocks the Dream ending and Dream
  • Instead of invading Karin, head left past her and interact with the mirror to leave. Talk to the Goliath, and then you'll have a boss fight against The Unstoppable Devil. Defeat it to unlock the Waiting ending and this achievement
World Flower

Shine on, you crazy flower.


This achievement is unlocked by achieving the True Ending to the game.

To reach the True Ending, there's a bunch of things to do:
  1. Complete one of Renee's endings (doesn't matter which of the three)
  2. Complete one of Ifree's endings (must be one of the two where you don't fight her)
  3. Doing both of the above unlocks NG+ mode
  4. Play through and complete all ten chapters of NG+ mode. They are very short, and the entire thing will likely only take an hour
  5. In Chapter 10 of NG+ mode, play it twice to get both NG+ endings (refer to Waiting if you need more information)
  6. Load your main playthrough back up. Teleport to Albedo Tower, and head into the secret room off to the right to take the teleporter to Nigredo Tower, where the ninth and tenth chapters of NG+ took place.
  7. Head all the way to the bottom of Nigredo Tower where you'll find 42. Talk to her to start a new quest, and you'll need to invade Karin and beat this boss fight. You'll get a new quest called 'Sea of Souls'
  8. Return to the Holy Grounds and head up to Owl's usual spot at the very top, and talk to him to find out your mask needs to be repaired
  9. Head to Samsare (the big pink Goliath) in Field of Hydro and talk to it. You'll now need five mask shards (one of which you automatically got from beating Karin above), and then two other new Afterimages. Refer to Trinity for how to get all three required Afterimages to progress
  10. Refer to Samsare and she'll repair the mask, and acknowledge the other two Afterimages (and Trinity will unlock here)
  11. Return to 42 at the bottom of Nigredo Tower and interact with her to start the final boss fights of the game
You now have to fight three bosses in a row. The good news is that your glyphs and health fully refill after each boss fight. The bad news is that if you die against one of the bosses, you have to fight all three over again (and for some annoying reason, it spawns you on the unnamed island in the Manta Ray overworld with the lighthouse, so you need to head all the way left to the teleporter Confluence and teleport back to Nigredo Tower to try again).

The first boss is Eseus. It's giant, meaning really easy to constantly damage. There's a pit in the center of the screen, but you can actually use it to your advantage: you take less damage from falling in the pit and respawning than you do from getting hit by Eseus, so keep that in mind. Other than that, this boss is pretty easy. Use your dash to your advantage, since you can dash through attacks/damage, and just keep hitting Eseus. It shouldn't pose any problems.

The second boss is Eseus the Transcendent, and you'll fight her as 42 instead of Renee. This fight can feel pretty hectic at first, but it's important to be patient and get in hits when it's safe. Once you know her attacks, she's pretty easy to predict and avoid them. She'll be at either edge of the screen and will flash one of the four elements for a couple seconds before unleashing an attack of that element:
  • Fire attack will either be a fire explosion on you (just keep moving and dash away) or a series of homing fireballs. The latter is the best, because just stand at mid range, then walk/dash toward her under them. They'll all hit the ground behind you, and you're free to unload on her
  • Ice attack will either be an ice cloud (just stay away from it) or ice spikes. For the ice spikes, you can either be across the screen to avoid them, or just be right up against her (under where they shoot from). Doing the latter allows you to unload on her
  • Earth attack will either be a set of pillars that shoot up (the locations are easily telegraphed) or a series of fast boulders. Stand on the ground to let the boulders fly over your head, then jump and shoot her, using double and triple jump to stay airbound, while all the boulders roll back under you and you damage her
  • Wind attack will either be a stationary tornado (just stay away from it) or wind blades, which you'll need to stay away from to avoid
Once you get used to those eight attacks, you'll find they're quite easy to predict and avoid, and unload on her when it's safe. Periodically, she'll move to the center, choose and element, and unleash an attack that goes all over the screen. Prioritize dodging over dealing damage, as it's really easy to get hit a bunch if you aren't paying attention. Stay patient with this boss and you'll be able to finish her off without much issue. Beating her unlocks She Is My Sin.

The third boss is Eseus the Eternal, and is pretty similar to the first boss fight. You're back as Renee again for this fight. Once again, the boss is huge, so you can constantly deal damage to it with ease. It's got basically the same attacks as the first boss except all amped up and bigger on the screen. Again, use your dash to your advantage. You can also often super jump up to the ceiling to avoid some attacks. Use weapon skills nonstop and heal if needed. I found this boss quite easy since it's huge and stationary, and it should die pretty quickly. Beating it unlocks Tomorrow Will Be Longer as well as this achievement for achieving the true ending.

If you'd like to see a video of the bosses to see their attacks and patterns, refer to the following video to see all three. Full credit to the creator of the video.

The Number Of The Beast

Deal 666 damage in one single hit.


As the description says, you need to deal exactly 666 damage in a single hit to any enemy or boss in the game. As you might surmise, this is entire luck based. While there is a chance this will happen naturally during your time with this game, especially if you crit a weaker enemy, there's also a good chance it won't happen.

I went the entire game without this happening, so I had to actively try for it after doing everything else. To try to eliminate the randomness from it, I waited until I had completed everything to try for it, meaning anyone can replicate what I did. It's also impossible to sell weapons, armor, and accessories, so there's no way that my build below will be unavailable to anyone.

Here is my exact endgame build:
  • Entire Talent tree filled in
  • Every meal purchase and consumed (but none active at the time)
  • Pyro Calamity Whip, fully Enhanced
  • Prism Gale Blade, fully Enhanced (for the increase to Weapon Skill Damage)
  • Outfit 1001 (increase to normal and skill damage)
  • Remex Helmet (increase to final damage)
  • Hornbeast Fang (increase to main weapon attack)
  • Hornbeast Claw (increase to main weapon attack)
  • Remains of a Broken Sword (increase to main weapon attack)
  • Fatal Ring (increase to final damage)
  • Twin's Right Ring (increase to main weapon attack)
I then went to Rubiwood Desert, the first area of the game, and found the little flying blue bird enemies. With the Whip, I would jump and do a Down + X-Button attack, and it was doing 640-670 damage to each enemy. From there, it was just a matter of time until one of the attacks did 666, which it did after around ten enemies. Use the easternmost Confluence to respawn these bird enemies just west of it.
Holy Diver

Perform a leap of faith.


This achievement is unlocked by jumping off the eastern edge of Emerald Falls. To get there, after progressing through the Field of Geo, you'll head east into Emerald Falls. You'll then need to head up and right whenever you can, and when you get to the top you'll have to fight a boss: Loss, the Galefeather. This can be a tough fight, but once you beat it, you can head all the way east, drop down, and continue east until you get to the edge of a cliff, looking like you're at the end of the map. Jump off, and when you land at the bottom in a new area, this achievement will unlock.
Iron Man

Defeat an enemy by performing an enhanced Iron Bastion.


To unlock this achievement, you first need to get the skill Iron Bastion in the Talent tree. It's in the upper left section, which is the Greatsword branch of the Talent tree, and you'll need to be at least level 18-20 to reach it and unlock it. You obviously also need to have a Greatsword available to equip.

Once you have the skill and the weapon, you can use the skill by holding LT-Button and then pressing whichever attack button the Greatsword is equipped to (X-Button or Y-Button​​​​​​). Doing this will cause you to first parry forward with your sword like a shield, and then strike. What you need to do is have an enemy strike you while you're doing the parry part of the attack, and this results in the followup strike being enhanced. You need the resulting enhanced swing of your sword to kill an enemy in order to unlock this achievement.

In my experience, the parry only worked on a physical melee attack. It didn't seem to do anything to ranged attacks (I would just take damage). So, find any simple melee enemy anywhere in the game, get near them, and when they telegraph an attack, do the Iron Bastion move. If it doesn't kill them, repeat until it does, and then you'll unlock this achievement.
Secret achievements
Word Of Shenlong

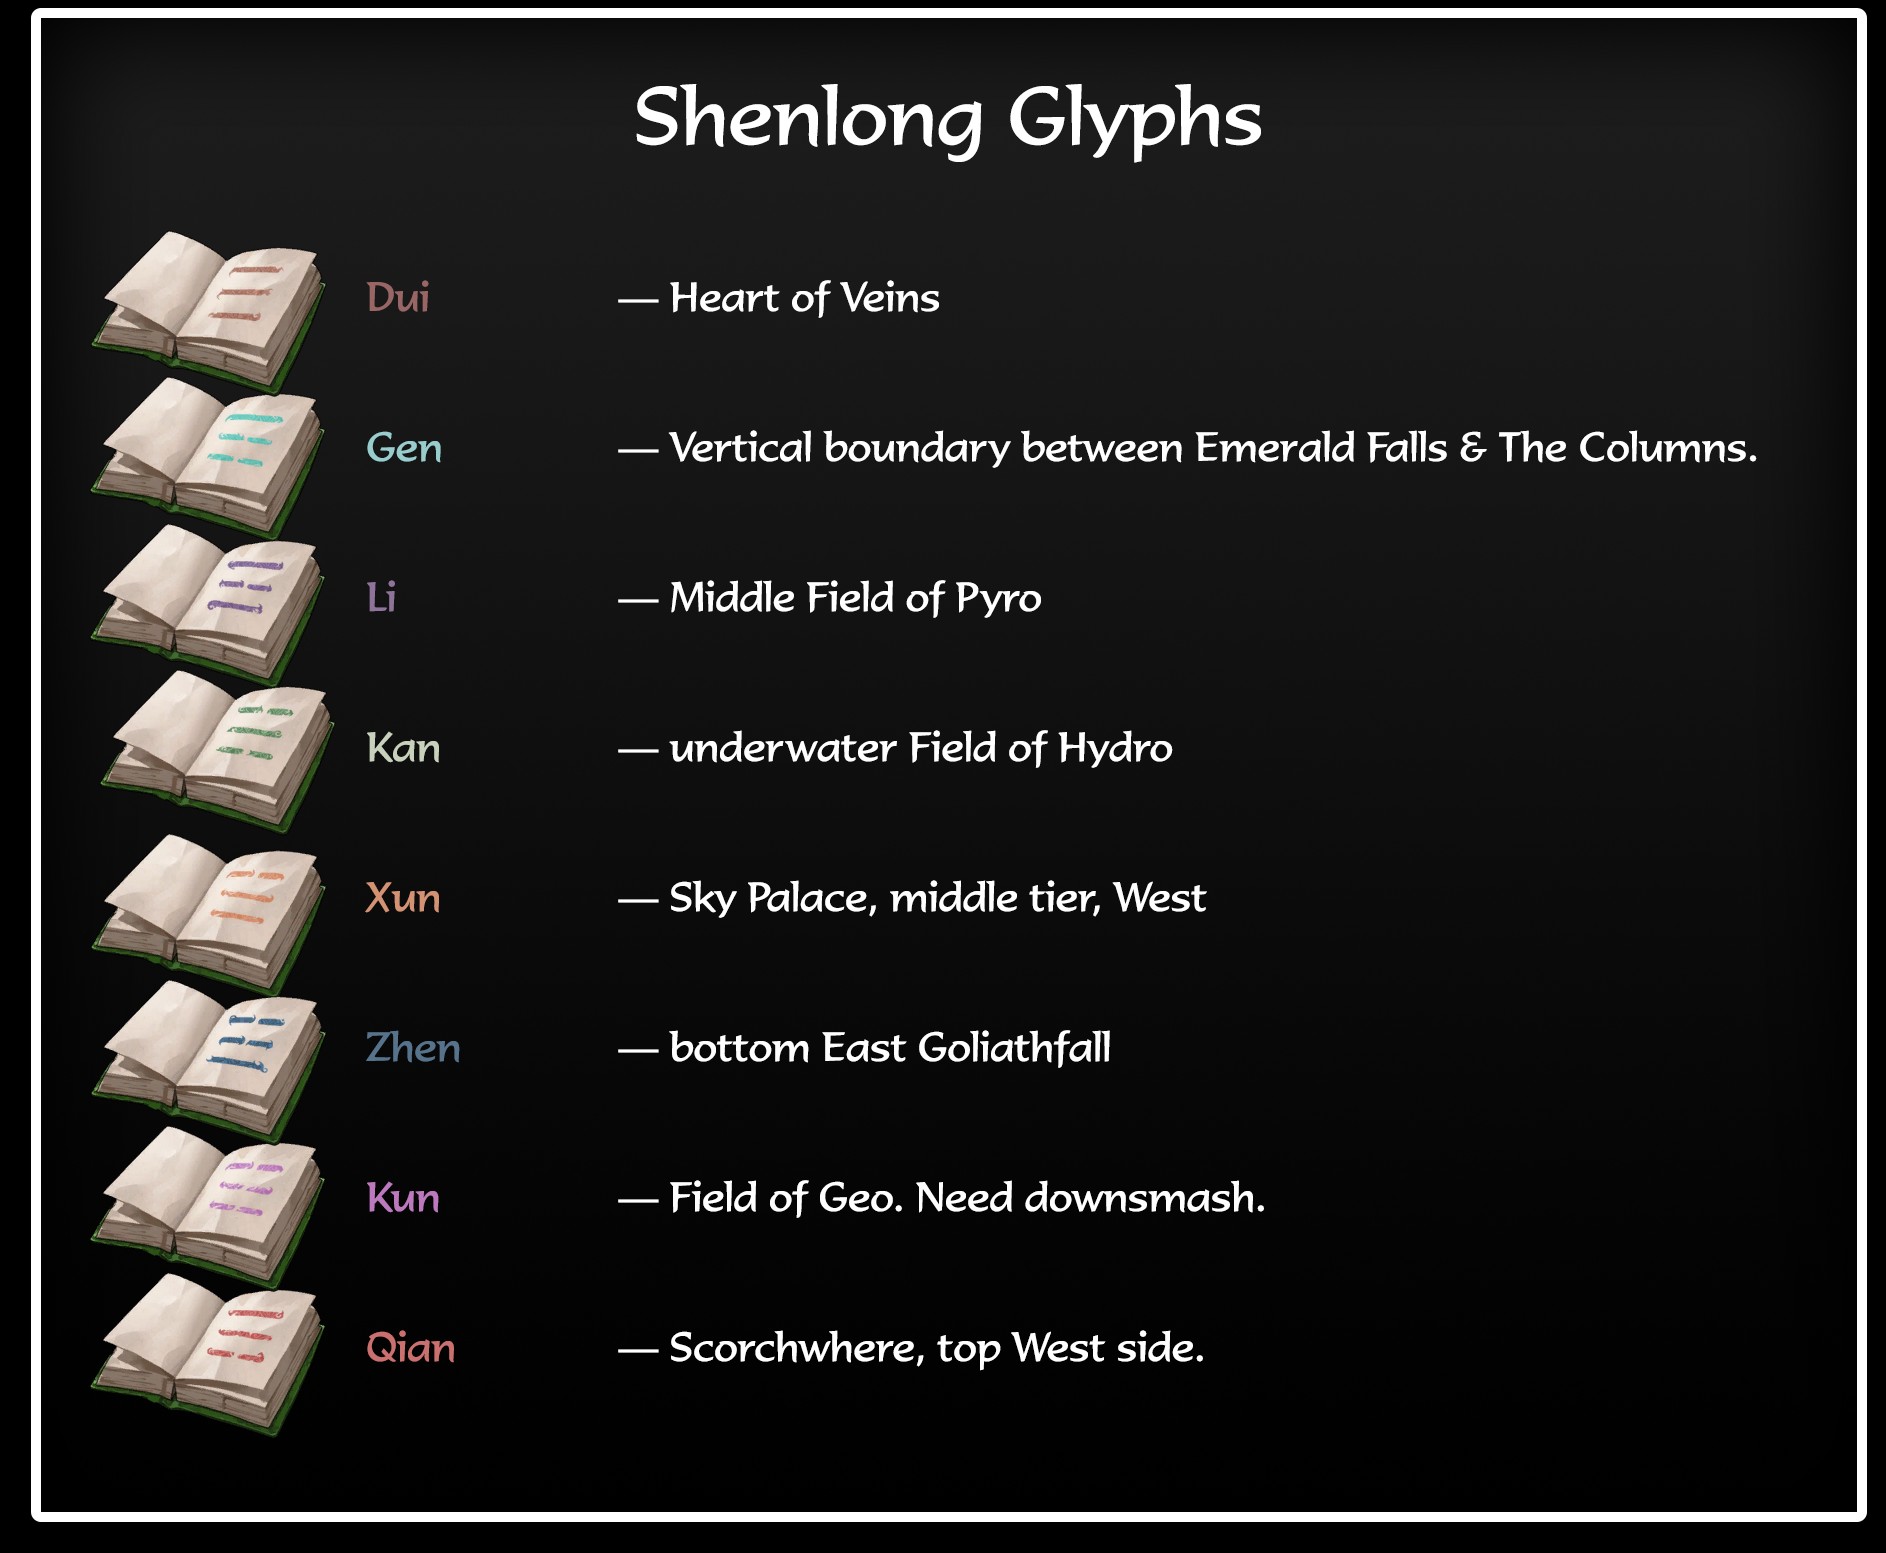
Collect all Shenlong Glyphs.


There are 8 Shenlong Glyphs in the game. These appear as purple item drops, and don't serve any real purpose in the game except to complete a quest and unlock this achievement. You'll likely find most or all of them as you explore, since they aren't particularly well hidden (or hidden at all), but as always, refer to THIS LINK[drive.google.com] to be taken to a Google Drive with tons of extremely useful maps and information about this game. As noted in the roadmap, full created to demajen for the insane amount of work they put into compiling all this information and especially for creating the 100% maps for every single region of the game.

In that link, you'll find an entry called 'Locations - 8 Shenlong Glyphs.' Opening that will just briefly tell you where each Glyph is located. You can then, if you need more information, jump to the appropriate map to see where exactly that Glyph is located on the map, and what ability you need to reach it.

The March Of The Swordmaster

Learn all secret arts.


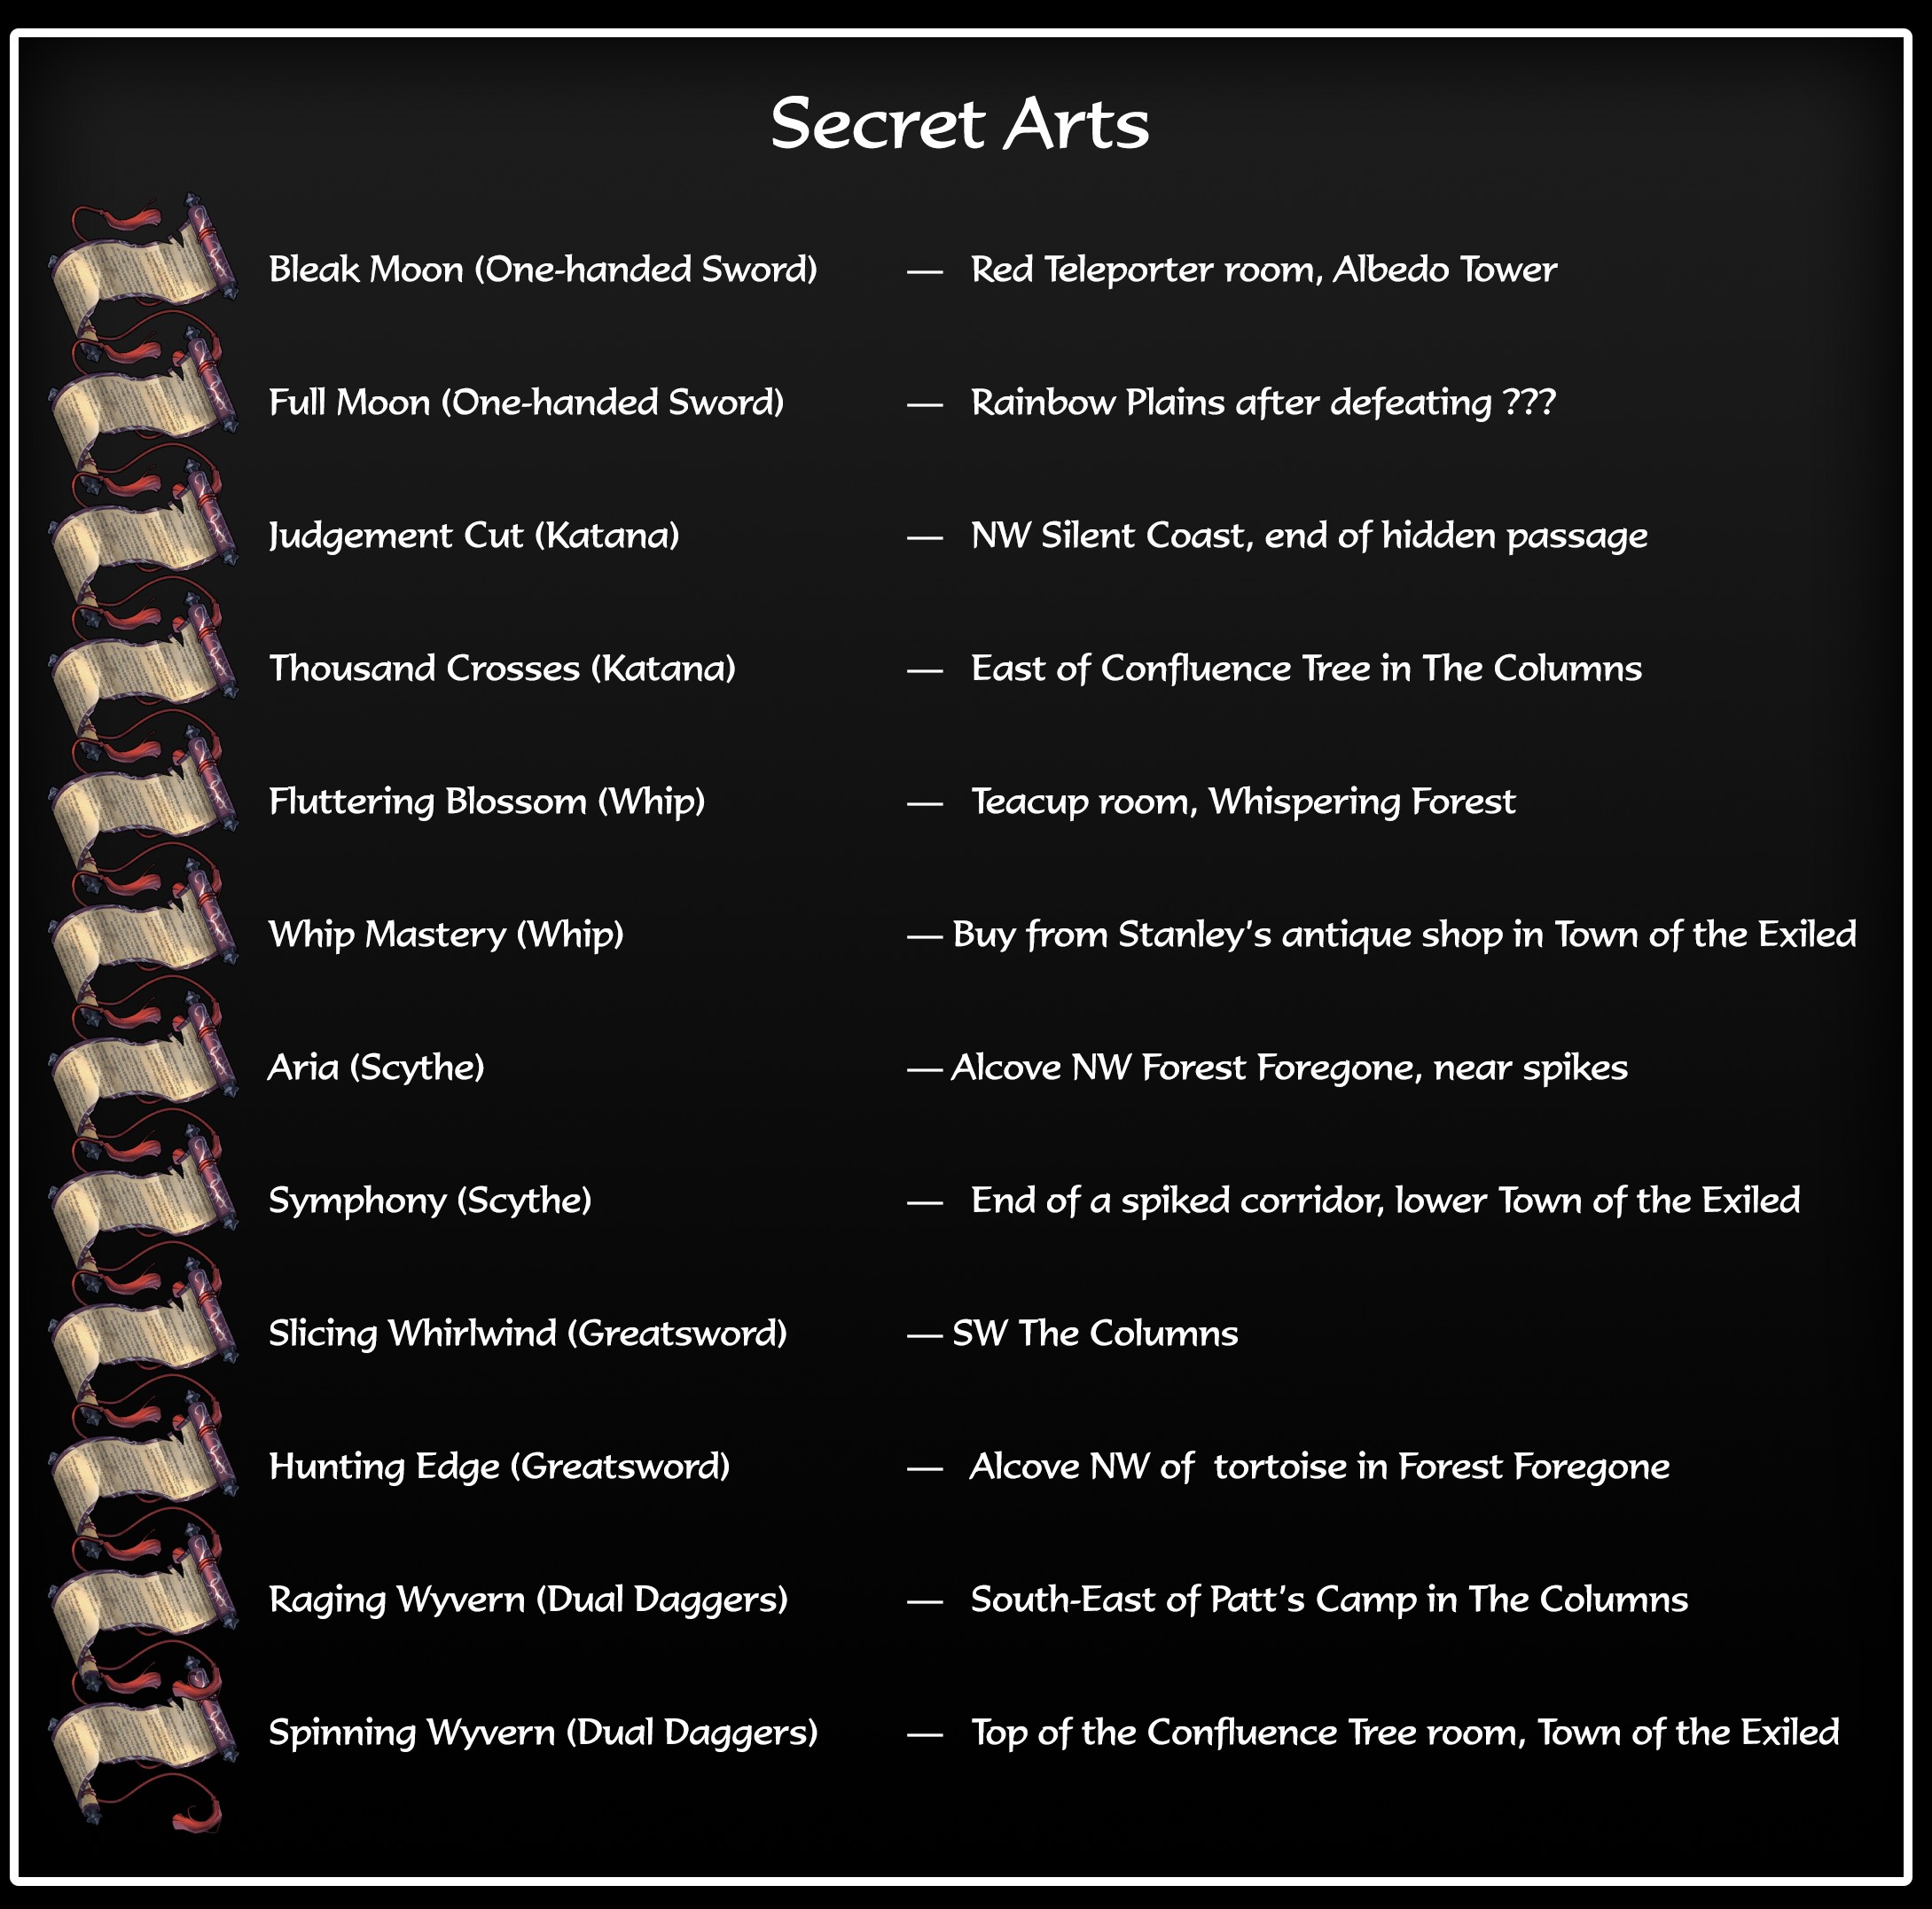
Secret arts are another form of collectible in the game, and they typically come from the same chests that give you weapons, armor, and accessories, and so need to be tracked down on the map. There are a total of 12 of them, two per weapon type, that you need to find. Note that this achievement unlocks when you find them all. You don't actually need to "learn" them all by investing Talent points in them all, if you don't want to.

Thankfully, demajen has already put together a list of all secret arts, along with where to find them. Refer to THIS LINK[drive.google.com] to be taken to a Google Drive with tons of extremely useful maps and information about this game. As noted in the roadmap, full created to demajen for the insane amount of work they put into compiling all this information and especially for creating the 100% maps for every single region of the game.

Half way down the list is a file called "Locations - 12 Secret Arts." Open that to see in general where each is located. Utilize the maps they created to track down each one in its designated location to mop up whichever ones you're missing.


Come As You Are

Witness the long journey of Stanley and Levine.


There is a lot of work needed to finish the side quests to unlock this achievement. Before you can do Stanley side quests, you need to complete Owl's side quests.

Owl's quests
  1. From the teleporter Confluence of Holy Grounds, head all the way to the top and then to the room on the left to find Owl. This is his standard location. Talk to him to start the quest and get a note
  2. Head to Stanley's shop in Town of the Exiled, and talk to him to give him the note. Stanley will give you a list of items he needs, and will also now sell Pure Orb, which you need to buy. Binding String is dropped by either of the Monkey enemies in Emerald Falls; Ever-Burning Crystal is dropped from the boss Chroma in Scorchwhere; Firmamental Feather is dropped in Sky Palace by either Anemo Scout (the hovering wanded enemies) or Anemo Rider (the floating green enemies); Water of Equilibrium is in the very topmost room of Silent Coast, all the way up, just left of center
  3. Return to Owl at the top of Holy Grounds to give him all five items. He will give you Grey Orb and tell you that you need to kill enemies in Town of the Exiled with it
  4. Head to Town of the Exiled (Grey Orb doesn't need to be equipped), and kill enemies until you get an onscreen dialogue that it turned golden
  5. Head back to Holy Grounds, but this time, from the teleporter Confluence, you need to head to the lowest floor instead of the highest. If it's still locked and you can't go down yet, you need to head east from the teleporter, beat the boss Valos, the First Knight, then head east, around and down, and back to the west. Owl is on the bottom floor to talk to again. He'll teach you about Soul Invading, and have you invade the Candelabra of Desire. Attack the Soul Link to break it
  6. Head up above the teleporter Confluence to find a big Orb you can Soul Invade. Break the link again. The orb is directly above the teleporter, in line with it
  7. Head up to the top floor, in the center from where Owl normally is, to find a big book to Soul Invade. Break the link here too.
  8. Head west into the room with Owl and talk to him again to complete the quest. You now have the ability to Soul Invade (specific story moments only), and now you can finally start Stanley's quests
Stanley's quests
  1. With Owl's quests done above, head to the Manta Ray dock on the west end of Holy Grounds. Owl and Stanley will be together. Talk to them.
  2. Return to Stanley;s store in Town of the Exiled, and speak with the broom that's just left of the door
  3. Head to the teleporter Confluence in Goliathfall. Drop down to the left and head down the stairs to find Stanley again to talk to
  4. Head to the Confluence point in the very north of Scorchwhere. Refer to Sleeping Sun for accessing this area, if you haven't already. Stanley is just down the hill to the left of the Confluence point
  5. Head to Emerald Falls where Karsa's quest ends (the big square room central west of the area, directly southwest from the teleporter Confluence) to find Stanley again
  6. Head to the teleporter Confluence in Forest Foregone. Head left and up to the surface, then all the way left to find him again
  7. Return to his shop in Town of the Exiled and talk to him one last time to complete his quest and get many new items to buy
Long Gone Day

Witness the effects of Nicole


This achievement comes at the end of a side quest involving Nicole.
  1. The first time you meet her is in Resting Town, just to the right of the teleporter Confluence. Talk to her to begin her quest.
  2. Next is right next to the Confluence tree in Emerald Falls. She's literally just to the right of it. She asks for a tasty meal, and unfortunately I can't give any more detail about what to give her, as I apparently had the requirement in my inventory. I will say that it didn't require me to actually cook any meals with the NPC in Resting Town, Alice, as I had never used that mechanic up until this point. All it took was some proper food in my inventory.
  3. The third dialogue takes place in Whispering Forest, in the northeast corner near where it connects with Albedo Tower. She'll be standing next to a series of teacups, and mentions how they make noise. Just to the right of her is a huge teacup you can interact with. Do so to play a tune and activate the five teacups to the left. The correct order to touch them, if you aren't musically inclined, is 21543. You'll get a weapon, but make sure to talk to Nicole again to end the quest.
  4. Next is much later in the game, in Goliathfall. You'll need to head all the way up to the northernmost section, beat the boss up there (Occult Prime of Anemo and Geo), and she'll be just to the left after the boss fight. Talk to her there.
  5. Lastly, back in Resting Town, she's just to the right of the teleporter Confluence again. Talk to her one last time there.
  6. Finally, go back to Whispering Forest, just under where the teacup puzzle was, and between two sets of spike pits will be a golden light to interact with. Do so to end the quest and get a couple items, as well as unlock this achievement
Fade To Black

This achievement comes at the end of Ethan's side quest.

  1. The first time you'll encounter Ethan is in Ashen Canyon, right at the bottom of the western point where The Columns dumps you down into Ashen Canyon, which is just to the left of the boss fight before reaching the Manta Ray port. Talk to him there to start his quest.
  2. Now head to Town of the Exiled, head east from the teleporter Confluence, take the elevator up, and his house is on the right. Enter and talk to him again
  3. Next is Silent Coast. Head to the southeastern point where the boat is that takes you across Misty Waters, and then head left a bit to find him.
  4. Head back to his house in Town of the Exiled to talk to him again
  5. Lastly, in Heart of Veins, just to the left of the boss fight against Loss, the Broken Wings, he'll be there (he's a statue, so look for the interact prompt to know you've found him). That'll complete his quest and unlock this achievement.
On The Road

Witness the great adventure of Karsa and Brenda.


This achievement unlocks at the end of Karsa's side quest.
  1. You'll first encounter Karsa in Resting Path, under Resting Town, right next to the southernmost Confluence in the center. Talk to him there to start his quest
  2. His next location is in Ashen Canyon, much later in the game. Enter Ashen Canyon from Town of the Exiled, either eastern exit, and there is a vertical path connecting the two entrances to Ashen Canyon from Town of the Exiled. He's on that vertical platforming path
  3. Next up is in Holy Grounds, all the way on the west side by the Manta Ray dock, just right of it
  4. His fourth location is also in Holy Grounds, but it's under the teleporter Confluence. To get there, you need to head east from the teleporter and beat Valos, the First Knight, who is one of the toughest bosses in the game, and then you can circle back underneath to reach him under there, directly down from the teleporter two levels
  5. His fifth location is in Albedo Tower, tucked in a corner. From the Albedo Tower teleporter Confluence, drop off the edge to the left just barely, land and head right, drop down, and head left to drop down there and find him. You'll need to beat two regular enemies to save him to progress the quest
  6. Up in Heart of Veins, just to the left of the teleporter Confluence, is his next location
  7. Lastly, in Emerald Falls is where his quest ends. There is now a new room open, a big square room in the center of Emerald Falls, off to the west. it's directly southwest from the teleporter Confluence. You'll find him at the entrance of the room that's now open, and talking to him completes the quest and unlocks the achievement. Don't forget to grab all the items in the new room!
Trinity

In the name of the Mask, Sword, and Halo.


Note: This achievement isn't possible until you finish NG+ mode.

Note: This is required to access the True Ending of the game.

This achievement requires you to collect three additional Afterimages, all of which get placed inside your circle of Afterimages on the Afterimage tab. The first two can be obtained during your normal playthrough, but the third isn't available until you complete all ten chapters of NG+ mode.

Sword of the Lake
To obtain this Afterimage, you first need to collect all four Stream Crystals, which become available once you obtain the ability to dive underwater in Field of Hydro. Here is where all four Stream Crystals are located:
  1. In the Frozen Veins area, in the southeast is a boss fight again Izotz, the Frozen Knight, He drops a Crystal upon defeat
  2. Near the top of Albedo Tower, a couple levels below the boss fight at the top, is a square room sticking off the left of the upward path, and this room houses both a Stream Crystal and a Memory Shard
  3. Once you obtain the Crimson Cape from Goliathfall that allows you to dash through red barriers, head back to Halcyon Veins. Just to the left of the huge open treasure area where Se is sleeping, there's a red barrier to dash through, and the Stream Crystal is just beyond it
  4. The final one is in Raging Veins, and the only way to access this area is via the Ferryman at the westernmost point of either Scorchwhere or Field of Pyro. Either route takes you to the Ferryman on his boat. Talk to him and buy his ticket, and then you'll have the options for him to take you to various places, one of which is Raging Veins. Sail there, and the final Stream Crystal will be waiting for you there
With all four Stream Crystals in your inventory, head to Heart of Veins. Just to the left of the teleporter Confluence is a sword stuck in the ground next to a golden light. Interact with the sword and it'll attempt to Soul Invade you. Fight and beat the boss, and you'll be rewarded with the Sword of the Lake.

Halo of Genesis
On the very eastern edge of Forest Foregone, it connects with Silent Coast at two points. At the southern one, in the water (you'll need the ability to go underwater), there's a giant turtle you can interact with. It's unclear exactly what progresses the quest, but the general feeling from the community is that you need to be at least level 75. Talk to him, and he'll spawn a new golden light on his back. Jump up and interact with it to get the Halo of Genesis.

Nuo Mask
This one requires you to first beat NG+ mode. Once done, load your normal playthrough back up, head to Albedo Tower, and use the same teleporter as NG+ to teleport to Nigredo Tower. Head all the way to the bottom of it to fight Karin again. You'll get a mask shard from beating her. Interact with 42 who's standing there, and it'll start a new quest. Head back to Owl at the top of Holy Grounds, in the room at the top of the teleporter Confluence, on the left. Now teleport to Field of Hydro and go talk to Samsare (the giant creature in the center under Aros). It'll tell you that you need five mask shards to repair the Nuo Mask. You likely already found some in your travels, but here is where all five are:
  1. In Town of the Exiled, you get one for defeating the boss Auss, so this one is basically unmissable
  2. In Rainbow Plains, just to the right of the westernmost Confluence is the drawbridge for the castle that you originally had to go down and around. Climb up and onto the castle where the drawbridge is to find a chest with this mask shard
  3. While on the Manta Ray in the overworld, sail to the island in the southeastern corner, which is an unnamed location. To access the base, you'll need the Key to the Teardrop Base. If you haven't gotten it, you simply talk to Aros in Field of Hydro, and select the dialogue option telling her to come with you. She'll give you the key. Head into this unnamed location, and head southeast until you get to a boss fight. Beat it to get this mask piece
  4. The next one requires you to have beaten Eldritch, the Gongor Fusion, in Whispering Forest (in the purple mist area) to get the Eye of Gongor Afterimage. With it, head to Holy Grounds, and just outside the entrance to the facility (if you teleport to Holy Grounds, head west and out of the facility, then climb up and to the right over the entrance to fight a rock statue to interact with, and after it breaks you'll get a mask piece
With all five pieces, go back to Samsare in Field of Hydro and talk to it. It'll repair the mask. If you have the other two items above, Samsare's quest will complete, and you'll unlock this achievement (if you don't have them, you'll have to return to talk to it again to complete the quest and unlock this achievement).
Poem Of Death

Witness the last Echo of Rosalia.


This achievement unlocks at the end of Rosalia's side quest.
  1. You will first speak with Rosalia automatically after beating Auss in the Town of the Exiled.
  2. Next, you need to head to her inn, also in Town of the Exiled, directly west of the teleporter Confluence (and directly under the lowest Confluence in Emerald Falls)
  3. Her next location is in Whispering Forest, right where it connects to Albedo Tower. From the Whispering Forest teleporter Confluence, head northeast to the first exit east, and she'll be standing at a door
  4. Next, she'll be just to the left of the giant turtle, which is right where Forest Foregone and Silent Coast meet, all the way south
  5. Lastly, head east across Silent Coast toward the port where you sail across the Misty Waters, and right before you get to the port there will be a golden light to interact with. Do so to hear her last Echo and unlock this achievement
"Comfortably Numb"

Do not disturb other's "work."


In the northeasternmost corner of Silent Coast is a broom NPC "guarding" a door. Talk to the broom, and it'll give you some dialogue, then start sweeping. Interacting with it again gives some generic repeating dialogue, but don't give up. Keep interacting with the broom over and over, and you'll eventually get some new dialogue. Repeat this again for a second string of dialogue, and you'll finally unlock this achievement. You'll need to interact with it at least 10-15 times, so just be aware of that.
Sleeping Sun

Witness the fading of a sun.


To unlock this achievement, you'll first need two items:
  1. Sorrow, the Divine Teardrop, a Primeval Glyph located in the Sunken Sanctum under Holy Grounds. It's directly under the first Confluence you come to in Sunken Sanctum, just sitting in the middle of an open area
  2. Eye of Gongor, which is an Afterimage you get from beating the boss Gongor, the Eldritch Fusion, in Whispering Forest
Once you have both of these items, teleport to Field of Hydro and head all the way east. The water barrier will now open with the Divine Teardrop. Continue east to find a large egg. Interact with it to use Eye of Gongor to free a creature. Talk to it, and accept its invitation to take you to the Solar Birthplace. Once you arrive there, this achievement will unlock.

Once you land, make sure to interact with the Confluence just to your right, and then destroy the one-way barriers to open this area back up via Scorchwhere.
Taste of Happiness

Taste the flavour of happiness.


Refer to Epicure for more information.
Condolence

May our paths cross soon once again...


This achievement is tied to a side quest that you can begin as soon as you arrive in Resting Town for the first time. One of the two NPCs there will give you a quest to find an altar along the Resting Path. It's in the far south, just above the southernmost Confluence. Interact with the altar to unlock this achievement.
The Wall

Red phone or blue phone?


This achievement is for receiving a secret bonus ending in the game. To unlock it, you first need to find all Shenlong Glyphs. Refer to Word Of Shenlong for doing so.

Once you have them all, head to the huge open treasure area in Halcyon Veins where Se is, and interact with Se and the Obelisk. This will complete a quest and reward you with the Key of Se, which is what you need to achieve this ending.

Head to the port on the east end of Silent Coast, where the boat is that you take across the Misty Waters. Go on the boat so it's starts sailing, then jump and attack the light on top of the mast. Make sure the light goes out. Now, idle for at least three minutes. Just sit there and let the boat sail to the right for at least three minutes. Once three minutes have elapsed, hit the wheel on the right to reverse direction and head back to the left. You'll eventually dock. Hop out and go left until you reach Se. Talk to Se, then head farther left until you reach a red phone booth. Go inside and interact with it to end the game, unlocking this ending and this achievement.
TIS AIN'T POGO TIME

Save this for the sequel!


To unlock this achievement, you first need the Hollow Vessel accessory. It's located in Goliathfall in a chest just past one of the red barriers you need to dash through. Check Gate Of Babylon if you need guidance finding it.

Once you have it, equip it in an accessory slot. Now all you need to do is "bounce" on enemies by pressing DOWN + A-Button while in the air. I only had to bounce on around five enemies before this achievement unlocked.
18 Comments
Chaosmaniac  [author] 17 May @ 12:57am 
Since the original guide tells the other way around , a decentt conclusion would be :
You achieve "Waiting" for the 1st option of choice and "Dream" for the other path after you got "Waiting" .
Gotachi 21 Apr @ 2:26am 
There is a slight error in the "Waiting" achievement description: You get the Waiting ending for fighting Eseus and the Dream ending for fighting the Demon, not the other way around
Auspice 12 Apr @ 2:25am 
for Iron Man achievement: you can parry most projectiles with it, and get the improved slash. It's somewhat challenging to do while in range to actually hit with the slash, but it is possible (and practical).

In general GS is very, very good on bosses due to Iron Bastion.
Gushterul 5 Mar @ 5:30pm 
you can get everything in one save, you can't miss something.
for number of the beast i found that using the max upgrade pyro calamity greatsword with normal attacks to be easier (same setup as recommendation). teleport to the fields of geo and go left past the npc mushroom guy and just whack the flying mushrooms
kseixas 5 Mar @ 1:05pm 
Is there anything missable I should look out for? I dont want to get spoiled reading everything but I would like to know
Ak2 3 Feb @ 2:08am 
Thats a really great guide!

However i have one question. What do you mean by "For the Money for Nothing Achievment, you need to buy 1 item of every unlimited stack and the whole stack of every limited stack at every merchant. ( Se and the cooks included )"

Thats kinda misguiding since regular cooks (Alice is an exception) do not sell ingredients, only dish.

Also one little correction, you actually end up with 1 Se coin left after getting all of her stuff.


Why did i brought that up? Because all i have left to do is "Money for nothing" trophy and im 100% sure its either bugged or there is actually something to do to get it which is not mentioned in any guide over the Internet.
Leinarth 12 Nov, 2023 @ 6:40am 
The Waiting and Dream steps are mixed up, the Dream one is with the Devil and the Waiting is with Eseus.
James 8 Nov, 2023 @ 5:17am 
In the story/area progression section near the top, step 15 says Albedo Tower is northeast of Emerald Falls, but I think that should be Whispering Forest (just spent way too long trying to climb up to Heart of Veins from Emerald Falls lol)
Chaosmaniac  [author] 1 Sep, 2023 @ 1:02pm 
Gongratz .:FFIX_Chocobo:
I am also done with the achievments.
EndlessPlayer 1 Sep, 2023 @ 11:36am 
Treasurescope of Se was so need that I am emberesset, that I don't buy it earlier (curse you 1 point talent in her shop).
Also about Journey , this can be unlock propably even as first ending for Ifree, because I accomplishment it as second ending after I invide and defeat Ifree, so there is not need to completing Hope and Withering first.

And in Waiting description you have mistake: Inviding Karin and defeating Eseus will give Waiting ending, and defeating Demon will give you Dream Ending.

I collect today all remain achievements and after restarting the game (quit the game and return) the Afterimage achievement pop-out