Contraband Police

Contraband Police

29 ratings
Contraband Police - About everything a little.
By Maza-Faker
"Take over the duties of a border guard inspector in a communist country of the 80's. Smuggling, corruption and forgery are the order of the day here. Be vigilant and earn the respect of your superiors."

Today we will talk a little about the game, make some notes and conclusions about what and how we should do and how it works.

The guide is rather aimed at those who have completed the "Prologue" and intend to play further in this game.
[The manual may contain poor translation. Sorry for the inconvenience]
[The guide will be further supplemented, so this is not the final version yet]
[Contact me if you have anything to add to this guide]
7
   
Award
Favorite
Favorited
Unfavorite
Game start
After completing the Prologue, you will be replenished with items and part of the ammunition for a more or less comfortable start to the game. From this point on, your best decision to start the game is:
Improvement of such buildings as: House and Warehouse.

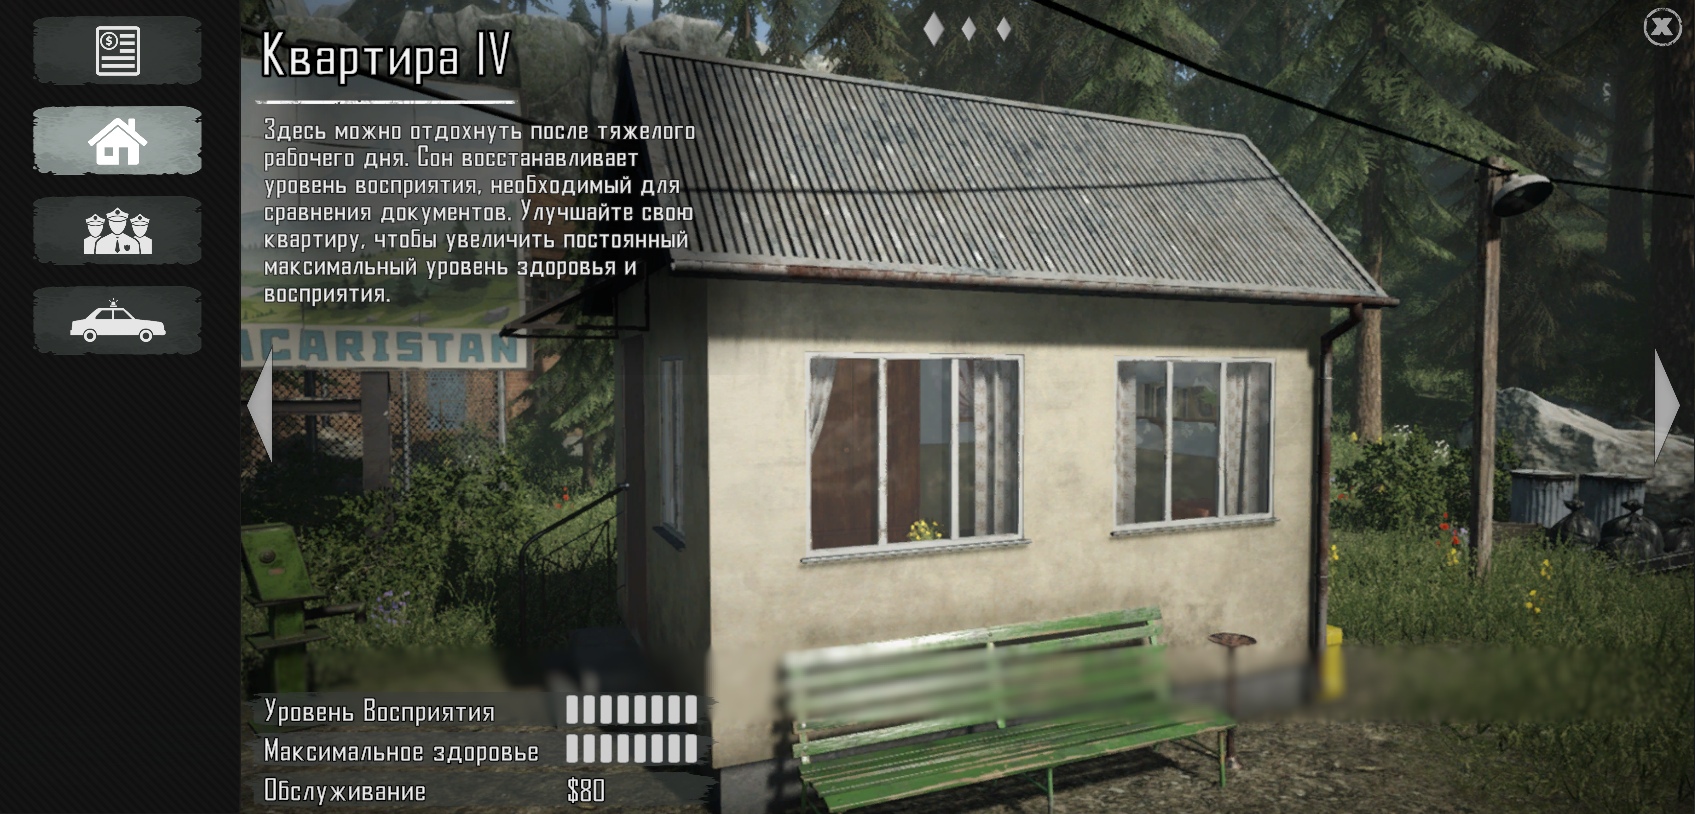
House: Increases your "perception" and "health" points, which will be useful both when checking documents and during combat encounters.


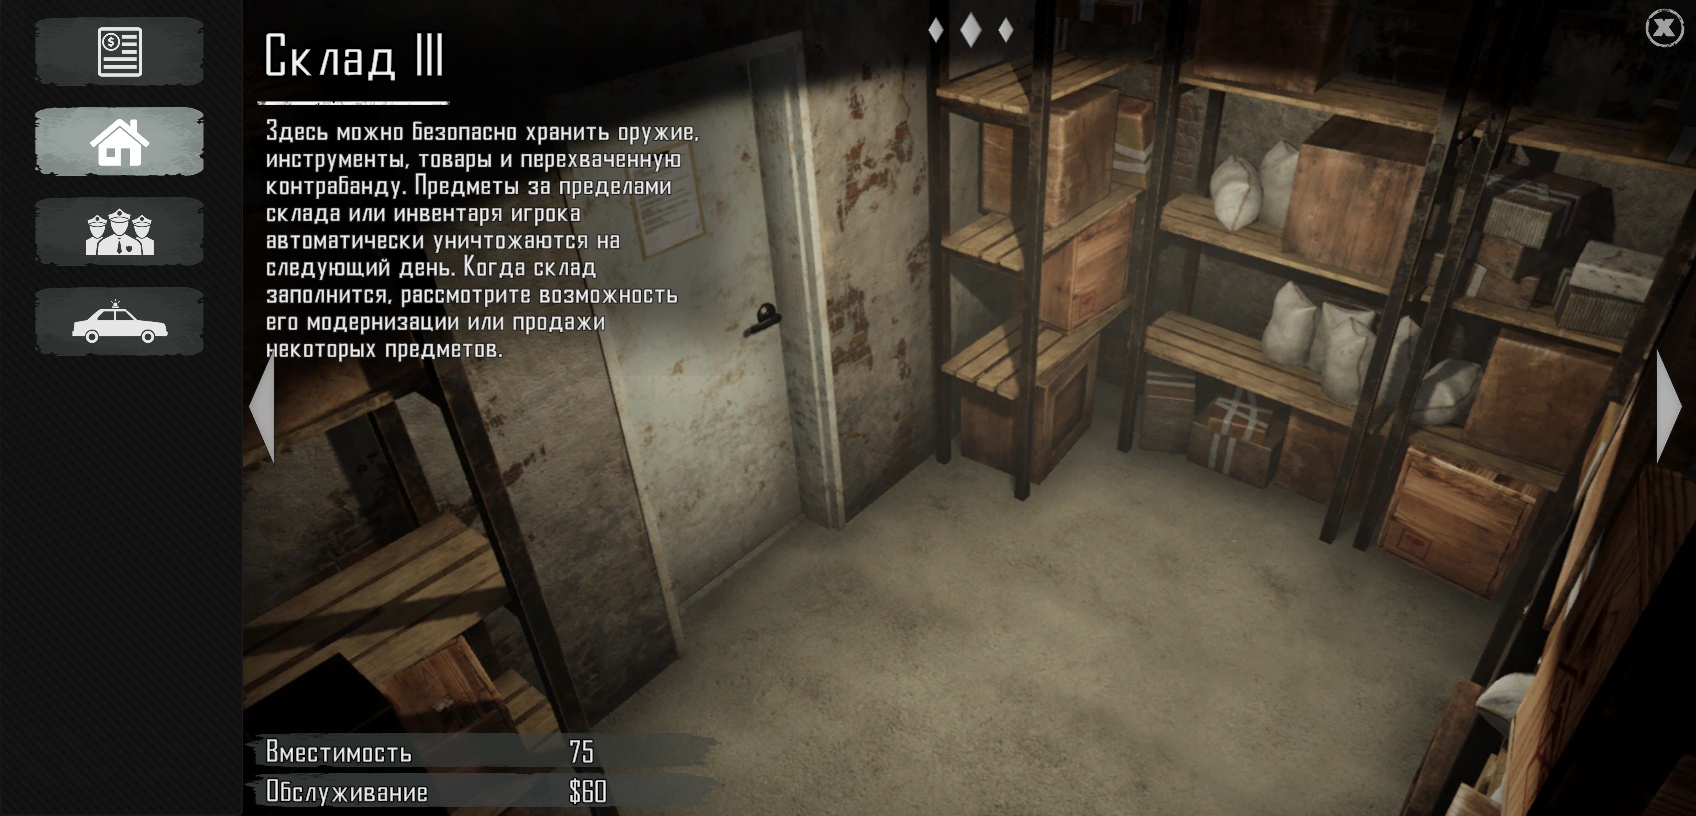
Warehouse: Allows you to both store surplus ammo, goods for sale (if you choose to trade in the game) and of course any contraband you find.


Tip: All items from the warehouse can be quickly moved to your transport using this icon on the left.


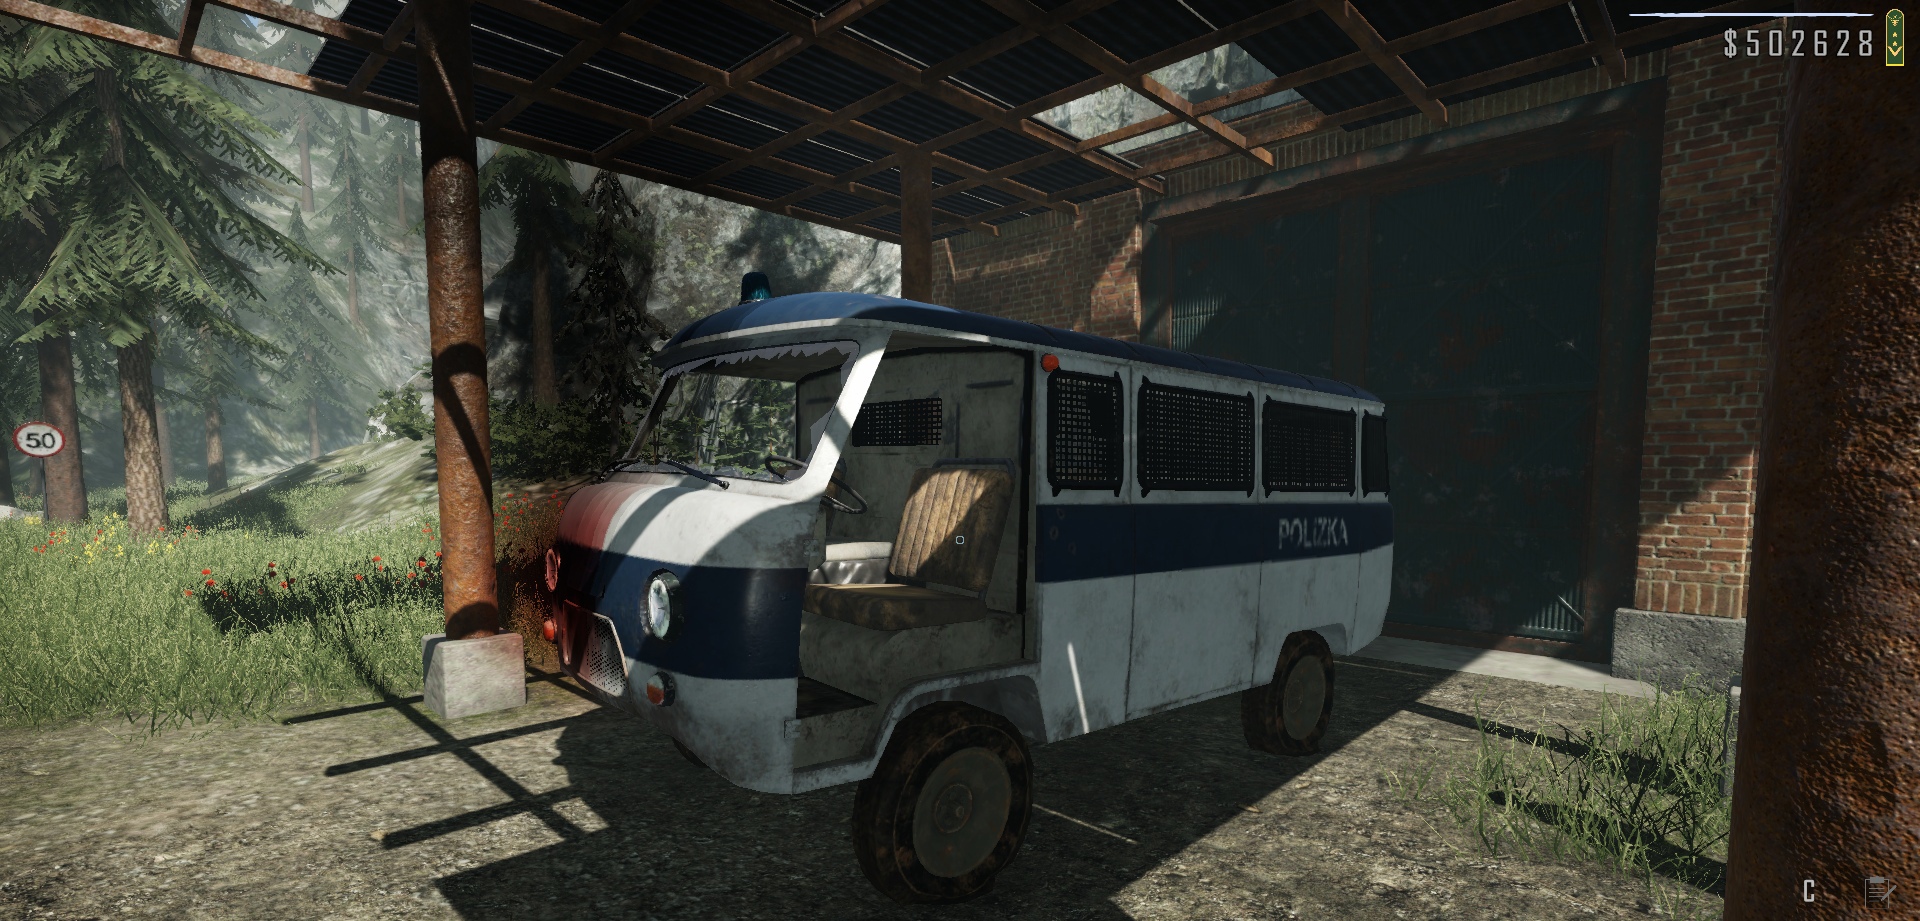
As for the vehicles, I would first advise to improve the "Azar-V".
"Azar-V" (aka "UAZ-452") is not a bad car for further play. Its capacity is 25 cells, which is generally the highest threshold for all machines. The capacity of prisoners is 5 people, which is almost the highest figure. Its disadvantages: Not the highest speed and perhaps not the highest bullet resistance (my personal impressions). However, you can not look at the speed of this car, since the fugitives in cars are not very fast, at least I could always catch up with them on "Azar-V".


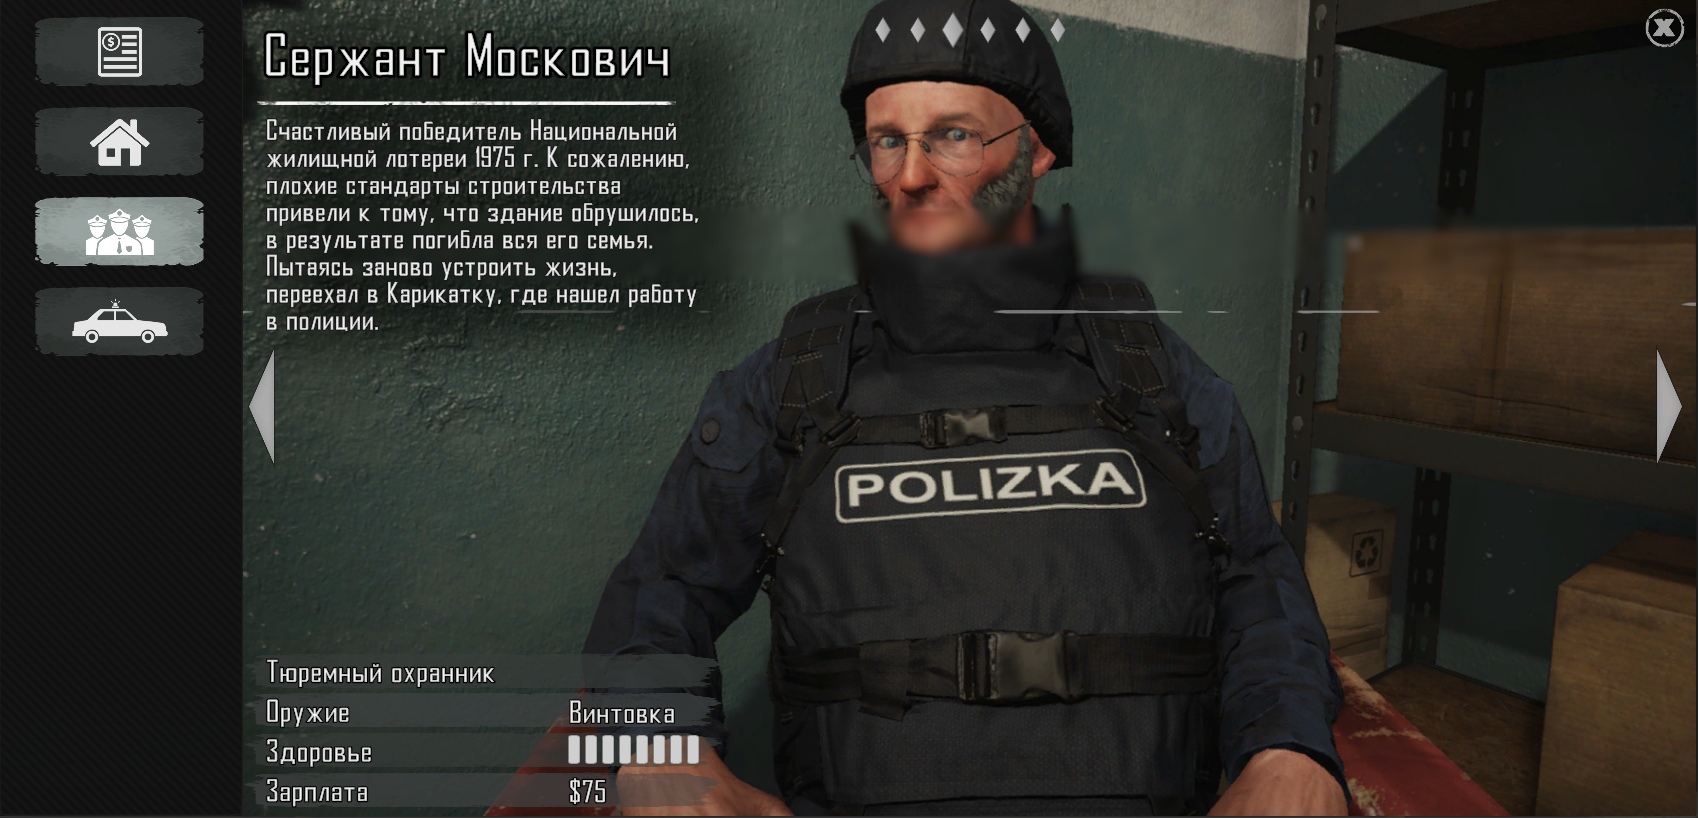
Personnel: Sergeant Moskovich [Optional].
For this game, not a bad employee, as he does a very useful job. Namely, he is watching so that your prisoners do not escape. This is not to say that this is a big problem, especially if you do not hold criminals for more than two days, or immediately after the end of the shift you immediately take them away, but if you do not want to travel on the map often, then it is better to purchase it.


Weapon: Shotgun (aka "KS-23") [Optional].
A good shotgun worthy of your attention. It is an extremely lethal thing, hitting targets well even from medium distances. Unlike other guns, it has 12 rounds in one pack of cartridges, while its magazine capacity is 4 rounds. You can buy it, but I can say that at the beginning of the game you will not need it too much, but if there are extra funds, then why not. In another section, I will talk about weapons in more detail.


Tools: The cheapest.
According to the calculations verified from the game files, the cheapest tools are effective in terms of [(Durability * Vehicle Damage) / Cost].
The only disadvantage of cheap tools is that they wear out quickly and do little damage to vehicles. But if you're willing to save money early in the game, then this is the best option. In the future, if you have more than enough money, you can afford to purchase more expensive tools. In another section, I'll talk a little more about tools.

Tip: Do not buy the most expensive shovel, its damage is the same compared to the cheapest and most expensive, and the cost is very high, the difference between them is that the expensive one can withstand 55 hits, and the cheap one 40. As for axes, you can take the most expensive one, the difference in [(Durability * Vehicle Damage) / Cost] for the cheapest and most expensive is negligible.


Smugglers and Bribery
A little advice.
It makes no sense to search all the cars that enter your place for inspection. If the car or person matches the leads, only then does it make sense to search the vehicle completely.
It sounds as obvious as possible, but I tell those who may not know.


There are three stages of behavior in smugglers:

1. Hopelessness - This is when you find smuggling from them, but they do nothing to avoid punishment.

2. Bribery - Periodically works randomly. As soon as you find illegally transported things, there is a chance that the smuggler will offer you a bribe in exchange for release. As some players, such as Volker Schultz, Blåhaj kinda pog and others, have noticed, taking bribes does not affect the gameplay in any way. And even the ubiquitous Yuri Petrov won’t say much to you for this if he doesn’t see it, but there is a chance that you will be caught by the hand, so taking bribes or not is purely your decision, you can’t help but notice the fact that this is a pretty quick way to raise money.

3. Fugitive - They can act differently, either they will immediately go to ram the barrier as soon as they start entering the checkpoint, or after you find one cache, they will immediately turn towards the driver's door, sit down and also try to escape. So even if you find the smuggler's car, after picking up the smuggling, make sure that he doesn't care, or pre-arrest him before a full search.
Improvement and purchase of buildings, personnel and vehicles
Basically, there are only 3 things you can buy or improve in the game. These are premises, personnel and transport. Let's talk about everything now.

Premises:
"Apartment" as said, is a very good investment in the game, as it allows you to increase your current level of health and perception. It is better to pump it to the maximum, because you will not regret it. Although if you wish, you can get by with the second or third level of pumping.

The "warehouse" is also equally important, as you can store all those surpluses that do not fit in your pockets, such as contraband, weapons, ammo, tools and goods for sale to drivers. It is also better to pump the warehouse to the maximum, but if you wish, you can get by with the second level of pumping, although the longer you play, the more things you will have.

A "prison" is a room that makes sense to upgrade only if you don't want to transport criminals after each shift, but transport them immediately in a whole pack (approximately the same situation with a warehouse). To be honest, for me, leveling above the second level does not make sense, unless, perhaps, you want to get the "Ideal Frontier Post" achievement.


Staff:

Of all the personnel being bought, Sergeant Moskovich can be singled out, since this character performs the work of a prison guard, preventing the opportunity for prisoners locked at your post to escape.

The rest of the purchased personnel are more like turrets that are activated during a raid on your border post. The only things you can improve on your current staff are health and weaponry. However, I see only losses in buying all this, because your people will not become more deadly from this, and you can cope with attacks in one person if you use one tactic, which we will talk about later. The maximum to where it is probably worth pumping your employees is to the second level, because they will consume your funds only twice as much, and not three times as with maximum pumping, in addition they will receive submachine guns, which will be at least a little better than ordinary pistols Makarov. As soon as you have more than enough money to earn money, only then it probably makes sense to pump the staff to the maximum.
I would also like to note Sergeant Smirnov, or rather his complete uselessness.

This is a sniper, he doesn't do ♥♥♥♥ during a border post raid, so his job is mostly to play the role of furniture.
[Update]: This has most likely already been fixed, but by the time I originally wrote this guide, everything was exactly as in the screenshot.

Vehicles:

All current transport can be purchased if desired. The maintenance of a pumped transport costs practically no more than one unpumped border guard. And now some numbers.

"Azar-V ZZ"

Health: 500
Weapon Damage Multiplier: ~0.189
Weight: 2000
Engine power: 39
Prisoners: 5
Capacity: 25
The golden mean of the game. It has a good capacity of both people, and a marginal capacity of objects and an average speed compared to all the others. However, its bullet protection is the weakest of the three.

"Zaved XT"

Health: 450
Weapon Damage Multiplier: ~0,159
Weight: 1150
Engine power: 39
Prisoners: 2
Capacity: 16
A car created rather for those who do not like to waste time on the road or chase. Dominating with superior speed and acceleration compared to any car you can own, it pays off with a small number of people carried and luggage capacity is 9 cells less than the rest. But at the same time, its body is slightly more resistant to bullet damage than the "Azar-V ZZ".

"Grazduk P9"

Health: 700
Weapon Damage Multiplier: ~0,189
Weight: 3400
Engine power: 42
Prisoners: 8
Capacity: 25
A car designed for those who do not like to worry about being fired on and for those who like to carry everything and a lot. The slowest speed in the game and some sluggishness, it pays off with acceptable protection against small arms compared to the other two samples and the largest capacity of people and the number of items carried in the trunk.

A note about cars: All cars, regardless of brand, pumping and the nature of the damage (as if minor or even tangible) cannot have a repair cost above $50. So it makes sense to repair the car only if it is very badly damaged.

Ambushes
"Ambush" is not a bad way to save up a little money and ammunition at the beginning of the game. Do not be afraid of ambushes, at the beginning of the game, the opponents are still pretty not dangerous because of their weapons, and their intelligence is pretty dumb. For everything to go perfectly, do the following:

1. As soon as the combat music starts playing and the inscription about the ambush comes out, immediately take the car to the side of the road (preferably back and not forward), without forgetting to turn on the siren to "H". The siren is only needed so that passing onlookers take their cars to the side and stop (to be honest, I can’t say how effective it is, unsubscribe if it doesn’t work for you), and by taking the car to the side of the road you are protected from the possibility that random drivers will ram your car in a panic.


2. Having done all of the above, press the "G" button (turn off the engine), turn the camera towards the door and open the door. We quickly jump out of the car and look for shelter.


3. Then we shoot the opponents one by one (not necessarily in the head, I will explain why).


4. As soon as the inscription about the successful reflection of the ambush is displayed, we run to the dead NPCs and pick up the cartridges as quickly as possible (it is advisable to start with those whom you killed first), since the dead bots can despawn with all the loot. To collect ammo faster, hold "Ctrl" and click the left mouse button. And so it is with everyone.


Well, congratulations, you've stocked up on some pistol and shotgun ammo, adding extra ammo to yourself, and replenishing what you've spent.

You don’t have to worry about repairing the car, because you will receive $70 for repelling an ambush, and it always costs $50 to repair a car, no matter how badly the vehicle is damaged.


At this point, you can continue your adventures to kill bandits or ignore them during your journey around the map. I do not advise you to seek out ambushes, because you will spend a lot of time more likely to be empty. It's best to reflect them as you move between locations, but it's up to you. Also remember that over time, the bandits will not only have pistols and shotguns, so you can still replenish your arsenal with excess new cartridges.
Raids on the post
Raids on your border post are just as easy if you have plenty of ammo and pumped up your health. Having repulsed more than one attack, I have verified for myself a more or less working tactic that allows me not to lose fighters during the raid, thereby saving money on further treatment of the half-killed personnel.

The tactic is very simple and should work for many.

1. As soon as the alarm signal came in and the siren yelled, we run to the warehouse, if you have excess ammunition or some kind of weapon stored there and pick it up, if not, then we immediately run and hide behind one of these two concrete blocks.


2. Having taken a position, we shoot off the attackers and try to transfer fire to ourselves (forgive Maksimov, but for now you will be a test target). Do not try to shoot everyone too hard, because until the timer from above reaches zero, the opponents will not stop appearing again and again, so if you shoot, then either sparingly or from a weapon for which you have an excess of ammo, but it is better to combine both options .[Updated]: As I heard, the more opponents you personally kill during the attack on the post, the greater the reward for repelling the attack, I can’t say for sure, I’ll try to check one of these days. Remember that your task is rather to transfer all enemy fire in your direction.


3. Don't forget to hide behind cover when your health reaches critical. The most fun begins when they start throwing grenades at you. The bots are pretty accurate, so they will not miss in almost no circumstances. At this moment, we just use the second concrete shelter, for which we run across and wait out the explosion. After that, you can return to the old position or stay at the current one.


4. As soon as the timer has come to an end, fall out on the enemy and finish off the rest, or if you feel that you can die from the pressure of enemy bullets, then you can continue to fire from the above shelters until everyone dies. Remember that in which case you can always undermine the enemy without using grenades, since there are enough explosive items on the post that you can use against the enemy.


Congratulations, the raid was successfully repelled. Your employees are more or less safe and sound, you saved on their treatment and in general did not spend much ammo. There is no point in running to loot enemies, because after the end of the raid they all immediately disappear. I don’t know if it’s possible to loot corpses during a raid, and it’s still a little risky to try to do it, so save your ammo, and you can replenish what you spent on another random ambush (unless, of course, you used a weapon that attackers from ambushes have ammo). The only reason we do not stand next to our employees is that when you are next to them, opponents focus more on them, in addition, if a grenade flies at you, there is a very high chance that one of your fighters hit by an explosion.

[Updated] Also in this guide, Greenmovie13 talks about how to protect the outpost using the village toilet. If you've always felt that your skin color is green and "Somebody once told me the world is gonna roll me" is playing in your head, then why not give it a try.
https://steamproxy.net/sharedfiles/filedetails/?id=2945677331
Tools
Here I will describe a little with numbers what is not entirely obvious. Namely, how much durability each tool has, what specific damage it has to vehicles (and to NPCs too), as well as how much it costs and what is the ratio between price and useful work for each. This indicator will be calculated according to the formula [(Durability * Damage to vehicles) / Cost]. Well, let's get started.


Batons are needed to open car fenders, bumpers, air filters and some cargo in a solid container:

Branch:
Durability: 25
Damage: 5
Cost: 8
Calculations: 15.6


Handle:
Durability: 29
Damage: 6
Cost: 15
Calculations: 11.6


Gas pipe:
Durability: 33
Damage: 8.75
Cost: 40
Calculations: 7.22


Tonfa:
Durability: 36
Damage: 11.6
Cost: 65
Calculations: 6.42


[Updated]: As user hodic4[RUS] noted, tonfa can be useful during one of the story missions at the quarry.
"Tonfa is needed according to the plot. In one of the tasks you need to talk to a smuggler at a quarry. Waving your fists will not work. Shooting at him is not an option. The quest failed. The only option I found was to hit him a couple of times with a tonfa. Then he starts to sing like nightingale. With a crowbar - you will kill at once. Quest failed."

Crowbar:
Durability: 40
Damage: 17.5
Cost: 100
Calculations: 7


Knives are needed to open the trim inside the cabin and some cargo in bags:

Kitchen knife:
Durability: 25
Damage: 5
Cost: 12
Calculations: 10.42


Scalpel
Durability: 30
Damage: 7
Cost: 25
Calculations: 8.4


Tactical knife:
Durability: 35
Damage: 11.6
Cost: 55
Calculations: 7.3


Commando knife:
Durability: 40
Damage: 17.5
Cost: 100
Calculations: 7


Axes can act as "clubs", they can also open fuel tanks and cut down fallen trees:

Axe:
Durability: 25
Damage: 10
Cost: 25
Calculations: 10


Fire axe:
Durability: 32
Damage: 15
Cost: 50
Calculations: 9.6


Ice-axe:
Durability: 40
Damage: 24
Cost: 100
Calculations: 9.6


Shovels are needed only for some tasks, as well as for digging treasures with Oberankov's money:

Shovel:
Durability: 40
Damage: 8.75
Cost: 25
Calculations: 14


Spade:
Durability: 55
Damage: 8.75
Cost: 100
Calculations: 4.81


Pitchforks are needed only for piercing wheels:

Pitchfork:
Durability: 30
Damage: 5.8
Cost: 25
Calculations: 6.96


Devil's pitchfork:
Durability: 45
Damage: 8.75
Cost: 100
Calculations: 3.94


Personal conclusions: I can say that the "clubs" in the game have a mostly symbolic role, since they can easily be replaced by axes, and it is very profitable, so when choosing between an expensive crowbar and an ice ax, it is better to choose the latter, since it has a useful coefficient more, and they cost the same. As it was said in the "Start of the game" section, an expensive shovel is greatly overpriced, it will be easier to take a cheap one, because it costs less and the functionality is the same, except that the durability is slightly less, if it would cost not $100, but at least $40 or 50 $ could still be considered. With pitchforks, it's about the same as with shovels, the difference between cheap ("Calculation: 6.96") and expensive ones ("Calculation: 3.94") is also felt, I would choose the first option, given its reasonable cost. Axes are perhaps the only tools whose calculations from cheap to expensive do not jump much, namely 10 for the cheapest and 9.6 for the medium and most expensive, there is not much need to choose between savings. Decide which tools you personally use, I can only say that if you have more than enough money, then choose expensive tools, you will follow us less through the card, or call Vlad to your post to replenish them.
Weapon
In total, the game features 6 types of weapons (one of them is throwing). We will also touch on them now. I would like to say that ordinary tools that you use can also be used as weapons, but this idea is more suicidal than effective, but you can keep it in mind. The damage has been tested everywhere through trial and error, as has the rate of fire with reload speed, but the results are more than accurate. The ratio of damage to the rate of fire was calculated according to the scheme [One second / (Time to completely empty the magazine / Ammo in the weapon) * Damage per shot]. Regarding the "Damage / ammo cost ratio", I can only say that the higher this ratio, the better, and the form is as follows [Number of purchased ammo at a time * Damage per shot / Cost of purchased ammo at a time]. Next come the numbers.

Pistol, real prototype "Makarov pistol[en.wikipedia.org]":
Damage: ~9.9
Rate of fire: 300 rounds/min
Damage to Fire Rate Ratio: ~49.5 DPS
Cooldown: 2 sec.
Magazine capacity: 8
Price: 250$

Ammo:
Purchased number of rounds at a time: 8
Price: 10$
Damage / ammo cost ratio: 7.92


Shotgun, real prototype "KS-23[en.wikipedia.org]":
Damage: ~39,6
Rate of fire: ~89 rounds/min
Damage to Fire Rate Ratio: ~58,6 DPS
Cooldown: 0.80 sec. (each ammo separately) and 1.60 sec. for the very first bullet, with an empty store in a shotgun.
Magazine capacity: 4
Price: 700$

Ammo:
Purchased number of rounds at a time: 12
Price: 30$
Damage / ammo cost ratio: 15,84


Submachine gun, real prototype "PPS[en.wikipedia.org]":
Damage: ~8,58
Rate of fire: ~923 rounds/min
Damage to Fire Rate Ratio: ~133,8 DPS
Cooldown: 2,56 sec.
Magazine capacity: 40
Price: 1300$

Ammo:
Purchased number of rounds at a time: 40
Price: 30$
Damage / ammo cost ratio: 11,44


Rifle, real prototype "AKM[en.wikipedia.org]":
Damage: ~11,58
Rate of fire: ~857 rounds/min
Damage to Fire Rate Ratio: ~165,6 DPS
Cooldown: 2,45 sec.
Magazine capacity: 30
Price: 2000$

Ammo:
Purchased number of rounds at a time: 30
Price: 40$
Damage / ammo cost ratio: 8,685


Sniper rifle, real prototype "SKS[en.wikipedia.org]":
Damage: ~26,4
Rate of fire: ~147 rounds/min
Damage to Fire Rate Ratio: ~64.68 DPS
Cooldown: 3,45 sec.
Magazine capacity: 10
Price: 2800$

Ammo:
Purchased number of rounds at a time: 10
Price: 50$
Damage / ammo cost ratio: 5,28


Grenade, real prototype "RGD-5[en.wikipedia.org]":
Damage: ??? (But let's be honest, not one vehicle in the game is able to withstand the explosion of this grenade, I am completely silent about you or the NPC)
Price: 150$
To be honest, I could not verify the exact values for the grenade. If you have exact stat values for this, please contact me with the details and I will update the grenade stat values in this section.


Personal conclusions: The shotgun turned out to be the most effective in terms of the ratio of the cost of a cartridge to the damage of a weapon, however, it should be borne in mind that the further you are from the target, the lower the damage will be, and yet this weapon is extremely effective, especially if you are not afraid close combat clashes with the enemy. For long ranges, the Submachine gun is great, as its cost per shot and good range are more than satisfactory. The further the worse: Rifle, Pistol and Sniper rifle with the most disadvantageous cost per shot. If the Sniper rifle had a scope, it would still be good, otherwise, it would be better to shoot either from the Rifle or from the Submachine gun. Leave the use of Grenade to your personal subjective choice, as for me they are very expensive and situational, the only thing for which they are probably worth buying is in order to knock out the "Gift for Two" achievement.
Items to collect
In total, there are two types of collectable items in the game. These are "KGP Documents", there are 14 in total and "Oberankov's Money", there are 8 in total.
For each KGP document found, you will receive $100, for a total of $1400.


For each Oberankov stash $300, total $2400


And in the total amount for all the items found, you will receive a total of $ 3800. The amount is not bad, especially at the beginning of the game it can greatly help in the development of the border post. Collecting all the "KGP Documents" at the beginning of the game will not work, since one of the rooms where 1 of the 14 documents is located is closed until one of the tasks is completed, but even so, if at the beginning you accumulate another $ 3,700 of additional funds for yourself, they will make it easier for you a little life. For collecting all the items, you will receive in addition two achievements: "Special Agent" and "Treasure Seeker", so if you need them, then go for it. I won’t crucify for a long time, it’s better than me about where everything lies, this wonderful LEGO man will tell. Don't forget to buy shovels from Vlad before you start looking for Oberankov's caches.
https://steamproxy.net/sharedfiles/filedetails/?id=2944870811

A quick note: for each Oberankov stash you need 6 hits with a shovel, any of the two available in the game. Accordingly, in order to open all the hiding places, it will take 8 * 6 = 48 hits with a shovel in total. Accordingly, it is not necessary, as in the LEGO guide, to buy 2 shovels for $100, buy better 2 shovels for $25, they are also enough, in addition, save $150 on all this.
Chasing
Some dude broke your barrier and is carried away into the distance? Well, it's not scary. Now let's talk about what is the best thing to do in this situation.

1. Do not hesitate, immediately get into your "Azar-V ZZ" or "Zaved XT" if you have already purchased it. Both of these chasing vehicles are very suitable.


2. It is not worth shooting at the car of the person who is leaving, and it does not matter, in general, at the car or at the wheels, it does not make much sense, the cars in this game do not react to total damage in any way. Yes, and smugglers will drive until the victory until their car is blown up or stopped.
Quick note: You can kill the fugitive if you wish, the game will also count this as a successful capture of the fugitive.


3. During the chase, I do not advise you to use the siren when you are right behind the escaping, let the random factor play into your hands, because by turning on the siren, all the cars passing in front will start to give way, which will be used by the smugglers, only if you are far behind the fugitive, you should turn it on time for a siren so that while you overtake your victim, the rest do not block your path.
Quick note: As I've noticed, cars stop spawning during chases, so the siren tip can be omitted.


4. Do not hesitate, try to immediately ram the car from behind or to the side. Calculate so that the car of the evader will eventually skid so that he rests on something in front of him, because the NPCs here are pretty stupid, and they only know how to drive forward and nothing else. [Updated]: It looks like this feature has been fixed with the current version of the game, as smugglers can now still reverse if something prevents them from going forward, but even so this is not a big problem. Don't worry, it will be possible to get some of the money from the caught smuggler, from transferring him to prison, so don't worry about repairing the car, because the repair will not cost more than $50.


5. As soon as the fugitive has given up, you should immediately search the car from the outside for contraband, before that, having driven your car more comfortably to the side, turning on the sirens and opening the trunk and driver's door for convenience. Climbing into the salon still won’t work until the criminal is arrested, so shine a flashlight on the wheels, fenders of the car, and so on, pull it out for smuggling. After making sure that everything was found outside, knit the prisoner and continue the inspection already inside the salon, remember that after the arrest of the criminal, you have exactly 6 minutes to return to the post, so it does it quickly and preferably well.


6. When everything is finished, pack all the contraband found in the trunk of the car [optional] and drive back to the post, remember that no one has canceled the ambushes while you are driving back, however, during them, the timer stops and is played again as soon as you repel ambushes or get away from her, so you can fight some more if you want.


7. Do not forget upon arrival at the post, order Sergeant Maksimov to remove the criminal's car (only works if the car was stopped near the post), this will give you additional funds, depending on whether you found all of the contraband or part of it. And also reload the contraband from the car to the warehouse and all the prisoners in prison.


Well, that's all, the fugitive is caught, smuggling is found, the border is closed again, the party can be proud of you. There is also one trick that works. As soon as you start searching the car and find that it is a smuggler's car (having seen a snake in the ultraviolet or contraband not hidden in things or parts of the car), arrest the smuggler by forcing him out of the car and immediately arrest him, which will be easier and will be counted playing like a successful arrest. Also, before inviting a car to the checkpoint, you can approach the cars at the barrier and check the orientation by the numbers in front, if they match, try to roll out some heavy car to the middle of the road in front of the barrier, the fugitive who decides to press the gas into the floor will immediately crash into this car and can't do anything about it.


If the car left you, or you don’t want to chase it, You can just remember what the smuggler’s car looked like and restart the day, as a rule, the cars will not change from this and will be the same as on the same day that you restarted. The method is rather cheating, but it's up to you to decide for yourself.

Well, that's it, the criminal is caught.


Telephone
As you progress through the game, new telephone contacts will open, there are only two of them in the game:

"Summon Supply": Summons Vlad to your post along with his shop near your garage. The cost of the service is $ 200, it will stand with you until midnight.


"Summon Police Transport": Calls a police car at the garage, which can pick up all the prisoners and all contraband from the warehouse right there and on the spot, the cost of transferring criminals and contraband is the same as if it were transported by yourself. The cost of the service is $ 500, it will stand with you until midnight.


All functions are more likely to be needed for those who do not want to drive for the next tools or lead bandits and smuggling through the whole map. It’s too expensive for me, I would most likely call Vlad if I suddenly needed any tools to open the car, which I wouldn’t have or they would all be broken. Destroying either of the two machines leads to an instant loss.

Trade
Trading is also an equally effective way to make money in the game, but remember that favorable prices always come in different ways.
Thanks to user Blåhaj kinda pog for the tip on this information in this guide.
https://steamproxy.net/sharedfiles/filedetails/?id=2944543012

Here, the information that was indicated in the guide by reference will be duplicated. If the information on trading in this section was useful to you, please thank the original author of the guide.

Vodka:
12$ - 75$

Detergent:
5$ - 39$

Cigarettes:
8$ - 50$

Toilet Paper:
2$ - 24$

Potato Sack:
7$ - 34$

Coffee:
10$ - 64$
Cheat sheet
In order not to look into the game guide ten times, here's a cheat sheet from the instructions.
.jpg]

You can download and print the cheat sheet if you wish.
Rewards
In the game, you can receive both rewards for good work and fines. Rewards are given for a job well done and for some successful shenanigans. Some cash rewards will increase depending on your current level of experience and actions taken.

Rewards:
"Correct Inspection": Allow the car to enter in accordance with the rules.


"Justified Refusal": Deny the car entry in accordance with the rules.


"Justified Arrest": Arrest the smuggler.


"Inspection Completed": Complete the inspection of the smuggler's car.


"Bribe Accepted": Appears when taking a bribe, when Yuri Petrov does not pay attention to your machinations.


"The post managed to be defended": Repulse the attack on the frontier post.


"Chase Completed Successfully": Chase up and stop the fugitive in the car.


"Fugitive Detained": Kill or blow up a fugitive in a car.


"Attackers Defeated": Reflect "Ambush".


"KGP Documents": Pick up a KGP document.


"Oberankov's Money": Find and dig up a cache of Oberankov's money.


"Prisoners Transferred": Awarded for transferring prisoners to a labor camp or to an ordered police transport.


"Contraband Transferred": Awarded for handing over contraband to the police department or police transport.

7 Comments
SpacetimePhysics 12 Jul, 2023 @ 7:11am 
Another addition: Tires seem to require(or at least prefer) knives. Axes do work tho
MDiamonds 11 Jul, 2023 @ 6:42pm 
Great guide bro.
Thanks for your time and effort. :steamhappy:
Nantes 30 Mar, 2023 @ 3:15pm 
"The only option I found was to hit him a couple of times with a tonfa. Then he starts to sing like nightingale. With a crowbar - you will kill at once. Quest failed."

Not true, I hit him a couple times with a crowbar on his leg and he talked. The thing is that you must wait until the "talk to the prisoner" quest text changes to "make the prisoner talk", otherwise he will die in 1 hit. Other types of clubs will probably work too.
Aetis 30 Mar, 2023 @ 1:10pm 
Didn`t read everything but i found a little mistake. The shotgun is a hunting version of KS-23, wich is named "Sielezień-4".
PeachVsEggplant 25 Mar, 2023 @ 8:08am 
Just a note, if you refer to my answer in this thread, the probability of accepting bribes actually working seems to not actually be random and depend on the the assistant inspector.

https://steamproxy.net/app/756800/discussions/0/3829787744080730466/
Nantes 24 Mar, 2023 @ 11:54am 
"Climbing into the salon still won’t work until the criminal is arrested, so shine a flashlight on the wheels, fenders of the car, and so on, pull it out for smuggling. After making sure that everything was found outside, knit the prisoner and continue the inspection already inside the salon,"

What do you mean by "salon"? (the word appears twice in the quoted text above). I think your Google Translate failed there.

Great guide regardless, especially the cheat sheet. Gave you an award!
Krieltje 22 Mar, 2023 @ 2:32pm 
This is the best one ever, why you have so many views? Thanks!:steamthumbsup: