Hogwarts Legacy

Hogwarts Legacy

126 ratings
Guide To All Puzzle Types
By Athrek
This Guide will teach you how to solve all of the different types of puzzles located throughout the game. It won't solve individual puzzles but most every puzzle is simple enough once you know how.
6
4
3
   
Award
Favorite
Favorited
Unfavorite
Intro
This Guide is meant to help teach every type of puzzle in Hogwart's Legacy. It won't solve individual puzzles for you, but it will explain how to go about solving them through an example.

WARNING!!!
This Guide may spoil the game for you. Do not proceed past this point if you want to avoid any spoilers. I will be focusing on just the puzzles but the further down the list you go, the more spoiler heavy it will become.

This Guide is also not 100% Complete yet, I will be adding to it as I go but given the sheer amount of puzzles to solve in the game, I will be updating over time as I come across a puzzle I haven't covered yet. If you need help with any particular puzzle not on the list, let me know in the comments where it is and I'll add it to the guide to help you.

My Other Hogwart's Legacy Guides

I'm also looking for suggestions on guides to make as I've now beaten the game and am about to finish my first 100%. I've basically memorized everything and will be playing through the game again while recording so I can add videos. Please let me know if there is anything specific you'd like covered.
The Very Basics
Here are the most basic of basics puzzles I've found. They either don't fall into another category or they are already explained through the quest required to unlock them.

Numbers Puzzle


Butterfly Portraits
Found throughout Hogwart's Castle are Blank Portraits.
Use Lumos on the portrait to reveal an image. The area shown in that image will always be close by, possibly upstairs or downstairs.
Go to the area, leaving Lumos on and cast Revelio repeatedly to find a Butterfly in the area shown in the picture.
Have Lumos on near the butterfly and it will follow you.
Lead it back to the portrait and then turn off Lumos to complete the puzzle.

Treasure Vault Doors
Some Treasure Vaults in the overworld are locked by puzzles with a circle with a symbol on the ground and a box with a symbol nearby.


Simply Accio the box onto the circle and perform the action the symbol hints at on the box while it is on the circle and the door will open.
Feather = Levioso
Fire = Incendio/Confrigo
Snowflake = Glacius


Alohamora
Lockpicking only available after unlocking the spell via the Main Story.

Interact with the lock


Turn both wheels a little at a time until one lights up, there will be a sound accompanied by it.


Turn the remaining wheel until it lights up like the first one and the lock will open after a few seconds.


Daedalian Keys
You unlock the ability to do these puzzles through the Side Quest 'The Daedalian Keys' located in Hogwart's once you are far enough in the Story.

To solve the puzzle, find either a locked cabinet or the flying key. If you find the cabinet first, there key will be nearby so use Revelio to search for it. If you find the key first, follow the key to the cabinet or use Revelio to find the cabinet nearby.

Upon the key reaching the cabinet, you can interact with it.


Now this is a reaction based game. Watch for the key to move from right to left or left to right and slam it once it reaches the lock. This can be difficult so it takes practice but once you've got it it's pretty easy. Afterwards just take the seal to your house chest.


Once you have all 16 then you will get the reward inside and complete the quest.

Follow The Butterflies
Colorful butterflies are spread in various places around the map.


Follow them to find a treasure.


Pop The Balloons
Spread in the air around the map. They come in groups of five. Pop all 5 to finish a challenge.


Landing Pad
Spread in high places around the map. Usually located near some balloons but not always.


Land on them while flying to finish a challenge.


Devil's Snare
Found fairly often in dark places. Will damage you if you touch it.


Use Lumos or any fire spell to send it reeling temporarily. You can also dodge it.


Dive Locations
Found in waters everywhere. Dive in for treasure or to access new locations.


Eyeball Chests
They see you coming from all sides. Turn invisible while out of there sight and open them for 500 Galleons.


Need A Lift?
Sometimes a box isn't enough.


Cast Leviosa on it to get even higher.


Spinnymajig
Cast Depulso on it for maximum spinnyness


Checkmate
The game is nearly over. It's just missing a piece. Find an object to use.


Cast Transformation on it to make it suitable for play.


Put it in a winning position.

Merlin Trials
These Trials are unlocked through the Main Story Quest and afterwards you can start doing them in the overworld.


Light The Braziers
There will be 3 Unlit Braziers nearby, just like the first Trial. Cast Confrigo on them(Incendio won't be enough) and light all 3 in a short time.

Balls And Holes
Saving before starting is recommended for this one.

There will be a ball and/or hole nearby. Find one and then look around for the other. Usually there is an obvious path leading one to the other.

Use 4 Basic Attacks to do a Strong Attack that will knock the ball forward.

Lead the ball to the hole and get it inside.

If you mess up and the ball is impossible to get in the hole, load a previous save. If you didn't save, leave the area, wait a day and come back.

Hit The Targets
There will be 3 Sets of 3 Targets on pillars. Destroy them with a spell.


Destroy The Rocks
There will be 5 Glowing Rocks scattered nearby that need to be destroyed with a strong spell like Confrigo.


Repair the Statues
There will be 3-5 Broke Statues scattered nearby that need to be repaired with Reparo.


After repairing a statue, it will face the direction of another broken statue until the final statue faces the trial start.


"Jump" Puzzle
There will be a set of platforms that you must touch the top of to progress the trial, obviously wanting you to jump from one to the other.


Instead, get on your broom and lower yourself ontop of each one without even leaving your broom for easy success.


Glowbug Pillars
There are 3 empty pillars that need to be filled with the 3 sets of nearby glowbugs.


Use Lumos on the glowbugs to get them to follow you.


Lead them back to the pillar and release them.


Flipendo Dice
There are 3 Pillars with dice on them scattered nearby. The dice and pillars have 4 symbold on them.


Use Flipendo on 1 side until the symbol matches. If it doesn't match after 4 casts, go to one of the sides next to you. Repeat this until the 4 sides match.
Outro
Hopefully you've found this guide helpful and if you didn't, let me know and I'll see what I can do to fix that. As I said, this is a work in progress and I will be updating it as I am able.
15 Comments
STONER 2 Apr @ 3:32pm 
all u need to use is wingardium leviosa. move the arrow block towards and above the empty space and rotate the block with 'e or q', then let it drop into the space
QueenPinkaholic 27 Mar @ 5:55pm 
@SimulcarumVeneris I can't figure out that puzzle either.
SimulcarumVeneris 19 Oct, 2023 @ 4:31pm 
there are these treasure cave riddles with 11 blocks stacked, the top three have arrows, one pointing up, the ones on the sides pointing to the front. I have to add the 12th Stone with an arrow, it always lands with the arrow pointing up, but the treasure does not get revealed i do not understand this puzzle. i tried flipping it, but it does not work.
Nermosh 11 Mar, 2023 @ 8:43am 
how to unlock the door near the headmaster's office?
TicoLiro 20 Feb, 2023 @ 4:35am 
Just use wingardium leviosa for the ball game
Seraph 19 Feb, 2023 @ 11:23am 
for the ball and hole type merlin trials, you don't need to load a save, leave the area, or pass time to reset the puzzle. simply move the ball far enough away from the puzzle area and the game will despawn it and respawn it in the original location, resetting the puzzle.
Baker 18 Feb, 2023 @ 4:34pm 
@starrborrn I found my problem with astronomy tables. I had an edited "Engine.ini" file with Bloom turned off. I changed that line and now the stars are not all the same.
Athrek  [author] 18 Feb, 2023 @ 11:25am 
I'll be updating this over the weekend.

@Radioactive Panda I will add pictures in a little bit

@Baker I plan to add video for these but that may take a couple days. @starrborrn did a pretty good explanation of how to do it
starrborrn 18 Feb, 2023 @ 10:39am 
@Baker the atronomy tables will always place the view almost on top of the stars you need , they are also a bit brighter than the other stars yu need to rotate and zoom in or out till the bright stars align with the pattern in the telescope (it takes a bit of time but can be rewarding)
Pandalorian 18 Feb, 2023 @ 8:45am 
@radioactive panda

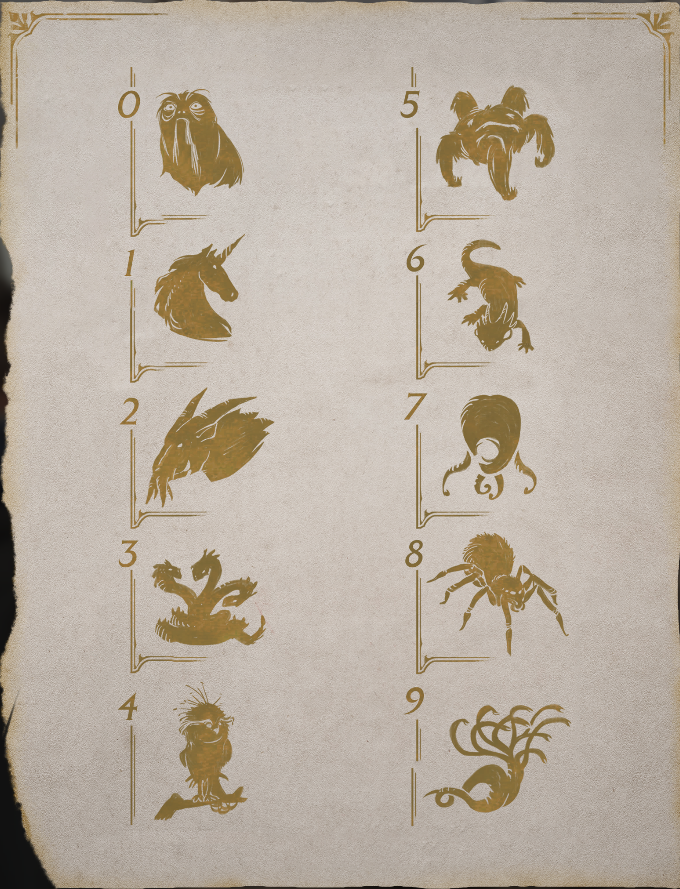
For the door puzzles, the numbers outside the triangle add up to the number inside the triangle. They use images instead of numbers, but you can use the chart shown in this article to see which image = which number.

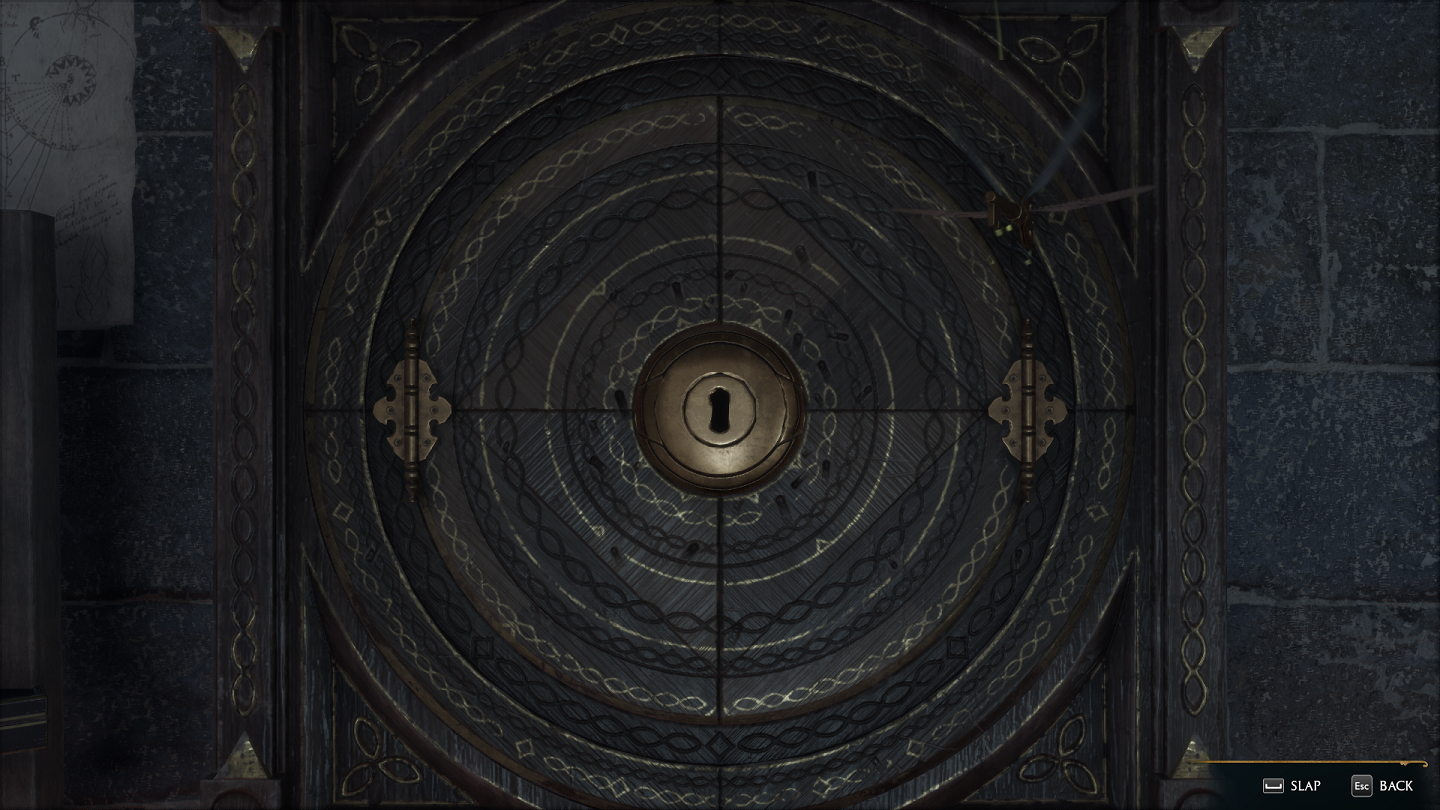
Nearby each door (sometimes up or down some stairs) there will be a plaque in the wall with a single ?, and another with double ??. Use each plaque and select which image would solve the puzzle.

Example: If one of the triangles has 3, Spider, ? along the corners, and the inside has the number 13, you can translate that to 3 + 8 (spider translates to 8) + ? = 13. The missing number is 2 (3 + 8 + 2 = 13), and the Graphorn image translates to the number 2. You'd then change the single ? plaque to the image of the Graphorn.

Repeat for the second triangle, changing the ?? plaque. Then you should be able to open the door