Persona 3 Portable

Persona 3 Portable

135 ratings
All Secret Boss Battles Guide
By HayateButler
Persona 3 Portable has a number of optional fights that you're able to tackle, and unlike later Persona games, you're given the choice to challenge all of them on your first playthrough. This guide aims to provide a breakdown of how to encounter every optional boss fights, and inform you what's the best way to defeat them.

3
2
   
Award
Favorite
Favorited
Unfavorite
The Reaper
While technically not a secret boss since you'll most likely encounter the Reaper at least once during your playthrough, it's worth mentioning because it's a difficult boss that appears in Tartarus and needs to be defeated to complete request #53 (available on 1/1), which in turn allows you enter Monad and unlocks request #55 (Elizabeth/Theodore fight).

To spawn the Reaper, simply hang around in a floor that can spawn shadows and wait. The time it normally takes for the Reaper to spawn can range from 3-12 minutes depending on the floor size. This timer can be further lowered if any of the following conditions are met:
  • Choose a cursed card during Shuffle Time
  • Be on a regular floor with no Shadows
  • Be on a floor with powerful (red) Shadows
  • Be on a floor that's filled exclusively with gold Shadows or rare chests

Your navigator (Mitsuru/Fụuka) will warn you, and after 30 seconds, they'll either repeat the same warning or alert you that the Reaper has spawned. When it approaches, you'll be able to hear the sound of rattling chains and see him on the minimap when he draws near. Be aware that it can even climb up small ramps. The only safe zone is the stairs leading to the next floor.


Strategy
Now let's talk about how to deal with the Reaper.

Generally speaking, there's two ways people kill it. The cheese, and the head-on fight.

For the cheese, it's quite simple. Just use an Armageddon (guaranteed 9999 damage). If you've farmed 99 Malachites and 10 Rubies, you can purchase one from the Shinshoudo Antique. With that said, you'll want to have an Armageddon for the Elizabeth/Theodore fight in the future, so I recommend doing the fight legitimately.

For a normal fight, your party should be at least level 70+, and you'll want to bring buffs and debuffs (at least attack up and def down) to make it easier for yourself. The best strategy is to fuse Odin with Elec Amp & Elec Boost, then go to town on the Reaper with Thunder Reign - shock the Reaper for guaranteed critical hit from physical attacks, follow up with physical attacks into all out attacks. Keep in mind that turn order matters heavily for the shock strategy, and you'll need to run away if you get a bad order where your allies don't go after you.

Here's a couple general tips related to the Reaper as well:
  • Make sure to have a few Homunculus if you don't null Light or Dark, you don't want to get insta-killed (Melchizidek & Thanatos Heart Items grants Null Light & Null Dark respectively)
  • If you're bringing teammates that have elemental weaknesses, give them an accessory that improves their evasion against their weakness (can easily pick them up from Police Station).
Monad (Elizabeth / Theodore Prerequisite)
Starting on 1/1, request #53 will be available. Once you complete it, you'll be able to enter Monad from Tartarus 1F and also take on request #55.

Monad has 10 floors, and it's the best place to level grind as all shadows there are in the high 80s to 90s level range. Here's a list of their elemental affinities.

Shadow
Weak
Resist
Null
Absorb
Repel
Acheron Seeker
Fire, Ice, Elec, Wind
Amorous Snake
Ice, Mudo
Slash, Strike, Pierce
Fire
Hama
Chaos Cyclops
Hama, Mudo
Ice
Eternal Sand
Slash, Strike
Fire, Ice, Elec
Wind
Divine Mother
Ice, Mudo
Zio
Hama
Grand Magus
Fire
Strike
Ice, Hama, Mudo
Hallowed Turret
Elec
Hama, Mudo
Slash, Strike, Pierce
King Castle
Wind
Hama, Mudo
Elec
Strike
Tenjin Musha
Elec
Wind
Vehement Idol
Hama
Wind
Pierce, Fire, Mudo
Void Giant
Slash, Strike, Pierce
Hama, Mudo
White Sigil
Fire
Ice
Slash, Hama
Elizabeth / Theodore
To unlock the Elizabeth/Theodore fight, you'll need to have accepted request #55 and reached the top floor of Monad. This is widely considered the hardest fight in the game, even harder than the Margaret fight that was added in Persona 3 Portable, so you'll need to prepare some things before even taking on the challenge. I'll be referring to the attendant you battle as Elizabeth for simplicity sake, but Theodore's fight is exactly the same.

This battle is a 1v1, so you'll only need to concern yourself with your own gear and persona setup.

Preparations
Let's start with equipment:
  • Male Protagonist Weapon - Lucifer's Blade (Weapon Fuse Lucifer)
  • Female Protagonist Weapon - Vel Vel Muruga (Weapon Fuse Kartikeya)
  • Armor - Armor of Light (Messiah ♥ Item)
  • Shoes - Shoes of Light (Messiah ♥ Item)
  • Accessory - Divine Pillar (Alilat ♥ Item) / Barbaric Bracers (Chi You ♥ Item)
*Armor & Shoes of Light are two of many Heart Items you can get from Messiah, so fuse him, get him to level 97, register him to the compendium, and repeatedly level him to 98 till you get the right equipment.

Once you have this, you'll also need to prepare a few items:
  • Infinity x12 (Shinshoudo Antiques - 4 Malachite, 4 Pearl)
  • Armageddon x1 (Shinshoudo Antiques - 99 Malachite, 10 Ruby)
  • 20+ Beads (Treasure Chests)
  • 1-2 Precious Eggs (Treasure Chests)
  • 3-4 Somas (Treasure Chests)
  • 20+ Homunculus (Treasure Chests)
  • An IRL Calculator (Surprise Math!)
*Optional: Best Friends (It's Tarukaja, Rakukaja, and Sukukaja in one)

Next, let's work on your persona...
Orpheus Telos is your best bet, but if you can't fuse him because you weren't able to max all the social links in one playthrough to receive the Colorless Mask, I'll provide an alternate build using Hokuto Seikun.

Orpheus Telos Skills:
  • Null Poison
  • Unshaken Will
  • Sharp Student
  • High Counter
  • Mind Charge
  • Fire / Ice / Elec / Wind Amp
  • Fire / Ice / Elec / Wind Boost
  • Ragnarok / Niflheim / Thunder Reign / Panta Rhei
*Take your pick of which elemental skill you want to use, just make sure to have the correct amp & boost skills as well.

Hokuto Seikun (O. Telos Alternative) Skills:
  • Salvation
  • Unshaken Will
  • High Counter
  • Resist Ice
  • Resist Wind
  • Resist Slash
  • Resist Strike
  • Resist Pierce
*This looks absolutely clown, but it can get the job done (as long as not highest difficulty).

To make things easier, I'll list how to acquire skill cards for skills listed above, then talk about fusion inheriting Mind Charge + Ragnarok / Niflheim / Thunder Reign / Panta Rhei for O. Telos.

Skill Card Info:
  • Null Poison: Barong (Lv 56 - Emperor)
  • Salvation: Vishnu (Lv 87 - Sun)
  • Unshaken Will: Asura (Lv 93 - Sun)
  • Sharp Student: Zouchouten (Lv 19 - Chariot)
  • High Counter: Siegfried (Lv 67 - Strength)
  • Mind Charge: Atropos (Lv 59 - Fortune)
  • Fire Amp: Kumbhanda (Lv 58 - Hermit)
  • Fire Boost: Hua Po (Lv 25 - Magician)
  • Ice Amp: Titania (Lv 55 - Lovers)
  • Ice Boost: Jack Frost (Lv 14 - Magician)
  • Elec Amp: Odin (Lv 66 - Emperor)
  • Elec Boost: Take-Mikazuchi (Lv 31 - Emperor)
  • Wind Amp: Ganesha (Lv 65 - Star)
  • Wind Boost: Kusi Mitama (Lv 35 - Fortune)
  • Resist Ice / Wind: Sapphire x2, Pearl x1 (Shinshoudo Antiques)
  • Resist Slash / Strike / Pierce: Sapphire x1, Diamond x1 (Shinshoudo Antiques)

To fuse O. Telos, you'll need Messiah, Helel, Metatron, Chi You, Asura and Thanatos. You'll basically want to cram as many of the skills you want on O. Telos into those 6 personas (duplicated across them is even better for higher odds) to have at the end to have the highest chance of rerolling the correct skills during fusion. There's many ways to get fuse O. Telos in the end, so I'll just offer a few suggestions for your fusion experience to be less hellish.
  • Get rid of as many Mudo skills from Thanatos as you can, or they'll keep showing up.
  • Asura can only inherit Ragnarok, and not the other elemental skills.
  • Helel & Chi You can't inherit any elemental skills.

By the end of all this, you'll want to make sure you're level 99 (for max HP and SP), and that your persona has max stats to help you bulk up and do as much damage as possible.

As an extra bonus, you can also consider bringing a Persona with Auto-(Ma)Tarukaja/Rakukaja/Sukukaja for extra damage on your early turns (Start the fight with it, and switch to O. Telos/Hokuto Seikun.

Strategy
Now that you're ready, let's talk about the battle plan (having great status here doesn't hurt either).

To start, Elizabeth has a couple Rules of Engagement that you'll need to adhere to throughout the fight. If you don't, you're immediately rewarded with a Megidolaon instant death.
  • You may not use any equipment or Personas with Null, Absorb, or Reflect.* This includes using the Omnipotent Orb, as well as Makarakarn/Tetrakarn (or Mirrors).
  • You may not spend more than 100 turns defeating her.
  • Using Armageddon and not ending the fight on that turn
*See "Advanced Elizabeth / Theodore Info" section below for more detail.

Elizabeth has 20,000 HP and wields 9 personas which she will switch every turn. She also gets to act twice per turn. Her pattern overall is very simple, so here's how it goes:

From 20,000 HP to 10,000 HP (100 - 50%)
  1. Surt (Uriel) - Maragidyne / Physical
  2. Jack Frost (Gabriel) - Mabufudyne / Physical
  3. Thor (Michael) - Maziodyne / Physical
  4. Cu Chulainn (Raphael) - Magarudyne / Physical
  5. Metatron (Sandalphon) - Mahamaon / Physical
  6. Alice (Lilith) - Mamudoon / Physical
  7. Nebiros (Abaddon) - Status Ailment / Physical
  8. Masakado (Beelzebub) - Megidolaon (9999 Insta-kill)
*After Megidolaon, she returns to Surt and repeats the cycle.
**Personas listed on the right are what Theodore uses instead for this fight

Under 10,000 HP (<50%)
First Time Only: Pixie (Metatron) - Diarahan
*She full heals herself the first time she reaches sub-10k HP, and returns to the above pattern.

Under 9,000 HP (<45%)
Always Diarahan & return to 100 - 50% HP pattern

Time for your preparations to pay off, here's what you'll have to do to win against Elizabeth:
    >Turn 1 Only: Mind Charge (If you brought auto-buffs, switch to O. Telos first)
  1. Niflheim / Thunder Reign / Panta Rhei / Physical Atk
  2. Ragnarok / Thunder Reign / Panta Rhei / Physical Atk
  3. Ragnarok / Niflheim / Panta Rhei
  4. Ragnarok / Niflheim / Thunder Reign / Physical Atk
  5. Buffs / Physical Atk
  6. Buffs / Physical Atk
  7. Infinity
  8. DON'T ATTACK (Heal with Bead/Soma, Salvation if poisoned, otherwise Buff/Debuff)
*Repeat from step 1 after. Skill priority is from left to right (depends on your persona setup), and you may heal on any turn of the pattern except for when you need to use Infinity

IMPORTANT: Keep track of how much damage you have dealt to Elizabeth! When she's around 10,500 - 10,600 HP (dealt 9,500 - 9,600 dmg), stop attacking. Since she uses Diarahan when she's under 10,000 HP, and Armageddon only does 9,999 dmg, we have to rely on High Counter (20% proc chance) so she ends her turn with less than 10,000 HP. Once you counter her physical attack on her second move of the turn and she's under 9,999 HP, use that Armageddon you've been holding to win the fight.

*It’s possible to defeat her without High Counter, but the fight will be basically twice as long since you need to deal over 20,000 damage total due to her Diarahan (on the bright side, no calculator necessary). You’re still forced to use Armageddon anyway due to the 9,000 HP Diarahan condition.
Advanced Elizabeth / Theodore Info
Although the “Elizabeth/Theodore” section above covers the general pattern, and a straightforward way of approaching the battle, it technically is not the most effective way of winning. For this, I’ll be talking in more depth about the fight, and additional changes you can make to your setup to make the fight go faster, for those willing to spend the effort.

Accessory Consideration
While Divine Pillar reduces all damage taken by 50%, it comes at the cost of making you have 0 evasion. This can be a bit of a concern for two reasons: critical hits, and shock. While Elizabeth doesn’t have a high critical rate, it can be a run killer depending on how much damage you’re able to endure. In addition, her Maziodyne has a 50% chance to apply shock, and if she lands it on her first action, she’ll be able to follow up with a crit on her second action.

In this case, you can consider using Barbaric Bracer instead. It reduces the enemy’s hit rate by 50% and practically reduces the need for Sharp Student (reduce crit chance by 50%). Although this means you’re able to endure less hits, the fact that you’re able to evade attacks in it of itself is quite helpful in reducing the need to heal, giving you more turns to deal damage.

Persona Usage
There’s actually a few more things to note about the Elizabeth fight which wasn’t covered in the previous section for the sake of simplicity which will be discussed here. First, she always takes reduced damage from physical attacks; that makes them much less effective than magic. On top of that, depending on what persona Elizabeth is currently using, attacking her with that persona’s “opposite” element will deal 1.5x damage. This means having multiple personas to switch to will allow you to deal more damage (with the exception of Messiah’s unique passive Magic Skill Up 1.5x boost that rivals it).
  • Agi (Fire) ⇄ Bufu (Ice)
  • Zio (Elec) ⇄ Garu (Wind)
Because of those 2 things, it’s better (de)buff up for your next magic attack during turns where you can’t deal damage, or can only use physical attacks (Metatron, Alice, Masakado). It’s also important to keep in mind that unlike later games, Mind Charge in Persona 3 only provides a 1.9x damage boost, so it should only be done during turns you can’t use magic attacks.

Now in terms of persona switching, the previous section does mention in the Rule of Engagement that you may not use any personas with Null, Absorb, or Reflect. But that’s actually more of a check based on the persona Elizabeth is using for her turn. Let’s say she switches to Surt, as long as you’re not equipped with a persona that stops Fire attacks, she will not Megidolaon you. This means you simply need to have personas that has Resist Slash, Resist Strike, Resist Pierce, and resist the element it’s up against; and you can fill the other slots with High Counter, Spell Master, Elemental (Fire/Ice/Elec/Wind) Boost, Elemental (Fire/Ice/Elec/Wind) Amp, Elemental Skill (Ragnarok/Niflheim/Thunder Reign/Panta Rhei).

As for Elizabeth’s Metatron/Alice/Masakado turns, you can use a persona (such as Alilat) which resists all physical attacks, and give it Unshaken Will + Null Poison to stop any ailment afflictions and remove the need to waste a turn cleansing ailments. You just have to add Mind Charge (and maybe Rakunda/Marakunda) to the skill list for your turn’s set ups.

*Because Elizabeth acts twice per turn, defense down lasts half as long. Keep that in mind and only use it right before your attack.

**Remember not to have Null or Repel Light/Dark on your active persona during Elizabeth's Metatron/Alice turns.

Extra Skill Card Info:
  • Spell Master: Lucifer (Lv 97 - Judgement)
Vision Quest (Margaret Prerequisite)
On 1/1, Elizabeth/Theodore will call and let you know that their sister wishes to test you. Head to Tartarus any time after this call, and you'll find a new door at the entrance. Upon entering, you'll find... Margaret!

Here, you'll find 13 doors, with the top row of 8 corresponding to the 8 Full Moon Shadow bosses you fought, and bottom row of 5 corresponding to each of your persona stats. The boss doors will be the same bosses you fought before except stronger, and the 5 stat doors will be strategy/puzzle based.

It's recommended that you have your active party at level 80+ before tackling Vision Quest to ensure you have all their skills learned. And as a side note, reaching level 99 on any character will max out their HP and SP to 999, which can be helpful if you find yourself struggling.

Priestess
Party Conditions: Protagonist, Junpei, Yukari

Like the original fight, this boss is simple. The boss will summon 2 minions, which you'll want to focus down before dealing with the boss.


Empress & Emperor
Party Conditions: Protagonist, Junpei, Akihiko

Use physical attacks on the Empress to find weakness, and then elemental on the Emperor until you get lucky with finding both weaknesses for an All Out Attack. Rinse & repeat. Or just Almighty to skip their entire mechanic.


Hierophant
Party Conditions: Protagonist, Yukari + Pick 2> Junpei, Akihiko, Mitsuru

Use Me Patra after Prophecy of Ruin to remove fear from your party. Defending can also block PoR's fear. Consider equipping a persona with Unshaken Will to make the fight easy.


Lovers
Party Conditions: Protagonist, Yukari + Pick 2> Junpei, Akihiko, Mitsuru

Main risk is your party getting Charmed, so watch out for that. Not too much else to note other than the fact that you can throw in Makarakarn for some repel damage.


Chariot & Justice
Party Conditions: Protagonist + Pick 3> Yukari, Junpei, Mitsuru, Akihiko, Aigis

The fight is more or less the same...


Hermit
Party Conditions: Protagonist + Any 3 except Junpei

This fight is a jump in difficulty compared to the previous ones so far. It'll follow Charge with Giga Spark, and Mind Charge with Maziodyne/Megidolaon. Elec Break + Makarakarn will do nicely here.


Fortune & Strength
Party Conditions: Protagonist + Any 3 except Shinji or Ken

Unlike most bosses, these are actually vulnerable to Ghastly Wail, so... just insta-kill after self-inflicted fear. lol. Otherwise pretty much the same fight.
Tip: Wheel will stop opposite of where you hit stop
*All Full Moon boss fights here have a special activation requirement for a special reward at the end of the fight. This one requires letting a party member die to the Wheel of Fortune to be rewarded with 10x Infinity.


Hanged Man
Party Conditions: Protagonist + Any 3 except Shinji

Probably the least changed fight, it just has higher tier skills and more HP so fight will take longer.
*All Full Moon boss fights here have a special activation requirement for a special reward at the end of the fight. This one in particular is worth noting because it rewards you with 10x Armageddon, which is really nice to have and necessary for the Elizabeth/Theodore battle. To meet the requirement, you need to let Hanged Man detonate one of the Mayas it summons and take damage from it (infinity won't work).


Hall of Power (Power Door)
These are the 3 patterns the Guardians can change into each time they're hit:
Weak
Normal
Null
Absorb
#1
Strike
Pierce
Slash
#2
Slash
Strike
Pierce
#3
Pierce
Slash
Strike

The Guardians won't attack at the start until you've hit them, so we'll be abusing this to set up an All Out Attack on all 3 at once. Using the pattern table above, attack one Guardian at a time until you've set all 3 of them to drain Slash. During this time, have Shinji Power Charge and wait. Once the 3 Guardians are set, have Shinji drop Akasha Art and finish them off.

Alternatively, pick them off one by one to play it safe.

Hall of Magic (Magic Door)
Switch your persona to Raphael and Makarakarn spam. Wait for Hamaon repels.

Hall of Vitality (Resistance Door)
There's 3 catches here:
- Do not cast Dekaja / Dekunda
- Do not cure poison
- Do not take more than 11 turns

Use Sexy Dance on turn 1 to break their Makarakarn, and you'll be on Magarudyne spam duty with Yukari (with occasional heal) to dizzy the Red Guardian. Mitsuru can item heal (Dis-Charm, Bead, etc.), and otherwise Mabufudyne spam; Akihiko will be on debuff spam duty (Masukunda & Marakunda), and otherwise Maziodyne spam. The White and Black Guardians have 0 accuracy, so they will always miss and slip when they try to attack you (if not defending). Get those All Out Attacks when all 3 Guardians are down, and hope you don't miss too many times.

Hall of Speed (Speed Door)
The Guardian here has 4 different patterns it can choose, and you'll have to follow the following steps depending on which one it picks (based on the first move). Generally speaking, the plan will still fail if the Guardian crits you, or if you miss important attacks.

Turn 1: Power Charge
  1. Defend
  2. Persona: Mothman → Primal Force
    Bead
  3. Persona: Saki Mitama → God's Hand
    God's Hand
  4. Persona: Pixie → Slash Attack
    Bead
  5. Gale Magatama
    Persona: Sarasvati → Garudyne
  6. Persona: Pyro Jack → Shock Magatama
    Bead
  7. Frigid Magatama
    Persona: Jack Frost → Bufudyne
  8. Flame Magatama
    Persona: Pyro Jack → Agidyne

Turn 1: Mind Charge
  1. Persona: Jack Frost → Slash Attack
  2. Flame Magatama
    Persona: Pyro Jack → Agidyne
  3. Frigid Magatama
    Persona: Jack Frost → Bufudyne
  4. Shock Magatama
    Persona: High Pixie → Ziodyne
  5. Gale Magatama
    Bead
  6. Persona: Saki Mitama → Bead
  7. God's Hand
    God's Hand

Turn 1: Life Drain
  1. Slash Attack
  2. Persona: Narcissus → Brave Blade
    Defend
  3. Persona: Pixie → Bash
    Bead
  4. Persona: Mothman → Primal Force
    Bead
  5. Flame Magatama
    Persona: Pyro Jack → Agidyne
  6. Frigid Magatama
    Persona: Jack Frost → Bufudyne
  7. Shock Magatama
    Persona: Narcissus → Bead
  8. Gale Magatama
    Persona: Sarasvati → Garudyne

Turn 1: Spirit Drain
  1. Slash Attack
  2. Gale Magatama
    Persona: Sarasvati → Garudyne
  3. Persona: Pyro Jack → Shock Magatama
    Bead
  4. Frigid Magatama
    Persona: Jack Frost → Bufudyne
  5. Flame Magatama
    Persona: Pyro Jack → Agidyne
  6. Persona: Mothman → Primal Force
    Defend
  7. Persona: Saki Mitama → God's Hand
    God's Hand or Bead
  8. Persona: Narcissus → Brave Blade
    Brave Blade
  9. Brave Blade
    Brave Blade (Pray GG)

Hall of Luck (Luck Door)
Defend.
If it says 1, use Mudoon.
If it says 2, use Hamaon.
*2nd clear rewards you with 20x Homunculus.
Margaret (Preparations)
To unlock the Margaret fight, you'll have to clear the 13 doors in Vision Quest. Once done, Pandora's Door appears and you can challenge her.

Luckily, this battle is easier than facing Elizabeth/Theodore, since you're working with a full party, instead of just your protagonist. However, this also means more gear prepping...


Preparations
Let's start with equipment:
  • Male Protagonist Weapon - Lucifer's Blade (Weapon Fuse Lucifer)
  • Female Protagonist Weapon - Vel Vel Muruga (Weapon Fuse Kartikeya)
  • Armor / Aigis Armor - Armor of Light / Soul of Athena (Messiah ♥ Item)
  • Shoes / Aigis Shoes - Shoes of Light / Swan Legs (Messiah ♥ Item)
  • Accessory - Divine Pillar (Alilat ♥ Item) / Barbaric Bracers (Chi You ♥ Item)
  • Aigis Accessory - Lightning Gloves (Thor ♥ Item)
*A ton of Heart Items necessary from Messiah, so fuse him, get him to level 97, register him to the compendium, and repeatedly level him to 98 till you get the right equipment.
**I won't list all party member's best weapon fusion, since that's a bit excessive. Basically, most of your equip will be from Messiah.

While on the subject, you should decide who to bring to the fight. I advise against Junpei and Koromaru because of High Counter, since Margaret can absorb certain physical attacks during parts of the fight (though Junpei with great condition + Vorpal Blade is really nice). I suggest bringing Aigis as she provides Matarukaja and Marakukaja, just keep in mind she can't use Divine Pillar due to her elec weakness.

Once you have the gear, you'll also want to prepare a number of elemental gems/magatama, 20 Homunculus, and an Armageddon. These are mostly optional but they'll make the fight go quicker.

Lastly, there's Personas.
Bad News: You'll most likely need to build more than 1 persona for this. Though technically you can easily clear with just a specialized almighty build (I'll provide both setups).
Good News: Unlike Elizabeth, you can equip Null/Absorb/Repel personas without any worry; and you're not restricted to any specific personas, you just need to have the right skills.

Persona 0 - Almighty Spam
Here's the deal, you don't want to deal with Margaret's mechanics and just want to beat her. In that case, it's time to build an Almighty spammer. Satan's Black Viper is the strongest Almighty skill, so let's work with that (you can use Helel as well with his Morning Star, which is slightly weaker but he comes with more resists).
  • Black Viper
  • Mind Charge
  • Absorb Wind
  • Unshaken Will
  • Spell Master
  • Salvation

Persona 1 - Physical Attacker
Siegfried looks nice here. Give him the following skills:
  • Arms Master
  • Apt Pupil
  • Power Charge
  • Vorpal Blade
  • Repel Dark
  • Unshaken Will

Persona 2 - Magic Attacker
You'll want any persona with the four elemental -dyne skills: Agi, Bufu, Zio, Garu. Throw in a few elemental buffing passive skills (refer to Elizabeth/Theodore section for some detail on the skill cards), and avoid elemental repel.

Same as Elizabeth/Theodore fight, make sure your active party and persona are at max level or stats.
Margaret (Battle Strategy)
Now let's talk about Margaret's attack pattern and combat plan (having great status here doesn't hurt either).

First, Margaret has a few of her own Rules of Engagement that you'll need to adhere to for the fight. If you don't, you're immediately rewarded with a Megidolaon instant death.
  • You may not equip Omnipotent Orb
  • You may not use Infinity
  • You may not spend more than 50 turns defeating her
  • You must deal 5,000 damage every 10 turns (damage requirement is cumulative, so it's okay to deal 6,000 damage on first 10 turns, and only 4,000 damage on the second 10 turns)
  • Using Armageddon and not ending the fight on that turn

Margaret has 30,000 HP and wields a total of 22 personas. She acts twice per turn, and her moveset can be split into to 5 phases, with each phase taking 10 turns (she will not skip to the next phase even after you reach the damage threshold.

Phase 1: Physical Attacks (Turns 1-10 / 25,000 HP Threshold)
This is generally regarded as the hardest part of the fight, so pay careful attention.

Margaret will hit your party with physical attacks. You'll want to remember what persona she ended her turn with, as that determines what she will absorb. Here's a table breakdown of the four Persona she can switch between during this phase.

Persona (Color)
Skills
Vulnerable Phys
Jikokuten (Green)
Vorpal Blade, Brave Blade, Charge
Strike, Pierce
Zouchouten (Blue)
Akasha Arts, God's Hand, Charge
Slash, Pierce
Koumokuten (Red)
Myriad Arrows, Primal Force, Charge
Slash, Strike
Bishamonten (Yellow)
All Previous Persona Skills
Slash, Pierce

Since Margaret can only take physical damage that she doesn't absorb (and almighty damage), teammates that can't do damage can be on support duty with heals and buffs, or otherwise on defend mode to minimize the odds of being downed from crit.

For players with almighty spam, just do Mind Charge > Almighty nuke.
For players with a physical attacker persona, go with Vorpal Blade, and Power Charge if Margaret absorbs slash (Jikokuten).

Phase 2: Status Ailments (Turns 11-20 / 20,000 HP Threshold)
Margaret changes her strategy to applying ailments on your entire party. She'll cast Stagnant Air, and attempt to Charm/Poison/Enrage your team. For damage, she'll either use single-target physical attacks or AoE -dyne skills. Unshaken Will prevents Charm and Enrage, so your protagonist is guaranteed to be able to act each turn to dispel them (you don't want your teammates healing Margaret). Remove ailments as necessary, otherwise follow the strategy from Phase 1. She only nulls Light and Dark here, which doesn't matter.

Phase 3: Elemental Attacks (Turns 21-30 / 15,000 HP Threshold)
Margaret has taken a page out of the Elizabeth/Theodore fight and will only take damage from one specific element each turn. She will use each turn to cast AoE -dyne followed by a single target elemental skill, pay attention to what element that is, and use the opposite element (or watch the Persona):
  • Agi (Fire) ⇄ Bufu (Ice)
  • Zio (Elec) ⇄ Garu (Wind)
If you're almighty spam, you can just ignore this and do Mind Charge > Almighty...
Your teammates are most likely on buff support duty. They can use elemental break + nuke for extra damage when possible, or use elemental gems/magatama which I mentioned you should prepare. This will probably be the slowest phase due to the limited damage sources.

Phase 4: Power Charge / Mind Charge (Turns 31-40 / 10,000 HP Threshold)
Margaret will always open this phase with Power Charge & Mind Charge on the first turn. After this, she'll use a mixture of skills from the previous three phases. You'll mainly want to watch out for Marakunda and Evil Smile (AoE Fear) + Ghastly Wail Combo for debilitate skills, and her offensive skills are mostly comprised of physical attacks, plus Megidolaon (not insta-kill version). Attack Mirrors/Tetrakarn are nice to have here, and you can use any attack to hurt her because she only nulls Light and Dark (except when she summons Nigi Mitama, she's only vulnerable to Agi).
*If she uses Tetrakarn/Makarakarn, have a party member do a regular attack/use a weak single target gem to remove it.
**If you have an Armageddon, feel free to use it here. Be absolutely sure that Margaret has less than 10,000 HP, as you'll be punished with instant death if Armageddon doesn't finish her off.


Phase 5: Imitate (Turns 41-50 / 5,000 HP Threshold)
It's the final stretch. Margaret will equip the same personas used in the Elizabeth/Theodore fight and use those same skills to imitate the protagonist's actions (beware using heal, Margaret will use Spirit Drain the first time you use a recovery skill, and then Diarahan full heal herself every time afterwards). Refer to the table below for what skills to use against Margaret. If you're using Almighty, she also resists it when she summons those Persona with elemental skills. Your party should follow phase 3 strats and (de)buffs + gems, though you'll ideally want to win before reaching this phase.

Persona
Skill Usage
Slsh
Strk
Prce
Fire
Ice
Elec
Wind
Lght
Dark
Almg
Jikokuten
Vorpal Blade, Brave Blade
Dr
Nu
Nu
Nu
Nu
Nu
Nu
Zouchouten
Akasha Arts, God's Hand
Dr
Nu
Nu
Nu
Nu
Nu
Nu
Koumokuten
Myriad Arrows, Primal Force
Dr
Nu
Nu
Nu
Nu
Nu
Nu
Surt
Maragidyne, Concentrate
Nu
Dr
Wk
Nu
Nu
Rs
Jack Frost
Mabufudyne, Concentrate
Nu
Wk
Dr
Wk
Nu
Nu
Rs
Thor
Maziodyne, Concentrate
Nu
Dr
Wk
Nu
Nu
Rs
Cu Chulainn
Magarudyne, Concentrate
Nu
Wk
Dr
Nu
Nu
Rs
Metatron
Mahamaon
Rp
Rp
Rp
Rp
Nu
Nu
Rs
Alice
Mamudoon
Nu
Nu
Nu
Nu
Nu
Nu
Rs
Pixie
Concentrate, Spirit Drain,
Diarahan, Megidolaon
Nu
Nu
Nu
Nu
Nu
Nu
Nu
Nu
Nu
Rs
*If you defend on your protagonist, Bishamonten is summoned instead.
End Notes
Please feel free to point out any mistakes, inconsistencies, or additional information you would like to see fixed/added.

Big thanks to yukiyoneko and BothDoorsCares for their helpful comments below on the Elizabeth/Theodore fight.

I've included BothDoorsCares's detailed guide breakdown of the secret boss fights here as well for the helpful persona fusion info:
https://steamproxy.net/sharedfiles/filedetails/?id=2925884706
Check out a few other guides I've made for Persona 3 Portable:
https://steamproxy.net/sharedfiles/filedetails/?id=2920228498 https://steamproxy.net/sharedfiles/filedetails/?id=2920228429 https://steamproxy.net/sharedfiles/filedetails/?id=2920229818
34 Comments
HayateButler  [author] 29 May @ 1:00pm 
Sorry, I don't think I understand your question clearly.
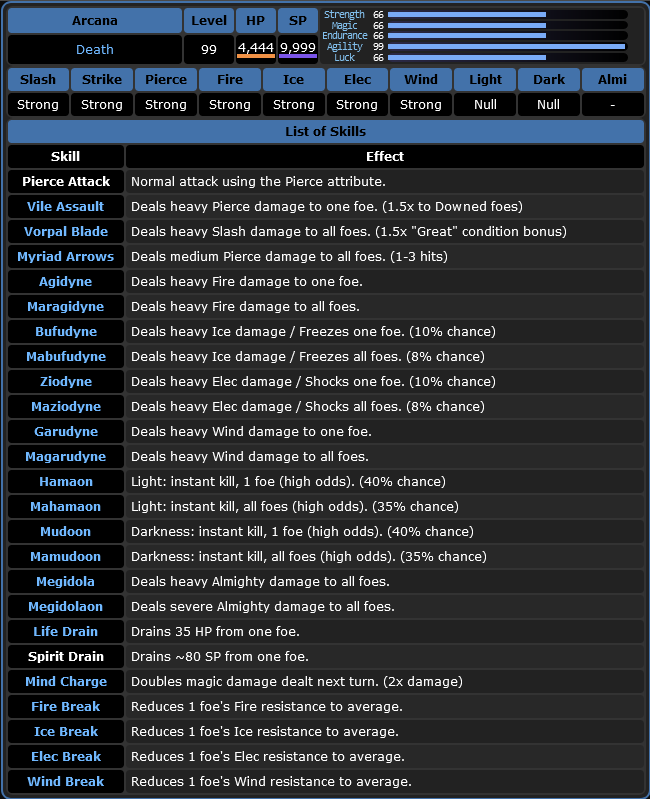
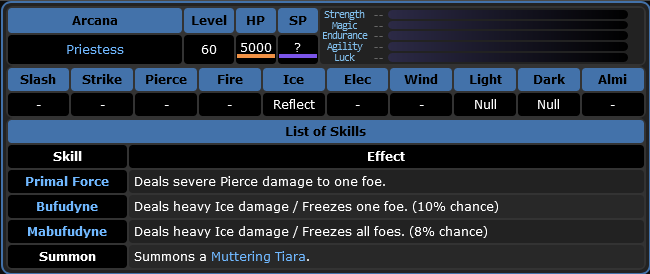
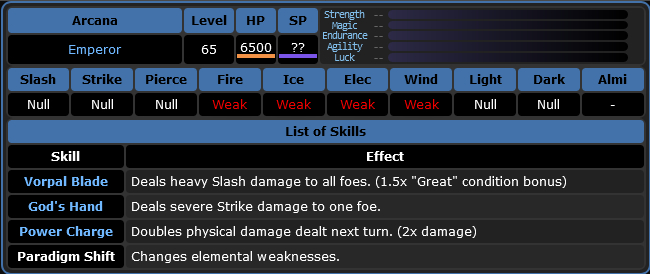
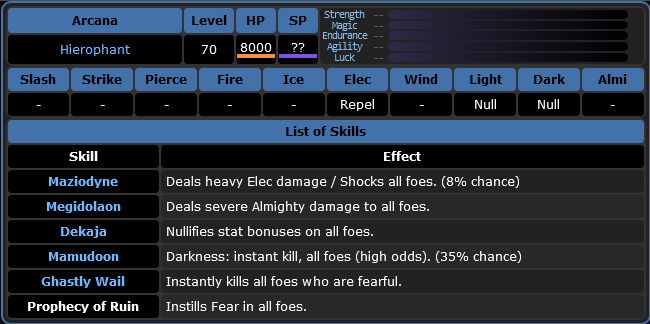
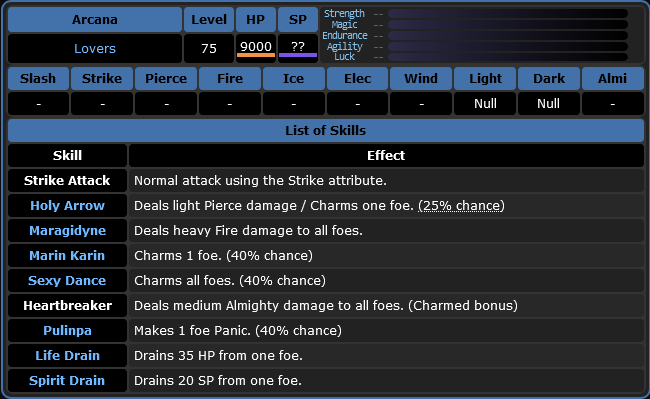
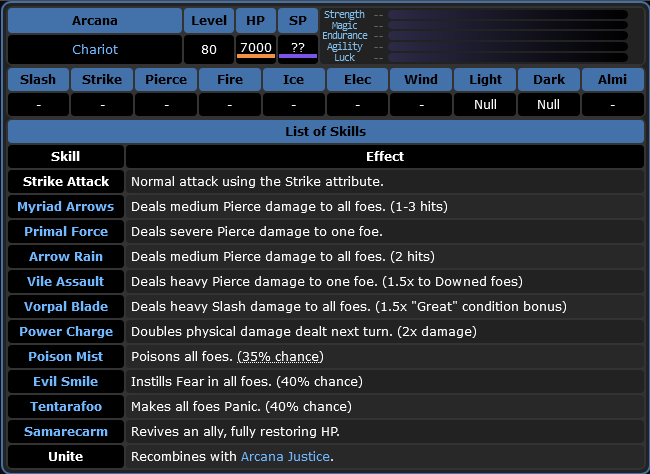
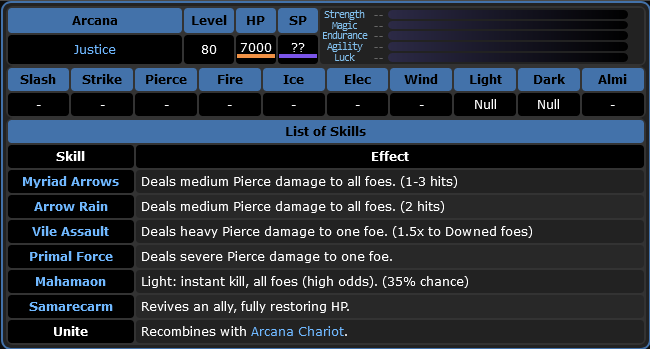
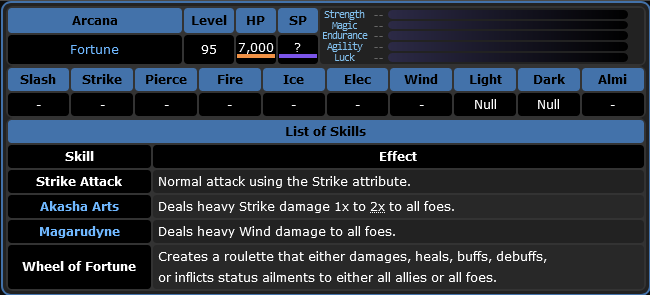
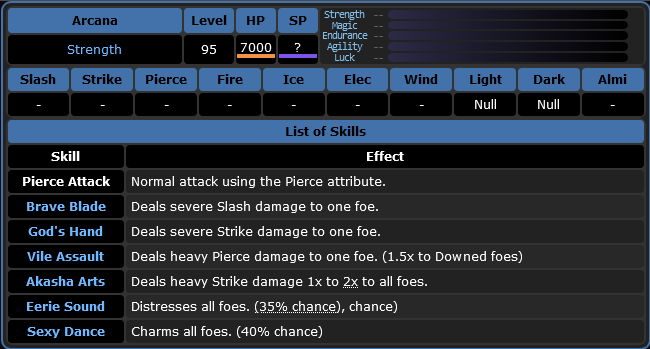
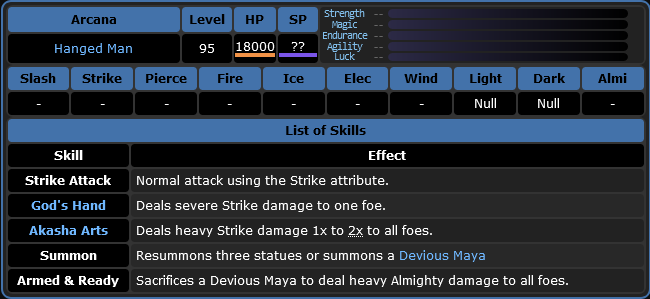
If you're talking about the Margaret fight, every 10 turns is a different attack pattern (termed phases). In addition to the 5,000 minimum damage requirement per phase, she has her own rule of conducts which are listed in the Margaret (Battle Strategy) section. You probably broke one of those rules during the battle.
Maximilion13 29 May @ 10:18am 
I'm confuse, so aren't we supposed to do 5000 dmg during first phase? like before 10 turns? she do megieload 1hit KO, why?
HayateButler  [author] 10 Apr @ 12:06pm 
Just an update for those interested. :p3p_idea:
I've updated the Margaret Battle sections to include more details on her phase patterns, and added a few tables (namely in phase 1 & 5) to provide more clarity on what your plan of action should be.
stray cat girl 2 Apr @ 2:49am 
i kinda wish I knew before trying to go for the reaper stuff that you needed to max the emperor social link to get odin. I'm in the last stretch of the game and I have one level in it. RIP me, lmao.
Casual Sauce 13 Mar @ 5:46am 
Elizabeth is one of my least favorite fights in any game
yeehaw 7 Dec, 2023 @ 9:21am 
she also absorbed pierce after using primal force... somethings not right here
yeehaw 7 Dec, 2023 @ 8:08am 
for some reason Margaret will absorb slash attacks after last using akasha arts
That Hat Guy 15 Jul, 2023 @ 4:51am 
Thanks for the help, I was able to defeat both bosses. [cdn.discordapp.com]
Ephemeral 5 Jul, 2023 @ 1:14am 
Very grateful for this guide, would have never figured out Elizabeth without it :steamthumbsup:
HayateButler  [author] 27 Mar, 2023 @ 8:04am 
That’s correct, you could just run any other shoe that provides some stat boost or have a bonus effect like reduce stumble (as you mentioned).
I would note that in the guide, but the sections have hit their word limit and I don’t think there are any shoe effects that provide a big impact to the overall gameplan, so I left it out.