FAITH
306 ratings
BECOMING A GOOD CHRISTIAN BOY (Strategy Guide)
By Marceloid
A strategy guide for the Good Christian Boy-Achievement, including relevant maps and images.
More combat-oriented with consistency in mind, for those who have already beaten the Unholy Trinity with all of its endings.
22
5
20
2
5
2
2
2
   
Award
Favorite
Favorited
Unfavorite
Intro
MASSIVE SPOILER WARNING FOR EVERY PART OF THIS GUIDE.
You will find a very trimmed-down walkthrough for the good endings here, still.

Welcome to my guide for the Good Christian Boy-Achievement.
If you are reading this, I am assuming you have already fully beaten the game, and want some concrete routing and boss strats for this endeavor.
Here is everything I have amassed in order to beat it, I hope it will help you finish what you started.

Good Luck!

-------------------------------------------------------------------------------------------------------
Endings:

In order to get the Achievement, we will need to get all 3 good endings, which are

- Chapter 1: When Faith Endures; We will shoot Michael with the rifle after pacifying Amy.

- Chapter 2: Go forth with Faith; We will keep Garcia alive during the battle with Miriam Bell and won't commit any major sins (no pentagrams, no luring any children into the church, etc.)

- Chapter 3: A new Journey; We will take down the Unholy Trinity (the 3 secret bosses), Gary, his demon form Astaroth, his wingman Malphas, and finally, burn the vessel of his mother, Miriam.

-------------------------------------------------------------------------------------------------------

I recommend practicing each chapter separately to save time and feel confident in your ability to fully finish a run of each chapter once you try the real deal in Marathon Mode.

-------------------------------------------------------------------------------------------------------
General Combat Tips
These strategies will be used all the time throughout the run!
They should be quite intuitive - you've probably used these in your regular playthrough before:

1. Use the full range of your crucifix. Its effective range is bigger than you might expect, it is similarly shaped to the flashlight cone and can hit enemies from a slight angle, too.
Using the full range of your crucifix also means keeping enemies at a distance, giving you more time to react if something dashes towards you.

2. The middle is your friend. (with few exceptions) Standing close to the middle allows you to react to demons and attacks coming in from the border, where the vast majority of both threats come from.

3. Kiting is an important technique that we will use if a demon chases right after us.
First. we run straight away from the demon until we get some distance from it, and then we quickly turn back around to damage it as it catches up. Before it catches us, we start running again, and repeat the process.
If the enemy moves too fast to be kited, this strategy devolves into just the "running away" part, until the demon has slowed down or switched up its attack pattern.

4. Sidestepping dashes and projectiles that fly in a straight line will help greatly against major bosses - they usually love to use this attack type, but a few smaller demons do as well.
Move perpendicular to - but also alongside the direction the projectile is flying, to give yourself the biggest possible time window to dodge it.
CH1: Snake Meadow Hill Forest
Start up Marathon Mode. Welcome to Chapter 1!

-------------------------------------------------------------------------------------------------------
😈 Michael

Outside, Michael may attack you randomly at any time from the border of the screen.
> React quickly
and ward him off.
-------------------------------------------------------------------------------------------------------

After arriving and parking your car, head 4 screens up and 2 to the right, there you will find a shed with the residence's key inside.

-------------------------------------------------------------------------------------------------------
😈 Michael (again)

> After grabbing the key, don't forget to ward off Michael, who will ambush you from the doorway at the bottom.
-------------------------------------------------------------------------------------------------------

After stepping outside, head back 2 screens to the left and then 2 screens up, and you will reach the house. Step inside.
CH1: Martin Residence
Once you are Inside the residence, make a beeline to the basement, which is located one screen to the north, and then down the stairs on the bottom right.
Move counterclockwise around the boxes in order to get to Amy's first ritual site.
Step atop of it, and Amy will appear - don't worry, she won't attack you just yet, and a cutscene will play, showing Amy creeping up into the bedroom.
As you find yourself there, too, head east into the children's playroom.

-------------------------------------------------------------------------------------------------------
😈 Haunting Amy

- From now on, Amy will start haunting you.

> Point your crucifix towards her spawn points (you should also see blood) to reveal her.

The spawnpoints we'll be guarding are between the two beds and close to the painting,

> Alternate between the children's room and the rec room one screen north, and catch her right when she spawns.

> She surrounds you with 3 fakeouts when revealed, quickly tap your crucifix in all 4 directions to ward her and her fake-outs off.


* After warding her off 6 times, she will retreat to the attic, and open its entrance inside the rec room with her. Head upstairs.
-------------------------------------------------------------------------------------------------------
CH1: FINALE: Amy in the Attic
-------------------------------------------------------------------------------------------------------
😈 Amy

Phase 1:

> As the fight begins, walk up to Amy, and get as much damage in as you can.
> When the grey demon spawns in, keep damaging Amy, and when it gets close, start walking around Amy in a circle (clockwise), then damage her once you have distanced yourself a bit from the demon.


- Later in this phase, a second demon will spawn.

> What I like to do here is to simply run a full lap around Amy without damaging her, so that both demons are basically on top of each other, and the circling strat for the single demon still applies for the rest of this phase.

Phase 2:

- Amy will re-use her fake-out move.

> Again, quickly tap your crucifix in all four directions to find the Amy you can actually damage (she will blink red and make a grating sound)

- After a short time, Amy will teleport behind you, and then dash in a straight horizontal or vertical line at you (depends on her position during the fake-out).

> Sidestep her by walking perpendicular to the direction she dashes in.
> Right after the sidestep, immediately turn back towards Amy to get some further damage in.


Phase 3:

- Amy will draw a pentagram on the floor and dash three times alongside its edges.

- After dashing three times, she will stop and scan the area close to her, indicated by bloody symbols appearing around her on the ground. Keep your distance!

- After five sets of dashes, she will once again stand on the top left star tip, where she started.
Now, she will dash five times once, clearing all edges of the star, starting and ending the attack on the top left star tip.

- Once Amy has fully cleared the star, she will shoot a grey demon close to your current location, and the cycle repeats with Amy dashing three times.


This is my approach to this fight - as long as you don't get too close when she scans the area after dashing, you'll be fine!

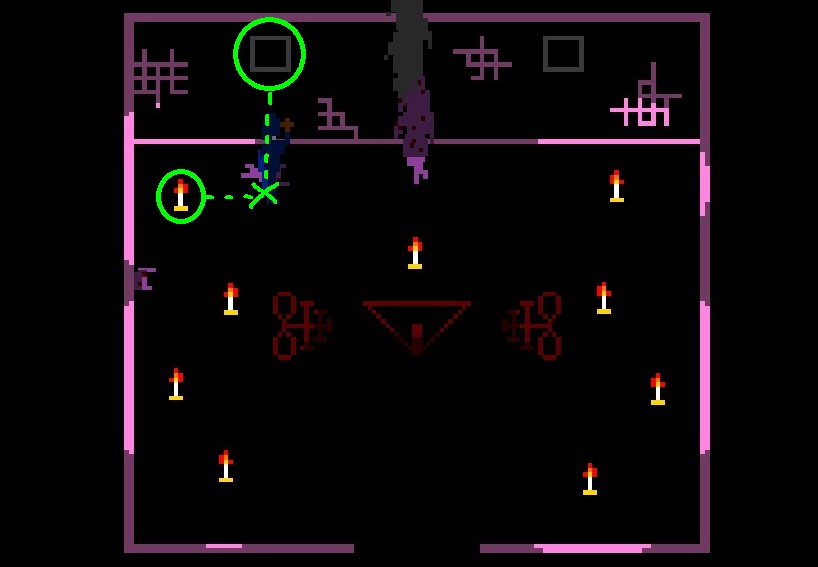
1. Immediately, as she begins drawing the star, head to the left side, move a bit into the top half, then damage her when she comes to a halt.

2. When Amy starts moving, move downwards, right next to the edge of the wall, and look to the right.

3. As Amy starts to dash, immediately move to the right and downwards to dodge her incoming dash, coming in from the left. As she comes to a halt, move up and to the right, just into the bottom tip of the pentagram.

4. As Amy starts moving again, immediately head upwards, just below the window, and a little to the left, to be safe.

5.
After another set of dashes, move just a little to the right to avoid her scan, and then, stand still to avoid the grey demon Amy will shoot right beside your current location, grazing it as it passes by.


- Keep damaging her, and the fight should end here, assuming you did not miss any large damaging opportunities. You can also damage her as she dashes around, if you are already in position.

- If she did not go down, Amy will simply start dashing again, starting from Step 1, so move back to the left if she does.


❗ Final Note:
If you are really struggling with the fast pace of Amy's attacks, collect as many notes as you can before entering the attic - this will slow all of her phases down by a bit.
However, doing this every run may result in a lot of additional cumulative playtime, which I recommend putting into practicing the boss itself instead, but I'll leave that decision up to you.

If you want to grab the Notes, here's a turbo route for 17 quick notes on Chapter Start:

> Start the chapter, get the note close to the car.
> Watch out for Michael, he may attack at any time.
> Walk one screen left and up, exorcize the tree, grab the note.
> Head two screens upwards and one to the left, exorcize the stone formation, grab the note.
> Next, walk two screens to the right, exorcize the well, grab the note.
> Walk one screen upwards and to the right, exorcize the bones, grab the note.
> Walk one screen to the right, grab the note, enter the shed, grab the key.
> Ward off Michael and head out.
> Walk two screens down and exorcize the puddle, grab the note.
> Head three screens up and three to the left, exorcize the tomb, grab the note.
> Head one screen to the right and one screen up, enter the house.
> Grab the note close to the carpet, then exorcize the portrait, grab the note.
> Head one screen up, exorcize the image on the fridge, grab the note. Head downstairs.
> Enter the basement - Head one screen up, exorcize the crib, grab the note.
> Head one screen left and one screen down, grab the note, then summon Amy.
> Grab the note close to you, then exorcize the pink doll, grab the note.
> Head to the right, ward off Amy as described earlier in "CH1: Martin Residence"
> Head to the left into the bathroom, exorcize the rubber duck, grab the note.
> Head right and up into the attic, grab the note on your way there.
> Good luck!
-------------------------------------------------------------------------------------------------------

Amy will see a window of opportunity to escape, so walk back down into the foyer of the residence, and grab the rifle lying there.

Walk outside, and keep heading south.

-------------------------------------------------------------------------------------------------------
😈 Michael eats lead and dies

> Once you get close to your car, shoot the ambushing Michael on the way out.
-------------------------------------------------------------------------------------------------------

After shooting him, Michael will stumble onto the road, the mythical Airdorf Truck will finish him off, and the Epilogue will play. See you in Chapter 2!

CH2: Gallup Cemetery, West
Welcome to Chapter 2!

Play out the Prologue with Garcia, then follow the linear path into the cemetery.
After approaching the mirror inside the spirit house, head outside again, and to the left.
We will need to exorcize all demons in the area to proceed.

In the south, we will meet the Cloud Demon, hiding behind foggy clouds.

-------------------------------------------------------------------------------------------------------
😈 Cloud Demon

> This boss is rather unpredictable in the way it moves from cloud to cloud, luckily there is a safe spot right in the small alcove at the top of the screen, just below the hands.

> For the entire fight, stay as far to the top as possible, and attack by pointing your crucifix to the left or right.
- If the Cloud Demon moves into the top row, it cannot reach you, but you can still hit it from an angle with your crucifix.
-------------------------------------------------------------------------------------------------------

In the north, there is the Maze Demon, requiring you to solve its maze puzzle to find it.

-------------------------------------------------------------------------------------------------------
😈 Maze Demon

Solve the maze puzzle by memorizing the direction each statue is looking in, then entering the maze and going: right, up, left, and up.

- This demon is a reflex check.
- Fortunately for us, it does not have much health.

> Walk up to the altar and raise your crucifix to get some early damage in, then start kiting.
> The demon teleports around you in certain intervalls - and maybe right in front of you - so be
prepared to do a quick 180 and run in the opposite direction once it does.
> If it gets too close, kite it back, but especially then, beware of its teleport.

-------------------------------------------------------------------------------------------------------

After defeating both, head back towards the spirit house, and then to the right,
CH2: Gallup Cemetery, East
After heading east from the spirit house, move to the screen south and pass through the narrow passage, in order to head north again, so you can purify the Purple Skull.
This will open the gate leading to the demon, on your way back there will be harmless - albeit spooky - footprints.

Passing through the gate and heading north, a cutscene will play, showing the Fetus Demon ambushing you from behind a tree.

-------------------------------------------------------------------------------------------------------
😈 Fetus Demon

> Immediately look eastwards and raise your crucifix; It will send the demon off the eastern screen border and deal a lot of damage.
- It will now dash across the screen in a wave-pattern, coming from the left side.
> Standing in the middle, move upwards to dodge it. Move back into the middle after the attack.
- Now the demon will randomly teleport to a location near the border and charge directly at you.
> Sidestep the demon, then damage it with your crucifix as it passes you by.


- If you've gotten decent damage in, the fight should be over. If not, you may have to dodge another wave attack. Rinse and repeat.
-------------------------------------------------------------------------------------------------------

After defeating the demon, head back into to the spirit house.

CH2: Snake Meadow Hill Chapel
Approach the mirror, which will show John ramming the key into his right eye.
Leaving a blood trail, head outside and north.
Walk through the small gate, and keep heading further north.
After encountering a harmless tree, we will arrive at the chapel. Head inside.
Here, we will need to exorcise the Chapel Demon to open the hatch to the basement.

-------------------------------------------------------------------------------------------------------
😈 Chapel Demon

Once you are inside the chapel, you should see candles positioned on the ground.

- Each candle represents a room inside the chapel, it is basically a minimap.
- A candle of a room is lit up if either John or the chapel demon are in it.

- When you switch rooms, the chapel demon will stand still or move to an adjacent room.
- If John and the demon both are in the same room, only one candle is lit, as their position overlaps.

💀 Warning: Switching rooms back and forth in very quick succession will cause the demon to instakill you. Wait for a few seconds before retracing your steps!

> Track her down, and once you are in the same room as her, use your crucifix to scan the area.
- Once revealed, she will screech and teleport around the room three times, then she will dash at you in a straight line.

> Sidestep the dash, then damage her as she passes you.
- She may teleport uncomfortably close to John before dashing, but if you sidestep correctly, you will still be able to dodge her.

- You can also damage her as she is teleporting around, which can speed up the fight significantly.
-------------------------------------------------------------------------------------------------------

After defeating her, head to the central room, and down into the basement, then further to the right.
Follow the blood trail symbols in the correct order, just as displayed on the dial in the room before, clockwise.


Keep moving; Walk up the stairs, and you should find yourself outside. Head a screen down and to the right, and you will find a note.
Pick it up, and run straight into the set-up of the supposed Amy.
Being nothing more than the clump of deformed demon-flesh, head south, east, north, and keep walking towards the bridge.
Further onwards, you will find the entrance to the candy tunnel, and turn back to your human form.
CH2: Candy Tunnel 😋😳
After entering the candy tunnel, head right, up, right, down, and to the right.
Here will be a minor encounter:

-------------------------------------------------------------------------------------------------------
😈 Looksie

- When walking into the room, a cutscene will play, showing the demon appear from behind a pillar.

> Stand still, don't do anything until it leaves the room.
-------------------------------------------------------------------------------------------------------

Once the demon has left the room, head further north, too.
Head into the open sewer grate on the right, and walk left.
Once you have switched screens, walk behind the sewer grate with the two arrows next to it, and head north from there.
Keep following the narrow hallway north and to the right, until you step out of another broken sewer grate.
CH2: Underground Crypt
From there, head south, east, and south again, then pick up the flashlight. Get ready to battle.

-------------------------------------------------------------------------------------------------------
😈 Sewer Demon

After picking up the flashlight, this demon will spawn in the doorway on the way back.

> When you approach him, immediately raise your crucifix, as it takes a little while for him to do his first attack.

- This boss has 2 states: Resting and attacking. He starts off resting, which is why we had time to attack him earlier, and will alternate between states on a timer.

While he is attacking:
- He will taunt you with lines, such as "Here I come, etc."
- He will spawn close to the border and slowly approach you from the dark.

> Stay in the middle, and quickly tap your crucifix in all four directions.
> Look for a moving sprite in your flashlight cone. If you see him, start kiting him.
> He may teleport around, so adjust your movement as required.
> If he blinks away and you can't see him anymore, take a few steps forward into the area you know that is safe and start looking around again.

- His sprite is rather large and twitches a lot, and practically the only thing that moves in the arena, which makes it a lot easier to spot him in the dark.

While he is resting:
- He will teleport to a location close to the border, and stand still for a while.
- He will taunt you with one-liners, such as "I am here, priest, etc."
- This is a great chance to deal damage.

> What I like to do is: Stay in the middle column, move up and down, while shining your flashlight to the left and right.
> Generally, carefully look around the area, his sprite is still twitching around.

-------------------------------------------------------------------------------------------------------

After banishing this demon, head straight north, right into the sewer grate, and follow the hallway until you reach the dark crypt.
Once inside, keep heading north into the first room, and try walking past the seal.
John will say that it is locked, which will be a key factor in getting a key to spawn two rooms to the right.

Walk away from the seal, and enter the room on the right.

-------------------------------------------------------------------------------------------------------
😈 Acolytes in the Darkness

- In here, three red-hooded Acolytes will slowly approach you, but you can shoo them away with your flashlight.

> Immediately after heading inside the room, head north and to the right, and raise your crucifix to exorcize the nun portrait for ~ 2.5 seconds, then scare away the Acolytes that are approaching you from all around, start with the one right below you.

> Finish exorcizing the nun portrait (it will make a distorted, bit-crushed screaming sound), then loop back around the torches in the middle and to the right, into the next room.

> Grab the key, and head back into the room you were just in.

> On your way back, walk left, and then circle upwards around the torches.
* Alternatively, you can enter the room transition from the bottom and walk straight left while squeezing yourself between the torches, too.

-------------------------------------------------------------------------------------------------------

Quickly head north after exiting the room, and unlock the seal. Keep heading north, and Miriam will appear. Father Garcia soon follows to help you exorcize her in the next room.
CH2: FINALE: Nun Miriam Bell
-------------------------------------------------------------------------------------------------------
😈 Miriam Bell

Phase 1: The 91st Psalm

- Garcia will recite the 91st Psalm, while you play his bodyguard.

> Stand right on top of Garcia at all times, and when he moves after reading a passage, follow him closely.
> Protecting Garcia has priority at all times. However, If you feel like you can turn your attention to Miriam for a second, attack her to progress through the phase.
> Again, do not underestimate the range of your cross. It can consistently ward back cultists from a comfortable range, even if they come slightly from an angle.


Phase 2: Darkness

- Miriam will turn the room completely dark, and your vision will be limited to your flashlight's cone.
- Similar to the cultists in the dark underground, Miriam will slowly approach you.
- If you shine your flashlight at her, she will be repelled away while exposed to light.

> Standing in the middle, quickly tap your flashlight in all four directions to look for her sprite.
> Once you have found her, raise your crucifix to hurt her while she is being repelled.
- She will disappear and reappear at a random location close to the border, rinse and repeat.


Phase 3: Takedown

Miriam has a special attack in this phase:

💀 Special (once for each 25% health lost): 💀 Sneak Attack

- This is the only attack that can actually harm Garcia.
Except for this one single move, Garcia is immune to Miriam's entire moveset shown down below.
You may focus on dodging the rest of Miriam's moveset with John, but beware of this attack.
There are indicators once Miriam uses it:


- When Miriam loses a quarter of her health, she will cancel any attack she is currently doing, and the screen will flash completely dark, obscuring the layout of the room in darkness.

- Then, Miriam will teleport to a location close to Garcia and go for the kill by dashing into him. Dealing damage to her before she can start the dash from this attack will cancel it, and the normal moveset rotation will resume.

> Once the screen turns completely dark, be prepared to immediately run up to her to cancel the ambush on Garcia.


Moveset, in this order:

1. 🌊 Wave Dash

- Miriam will dash across the screen, horizontally, in a wave-like pattern, she will start at your vertical level.

> Standing in the middle, immediately move upwards to dodge the wave-dash.
> if you are not in the middle, dodge upwards or downwards - you just need some vertical distance, so choose the side with the most space to dodge.

2. 👻 Fake Out

- Miriam will appear alongside 3 fake-outs around you.
- After a brief moment, if not revealed, she will lunge at - and kill you.

> Similar to Amy, quickly tap your crucifix in all 4 directions to ward her off.

3. 💨 Wild Dash

- Miriam will dash across the room several times.
- The dashes can be targetted either at John directly, or a random location across the room.

> Keep your distance at all times. This way, you will have enough time to react and avoid running into a random dash, or to sidestep one that is directly aimed at John.

4. 🌚 Creep

- Miriam will appear at a location close to John, and slowly move towards him.

> You are faster than her, play it safe, kite her, and run away if needed.
> She may teleport around you, be prepared to change the direction of your kiting when she does.

5. ⭐Star Dance, then start over with 1. 🌊

- Miriam will draw a small star around John, and teleport to its top left tip.
- She will start dashing along its edges, starting by moving down, beginning and ending the attack on the top left star tip.

> Quickly move out of the star to be safe, sidestep the dashing nun if you're late.
* I like to exit the star from the bottom right as it is being drawn, then wrap back around its bottom edge, so I can focus my crucifix damage on the top left of it, where Miriam will stop for a short while after dashing.

-------------------------------------------------------------------------------------------------------

Beating this fight will allow you to proceed to Chapter 3. See you there!
CH3: Clinic Ambush
Welcome to Chapter 3.

Play through the intro cutscene, which details the first visit from John and Father Allred trying to exorcise Amy.
After getting out of bed, head two screens to the right, down, and into your car.

After arriving, immediately move down onto the sidewalk. From there, head left, go through the hole in the fence, and head right - into the side entrance of the clinic.

Once inside, head two screens south and one to the left. Pick up the crowbar at the end of the C-shaped corridor.

Head back to the right, and approach the boarded-up door.
You will be ambushed by a demon and taken away on a gurney.

-----------------------------------------------------------------------------------------------------
😈 Hide and Seek

When being prompted to hide, move your sprite behind the pink curtain on the left.
Let the demon walk in. Once it is examining the body on the top right, head through the middle, and down one screen.

From there, you will be prompted to hide again - hide on the left side between the other three gurneys at the top, until the demon walks away.

-------------------------------------------------------------------------------------------------------

Approach the flight of stairs on the right, and the cop you saw earlier will show up and free you from your restraints.
Being able to freely move again, head up the stairs, and two screens to the north.

-------------------------------------------------------------------------------------------------------
😈 Hospital Demon

- This demon will jump into the room, entering through one of the windows, and then slowly walk towards you.
- Both your crucifix and the cop's gun will deal damage to it.

> Stay in the middle, just below the wall, and point your crucifix at it. Should it get close, kite around the wall. You can also deal damage through the wall in the middle, if it approaches you from above.
> When the demon exits the room through a window, again, stay in the middle. It will pop into the room a few seconds later. Stay away from the windows, and you should be safe.

-------------------------------------------------------------------------------------------------------

After transforming the demon into nothing more than a puddle of blood, approach the main entrance, and remove the barricade.
Once outside, the cop will set chase after some cultists who have set his car ablaze.
CH3: Secret Boss 1: The Mother
We, however, have different plans.
Immediately head back inside the clinic, head two screens downwards, down the staircase on the right, and get back onto the gurney.
Next, move to the left side of the room, right below the locked door, next to the occupied gurneys.
Wait for a short while, and the door will open.
Enter, a cutscene will play, and John will be pushed down a flight of stairs.
Now freed again, stay on the right side, and keep heading upwards.
You will hear a crying baby and eventually reach the Mother.

-------------------------------------------------------------------------------------------------------
😈 The Mother

> Position yourself below the left vent at the height of the candle closest to it, and point your crucifix at her.


- The small babies won't hurt you.
- The babies that can actually hurt you have to transform first by walking into a corner of the room, they have glowing, bright red eyes.

> However, from this position, we will take out all of the latter babies before they even get the chance to transform. Just make sure you keep holding up that crucifix.

-------------------------------------------------------------------------------------------------------

Afterwards, head back outside and into your car (don't get hit by a passing car, please).

Flashback time! Recite the exorcism and bring the parents upstairs when prompted to. Move back down and pick up the crucifix to be sent straight to the second day.
CH3: Hotel Arrival
Just like on Day 1, head outside and into your car - you will arrive at the hotel shortly after.
Enter the building and then the elevator straight ahead.

First, we head to floor 3. Head right, and enter room 3B.
Here we will find the Key to Lisa's Apartment, labeled as 5A. There will be a harmless schpook on the TV as you leave.

Head to 5A next, head inside and use your crucifix on the seal at the door.
After that, head east into the bathroom, there you will find a key to the maintenance door on floor 10. Take it, and head to floor 10 next.

The maintenance room is on the left side - use your key to unlock the door and head inside.
Approach the dumbwaiter on the right side and part ways with your cross. Head outside.
Head inside the elevator, and press any button on its panel.

You will become the victim of an epic non-Christian elevator prank as it takes you to floor 4.
Head outside, to the right, and grab the camera.

CH3: Hotel Blackout
Flash anytime you would like to for now.
Head east, down the stairs, into 3B, and the bedroom north of you.

There is some spooky fluff around this area, you may be teleported into the attic where you fought Amy, but in the end, everything is harmless.

In general, this section is very straightforward - follow the linear path laid out to you.
There are two dangers you have got to look out for, though:

-------------------------------------------------------------------------------------------------------
😈 Altar Cultists

- When traversing the hotel, you will eventually reach the room with a cop poster.
> Do not flash your camera in the room to the left of it, or you will be ambushed by the cultists.
> Keep walking straight to the left, without flashing.


-------------------------------------------------------------------------------------------------------
😈 Looksie Chase

- As you make your way down a hidden set of stairs in a living room, you will reach an U-shaped corridor.
> Keep moving towards the lower half, until the screen turns dark.
> Right away, flash four times, and the Looksie will appear, alongside a rotoscoped animation.
> Keep moving up the stairs and push on through the small maze of crates to shake it off.


-------------------------------------------------------------------------------------------------------

There will be a harmless Malphas jumpscare once you reach the second staircase.
Keep following the linear path, down into the basement. Pick back up your cross.
CH3: Breaking Alu's Curse
After picking up your cross, head to the right. Inside the room, you will find a pink mask.
Use your crucifix on it, and half of Alu's seal will break.
Head left into the room with the candles; A minor encounter is coming up.

-----------------------------------------------------------------------------------------------------
😈 Candle Looksie

- This demon will approach you from a location close to the border while being invisible.

> Stand in the middle. Look for candles lighting up, the demon will be there.
> This demon may teleport next to or behind you - in that case, an audio cue will play. Quickly scan the room for lit-up candles, and point your crucifix in their direction.

-----------------------------------------------------------------------------------------------------

After banishing the demon, head back up the stairs.

As you head back up the stairs, Alu will temporarily possess you, and you will come face-to-face with Malphas, which is luckily harmless, for now.

Before we can free Lisa, we must break the other half of the seal.
In order to do that, head up to 2A. In there, you will find the bloodied dagger you need to purify in order to fully remove the seal.
After purifying it, head back up to 5A, and get ready to face Alu.

----------------------------------------------------------------------
😈 Alu's Possession

- Possessed Lisa will slowly walk towards you.

- You can fight her in the middle as well, but what I like to do is:

> Kite back Lisa to the left side.
> Attack her long enough with your crucifix, and Alu will pop out.
- Alu will now split up and send himself alongside 4 fakes into the 5 empty grey vessels, one Alu for each vessel.

> The real Alu moves faster than his fakes.
> When he pops out, simply focus your attention on the empty grey vessels in the middle and the two on the right. If one of the Alus moves way faster towards them, its him.
> If you did not catch any demon that's faster on the right side or the middle, check the remaining two vessels on the left.

> Either way, use your crucifix on the vessel the fast demon went into - Alu will pop out, and you can deal damage to him.
- After a while, he will re-possess Lisa. Rinse and repeat until he is defeated.


* Should you fail to clearly identify Alu as he dashes to the vessels, quickly run as far away from Lisa as possible.
When Alu possesses John shortly after, you have some breathing room once Alu takes over your body. Mash your movement keys away from Lisa to fight the possession - Alu will try to get John to kill Lisa, and you need Lisa alive to reach the second Secret Boss.
----------------------------------------------------------------------
CH3: Secret Boss 2: The Daughter
Once Alu is defeated, Lisa will run out of the arena.
Follow her out of the room and approach her for a cute little cutscene;
Saving Lisa has also removed the seal blocking the corridor to the secret boss.
Let's head there next! In order to get there, we will need to complete the game of the elevator prankster. Head back into the elevator.

Get to the secret floor by completing the elevator game, which means going to the floors in this order via the elevator:

> 1, 4, 2, 6, 2, 10, 5, 1.

Watch out - on floor 5, there is a chance that you may encounter another demon.

-------------------------------------------------------------------------------------------------------
😈 Pink Elevator Lady

- When reaching floor 5, your second-to-last destination in the elevator game, a pink lady may join you in the elevator.

> Do not point your crucifix at her, she will jump you if you do.
> Ignore her, and proceed as per usual by pressing F1 on the elevator panel.
- When reaching the secret floor, she will ask you where you are heading.
> Ignore her, and quickly make your way out of the elevator.
-------------------------------------------------------------------------------------------------------

Move out of the elevator, head east, and then up. Push ahead through the corridor, and you will find Tiffany, transformed and empowered by the Second Death.

-------------------------------------------------------------------------------------------------------
😈 Tiffany, the Daughter

Remember the Maze Demon from Chapter 2? Well Tiffany is basically that guy, but a lot tankier, and she has a screensaver attack.

> When she teleports around you, kite around her.
- Usually, she does not teleport very close to you.
> Patience is key here. The lower her health gets, the more she will teleport around you, at an diagonal angle with an ever-increasing pace. Don't get baited into walking closer to her, wait for a decent opportunity to arrive, e.g. once she comes only from a small angle.

- After dealing some damage to her while she is teleporting, Tiffany will dash across the room in a screensaver-like pattern.

> This attack is very telegraphed. If she threatens to crash into your location, move away, moving parallel to a border.
> If she herself dashes around the room while moving nearly parallel to a border, take initiative and quickly switch sides should she get close and threaten to sweep you away.


- After defeating her and walking out, she will try to ambush you one last time.
> Do not get caught by surprise here, quickly turn around and point your crucifix at her until she dies.
-------------------------------------------------------------------------------------------------------

After that, head back to the elevator, jump down the holes until you reach floor 7, then immediately head to floor 1 via the panel, exit the hotel, and head to your car.

Flashback time!
Starting in the basement, make your way up to the attic. Ignore the grey spirit sometimes lurking behind the furniture. a cutscene will play once you reach Amy in the attic.
Afterwards, John will wake up back at his house.
CH3: Daycare Investigation
From John's bed, head two screens east and then exit the house to the south, and enter your car.
(Try dodging the letters for a small time save)

Arriving at the daycare, head one screen left and then immediately north, while staying close to the fence.

Walk around the building and enter its courtyard through a hole in the fence on the top left, then
enter the door to your right.

After heading inside, immediately move to your right, and downwards.
Unlock the stairway to the underground by changing the colors of the symbols on the ground.

Red Star, Orange Moon, Purple Chalice, Dark blue Bird.

Push onward, down the staircase that just opened up.

Head through the really loud gate, to the right, and down the flight of stairs.

After arriving at the bottom of the stairwell, head north and keep looking at the image of Miriam until hands grab it and pull it away. Enter the hole that has just opened up behind it.

Keep heading north. Once you reach the intersection, turn left into the chair puzzle room, and then immediately north - don't worry, the cultists in here are hitting vessel puberty and won't hurt you, although they will walk up to you and sign creepy chants.

Here, you will find idols that manipulate the puzzle.
Activate two of them, and then walk back out south, just to immediately head back north again.

Repeat this process 2-5 times, and an acolyte-admin will bless ambush you with a special injection.

The last location during the resulting trip is the attic where John chased after Amy.
Starting from there, head back down south, down the stairs, and to the entrance.

A cutscene will play, showing Amy turning off the lights. This also marks the end of your trip.

Now you are ready. (for Gary's Cognitive Behavioural Therapy-Dungeon.)
CH3: Garyland, West
After waking up, head two screens eastwards and then north, walking past the moloch, until you reach the save point.

Now, we will need to collect three keys for the moloch.

Let's go left first. Head all the way to the left until you pick up the first key, down a small set of stairs.

After picking up the key, head right (the statue room will loop 2 times) until you can see an acolyte.

-------------------------------------------------------------------------------------------------------
😈 Acolyte West

> Carefully make your way past him, hugging the top wall, and you should make it out without any trouble. Don't bother fighting him, it is an unnecessary risk.

-------------------------------------------------------------------------------------------------------
CH3: Secret Boss 3: The Profane Spirit
Now we head to the right side. On our way there, just past the devil's statue, we will come face-to-face with the Profane Spirit.

-------------------------------------------------------------------------------------------------------
😈 The Profane Spirit

- The Profane Spirit will spawn on a random location at the screen border. Do not get caught by it, you are only a little faster and the spirit is quite large.

> Play it safe, when it gets close, change the screen, preferably alternate between the long horizontal corridor and the upside-down T-Intersection with the devil's statue.
> It will retain the damage it has taken even when switching screens.
> Walk a little into the room in case it spawns right behind you. If it does, run to the other end of the corridor, then retrace your steps.

-------------------------------------------------------------------------------------------------------
CH3: Garyland, East
After taking down the Spirit, the Seal of the Unholy Trinity should be fully removed now.
Let's get the key on the right next.

Past the T-Intersection on the right, here you will see a single acolyte standing menacingly in the middle of the room.

-------------------------------------------------------------------------------------------------------
😈 Acolyte East

Just as we've practiced it in the west, we can again walk past him if we just stay out of reach and hug the top wall.

-------------------------------------------------------------------------------------------------------

As we switch screens to the right, we arrive at the Red Light Green Light Game.
Pick up the note so it doesn't get in the way later.

-------------------------------------------------------------------------------------------------------
😈 🔴 Red Light Green Light 🟢


- This key piece is simple, just don't. get. greedy.

A few tips for consistency:

> The white line in the image is the "Point of no Return" (about the pupil of the eye on the wall).
If you are on top of it, and you are running to the left as the acolyte starts chasing you, you will escape him by the skin of your teeth.

> If you get caught walking before the point of no return, run immediately to the left to escape.

> A second demon will spawn once you pick up the key. Make a stop just before the key to get a head start, then stop just before the right torch on your way back.

> Afterwards, just make a run for it to the left once the acolyte turns around. Before his next "Red Light", you are well past the "Point of no Return" and can run to safety.
-------------------------------------------------------------------------------------------------------

But wait! We are not done yet. On the way back, we will encounter two acolytes and take one of them out in order to proceed.

-------------------------------------------------------------------------------------------------------
😈 Return of the east Acolytes:

Practice this strategy beforehand! It feels really satisfying and smooth to pull off, and is one of my favorite parts of the run.
You can respawn the acolytes by switching rooms to the right.

I prefer to take out the bottom one, here is how you do it;

1. After entering the room, move downwards and align yourself with the bottom Acolyte in a straight horizontal line; Keep your distance from it.

2. Look to the left, and slowly inch yourself forward while holding up your crucifix. Stop moving once the Acolyte starts moving on its own.


3. If you have gotten close enough, the Acolyte will slowly move towards you without actually transforming, and you can get some free early damage in.

4. The Acolyte will transform. Sidestep its grappling hand upwards, it shoots out directly once the Acolyte has finished its transformation.

5. Immediately after sidestepping the hand, look back at the Acolyte, and finish it off. It may start charging at you if your sidestep was a little slow, but you will take it down before it can reach you.

After taking out the bottom one, quickly slip into the exit on the left, moving in from the bottom.
The upper Acolyte will start transforming in the process, but it won't be able to reach you if you ignore it and hurry out.
-------------------------------------------------------------------------------------------------------
CH3: Garyland, North
Back at the T-Intersection, we are heading north, for the final key piece.
Head up, left, up, walk past the cages with acolytes in them, and enter the mirror room.

----------------------------------------------------------------------
😈 Mirror Demon

- A demon only visible in the mirror will approach you.

> Head into the very top left corner and point your crucifix to the right. The demon will go down before it can reach you.

💀 Warning: Shortly after spawning, there is a small chance that the demon will teleport a short distance towards you. If it does, circle around it by moving downwards and to the right.
----------------------------------------------------------------------

After grabbing the final key piece, head back down past the cages, then back to the Moloch.

Left, down, right, right past the painting, and down once you reach the save point.

CH3: Nowhere
Enter the Moloch's door by first inserting the keys into the scales on his hand, and finally at the door in the middle itself.

After heading inside, walk down the stairs, and head north.

Follow the linear path to the south until you find a lantern. Wrap around the right-side wall and grab it.

Now, follow the linear path back up.

-------------------------------------------------------------------------------------------------------
😈 Pigeon Lady

- In here are the birb jumpscares.
- At the last one, when the birb is not locked away behind a fence, watch out!
- A cutscene will play, showing a purple girl uncannily approaching you.

> Immediately look north and raise your crucifix to pacify the very weak demon.
-------------------------------------------------------------------------------------------------------

Keep heading north, closely follow the blood trail, and you will reach another door seal.
Let's crack it open!

-------------------------------------------------------------------------------------------------------
😈 A Forest, Nowhere

> Use your crucifix on the seal-holding demons at the end of the blood paths, one in each direction.
> For this one, you just really have to closely follow the blood trails on the ground and eyeball it.
> Stay on your toes, because you might have to circle around a few stray demons that spawned close to the paths. You are faster than them, though.


- You can take a shortcut on the left side, don't get lost on the way back!

No Johns were harmed in the making of this map.
-------------------------------------------------------------------------------------------------------

Enter the Door. Keep heading north, meet Gary and some ominous white guy.
Pick any options during the interview with Gary, which will result in him wanting you to go
not alive.
CH3: En garde! (Gary)
-------------------------------------------------------------------------------------------------------
😈 Gary

Regarding the crucifix retrieval:

- We are going for a kill as safely as possible.
- Do not let yourself intentionally get hit - as tempting as it may sound to get a little extra damage in when Gary is stunned as you pick up your crucifix, I recommend not intentionally going for it, because the crucifix may even spawn directly at the top middle, even behind Gary, which might instantly end your run.

> If you were able to get it back after a hit - by all means, go for the extra damage.

> Again, always try staying close to the middle.
This will give us the best chance to get our crucifix back should it get dropped, because we can cover as many potential crucifix spawns as possible, before Gary can finish us off.
Also, you will not be cheap-shot by a trident spawning in your face, and you will have decent room to dodge Gary's unholy summons.

📋 Moveset:

Gary will choose a random move from this moveset, usually starting with his trident throw.
He may also do the same move multiple times in a row.

🔱 Trident Throw:

- Gary will align himself on the left or right border at your vertical level, and throw his trident in a straight horizontal line across the room, at shoulder level.

> Since we are standing in the middle, we can simply sidestep it.
> When Gary reappears on the other side to catch it, walk up to him and get a little damage with your crucifix in.


👺 Unholy Summon:

- Gary will dash across the room and raise his trident, slowing you while he is facing you.
- A random demon sprite will spawn in a random corner of the screen and slowly fly in a straight line towards your initial location - which was determined when he raised his trident.
- When Gary has lost about half his health, this attack will spawn two, and sometimes even three demon sprites instead of one. However, this won't change our approach all that much.

> When Gary raises his trident, immediately focus on dodging in a straight cardinal direction or sidestepping the approaching demon.
> Once you are out of danger from the demon sprite, sharply turn twice or circle back around the demon (if you sidestepped), and use the full range of your crucifix to hit Gary from the side for a big chunk of damage.

🕷️ RAIN OF SPIDERS

- It is raining spiders. From the top of the screen downwards.
- You won't be able to hit Gary for its duration.


- There will be proportionally more spiders in each row the more damage Gary has taken.
> This is a rather skill-based micro-dodging maneuver. The Spiders may move erratically, so if you can see any opening in their rows, walk towards it, but try staying close to the middle. (This was the attack that dropped my crucifix most of the time)

🤡🤡🤡 CLOWN TIME!!! (low health or extended combat duration) 🤡🤡🤡

- Gary may spawn his clown cameo for a short duration in the upper half of the arena.
- It will move horizontally on the top half of the screen. After hitting the side borders three times, it will leap downwards.
- It will disappear should you drop your crucifix. Also, touching it will drop your crucifix, too.

> No room for negotiations here, move to the lower half to dodge it, and stay in the middle there.
> If Gary throws his trident during Clown Time, hug the bottom wall as he throws it, then move back to your original position. (Hope you were standing middle-ish!)
-------------------------------------------------------------------------------------------------------

Afterwards, Gary will eat Garcia's holy lead and run off into the crucible.

Now, that was the second hardest enemy in the game, and only one last hurdle is in your way - and that is Astaroth. Good job! Give yourself a pat on the back.

Follow Garcia to the Sabbath Altar. Immediately walk on top of the hole in the middle, and enter the crucible.

Turns out the crucible resembles the Martin Residence!
Head to its attic by climbing the stairs on the right, and enter the door on the left once you are upstairs.

Step inside the attic to enter the final arena.

Gary, now Astaroth, will re-introduce you to his mom.
CH3: FINALE: Astaroth's Hate Crime
😈 Astaroth and Malphas 😈

Note: After beating Chapter 3 and continuing from your final autosave in Chapter Select, you will start at Phase 1 of this fight, giving you a great opportunity to practice it. Do so a lot!

GARY DOES NOT LOVE YOU.

Here it is. The true final boss of this run.

Phase 1: Astaroth

📋 Moveset (Astaroth)

⛧ Passive: Satanic Seals, Movement

- These will spawn every few seconds in the direction John is looking, and some will spawn right at your feet, cutting off your path. You cannot walk over them, and if you are not careful - or unlucky, they will trap you and allow Astaroth to corner - and end you.

- We want to give us the best shot to be able to walk around those seals (around the left- and right side, so don't stick too close to the border) while kiting Astaroth, so think of it as if you are walking along the tracks of a flexible ring.

- The ring will allow you to run circles around the arena, which is basically required because the arena is so small and Astaroth so large.

- Astaroth's seals will alter the shape of said ring. Generally, you want to avoid areas enclosed by them, as well as having to squeeze yourself close to the arena border; if one wrong seal spawns in your path there, you may be trapped in a dead end.

- It will also give you a feeling of where you can easily get cornered, so always try to think of it!

- Astaroth will destroy all seals he walks over, so walk closely around them, if they don't lead you into a dead end. Also, if they don't get destroyed by Astaroth, they will vanish on their own after some time, clearing up space as you loop back around into the area they spawned in.


-Example 1: The Ring

-Example 2: Here, there are a lot of seals on the left side, and it would only take one unlucky seal to get cornered (yellow route). Once I reach the intersection, and the left side hasn't cleared up significantly, I would keep kiting in the smaller, green ring. Also, our way to the right past Astaroth's mom got blocked off :(

-Example 3: Still a nice ring to dodge in. If the yellow spot is clear when I reach the intersection, I can walk a nice big lap. If it does appear though, I can closely walk around the upper seal to let Astaroth destroy it once he rebounds from the right side. The bottom right corner is a death trap waiting to happen.

TL; DR: Circle around the arena, don't trap yourself close to the arena border or in areas cluttered by seals, and bait Astaroth to walk into the seals, if an opportunity arises.

This is how I personally think about my movement during this battle, so take this Ring strategy with a nice grain of salt; Improvise and adapt your own movement preferences as you see fit.

For his other two attacks, Astaroth will always stop in his tracks and wind up.

> Get some good distance while being within reach of a safe spot for the screensaver attack - or to be able to sidestep once he lunges at you.
- Safe spots for the screensaver attack are behind Astaroth's mum, and at the very bottom middle.


🦈 Lunge:
- Astaroth will stop in his tracks.
- After a short windup of ~2.5 seconds, Astaroth will charge to your location in a straight line.

> Sidestep or keep running away in a straight line! You will need to get some distance from him, because Astaroth's hitbox is massive.


📺 Astaroth's Screensaver

Yes I know, it's not really an ordinary screensaver. It's Astaroth's one, duh.

- Astaroth may limit your field of view for the duration of the attack. If the room darkens as he winds up, you instantly know it is the screensaver attack.
- Astaroth will wind up for ~4 seconds, longer than for his lunge.
- Astaroth will wildly dash across the room from left to right - and vice versa.

> This attack is very fast and unpredictable. Quickly try to get to one of the two safe spots.
> Don't forget to point your crucifix towards the middle to deal a bit of extra damage.


- If the safe spots are blocked, generally, the very top and bottom are safer than the middle.

> Right after each attack is a good opportunity to get some extra damage in, as Gary will stand still, or approach you from a distance.

Once you have dealt enough damage to Astaroth, he will freeze, and Malphas will enter the arena.


Phase 2: Astaroth + Malphas

Once we enter Phase 2, one of two things will happen:

1. Malphas spawns on the left side! 🙂
> This means we have a few seconds to reposition ourselves right above the left torch and get massive damage in on Malphas, while not having to worry about the arrows.
When Astaroth arrives, we can hit both for a short time, stay close to the bottom, and walk right to dodge the incoming arrows, then upwards to dodge Astaroth and weave in between the next batch from Malphas.


2. Malphas spawns on the right side... 😬
- Malphas will spawn almost instantly
> Salvage the situation by quickly walking to the right torch and getting a bit of damage onto Malphas from below, just before Astaroth demands back full attention.
Quickly walk to the left and stick to the bottom side to dodge the batch of arrows Malphas will be shooting at you, then walk upwards to dodge Astaroth and weave in between the next batch.


> Afterwards, you will need to improvise again; Your seal spawns may vary a lot.
> Depending on their positions and distribution around the arena, you can keep kiting around in the bottom half, or you have to loop around at the top and weave in between a batch of Malphas' arrows. Again, if it helps you, think of the Ring!

Generally spaking:

- Try to end this phase as quickly as possible. Moving below Malphas is definitely worth it, as you can deal massive damage to him in one go.
- Malphas will not move past the torches, so if you stay in the bottom third of the arena and on the side he is shooting from, he won't be able to reach you with his arrows.
- Malphas will switch sides after shooting three batches of arrows.
- After having switched sides once and shooting his arrow batches, Malphas will directly charge at you from the top of the screen and try to stomp onto you. This is a great opportunity to deal damage to both Malphas and Astaroth, who will still be chasing after you.
CH3: FINALE: SUPER MIRIAM
The worst part is behind you, time for the epic finale!

At the end of Phase 2, Astaroth and Malphas will fuse together with Miriam's body, forming the true final story boss, SUPER MIRIAM.

Here, thanks to the power of John's faith and determination, we can get hit ten times before we die.
This breathing room, combined with SUPER MIRIAM's spectacular attacks, makes way for a really fun and unique final story boss to conclude the trilogy.

Also, SUPER MIRIAM's battle theme slaps. Let's take her down!

-------------------------------------------------------------------------------------------------------
😈 SUPER MIRIAM

First of all, after dealing enough damage to her, the demons will split apart, which is your cue to quickly light yourself on fire using one of the torches, and then run straight into Miriam's body to end the fight. (Miriam is the nun in the middle)

> Don't mess this up: If you don't make it to Miriam's body in time after setting yourself on fire, you WILL INSTANTLY DIE.

Moveset, in this order:

My God, take this cup from me...

➡️ Arrow Rain

> Move close to the right side of the screen to dodge most of the arrows.
> Weave inbetween the skull-circle or tank it, more on those later.
> Sidestep the single fire ball whilst staying on the right side.


This abomination's power is too great.

🚧 Detour:

- Starting from the top left, SUPER MIRIAM will dash on an U-shaped path across the screen.

> Luckily, you were already standing on the right side border of the screen and automatically dodged it.
> Deal lots of damage to her, as she will hover around at the top right corner for a while, before returning to the middle.
> When SUPER MIRIAM moves back into the middle, immediately move upwards, right beside her, and keep chugging in the damage.


And yet, it is not the end...

💥Skull Bombs

- SUPER MIRIAM will fire skulls downwards, which will splinter up into 8 skulls each.

> This attack is basically trivial too, as you are standing close to the top. You may have to dodge one or two stray skulls, but that's about it. Time to deal damage!

Perhaps some divine intervention at last?

🔘 Variant: Skull Rings

- SUPER MIRIAM will send rotating rings of skulls at you.

> The trick here is to aggressively dodge through the gaps between the individual skulls, which means actively walking towards the middle of each ring once you see an opening.
> If you react early, and the ring flies in a convenient direction, you can also sidestep the entire ring!

Yes, Lord, I feel Thou art with me.

⭕ Fire Ring

- After firing her Skull Bombs (or Rings), SUPER MIRIAM will move back into the middle, and summon a fire ring that closes in around her.

> Stay right beside her as she moves, so you can keep dealing damage to her as the circle closes in.

> She will also hover around the middle and shoot skulls directly at you from the screen border, so make small sidesteps within the circle as needed.

Thy saving grace transfigures me.

💀 Bullet Hell

- An unusually high amount of Skull-Danmaku will fill the screen, as SUPER MIRIAM dashes from left to right at the top side of the screen.

> Graze the Danmaku while looking north to damage SUPER MIRIAM (fun).
> Alternatively, move into the top right corner once the attack starts, so you don't have to worry about the skulls, and can deal free damage to her once she comes close to the right side.


The power to save myself and those i love.

🔥 Flame Thrower

- SUPER MIRIAM will fire directionally aimed fire balls straight at you, emerging from the corners on the top half.

> Move back into the middle when SUPER MIRIAM winds down after her Bullet Hell attack.
> Stand still for as long as possible. Then, just before the flames hit you, move horizontally in a straight line to dodge the incoming flames.


- This is usually where the battle ends and you get a chance to burn Miriam's corpse, ending the fight.

But alas, I can't go on like this forever.

🖥️ Off-Screen Detour, then start over with ➡️ Arrow Rain.

- SUPER MIRIAM will exit the arena via the top of the screen, and shortly after come barreling through the middle - from left to right, or top to bottom.

> Move diagonally away from the middle, and she won't be able to reach you.

The spirit is willing but the flesh is weak.
How often we forget... Faith without works is...
𝐌 Ꚛ 𝐑 𝐓 𝐈 𝐒 .

Finally, put Amy to rest, and drive away with either Garcia or Lisa, both options will count as a good ending.
Thank you for having FAITH!
Thank you for reading my guide! I hope it aided you in your quest to become a Good Christian Boy.

If you found this guide helpful, please consider giving it a like to help support my work. And if you have any feedback or questions, I'd love to hear them in the comments below. Thanks!

Shoutouts to Hiei1020 for pointing out that exorcising the Elevator Demon is not required to get to Tiffany and an additional note regarding SUPER MIRIAM's offscreen-attack.

Shoutouts to Duke Reeves for pointing out that the Chapel Demon can instakill you if you switch rooms too fast.

Shoutouts to Monke Pogger for improved route suggestions regarding the section with the Acolytes in the dark crypt and correcting the final step in the elevator game.

Shoutouts to Poisoned for pointing out that the Mirror Demon in Chapter 3 can teleport towards you.

Shoutouts to god tier trunk sama for suggesting an alternative, more consistent strategy for the Mother boss fight.

Shoutouts to Slavic cloaker for pointing out that collecting Notes in Chapter 1 will slow down the Amy boss fight.

Lastly, thank you Airdorf for creating this amazing trilogy of Indie Horror *chef's kiss* 👌.
113 Comments
Marceloid  [author] 15 Apr @ 6:14am 
Congratz, way to go! I'm glad the guide could help ya out. :faithjohn:
Garmfild 15 Apr @ 1:04am 
Would not have gotten the achievement if it weren't for this guide, thank you so much!
GoZaRaNii 8 Mar @ 10:16am 
I finally made it! :cupup: :papyruswacky:
thank you! it was reeeeeaaally helpful
Kamilsgg 6 Mar @ 11:19am 
I almost got it and at the end gary hit me and the cross spawned on top middle and I died, that was my only death brooo
Nameless 5 Mar @ 5:49pm 
just so you know, author, garcia points to where the real miriam is in the final step of battle, i found this out during my practice runs for completing this achievement :faithgarcia:
Marceloid  [author] 3 Mar @ 1:35pm 
I sure hope it will be, good luck! :Ashhat::faithmikey:
kav 3 Mar @ 12:06pm 
Thanks bro, this is gonna be really helpful :GDNormal::faithgoldcrux:
the 18 Feb @ 4:49pm 
:faithjohn: :faithgarcia: moment
Marceloid  [author] 13 Feb @ 6:40am 
👁️👄👁️ 👉👈
Th-Thabks, great job on the GCB run. ^^
Delago 12 Feb @ 6:27pm 
Deus benedicat tibi, amen