Warframe

Warframe

159 ratings
Wisp
By Finni and 1 collaborators
Mod Build Suggestions focused on High Ability Strength.

This guide also includes topics like:
  • Helminth System
  • Focus Schools
  • Archon Shard System
Forma count on screenshots is not representative.
2
2
3
   
Award
Favorite
Favorited
Unfavorite
Overview
Gameplay

"Wisp Prime's gilded splendor haunts the battlefield.
Allies welcome her interdimensional beauty."
-Wisp Prime In-game description

  • Wisp is a diverse, comfortable and rewarding Warframe. Her abilities make her viable for every mission. Neither its type nor level matter that much to her.

  • Her Reservoirs are providing defensive as well as offensive buffs. No matter the situation nor the playstyle, Wisp always offers a lot, even when solo. Use her Reservoirs for traversing the map or speeding your attacks. Use the additional health for tanking or go invisible by going airborne, while stunning enmies passively around.


  • Her passive ability and reservoirs are enough to make her an untouchable guardian and killing machine at once. Every other ability thrown into the mix as well and you have a frame that offers enough from everything.

  • Wisp offers gameplay that is both easy to access and deep in mechanics allowing you to improve over time, while also being useful and fluid allowing. Which allows you to adapt to everything that is thrown at you. To sum it up Wisp is a Warframe that always works.

This guide provides a non Archon Shard build and several variations to it, that should help in most if not all situations. Below that is a newer version that includes Archon Shards. Both work well, however if you have access to the Archon Shard System, you might just do a quick skim through the parts prior to it and focus on that instead.

This guide focuses on high ability strength and is not beginner-friendly.

If you wonder why high power strength builds are so well-liked on Wisp, it's because Warframe prioritizes strength over any other stat and it will overwrite the other stats with the motes that have the highest ability strength to it.

It also decides whether your buffs give a small boost to your Warframe's stats or turn a slow or fragile Warframe into a speedy tank, making higher level content more accessible for everyone.

This means if you have two Wisps. One with 200% strength and one with 300% strength. You will get the 300% strength motes applied even if they have only half the duration compared to the 200% strength one.

Worth mentioning is that these require a lot of Forma and specific mods, that aren't easy nor fast to obtain/level up, so if you're not willing to spend some platinum, than you will have to spend time, at least as a new or mid level player.


The base (mod.) strength of this build is at 370%
The base (mod.) strength of the Archon Shard build is at 355% to accommodate for Archon Stretch. Increased up to 400% by Crimson Archon Shards

Don't hesitate to ask questions. I would like to help finding an answer to them.
If you have your own build and you feel more comfortable with that, then feel free to see this just as useful information on how a different set up could look like.

Important Note: The amount of Forma in my screenshots isn't always representative for the amount of Forma you need. It can be significantly lower.
Abilities
In case you are well informed in terms of her abilities, then feel free to just skip to the end of this part or skip it even entirely.
Reservoirs
Wisp can choose between three reservoirs (Vitality, Haste, Shock) and place up to six of them.
Vitality: gives health and health regen. The health regen amounts to 10% of the added health.
Haste: gives movement speed, fire rate and attack speed increase.
Shock: targets up to five enemies around you, shocking them and guaranteeing an electricity status effect.

Wisp's reservoirs are her signature ability and the main reason to mod her for high ability strength, since the vitality and haste mote benefit gretly from this.
Her shock mote doesn't benefit from it, however the biggest benefit from the shock mote is the crowd crontrol and the additional status effect for condition overload and gun co, which doesn't need ability strength.

Wil-o-Wisp
A spectral image of Wisp, which gives Wisp invisibility and when teleporting to it, Wisp also gains invincibility for three seconds. Her Wil-o-Wisp ignores lasers and sensors, therefore not triggering alarms. Additionally her spectral image does spawn breach surges as well.
This ability is great for spy missions and has decent utility for mobility, crowd control and survivability.

Breach Surge
Wisp opens a dimensional breach. Enemies hit by it are blinded for a short duration and release surges that are triggered by damage. Theses surges amplify the damage by multiplicator that is affected by power strength. They also have a chance of afflicting radiation procs when hitting an enemy.
This ability is her helminth ability. It has the potential of massive amounts of damage in addition to its good crowd control.

Sol Gate
Wisp opens a portal to the sun. Holding left click will double the damage. Further damage increase comes by having the reservoir buffs active on Wisp.
This ability is useful for Sortie level kinds of missions, but is besides that merely an impressive looking meme ability.
However this makes it great for being replaced by an helminth ability.


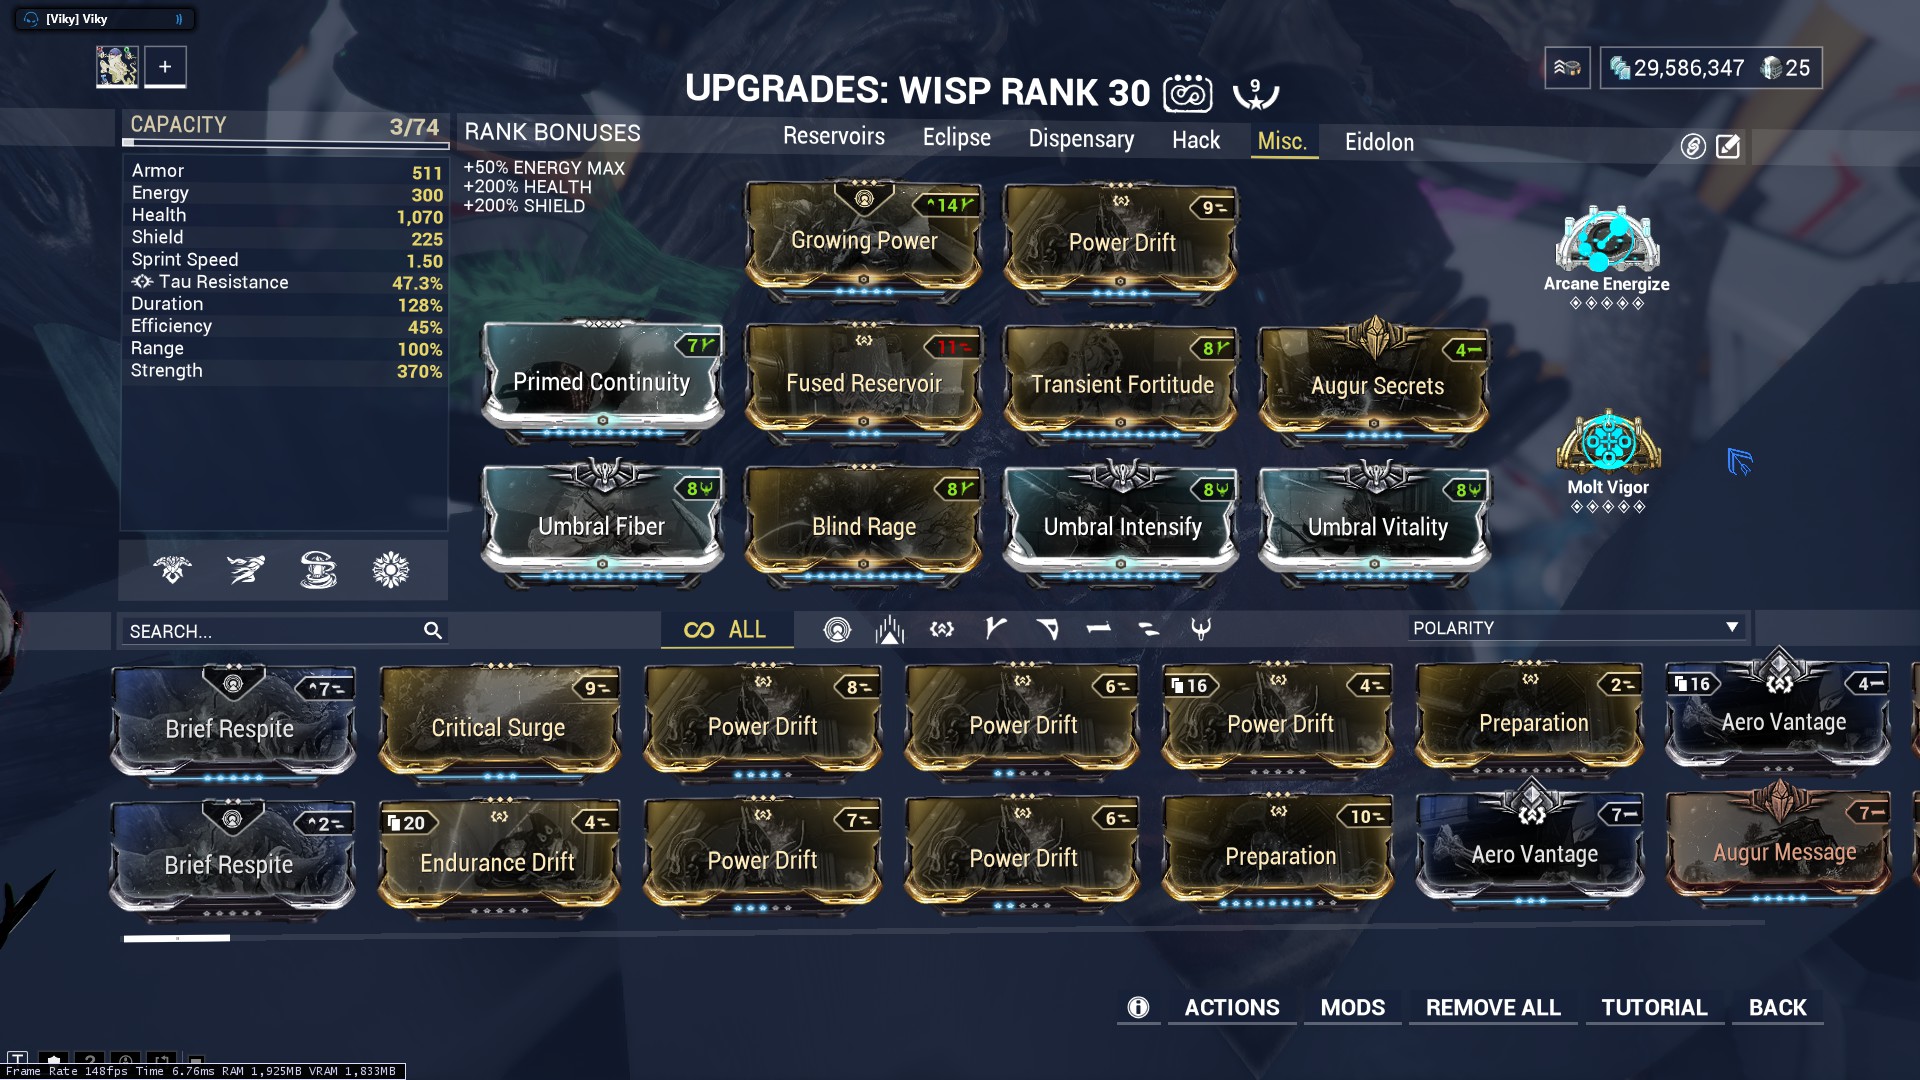
The base build

This build doesn't include (Primed) Flow, but Wisp's energy reserve of 300 is enough. The only trouble you can run into is only one. Which is the Energy Reduction modifier from Sorties. It will cut down your reserve to 75 preventing you to use the Fused Reservoir with this kind of efficiency.
You either have to use Streamline, (Primed) Flow or use a kitgun with Pax Bolt, since it will give you enough efficieny to cast the the Fused Reservoir.

One important fact about the Fused Reservoir Mod is that it counts as one cast, which is crucial for Molt Vigor, since its buff applies only for the next cast. Fused Reservoirs therefore saves a huge amount of time. You can of course put in another mod for even stronger reservoirs, but this means casting an operator ability, applying a status effect for growing power and then casting the single reservoir and this up to three times in order to apply the Vigor Buff to every reservoir(two times if you ignore the Shock Mote).
It can be done, but it also makes it more complicated for a small increased payoff.

Chaining GP, Void Sling and Vigor Buffs
This is about casting the reservoirs with all buffs active.

I apologize for the low quality of the image. Due to steams restriction of 2mb for image files I had to lower the quality and frames.
This information is just in the case of you having problems to remember and execute the necessary steps in order to activate the (1.)Madurai Void Sling, (2.)The Molt Vigor and (3.)Growing Power Buff.
You should use a weapon with high status chance.

I recommend using the second Madurai ability (Contamination Wave) for triggering Molt Vigor. It's fast, it debuffs enemies and doesn't have a cooldown or any sort of restriction.

Forma Count
For the shown set up you will have to use Forma 7 times, if you include the Aura and you are only using 2 Umbra Forma. You already have one Madurai polarity on Wisp.
Which would be: four Forma to get in Blind Rage, Transient Fortitude, Primed Continuity, Power Drift and Fused Reservoir. One Forma/Aura Forma for the Aura Slot and two Umbra Forma to get in Umbral Vitality, Umbral Fiber and Umbral Intensify.
Helminth Abilities and Synergies
There are a lot of abilities, that work fine on her. The most used (considering the general use) one's like Gloom or Roar included.

The options I'll give are just my personal preferences and are maybe already part of your kit, like Eclipse or Dispensary.
For those who don't use them, I'll give an explanation to why you could/should use them.

The three Helminth builds I'll explain to you are build around: Pillage, Eclipse and Dispensary.
The modding part is basically the same, since they profit off high ability strength.
I'll start with Pillage, since from my experience it's the least used Helminth ability on her out of these three in terms of other Wisp player choices, while also being the one with the best scaling potential.


If you don't know what the Helminth System is and how it works than click on this[warframe.fandom.com]

Note: I'm always using Madurai in these builds.
Note 2: A different version of the pillage build can be found in Archon Shard Build section.

Pillage
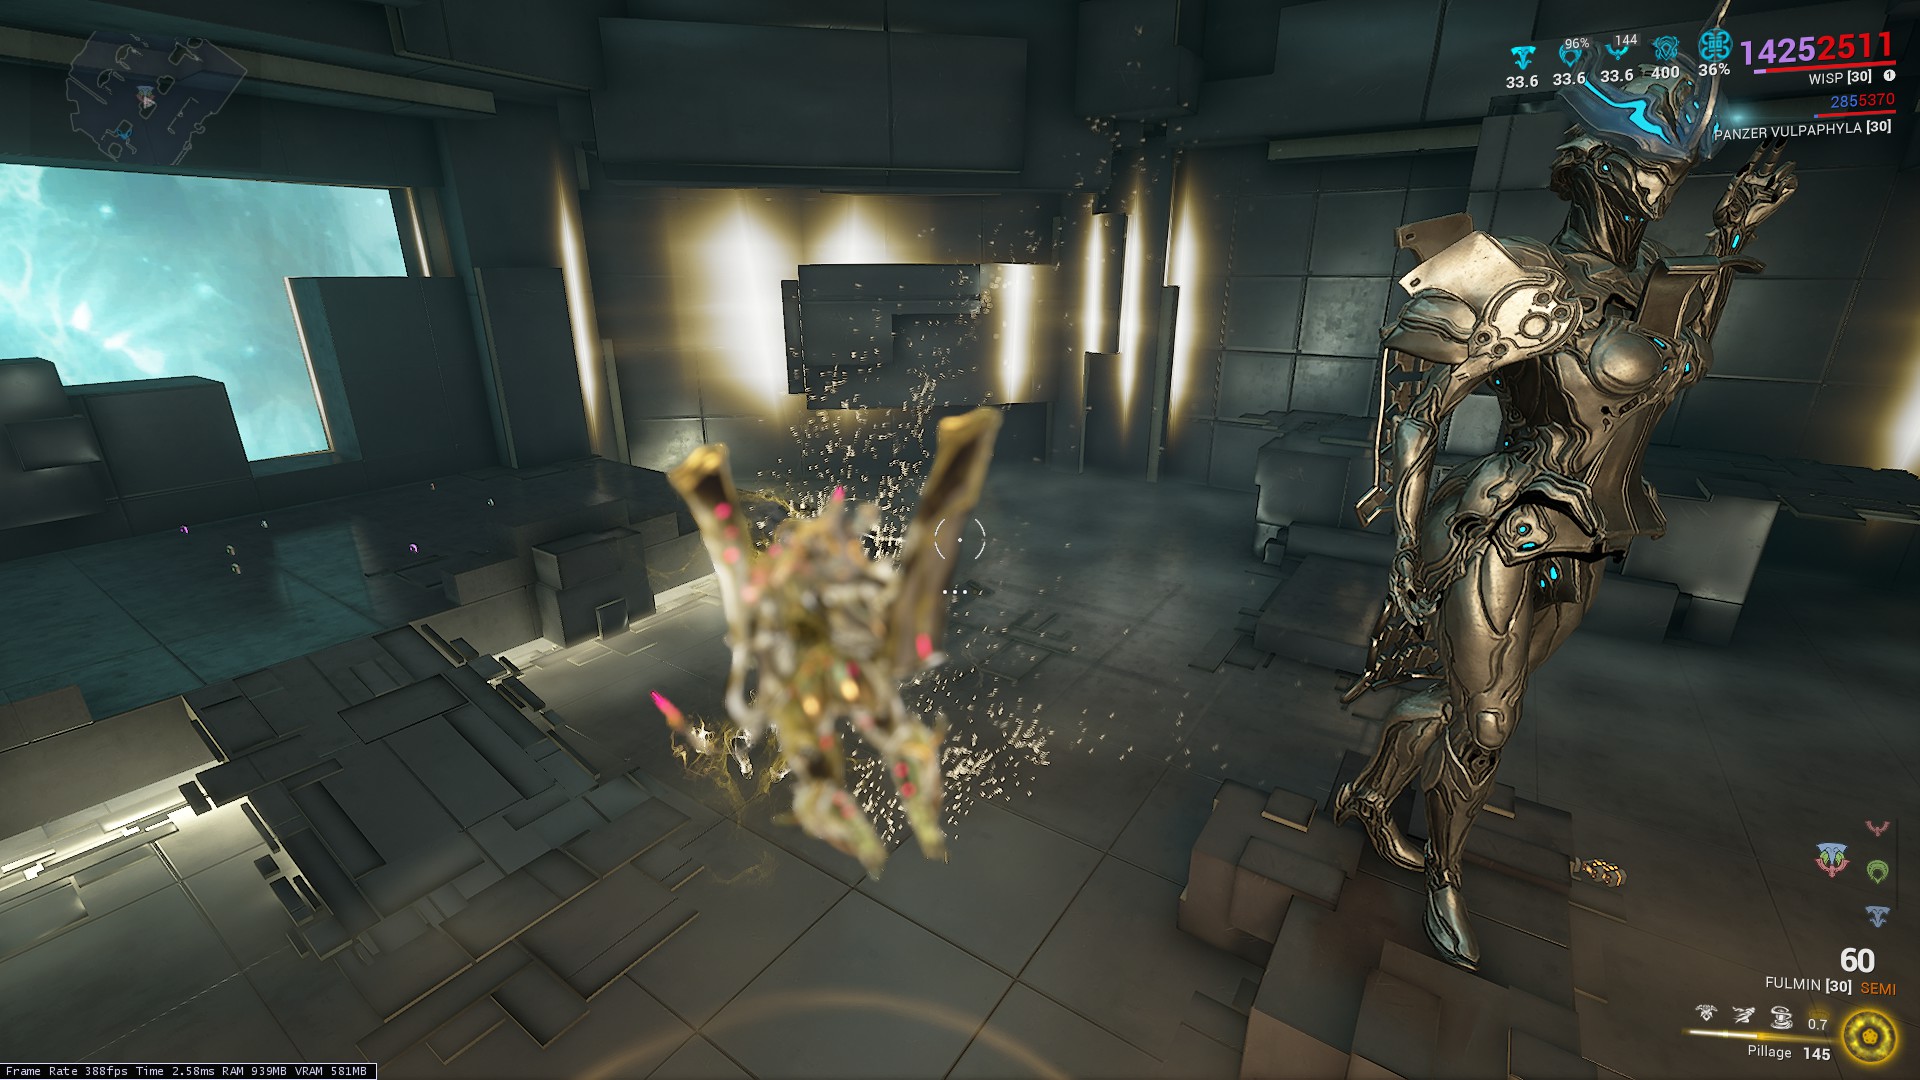
Originally coming from Hildryn, this ability works perfectly with a high ability strength Wisp (and imo the best subsumed ability for her).
Pillage removes a portion of enemy defenses and gives it back to you in form of shields. It also cleanses you and nearby allies from status effects.
This means that Pillage is essentially an infinite scaling support/defense strip ability. It allows you to strip even level 9999 steel path grineer and corpus off all their armor and shields.
Note: Pillage doesn't work on most bosses and it only removes armor of Demolysts.
Making high level enemies a joke is one thing. Having the ability to renew your shield gate and remove annoying status effects like toxin, heat or electricity is another dimension.
The survivability aspect of the ability is at least as useful as the defense strip for Wisp.

Why? Because you can cast this ability in the air. So basically you are invisible and therefore most of the time untouched, you're removing all defenses from the enemies within that room and because of the additional small time window you get in comparison to other defense strip abilities, you can readjust your positioning in the air to make sure to cover as much area as possible and at the end of it you have weak enemies, who are probably either dead or stunned (bc of your shock mote) and you're cleansed of any pesky status effect with overshields and shield gate ready.
Summed up, you are invincible with this strategy, without much modding or set up. This strategy requires you to pay attention to your surroundings and your energy economy without burning you out mentally in the long run. It is comfortable enough to become an easy to remember routine when using this setup and it will to go in to your muscle memory. Combine this with being airborne a lot, good energy management and you will be unkillable.
The Build
The important number on this build is 370% ability strength. Combine this with the 25% ability strength increase from Growing Power and you will remove 98.75% of the enemy defense. This combined with corrosive and heat will allow you to reduce the enemy armor to a tiny bit at around 0.1% of the original armor value. Even steel path enemies will have basically no important damage reduction at that point. Which allows you to get massive amounts of bonus damage against ferrite armored targets when using Corrosive and a good amount of damage against alloy armored targets.
Of course you can also use the sling strength buff of Madurai to get 40% more ability strength for 20 seconds to remove all defenses (always recommended on Corpus, because of Shield Ospreys). Using viral like most players do, not only do you get the bonus damage of the status effect applying but also the bonus damage against Orokin.
Whatever you choose you will get tons of (bonus) damage. A win/win situation.
(outdated)
It only lacks utility against Infestation.

One important tip when fighting Corpus: Use Breach Surge before you use Pillage. The removal of shield counts as damage to them, so the amount of shields stripped will be partially converted into radiation surges that deal massive amount of damage based on the removed shields. Fixed/Nerfed with the 1999-Update
-------------------------------------------------------------------------------------------------------
Helminth Abilities and Synergies II
These builds are just extras and more commonly used. If you are already familiar with them feel free to just skim through it.

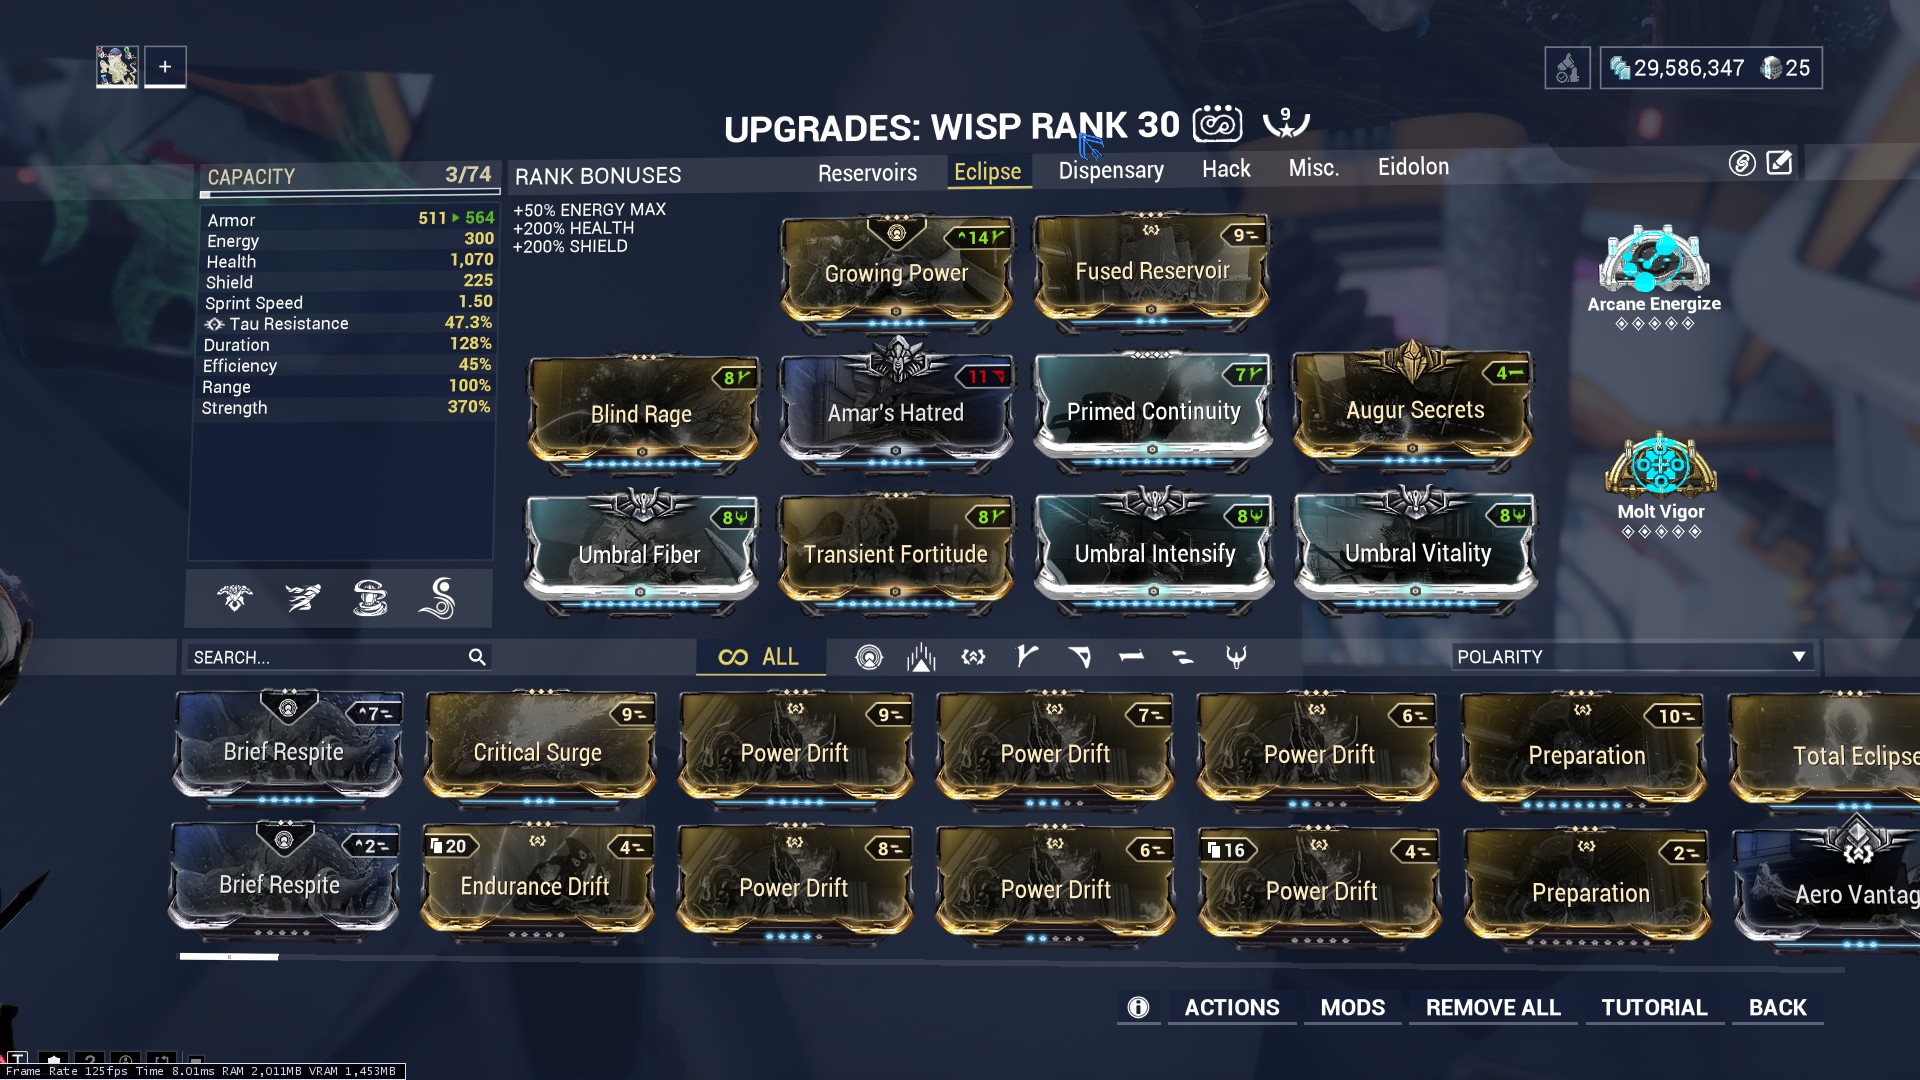
Eclipse
A good alternative is Roar, as it counts for teammates around you as well and is more consistant considering the damage buff. Turn off dynamic lighting in your settings to make Eclipse more reliable and effective.//
Originally from Mirage, this ability will be your main source of damage amplification to take down bosses like the profit taker, the Eidolons or any kind of boss you struggle with, if you have access to a source of light, of course it is also a great damage amplifier for normal or steel path missions.
Are there better ways in terms of damage, when dealing with bosses?
Yes, but on other frames, like Chroma. This is about Wisp and this frame combines survivability, speed, fire rate and damage. A strong Jack of all Trades.
The Build
Molt Vigor can be used in short missions, but is also a placeholder for other arcanes. For example during Eidolon Hunts I would recommend to use Arcane Nullifier, together with Arcane Avenger or Arcane Momentum instead and in endurance runs Molt Augmented would be much better.
With 370% ability strength you will have an up 555% damage buff. With the Growing Power, Madurai and Molt Vigor buff applied you will have an up to 720% damage increase.
Note: It's recommended to turn off dynamic lighting (Options->Video->Advanced), as this will increase the damage value you get off the Eclipse damage buff, since its effect is affected by the intensity of the light source.
Eidolon version
Transient Fortitude is replaced by Hunter Adrenaline for two reasons. First being to increase the ability duration, to make sure the buffs are longer active on your lures and teammates. The second reason is to save on Energy Pads. You can keep Transient Fortitude, if you want. This version is the more economical and simple one. This build also revolves around using a sniper rifle for damaging the limbs.

-------------------------------------------------------------------------------------------------------

Dispensary
Originally from Protea, this ability will underline your role as support, by giving yourself and your team universal ammunition, as well as energy and modified health orbs, which synergizes well with arcane energize and Equilibrium.
With this build you can't go wrong and it will make you the best and only support your team needs.
It will also assist you in leveling your archgun's as it provides you consistantly with ammo.
It is also the easiest of all the builds, since you don't need to keep anything in mind. You can just spam it the whole time. This is more of a build that revolves around you supporting your teammates.
This build is also very useful for Railjack since you don't need any ressources nor energy pads, in order to keep spamming your abilities.
The Build
Again one of the Arcanes can be seen as placeholder. I used Molt Efficiency instead of Arcane Energize, because most of the time a teammate has Arcane Energize and with Molt Efficiency you get enough duration to get three drops of energy instead of just two drops. This will give another chance of getting three energy orbs instead of just two, because with all ability strength buffs active you will have 120% exra pick up chance. It means you will always get two and sometimes three drops.
Effectively this gives you between 150 and 175 energy from one use. Coming out to an effective energy gain (considering the energy cost for one cast of Dispensary) between 33.75 and 58.75 energy per cast for you alone.
Again you could use Arcane Energize as well, which would give much more energy out of these two drops of energy orbs. This build with Molt Efficiency revolves more around the case of a teammate having Arcane Energize.
Archon Shard Options
There are three different types of Archon Shards

Azure (Blue): Defensive Buffs; the only important buff regarding Wisp is the increase to the energy capacity, as 375 capacity instead of 300 makes your energy economy significantly more comfortable to manage.

Amber (Yellow): Utility Buffs; these add flavor to Wisp and are more important if you are maining Wisp like me, since they make playing her more comfortable and fun. Two buffs are very much worth considering: Parcour Velocity and Increased Energy Orb Efficiency.

Crimson (Red): Offensive Buffs; increasing Wisp's Ability Duration and especially Strength is crucial for her kit, helping you and your team. No further explaination needed.

Now the choice is up to you obviously. However the build I'm feeling most comfortable right now is:
2 Amber Shards and 3 Crimson Shards (all Tauforged)
The Amber Shards improve the capabilities of Wisp, while the Crimson Shards her abilities providing as much value and longevity for me personally.

Another version close to that would be to replace one Crimson Shard with an Azure one, for more energy capacity.
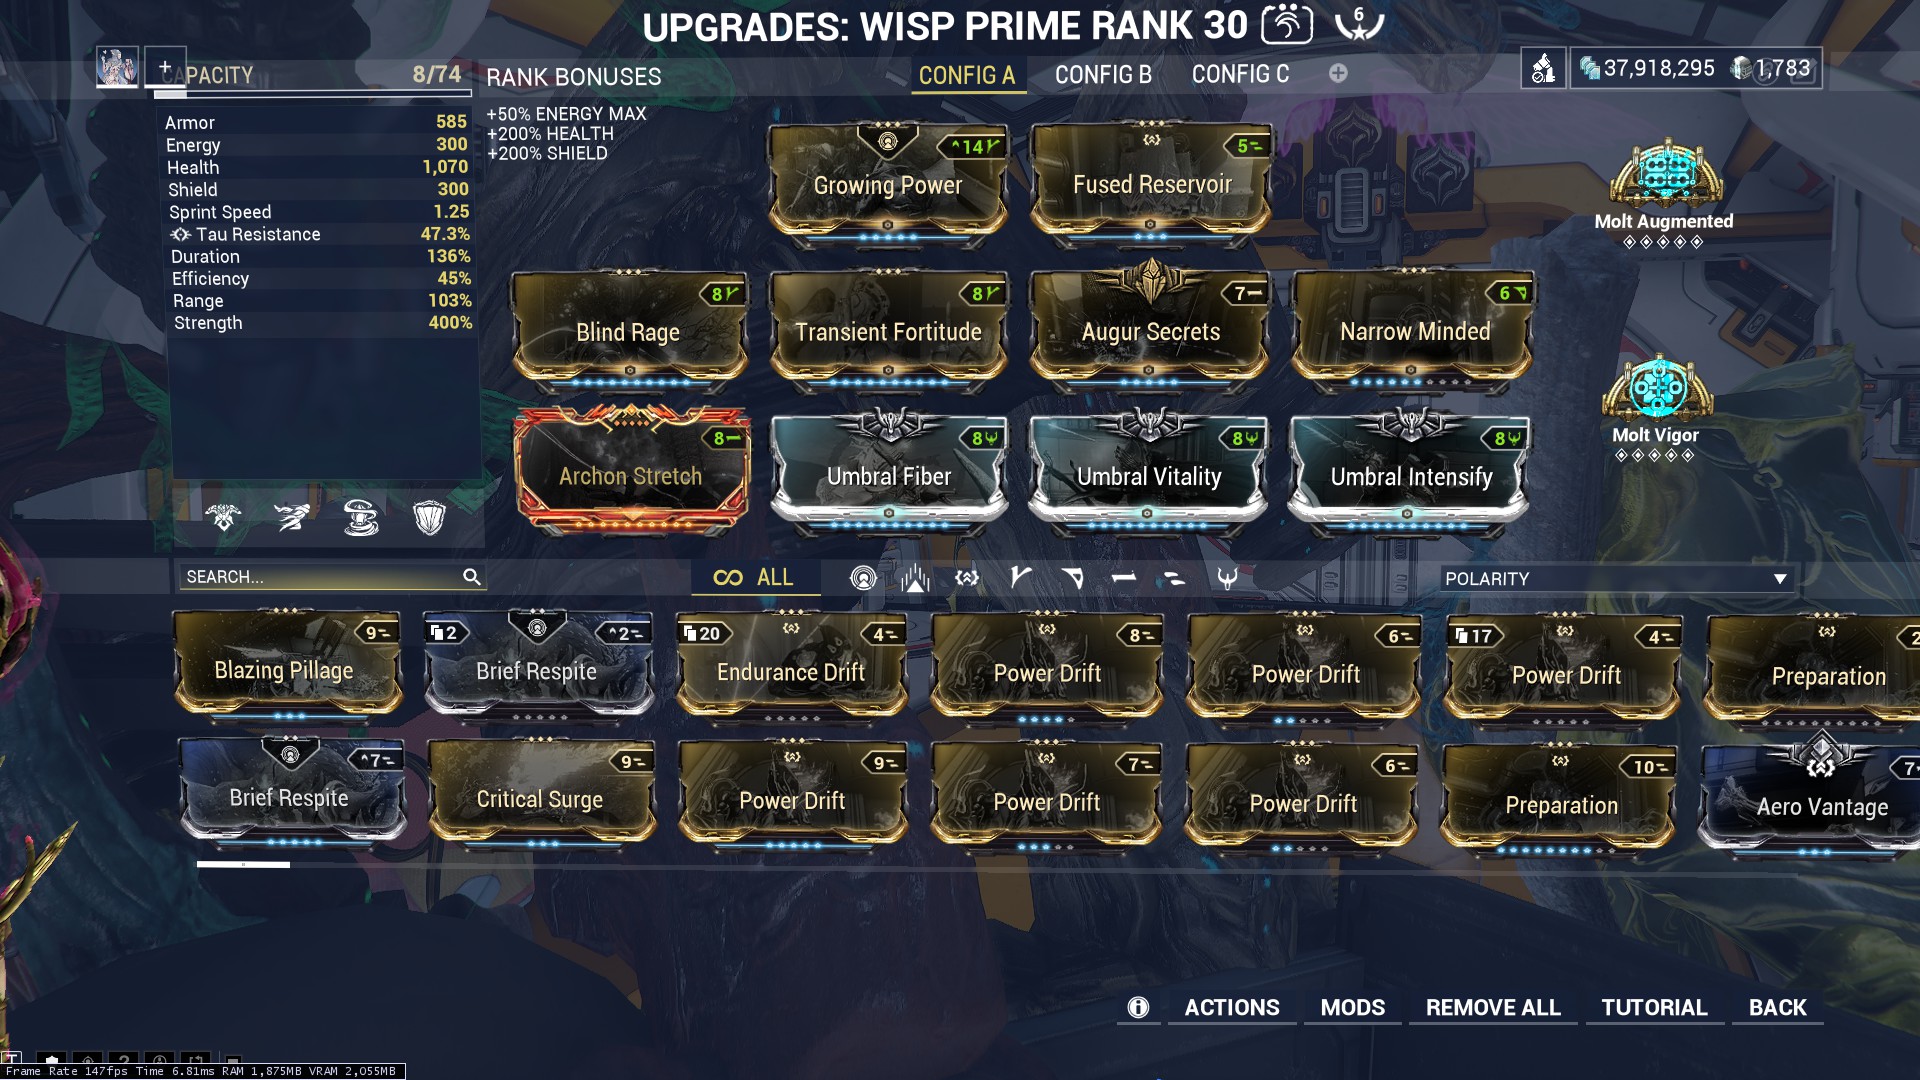
Archon Shard Build
You will need 5 Formas for this build on Wisp Prime (and one more on Wisp), however I recommend 6 to 7, since additional capacity increases the energy you start with in the beginning of the mission.
Molt Augmented can be replaced with Arcane Energize for a smoother energy economy, otherwise this build provides a high amount of strength while being relatively easy to manage and execute.

The only real weakness are stuns.
It works perfectly fine in levelcap runs as well, of course you have to put in more effort than in regular levels.
Tips and Tricks
Stay in the air and stay on your feet or Wisp's case etherical feet. Your airborne invisibility will be your biggest life insurrance.

Wisp's reservoirs are a lifesaver, but Wisp still remains a relatively squishy frame. Stuns, Stunlocks and animations that do not grant invincibility are her biggest threat.
Therefore you should try to get comfortable to move a lot on the ground while fighting and especially in the air.

Any weapon fire will break your invisibility, except glaives and Zaws with Exodia Contagion.

Your Wil-o-Wisp is excellent at protecting you during animations, like capturing targets or reviving teammates. Don't overlook it.

Use Amalgam Serration for additional sprint speed. It synergizes extremely well with Wisps already high sprint speed and the haste reservoir.

Having 100% range on Wisp is totally fine, since her abilities have already a decent range on them and you can cover more area with Breach Surge by using the syngergies between the different abilities. Increasing the range can be counterproductive in some cases, like defense where the increased shock mote stun radius will slow down enemies, therefore increasing the time it takes to finish the round.

For your Parazon use Power Drain.

It guarantees you 50% additional power strength after a Mercy Kill. If you have difficulties mercy-killing Eximus units, consider using weapons that have impact damage, since impact procs do increase the threshold at which you can mercy kill.

If it's due to overkill or high damage output, then this won't help, however you will still gain a lot of use out of that mod in Lich and Sister missions, since their thralls do trigger the bonus as well.

Power Drift can be replaced by Amar's Hatred in these builds. Up to personal preference.
In the Profit Taker fight I would recommend Amar's Hatred for the additional armor, since the 40% knockdown resistance won't be much of use there.

When timed correctly the short animation of Pillage will be enough to not be stunned by certain enemy attacks (like Arson Eximus' fire wave).
This counts for Wisp's other abilities (except Wil-o-Wisp) as well. However since you will use Pillage most of time, it makes the most sense to keep it in mind when using the Pillage set up.

While you can use any equipment you wish on Wisp, her kit rewards gunplay more then melee, since you can use your guns more effectively while in the air. Therefore allowing to profit off her passive, while aimgliding and reloading in the air. Of course glaives are excluded from this. Generally you will probably feel most comfortable when using weaponry that allows you to strike enemies from a distance.
Opportunity Cost
This section is just side information and doesn't provide any essential information or details.

The basic build that this guide provided is of course centered around ability strength, however opportunity cost also play an important role, since the intention is too have as much strength as possible without much effort and being reliant on other sources like teammates, match modifiers specters or pick ups. To sum it up in one term: RNG.

Opportunity cost basically means, how much effort, time or other ressources do I save when using this method or way over another one.

Now there are builds that have more strength to it than this one. Possible ways (besides Archon Shards) to achieve this is by using Energy Conversion, Power Drain, Molt Augmented or Empower.
Energy Conversion = 50% Strength for next ability cast after you picked up an energy orb
Power Drain: Mercy kills give you 50% Strength for your next cast.
Molt Augmented: Gives 0,24%Strength per kill, up to 250 kills.
Empower: Spend 25 Energy to give 50% Strength to your next cast.


These mods and abilities all give you 50% more ability strength at the cost of a mod slot or ability slot. The Arcane (Molt Augmented) provides a little bit more than 50% with all stacks aquired.
However besides these sarcifices there are also other investments that these builds require from you, which are effort and time.
F.e. using Energy Conversion gives 50% more Strength which translates in +150 health, +15 h/s and +10% more Speed.
However in order to achieve that you need to pick up an energy orb, which are mainly dropped by enemies or loot containers. So in order to place a reservoir that has all additional buffs active (considering the build that is provided here) you now need to do: two Void Slings, one operator ability, pick up an energy orb, afflict a status effect and cast the ability in the next six seconds.

Definetely executable, but it means you have to put in more effort and preparation to apply all these buffs. Time that could be used to focus on the objective or other stuff. It also means that during this time you and your teammates have no reservoir buff or refresh of it, which would have helped. Naturally you can just cast the reservoirs without all buffs active, but then you just sacrificed energy as well a mod slot/ability/arcane slot, that could have been used for something else.

You can mod however you want. This information only serves the purpose of underlining a point. High strength doesn't equal high effectiveness. And sometimes it's more effective to not increase strength for the sake of energy management/ time management and to save on effort. And most importantly comfort/fun.

Again mod as you wish, the most important thing is that you have fun. Just keep in mind that theory and practice may differ.

Addendum: The same basic logic counts for Archon Shards as well.

Hopefully the provided information is helpful. Don't hesitate to ask questions.

PS: Booty
19 Comments
Finni  [author] 20 Dec, 2024 @ 2:49pm 
Of course :oxinablanket:
UrlocalBozo 20 Dec, 2024 @ 2:34pm 
I didn't came for the assets.
I came for the lore.
Finni  [author] 3 May, 2024 @ 10:52am 
:3:
BroPsycho 3 May, 2024 @ 10:11am 
I came here because I saw the ASSETS! (2)
Абдуло 29 Apr, 2024 @ 1:58am 
RUS: Выберите что то одно из этого списка и напишите в моём профиле, отвечу тем же!
ENG: Choose the one that's on the list and write in my profile, I will answer the same!

💜+Rep Clutch King 👑
💜+Rep 300 iq 🧠
💜+Rep ak 47 god👻
💜+Rep SECOND S1MPLE😎
💜+Rep relax teammate🤤
💜+Rep Killing Machine 😈
💜+Rep AWP GOD 💢
💜+Rep kind person💯
💜+Rep ONE TAP MACHINE 💢
💜+Rep nice profile 💜
💜+Rep add me pls😇
💜+Rep very nice and non-toxic player😈
💜+Rep AYYYY LMAO
💜+Rep nice flicks👽
💜+Rep king deagle💥
💜+Rep best👹
💜+Rep killer👺
💜+Rep Good player 💜
💜+Rep Amazing Tactics 👌
💜+Rep Top Player 🔝
Finni  [author] 21 Mar, 2024 @ 2:40pm 
:lunar2019piginablanket:
Clawzes 21 Mar, 2024 @ 7:10am 
I came here because I saw the ASSETS!
Finni  [author] 16 Sep, 2022 @ 1:53pm 
Yes 250 kills are easy, but most of the time you're not that long in a mission. Of course when playing for a longer time, then Augmented gives definetely more value. In theses case go for it. Personally I'll stay with Vigor even in these cases, just because I can put them down and forget about it. F.e. in a disruption mission where you can get 250 kills quite quickly and strong reservoirs are giving a huge boost against demolysts, it would make more sense to go for Augmented instead of Vigor, but it would also mean that during the time you build up that a) you have to look out for the moment you reach 250kills and b) you'll then have to spend energy and time to reset your reservoirs. All in all this isn't much effort, but as I stated before I'm a sucker for consistency and I'll sacrfice some strength for convenience or to stay lazy in that regard.
WitTheLandlord 16 Sep, 2022 @ 1:17pm 
i would put molt augmented instead of molt vigor, 250 kills are easy to get
Finni  [author] 10 Sep, 2022 @ 2:03pm 
*mention this in the guide description*