Factorio

Factorio

25 ratings
Survival Tips for Hostile Worlds (Beating the early game)
By piper.spirit
Tips and tricks on how to survive hostile worlds under extreme conditions. Guide is most useful for Deathworlds, or Deathworld Marathon playthroughs, however the strategies can be utilised anywhere for optimal factory starts.
   
Award
Favorite
Favorited
Unfavorite
Introduction
This is a general guide providing some useful information for surviving hostile worlds, that may give the player the extra help needed to make it through to the next day, and hopefully beyond. There is an emphasis on early game strategies and techniques, as this is the most difficult time for the factory, and helpful actions at this stage can make later stages easier.

Not all concepts are covered, however my Deathworld Survival guide could provide a useful complement in conjunction with this guide.
https://steamproxy.net/sharedfiles/filedetails/?id=2385431916
Perimeter and Enemy Expansion
Within hostile Deathworld environments, enemy nests are more numerous, closer to the starting area, with dangerous bugs that evolve at a faster rate. It is important that enemy expansion is prevented, or slowed down, in order to protect future patches, and defend the perimeter of the factory.

Resources to do this, especially under Deathworld Marathon settings can be very limited. Furnaces are a cheap resource that only require stone to handcraft. Using a spaced line of furnaces to outline a rough perimeter, and paths to future resource patches, will deter enemy expansion into these crucial areas. Enemy attacks on furnaces will highlight (alert) an area where expansion may have been attempted.


This early action can prevent nests from appearing close to your factory, within your pollution cloud, and stop bugs making their home on valuable ore patches. Furnaces can also be used in place of walls, to give turrets extra protection against attacks.
Handcraft and Handmine
In the early stages of the game, pollution is a major problem within Deathworlds. There is a higher chance of pollution reaching enemy nests, and being attacked at an early stage of the game can be dangerous.

Handcrafting and Handmining, do not contribute to pollution. It is advisable to handcraft as many items as possible, and if necessity requires it, handmine in place of a drill. Miners emit significant amounts of pollution, and removing even just one, can make a big difference to the pollution cloud. The player can handmine at the same speed as that of an electric miner. A strategy could be to handmine on the patch nearest the enemy, or handmine the lesser used resource (in the early game) of coal or copper.


Loading and unloading of furnaces with ore/coal is also an option too if electricity or fuel is in short supply. Likewise using less inserters and more belts/splitters, will save on resources and limit pollution.
Rocks
Look for rocks, specifically huge rocks on the map. Mining rocks, which are part of the natural terrain yields stone, and stone/coal for huge rocks. This is a fast and non polluting method of gaining a large amount of stone that can be used to build furnaces, which could be utilised in defences and perimeters.


It is a good idea when exploring the map, to take the opportunity to mine rocks that are discovered, and all huge rocks- the coal makes these finds extra useful. Rocks can also be located on the map screen and are displayed as a grey square symbol (huge rock is a larger square). This is helpful for finding rocks within forests that might otherwise be hidden.
Trees Absorb Pollution
Even dead trees on the ground in a harsh desert environment absorb pollution. It is important to make use of trees to help absorb pollution that is emitted from the factory. Try and smelt iron and copper in wooded areas, and position miners the farthest spot on the patch from the nearest enemy nests.


Running a belt from miners to a wooded area for smelting can be helpful for reducing the pollution cloud. In addition, positioning the boiler/steam engine setup in a forested area, or far away from nearby enemy nests is especially beneficial. The boiler emits 30/m, the largest of all machines within Factorio. Minimising the impact of boiler pollution with a strategic positioning can help immensely in the early stages of the game.
Remove Trees from far away Locations
As previously stated, trees absorb pollution and are a fantastic aid during the starting stages of the factory. Limiting the amount of trees that are removed within your perimeter and pollution cloud is helpful, as once a tree is removed, it cannot be replaced.


Harvest trees for wood from far away locations, in order that you gain maximum benefit from the trees in close proximity to your factory. This can easily be done whilst exploring the map and hunting for rocks.
Do not Overproduce
As resources are limited within Deathworlds, and all production involves some emission of pollution, only create what is required. Pollution also contributes to evolution, so even if the pollution cloud is not hitting enemy nests, it is generally unhelpful within the early stage of the game to stockpile items that are non essential.


Prioritise military items and science above all other things during the starting phase of a Deathworld. There is little need for the stockpiling of other items.
Military 2- Grenades
One of the most important technologies to get early is Military 2. This gives the player access to grenades, which are incredibly effective against the early biters of Factorio. It is worthwhile to make this research a priority, as not only does it enable the player a secondary weapon, grenades can eliminate multiple enemies, saving on iron resources. The player can also throw a grenade and run at the same time, which can make it easier for the player to avoid enemies or incoming spitter/worm damage.


The blast radius of grenades make them useful weapons for attacking groups of enemies and biter nests in the early stages of the game.
Fish/Quickbar
Fish are incredibly useful for increasing survivability within the starting stages of the game. Consuming fish will heal the player's health, which is a valuable ability during combat.


By placing this item on the main screen quickbar, it can be accessed quickly in the event of an emergency. The numerical buttons are hot keys for the quickbar that enable even faster access. For example, by placing fish in slot 1, the player can select fish quickly by pressing key 1. With grenades in slot 2, the player can switch between both without having to go into the inventory screen, saving vital seconds.

(The quickbar can also be useful for other items that may be needed quickly eg ammunition/turrets/mines.)
Shotgun
The shotgun is a good weapon to use during the early part of the game especially vs nests. The weapon deals a high amount of damage, and can be a more cost effective means of attack when resources are limited. A nest will include many targets close together, ideal for the shotgun.


The weapon however can be harder to use effectively, as it has a shorter range, and it will not auto target enemies like the submachine gun does. The player may also have problems dealing with enemies that are at extreme close range. For these reasons, the shotgun is often overlooked, in favour of the submachine gun, however in a resource strapped Deathworld, the shotgun is a handy weapon provided it is used in the correct way.
Worms
Worms are only created during biter expansion. Provided all spawners are eliminated when destroying a nest, worms on their own cannot reproduce or attack you (if far enough away). They pose no threat, therefore weapons or resources could be saved and used for other purposes.
Radar
It is important to be aware of how big the pollution cloud is getting and what nests it is hitting, or potentially going to hit in the future. This is especially important in Deathworlds as nests are larger and populated with more powerful enemies. Use radar to help uncover the fog of war to fully reveal the surrounding territory and potential nests that the pollution cloud might encounter. This is extremely beneficial for uncovering land across water that might contain larger nests.


Radar is particularly expensive in terms of energy early in the game. It can be useful to use solar to power radar to reduce the use of boilers for energy production. Once an area is fully revealed, the radar can be moved to a new location. If a perimeter has been established, the enemy will not expand into that area, and any attacks that do happen will show up in alerts. It is therefore not necessary to keep radar in areas fully revealed in the early stages of factory development.


Alternatively use radar outposts that are off grid powered by solar. These work only in the day time, however will gradually reveal the fog of war and provide a useful field of vision into those areas.
Flamethrowers
Fire is a potent weapon against bugs. In heavily infested worlds, it can be a good idea to make the research of flamethrowers a priority. Eventually, without proper research or upgrades, biters will evolve past the point where basic firearms are effective on them. When big biters come on the scene, generally red ammunition is required, and the production of this can eat into resources of iron and copper. The research requirements of projectile technology are also quite heavy, especially under Deathworld marathon conditions.


Biters have very poor resistance to fire, and flamethrower turrets are incredibly effective against them. Flamethrower turrets do not require very much oil per shot, and are extremely cost effective for the price. If the enemy can be held back with several layers of walls, a single flamethrower turret can eliminate multiple enemies with one shot. In addition, cliffs cannot be destroyed by the enemy, and as such should be utilised in defensive perimeters.


The portable handheld flamethrower is also effective and can be used by the player to defend areas against biters. This is useful, as flamethrower turrets are quite resource intensive to build, so the portable version could be used until the infrastructure is in place.


Even though flamethrower turrets are incredibly effective, fire can be a dangerous thing for nearby forests that are absorbing your factory's pollution. Without due care, a misplaced turret could potentially burn down nearby forests. Cut down connecting trees that are within a flamethrower turrets fire range, to prevent the entire forest burning down should the weapon engage. Alternatively place flamethrower turrets after segments of forests. (Note flames only ignite trees when they hit the ground)
Modules (early-mid game)
Aside from the use of green modules to reduce pollution, it is highly beneficial on resource strapped worlds to use productivity modules on research labs, and if possible assemblers producing science. The extra science that is produced will save on resources, which is a great help especially under marathon conditions where recipes are more costly.


Productivity modules increase the power consumption of buildings, so try and utilise solar power as a non polluting way of creating energy. Once there is a solid defensive wall with flamethrower turret coverage, the pollution cloud becomes less of an issue, with factory expansion/advancement being the next goal.
Offensive Options (early-mid game)
Bugs will evolve faster within Deathworlds, and the resource limitations, especially under marathon settings, can make the elimination of the larger nests more challenging during the early-mid stages of the game. There are several effective options that are available for the player, for taking out powerful biters, with lower levels of military research having taken place.

The most effective is the rocket launcher and land mine combination. This strategy involves laying mines in the expected path of biters, who are then stunned and killed, giving the player the opportunity to eliminate enemy nests with rockets. This strategy can work well against highly evolved enemies, with the player having very basic military technology present.


Another option is flamethrower turret crawl using walls. This is an incredibly effective technique that works in a very similar way to the regular gun turret crawl. The only difference is the flamethrowers are protected by a layer of walls. Turrets are "crawled" into the enemy nest, which then eliminate all bugs and spawners within range. The player only needs access to oil and stone/walls to carry out this tactic.


These two strategies are extremely effective within playthroughs where military technology is lacking and/or significant enemy evolution has taken place. They also do not require higher levels of research to have been undertaken eg blue science.
Summary
Playing a more challenging game of Factorio, presents new problems and difficulties, that must be overcome with better solutions. Since the playthrough will be less forgiving, a more efficient playstyle is needed along with better design builds. A difficult map ultimately forces the player to improve their decisions and hone their blueprints, that they can then utilise in other games.

Hopefully this guide has given some helpful tips and tricks, and insight on how to beat the early game of a hostile world. Thanks for reading :)
4 Comments
exfret 6 Apr, 2023 @ 12:06am 
As a player with 3500 hours, most of those in deathworlds, I have to give my approval to this guide. Well-written and doesn't fall into any of the common thinking traps. Very well-done!
tiffsterr 24 Mar, 2023 @ 12:36am 
I have found proactively ranging out and eliminating nests before they make contact with the pollution cloud keeps them from evolving much. Perhaps because I really try to keep my pollution as low as possible I have gotten away with this. I just mainly use grenades and a handful of basic turrets that I arrange very close to a nest to give me fire cover while I eliminate the nests with the grenades.
piper.spirit  [author] 19 Oct, 2022 @ 6:42am 
Using all means to defend yourself is good within a hostile map. Bots, capsules, grenades the more the merrier. Whatever gives you an advantage will make your life easier.

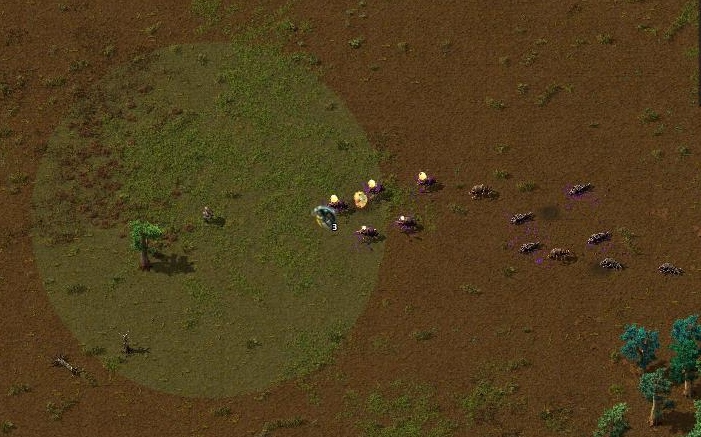
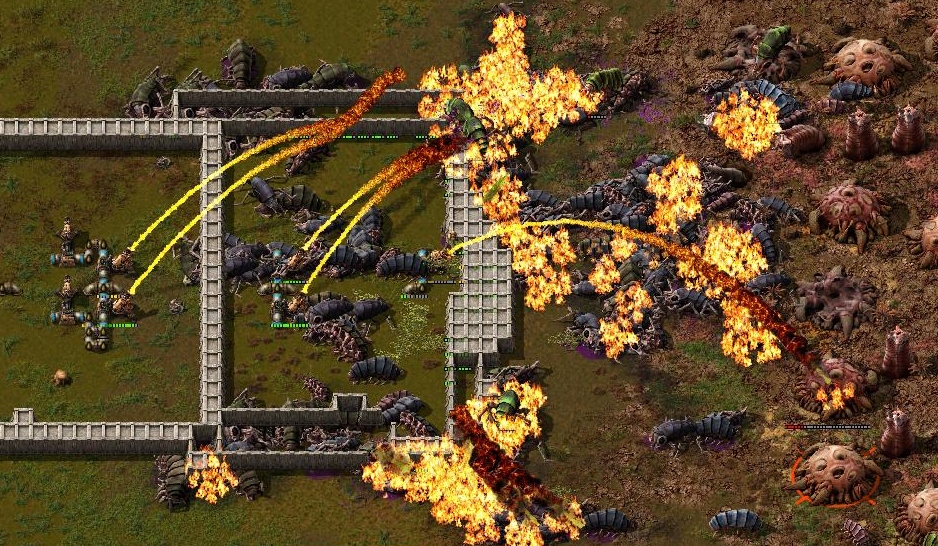
The 2 methods described above are basically fall back strategies to be used when all hope is gone, and enemies are too evolved for regular attacks. They will always be effective no matter how tough the enemies have became.
Mission 16 Oct, 2022 @ 3:32am 
defender bots are really strong for there price (tho you need follower robot count upgrades). these + hand-held flamethrower is one of the most effective methods for clearing nests early-mid game, althougth is does fall off a bit when big biters come into play