Tap Ninja

Tap Ninja

160 ratings
In Depth Analysis [4.0.1]
By Grimagin
A Beginner-Master look at Tap Ninja. Provides introduction information, and tables on total cost of buildings and upgrades. We even take a look at total gold increases at given marks. Notes on trickier achievements are also included.
5
4
2
2
   
Award
Favorite
Favorited
Unfavorite
Guide Version
Live Update 4.0.1 Pets

Previous Updates
V3.2.0
  • Archdemon skin
  • Unique Shuriken sprites
  • Wipe Progress Option

V3.1.0
  • Unlockable Iris Dye
  • Legendary Dyes (from the Amber Store)
  • Legendary Katana (from the Amber Store)
  • New Daily Quests
  • Rebind Hotkeys

V3.0.0
  • Daily Quests
  • Weekly Challenges
  • New Achievements
  • New Upgrades
  • Building Buy All Button

V2.8.0
  • New Achievements
  • Upgrade Tier 12
  • New Ascension Upgrades
  • Challenge Pack 5
  • New Star Upgrades
  • Unlockable Bellflower Dye
  • Highlander (b) Skin

V2.7.0
  • Idle income boosted
  • Energy boosted, Base limit is now 10 minutes
  • New Energy Upgrades
  • Speed Step now decreases over time
FAQ
(Coin) & (Gold) are the same resource.
(Gold per second, G/s or GpS)
(Gems)
(Elixir)
(Amber)
(Key)
(Star)
(Medal)
(Egg)
An Introduction
When the game is launched, a choice of male or female ninja is presented along with a choice of color. More characters and colors can be unlocked later (that look cooler) by completing various tasks, so pick whichever suits you best. The freedom to change them at any time resides in the options menu. There is even an achievement pertaining to this.

There is currently no context or tutorial as to why there's a ninja chopping up samurai, but it's simple enough to figure out. A plain looking screen of a ninja running to the right is what this game is all about.

Objective
Samurai will periodically spawn on the right edge of the screen. Running past them does nothing, but tapping the mouse (or pressing spacebar) at the right moment will perform, what is known as, a Katana Slash. This single strike attack kills them, and causes them to drop 1 in the process.


Katana Slash

A blue streak is a normal attack. The red streak indicates a critical hit with multipliers involved. Criticals aren't available at the beginning, but the chances go up to a total of 4.5%. The multiplier starts at 2x, but can be sequentially upgraded to a max of 7x. The blue bar shown at the bottom is the attack interval cooldown. It's really short and probably don't notice it most of the time.

HUD
Coin and Gold

The top-right of the HUD shows the amount of available to spend, and the total buildings are currently earning.
drops from slain enemies on the screen.
is generated from purchased building's income.

Menu
After collecting a small amount of , an upgrade arrow on the lower-right end of the screen appears.

Eventually, every aspect of this simple (yet addictive) game becomes available.
Tier 1 Menus
*Menus are in the order they are given to the player

[~] Close Menu
The big red "X" closes the right-side panel.

[7] Options
Explore everything this has to offer. Specifically, the statistics window is very detailed and interesting to look at. Besides that, there is an achievement for almost every button here.

Statistics
More detailed information about the game, and collection rates, can be found in this panel. This nifty window can be found from the options menu, and can be toggled between current and lifetime statistics and standings.

[1] Buildings
This is where buildings can be bought and upgraded. They reset with every ascension unless the was claimed with a "Perfect Ascension." There are 17 in total with the Treasury and Shrine not available until the appropriate skills are obtained for 1.20B+ . Patience is rewarding.


When you first start playing the game before you have any to unlock any upgrades, it will seem very slow going. When you're first given the ability to purchase and upgrade Buildings, that will quickly become the fastest way to obtain .

There will be a point in the game once you've unlocked a few skills after Ascending a few times that will forever flip that boundary. When that happens, it'll be obvious that actively slashing baddies as you run past them earns exponentially faster than your income.

The Farm

For now, the first purchase of a farm valued at 4 will contribute to progress, and unlock the next menu panel. Each new building bought will also let the next one become available.


[2] Research
Here, hard earned can be spent on various upgrades. A lot of time will be spent with this menu open early on. It's also where the rest of the menus can be bought. Half the research in the first tier will disappear upon first ascension as they are just a one time introduction to the game's mechanics. Like buildings, research also resets with each ascension.

Research comes in sets presented as tiers. There are 12 in total, and each one will need to be fully completed before moving on to the next.

Speed Step
For a few spent in tier 1, researching Speed Step and Coin Multiplier present a new HUD item in the top-left. This helps keep track of the Ninja's speed, and the multiplied dropped from enemies in steps.

Initially the multiplier starts at 4, but it's possible to get it up to 20. With each increased step, the amount of dropped by enemies is also multiplied by that number.

New enemies that appear on screen with higher tiers of research do award increased drop. Also, each enemy type will differ in the base amount of they drop both independently and collectively with the right research. Keep this in mind when figuring out which upgrades to prioritize first.

[4] Achievements
There are a whopping 561 631 to achieve in total from 16 17 categories. Although, only 100 127 of which translate over to Steam. All achievements inside the game eventually translate into , so they're all worth tackling at some point. Consider them as fun activities. Take a look and unlock as many as you can as soon as possible.


[5] Quest Board
The last menu unlock in Tier 1. Quests are a great way to get free . Bonus , , and even can be awarded. Active players can keep busy performing a variety of tasks, much like hunting down achievements.


Quests


It might take awhile, but it's possible to level up the quest board to 7 after 1210 quests have been tackled.


Rewards will get bigger and better with each increased level, but the quests will also prove to be more challenging.
Fireflies
Fireflies are a great way to get some extra from time to time. They come pretty quick into the game after they're unlocked in Tier 1 research for 150 . These small insects can be seen in the sky flying in either direction. Initially they are very small and fast, but with a handful of upgrades, can be slow and large. Later on, there are even a few events that can be unlocked causing them to show up in swarms for large payouts. Further improvements to fireflies can be found in the Ascension and Skills section.

Size Difference:

Events
About every 75 seconds or so, striking a firefly down with a shuriken will activate an event. With upgrades, it's possible to reduce the timer to as little as 40 seconds. More, and better, events become available once you've obtained enough challenge . Some events are at lot more common than others too. Here are the possible events below:

Regular Coin
Drops a set amount of . This also seems to be the most common event to happen.


BIG Coins
Drops a larger amount of .


MEGA Coins
Drops an insane amount of . One of the very rare events.


G/s Increase
Gain a 5x boost to for 1 minute and 30 seconds.


BIG G/s Increase
A hefty 51x increase to , but only lasts for a mere 30 seconds. Also a rare event.


Coin Drop Increase
Enemies are now seen dropping 4x more for 1 minute. That means Shieldbearers can drop 404 at one time.


Samurai Frenzy
Instantly spawns a line of 100 Samurai in a row. Better start spam clicking!

Upgraded Frenzy

Gemstone Fever
To be honest, I'm not sure how this applies. It could be a 400% increased chance to drop, or they are worth 400% more . Either way, I'm not complaining, and it lasts 1 minute and 10 seconds.

Firefly Swarm
Spawns about 5 fireflies at one time. These may contain the rainbow variety, and if you're lucky, immediately get another swarm event.


Firefly Storm
Spawns hundreds, if not thousands, of baby fireflies. Unlike Firefly Swarm, these little guys only drop handfuls of .


Key Drop
It's possible for fireflies to drop up to 2 per day.

Amber Drop
Fireflies can drop 3 at a time up to 3 times per day.

Egg Drop
With the second level of Flying Keys in the Medal Upgrades, Fireflies can also drop an a day.
Tier 2 Menus
[6] Amber Store
The first menu that comes along when Research Tier 2 is reached is the Amber Store. It's basically a gimme because it only costs 1 . The store is where can be spent.

Amber
Think of as premium currency. No freebies this time, but fireflies have a chance to drop a total of an extra 9 every day. also has a 24 hour cooldown after you've collected your 3 drops for the day. Saving up enough to afford anything is no small task. The fastest way to earn for free is by completing Quests and Challenges.


And, If you feel like becoming a VIP, you can support the developer for a 700 bonus on top of a few other rewards.


[5] Challenges
Located in the same menu as Quests, these too are a great way to earn , , and a one time current ascension bonus of . Unfortunately, they won't award any .

Keys
Though Challenges aren't explicitly bound by time, they will require keys, which are. You'll start the game with 3 and will only be able to earn 2 a day. They drop from fireflies and have a 24 hour cooldown as well. After you've unlocked all the challenges, your extra can be spent on the "Element of Wind" later in the game.

Challenge Packs

Challenges will only require 1 in order to play, permanently unlocking them. Bonus for the current ascension is awarded the first run-through, so they help get some extra push in before making an ascension. They are all unique, and some can be quite difficult.


Making a perfect run awards 3 , and each awards 3 . As challenge packs are completed for passing all 25 levels, new character skins become available for use. Earned 's can be spent for rewards in Star Medal Upgrades.

Pets

Pets are broken into two full page windows that can appear confusing and unnecessary at first. Pets are complicated, which is why there's even a short tutorial for them rewarding you with 2 when you finish. They require in order to hatch, and only one will be able to stay by your side at a time.

Eggs
A vital asset for your arsenal of pets. With a single summon it's possible to hatch a perfect level 12 animal, but the odds of that happening are very unlikely. Extra are used to gain to increase their rating manually.


[3] Ascension
At last, we've finally reached Ascension where the Skill Tree can be found. It's where can be spent on game-changing upgrades for the better. It splits into two branches and converges back into one line with the Treasury. Each skill provides a permanent effect to many aspects of the game.

Elixir
Now we are able to monitor our collection with a HUD item just below our . A pocketful of about 5 should be in hand waiting to be collected from first ascension.

The amount of collected is based on the total acquired in the current ascension. Eventually, the highest amount earned from your highest max total will translate into bonus . More at a slightly increased rate can then be continued to be earned. The best way to earn more is repeatedly ascending when your progression comes to a halt.

The constant cycle of the struggle to earn enough to unlock the next upgrade to then in turn be able to to earn and faster is unwavering. Just keep in mind that you'll also start to notice the Law of Diminishing Returns as you make progress. Each next unlock will cost exponentially more than the last, but only award the same amount of increase. This applies for both Skills and Research.
Player Active Skills
There are a couple of active skills to be acquired from within the Skill Tree. They ultimately help earn bundles more , and help keep Speed Step at max while you run off to the bathroom.

Energy
The first one to come across. It transforms the game briefly into an idle game with an auto-clicker. After your first Ascension, it should be an easy to grab skill for 7 . It'll start you off with 10 minutes of auto-clicking power, and additional upgrades can be acquired to increase it to 17 minutes.


Another trait not much further away, Initiative can be acquired to automatically toggle this feature when it's bar becomes full. Now you'll be able to grab dinner without having to worry.

Rope Hook
Later on when you've had the chance to make your way down the Skill Tree and had the opportunity to spend a piggy bank's full of , the Rope Hook will be in hand at the ready. The Rope Hook latches onto enemies causing them to drop additional . Besides having to click on its icon, q can be used as a shortcut.


Shruiken Vortex
Providing infinite throwing stars, the Ninja can now quickly barrage multiple enemies simultaneously including fireflies. The Shuriken now at your disposal also cause enemies to empty their deep pockets. w can be used as a shortcut.
Enemy Coin Drop
value starts at 100% with enemies only dropping one at a time. There are a couple of ways to increase those values to multiply the total income. When you increase the number of dropped by one enemy from 1 to 2, the difference is multiplied by the increase of each value. So, if a single value is worth 4, and a samurai drops 5, then the total amount of gained is 20. This is why actively slicing enemies on screen is a much better source of income than passively waiting for earnings from buildings.

Samurai
Available from the start of the game. They initially drop a measly single . Through research and skill upgrades, they can drop a maximum of 58 upon death.


Hellhound
Unlocked after reaching tier 3 in research. They start at dropping 5 making them more enticing to kill when they first appear. However, because research must be done before they show up, Samurais actually drop more at a time until Way of the Beast is researched. By the end of the game, they will drop a total of 71 at a time.

Spearman
Unlocked after reaching tier 5 in research. When these guys start appearing, they drop their wallet full of 16 . However, because Deep Pockets should already be researched, they will start at 20 instead. Surprisingly, when the Spearmen first make their appearance, Samurai will actually be dropping 21 while Hellhounds only drop 15. When all research and skills have been obtained, 84 s are possible.

Shieldbearer
Unlocked after reaching tier 7 in research. These guys actually put up a fight. Not only do they have shields protecting them from a katana slash, which requires you to hit them twice to kill them, they drop 25 with the previous +4 drop included. At this time, Samurais still only drop 21 , but Hellhounds will still outdo them by 2 at 27. Even worse, Spearmen are dropping 42 at a time. However, at the end of the game they will drop the most out of anyone with full pockets of 113 . That's a little less than double the amount Samurai can drop.

Things start getting messy when not only calculating the value of 1 individual with all the multipliers and percentage increases, but when also hit the floor with increased values.
How to Read Tables
In order to look onward to my tables more 1:1 you'll need to switch to Mathematical Scientific Notation from the options menu. I created my tables with formulas derived from the game's information using Excel, which automatically converts the numbers from being so large.
Buildings
Bonuses on upgrade intervals are multiplicative, not additive.
x2 intervals of 10,25,50, then every 50.


Values are not adjusted. They are before the purchase of any research and skill upgrades.


Noteworthy Levels
You can convert you game numbers over to scientific values in the options menu


Building Achievement Levels
*Based on Max Achievement Levels
Research Tiers
There are 12 research tiers with a total of 78 79 upgrades between them. Only 8 9 of the researches are a one time unlock purchased at the start of the game to get things rolling into gear. Those are found in the first two tiers before ascending after their acquisition. Then, only 70 upgradable researches will forever be available.

First time permanent researches are included below for the tiers that have them. They will be purchased before your first ascension and not subject to the discounts from skills. They all have a single level, plus permanent researches are also cheaper than the others in the same tier. The cost of research can be reduced by up to 60% from unlocking skills spending through the ascension tree. The pictures below are all based on the 60% discounted price.

Each purchase increases the research level by 1. Various amounts are needed to unlock new research in higher tiers. New enemies are also introduced as you scale the research ladder.

Permanent Research
Tier 1
  • Speed Step
  • Coin Multiplier
  • Golden Firefly
  • Achievements
  • Quest Board
Tier 2
  • Amber
  • Challenges
  • Pets
  • Ascension
Tier 1
9 in tier 1 reduces to 4 after first ascension.
Tier 2
10 in tier 2 reduces to 6 after first ascension
31 Research required
Tier 3
New enemy Hellhound unlocked
87 Research needed
Tier 4
194 total Research to unlock
Tier 5
New enemy Spearman unlocked
364 Research
Tier 6
504 Research
Tier 7
New enemy Shieldbearer unlocked
669 Research
Tier 8
914 Research
Tier 9
1196 Research
Tier 10
1586 Research
Tier 11
2111 Research
Tier 12
2706 Research

Bonus Totals
Bonus
Total Amount
Speed Step
8
Coin Value
155%
Coin Drop
21.5
Samurai Drop
11
Hellhound Drop
18
Spearmen Drop
22
Shieldbearer Drop
25
More Enemies
x4
Fireflies Coin Drop
50%
Gemstone Value
15%
Emerald Chance
4% x5
Sapphire Chance
3% x10
Ruby Chance
1% x20
Diamond Chance
0.04% x50
G/s Default
2695%
G/s Upgrades
636%
G/s Achievements
10939.5%
Godai Elements
50%
Research Cost Totals
Finding the total cost of a research is easy once you've figured out the formula.
Formula
=rounddown(sum([multiplier]^[level-1])*[base coin]), 1)

The formula for the total cost of the research is a bit more complicated as it requires a circular function. To simplify, a complex nth triangle number equation is needed. A simple algorithm can be derived with a few lines of JavaScript, but I've already gone ahead and compiled the information into easy to view tables below. The number will be slightly off due to rounding errors, but only by negligible factors.

To give you a crude example, it might look something similar to this:
function divider() { let level1Cost = document.getElementById("level1").value; let level2Cost = document.getElementById("level2").value; var multiplier = level2Cost / level1Cost; document.getElementById("multiplier").innerHTML = multiplier.toFixed(2); } function solve() { var total = 0; const numberLine = []; const levelCosts = []; let maxLevel = document.getElementById("maxlevel").value; let baseCost = document.getElementById("basecoin").value; let multiplierAmount = document.getElementById("multiplierAmount").value; let currentLevel = 0; while (currentLevel < maxLevel) { total = (baseCost * multiplierAmount ** currentLevel).toFixed(1); levelCosts.push("Level " + (currentLevel+1) + ": " + total + "<br>"); numberLine.push(total); currentLevel++; } let absoluteTotal = 0; for (var alsoLevel = 0; alsoLevel < numberLine.length; alsoLevel++) { absoluteTotal += +numberLine[alsoLevel]; } let discountPrice = absoluteTotal * 0.4; document.getElementById("levelcosts").innerHTML = levelCosts.join(' '); document.getElementById("solution").innerHTML = "Total Cost: " + absoluteTotal.toFixed(1) + "<br>" + "Total Discount Cost: " + discountPrice.toFixed(1); }
Working model found Here[sites.google.com] for those of you who want the full level information based on your current skill discount. It's just way too many numbers to display on a Steam Guide.

Now, there really isn't a surefire way to know what the multiplier is for a given research, but it's pretty straightforward to figure out. All you need from the game itself is the level cost of the first two levels, or two consecutive ones. Divide the value of level 1 from the value of level 2, and then you'll have everything you need.

The numbers [en.wikipedia.org]in this game are very large. Consequently, using Excel converted all the numbers into scientific.

Tier 1


Tier 2


Tier 3


Tier 4


Tier 5


Tier 6


Tier 7


Tier 8


Tier 9


Tier 10


Tier 11


Tier 12


Absolute Totals


*For those of you who haven't switched your numbers over to scientific, 2.98E+82 is equivalent to 29.80 OVg
Quests
The Quest Board starts at level 1. You only have 3 running simultaneously, and new ones are provided every 24 hours that reset at midnight. With Skill unlocks, it's possible to have up to 7. 10 will need to be completed to level up, which in turn may provide better quests with better rewards.


Board Level
Quests Needed
Rarity
1
10
Common
2
50
Common, Uncommon
3
100
Common, Uncommon, Rare
4
200
Uncommon, Rare
5
350
Uncommon, Rare, Epic
6
500
Uncommon, Rare, Epic, Legendary
7
Max
Rare, Epic, Legendary
Challenge Medal Upgrades
There have been some major changes to how Star Upgrades work since Weekly Challenge Packs have been added. They now use Medals as Stars are now used for Pets.

Besides the immediate reward of extra for the current ascension, there are Perks you can spend the you gained on. The cost to upgrade any of the perks starts at 5 , and will increase by 1 regardless of which upgrade is chosen.

With the 19 21 available perks, you will have to participate in the weekly challenge packs. In order to get them all, it will take a total of 693 .

You can reset your upgrades and reallocate the to re-select your perks for a small fee of 30 , but there's hardly a point anymore thanks to the recent update.

Eventually, you'll be able to acquire all perks at their full potential.

All Done
After have been spent to unlock all the challenges, you'll still want to collect them for the "Godai Elements" skill. They will be used to upgrade the "Element of Wind." The max number of achieved can also be used in junction with "Godai Elements" to upgrade the "Element of Fire."
Pets
There are currently 12 Pets with 4 in each category.
The top green row are rodents, which is why I find it odd their symbol is a beetle.


The middle red are mammals. This one makes sense because they all have paws.


The bottom yellow are winged animals (hence the dragonfly).


Pets will require , and only one will be able to stay by your side at a time. This is why it's very important to know which pet is best suited to be your familiar.

Summoning
This should really be in an info tooltip on the summoning page instead of hidden deep withing the options information.

Rodents
All Rodents have one thing in common. Their passive increases .


Mammals
Mammals passive increases base value.


Winged Animals
The shared passive among these flying creatures increase the amount of dropped from Firefly events.


Pets Star Rating


Star Rating
Star Cost
Skills
Yellow 1
3
I
Yellow 2
9
Yellow 3
27
Yellow 4
81
II
Yellow 5
243
Purple 1
729
Purple 2
2,187
III
Purple 3
6,561
Purple 4
19,683
Purple 5
59,049
IV
Red 1
177,147
Red 2
Max

Pets Bond Requirement


Bond Level
Bonding Time
Medal Cost
1
3m20s
0
2
3h12m
2
3
12h48m
5
4
28h48m
10
5
48h
15
6
75h12m
20
7
102h24m
(25)
8
128h
(30)
9
168h
(35)
10
224h
(40)
11
320h
(45)
12
MAX
(50)

Roughly 1111 hours or 47 days for max bonding.


This is a $24.99 package. Now, think carefully about this one. The Dragonfly is capable of producing 8 every 4 hours, or 48 a day. In the amber shop it's 800 for only 10 . Can you wait patiently for 17 days? However, don't forget about your daily free appreciated from a Firefly drop.
Characters
Personally, I think it would be nice if each of the characters had their own flavor text besides just the unlock description. They also don't add any benefit or perks as of now, but it's very possible the developer might add incentives in the future to award a small increase to .

Default
The male ninja is swift and cunning. His blade cuts with unparalleled precision.


The female ninja is beautiful, and dances gracefully with each swift strike of her sword.

Premium


Challenge Pack
The Assassin is quick. He hides in the shadow to patiently wait for the perfect moment to strike. You'll never see him coming!


Amber Shop
You've come to the right place if you're looking to spend all that free you've been collecting from fireflies. In addition, 1125 can be gained from completing all of the 5 challenge packs. Once the challenges are done, I suggest spending your on the Kimono of Legends. I believe the Kimono and "Perfect Ascension" are probably the two most helpful. However, you can also spend them on the Archangel if you're looking to play in style.


A great way to boost your supply. It will also help speed up the rate of progress for earning both and used for a handful of upgrades.
The Kimono of Legends
Providing an additional way to get more permanent . This traditional Japanese garment will give you an additional 25% increase with each level purchased.


Because this is very valuable and costs the hardest to earn resource in the game without purchasing premium features, I'll provide you with a full table:

With an outstanding balance of 23,474 , the Kimono's full power will awaken.

The Katana of Legends
This traditional Japanese weapon grants an increased 10% coin base value with each level. I would recommend acquiring this item first before adding to your wardrobe.


Level
Amber Cost
Total Bonus
1
75
10%
2
142
20%
3
241
30%
4
408
40%
5
536
50%
6
664
60%
7
792
70%
8
920
80%
9
1048
90%
10
1176
100%
11
1304
110%
12
1431
120%
13
1559
130%
14
1687
140%
15
1815
150%
16
1943
160%
17
2071
170%
18
2199
180%
19
2327
190%
20
2455
200%
The initial value of the Katana of Legends is slightly more, and the percentage return slightly less. It's total cost of true power is 24,793 .

Gold Multipliers
*Unfortunately, the amount multiplied has been reduced in the recent update from x85 to x42.
The great thing about these temporary boosts is that they stack on top of each other and with themselves. It's possible to get a total multiplier of x42 with all of the active simultaneously. You can even purchase them multiple times. However, even though the timer in the top corner will only show up to 59:59, it does keep track of the total time remaining even if you break 1 hour.

Perfect Ascension
This is a great way to grab all of the you have been earning for the current ascension without resetting any of your progress. Instead of losing your , buildings, and research, you get to keep them all on top of getting that and additional because of it.

Bags of Gold
I'm not exactly sure how this is calculated, but I can tell you it's based off of your from Buildings. As far as I can tell (I'm probably completely wrong about this):
A Small Bag of is 650,000 times your current in one hit.
A Medium Bag is about 4,355,000x.
And, the Large Bag is approximately 10,877,500x.

Archangel Character
If for no other reason, because it looks dang cool!

Ascension and Skills
Ascension becomes available as soon as enough is earned to research it. By the time it's unlocked, about 5 should have also been earned. After ascending, start unlocking permanent skills that make every ascension, and virtually starting over from scratch, worth it.

There are a total of 165 skills to unlock through a progressive tree. These add improvements to every mechanical aspect of the game as well as unlocking a few extra tools and perks along the way. About 1/3 of the way down, a skill called Godai Elements will unlock 3 additional skills that can be upgraded indefinitely. The two skills at the very end of the skill tree also have no limitations to the amount of times they can be upgraded. When those two blessing are reached, that's the end game.

Unlike the multiple options available in research, freedom of choice on which skills to unlock first doesn't exist. However, to some extent, choosing to focus down the upper or lower branch, depending on preferable upgrades, does present some freewill. Both will eventually need to be taken to be able to use the Rope Hook. There is no shame in just unlocking skills as you obtain enough to buy them because every little bit helps, and the skills become increasingly expensive.

Full Tree


New Skills
There are a few more scattered around the skill tree from the recent updates, but these are the new ones most notably added at the end of the tree just before the blessings.


Shrine is the newest building unlocked from the skill tree.


4.0.1 Update
[9 new Skills]

3.0.X Update
Quest skills have been scattered around the ascension tree along with the "Buy All Building" button. For various , 1 additional quest is added to your board.

Bigger Board
6


Washi Paper Production
5.7K


Contracting
285M


More Problems
105B


Buy All Buildings
780K


Unique Skills
Skill Name
Elixir Cost
Total Elixir Needed
Buy All Upgrades
0
2
Energy
7
12
Initiative
47
85
Rope Hook
200
973
Shuriken Vortex
2600
7423
Firefly Swarm
2100
23373
Firefly Storm
230000
>1M
Godai Elements
1.55M
>1.55M
> Element of Void
9000
>1.55M
> Element of Wind
1 Key
>1.55M
> Element of Fire
100 Stars
>1.55M
Not All is Lost
345M
>345M
Treasury
1.20B
>3B
Shrine
2.8T
>2.8T
Blessing of the Tiger
6.45T
>20T
Blessing of the Dragon
6.45T
>20T

Coin Drop


Enemy Density


Hook Cooldown


Hook Multiplier


Shuriken Cooldown


Shuriken Multiplier


Speed Step


Energy From Enemies


Energy Timer


Energy Regen


Godai Element Effects


Coin Value


Gem Drop Chance


Gem Value


Away Income


Building Cost


Upgrade Cost


Challenge Gold


Crit Chance


Crit Multiplier


Gold per Second


Total building levels taken from achievement numbers adds up to 12100. The 0.65% from research multiplied by 12100 comes to 7565%. The 0.4% from skills sown above adds to 4840%.

Firefly Spawn Rate


Firefly Gold Drop


Firefly Size


Firefly Speed
Blessings and Totals
There are 5 skills that don't have a maximum limitation on how many times they can be upgraded. There are even a couple of skills whose value is ever increasing since they are based on the number of building levels, and those will always continue to get more valuable. Therefore, they will be included at the end of the totals, but only based from the combined value of Building Levels Achievement caps of 9800. Otherwise, the total numbers have no way to accurately calculate them.

By name, the limitless skills are:
  • Legacy; Increase based on most gained in one Ascension.
  • Contracting; Building levels increase by +0.1%.
  • Investment; Add +0.1% from to value.
  • Property Restoration; Building levels increase by +0.3%.
  • Market Manipulation; +0.3% from to value.
Godai Elements
Unlocking this skill activates the Five Element's upgrade tab in the lower right-hand corner of the skill tree. There are currently only 3 elements, so it may suggest there are plans for 2 additional elements in a future update.
Element of Void
Costs additional to increase by +0.5% multiplied by this skills level. No level cap.

Element of Wind
Costs additional to increase by +0.25% per upgrade tier (12) by this skills level. No level cap, and cost increases by 1 every 10 levels.

Element of Fire
Costs s to increase base value by +1% of this skills level. Cost increases by 10 indefinitely.


Blessings
Currently, only two exist. They can be found at the very end of the skill tree. These end game skills have no limit to the number of times they can be upgraded. They provide additional bonuses for ever increasing costs of .


Blessing of the Tiger increases base value by 1% per skill level.


Blessing of the Dragon increases by 2% per skill level.


Absolute Totals
This includes all bonus totals from all branches of upgrades.
Totals include Base Value + Research + Skills + Challenges

Bonus Name
Base Value
Research Bonus
Skill Bonus
Challenge Bonus
Bonus Total
True Total
Speed Step
2
8
10
0
20
Coin Value
100%
155%
380%
0
635%
Coin Drop
0
21.5
14.5
0
36
Samurai Drop
1
11
5
0
17
53
Hellhound Drop
5
18
12
0
35
71
Spearmen Drop
16
22
10
0
48
84
Shieldbearer Drop
21
25
31
0
65
113
More Enemies
1
4
4
0
9
Fireflies Coin Drop
100%
50%
900%
0
1050%
Gemstone Value
100%
15%
10%
20%
145%
Emerald Chance
0%
4% x5
6% x5
0
10% x5
Sapphire Chance
0%
3% x10
2% x10
0
5% x10
Ruby Chance
0%
1% x20
0
0
1% x20
Diamond Chance
0%
0.04% x50
0.06% x50
0
0.1% x50
Challenge Gold
100%
0%
280%
80%
460%
Energy Timer
600s
0s
270s
150s
1020s
Critical Chance
0
0%
2%
1%
3%
Away Income
100%
0%
965%
30%
1095%
G/s Default
100%
2695%
1420%
80%
4295%
G/s Upgrades
0%
636%
174%
0
810%
G/s Buildings
0%
405%
0
405%
G/s Achievements
0%
10335%
12190%
0
22525%
G/s Days
0%
0%
100%
0
100%
G/s Building Levels
0%
7865%
4840%
0
12705%
G/s Total
100%
21531%
19129%
80%
40840%
81680%
Notes on Achievements (Part 1)

I will not be covering all of the achievements unlockable in game because most of them are self explanatory. A considerable amount are also multiples of each other. In case you weren't already aware, there are no secrets to unlocking achievements. A good handful of them are very easy to get and might already have earned without even knowing it. The ones I will be covering I think are a bit tricky, and some people might need more context guidance.


So much to do so much to see
Just slide your finger across the keyboard numbers row from right to left. This achievement pops when the side menu closes.

Effective Idler
An accumulation of 72 hours of offline time without the timer ever exceeding 12 straight hours. If it hits that maximum cap, you'll have to start over.

Army of One and It's Not Ready Yet!
Spam click the mouse along with q and w. 20 seconds in you'll get one. 100 seconds later, you'll get the other.

Around in 80 Days
It takes about 10 minutes to go between zones. So, after around 50 minutes of traversing the plains, you should get this achievement. Just make sure you don't plan to ascend during that time.

You found it!
This one's a bit of a secret. You'll unlock it as soon as you find it. Can you guess where it is? I'll give you a hint. It's located within the achievements.


Since You've Been Gone, So it begins, A fan of Pavlov, I Remember You, Hobbyist, Here I go Again, I'm lovin' it, Devotee
All these achievements require you to put in some time. Or do they? If you know how to manually change the time and date on your computer, then you can get all these in just a few minutes instead. You can even do this while the game is still running so you don't have to keep closing and reopening the game.

New Year, New Ninja, Romantic Ninja, Respectful Ninja, Hard Boiled Ninja, Loving Ninja, Responsible Ninja, Free Ninja, Healthy Ninja, Knowledgeable Ninja, Spooky Ninja, Grateful Ninja, Gifting Ninja, Year of the Ninja
Can be done the same as the above achievements, except the date must be set to the specific dates instead.


Big Brain Move, and The Pen is mightier than the Hammer
Both achievements, and even the remaining ones, are all much easier to do after several ascensions where earning coin from enemies without the help of buildings is substantial.

Acquiring the Ascension Skill Not all is Lost will not prevent you from earning any of the Pen is Mightier than the Hammer achievements.


Region, and Turn it up to 500
Just like the two mention in Research, it helps to have some elixir and skills under your belt. It's easiest to do this with lower tier buildings. Especially when being able to purchase 500 farms at one time for 5.95E+38 coin. The trick is only buying 1 farm while maxing out the levels of every other building before coming back to buy all the farms.


I'm Feeling Sick
This is very similar to Around in 80 Days except to remember to ascend while in every zone that comes by around every 10 minutes.


Marathon Sprinter
This is pretty straight forward, but I thought I would add a tip of doing these right after an ascension. It reduces the number of enemies on the screen making them easier to do. Not having Shieldbearers present helps prevent the mistake of only striking once.


Auto Clicker Detected
Do you already have an auto clicker at the ready? If you do, use it. If not, instead rapidly click the mouse button until it pops.


Min/Max
This achievement is also easier to do after a fresh ascension. All you have to do is turn Energy on right before an enemy is within slashing distance, and then turn it off right after the last enemy is a group is killed.


Shieldbreaker
This one is a bit tricky. Wait until a Shieldbearer is the first enemy in a line. Use the Rope Hook ability to pull his shield away and immediately strike with a katana slash. It helps to be fast by using the keyboard shortcut.

Not Like This
The exact reverse of Shieldbreaker. Repeat the steps above, except this time use the katana slash immediately followed by the Rope Hook instead.


Mass Effective
The best way to achieve this feat is to kill a firefly that triggers a Samurai Frenzy event. While you're in the heart of it, use a Shuriken Vortex and you'll be sure to get it no problem.


Did I get it?, and Here Goes the Sun
After some skills have been unlocked that slow the speed of fireflies, this shouldn't give you any trouble. It's best to wait for a firefly to be moving from left to right and the side menu closed. Just when it's about to fly off screen, spam click the mouse over it and you'll knock out two birds with one stone.

Lightning Fast Reflexes
Hover the mouse at the very left of the screen somewhere between your character and the Energy GUI. Spam the mouse, and you'll down a firefly before you know it.


Picky Ninja
This is another one of those achievements that's easier to do with less enemy types showing up. After an Ascension, only acquire the research from tiers 1 and 2. The Hellhounds will show up without too much interference form the Samurais.
Notes on Achievements (Part 2)

Challenge Packs
Just a side note: you don't have to complete all the challenges or play them. You just need to spend a key to unlock all 25 in the set, but I'm sure you'll still strive to get 3 stars in each one for Star Upgrades. Plus, the skins you unlock are really cool!.

July 3.0.X Update
Quest achievements have been added.


Price table can be referenced in a former section above.


Final Takeaway
First of all, I would like to give a big thanks to TableConvert [tableconvert.com] for making the creation of this guide much simpler and faster to make.

Though simple, it's strangely complex with it's mixing of algorithms between every crevasse of each game mechanic. There is always something to do or something to upgrade letting the time fly by. This is one of the better idle/clicker games I've played recently as there doesn't seem to be much downtime waiting for something to happen in order to make progress.

If you happen to notice a flaw in my guide such as a typo, don't hesitate to let me know so I can fix it. Any questions you may have, just fire away and I'll do my best to answer them.
57 Comments
carlospb333 18 Jun @ 7:45pm 
As long as I try to understand it, I cannot comprehend how to calculate the buildings 1 purchase cost (example: Tabern 0-400)
Raishou 7 Nov, 2023 @ 10:50am 
So you cant change your clock anymore for date achievements?
Phantagor 2 Jul, 2023 @ 2:42am 
I am afraid the "hack" to change the time manually on your windows machine to finish some achievements is not working anymore
Plüschtiger 6 Feb, 2023 @ 7:28am 
It seems the guide is out of date.

Godai. The last one now requires medals, not stars. In addition, the medals are not consumed when used. You can level the third until the cost of the level up equals the total amount of medals earned.

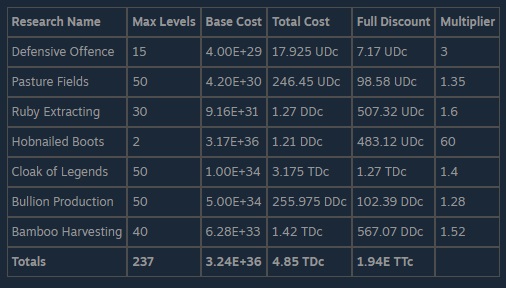
There are now 13 research levels and there are also a few more medal upgrades.

The values were changed for the cat. (translated)
Emperor Palpatine 5 Feb, 2023 @ 3:01am 
Impressive.
Colt Carson 26 Dec, 2022 @ 4:03pm 
but why
Jay For Short 9 Nov, 2022 @ 2:28pm 
Great guide! Thank you!
Grimagin  [author] 8 Nov, 2022 @ 6:46am 
Correct. I was waiting for a major update before I adapted this guide accordingly. Version 4.0 was launched with pets yesterday. Lots of new content and changes, so expect a reflection of that by the end of this week.
In Vino Veritas 7 Nov, 2022 @ 9:25am 
u r missing Katana of legends (cost table like from kimono of legends) and also u could add the Pack of 10 eggs.
D O N T A L K I N G P L E A SE 14 Aug, 2022 @ 2:53am 
How far are you in the game ? What % of elixer are you on yourself?