Deep Rock Galactic

Deep Rock Galactic

86 ratings
(SEASON 2) Engineering in the Caves of Hoxxes
By NK
A guide full of builds for Engineer on Hazard 5! All of them up-to-date for Season 1! Individual weapon builds included!
2
3
   
Award
Favorite
Favorited
Unfavorite
Introduction
Everything I'm going to be describing in this guide are all builds I personally have used and succeeded with in Hazard 5 as Engineer. This is a guide of builds, with builds for individual weapons and full builds that I use. My biggest disclaimer here is that I have not tested most of these builds for solo play, BUT, each are capable to hold their own in Hazard 5 multiplayer and I play with these builds all the time with no issue.

As it currently stands I have not fully tested and properly used the new Shard Diffractor so I won't have any builds for it posted for the time being, sorry.
Perks
Perks can make or break a mission for you and I could sit here going over the pros and cons of each perk but that's not the point of this guide. There are only two perks I personally have found I struggle to go without on Engineer:

Resupplier
Resupplier is exceptionally useful at keeping you alive in a mission or coming in clutch. Resupplier allows you to take a resupply in the middle of a horde far quicker and with the extra effect of a reload and bonus health you can get back to shooting right away. Also gives you more leniency with Iron Will.

Dash
Dash is an active perk that is simple in what it does. It lets you zoom forward or dash as the name suggests. This perk has saved me from so many different things. From dashing to cover from spitball infectors, to running that Compressed Gold faster to the minehead. Dash will easily save your life many times, and with Engineer that chance you dash into a deep pit is not so bad with the Platform Gun in your kit.

Armor, Platform Gun, and Sentry Gun
Armor
The first gear mod is completely and totally preference, I typically will use Improved Generator or Bigger Mineral Bag. The rest you should always use 213 (even on other dwarves) as bonus health is just better than more shield, and Breathing Room helps prevent getting revived and immediately dying again (also the shield break mods are practically useless).

Platform Gun
Platform Gun is a super useful tool on Engineer as it allows you to traverse terrain as well as help teammates do the same. This build of 212 is just a completely universal build as it it comes in handy on every mission. The Repellant Additive allows you to guide and group up bugs to allow for more effective killing of bugs as well as create safer area for your teammates to crowd under while the bugs stream in. Overall makes the platform gun super useful on almost any mission.

The only exception to this is Elimination missions, I prefer to take Expanded Ammo Bags as those missions the Repellant simply becomes far less useful.

Sentry Gun
Sentry Gun is a big part of Engineer's kit and is exceptionally useful as a defensive and offensive tool. My build of 1221 is what I use almost all the time. Quick Deploy allows you to construct your sentry gun's in a pinch and the Stun allows your sentry guns to control incoming bugs, particularly useful against Praetorian's.

If you don't mind the longer build time then taking Expanded Ammo Bags is a very strong substitute.

LMG MKII is an okay upgrade, however I recommend against using it as you are simply giving up a lot of crowd control and damage potential. Even more losses, if you run Turret Whip.
Grenades
The grenade options on Engineer are all potent and effective. In general I think it's best to experiment with each grenade types on your builds to find which you think is most effective. I will still give explanations of each grenade.

L.U.R.E.
The starting grenade on Engineer, the L.U.R.E. This grenade is probably one of the best on Engineer as a whole as it provides the most synergy. It's a simple grenade that deploys a dancing decoy dwarf that attracts enemy bugs. There are some very important things to know about this grenade.
  • The grenade can only attract 10 bugs at a time, BUT, if you kill the bugs on the L.U.R.E. more will be distracted
  • The hologram itself has 50 HP and the color changes as it takes damage.
  • Once it is finished/destroyed the grenade deals an electrocuting shockwave that does a small amount of damage.
Plasma Burster
Plasma Burster requires the least amount of thought to use. It deals 4 moving bursts of damage, however be careful as the bursts are effected by the momentum and terrain so you can easily plasma burst a fellow dwarf's beard off.

These are best used to clear a bunch of bugs on the spot and with 6 of them allow you to use them frequently.
Proximity Mine
My personal favorite grenade to use on Engineer. Proximity Mines are sticky and have a charge up time before they start exploding. They explode only when grunts or larger bugs are in proximity, so be careful as it won't kill swarmers on its own.

Try to avoid throwing these grenades in places where teammates stand as they can quickly start to damage teammates trying to fight a horde.
"Warthog" Auto 210
The Warthog is Engineer's easiest and most versatile primary weapon to use. Contrary to the fact that its a Shotgun, it can be used effectively at almost all ranges (depending on your build) and is one of the many reasons it has strong versatility.

Always be sure to shoot bugs in the face or weakspots to reduce the amount of ammo you need to use.
I run Turret Whip as it provides far more bonus damage to Engineer overall compared to the burst damage that full auto provides only to the shotgun. Full auto has its uses, but I think those situations are negligible.

NOTE: I animation cancel reload with the Warthog which is why I do not take the faster reload mod.

General Purpose Builds

Stunner 21321
This is a simple but powerful build for the Warthog. With the Stunner overclock the shotgun is able to output a lot more damage with your turrets stunning bugs combined with the built in stun on the shotgun itself. Stunner will let you easily clear out all grunts and even kills pesky Acid Spitters and Web Spitters.

If you don't have Stunner this build works with Light-Weight Magazines overclock.
Mini-Shells 11321
In exchange for some damage and stun, Mini-Shells provides a lot of overall sustained damage and TONS of turret whips to deliver to your sentry guns. Although my least favorite overclock, always fun to take this shotgun out when you have other Engineers in your squad to turret whip all the sentry guns.

This build is also a super strong pick for Critical Weakness missions.
Magnetic Pellet Alignment 11321
My personal favorite build on the Warthog. Thanks to the bonus damage and decreased spread on the Magnetic Pellet Alignment overclock this shotgun works effectively at all ranges. This build lets you quickly dispose of Acid Spitters that are high up on the ceiling. With the bonus weakpoint damage the shotgun becomes even more potent.

The main drawback to this build is if you aren't good at hitting weakpoints the build starts to fall short. (Although this can be said about all the other shotgun builds)
Cycle Overload 11121
The Cycle Overload overclock is incredibly strong and with this build you get a load of bonus damage to help with bigger bugs and general horde clear. The high firerate lets you get behind Praetorians and Oppressors and quickly dish out damage.

I recommend this build if you aren't the most accurate shot as the bonus damage gives you more leniency. Be careful about the recoil.

Cycle Overload 23121
This build for Cycle Overload is for people that want a more accurate Warthog build but with high damage. I've become a good fan of this build for the Warthog.

High Damage Builds

Cycle Overload 21321
The main difference with this build and the previous Cycle Overload build is that this build opts for higher damage output instead of preserving accuracy and recoil. This build is meant specifically for Elimination missions as this build allows you to deal a massive burst of damage when you get up close.
"Stubby" Voltaic SMG
The Stubby SMG is often looked as a much weaker option compared to the Warthog. I personally do not agree with this and find the Stubby to be completely and totally capable as a weapon. The main problem with the Stubby is that it has high recoil making burst or tap firing a necessity when trying to hit distant targets. It has some built in electrocution which can be surprisingly useful in lots of situations.

It is best to avoid full spraying with the Stubby as this results in a lot of wasted ammo.

Electrocution is highly effective at slowing down dangerous targets like Detonators, and the 5th Tier Electric Arc mod can provide potent crowd control to the weapon.
The stubby also has a lot of unique overclocks that synergize with your sentry guns.

General Purpose Builds

EM Refire Booster 32212
EM Refire Booster is one of the most powerful overclocks on the Stubby. This build goes for ease of use and provides good overall damage. The Tier 5 mod helps with close together bugs as well as swarmers.

EM Refire Booster 22222
This EM Refire Booster build is Electrocution focused. With this build you want to avoid spraying all your ammo to kill. It's better to use the electrocution to slow down and weaken big hordes of bugs for your sentries, teammates, or your secondary weapon to kill.

Super-Slim Rounds 13222
A simpler build that just cares about killing bugs.
Well Oiled Machine overclock is interchangeable with this build.

Light-Weight Rounds 33211
This build has a ridiculous 890 ammo for you to dump into enemy faces. The lack of damage is compensated by the weakpoint bonus and increased firerate. Mag dumping with this build is a lot of fun and effective, just don't get too carried away.

This is a strong build in Critical Weakness as well.

Sentry Focused Builds

Turret EM Discharge 22222
Turret EM Discharge is a ridiculously fun and ridiculously strong build. This build is potent enough to be run on practically any mission. The biggest drawback is that the overclock heavily weakens the Stubby so picking mods that benefit electrical damage recover most of the lost damage. This overclock did get a mild nerf it is still perfectly viable.

Do note that if you want to use this build effectively I highly recommend running faster sentry building. The sentry gun build I run for this build specifically is 1231.

This build is particularly powerful on Industrial Sabotage missions as it provides strong crowd control for hacking events and deals strong damage on Caretaker tentacles.

Turret Arc
I do not believe that Turret Arc is really worth using as EM Discharge is just better.
LOK-1 Smart Rifle
The LOK-1 or Loki was a controversial weapon on its release and this is likely due to the fact that it is one of the highest skill ceiling weapons for Engineer. There is a lot that goes into using this weapon, especially so when using different overclocks. Different builds will often change the way you need to play the Loki. There are two important things to note about the Loki:
  • Excess locks do NOT cause the Loki to fire extra shots on already dead targets. Thus extra locks on a target to get a damage bonus is typically always worthwhile.
  • You can move your camera around to direct the shots and the tracing lines will change color based on what they're hitting

I will note that I personally find Neuro-Lasso and Armor Break Module to be useless or bad overclocks for the Loki.

General Purpose Builds

Eraser 11111
This is a solid overall build that works on just about everything. The Tier 3 and Tier 5 mods synergize with each other to bring out more damage. Using this build on hordes works well although it may burn through ammo very quickly.

Switching the Tier 1 mod to Expanded Ammo Bags works as the 21111 build is suitable with practically every overclock.

Seeker Rounds 21111
I used to think the Seeker Rounds overclock was quite awful and not very good. However, I started using it again and tried it out in a bunch of missions and I was mistaken. This build is highly powerful and makes the Loki shine as a priority target killer. Seeker Rounds lets you kill Shellbacks, Brundles, Oppressors, and practically any other higher armor bugs with much greater ease. The lower firerate does take getting used to but otherwise a great build.

IMPORTANT NOTE: Seeker Rounds guarantees that it will hit through armor, this does not mean it completely ignores armor as it still does reduced damage on armored bugs versus unarmored.

Executioner 23111
Executioner is one of the strongest overclocks on the Loki making most the other overclocks look weak. This build combines the weakpoint bonus from full locks with electrocution bonus damage. This build synergizes well with secondary choices that set bugs on fire or electrocute. Otherwise you can opt for the Tier 5 Unstable Lock Mechanism for a raw 20% damage buff on full locks.

Explosive Chemical Rounds 21111
My personal favorite overclock on the Loki, this build packs explosions into your Loki. This build allows for much faster reactions to hordes and more horde control overall as you only need to get 3 locks on one bug to trigger an explosive shot. The explosions themselves have a fear chance as well making it a potent crowd controller.

High Damage Builds

Executioner 21322
Instead of focusing on versatility like the previous Executioner build, this one opts for high damage outputs. This high damage output can be put to use in hordes as well by lining up your shots so blowthrough rounds can tear through multiple enemies.

This build is particularly powerful in Elimination missions.
Deepcore 40mm PGL
The Deepcore is the first secondary on the Engineer and has a lot of fun builds to play with. I always come back to the Deepcore as it's always a reliable and fun option even if it isn't as powerful as the Breach Cutter.

General Purpose Builds

RJ250 Compound 21122
Ever wanted to feel like a Scout? Well now you can with RJ250 Compound you can fly around the cave and launch your friends too. This build is really solid at providing support horde clear and setting enemies on fire. It can be very useful to grenade jump away when surrounded too.

Compact Rounds 32222
This is another well rounded PGL build and the Compact Rounds overclock can be replaced with Pack Rat or Clean Sweep.

Fat Boy 22222
Fat Boy is a crazy fun and highly dangerous overclock that is exceptionally effective at clearing out bugs and providing area denial. This build uses the Tier 5 Spiky Grenade for ease of use and to give more direct damage combined with area damage.

This is very useful on Industrial Sabotage missions

High Damage Builds

Fat Boy 21221
The full crowd control package maximizing ammo and radius. Make sure to shoot near a bug or risk having a nuclear warhead bounce dangerously around the cave.

This is a really nice build for Escort missions, just try not to hit Doretta. ;)

Hyper Propellant 21212
Pocket Sniper Rifle is the easiest way to describe this build. Losing most of your crowd control means you will likely want to bring crowd control options for your primary instead.

This build is highly effective on Elimination and Industrial Sabotage missions.
Breach Cutter
This is the most powerful weapon in the whole Engineer kit. It can crowd control and do direct damage incredibly well and most of its overclocks are very powerful. There isn't much to explain about this weapon other than shoot it at straight lines of bugs or big bugs.

General Purpose Builds

Spinning Death 11122
Spinning Death is incredibly fun to play around with. Running Disruptive Frequency Tuning for stun and Plasma Trail helps maximize the amount of damage dealt by each shot. L.U.R.E. grenades synergize quite effectively with this build. It's also important to remember that the projectile still moves forward albeit slowly.

Light-Weight Cases 12122
Solid general use build that can do just about everything. The overclock can be interchanged with Stronger Plasma Current.

Return to Sender 11113
Return to Sender used to be the strongest overclock on the Breach Cutter. Even though it isn't in the same glory (or rather overpowered) it is still incredibly powerful. The overclock essentially gives you double damage on most enemies, this makes the weapon highly effective against bigger targets.

This build is particularly useful on Elimination missions.

Inferno 21111
Inferno is a powerhouse of an overclock and with the Tier 5 Explosive Goodbye you get a super potent combo. Explosive Goodbye is typically skipped in favor of Triple Beam or Plasma Trail, but with Inferno the Explosive Goodbye's lingering effect is great at lighting Oppressors or Praetorians on fire. It also is a great way to kill swarmers. This build has been surprisingly versatile for me and I highly recommend it.

Elemental Builds

Inferno 21122
Inferno is an overclock I think is frequently overlooked. Fire provides more lasting damage out of the Breach Cutter and synergizes with the LOK-1's bonus damage to flaming enemies.

High Voltage Crossover 11123
This build makes the most sense to go along with many of the Stubby builds as it applies electricity to enemies. Another solid overclock that generally boosts your damage output as Engineer.
My Builds
This is the section for those who just wanted to see some full builds.

Here's a bunch of my builds that combine all the different weapon builds I listed above.

Seeker Rounds All Purpose Build
Elimination Mission Build
Industrial Sabotage Build
Electrical Build
Personal Favorite
Sheer Crowd Control Build
Low Effort Build
Final Thoughts
I hope I gave you some new build ideas or made you feel inspired to use some new Engineer weapons. If you enjoyed my guide be sure to Like and Favorite at the top!

Have any suggestions or builds I should try or add? Comment them below.

ROCK AND STONE!
7 Comments
Papazhoom 14 Jun, 2022 @ 6:16am 
nice
alwayscompany 24 Feb, 2022 @ 9:54am 
In the mission, to fight against swarms, you create "YOU CAN NOT PASS" deathzones/chokepoints with your plattforms and drills (you need to fight as a team so all bugs go to one point, no use if everyone fights in a different cave)
Note: nice perks are:
elemental resisstance (you get less self inflicted arc damage)
friendly fire (your team get less self inflicted arc damage)
dash ( better swarm managment)
shild link (you should fight at the same place)
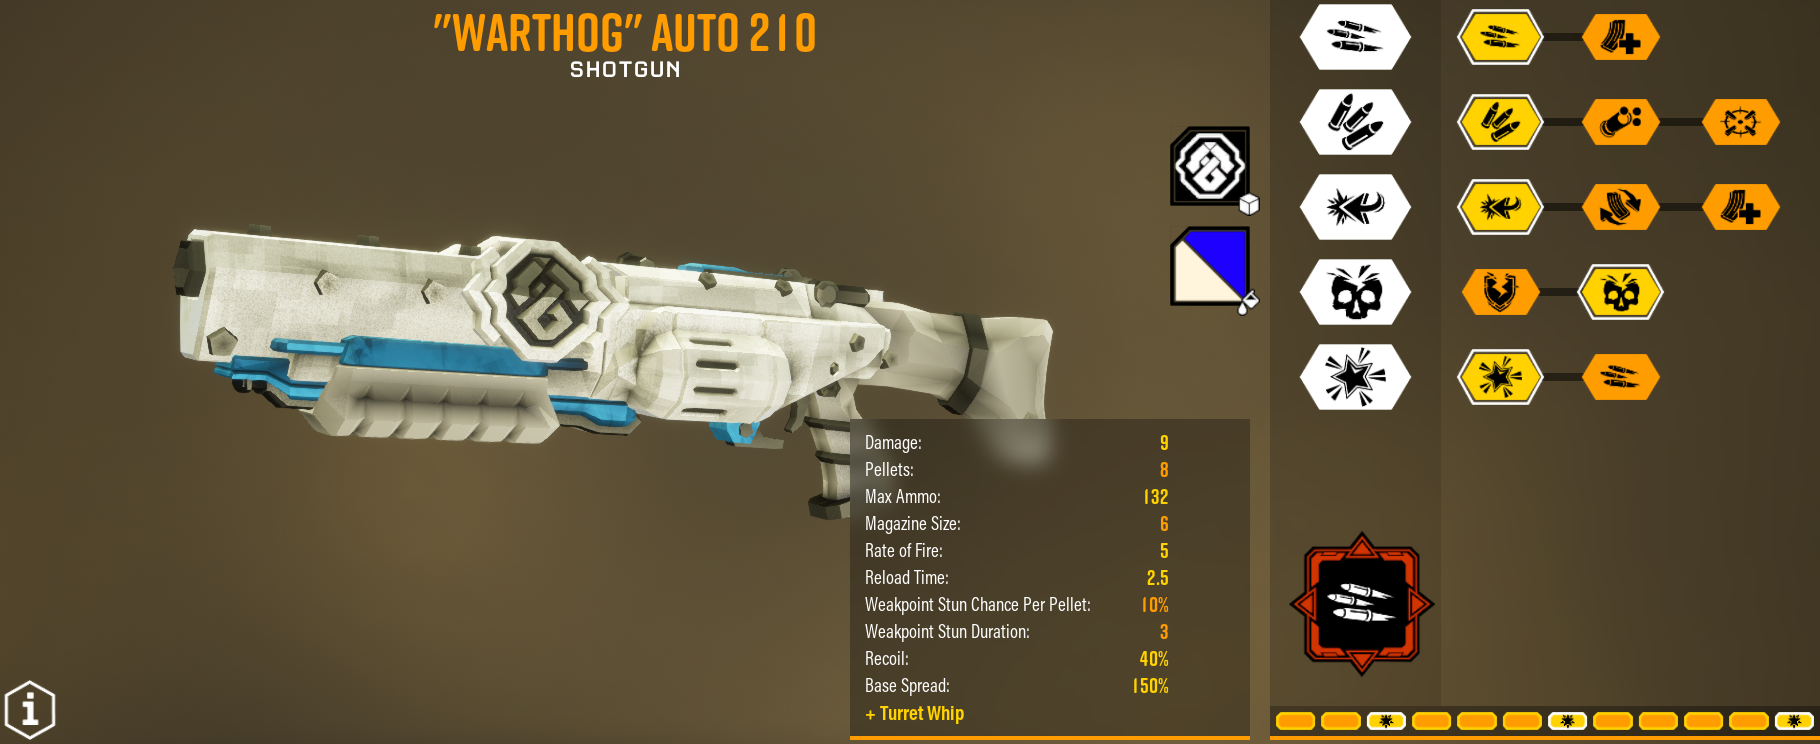
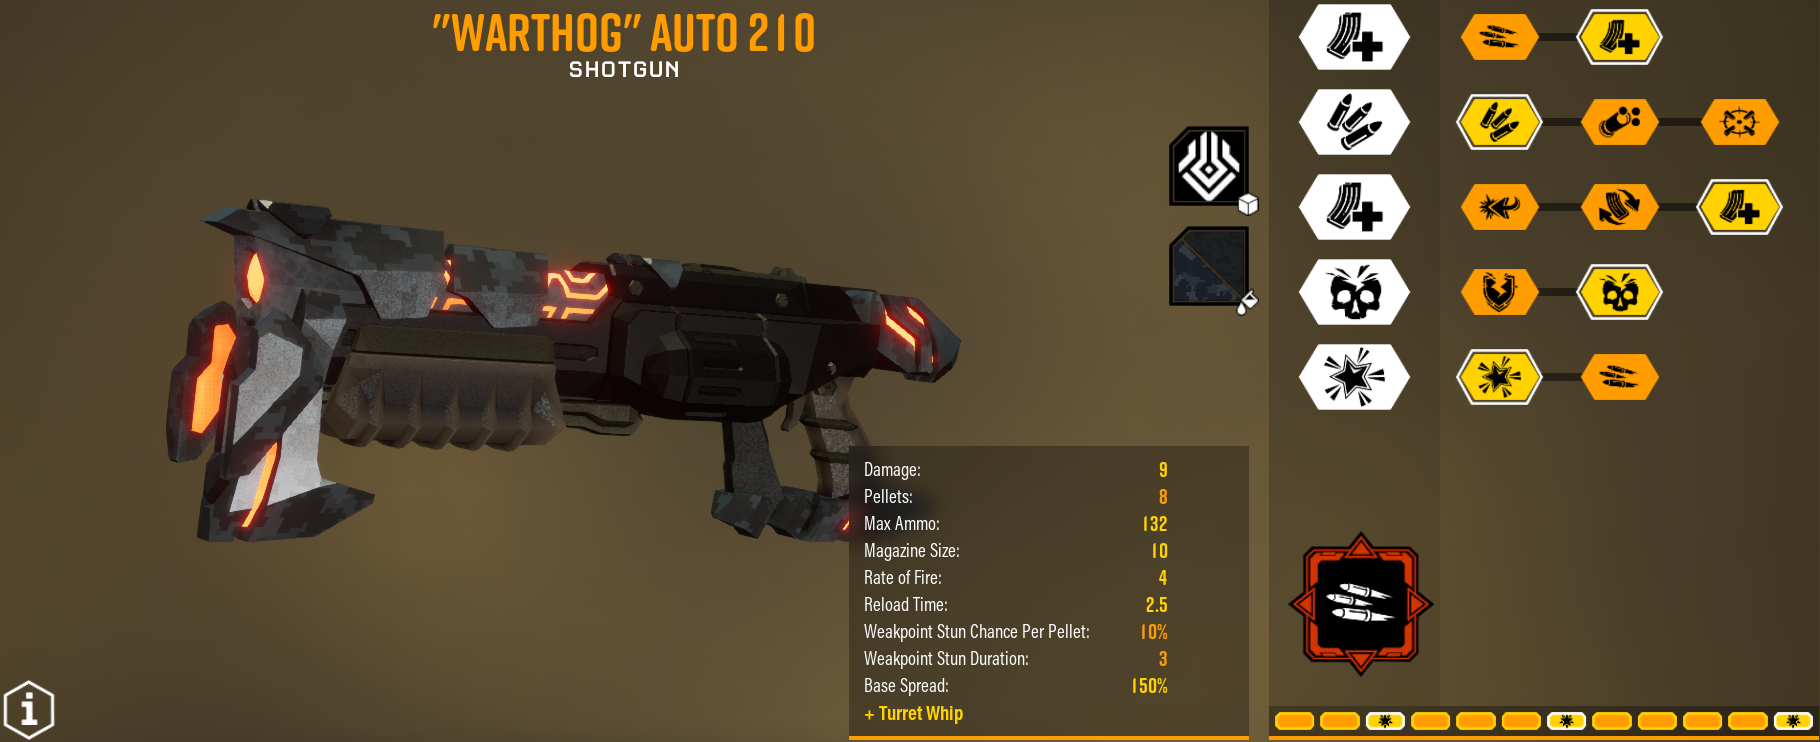
Turret arc is best at salvage or esscort missions, good at minning and egg hunts
weak at elemination, aquark, industrielle sabotage and against mactaras.
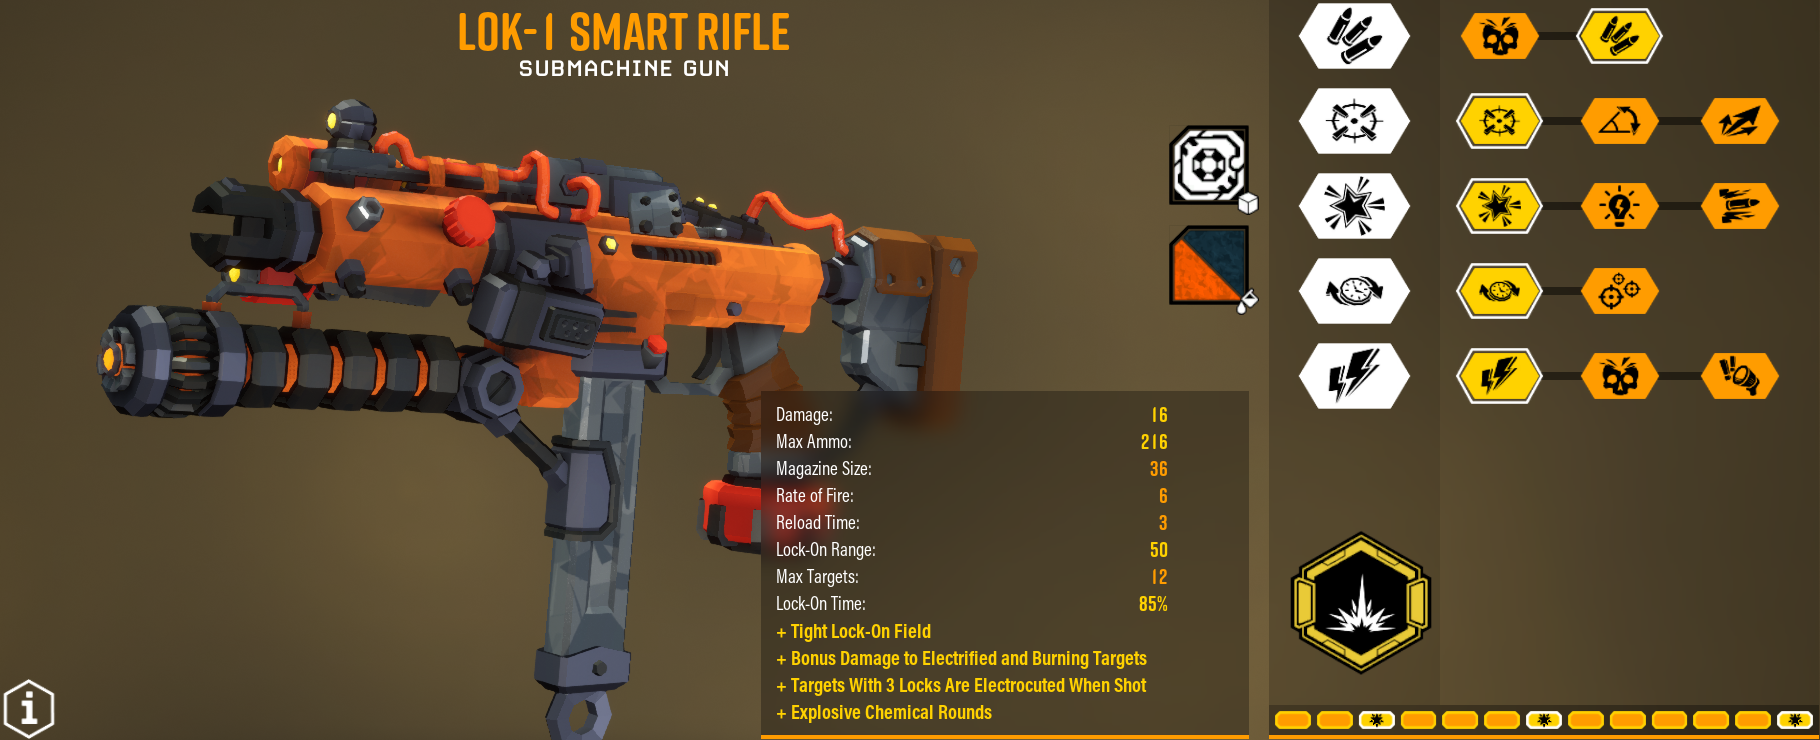
R&S
alwayscompany 24 Feb, 2022 @ 9:54am 
stubbys Turret Arc OC can be realy good but it has a lot of pros and cons
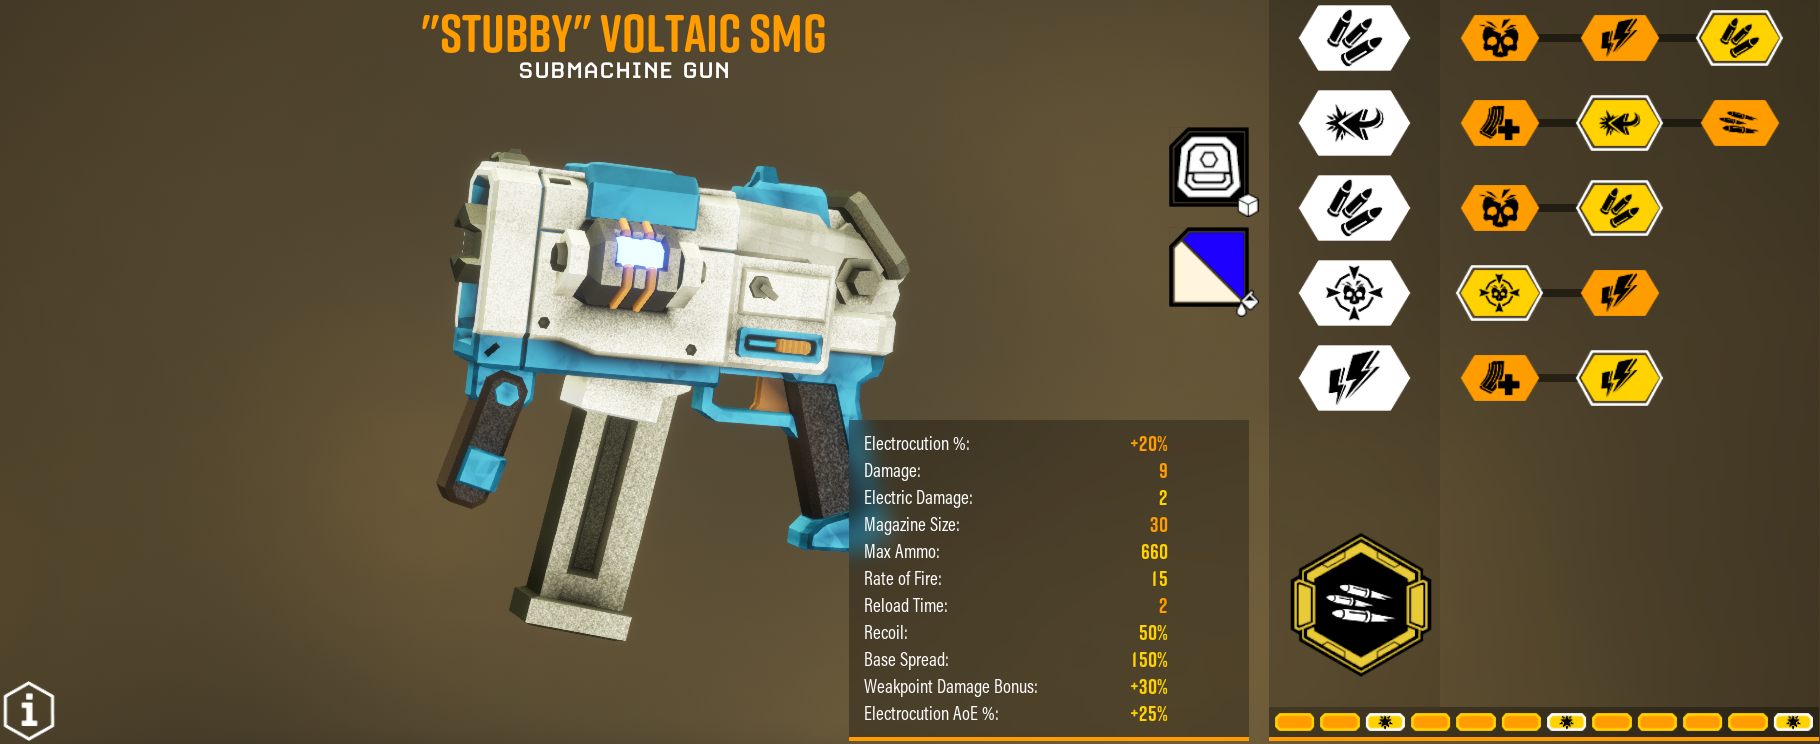
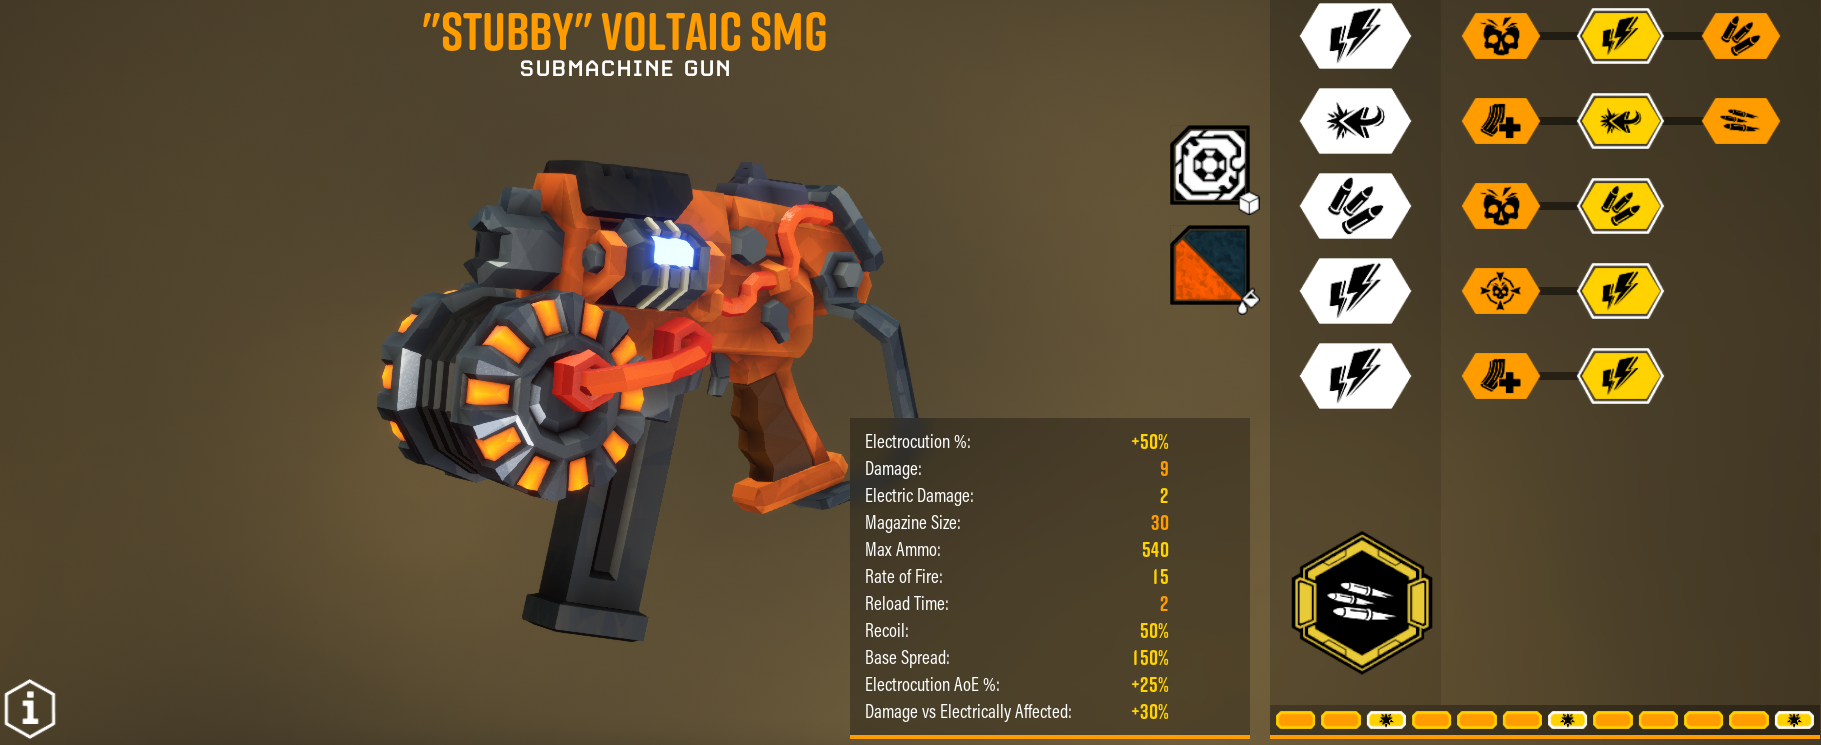
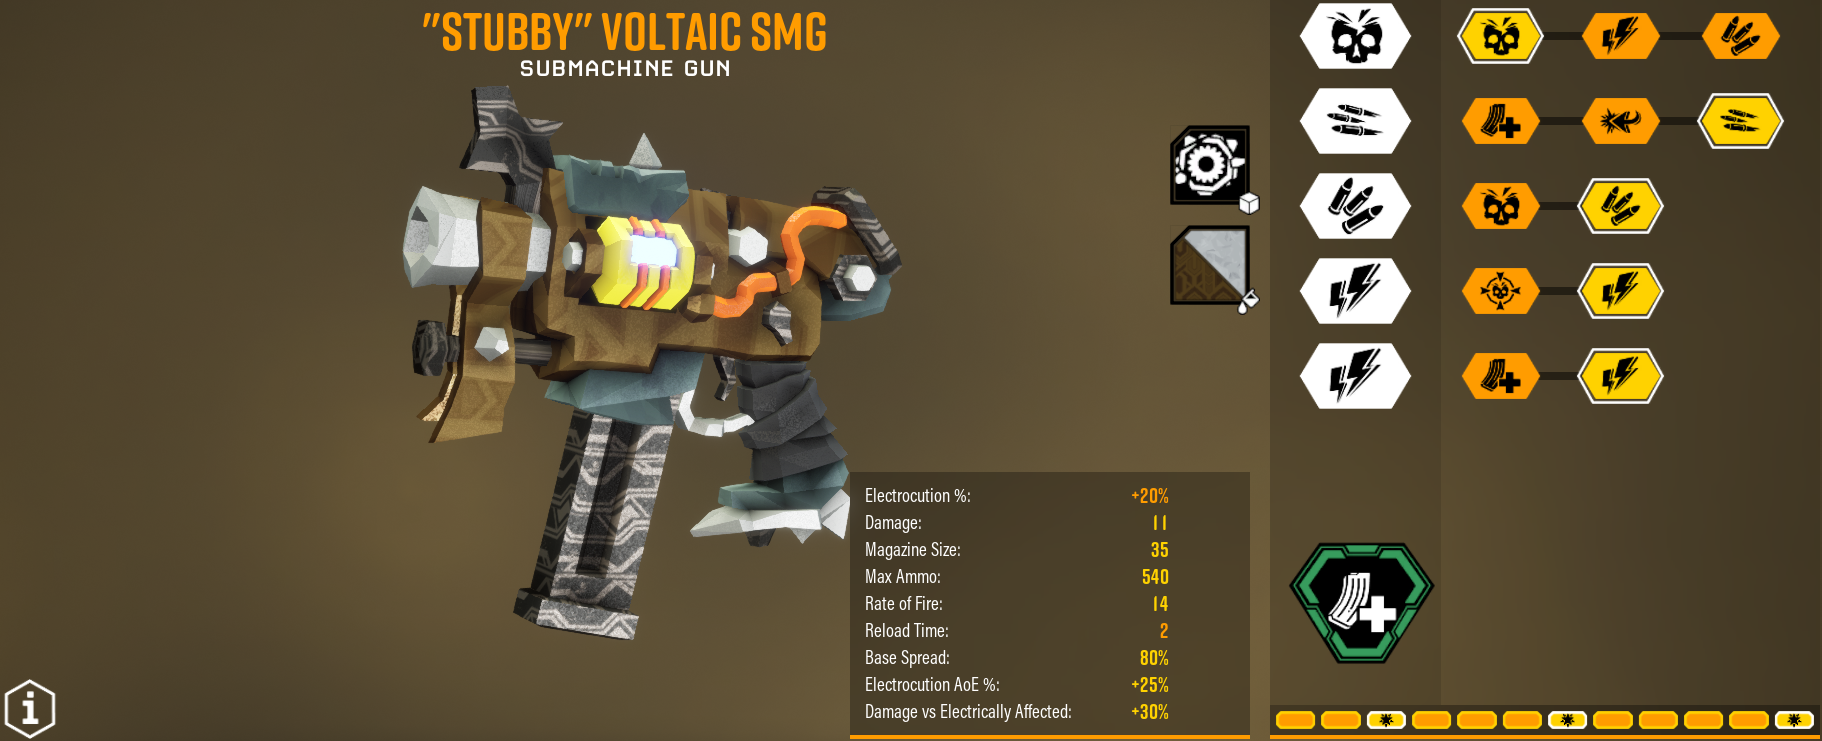
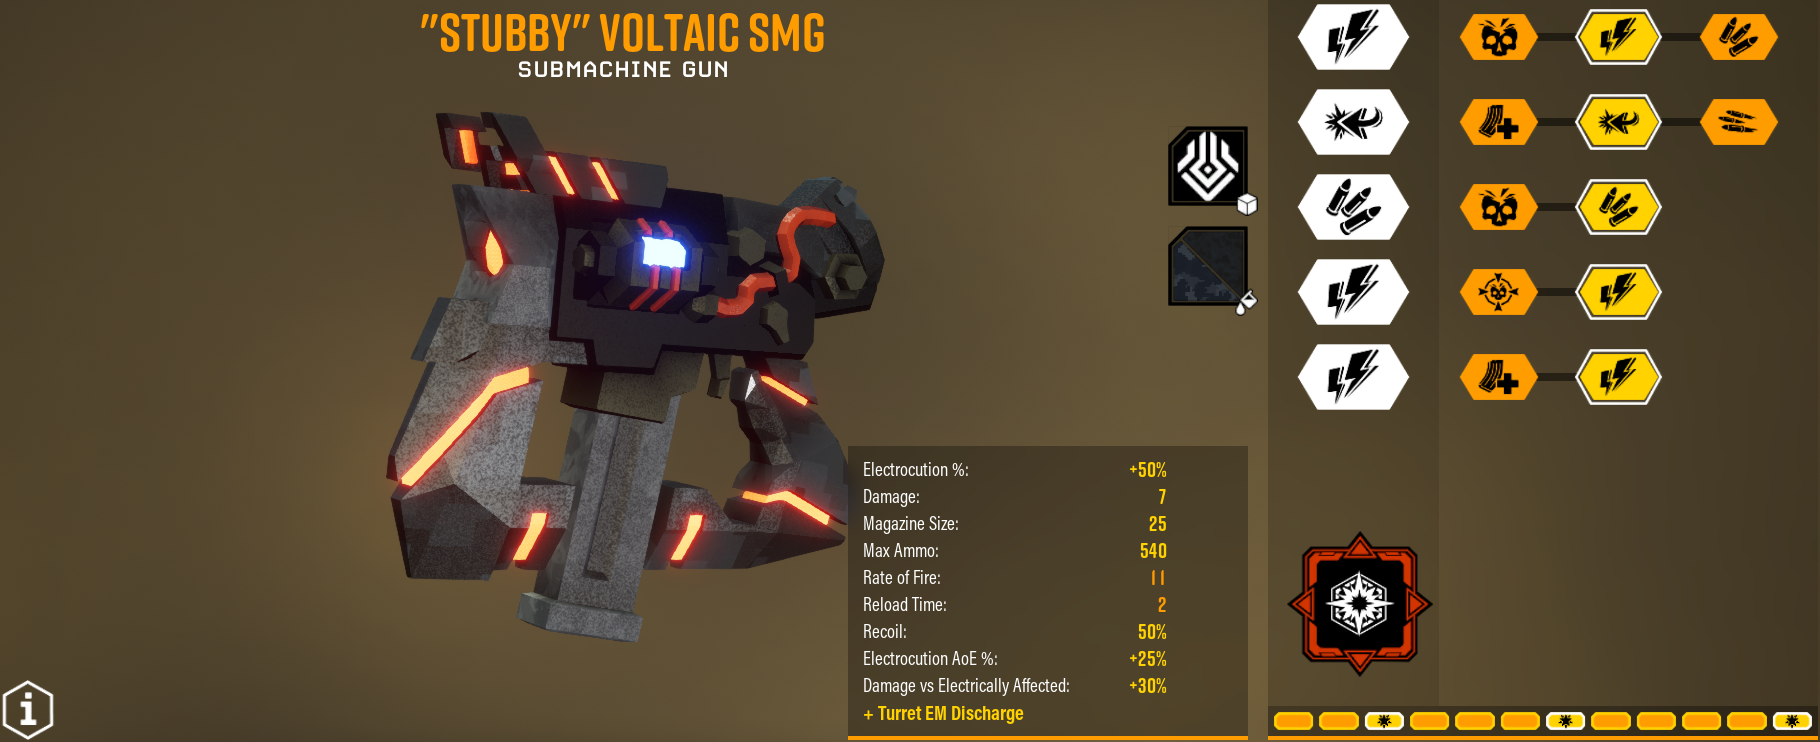
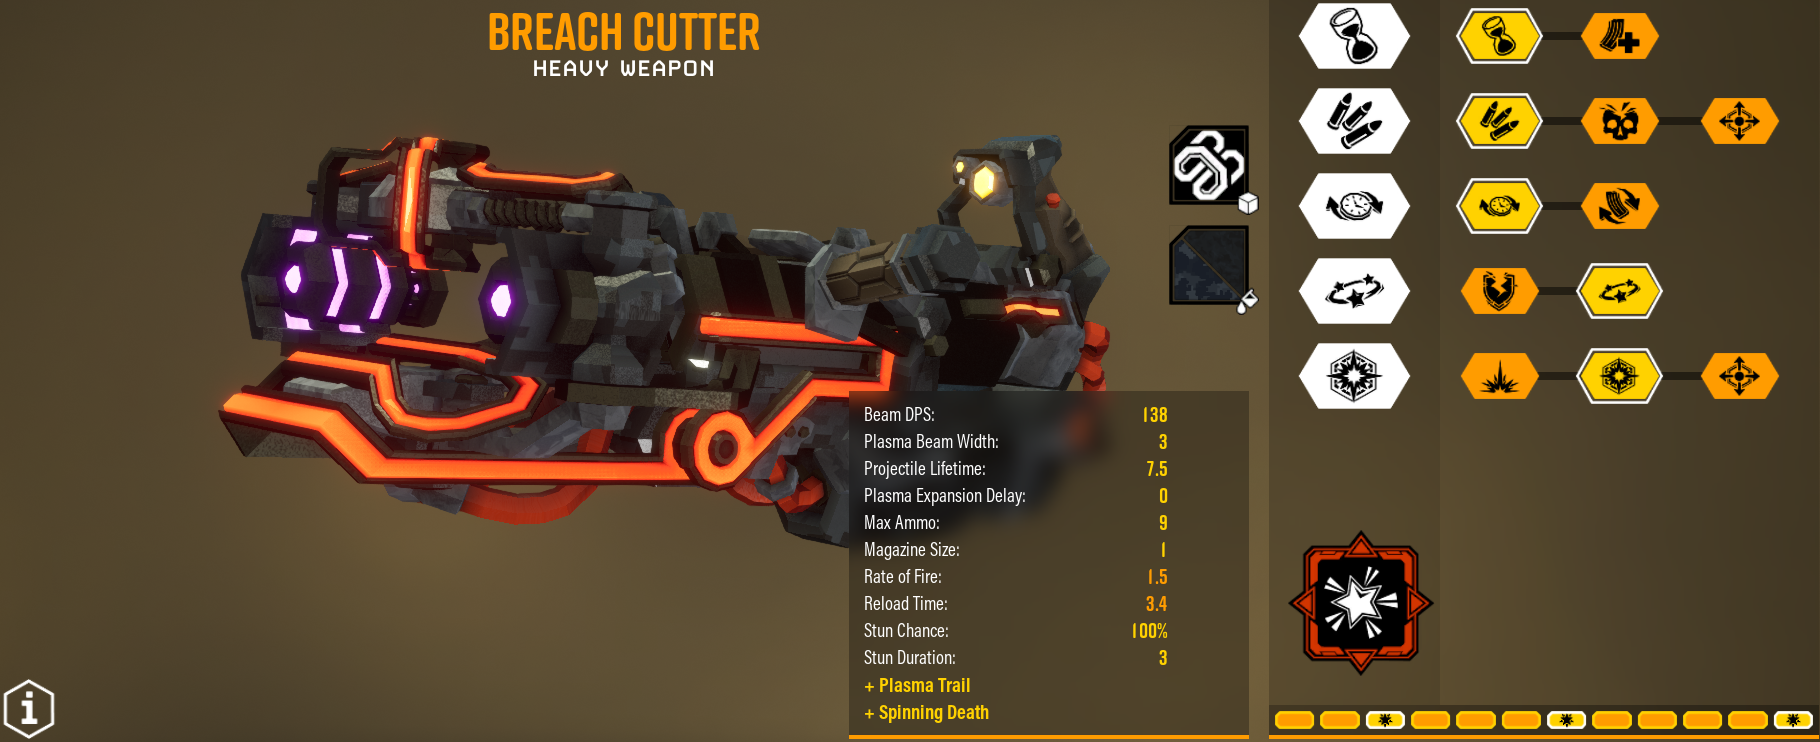
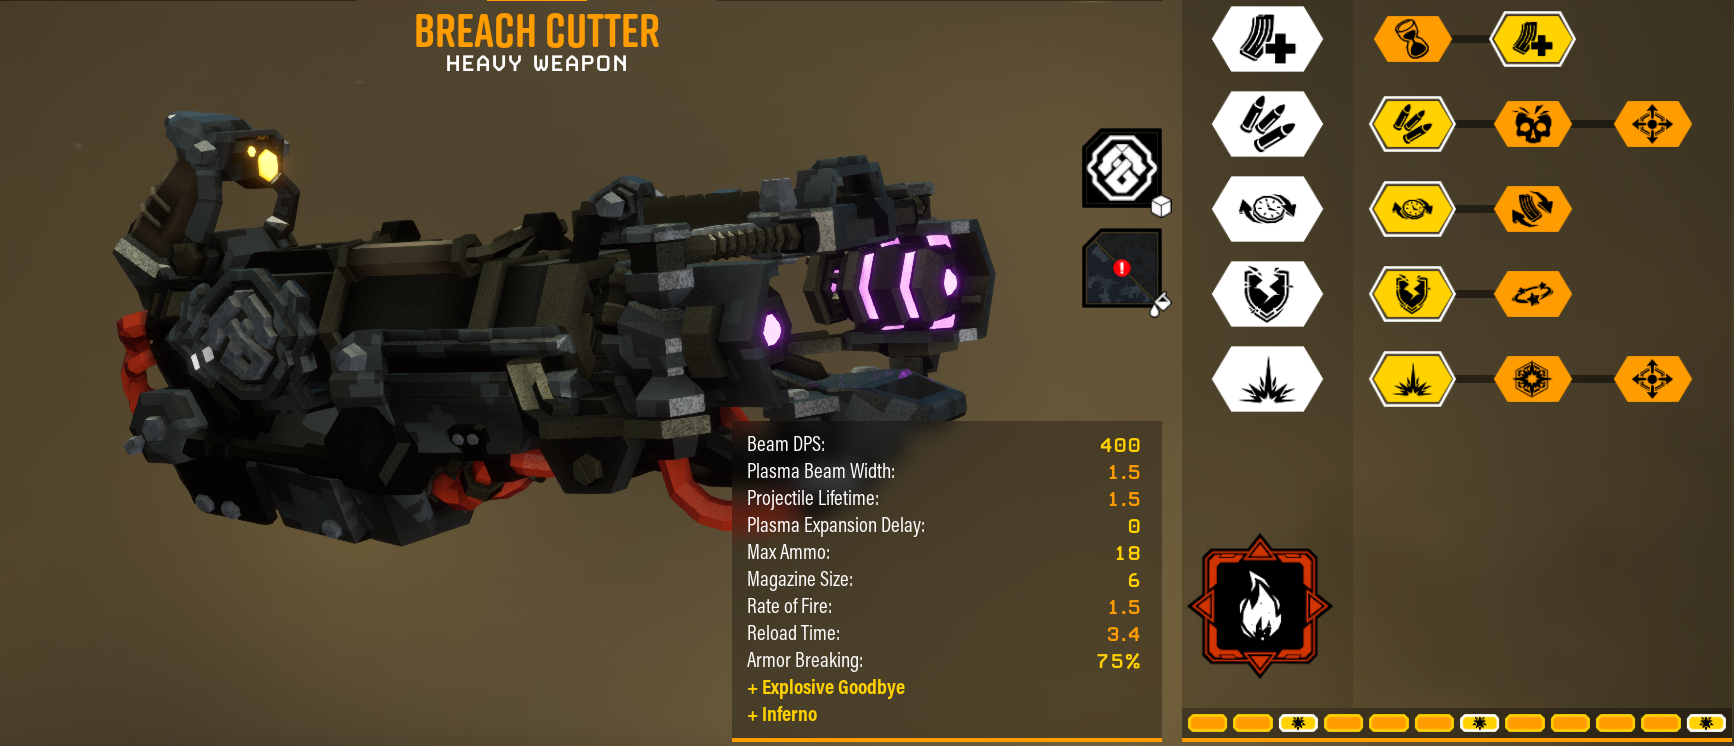
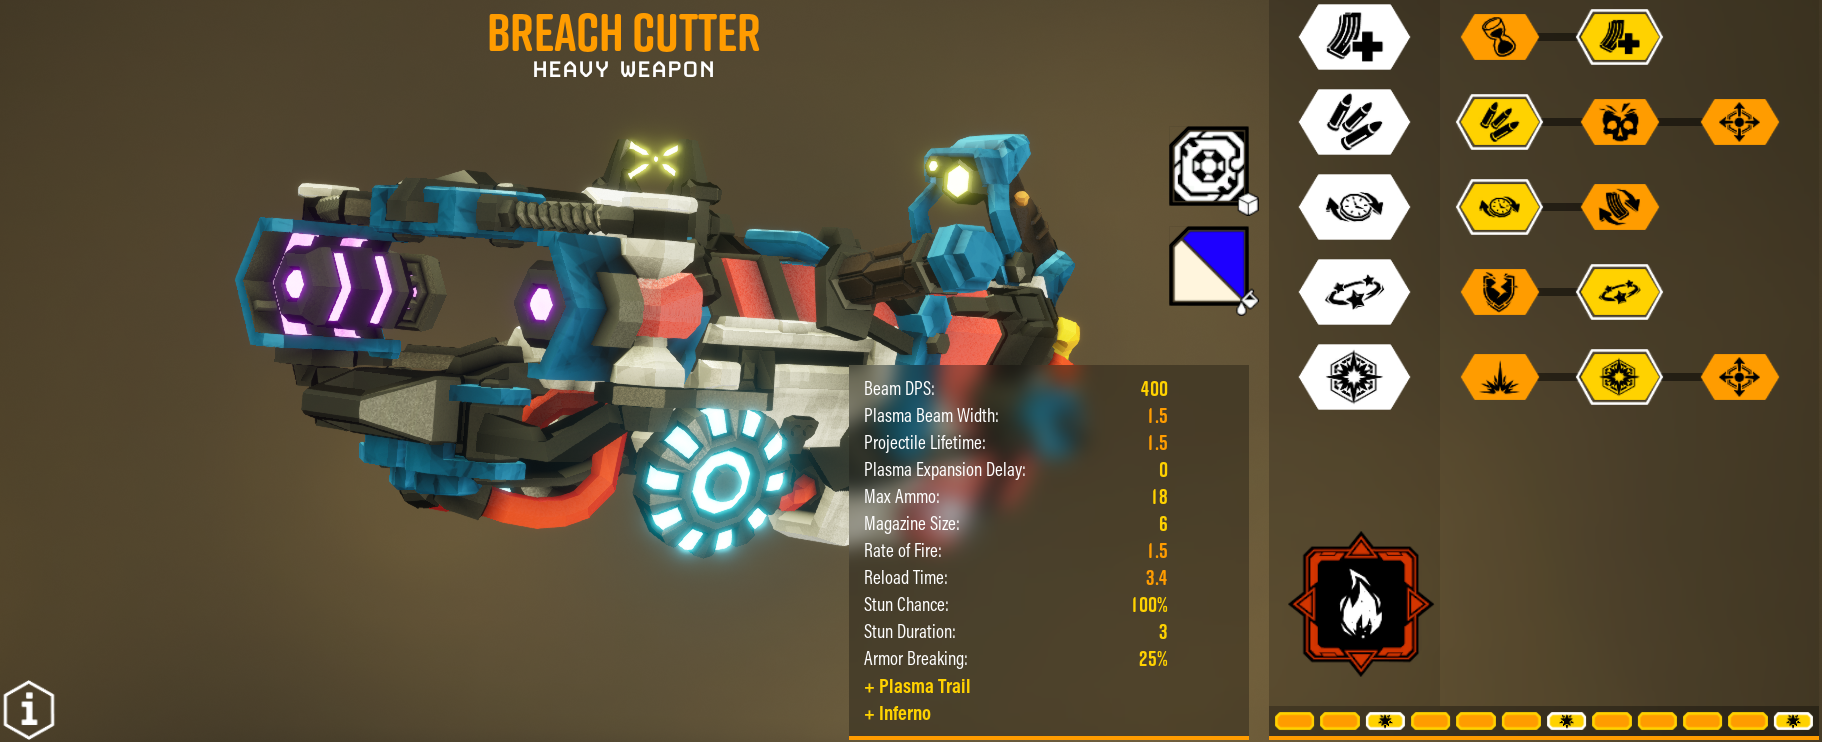
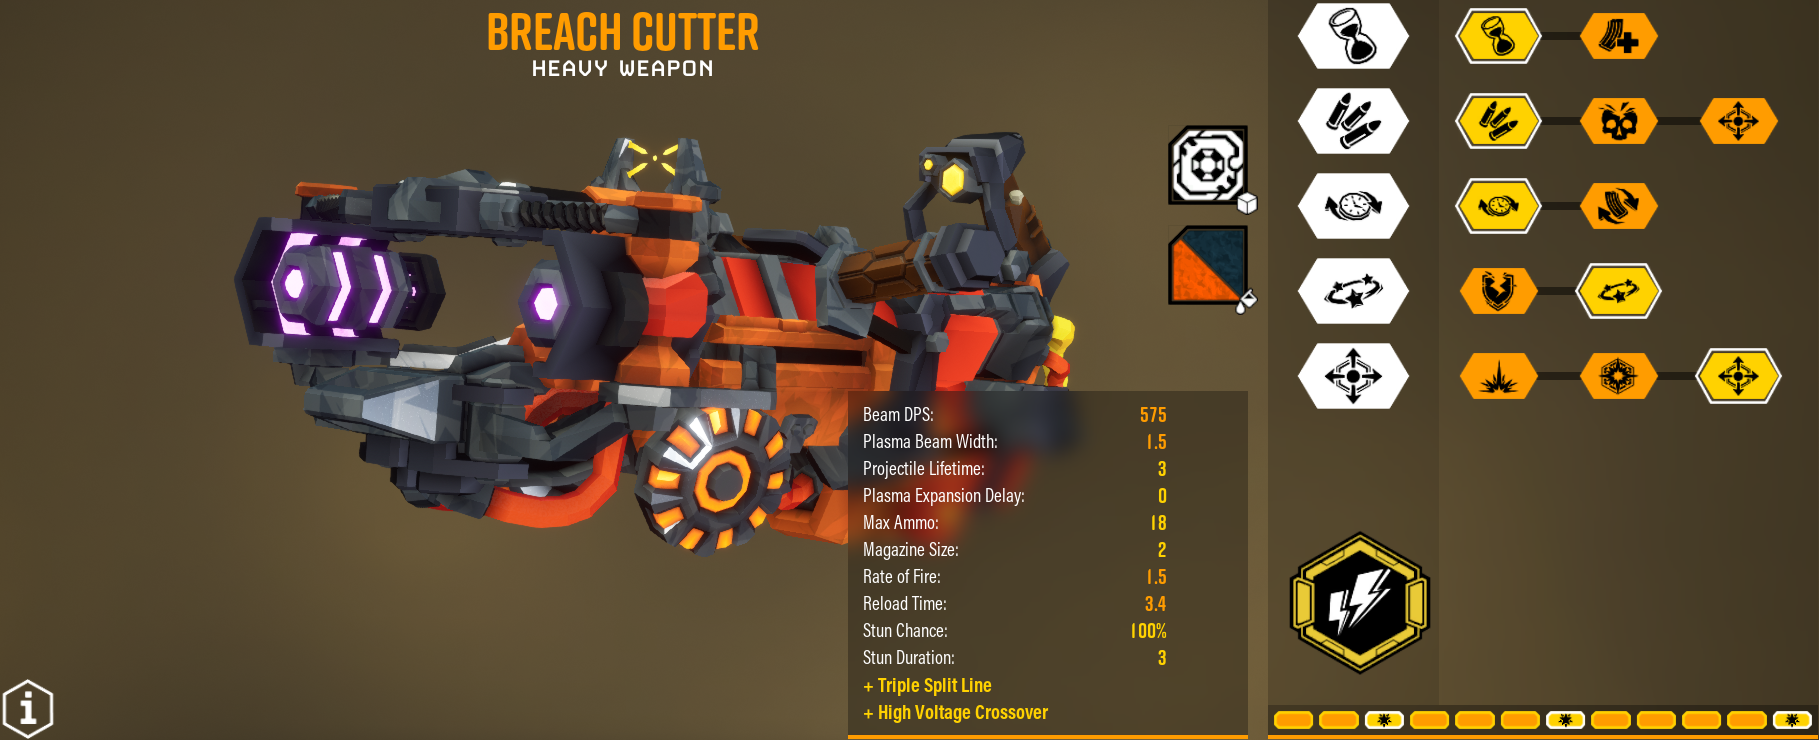
You can use a electric stubby build and ( i recommend) a spinning death build for the BC with lure.
BUT DONT JUMP in an running mission with turret arc!
1. this can (and will) kill your team
2. you need a team to improve and compenste your build
2.1 a second ing helps a lot, because you can use his turrets too (one turret can "support" multiple arcs)
2.2 a driller with an CC build (sticky flames, sludge pump, NO cryodriller, it is suicide)
2.3 and a dwarfe with tactical high range to kill the range bugs (scout, gunner, ing)
Bad Time Bagels 21 Feb, 2022 @ 7:27pm 
Maybe I'll give it a try then, thanks
NK  [author] 21 Feb, 2022 @ 5:04pm 
I think I've used choke before but I don't have much difference in experience between using the choke so i run bigger mag for more shots
Bad Time Bagels 21 Feb, 2022 @ 3:58pm 
This is an awesome guide, but I'm curious why you don't employ Choke on the Warthog to make your shots count, especially at longer ranges?
House 21 Feb, 2022 @ 10:49am 
ok thx cool beans dude