Nimbatus - The Space Drone Constructor

Nimbatus - The Space Drone Constructor

38 ratings
So, you decided to try out the programmer...
By Khadgar
I beat the game as a programmer, and so can you! -- A basic guide to getting past the initial learning curve of the programmer class.
2
   
Award
Favorite
Favorited
Unfavorite
So, you decided to try out the programmer.
You've made a terrible mistake. I'm sorry.

You've made a wonderful choice. Congratulations!

The fact that you are here, reading a guide, instead of conquering the universe, however, implies you are a bit overwhelmed, and aren't quite sure how to get started. Fear not! This guide should set you on the path of galactic domination! Or, at the very least, on the path of maybe beating a mission or two.
Who this guide is for
If you haven't played Nimbatus at all on any of the other classes, even a little bit, this guide isn't for you! Go play another class for at least a level or two and come back!

The goal of this guide is to help out people who want to try out the programmer but couldn't make any headway, or for those who did try out programmer but got stuck somewhere further along the way. (Probably with collecting toxic barrels or ice mantas. Seriously, screw both of those.)
Getting Started
The first thing to note about the programmer is there is no penalty for failure. There is no deploy cost of resources, and no increase of threat for launching a drone. This is good, because you will likely end up launching a lot of drones as you work your way through the programmer.

The second thing to note is that you have at your disposal the complete arsenal of all blocks, all weapons, and all logic parts in unlimited quantities. This means you can make your drones as big and wasteful as you want from the start. Overkill? No such thing!

If you've already played through the base game, and are familiar with using the preview mode to test out your drone -- forget everything you know. Preview mode is for chumps. We only test our drone in a live environment in this guide! (You can still use preview mode if you want, but I did not find it very helpful on the programmer.)

Tutorial 1 : My First Drone
Let's tackle the first mission that you start on in every run of Nimbatus - Locate the Black Box.
How hard could it be?
The goal of this mission is to break open several containers scattered around the map until you break open the one that has the black box mission objective in it. It's quite simple. Accomplishing this normally is a breeze. In programmer mode, however, it's a bit trickier.

Go ahead and open up the drone list, and create a new drone.
The start of something wonderful. Or terrible.
If we launch our drone right now, having done literally nothing to it at all, we will find that this is not enough to complete the mission. It just falls harmlessly into the container where it sits forever.
I have a good feeling about this!Darn, I was SURE that was gonna work.
At the bare minimum, we will need:
  • Power
  • Fuel
  • A weapon
  • A way to move around


Power and fuel are simple. Just slap on a single fuel cell and power block, and that should be enough for a basic no-nonsense drone. A drill on the front so we can dig our way through any obstacles, and a VTOL Thruster somewhere near the front to steer the whole contraption in the proper direction. For the VTOL thruster, make sure to set the target field to be 'Missiontarget', so it will aim where we want to go.

Now we reach the first differences of programmer mode: you can't press any keys! The drone will only do anything if you set up keys or tags for it to do so, so lets do that now. First, in the top left, click the TAG button to turn on tags. Tags are just like key inputs except you can name them, and make as many as you want. I exclusively use tags for all of my logic, and I highly recommend you do as well. You'll notice a second field on all your objects once you turn on tags. The right side is where you'd bind a key (useless to us), and the left side is where you bind tags.

Now, with tags on, lets set up a really simple input for us. For our drill, we are ok with it always being on, so lets go ahead and give drill activation the tag called ALWAYS. Our engine is also fine to always be on, so lets give it's activation another ALWAYS. Right now, if we were to launch our drone, nothing would happen, because we haven't actually done anything yet. "ALWAYS" is just a name for a signal which we have yet to define. Lets go ahead and define it now.

On the bottom parts panel, select the the 2nd to last section, Logic Parts. Spooky! For now, we are going to use the very first part on the list, 'Button'. Go ahead and place one of these down somewhere on your drone. When you select it, you'll see that it only has 1 setting: Output. Go ahead and set the tag for the output binding to be ALWAYS. Now, this button will always be pressed, since thats what the button object does - it just presses the button you define as long as it exists. Therefore, we called it always to represent that it is always being pressed.

If you've been following this guide, your drone might look something like this:
I dub thee - Droney McDroneface
Lets go ahead and launch it and see how it goes.


Good ending: Hooray, we found the black box, and can move on to the next level! Don't do that yet, however, as there's more to do on this level before we leave.

Alternative ending: Oh no, we dug straight through a purple plant thing and blew up before we found the black box!

If you were unfortunate and had your drone blow up before reaching the mission target, fret not. It's time to upgrade our current drone. You weren't planning on settling for this wimpy little thing, were you? There was hardly any programmer-ing done either! Hold on to your butts, because it's time to introduce...
Tutorial 2 : My First Factory
The Factory Part! Behold! It's square! It's orange! It has 3 configuration options! And it is going to be one of your best friends when playing as the programmer.


Sure, you don't have to use it, but judicious use of the factory block can make your life as a programmer much easier.

Let's go back and edit the drone we made just a moment ago.

If you happened to play the Engineer class on Nimbatus already, you will be aware of the wireless energy, fuel, and resource transfer that the class has. If not... then.. consider yourself informed. What that means is that your fuel and power blocks don't need to be connected to the blocks using fuel or power. This includes resources, but we'll get to those in a moment.

What this means is we can leave all our fuel and energy blocks safely at home, while the actual 'do stuff' parts fly around as their own drone, unencumbered by the weight and size of power and fuel. Logic blocks are wireless as well by default.

So, lets take our previous drone, and slightly tweak it. We will stick the power & fuel directly onto the drone core, and then leave the drill, thruster, and engine as they were.

Next, we will attach a factory block to the drone core. Anywhere will do for now.

Then we will attach our little tiny drill-drone to the factory block. The factory block prints everything 'after' it in the tree of parts, so the factory block must be between the drone core & the drone itself.

Lastly, we will add in the logic tags that make the factory work. For now, we can set up the factory part to Decouple --> ALWAYS and Print --> ALWAYS.


Feel free to test this new variant out. Remember -- launching drones as a programmer costs you literally nothing. No resources, no threat, so testing out something like this only takes time.

You may note that the camera is still following your drone core, and not your sub drones. There are a few ways to solve this issue. For now, you can just click the 'Free Camera' button in the top right of the screen, that looks like this:


In short order, you should see your printed drone fly off to attempt to complete the mission. Depending on how many parts your drone is comprised of, you will see the printer begin to print out another drone following the first... and another, and another, forever.

Cool! Now, if our first drone fails from blowing up on a purple plant, or gets shot down, or manages to get lit on fire from the container engines, or otherwise get stuck, you'll have another shot at it! And another!

Printing out an unending series of drones might not be ideal, however, but for now, it's a big step up from the one-off attempt we made earlier. Redundancy! Feel free to tweak your drone as desired before moving on to the next section.
Tutorial 3 : HELP THE FACTORY HAS GONE CRAZY
That's... a lot of drones
Correction -- THATS a lot of drones
Despite being way too many drones, this is actually really cool lmao
Yeah, they tend to do that. I watched a movie once where a net of factory parts spread throughout the sky, took over the world and forced humanity into hiding. Then one factory part went back in time to try to stop the other factory parts from terminating the--... what was I talking about again?

Here's several ways how you can make your factory parts not completely tank your poor FPS from printing out a bajillion drones.


The One-drone-at-a-time method
This method works well for when you have a relatively complex drone that should complete the mission, if onyl it didn't blow up on that mine / get burnt to death by a lava bug / have it's magnet shot off by an enemy ship.

This method relies on the Button logic part & the NOT gate.

Here is my cool example drone which is totally perfect and has no problems whatsoever.
As it stands right now, this setup will print out unlimited of this drone forever until the heat death of the universe / my CPU melts, whichever comes first. I really only need one of these fellers out at a time, however. So, to ensure that my factory part only prints a drone when one doesn't exist, I'm going to add on a button directly onto the drone itself. Let's try putting it here. We'll give it the tag of DRONE EXISTS, and as long as that button remains un-blown-up, the signal "drone exists" will be put into our logic network.


As we want our factory part to only print out a drone when one doesn't exist, we just need to use the NOT gate to invert this. I like using descriptive names for my tags to help me keep things sorted. So, I plop down a NOT gate somewhere on my main power brick. For the input, i put DRONE EXISTS, and for the output, I call it DRONE DOESNT EXIST. What does this is make it so, whenever the DRONE EXISTS signal is --not-- on, then the not gate will output it's signal. Effectively, we have a little switch. Either it exists, or it doesn't exist.


Now that that's set up, we just tell the printer to only print when DRONE DOESNT EXIST (leaving Decouple set to always decouple), and voila! The printer will print out exactly one drone, and then stop. If the existing drone is destroyed, it will print out another, and repeat forever. FPS saved!


Here's a handy diagram of how the logic flows:

Timed Life method
If one drone at a time isn't enough for you, there is always the option have having your drones self destruct after a certain amount of time has passed. This can be effective in certain circumstances where you want a lot of drones out at once, but know that eventually they will run out of stuff to do, or become too damaged to continue. Not point having a bunch of half-functional drones sitting around taking up power and fuel.

For this method, you, again, just need 2 things. TnT, and Long Impulse Giver. Take your drone as it exists now, and slap a bunch of TnT on it. You heard me. Do it. It's safe, I promise! How much you need depends on the size of your drone, but the basic principle is to add enough that, when it explodes, it takes the entire drone and all its parts with it. Given that TnT does 500 damage, and most parts have at least 1000 HP, you will need 2 TnT at a minimum. More if you have high HP parts, or a large drone that cannot fit in the radius of a single TnT. Then, once it's rigged to blow, attach a long impulse giver somewhere. This will be your timer. If you attach this to your printed ship, the timer will start the moment the ship is printed.

Just give it the same output signal as your TnT has, and whenever the timer reaches its limit -- kaboom! No more drone. Please note that if you plant on printing out a swarm of drones at once, you may wish to employ the Logic Splitter part (covered at the end of Tutorial 4b) to ensure they each have their own timer, and dont inadvertantly explode one another.

This is completely safe and I foresee nothing going wrong with making my ship explosive.
Tutorial 4 : Mining Our Way To Riches
We're rich! We're rich! We're rich! We're rich! We're rich! -- Dwarven Proverb, Planet HoxxesSo... you've gotten a handle on making a basic drone, but you either didn't want to leave the first planet until you've mined it out, or you've been leaving resources behind and decided it's time to stop! Let's get to mining!

In my opinion,there are 3 main ways to go about mining a planet's resources: Incidental, Altitudinal, and Radial.

Incidental mining is the simplest method. Just slap on a bunch of resource collectors to whatever other drone you have made for the mission, and whatever minerals you happen (incidentally) to travel near you will mine! Easy peasy! But clearly, it won't actively seek out resources, and you'll likely leave a bunch of un-mined minerals behind. It's still better than nothing, however.

Unless you wanted to get extremely complex, there isn't a good way to seek out and mine directly towards resources while leaving the rest of the planet untouched, so the remaining 2 methods are just 2 variants of full-planet strip mining.

Altitudinal mining would be mining a planet, one altitude at a time, making use of altitude sensors. So, you'd make a ship travel clockwise around altitude 60, digging and mining everything in it's path, until it had completed a full circuit of the planet. You might have a second drone doing altitude 50, and another, 40, and another, 30, and so forth. Or, alternatively, just have one single drone which you adjust the altitude sensor on manually and run the program multiple times until all the minerals are gone. It's simple and effective, and with the use of factory parts, if a drone at a certain altitude crashes and burns due to enemies, you can just re-print it and try again until you succeed.

Radial mining is similar to altitudinal, except instead of mining the entirety of one altitude at a time, you mine the entirely of a single 'slice' of the planet, from space to core. As a bonus, gravity helps you do the work, since it's ultimately just falling, but with style.

There are probably other fancier ways to mine as well, but these 3 are the simplest and most effective ways I've found to rake in the minerals.

Incidental Mining
Here is our example drone from earlier.
Gifs? In MY guide? The future is now!
It flies around and shoots stuff. Very basic. Watch closely to see how how you would convert this into an incidental mining drone.

Set the resource collectors to always be on, and any time your drone gets near yellow or red minerals, you'll vacuum them up and plop it into your resource tanks you placed in your container earlier. It's not really a complicated process. If your drone is bigger than this, just put more resource collectors on it. Try to ensure you have at least 180 degrees of coverage in the direction your drone is travelling for optimal results.

Altitudinal Mining
To make an altitudinal mining drone, you'll just need a few things: A way to dig through terrain, a bunch of resource collectors, and an altitude sensor. Optionally, a tilt sensor will help keep your drone pointing the right way. Let's build one together. We'll start with a basic setup -- a few drills and a few engines + the sensors. Here's a basic setup I came up with.


And some basic altitude sensor logic back on the power brick.

Right now, the altitude sensor will do one of three things: When it is higher than the target altitude, it will output MINING DRONE HIGH, when it is lower, it will output MINING DRONE LOW. And when it is neither too high nor too low, within the tolerance threshold, it will output nothing. We want a bit more control than that, so we set up two not gates to invert those signals. Now we have MINING DRONE NOT LOW and MINING DRONE NOT HIGH. It might sound redundant, and in some ways it might be, but it helps keep clear what is these signals are actually representing in this tutorial. Lastly, we're going to make 2 more signals that cover the last situations we care about: MINING DRONE GOOD ALT, and MINING DRONE BAD ALT. Now we have separate signals for when the drone is too low, too high, right in the middle, and either too high OR too low.

The drills on the front clear do the digging, and the resource collectors do the resource gathering, so they are both set to always be active. The rear thruster we don't want running all the time, only when we are at our target altitude, so its set to MINING DRONE GOOD ALT. The two internal VTOL thrusters are what let us get to our desired height. They activate whenever the mining drone is NOT at our target altitude, which we defined as MINIG DRONE BAD ALT. By default, they pull us straight down, towards gravity, but if the altitude is too low, that is inverted using the Flip Direction setting, which will push the drone back upwards. TL;DR too high go down, too low go up.

As I mentioned in the earlier segment, a tilt sensor is optional, but we're going without one for now, just to show a way that doesn't need one. The two side VTOL thrusters (yellow border on the image) are going to keep our drone aligned perpendicular to gravity. The bottom thruster is constantly pulling towards gravity, and the top thruster is constantly pulling away from gravity. Since they are the same thrust, the net thrust on our ship will be just about 0, so it doesn't move us anywhere. All it does it keep the top of the ship facing up, and the bottom facing down. Hooray! You can accomplish this with a tilt sensor as well, but I will go over that on the next segment.

Now, let's give it a test run and see how well it works!Death by purple plant thing :(

A rousing success! It mined at our target altitude very capably, and eventually crashed into an exploding plant and became inoperable. Argh, our one weakness: literally anything whatsoever! We'll get you next time, plant!
Tutorial 4b : Mining (cont)
Radial Mining
This is where things get fun. Altitudinal mining is all fine and dandy, but I can already tell, you're a busy person. You've got things to do. You don't have time to sit around and wait. You want your minerals and you want them NOW. You've come to the right subsection. Radial mining is, in my experience, potentially the fastest mining method. It also requires consummately more setup.

The radial mining drone is going to have 2 main parts: the orbiting platform, which traverses the planet's radius, and the actual mining drone, which dives straight down and harvests a strip of terrain straight to the core.

Let's start with making the orbiting platform. We'll also use the tilt sensor this time to make things tidier. Here's a bare-bones orbiting platform I came up with..

With annotations:
.

And a not gate back at the power brick.


This is similar to the altitudinal mining drone from the previous section. We have an altitude sensor telling us when we're too low, some thrusters to act on that signal, some thrusters on the back to make us go forward, and two ancillary thrusters to keep the platform from rotating. The tilt sensor has many of the same parameters to set as the VTOL thruster, but for now we just want it set to gravity. Whenever it gets tilted too much, it will throw out a signal, and the appropriate side thruster will kick on to un-tilt our platform. If you take it for a spin, it will just fly around the planet at whatever altitude you've set, eventually completing a full circle. Now we just need to give it some sort of mining capability.

For this task, we're going to introduce a new logic block, the logic splitter. In simple terms, the logic splitter prevents all logic signals from passing through it. In effect, it makes an entirely separate 'channel' for our signals to operate on. This isn't required, but like the factory part, if used properly, it will make your life easier. The benefits of using this part is that each new mining drone we make will operate independantly of one another, rather than all using the same logic.

So, to start with, building off the basic orbital platform we made a moment ago, slap a factory on the bottom of it, and then build a logic splitter as the first part after the factory. Then, from the logic splitter, build yourself a bare-bones mining drone that can handle the difficult task of digging in a straight line, straight down.

I'm not doing your homework for you, so here's my crappy drone I came up with.

The factory part is set to ALWAYS decouple and ALWAYS print. There is a button part with the signal 'ON', and every single part on the drone is running on that signal. Because we used the logic splitter, we can't use our existing ALWAYS signal from earlier, so we need this part for things to work.

One test run later, and we can see the reults:


The platform is orbiting slowly around the planet, clockwise, and periodically dropping mining drones out the bottom, which drill in a straight line until they reach the core, where they sit in a big pile. It's not complete mining coverate of the planet yet, but that can be tweaked by making the mining drones mine a wider area, slowing down the speed of the platform's orbiter, or even making it spawn more mining drones at once. I will leave you the task with improving the amount of coverage to you. However, I have yet to touch on the reason we used the logic splitter yet.

If you tried to do anything fancier than dig straight down, such as "If you see an enemy, shoot it" or "Avoid crashing into exploding plants", the signals from one of these drones would effect every single drone, since the logic network is global. That is... not ideal. When one drone fires, they woudl ALL fire. The applications of the logic splitter are varied, but for now, we are going to tackle the single biggest issue in a setup like this: degrading performance from building way too many drones at the factory.

To solve this, we will just put in a self-destruct system on each of your drones, by way of TNT & an altitude sensor. Slap on an altitude sensor with the altitude set to something suitably low, maybe -95, and then connect the TNT up to the low altitude signal. Now, whenever the drone reaches the planetary core, it will explode, preventing your poor computer from running into a standstill after a few minutes of drone production. Because most parts have a health of 1000, and TNT does 500 damage, you need at least 2 TNT to successfully blow everything up. Adjust the radius according to your exact needs.

With this new setup, you can happily AFK as your mothership slowly orbits the planet, and you hopefully won't come back to a 1 FPS slideshow.
Tutorial 69 : But How Do I Collect Toxic Bio Barrels Tho? [INCOMPLETE]
[This section is not finished. My interest in the game waned after I beat it, and I'm not likely to fully finish it.]

So you really want to do this mission type? You know you don't HAVE to do this mission type, right? Perhaps you've made a drone that can collect other things, but just can't handle bio barrels, and you just don't want to admit defeat because you're stubborn.

If you're dead-set on collecting a toxic bio barrel, the first thing youl'll have to do is make a plan.

The Plan
To successfully complete this mission, our drone must be able to:
  • A) navigate close to a bio barrel
  • B) not blow up the bio barrel!
  • C) collect the bio barrel in some manner
  • D) navigate back the container
  • E) deposit the bio barrel in the container
  • F) do it again a few more times

Now that we've broken down the steps we'll need to take, we can figure out how we are going to tackle each one, one at a time.

A is simple. We can just use a basic VTOL thruster on the front of the drone to aim towards missiontarget, with some sort of digging apparatus on the front. Drills, lasters, or whatever you like.

B is more difficult. Getting to a barrel might be easy, but how do we not blow it up the moment we arrive? A few potential solutions: Use sensors to disable your digging apparatus when the barrel is in range, research -100% damage upgrade from weapon lab and use weapons with that to dig, design digging apparatus so it doesn't pose a high threat to the barrel in the first place.

C is a standard collection task. Use magnets or a grappling hook to lash the barrel to your drone. Alternatively, use a factory block to spawn a collection drone with those parts on it, if you like.

D is deceptively tricky. Often times, if you just set a VTOL thruster to aim at the container, it will slam into the bottom and never accomplish anythnig except burning to death. The solution I came up with is to use the Position Tracker. Then, for my VTOL thrusters, I tell them to navigate to Primary: Position Tracker, Fallback: Container. I slap the position tracker somewhere high above the container, and once the drone reaches the position tracker, I disable it using logic. This makes the drone travel to the position tracker first, and then dunk into the container from above, avoiding the problematic thrusters and making it easier to deposit the items.

E depends on how your drone is designed. If your barrel is on the front of your drone, it just involves driving straight into the container headfirst. If your barrel is on the back, you have to reverse into the container. Alternatively, if your drone is hovering at the position tracker you placed directly above the container, you could simply disable your grappling hook / magnet and let gravity do the rest of the work. Could even slap a max range magnet on your container brick to help guide the barrel in if you think graivty is sketchy.

F is for FUN!, because this is where the fun begins. Before tackling this step, you might try building a drone that satisfies all the other requirements first, but I do not recommend that. This is a high level design task you may regret not doing from the start. At least, if you're anything like me, you will. There are a myriad of ways you could likely go about solving this problem, but the way I like the msot is by setting up your logic to operate in stages, which I will cover in the next section.

If you can accomplish all these taks, collecting bio barrels will be no problem do you! Assuming your drone doesn't blow up to enemy corps turrets, exploding bugs, meteors, jostling the bio barrel...
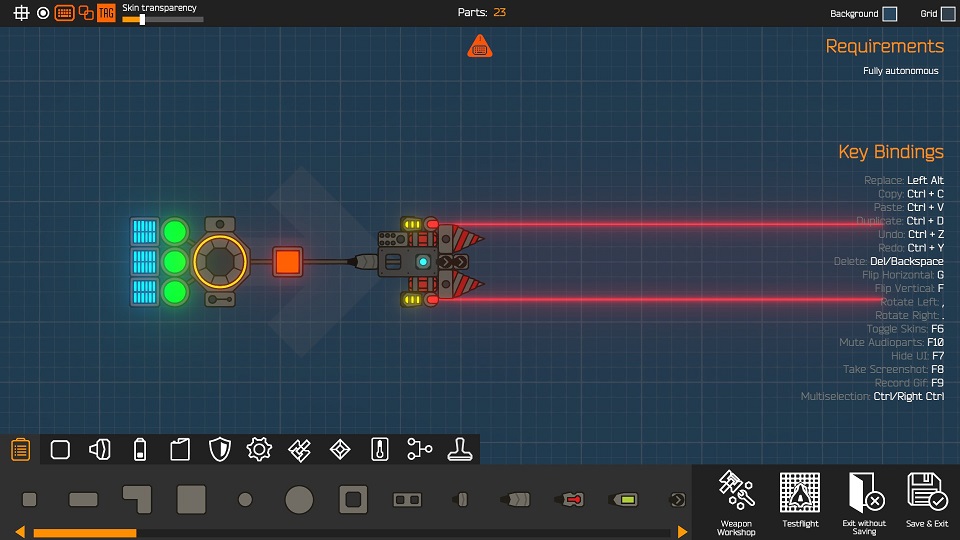
Tutorial 69.1 : Stage-Based Logic [INCOMPLETE]
[This section is not finished. My interest in the game waned after I beat it, and I am not likely to come back and finish it.]

Stage-based logic is just a term for having conditional logic systems that only activate when your drone is in a certain 'stage'. For example, if your task to collect bio barrels has 4 distinct stages:
  • Go to a barrel
  • Pick up the barrel
  • Go back to the container
  • Drop the barrel in the container

You might consider those as stage 1, stage 2, stage 3, and stage 4. You only want the magnet holding the barrel on during stage 2 and 3, not on stage 1 or 4. You only want the thrusters telling the drone to navigate towards a barrel on in stage 1, and none of the other stages. And, most importantly, your stages must activate in sequence, since you clearly can't just do them in a random order.

Designing your logic to work properly in such a manner is not as simple as it might seem to be, at first.

A Basic Setup

<picture goes here>

This is my starting canvas on which I am going to place my logic. It's just simple giant power brick, but I like how it looks. You can place your logic anywhere, I just like the large open space I have available to me on such a construct.

The key logic block for a stage-based setup is the on / off switch. This switch will allow us to designate when a given stage is active, and we will branch all our stage-specific logic to require that signal to be on before activating. For this example, lets do a 4 stage system.

To start with, place down 4 switches, 1 for each stage. I like to spread them around and keep all the stage logic grouped by stage, but that's a mental organizational thing for me, not a requirement to make the logic work. Just something like this:

<picture goes here>

Now to set up the logic. Use whatever naming conventions you like for the tags, but I find that being verbose is more helpful for organization than being concise. So, lets name the output tags for each of our stages. I will call them TUTORIAL S1, TUTORIAL S2, TUTORIAL S3, and TUTORIAL S4. For clarity's sake, I will also include an LED above each logic block to make it clearer which stage is currently active.

<picture goes here>

Next are the on & off conditions. Keeping in mind that we want our stages to be sequential, we want to set up stage 1 to deactivate at the same time stage 2 comes online. You might be tempted to use the same condition for switch 1's Off signal as for switch 2's On signal. This can be fine, but if you do this, you'll need to add in an additional logic check to avoid a race condition[stackoverflow.com]. Basically, you might have your drone advance through the stages too quickly if you don't take care.

For now, let's just continue entering in tags and we'll figure it out later. For each switch, lets name the On signal something like START S1, and the Off signal something like END S1.

<picture goes here>
Some general tips
As a parting section, I will leave here a couple tips that will make your programmer-ing journey hopefully smoother.

Make a giant power block:
Since there is no deploy cost or parts limit, why not just go overboard on power and fuel? Slap on 10, 20, 50 power blocks, and as much fuel as you think you'll need. Then double it because you're likely underestimating. Avoid supercapacitors and booster tanks, as they don't help us at all. We want raw fuel/power generation, and those merely provide storage.

Try something like this at first:
It's the power brick! It's so baaaad.

If you ever want to expand it, you can just duplicate one of the side sections and make it wider.
widepeepobrick

Send your power block flying upwards
The power block merely needs to exist somewhere on the map, and the default starting position for drones is sometimes perilously close to enemy spawn points. Moreover, if left to it's own devices, it will eventually just fall into / on top of the container, which isn't really ideal. No sense taking up valuable atmosphereic real estate, when space is infinite! Though in practical terms, if you send your power brick / drone core straight up, it will just crash into the underside of the Nimbatus, which, for our purposes, is actually completely fine.
This is fine.jpg
If you don't like the idea of constnatly burning fuel (you DO know you have infinite, right?), you can always rig it up to be fancy and grapple onto the Nimbatus, or even fly around the side and land on top, but I will leave that as a problem for you to solve on your own.


Put all your fancy logic onto the power brick too

The last thing you want is for your drones to stop working because the logic parts blew up mid-flight. Tuck your logic away on your power block for safekeeping. If your power block is under attack, you have bigger problems.

Make a resource storage brick that falls into the container
This is just a general carryover tip from the Engineer class, but if you let a resource storage brick fall into the container, and then proceed to mine some resources, they will automatically be teleported into the storage, which then deposits them immediately. Do not try to make the complex logic for a miner to mine until full, then go back and turn it in. Or do do it, I don't care. I'm not your mom. But you don't have to do this to get resources. Save yourself some hassle.

Make a variant for each mission type
Instead of trying to make one single mega-drone which can successfully handle all mission types (which is a good strategy for the other classes, in fact), try making a variant specificially targeting each mission type you run across. If you can make a drone that works well on multiple mission types, more power to you, but don't bash your head against a wall trying to make a drone that can destroy transmitters, retrieve ancient artifacts, destroy firefly infestations, recover toxic bio barrels, AND mine resources. Just make one for each. And on that note:

Make a dedicated resource mining drone
Since you can replay missions over and over, don't bother trying to make your mission-compelte variant of a drone ALSO mine resources. Make a dedicated resource mining drone which doesn't care about completing the mission objectives at all. Stuff it full of resource colelctors and whatever else, and then send that drone at the planet before / after your main drone is done. Until you find yourself sated on resources, try to mine 75%+ of the resources on EVERY planet you visit. There are quite a few clever ways to mine resources that I won't cover here, but aim to mine resources on every planet you visit, so you can buy more cool weapon upgrades.

Make Copies / Forks of everything you do!
Maybe this should be the first tip, because its so important. After you make a giant power brick with fuel on it, get it all prettied up, and save it -- Don't edit it directly when making another drone! Make a copy of it for a given mission type. Maybe you come up with a drone that works for 4 out of 5 "Destroy the Corps transmitter" missions, but the 5th one it just fails to work. Don't edit your drone that already works! DO NOT. Make a copy of it, and tweak the copy. Until you are absolutely positive you will never use a drone again, keep it. Better to have it and not need it, then to delete it and later realize, "Wait, crap... I still need that." Sometimes, when working on a harder mission type, you might draw inspiration from an earlier design. Or, at the very least, you can copy & paste the entire earlier design into a new drone and salvage the parts of it that are still useful. Good thing you didn't delete it, huh?
In parting
I hope this guide was helpful to you, or at least enjoyable. I still have some more things I wanted to talk about, but didn't feel up to writing right now, like how to make timers longer than 60 seconds, or a generally framework for collecting items such as barrels or ice mantas. Maybe in the future, if people are interested?

UPDATE: I checked back on this guide about a year after writing it, and like 10% of the images are now broken links, because the images deleted themselves. I don't know why this is, and I'm not about to re-create them all from scratch. How annoying.
19 Comments
feandor 29 Mar @ 10:50pm 
Very thanks for that brilliant guide!
kingarba 14 Dec, 2023 @ 7:53pm 
1 year later
greenghost 13 Nov, 2023 @ 2:00pm 
If you are wondering how to import workshop drones to survival read this comment.
1. make a folder to store the thing you are importing (I placed my folder in my downloads but you can put it somewhere else)
2. go into a creative world and make a editable copy of it.
3.export that drone into the folder
4.import the drone into the world of your choice.
Anomalocaris canadensis! :] 30 Jul, 2023 @ 6:52am 
This is beyond perfect :steamthumbsup:
Josiah42 25 Jul, 2023 @ 1:02pm 
This guide is phenomenal! Thank you so much @Khadgar. I started playing Nimbatus and after the second Galaxy I could tell the Programmer was calling to me. I wanted to make monstrously huge drones. Now after reading this I realized I was way under utilizing it. I hadn't touched the factory. Thank you for opening my eyes.
Macdoodleer 27 Feb, 2023 @ 2:02pm 
Actual gigachad
Khadgar  [author] 29 Dec, 2022 @ 4:19pm 
I never tried subscribing to things on the workshop, so I have no idea on that one.
V2 29 Dec, 2022 @ 4:07pm 
how the heck do i import things i subscribed to????
like im so confused but this helps quite a bit if i want to build somethin
Flames G 1 Sep, 2022 @ 10:30am 
PT BR please :steamthumbsup:
RigellooStarz 8 May, 2022 @ 8:00pm 
thanks khadgar