Nioh: Complete Edition

Nioh: Complete Edition

79 ratings
Mechanics, Choosing Armor, Armor/Weapon Properties, Leveling Stats
By Xorik
This guide is for new players or veteran players who may have missed certain mechanics or details in the game. It details basics for stances and Ki management, Living Weapon and Guardian Spirits, useful information about weapon and armor properties, information on choosing armor, and things to keep in mind when fighting bosses. All images were created by me, and all information is based on personal experience and observation.
5
   
Award
Favorite
Favorited
Unfavorite
Before Getting Into Basics
If you’ve played any ARPG similar to this, forget them. Forget, learn, and discover. Prior knowledge has a tendency to hold back one's potential when one is placed in a similar environment. There is much in the game to learn and understand. I will lay them out for you as best as I can.

First and foremost, the single worst thing this game does is not present any of these mechanics in the very first mission, The Man with the Guardian Spirit. For people familiar with the Soulsborne games, you will understand what I mean from your experience playing this game. The very first mission may mislead you to thinking how the rest of the game plays out and may cause you to skip the additional mechanics learned from the tutorial before William steps down on the shores of Japan (because who actually thinks a tutorial should come after being thrown into the game). During your progression in Isle of Demons, the game depends on the player to find Amrita memories to learn the remaining mechanics of the game with no immediate direct explanation for what they are upon finding these memories. Below are those mechanics and other useful information.
Fighting Stance and Ki Management
Fighting Stance

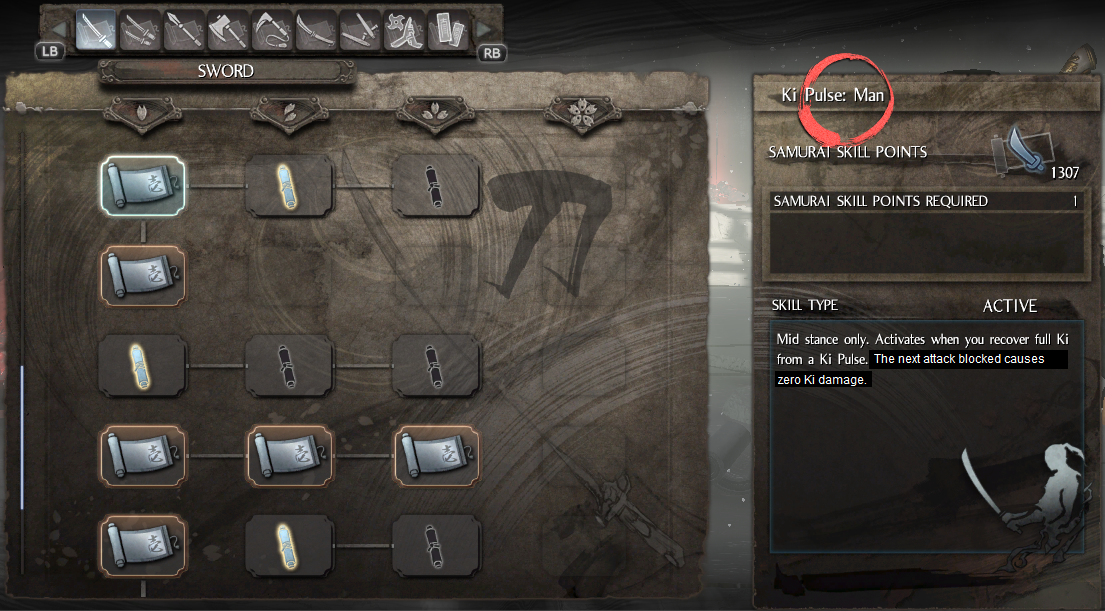
There are three stances: High, Mid, Low. The game already tells you how to switch between them, but regarding the Ki Pulse skills, there is a major typo. The text for the High stance ki pulse bonus, Ki Pulse: Heaven, is copied and pasted to the other two stances, being extremely misleading while partially causing single-stance playstyles. The correct perfect Ki Pulse effects are written in Nioh 2. Below are the effects paraphrased:
  • Ki Pulse: Man - Perfect Ki Pulses performed while in Mid stance makes the next attack blocked cause zero Ki damage (extremely useful for blocking single-hit attacks that would normally cause a guard break regardless of your toughness or when you have difficulty dodging certain attacks).


  • Ki Pulse: Earth - Perfect Ki Pulses performed while in Low stance makes the next dodge cost zero Ki (useful for Ki pulse while dodging and Ki control)
General concepts of the stance speeds and damage are as follows, but are not necessarily tied to stance-specific weapon skills:
  • High stance is the slowest, deals the most damage per hit, and costs the most Ki per attack. Has the least number of hits in a combo.
  • Mid stance is the average between the three in speed, damage, and Ki cost per attack.
  • Low stance is the fastest and weakest of the three with low Ki cost per attack. Has the highest number of attacks in a single combo.
Regarding the odachi and axe, they will not ricochet off a wall or someone’s block when in Mid or High stance. In the game’s terminology, they cannot be parried in these stances (phrased Parry Disabled VS Guarding Enemy as a weapon property). Additionally, weapon skills cannot be parried.


Tonfa and Kusarigama have a weird thing where they don't connect with walls but will be parried by blocks.


Ki Pulse


This mechanic separates this game from most, if not all, ARPGs. This game has a resource system for actions, but it also has a recovery mechanic for it called Ki Pulse.
  • A Ki Pulse can be performed after an attack and a white bar generates on top of the red bar. A perfect Ki Pulse is performed if Ki Pulse is activated when the red bar turns completely white (this opportunity is also indicated visually when the white particles around your character become significantly brighter as they are "absorbed"). When either are performed, the section of white is converted to green, meaning your Ki is refunded. However, your Ki recovery is stopped during the brief animation, and you are unable to act.
    • A red-orange icon depicting a person holding a sword in the corresponding stance indicates your temporary perfect Ki Pulse bonus. The duration of this buff cannot be refreshed and must expire to "reset" its duration.


    • The extremely short moment when you are unable to act can be the difference between taking a hit or not from a counterattack or after completing certain lengthy combos. To avoid this situation, use the Living Water complements of the Ki Pulses learned or learn how to utilize Flux. Both must be learned in the Samurai Skill section.
    • Ki Pulse can only be performed when your white bar begins to generate. Regarding Flux, prematurely switching stances will switch stance but not perform a Ki Pulse.

  • If you perform Flux, which is switching your stance during Ki Pulse, your Ki recovery is not stopped temporarily, and you will regain a small portion of Ki. When out of Ki, this small portion of Ki and the instant start to Ki recovery will grant enough to dodge attacks and prevent you from being knocked down. Flux also causes the Ki Pulse animation to cancel due to the animation played by switching stances and allows you to act immediately after. This is extremely useful for forcing human bosses to block more often by spamming a weapon skill or for you to block an incoming attack much sooner.


    • Flux must be learned in the Samurai Skill tree to gain the Ki recovery benefit. Otherwise, you will only gain the animation cancel benefit from switching stances during Ki Pulse.
    • If you are a single-stance player, you can still benefit from Flux by switching to a different stance and switching back to your original one immediately after. You will not have to learn how to play two stances with this trick.

  • Here's a comparison of Ki Pulse with and without Flux:


    • Notice that the Ki bars are extremely different overtime with the same actions performed.

  • The last thing to check-off is learning your preferred stance's Living Water skill. Each corresponding skill is right below your stance-specific Ki Pulse skill in the skill tree. These skills allow Ki Pulse to activate using dodge. This allows you to still refund Ki while repositioning yourself at the cost of Ki used to dodge.


Purification

While in range of a Yokai Realm (pool of black fog), if you perform a perfect Ki pulse or have a certain buff active, you will purify (remove) the Yokai Realm. Here’s a list of reasons why you should purify one ASAP (with the exception of axe users with the Mystic Art that benefits from Yokai Realm):
  • Prevents Yokai from recovering too much Ki.
  • Yokai cannot be dealt Ki damage while in Yokai Realm.
  • Your Ki recovery speed is significantly reduced while standing in one, unless you have high a VS Yokai Realm stat. Your resistance to Yokai Realm can be increased by spending points in Spirit.
  • Depending on your boots' properties, you can gain a buff. These properties are named Bonus After Purification ("insert bonus")
  • If you are in the Uesugi clan, you will gain a temporary buff that absorbs some physical damage taken. It is nowhere near as strong as the one in Nioh 2, so if you played Nioh 2 first, keep this in mind.
Grapple and Final Blow
Grapple

To perform a Grapple, you must learn the corresponding Samurai Skill. It is one of first skills listed on each weapon page in the set of universal skills.


Grapples are performed on human enemies who ran out of Ki from the last hit taken and are still standing or are knocked down (rolling backwards). A red lock-on marker or exhaustion animation on them indicates that they can be grappled.

  • You are invulnerable to incoming attacks during this animation, but not to damage over time effects you are currently afflicted with.
  • Enemies grappled gain a significant boost to Ki recovery after the last hit is dealt. An ally attack or well-placed traps can end the recovery animation early and end the boost to Ki recovery immediately.


Final Blow

Final Blow is an inherent mechanic from the start of the game that is performed on a downed enemy.


Final Blows are performed on any downed enemy (human or Yokai that falls face first to the ground). This is also indicated by a red lock-on marker on them.
  • Unlike grapples, you are not invulnerable when performing final blows and can be interrupted.
  • Final Blows will not grant a human enemy a boost to Ki recovery. This allows you to keep their Ki low, thus allowing you, in certain situations, to stun-lock an enemy.
  • Allies can perform this attack with you simultaneously. Because of this, Final Blows can be more useful than grapples to do damage against bosses during co-op. However, when done on a human enemy and certain Yokai, they will be placed in standing position immediately after as if they were struck in the back rather than stay on the ground for a little longer as they do when only one person performs a final blow.
Living Weapon and Guardian Spirit
Living Weapon


A mechanic marred by the ambiguity of Amrita gained from defeating enemies or obtained from interacting with Amrita Memories or drops, options for boosting the Amrita Gauge, and the need to read and understand the stats of a Guardian Spirit (Usable Time, Might, etc.). If you take the time to understand the properties of Living Weapon and its dependency on a Guardian Spirits stats, you will have an opportunity to create Living Weapon builds or choose a favorite Guardian Spirit corresponding to its element and stats.

The rate at which your Amrita Gauge increases to gain access to Living Weapon depends on a few factors:
  • The source Amrita is absorbed from (ex: enemies defeated, Amrita crystal consumables, Amrita Memories)
  • Having a multiplier buff, which is accessible early by learning and using the Pleiades Talisman
  • When using Extraction Talisman, the source of damage used (Onmyo Magic grants the most, attacks next, then Ninjutsu providing the least amount of Amrita Gauge)
  • Your Guardian Spirit Bond stat, which depends on your Spirit stat (caps at 99 Spirit)
  • Your Guardian Spirit's Amrita Gauge Rate (this stat is almost inversely related to Might with the exception of certain Guardian Spirits; a Guardian Spirit with low Might typically has a high rank in Amrita Gauge Rate and will fill gauge much faster than one with high Might)
Living Weapon’s effectiveness is based on a Guardian Spirits’ Might, Action, Tenacity, Recovery.
  • Usable Time determines how long your Living Weapon lasts up to, regardless of Amrita absorbed.
  • Might determines how much the “health bar” decreases by when receiving a hit.
    • One major issue to keep in mind is that Ki damage still affects the "health bar", so if you're about to take a hit from something that would normally break your guard at full Ki, you're going to lose a lot or all of your "health" from that same hit taken while Living Weapon is active, even if normally that hit wouldn't deal much damage to you.
  • Action determines how much the “health bar” decreases by when attacking or dodging.
  • Tenacity increases your effective “health” as it gets lower (a hit received while your health bar is full decreases it more than the same hit received at half of the health bar)
  • Recovery determines how much of the “health bar” is restored when absorbing Amrita.
    • The amount restored is also determined by Usable Time, as you cannot extend the duration of Living Weapon beyond the Usable Time.


Using Living Weapon
Depending on if you’re using controller or Mouse+Keyboard, a specific button combination can be used to perform your Guardian Spirits summon effect. You can also perform this by using the Onmyo Jutsu Guardian Spirit Talisman or the consumable version Moment Talisman. The effects vary with each Spirit and should be explored for this reason.


  • Examples include knock-down, large amounts of elemental damage, terrain advantage, etc.
You have hyper armor (in game terminology, No Guard Break when attacked) against most sources. Exceptions are certain weapon skills that cause knock-down or taking fire from a hand cannon.
  • You can avoid being knocked down by hand cannons if you have the armor property No Guard Break (Damage from Projectiles). This is a Divine Property and can only be obtained on Ethereal armor or accessories.
  • If an attack received would cause Living Weapon to expire, the following can occur:
    • If you were attacking, you will be knocked down and open for a grapple.


    • If you are standing, running, or blocking, it should only expire but not cause a knock-down when hit, unless the attack normally causes a knock-down.


    • If you are aiming with a ranged weapon, you will maintain your form unless its an attack that normally causes knock-down (ex: Hand cannon fire).
A very useful, yet almost never used, mechanic is the switching option unlocked when first starting the DLC regions and gaining the second Guardian Spirit slot. By using the universal switch button with a certain second button (I don't know the combination on Mouse+Keyboard; can be viewed in the Scroll Menu Tutorial), you can switch Guardian Spirits just as you would switch weapons. You can perform this switch whenever, but when doing so while Living Weapon is inactive, your Amrita Gauge cooldown is reset.

If you switch Guardian Spirits while Living Weapon is active, you will perform the same activation animation, gain temporary invulnerability, and push back nearby enemies at a high cost of your "health" bar.


Additional Notes:
  • Living Weapon attacks do not ricochet off walls or guarding enemies
  • Guard-based weapon skills can still be used
  • You are forced into Mid stance while Living Weapon is active
  • Ki Pulses can still be performed while Living Weapon is active, meaning Ki Pulse: Man and Living Water: Man can still be utilized. Performing a perfect Ki Pulse will create a shockwave that staggers and knocks back some enemies.
  • Living Weapon can be manually deactivated by switching weapons or putting your weapon away. This is useful against Yokai who are out of Ki when you want to refill your Amrita Gauge quickly to activate Living Weapon again in a few seconds and currently have low "health".
  • Living Weapon can still be activated during exhausted state (recovery time after being knocked down)


Guardian Spirit

Guardian Spirits can be utilized in many ways. They can be picked according to stat boosts, Living Weapon stats for builds depending on it, or for their effect upon summoning with a Talisman or pressing a button combination while Living Weapon is active. I suggest exploring your options and not defaulting to typical meta picks. You may find a different Guardian Spirit more useful to your preference compared to others.

I strongly suggest that you avoid picking a Guardian Spirit strictly for a stat boost. Consider its element and its summoning effect, as both of these can turn a losing battle into a winnable fight when using it as Living Weapon or when using two specific Talismans.

Some observations I made from the list of Guardian Spirits available are as follows:
  • If the Guardian Spirit has low Might, it will typically have high Recovery. The opposite also holds true. If the Guardian Spirit has high Might, it will typically have low Recovery.
  • Each element category may have similar Guardian Spirits in terms of stats. Where you find a fire Guardian Spirit with low Might and high Recovery, there will also be an Earth one with similar stats. However, you will need to unlock these Guardian Spirits by completing specific missions. Some will be from story missions, and some will be from optional missions.
The following is a guide I made early 2023. It is mainly the list of Guardian Spirits, their summon effects/attacks, and how to unlock them. It also lists them by element and types of properties.
https://steamproxy.net/sharedfiles/filedetails/?id=2913785965
Elemental Ailments (sorry Poison)
Each of these ailments can be applied through weapon attacks or Jutsus. Certain endgame builds can utilize Status Augmentation ("insert elemental ailment name") to make it easier to apply the corresponding ailment. Keep these in mind if you plan on playing through Way of the Nioh and in the Abyss. Confusion becomes very useful (to the point of being broken) against Yokai bosses when you can inflict multiple elemental ailments easily.
  • Fire causes Scorched. While Scorched, an afflicted target takes fire damage over time. The player can remove this ailment by dodging repeatedly.
  • Earth causes Muddied. While Muddied, an afflicted target takes more Ki damage.
  • Wind causes Blustered. While Blustered, an afflicted target deals less physical damage and either has their Block decreased or receives increased Break damage (because they are related, it is hard to say which it actually is).
  • Lightning causes Electrified. While Electrified, an afflicted target has reduced attack, movement, cast speed (stacks with Reduced Action Speed debuff).
  • Water causes Saturated. While Saturated, an afflicted target receives more physical damage.
  • Confusion is inflicted when a target is afflicted with two or more elemental ailments active at the same time. Yokai lose all Ki and cannot recover it until the debuff expires. Humans have their Ki recovery speed decreased, take extra damage, and are slightly slowed.
    • Confusion's duration can be reset in the current cycle of ailments by applying another element different from the first set inflicted. However, while Confusion is active, the elemental ailments inflicted during the cycle cannot be reapplied until Confusion expires, and the elemental ailments cannot have their durations further increased while Confusion is active.
Choose your element based on your preference while keeping in mind that some enemies take significantly reduced damage from some and thus cannot be inflicted by those corresponding elemental ailments.
Weapon Properties
There are many weapon properties, but the ones I find generally useful are as follows:
  • (Stance) Guard Ki Reduction
    • The alternative, Guard Ki Reduction, is for players who typically use more than one stance. The one above is only active during the specified stance.
    • This property, along with certain Guardian Spirits and Toughness, can help make tank builds.
  • Guard Ki Reduction
    • There are two of these: a rare text version for all weapons and a common text version for specific weapons. The common version only rolls on Swords and Odachis. The common version can be rolled even if you already have the stance-based guard Ki Reduction, meaning you can reduce Ki damage taken while blocking by even more. With the potential third source being the Guardian Spirit Fuse-ushi and the secondary bonus from having the corresponding Secondary Guardian Spirit, it is possible to block certain combos from certain bosses completely while not experiencing a guard-break and having Ki to perform attacks.
  • Close Combat Damage
    • Bread-and-butter property
  • Any element property
    • This can help inflict Confusion when paired with Jutsus of different elements or when a second player can inflict an elemental ailment differing from yours.
    • Consult the list of elemental ailments and their effects before choosing one, as some may be more useful to you than others.
  • Parry Disabled VS Guarding Enemy
    • Only useful against human enemies. This allows you to continue your combos and use Skills that are performed at the end of a combo as attacks against guarding enemies typically ricochet off and prevent use of Skills.
    • Some weapons with certain stances have this intrinsic effect (ex: Odachi Mid or High stance)
  • Change to Attack (Stat)
    • Most useful at higher levels. You should not roll this on a weapon if you already have a high number of points allocated to your weapon’s dominant stat. This property is for builds where your main stat focus does not align with your weapon of choice (ex: Tonfa’s dominant stat for damage boost is Skill, but you are putting points into Magic for an Onmyo build. Roll Change to Attack (Magic) to gain a large amount of damage.)
  • Remove Status Augmentation
    • This can only be acquired on Ethereal weapons.
    • This is most useful if you can take more than one hit on Way of the Nioh and do not wish to be inflicted with the various status ailments bosses and red enemies gain at higher difficulties. Landing hits has a chance to remove potential debuffs enemies can inflict you with, which is seen as icons under their health and Ki bars.
  • Close Combat Life Drain
    • This allows you to heal from dealing damage. Stack this with Life Recovery from Amrita Absorption while using the Jutsu Extraction Talisman for a Bloodborne combat approach. Can replace the need for elixirs and prevent loss of momentum in a battle.
    • Mostly only useful for tank builds or players who do not get one-shot.
Armor Basics and Deciding What Armor to Use
This is one of the major choices you need to make when playing this game. For your playthrough in Way of the Samurai, the main things to focus on are your Agility and Toughness.

Agility

Agility is based on your equipment weight percentage. It determines dodge distance, running speed, Ki regeneration, and Ki cost for actions performed. Higher Agility means greater dodge distance and running speed while decreasing Ki costs for actions.

Agility
A (blue)
B (green)
C (yellow)
D (red; don't you dare!)
Weight Capacity
0%-30%
30.1%-70%
70.1%-100%
100.1% and above

The thresholds are 30%, 70%, and 100%, with 30% and below being A rank (blue text), 30.1-70% being B rank (green text), 70.1%-100% being C rank (yellow text), and more than 100% being D rank (red text; above 100% equipment weight for all practical purposes is unplayable)

Toughness

Toughness is based on your numerical equipment weight. It determines how much Ki is lost when blocking. Higher Toughness typically means being capable of blocking more hits. However, some attacks are designed to deplete all Ki when blocking, unless you have the Mid stance buff Ki Pulse: Man active.

Guard Ki Reduction
C (yellow)
B (green)
A (blue)
Toughness
0-99
100-199
200 and above

The thresholds are 100 and 200, 0-99 being C rank (yellow text), 100-199 being B rank (green text), and 200 or above being A rank (blue text). Increasing beyond 200 has no visible benefit.

So how do you choose what to use? Generally, light armor is for dodging, medium armor is average at both dodging and blocking, and heavy armor is for blocking. Though, a mix of different armor weight tiers can yield a variety of results. For instance, some players can achieve 30% equipment weight while still having more than 100 toughness (this requires points into Stamina and rerolling armor properties for Toughness). To push this even further, some wear an armor piece called Warrior Monk Hood to achieve A rank in both Agility and Toughness (requires Toughness property on Divine or Ethereal armor for a boost from +2 to +7 when familiarity is maxed out).

Damage Reduction

However, damage reduction differs based on weight tier, which is shown as the triple icon directly below an armor's picture. From lowest to highest weight tier, the damage reduction per piece is as follows:

Armor Type
Light
Medium
Heavy
Head*
1.2%
2.3%
3.8%
Torso
2.5%
4.6%
7.8%
Arms*
1.2%
2.3%
3.8%
Legs
1.9%
3.5%
5.8%
Feet*
1.2%
2.3%
3.8%
Total
8% DR
15% DR
25% DR
  • As you may notice, head, arm, and feet armor have the same damage reduction values.
If you plan on playing beyond Way of the Samurai, the Damage Reduction bonuses on Divine/Ethereal armor at max familiarity* are as follows:

Armor Type
Light
Medium
Heavy
Head
1.6%
2.9%
4.6%
Torso
3.3%
5.8%
9.4%
Arms
1.6%
2.9%
4.6%
Legs
1.9%
3.5%
5.8%
Feet
2.5%
4.4%
7%
Total
10.6% DR
18.9% DR
30.2% DR

*Familiarity is the blue bar on a weapon or armor piece which fills from striking enemies with your weapon. Fills even when they block attacks. Living Weapon increases the amount gained per hit. Testing was done on the bandit at the beginning of Isle of Demons. Filling the Familiarity bar increases the bonuses of each property on a weapon or armor piece.

For players using the Yasakani Magatama or an accessory with the same property Set Requirements -1, the max achievable Damage Reduction value is ~70%* with two specific sets (one of which is only obtainable as an Ethereal) or ~60% with individual set pieces in each slot, a total of 9 different unique sets giving their damage reduction set bonus only**. This value is achievable as early as Way of the Demon.

*The 70% damage reduction is short-lived against enemies that weaken gear (temporarily negate properties of specified weapon/armor, including set bonus piece count)

**It is not recommended by most veterans and one-shot Abyss fans (who should stop visiting and deleting enemies without consideration for the host) to make an armor build using more than two unique sets (ex: Tatenashi 3-pc bonus paired with Hanzo's Head of the Iga Clan 6-pc bonus). I only do this "silly" damage reduction build to be a tank in a visitor's world or to make boss fights at least 3 minutes long. For perspective, most grapples from red enemies in Way of the Nioh don't kill me.

For New Game (Way of the Samurai), I would mostly ignore set bonuses and focus on Agility, Toughness, and Damage Reduciton for armor. Defense numbers are not significant compared to damage reduction percentages and can be mostly ignored. This was personally experienced by wearing the Guard Armor set that could be obtained from the beginning of the game by farming the armor-clad knights. I was able to wear it through New Game while still being able to take several hits from certain enemies.


If you choose to walk the path I chose and aim to have both dodging and blocking as dependable options in combat, you will want to check the armor you pick up for weight tier VS weight value. You will aim for the lightest armor in Medium or Heavy categories and offset some weight by wearing one or two Light armor pieces. This is the easiest way to achieve B rank Agility and A rank Toughness while still having moderate Damage Reduction. This path allows you more time in a fight to learn boss move sets, but traversing missions will generally take a little more time. Few people take this path, especially since most coming into this game are used to Fromsoft's Dark Souls series or opt for maximum DPS.

If you choose to walk the path of dodging with blocking as a last resort, you will take the lightest of Light armor and Medium armor to achieve A rank Agility without spending points in Stamina but still have a B rank in Toughness. This path requires more skill and faster learning of boss move sets, but you can become a speed demon with high damage. This is the path most people take.

Overall, your focus for Ki management will be Agility and Toughness, but you will have to keep in mind what damage reduction you have when all of your armor pieces are in place. It makes a major difference from being one-shot by grapples or other attacks.
Armor Properties
I want to put this out there while on the topic.

DO NOT farm Revenants for the Warrior of the West set for its set bonuses. It is an awful set, and the Muneshige fight misleads some to believe it’s good. Those Revenant graves are akin to the World War II problem Abraham Wald solved, which was that the planes should be armored not where the bullet holes appear most, but rather where they appeared the least. When you see many graves with Revenants wearing the same armor, it should be understood, regardless of the armor properties, that the set is not good. Even if those armor pieces have been reforged with certain high rarity properties, they may not necessarily useful for you (ex: Everlasting Ki, bonuses from absorbing Amrita, etc.). This set, the misconception, and the availability of the graves all prevent a player from exploring other options and fully understanding the game's Toughness and Agility system.

Various reasons to not use Warrior of the West (only applicable to new players):
  • Medium weight armor that gives B rank Toughness and Agility as a full set
  • Requires full 6-piece bonus to be useful and distinct from other 6-piece bonuses
  • Tradeoff for damage bonus is possible A rank Toughness and B rank Agility or A rank Agility
  • If you don't use Raiken/Paired Raiken as your Guardian Spirit, the 5-piece bonus doesn't work

Until you reach Way of the Demon or become more familiar with the mechanics in this game, you should not focus on armor set bonus properties beyond 4-piece bonuses. Some do not know or realize what tradeoffs are made when wearing complete sets, and I have found farming Smithing Texts for the early armor sets to be a complete waste of time as I abandon those sets soon after. If you’ve played Nioh 2 to Dream of the Wise, you know that the real deal is going to be in Way of the Wise and Way of the Nioh due to Ethereal Grace sets. Instead, focus on the rarity of an armor, armor properties, the weight tier, and weight value.


Rarity determines the number of properties an armor can have and the possible rolls available, and the range of percent values when reforging or tempering. For Way of the Samurai, focus on getting Rare or Exotic armor pieces with the weight you desire. For more advanced players making use of Living Weapon and Jutsus, look for one of two head armor pieces with Onmyo Magic Casting Speed Up and acquire part of Hanzo’s set for the 2-piece bonus(for non-sword and non-kusarigami single weapon users wearing heavier armor, get one of his weapons to keep 4 heavier armor pieces). The Onmyo helmet cannot be acquired until the third region.

Below is a list of useful armor properties to forge or temper on your armor:

Common
  • Received Firearms Damage - Reduces damage taken from ranged weapons.
    • Can only be obtained on Head and Torso, but the inheritable version can be transferred to the other armor pieces through Soul Matching for a total estimate of 30-50% depending on item rarity. Also available on Accessories.

  • VS. "element" - Increases resistance against the specified ailment, reducing damage taken and buildup caused by it.
    • Typically for annoying ailments such as Electrified, but can be rolled for specific annoying bosses.
Uncommon
  • Unlimited Onmyo/Ninjutsu - Gives a chance to not spend the corresponding Jutsu type when casting it. Effectively increases your Jutsu use count.
    • Can only be obtained on Hand and Torso, but the inheritable version can be transferred to the other armor pieces through Soul Matching to potentially obtain 15-25% or more (not counting Accessories or the Guardian Spirits). Also available on Accessories.

  • Damage Reduction (Status Ailment Suffered) - While afflicted with an ailment, you take less damage from attacks.
    • Can only be obtained on Torso.
    • Useful for bosses that always inflict a status ailment.
Rare
  • Life Recovery from Amrita Absorption - Recover the specified amount for each Amrita orb absorbed.
    • Can only be obtained on Torso.
    • Can also be gained from the Guardian Spirit Fuse-Ushi.

  • Running Speed - Increases Dash speed.
    • Can only be obtained on Foot, but the inheritable can be transferred to other armor pieces. Would only do this for speedrunning purposes, as you give up many combat-based inheritables to do this.
Exotic
  • Shorten Recovery Time (Out of Ki) - Significantly decreases the time spent in exhausted state

  • Tenacity (Recurrent Damage) - Prevents death from Scorched or Poisoned debuffs

  • Elemental Damage Reduction (Guarding) - Reduces incoming Elemental damage taken when guarding.
    • Can only be obtained on Head, but the inheritable version can be transferred through Soul Matching to yield 100%.
    • Can also be gained from the Guardian Spirit Blue Dragon.

  • Received Elemental Attack Damage - Reduces elemental damage taken from attacks. Most useful against bosses with Living Weapon (first-time DLC playthrough trauma kicks in :^) the horror)
    • Can only be obtained on Torso or Accessories for up to ~50%.
Divine and Ethereal:
  • No Guard Break (Damage from Projectiles) - Prevents stagger from ranged weapon attacks, allowing for continued attacks or movement even when struck.
    • Can only be obtained on Torso and Accessories.
    • Does not apply when guarding. Yes, translated terminology is somewhat stupid. I made the mistake the first time I got this back in 2018.

  • Deflect Projectiles (Timely Guard) - Parry to reflects ranged weapon projectiles back in the same direction they were fired from.
    • Can only be obtained on Hand or Yata Mirror (Ethereal Accessory)

  • Nullify Weakening ("armor" Protection) - Has a chance to prevent status ailments that would deactivate the specified armor piece.

  • Status Weakening ("elemental ailment") - Reduces accumulation rate for the specified ailment

  • Bonus After Purification (Nullify Damage) - Gain a buff after purifying a Yokai Realm. For a very short time, the next source of physical damage taken deals no damage.
    • Can only be obtained on Foot
This is not the complete list of properties I would choose from, but these are most of the ones that come to my mind immediately. As you become familiar with the other properties and other builds, you will find some more useful than others and seek them out accordingly.
Stat Bonus Breakdown
You can observe these when attempting to put points in, but this information is not given in the status help information. For your convenience, they are listed here. Some details are based on personal observations that may be incorrect from overgeneralizing.

Body
  • Increases Life.
  • The first point gives 40 Life before eventually dropping to 25 per point (thanks Team Ninja). However, if you are level 99, it gives only 20 Life per point after.
  • After 99 Body, it gives only 15 Life per point. If you are already level 99 before this, it will only give 10 Life per point.
  • At 51 points, bonuses to VS. Poison and Paralysis cap.
  • For all other stats, except Stamina, Life boosts are 10 per point invested until you reach level 99. Stamina gives 15 per point. Upon reaching level 99, Life boosts are decreased by 5. Their Life boosts are further decreased by 1 every 100 levels after level 199.
Heart
  • Increases Ki, allowing for more actions.
  • Initially gives 2 Ki until the 15 point mark. Gives 1 Ki per level after until the 40 point mark. Requires 2 points after to increase Ki by 1. Ki increase caps at 99 Heart.
  • Gives 10 Life per point invested until you reach level 99. Each level after gives only 5 Life until you reach level 199.
Stamina
  • Increases Equipment Weight max, which allows for wearing heavier armor while staying in certain Agility categories.
  • Increases Life by 15 per point invested after the 10 point mark. After the 99 point mark, gives only 12 Life per point.
  • Initially increases Equipment Weight max by 1 then quickly decreases by 0.1 at certain points. After reaching the 51 point mark, it gives only 0.1 Equipment Weight max per point. After reaching level 100, requires 10 points to increase by 0.1.
    • Maximum is Equipment Weight max achievable with Strength included is 56.9.
Strength
  • Increases Ki Pulse stat. Initially gives 5 points and decreases with every multiple of 5 points. At the 30 point mark, each point gives 1.5 points, meaning every 2 points invested gives 3 points of Ki Pulse. At the 40 point mark, each point invested gives 1 point of Ki Pulse. At 50, every 2 points invested gives 1 point of Ki Pulse. Caps at 99 points.
  • Has weird Equipment Weight max increases until the 12 point mark. After reaching the 12 point mark, you need 1 more point than before to increase the Equipment Weight max by 0.1 until you reach 99 which gives the last 0.1 point.
    • For example, if you invested 5 points to gain 0.1 Equipment Weight max, you need to increase Strength by 6 points to gain another 0.1 to Equipment Weight max.
Skill
  • Increases Ki Pulse. Initially gives 10 points and decreases in value every multiple of 5 points until the the 30 point mark when it gives 3 points per point invested. At the 40 point mark, it gives 2 points of Ki Pulse until the 50 point mark. After 50, it gives only 1 point to Ki Pulse. This bonus caps at the 99 point mark.
  • Increases Ninjutsu Power by 1 point after the 10 point mark. This bonus caps at the 99 point mark.
Dexterity
  • Increases Ninjutsu Power, Ninjutsu capacity, and grants Ninja Skill points.
  • Each point initially gives 2 Ninja Skill points. After the 30 point mark, each point gives 4 Ninja Skill points until the 99 point mark. After the 99 point mark, 2 points need to be invested to gain 1 Ninja Skill point.
  • After investing the first point to raise Dexterity to 6, Ninjutsu capacity increases by 1 for every point invested. At the 30 point mark, capacity stops increasing until you hit the 100 point mark. At the 100 point mark and every multiple of 10 after, you gain 1 more point in Ninjutsu capacity, which totals to an additional 11 capacity points.
  • Ninjutsu Power increases at weird rates at first before becoming somewhat standardized.
    • 11-15 Dexterity, you gain 9 Ninjutsu Power points.
    • 16-25, you gain 8 points.
    • 26-35, 7 points
    • 36-50, 6 points
    • 51-60, 5 points
    • 61-70, 4 points
    • 71-80, 3 points
    • 81-90, 2 points
    • 91-100, 1 point
  • After 100, you need 2 points invested to gain 1 point of Ninjutsu Power.
Magic
  • Increases Onmyo Magic Power, Onmyo Magic Capacity, and grants Onmyo Magic skill points to level up Onmyo skills.
  • Magic's Onmyo stat increases are exactly the same and Dexterity's increases. Refer to Dexterity for these increases.
  • Magic also increases VS. Yokai Realm. This stat also has weird breakpoints in reduced gains.
    • 15-19, you gain 20 points.
    • 20-24, 15 points
    • 25-29, 10 points
    • 30-34, 5 points
    • 35-39, 3 points
    • 40-44, 2 points
    • 45-99, 1 point
  • VS. Yokai Realm bonus caps at 99.
Spirit
  • Increase Guardian Spirit Bond, Onmyo Magic Power, and VS. Yokai Realm
  • Guardian Spirit Bond is responsible for how quickly the Amrita Gauge fills while factoring in your Guardian Spirit's Amrita Gauge Rate. Initially gives 50 points and decreases quickly like most other stats. These decreases occur after 9, 14, 24, 36, 51, and 71. Caps at the 99 point mark.
  • Every 2 points gives 5 points to VS. Yokai Realm. Every point after the 99 point mark gives only 1 to VS. Yokai Realm (not that anyone would recommend investing more than 99). VS. Yokai Realm reduces the negative effect of Yokai Realm, which is reducing your Ki Recovery rate.
  • Not including points before the 10 mark, each point invested gives 1 to Onmyo Magic Power. Caps at the 99 point mark.


Samurai Skill points are gained from leveling Body, Heart, Stamina, Strength, or Skill.
  • Before level 100, you gain 2 Samurai Skill point every multiple of 10 levels.
  • Every 2 points into Body, Heart, or Stamina gives 1 Samurai Skill point.
  • Every point into Strength or Skill gives 1 Samurai Skill point.
  • After reaching 99 in one stat, the base rates are doubled.
    • Body, Heart, Stamina all give 1 point per point invested.
    • Strength and Skill give 2 points per point invested.
  • Upon reaching level 216 (why though), Body, Heart, and Stamina give 4 Samurai Skill points per point invested while Strength and Skill give 5.
    • Each stat may give one more point than stated here if they still fall in certain categories listed above.
Regarding scaling on weapons, the stats detail which weapons are mainly affected. If you check the bottom of your weapon's details, you will see three boxes with Change to Attack ("stat"). Each weapon has three sources of stats where their attack will be increased, meaning you do not have to focus on the main stat as detailed when leveling. This is useful for getting around the softcap numbers for each stat, utilizing two different weapon types, or increasing health more while still gaining weapon damage.
Quick Way of the Strong -> Nioh Unlock Guide
https://steamproxy.net/sharedfiles/filedetails/?id=2864865050
For veterans or new players who are interested in getting to Way of the Nioh as quickly as possible. This guide was created based on a build I use every playthrough and may not be suitable to your preferred playstyle. It also relies heavily on relentless attacking for boss fights to apply debuffs. Videos are included to show how each mission listed can be done 2-4 minutes on average. It may require learning some mechanics most players overlook or ignore even after beating all of Way of the Samurai.
Afterword
The goal of this guide was to inform players of many aspects of the game have all of this information in one place without the need to inspect every single thing in-game. Hopefully, with this information, you will get better at devising your own dependable techniques and become adept more quickly in your playthrough. There are plenty of other guides or videos that you can view to gain better understanding of weapons and bosses or explore builds that you may not know exist, and I encourage you to check them out if you are curious. Otherwise, happy hunting Yokai slayer.
Copyright Notice
Copyright 2021 Xorik. This item is not authorized for posting on Steam, except under the Steam account named Xorik. No parts of this guide may be reproduced, transmitted, or copied without explicit consent from the owner. You may use this guide for your own individual non-commercial and informational purposes only.
17 Comments
NightLizard 19 Jun, 2022 @ 8:07am 
Well i choose the path of heavy build+odachi and high stamina, works pretty well most of time(my agility is in B rank...thoughness in A... and because i'm from Todo Clan instead of raising body for health points, stamina gaves away the same amount of health+bonus in damage)
Xorik  [author] 11 May, 2022 @ 9:56am 
Added images for Flux and no Flux comparison under the "Fighting Stance and Ki Management" section. Images have the same number of frames and should play at the same rate to make the comparison more obvious.
Xorik  [author] 5 May, 2022 @ 10:05am 
Reformatted armor damage reduction as tables after learning to do so for easier reading.
Xorik  [author] 30 Apr, 2022 @ 9:47am 
Edited for format and clarity in response to the influx of players from the sale. I don't know what looks better, so the format for Weapon Properties and Armor Properties are vastly different.
ValiantBlade 7 Dec, 2021 @ 11:48pm 
As for light armor, honestly, Hayabusa+Red Demon could be improved, Red Demon is the weaker link of that combo, since it's very Spear oriented, probably Righteous Strategist (moon shadow is unfortunate doe non-DS users but that LW bonus is NICE) is the better call, or maybe one of the weapon specific sets like Sarutobi's (DLC3 set for DLC3 weapon type), or Yagyu's (if you REALLY like Water Shadow lol).

For Sword or Kusarigama players, legitimately going full one set for Hayabusa's is nice and possibly ideal, because of the easy to proc shiruken attack buff, ontop of Dragon Blade Truth's constant buff, which is very valuable for high stance builds or block happy mid players (light armor blocking is viable if you minmax toughness on WotW or WotD). I'm assuming most people have DLC3 because the Steam version included DLC1-3 from launch.
ValiantBlade 7 Dec, 2021 @ 11:47pm 
With Light Armor it's very much a "if your iLevel isn't up to snuff it's a big problem" situation, so yeah I can understand medium being better for new players. Probably Swallowtail and Fanatic are a good combo to use for that.

Swallowtail eases the transition into Divines for DLC/WotSt and helps ease iLevel gaps in WotSa, and Fanatic provides excellent comeback and pairs with Suzaku, a slept on Guardian Spirit that can be versatile. Fanatic could be substituted with One Eyed Dragon in DLC1/2 (Date's easier to farm at the start of DLC2), or Crossed Sickles (simply because it's super early and isn't BAD) or National Unity.
Xorik  [author] 7 Dec, 2021 @ 9:13am 
I'm aware of those two sets being the go-to as early sets and being meta for damage, much like the Kato Spirit, but they are light armor sets. I decided on what is in the armor sets section based on the many visitors I met over the years and my first ~20 hours in the game when one-shots were frequent, and the recommendations are for Way of the Samurai. The idea was to help new players become familiar with mechanics and bosses before they try other builds post-Samurai when they are familiar with all enemies.

I don't know how new players would feel farming the Warrior Monk's Hood. For those who don't know, it's a tier 3 weight head armor that adds 40% of your total Toughness to the current value. It can only be obtained in The Battle of Ohashi Bridge (Kinki Region). If you've fought that Revenant before, you know farming may take a while.

New players, feel free to try the sets mentioned below, but mind that the Hayabusa set can only be obtained if you own the third DLC.
ValiantBlade 7 Dec, 2021 @ 1:47am 
Options do kinda suck before Abyssal Graces though, so RedDemon+Hayabusa is kinda only a good option before you get full build freedom.
ValiantBlade 7 Dec, 2021 @ 1:40am 
I disagree on one thing with the armor sets, a lot of people in Way of the Strong already figured out that Red Demon and Hayabusa mix is a pretty alright pre-Abyss/Graces combo, so I would say that's a decent place to start piecing together what people build. I also see Warrior Monk's Hood every now and then, which is a pretty alright helmet with a Grace, and has one of the few acceptable fixed effects.
Xorik  [author] 3 Dec, 2021 @ 2:35pm 
Stats section is finished. Hopefully, it's accurate. I had to do a lot of stat redistributing and watch for weird occurrences I wasn't previously aware of.