Planet Zoo

Planet Zoo

172 ratings
Timed Scenarios - get your gold statues!
By Livia
Want to get all your gold reward statues for the timed scenarios? Here's how! UPDATED through Conservation DLC.
2
3
20
3
2
2
   
Award
Favorite
Favorited
Unfavorite
Introduction
Do you enjoy "Planet Zoo" for the relaxing nature of the game? You want to build beautiful things and admire your adorable animals. As a builder, you want all the building items available to you, including those silver and gold reward statues in the timed scenarios, but they are too hard and you don't see any way to complete them! There's a lack of guides out there, so what do you do?

I created this guide for players like me: those that are perhaps not great gamers and got too stressed and frustrated trying to play the timed scenarios to get the statues. Sure, there is a mod out there, but mods break with every update, so better to earn those statues yourself.

This guide will offer some general tips and tricks to be used in all of the scenarios and then some more specific notes for each scenario.

Believe me, if I can do it, you can!


Scenarios available (as of June 21, 2022):

Bogged Down (Karst Mire)
Terrace Time (Cophaga Park)
Before the Bern (Scholey Manor)
Animals Liberandum (Hope Sanctuary)

Australia DLC
Outback Comeback (Tanami Roadside Zoo)

Aquatic DLC
Cash Flooding (Red River Barn Zoo)

South East Asia DLC
Malayan Beauty (Kuala Bintu Taman)

North Africa DLC
Once in a Blue Dune (El Darar Bazarr)

North America DLC
Well I'll Be Damned (Jameson Wildlife Park)

Europe DLC
It's Just a Matter of Time (Al's Pine Zoo)

Wetland DLC
Puddles in the Pantanal (Green Leaf Zoological)

Conservation DLC
They Grow So Fast (Turtle Rock Wildlife Orphanage)
General tips and tricks
This is an outline of general tricks and tips you can use for all levels.

NOTE: These are played in REAL TIME, not game time. To pause the counter, you have to bring up the settings. You can get the bronze by completing the scenario goals with time not being a factor - it's only the silver and gold ones that you need to meet the time goals for.

1) SET IT ON EASY. This will give you 15-30 minutes more. Honestly, with many of these tips, I sometimes would have achieved a hard setting, but if you’re only out for the statues, take all the help you can get!

2) Play the level once NOT AIMING FOR GOLD OR SILVER. If you happen to get them, cool, but it's not the point. Play this round to get the lay of the land, set up the zoo and screenshot what you've done - now you have a plan to play it a second time and know exactly what to do. This is important if it's an entirely empty level or fixer upper.

3) BLUEPRINTS. On that first run through, blueprint your habitats - then you can use them for the second time through. When making your blueprints:
  • Do NOT use the wooden shelters. Though you have immediate access to these, they are actually part of the African theme and will lock your blueprint.


  • Make them per scenario and create the blueprint before you do ANY research on that scenario. For some you’ll have nothing researched to start while others will have everything, so work with what you got. Make them the best you can with what you are given to start to have an immediate, ready-to-go habitat that will put your animal usually around 80-85% wellness as a starting point.
  • Placing blueprints: I found it easiest to remove all paths provided in levels, flatten the terrain, place the habitats, and then add the paths back. The pathing system causes such complication with blueprints, it’s easier to start fresh where you can (not all levels have, nor need this, but ones that are largely, if not entirely, empty of animals to start – do this).

4) NEVER PAUSE THE GAME. Play at LEAST at two times speed, but three is better - this is VITAL for your cash flow and for meeting many of your requirements.

5) Animals: Buy as many as you can rather than trying to use conservation credits (CC) as you're extremely limited in most levels. Avoid animals that cost CC and need more than two animals to be happy. See each scenario overview below for my recommendations for each of them.

6) CASH: For most levels, sell EVERYTHING you can sell. There’s a lot of decorations about in many levels. If you can delete it, do it, and get the cash. Don’t keep the decorations – they don’t matter and the cash is ideal. Obviously your donation bins matter. SHOPS! Put them out right away. Most of these levels are very hot – get drink shops and merchandise shops out everywhere. Add food as needed. These will be great for cash flow on 3 times speed. If you see a long line queuing, add another of the shop immediately. Don’t forget to place ATMs. Remember that happy guests will spend more money, so don’t neglect their needs. If you get the alert about ticket prices being too cheap, raise them $5 or $10 each time you get that message.

7) If the level requires research, figure that out on the first play through and then set your workers to do that IMMEDIATELY when you start the level and on three times speed. Most common one is one-way glass as you have animals that NEED that to control stress to keep welfare up. The do not disturb signs help until you get there, but some levels you will need the one-way glass. Some levels have ZERO enrichment - use your vets to research just a few items. Ideally research an animal that has stuff you know will work for other animals. Remember that research also improves your education (vital for a few levels – more on that later).

8) No work zones and over hire: managing work zones took way too much time. I stopped using them and just hired way more staff than I needed. Playing at the 2-3 times speed quickly makes cash less of an issue once you've blueprinted in a few habitats and put some animals in there (crocs and bears are very helpful). You need lots of workers to ensure your animal and guest needs are met. You don't have time to manage ANYTHING, so don't - let the staff handle things.

9) Go with anything practical and ignore what anything looks like. Ensure your staff buildings are off the path to avoid upsetting guests, but don’t worry about any decorations or making anything nice. You don’t have the time. Drop what you need quickly and move on!

10) Education: Unless you need to increase education OR your zoo level, IGNORE IT. It’s time you don’t need to spend. On levels that do require education:
  • Be sure to drop in a few information centres right off the bat.
  • RESEARCH YOUR ANIMALS: this increases education. I set out a research center by every habitat and hired enough vets to research any animal I had in the park at once. You can fire unneeded vets later, but get that education rating up first.
  • Put a speaker and a sign on every enclosure.
  • Create a blueprint with a few of the general education signs, with something on them all. Drop in several sets of this through the zoo.

11) Combine animals as much as you can. If they won't kill each other and you can make the habitat work for them all, DO IT. This is where a playthrough with no worry about speed and blueprints REALLY helps. I offer suggestions in each scenario guide.

12) The levels where you can't touch the terrain tools can be the most frustrating. Planning is everything because they already have habitats and buildings placed. Even more important: water placements. Plan carefully. Blueprints don't work for these.

12) Levels with rides: achieve everything else first then PAUSE THE GAME so nothing can be lost. Build your ride per the required length. Note: create a path from the exit and then attach the entrance to it – you don’t actually need to connect in a way anyone can get to. Even holding UNPLACED power source near the ride at this point will meet the goal and you will complete the level.

13) QUARANTINE! You have time and it prevents outbreaks.

14) Avoid bugs in exhibits. They breed TOO FAST to keep up with on three times speed. You don't need them for cash or CC, so make your life easier and go with reptiles (who also have a bigger draw in most cases anyway).

15) DO NOT DELETE TREES - it costs money - just move those things! 😉 I stick them in one corner of the map if I need to move a lot of them.

16) KEEP IT TIGHT - try to keep all your enclosures and buildings in as small an area as you need. You're not out to create a fancy zoo, you're looking for SPEED and you will meet this best by limiting where everything is. In pre-built levels, if you can toss out everything they've given you and start fresh in a blank space, do it, it tends to work better.
Bogged Down (Karst Mire)
Easy gold time: 1:30

Goals:
  • Build a Riverboat Transport Ride 600m
  • Have at least 10 different habitat species (overall welfare 85%)
  • Have at least 4 different exhibit species
  • Achieve an overall zoo rating of 3.0/5
  • Have at least 1300 guests in the zoo
  • Earn a yearly profit of $10,000

Map at start:


NOTES:
- You cannot edit the terrain on this level. Blueprints will not work.
- I deleted the raised path and went with ground - just easier.
- Once you have achieved everything but the ride: PAUSE THE GAME so you can't lose anything and complete the ride. The entrance only needs to be attached to the exit path - you don't have to get it where staff or guests can actually get there. Power doesn't even need to be placed, just hovered and you'll complete the level.

My animal recommendations:
- African buffalo
- African wild dog
- Aldabra giant tortoise
- Bactrian camel
- Baird’s Tapir
- Common Warthog
- Greater flamingo
- Grizzly bear
- Red panda
- Saltwater crocodile

My layout:


***I did use the video guide by ZooF on YouTube for this level. Props and credit to them!
Terrace Time (Cophaga Park)
Easy gold: 1:30
Conservation credits at start: 3000

Goals:
  • Have at least 10 different habitat species (overall welfare 85%)
  • Have at least three animal talks in a year
  • Achieve an overall zoo rating of 4.0/5
  • Have at least 2000 guests in the zoo
  • Earn a yearly profit of $30,000
  • Spend $5,000 on marketing yearly

Map at start:


NOTES:
- delete all the huts and barriers around the map for cash.
- guests will make good use of shops.
- I put my talking points at the camels, tigers, crocs, and tapirs. Get those in quick.
- Doesn't hurt to do more marketing to get people in.
- I start with the tigers for a good draw. Research them as much of their stuff will work for other carnivores.
- I added the tapirs and flamingos next. Then crocs, camels, and monitors.
- You will only be able to afford one giraffe to start, so I put them in last when I could afford the second.
- One-way glass was not needed. Do not disturb signs were enough to manage animal stress.

My animal recommendations:
- Bactrian camel
- Baird’s Tapir
- Saltwater crocodile
- Greater flamingo
- Bengal tiger
- Black Wildebeest
- Himalayan brown bear
- Japanese Macaque
- Nile monitor
- Reticulated giraffe

My terrain modifications:


My layout:


***I did use the video guide by ZooF on YouTube for this level. Props and credit to them!
Before the Bern (Scholey Manor)
Easy gold: 1:15

Goals:
  • Have at least 11 different habitat species in the zoo (overall welfare 85%)
  • Breed 1 new African lion
  • Have at least 1800 guests in the zoo
  • Increase education rating to 3.8 stars
  • Build a small steam train transport ride

Map at start:


NOTES:
- Drop in a trade center first because:
- You have only enough conservation credits to buy ONE lion to start, if it's cheap. If you don't have one you can afford right away, restart the level until you can get one.
- DO NOT SPEND CREDITS on any animal that is not a lion!
- There's not a lot you can delete, but there's bits and pieces all over and it does give you some cash.
- This is a good level for blueprints, but not in any of the already built areas as pathing makes placing habitat blueprints a challenge. Clear and flatten one side of the map to place your habitats in.
- I started with the zebras, warthogs, and ostriches because all three can go in one enclosure and they are good for breeding for credits. Do the peafowl next for breeding. I dropped in the tortoises next, then the carnivores.
- CONSTANTLY check for lions you can afford until you have a breeding pair. If you can get a second female, DO IT!
- Research all your animals immediately on 3x speed for education! Fully research all your animals. Have one vet and one research center per habitat, it's worth it. Especially ensure you research lions completely for improved breeding.
- Once you have achieved everything but the ride: PAUSE THE GAME so you can't lose anything and complete the ride. The entrance only needs to be attached to the exit path - you don't have to get it where staff or guests can actually get there. Power doesn't even need to be placed, just hovered and you'll complete the level.
- I researched the one-way glass, it just helps. But until you have it, use do not disturb signs and don't place your pangolins.
- Have information booths and place some of the general education signs. I made a group of six, set information on them, grouped them, saved the blueprint, and used them all over the park on this scenario and others that required it.

My animal recommendations:
- Aldabra giant tortoise
- Chinese pangolin
- Common ostrich
- Common warthog
- Galapagos giant tortoise
- Grizzly bear
- Indian peafowl
- Plain zebra
- Spotted hyena
- Timber wolf
- West Africa lion

Alternative animals:
- ring-tailed lemur
- red ruffed lemur

My terrain modifications:


My layout:

Animals Liberandum (Hope Sanctuary)
Easy gold: 1:00

Goals:
  • Adopt and place the rescue animals (22)
  • Have at least 12 different habitat animal species (overall welfare 90%)
  • Increase education rating to 3.0 stars
  • Receive a zoo inspection report with an overall star rating of 4.0

Map at start:


Animals at start:
- Bengal tiger (1 male)
- West Africa lion (2 males)
- Reticulated giraffe (1 female)
- Plains zebra (3 females)
- Western Chimpansee (1 male, 4 females)

Donated animals (you do not need any species to meet the requirement number):
- Bornean orangutan (2)
- Hippos (6)
- African elephant (3)
- Indian elephant (3)
- Ring tailed lemurs (3 – all female)
- Red ruffed lemurs (3 – all female)

NOTES:
- box all the animals immediately going to the zoo menu to do it.
- modify your terrain and create your lion habitat. Put the non-gold male lion in to get his welfare up, then put him back in the trade center and ignore him - he doesn't need to be placed. Use your gold lion to breed.
- I started with a female lion, then worked to get a female tiger, and ended with the male giraffe.
- You get 6 hippos - they need a BIG space and I found it easier to NOT put them with the other plains animals as you need way too big an enclosure and this can be an issue as a blueprint later.
- Craft your giraffe, zebra, elephant enclosure carefully. Don't go overboard with size - meet their needs and a little extra should be fine.
- Order I placed animals: lions, tigers, chimps, lemurs, zebras, orangutans, elephants, hippos, grizzly. The giraffe I place whenever I can get the male.
- Have information booths and place some of the general education signs. Group a set of six with information set and place them around the park.
- there's a large habitat barrier tucked into one of the corners, not connected to paths. I just deleted it for the cash.
- Research your animals to increase education.
- Relocate the trade center near the entrance of the zoo to be with the other buildings already next to the lions at the start - your staff can get bogged down with the foot traffic if you leave it that close to the entrance.

My animal recommendations:
- female West Africa lion
- female Bengal tiger
- male plains zebra
- male reticulated giraffe
- male red ruffed lemur
- male ring tailed lemur

My terrain modifications:


My layout:
Outback Comeback (Tanami Roadside Zoo)
Easy gold: 1:15

Goals:
  • Have at least 8 different habitat species in the zoo (overall welfare 85%)
  • Have at least 3 different exhibit species
  • Breed 5 new habitat animals of different species
  • Get 1 animal to a 5 star rating
  • Earn a yearly profit of $30,000
  • Earn a yearly shop profit of $6,000
  • Have at least 1400 guests in the zoo
  • Achieve overall zoo rating of 3.5/5
  • Increase education rating to 2.5 stars

Map at start:


Animals at start:
- Greater flamingo
- American bison
- Southern cassowary

NOTES:
- You cannot edit the terrain on this level. Blueprints will not work.
- Getting a 5 star animal: Welfare, time, and FEED ANIMALS AT LEVEL THREE!
- Avoid your high anxiety animals: aardvark, springbok, gemsbok. You can skip one-way research if you do.
- This level was easy: completed without a run through.
- This level has toxic waste barrels. You don't need to remove them all, but you do need to remove the three that are the closest; you can ignore the two on the far left. It costs $1,200 each to do it, but do it first thing as you can afford to and they make your animals sick. Use your heat map - they are the white dots (the orange dots in this image are bison):

- Check around for places already built for you to put in shops and where there's stuff you can delete. In the image below, place drink shops in the two containers at ground level and delete the one on top for cash (this is beside your flamingos):


Order to do things in:
- First thing: Hire staff - you don't have enough (or any in some cases)
- Second thing: improve welfare of current animals in your zoo.
- Third thing: drop in drink shops - it's HOT - the guests will use them!
- Fourth thing: Replace broken items and sell things you can.
- Fifth thing: remove the three toxic barrels
- Sixth thing: Build new enclosures.
- Last thing: Add exhibits.

My animal recommendations:
- Dingo
- Galapagos giant tortoise
- Saltwater crocodile
- Koala
- Red kangaroo
Cash Flooding (Red River Barn Zoo)
Easy gold: 1:15

Goals:
  • Have at least 12 different habitat species in the zoo (overall welfare 85%)
  • Have at least 2200 guests in the zoo
  • Get 1 animal to a 5 star rating
  • Earn a yearly profit of $65,000
  • Achieve an overall zoo rating of 4.5/5

Map at start:


Animals at start:
- Baird’s tapir
- Galapagos giant tortoise
- Giant otter
- Greater flamingo
- King penguin
- Reticulated giraffe
- Springbok (female only)

NOTES:
- You cannot edit the terrain on this level. Blueprints will not work.
- Getting a 5 star animal: Welfare, time, and FEED ANIMALS AT LEVEL THREE! You don't have all of them to start, so get researching! Also great for education and getting up that zoo rating!
- Set a mechanic on the barriers IMMEDIATELY. Those springbok will hurt you on welfare until you get one-way windows in. And the tapirs.
- Get shops and bathrooms wherever you can get them. Use vending machines where you can't.
- You need a lot more trash cans.
- Hire LOTS of staff, especially caretakers to clean up after guests.
- Put education boards and speakers at every enclosure.
- I do not recommend putting in the bongos or the sables until you have the one-way glass researched. Once you do, add the bongos to the tapir habitat and tweak the terrain as needed. Add the sables to the springboks and giraffe habitat.
- You start off with too many springboks and they are all female. Get a male and sell some of the females for cash.
- You need more staff rooms. Add research where you can that is NOT in places you can add shops for guests. Your vets will have to walk, but most of the animals in the park are fine. The otters need research for sure. When you place your new habitats, put extra research centers there.

My animal recommendations:
- Bongo
- Cuvier’s dwarf caiman
- Sable antelope
- Saltwater crocodile

Options for final:
- Giant panda (if you can get credits to get them in time) **Ideal
- Chinese pangolin
- Grizzly bear

**I couldn't find a single place to get seals in - the water isn't deep enough. They can't go in the otter habitat because the terrain is too steep - they can't get to the water. I did not try adding them and then moving them manually - that could be something to try, but it's not needed as the above works. They do have a big draw though, so might be worth playing with.

My layout:

Malayan Beauty (Kuala Bintu Taman)
Easy gold: 1:20
Conservation credits at start: 2,000

Goals:
  • Have at least 18 different habitat species (overall welfare of 85%)
  • Get one animal to a 5 star rating
  • Earn a yearly shop profit of $10,000
  • Pay off all loans
  • Build a suspended gondola ride

Map at start:


Animals at start:
- Babirusa
- Binturong
- Common Ostrich (2 males)
- Dhole
- Hippo
- Indian elephant
- Indian rhino
- Plains zebra
- Malayan tapir
- Proboscis monkey
- Reticulated giraffe
- Sun bear

NOTES:
- You cannot edit the terrain on this level. Blueprints will not work.
- Many of your female animals have contraception on. Turn it off from the zoo menu.
- Once you have achieved everything but the ride: PAUSE THE GAME so you can't lose anything and complete the ride. The entrance only needs to be attached to the exit path - you don't have to get it where staff or guests can actually get there. Power doesn't even need to be placed, just hovered and you'll complete the level.
- Quickly start in plaza – power, shops, vending. There's places to add shops as well as things you can sell.
Before:

After:

- Get rid of one male ostrich. Get some females and get them to the habitat.
- SHOPS, vending machines, bathrooms. Lots of drinks – it’s HOT.
- Get that loan paid off ASAP; on 3x speed, you’ll have cash enough soon once you get shops going
- The enclosure with the African animals needs a water cleaner added.
- This level was easy: completed without a run through.

My animal recommendations:
- Bengal tiger
- Clouded leopard
- Gharial
- Nile monitor
- Red panda
- Saltwater crocodile

My layout:

Once in a Blue Dune (El Darar Bazarr)
Easy gold: 1:20

Goals:
  • Earn a yearly souvenir profit of $2,000
  • Earn a yearly drink profit of $5,000
  • Have a least 9 different habitat animals (overall welfare 85%)
  • Have at least 4 different exhibit species
  • Have at least 12000 guests (overall happiness 70%)

Map at start:


Animals at start:
- Fennec fox (1 male)
- Meerkat
- Indian rhino

NOTES:
- You cannot edit the terrain on this level. Blueprints will not work.
- TO START: Get your mechanic on power research immediately and hit the three times speed. You can't get anything going until you've switched to wind power! Research barriers after to get one-way glass. The rhinos have no donation bin out - add them. The meerkats have no water – get that in immediately. The fennec fox is a lone male - get him some females or he'll die off on you with no replacements.
- Increase the size of the meerkat habitat, increase the wall height, and MOVE THE ENTRANCE to near the keeper hut on the other side (the ostriches can't get in the habitat from the cave). Add ostriches and common warthogs. I add the aardvarks only after I have one-way glass researched.
- Once you're running on wind power, get your exhibits in place. I put them all at the entrance.
- The rhino space will be too small if they breed. You can leave it – it's not enough to bring down your overall rating and the youngster shouldn't grow up (sell if they do). You can also apply contraception. I just left it. Once I cleaned their water, I ignored them entirely.
- Add more staff rooms.
- Get clean water for rhinos.
- Check around for where you want to put your buildings – there’s lots of options available in the bazaar space. Not always pretty, but there’s space. Lots of drinks – it’s HOT.
- Research souvenir shops once you have wind power and one-way glass – hats are way better than balloons.

My animal recommendations:
- Aardvark
- Common ostrich
- Common warthog
- Spotted hyena
- Wild dog
- Cheetah (bring in at the end – then you only need the one)

My layout:
Well I'll Be Damned (Jameson Wildlife Park)
Easy gold time: 1:10

Goals:
  • Have at least 12 different habitat species in the zoo (overall welfare 70%)
  • Have at least two arctic foxes
  • Breed 1 new cougar
  • Earn a yearly profit of $15,000
  • Increase education rating to 3 stars

Map at start:

Animals at start:
- Cougar (1 male)
- North American Beaver
- Moose
- California Sea Lion
- American Alligator
- Black-Tailed Prairie Dog
- American Bullfrog

NOTES:
- You cannot edit the water already on this level, but otherwise you have full control. Because of this, I had escaping sea lions because of the stupid diving glitch that I can't believe they haven't fixed yet!
- Add donation boxes first.
- Get a female cougar and add her quickly for breeding.
- Add some information centers to increase education and get some cash.
- Get food, drink, and shopping in for cash. Add bathrooms.
- STAFF! You don't have anywhere near enough to manage the animals you have. Vets and keepers. Add research centers and get on that to increase education. Keep on top of this as you add animals.
- Add education boards and speakers for animals you have. Add general education boards. Keep on top of this as you add animals.
- Add common warthog and bison to moose habitat.
- Add tapir to prairie dog habitat.
- Split alligator habitat in half and put the grizzly in your new habitat.
- Create new habitats for arctic fox and tortoise and place.
- Build a guest path out to the cougar exhibit.
- This level was easy: completed without a run through.

My animal recommendations:
- Arctic fox (required anyway)
- Common warthog
- American bison
- Baird's tapir
- Grizzly bear
- Galapagos Giant Tortoise

My layout:
It's Just a Matter of Time (Al's Pine Zoo)
Easy gold time: 1:20

Goals:
  • Have at least 20 different habitat species in the zoo (overall welfare 75%)
  • Build a small steam train transport ride (2.5km)
  • Have at least 3000 guests in the zoo
  • Earn a yearly profit of $18,999
  • Have at least four animal talks in a year

Map at start:


Animals at start:
- Alpine Ibex 1 male/12 female (male on contraception)
- Black-and-White Ruffled Lemur (1 male/2 female)
- Ring Tailed Lemur (1 male/2 female)
- Common Ostrich (1 male/2 female)
- Plains Zebra (1 male/3 female)
- Reticulated Giraffe (1 male)
- Eurasian Lynx (breeding pair)
- European Fallow Deer (1 male/6 female)
- Himalayan Brown Bear (breeding pair)
- Snow Leopard (1 female)
- Timber Wolf (breeding pair)
- European Badger (3 females/1 male)

Exhibit animals at start:
- Amazonian Giant Centipede (1 female)
- Brazillian Wander Spider (1 male)
- Eastern Brown Snake (1 female)
- Fire Salamander (breeding pair)
- Giant Desert Hairy Scorpion (1 male)
- Giant Tiger Land Snail (2 male)
- Gila Monster (1 male)
- Golden Poison Frog (4 male/3 female) *contraception on all
- Puff Adder (1 female)

NOTES:
- You are unable to edit the terrain though you may add water and remove water you add (not existing water).

My animal recommendations:
- Common Warthog
- Red Ruffled Lemur
- African Buffalo
- American Bison
- Pronghorn Antelope
- Galapagos Giant Tortoise
- Aldabra Giant Tortoise
- Grizzly Bear
- If you can, buy partners for your snow leopard and giraffe


HOW TO COMPLETE THIS LEVEL:
This zoo is very different from prior timed scenarios as it's a complete gong show and if you just follow the steps I've given for other scenarios, you will hemorrhage your money in minutes! So this zoo requires a VERY different approach at the start before you can then use the standard tricks and tips I've developed.

You're going to want to do a run through with the steps below NOT TO WIN, but to set up the zoo, know the plan and CREATE YOUR BLUEPRINTS (these will be key!) Once you have created the blueprints, then do the scenario again with them and you'll reach the numbers you need before you can even get all your 20 animals out.

FIRST THING:
- Send ALL your animals to the trade center - every last one. Use the main zoo panel to do so.

SECOND THING:
- PAUSE THE GAME! I know! Counter to everything I've said so far, but this will be KEY.

While paused:
- Using the main panel, delete EVERY shop (there is one bakery you will be unable to - close that one).
- Delete EVERY building (you cannot delete the trade center or the workshop, but you can delete the paths to them).
- Delete EVERY water treatment and power source.
- Close the gondola.
- Fire ALL staff assigned to the inner mountain - they are trapped up there anyway and you're not going to use this space.
- Fire ALL security guards and hire one noob (all you need).
- Fire all but 2 vets.
- Fire 3-4 mechanics.
- Fire the majority of your vendors.
- Remove ALL work zones from your remaining staff.
- Buy your needed animals (you may need to find a few later, but most that you need should be available). Release a bunch of ibex for some CC as you do NOT need SO MANY and it should cover giraffe and snow leopard mates plus red ruffed lemurs. Sell some of the deer while you're at it (work your keepers don't need to waste time on - the deer and ibex will breed bloody fast anyway).
- This level has FOUR entrances:

Close THREE of them (this is done by clicking on the SPAWN point and turning off "Entrance open to guests."). My suggestions:

- You are now going to create a much smaller park. My suggestion where:


WHILE STILL PAUSED:
- Drop down your first habitat. I recommend the African plains one as you can get a number of species in right away and start making bank. As you can see from my layout below, this first habitat I actually have farthest from the entrance, as it will also help bring from staff and guests to this area of the zoo (as they are ALL OVER currently).
- Connect the path from the bridge by the gondola to the habitat for viewing. Connect all the way back to entrance you've chosen to leave open.
- Put out donation bins.
- Put out trash cans all along this new path.
- Put down a staff room as close to the front of this enclosure as you can without bothering guests (this will be for your educators).
- Add required staff areas and power.
- Add a few shops (hats, food, drink) and a bathroom.
- Put zebra, ostrich, and the giraffe you started with in this enclosure.
- LOWER THE COST OF ADMISSION! (Way too high for just right this second)
- UNPAUSE THE GAME
- Send new giraffe you hopefully have, warthogs, and buffalo to quarantine. Once they have passed that, put in this habitat.
- You should get a notice pretty quickly (and even a few times) as you fill up this habitat to raise your zoo prices - do that.

Not all your staff nor guests will have arrived yet, but you're going to want to stop the zoo wandering now. DELETE ALL PATHS except the one from the entrance to your habitat, including the bridge from the ride (there is now only one path). Relocate staff manually as needed (I did it as alerts came up and as I had a moment. It's not life or death right away).

NEXT STEPS:
- Add the habitat for the bison and the pronghorn. Send them to quarantine and then to the habitat with donations down.
- You will probably see lines at your shops - add more shops!
- Ensure these two enclosures are very close to each other and very close to a staff room - this will be your 4 animal talks in a year. Set 2 at each habitat and set to four different animals. Have 1 set to March and 1 to January for each habitat and hire 4 educators (this task is done).

THEN:
- If you haven't yet, manage the alerts around the park: relocate staff and delete habitat barriers for the barriers you do not need anymore. For those you cannot delete, uncheck "habitat" at least for these (some are blocked by the water you can't touch) to remove the alerts.
- Drop in the tortoise habitat close to the entrance (with keeper hut, staff room, and power). You can also put in a 4 exhibit blueprint if you wish and put some of the exhibit animals back (I did 4 once and 2 once - didn't drastically matter). Ensure they all have donation bins.
- LEMURS: Give them one-sided glass and put out do not disturb signs or they will get stressed.
- If you've been adding shops, you probably have hit most of your targets by now and just need to drop in your other animals - do that as fast as you can (blueprints will help you SO MUCH here!) and up the price as guests note. Don't be afraid to add shops, vendors, keepers, and caretakers as needed, you have time and it will ensure your zoo doesn't blow up on you.

With blueprints you should be able to get the rest of your animals in quickly. Once you've done so, you should have hit all the requirements except the train ride. PAUSE THE GAME. Complete the track that is already there and you're done!

My layout:
Puddles in the Pantanal (Green Leaf Zoological)
Easy gold: 1:20

Goals:
  • Have at least 9 different habitat species (overall welfare 85%)
  • Have at least 4 different exhibit species
  • Have at least 1,200 guests in the zoo
  • Increase education to 2.5 stars
  • Achieve an overall zoo rating of 3.0/5
  • Earn a yearly profit of $15,000

Map at start:


Animals at start:
None, HOWEVER, you will be rewarded 10 species as the time goes on as follows:

Reward animals:
- 3 Red-Crowned Crane (1 male, 2 female)
- 1 Baird's Tapir (female)
- 4 Black-and-White Ruffed Lemur (1 male, 3 female)
- 4 Cabybara (2 female, 2 male)
- 3 Nile Lechwe (female)
- 2 Platypus (1 female, 1 male)
- 2 Spectacled Caiman (male)
- 1 Wild Water Buffalo (male)
- 6 Asian Small-Clawed Otter (male)
- 2 JUVENILE Galapagos Giant Tortoise (1 female, 1 male)

*You don't need to buy different species, but you may want females to go with your male animals. You will NEED more for the Wild Water for their social needs, but the rest survived enough for playing on 3x speed (I lost one otter, but that may have been one of the females I bought - I wasn't really paying attention), though this may depend on the order you place them in. Never hurts to have a breeding pair. If using the tortoises, you will need one adult. You only need to place 9 of these species.

NOTES:
- You cannot edit the terrain on this level. Blueprints will not work.
- Drop in a water treatment for the pre-made otter enclosure (you'll need more as you expand).
- Hire staff (you only have one vendor to start).
- Change at least one part of the path leading to your trade center area to staff to keep guests away from buildings.
- Delete the power near the entrance, the stuff decorating it, and the path leading to it. You don't need it, and it's some cash.
- You can ignore the workshop alert, you don't need one.
- Place the otters in the pre-made habitat. You will add the tapir/s here later (the land area is slightly too small, but not enough to affect the welfare requirements)
- Grab some exhibit animals and place them all.
- Place the other animals as you get them. Cranes and tortoise can share a habitat. Platypus and cabybara can share. Buffalo and lechwe can share. Put a do not disturb on your tortoises (they will still have some stress without one-way glass, but it is not an issue for any extended period in a way that will prevent you from achieving your gold).
- As you place each animal, put down donation bins, education signs, and speakers. As I had more money, I started to drop in a bunch of educators and that met the education requirement without anything else from me.
- Drop down food, drink, and shops to earn money and please your guests.
- I didn't end up needing any marketing to reach the guest or star goal.
- No research was needed. You have enough unlocked enrichment to meet your welfare needs and education goal was achieved without it. Interestingly, if you place the water feeders, they still count towards enrichment, even if the water is too shallow, it counts, so place it.
- There is a pre-made area for the lemurs, but, as they are high stress animals, I didn't bother to place them.
- This level was easy: completed without a run through, with plenty of time to spare (basically 20 minutes).

My layout:


They Grow So Fast (Turtle Rock Wildlife Orphanage)
Easy gold: 1:30

Goals:
  • Research 3 habitat species to level 2
  • Research Przewalski's Horse to level 3
  • Have at least 8 habitat species in the zoo (overall welfare 80%)
  • Release 3 different habitat animals to the wild
  • Have at least 2 animal talks in a year
  • Have at least 4 vista points in the zoo
  • Achieve a conservation rating of 2.0/5.0
  • Reach 20% plant diversity across at least 4 habitats
  • Power everything in the zoo with renewable energy

Map at start:


Animals at start:
- Chinese pangolin (2 female, 2 male)
- Indian peafowl (3 female, 1 adult male, 1 juvenile male)
- Axoloti (1 female)

Animal recommendations:
- Honestly, it doesn't much matter as this scenario offers you little choice and many of your choices are carnivores and thus need to be alone.
- That said Jaggid Edje on the Planet Zoo discussion page had some good suggestions - I will post their information at the end (posted with permission).

NOTES:
- IMPORTANT NOTE: For some reason you can use sandbox settings on this scenario. I didn't touch them myself for the purpose of this guide, but if you want to see if you can mess with that and get your statues, why not?
- Fix your axoloti settings and get her a mate.
- Hire a second mechanic and vet and get them researching green energy and one habitat animal. Keep on top of the vet so you can move them to research the next animal once you hit level 2. REMEMBER: horse requires level 3.
- Put up a water treatment to hit the pangolin habitat and the empty one to clean the water.
- Add the enrichment items you have available to your two habitat animals and the peafowl needs water. Add education to their pens. Put some do not disturb and do not feed signs on the pangolins as guests are literally walking in their habitat (though, to my shock, I only had them get stressed later and the signs fixed the issue - normally they are WAY more picky)
- Send the juvenile peafowl to the trade center and get the adults on contraception. They breed like mad and create health issues otherwise. If they die off, just buy new ones. Or, should you wish to pay attention to when the juvenile grows up, do that and then release the other male for your first release.
- Get your horses and place them right away to research. I put them in the habitat that was already there. Remember donations and education.
- Place recycle bins all over (helps you get CC, which you'll need).
- Get another animal (whichever) and put in in place with its habitat and education.
- I placed talk points at all four habitats and also hired some extra educators as they are suppose to educate while walking now.
- Place your 4 vista points on the habitats to get that off your list.
- Toss out some guest shops and ATMs.
- Once you have wind power, replace the generators. Feel free to keep researching for solar since you can place them anywhere.
- You should have horses and pangolins to release to the wild by now, and possible your 4th animal, so do that to get the goal and some CC. Keep on your releases for CC and conservation rating.
- Throw up your next 4 habitats with donation and education. You should hit the plant goal by default with that.
- Toss in exhibits as you go for a cheap addition to help you bring in guests and money.
- Hire additional staff as needed throughout.
- This level was easy: completed without a run through.

My layout:


****Jaggid Edje's method*****
Habitat 1 (pre-existing, enlarged):
- Indian Peafowl
- Przewalski's Horses
- Scimiter-horned Oryx

Habitat 2 (Pre-existing):
- Pangolin

Habitat 3 (pre-existing, but empty):
- Greater flamingo
(This habitat would have worked for Gharial as well, but Flamingos were more affordable)

Habitat 4 (new):
- Red Panda
- Japanese Macaque

Habitat 5 (new):
- Timber Wolves
42 Comments
Livia  [author] 5 Nov, 2023 @ 10:31pm 
You're very welcome!
BunnyRanch 5 Nov, 2023 @ 10:11pm 
Thanks so much for this guide! I was stuck in Once in a Blue Dune. I researched drinks after the power research, to get some variety. Did not change meerkat habitat and just built out habitats for the animals and in the location suggested. Surprisingly, got souvenir goal with just two stores. Had to spam the drink stores and added toilets because guest happiness started dropping. Finished gold with just a few minutes to spare. :) Thanks again!
Livia  [author] 15 Sep, 2023 @ 10:08pm 
Don't worry about the looks when you are playing for your statues. You can always play the level again in sandbox and make the zoo you actually want to make that way. I do that all the time. :cat_cool: Glad the guide is helpful!
Thrippa 15 Sep, 2023 @ 12:34pm 
Thanks a ton for this guide! I've still got some giving me problems, but these have helped me a lot! I really have to fight the mindset of 'looks nice' and just sling things down, because I keep getting hung up on fighting the paths to get my buildings in a proper row.
Livia  [author] 19 Apr, 2023 @ 11:31pm 
@Kaztelvania: Yeah, sorry, that's not very clear, but this is before I thought to make a guide and going back later. Those areas are where I had shops placed. Drink, food, shops, and toilets. Numerous drinks - they will use them.
Kaztelvania 19 Apr, 2023 @ 8:31am 
What does the "guest" areas mean in the 2nd scenario?
sweatlord 30 Dec, 2022 @ 5:03pm 
very helpful. personally I would like to see more building items and animals locked behind gold stars, it would give a greater sense of achievement and completion for those who get them. obviously no dlc content should be locked like that but maybe a new base game animal or theme that could only be accessed by getting a gold star would be cool.
Livia  [author] 21 Dec, 2022 @ 4:16pm 
@fyirechilde - I really need to mess with those exhibit settings - I haven't tried the auto sell option. Friggin' bugs NEED that. :laughing_yeti:

Thanks for offering your method. :cat_cool:
fyirechilde 21 Dec, 2022 @ 11:13am 
For Al's Pine Zoo, (I just finished successfully with 10 min to spare), you can actually beat it in it's default layout pretty easy with recent exhibit function updates if you:

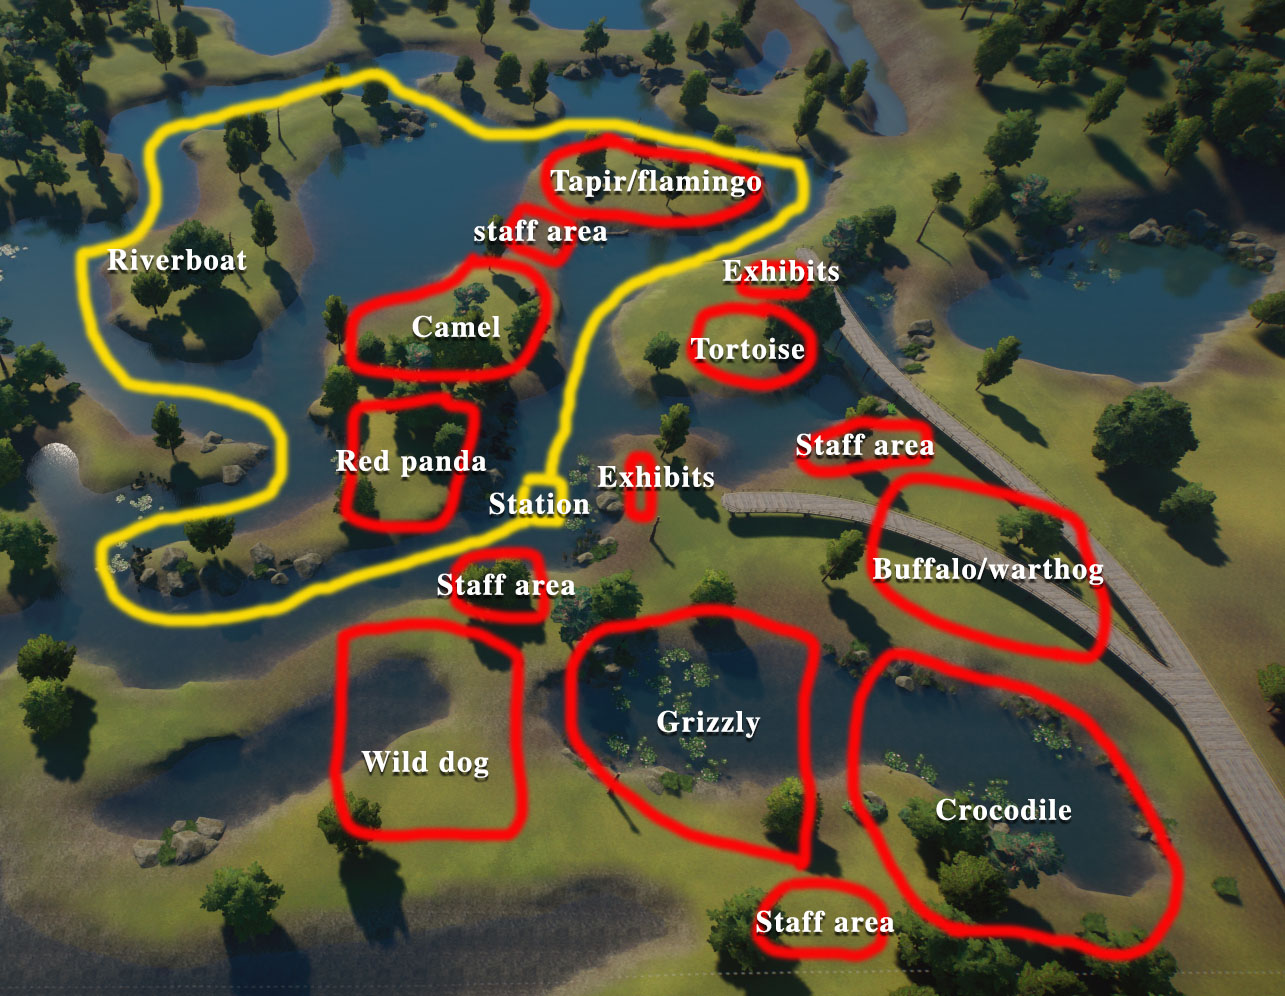
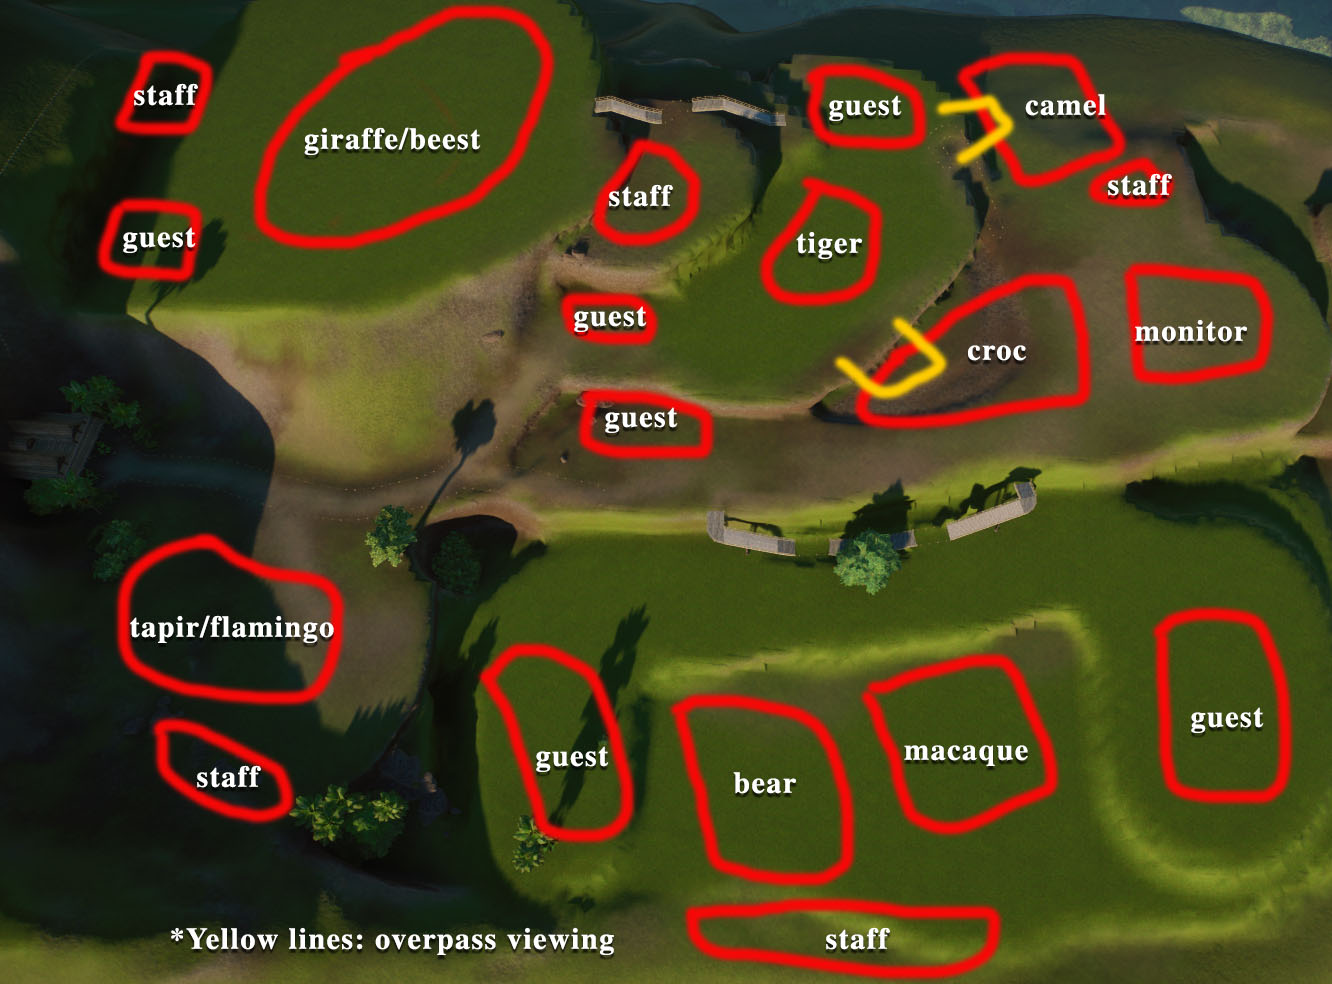
1. RAISE THE PRICE ON TRANSPORT TICKETS TO $6-10 (you have a gondola that isn't earning you squat is the problem, adjust this immediately and you will break even.)
2. Get mates for ALL exhibits and set them to AUTO SELL for cash/credits. (Fix them and plop down donation near each to see profit.)
3. Get animals talks down next to donation bins ASAP then raise all vendor prices up at least $1 an item and set bathrooms to charge .25. (it's fiddly so it isn't your first step). I got the train running w/$12 tickets then and could buy anything I wanted toward the end.
4. Then add camels, gemsbok & bison/prongshorn as new habitats with a new workzone (you have to play the workzone game on this one). Then spend your time stuffing species into the african herd exhibit to get the count up and you are done!
Livia  [author] 22 Oct, 2022 @ 8:27pm 
Yep, this guide is still up-to-date. :cat_cool: