Deep Rock Galactic

Deep Rock Galactic

78 ratings
Gunner - Burst CC Fire build for the "Lead Storm" Minigun
By Rodoto
A typical elemental build for Gunner centered around Fire, using the "Lead Storm" Minigun and the "Bulldog" Revolver.
   
Award
Favorite
Favorited
Unfavorite
Introduction
This build is centered around a ground based combat style for Gunner, offering high DPS and high crowd control at the cost of damage sustainability over time and long range efficiency. This build has the potential for efficient wave clear and high burst damage as long as you are ready to set things on fire first.

This build is close to what would be the standard Fire Elemental build for Gunner, using two Overclocks that were obviously designed to be used together to create a different playstyle for the class. This guide will help you optimize the build and understand how to use it effectively.

If you want to get precise regarding damage, DPS and stats in general, you can use this build planner: https://karl.gg/build

Requirements
  • Have all the weapon modifications recommended unlocked.
  • Have a promoted Gunner to unlock the 2nd active perk
  • Have enough progress in the perk tree to unlock the recommended perks and the 3rd passive perk slot
  • The Burning Hell OC for the "Lead Storm" Minigun and the Volatile Bullets OC for the "Bulldog" Revolver are both mandatory

Buffs from Update 35
This build was buffed in two ways with update 35:
  • First, the overall damage of the "Bulldog" Revolver was boosted: the damage penalty from the Volatile Bullets OC was reduced from -25 to -10; The base damage of the Revolver was increased by 10 while each damage mod boost was reduced from 15 to 10. Overall, this means that our Bulldog setup will reach 60 damage where it previously reached only 40 (with the exact same upgrades).

    Here is a table giving an idea of the damage increase with +20 damage on the Revolver:
    Shot type
    Damage boost per shot after update 35
    Weakspot shot on burning target
    (x1 multiplier and with +60% weakspot damage)
    +128 (= 20 * (160/100) * 4)

    384 total damage
    (a Glyphid Praetorian has 1125HP on Haz5 with 4 players)
    Weakspot shot on burning target
    (x2 multiplier and with +60% weakspot damage)
    +256 (= 20 * (160/100) * 4 * 2)

    768 total damage
    (a Glyphid Menace has 1050HP on Haz5 with 4 players)
    Weakspot shot on burning target
    (x3 multiplier and with +60% weakspot damage)
    +384 (= 20 * (160/100) * 4 * 3)

    1152 damage total
    (a Glyphid Warden has 1200HP on Haz5 with 4 players)

  • Second, the Stun mod of the "Lead Storm" Minigun was buffed with an increased stun chance in addition to the standard increased stun duration. This increases drastically the crowd-control potential of the gun, especially when combined with the Burning Hell OC.
Generalities

Pros and Cons
Pros:
  • High crowd-control at close range
  • Very high burst damage on big targets
  • Can deal with any kind of enemies in the game efficiently
  • Good ammo management
  • Work very well with a Flamethrower Driller
Cons:
  • Requires you to play at close range overall to get its full potential (high risk, high reward)
  • Weaker on a zipline
  • Requires some setup and some decent aim for high burst shots
  • Needs methodology when playing with a Cryo Driller

"On-Fire" mechanic
Every time a creature is hit by a fire attack, its temperature will increase. Once this temperature reaches the "Burn" threshold, the target will be put On-Fire, resulting in 12 to 18 damage per second while burning. At all time the creature is cooling down, its temperature decreasing at a fix rate. Once the temperature reaches the "Douse" threshold, the target will stop burning if it was On-Fire. This build offers 3 ways to increase the temperature of creatures:
  • Burning Hell OC: increases the temperature of creatures 5 meters in front of you after firing the Minigun for long enough (after around 6-8 bullets shot)
  • Hot Bullets Minigun mod: increases the temperature of creatures at any range once the Minigun is close to overheating
  • Incendiary Grenades: instantly set On-Fire with the initial explosion, then increase the temperature of creature who walk in the lingering flames

Keeping creatures on fire will greatly increase your overall DPS while also allowing you to be ammo conservative when needed, by letting enemies burn to their death. Once a target is on fire, your Revolver will deal 4 times its damage on them with the Volatile Bullets OC.

You will be able to set everything on fire one way or another, at the exception of Dreadnoughts who just have a too good fire resistance.

How to play with a Cryo Driller ?
If you are not careful you will constantely unfreeze the Driller's targets or even prevent him from freezing them in the first place. This can be very detrimental, especialy on bigger targets. The guidelines are as follow:
  • it is way easier for you to set creatures On-Fire than it is for Driller to freeze them. Give him priority when he starts shooting a key target: either shoot something else or wait for the target to be frozen to unload your (not overheating) Minigun.
  • Temperature shocks (i.e. unfreezing a target with fire or cooling down a burning target with ice) will deal 200 damage instantly and will get rid of most standard glyphid enemies so don't worry too much about those. This effect also works wonders on Q'ronar Shellbacks.
  • Don't shoot Macteras at the same time as your Cryo Driller. If he decides to freeze one let him finish.
  • If the Driller is constantly extinguishing the big targets you try to kill, maybe drop a line in the team chat to explain the situation. I never had to do this but hey, communication is key in a game like Deep Rock Galactic.

There should be enough creatures to shoot on high hazard difficulties so you don't have to interfere with one anohter too much. You'll get the flow eventually after spending enough time along Cryo Drillers, practice is key here.

Perks
Perks were chosen to provide maximum combat efficiency:
  • Resupplier is useful to resupply quickly when using a shield on a resupply pod. It also increases your chances to heal in time when using the perk Iron Will.
  • Born Ready is very useful to always have your Revolver ready. Set things On-Fire, get your Revolver out and kill them, then instantly switch back to your minigun. No downtime.
  • Vampire is very good when coupled with stun and fire on the Minigun: wait for stunned enemies to be low on health to finish them with your pickaxe. It is also useful to get some health back when using Iron Will.
  • Dash is a lifesaver in a lot of dangerous situations. Use it to reposition yourself and to navigate more easily above big gaps with the increased jump distance.
  • Iron Will is perfect to save the day. Use a resupply pod (quickly with Resupplier) or kill a creature with your pickaxe to heal and not go down when the duration ends. If you can only revive a teammate then do it and throw a Shield at your feets before going down so they can safely revive you right after.
"Lead Storm" Minigun
Our Minigun is built for close range combat and sustainability. It provides a lot of crowd control and will let us set enemies on fire.

T1: we take increased cooling rate and reduced cooling delay. This will help us compensate the increased heat generation of the Burning Hell OC, making us more efficient against larger groups of creatures. Once you get used to the heat management of the gun, you can consider switching to reduced spread for more accuracy (higher risk to overheat, but more DPS, especially at range).

T2: we take ammo to stay in the fight longer. The Burning Hell OC will already provide a sufficient DPS increase so we'll focus on sustainability.

T3: we take increased stun chance and duration to greatly increase both our crowd control and our efficiency against big targets. This will allow us to set enemies on fire and stun them at the same time, rendering them immobile while they burn to death or while we easily aim for their weakspot with our Revolver. Damage vs Armor is good but will be useful against fewer enemies compared to Stun.

This also pairs rather well with the Vampire perk: shoot a Glyphid to set it on fire and stun him, wait for his HP to lower then finish it with a pickaxe hit. You can easily and safely recover HP with lone bugs this way.

T4: we take spinup time reduction to be more reactive. Reaction time is very important on high hazard difficulty. Furthermore, the Burning Hell OC incites to not held the trigger for too long, shooting little salves instead of long ones. This mod will be useful every time you press the trigger.

T5: we take Hot Bullets to get a method to set enemies on fire from afar when our gun starts getting hot. This will be very useful against enemies you don't want to approach or can't approcach (Bulk Detonators, Spitterplants or Glyphid Menaces most notably) and will be very strong against macteras in general. Furthermore, the increased heat generation from the Burning Hell OC will help you trigger Hot Bullets sooner: you can then shoot several little salves of bullets to keep the gun hot without making it completely overheat.

Overclock: we take Burning Hell to set everything on fire 5 meters in front of us while we shoot. This will heat enemies very quickly, allowing to set multiple targets on fire at the same time. This will also make quick work of Swarmers. You'll need to be more careful with your heat management but overall this will boost your damage and your ammo efficiency.
"Bulldog" Revolver
Our Revolver is built for accuracy, burst weakspot damage and sustainability.

T1: we take accuracy to be more efficient at long ranges. Furthermore, the reload speed is not needed because we use the perk Born Ready.

T2: we take ammo to be at the comfortable amount of total ammo that will allow us to shoot what we need to without worrying too much about running out.

T3: we take Hollow-Point Bullets for a massive increase in weakspot damage, especially when coupled with the Volatile Bullets OC.

T4: we take damage to reach some Haz5 breakpoints, most notably to kill Glyphid Spitters in one shot in the body (through armor) and to kill Mactera Spawns in one shot in the weakspot. This is another great damage boost when coupled with the Volatile Bullets OC.

T5: we take Dead-Eye to remove the aim penalty while moving. This is a very important modification because we want to always be in movement on Haz5 and miss as little shots as possible.

Overclock: we take Volatile Bullets to synergize with the Burning Hell OC of our Minigun. This will allow to deal massive amounts of burst damage to burning creatures, effectively killing most of them in 1 or 2 shots. See the Breakpoints & Combat Strategy section for more details. Each bullet dealing 4 times its damage, this OC virtually multiply our ammo by 4 if we only shoot burning creatures, making it very sustainable.
Shield Generator
Our Shield Generator is built to be polyvalent and a junk of all trades. It could be specialized in duration, range or cooldown but I prefer to have it perform a little better in all those areas rather than sacrificing one.

T1: we take the small range upgrade.

T2: we take the cooldown upgrade to get our shield back faster in tense situations, but the duration upgrade is also very viable.

T3: we take the duration upgrade considering that we already have a range upgrade and that the extension of effects when outside of the shield is not super useful.

Tips:
  • Don't keep the Shields only for yourself, sometimes it can be great to drop one for your teammates, especially if you are safely shooting from a Zipline.
  • If you have more than 2 Shields before resupplying, always drop one on the ressuply pod, for safety measures.
  • The Shield won't block explosions (C4, Exploders, Bulk Detonators, etc) so be careful.
  • While inside the Shield Generator you get an increase recharge rate for your Armor's shield. This can allow you to survive against some damage overtime like toxic gaz clouds or fire hazards.
Zipline Launcher
Our Zipline Launcher is built for navigation rather than combat. Our build being rather focused on short range combat, we mostly want to shoot from the ground than from the air.

T1: we take the angle upgrade to be able to reach high grounds more easily. The ammo upgrade is useless because you will still recover the same amount of ammo (2) from a resupply pod.

T2: range upgrade.

T3: we take the movement speed ugrade to get a better chance at dodging some projectiles. This is mostly a quality of life upgrade.

Tips:
  • If you fall from the Zipline by being shot at, there is a short delay where you can grab back onto it. It might save your life if you know you won't be able to dodge a projectile.
  • Hold the interact key ('E' by default on PC) to automatically grab onto a Zipline when in range, rather than trying to time it when the prompt appears.
  • Don't be afraid to set up a zipline to be out of reach of melee attacks when defending an area.
  • The perk Born Ready will also reload your Zipline Launcher
Pickaxe & Grenade

Our pickaxe is built to favour single target damage in order to help eliminate resilient creatures at close range (especially armored ones).

T1: unclocks Power Attack.

T2: we take increased damage.

Incendiary Grenade
The Incendiary Grenade is a fantastic tool for crowd control. It also has the benefit to limit friendly fire on impact compared to the other Gunner grenades. It will only explode when hitting a creature or when hitting the ground otherwise it will bounce against walls. The initial explosion will instantly set the creatures in range on fire while the lingering flames will increase the temperature of those walking in them, eventually setting them on fire.

When to use it:
  • against a large pack of Glyphids
  • against a pack of Macteras (you need to aim well in order for it to explode on one of the flying bugs)
  • against a big target that you want to quickly set on fire, preferably Praetorians and Oppressors when they are grouped.
"Barracuda" Armor Rig
Our armor is built around combat and survival.

T1: we take reduce delay to start recovering our shield sooner. This is better to prevent some trash damage against smaller enemies.

T2: we take increased health. The use of the Resupplier and Vampire perks favours a larger HP pool.

T3: Explosion damage resistance.

T4: we take Static Discharge to slow down nearby enemies in order to get enough time to escape.
Breakpoints & Combat Strategies
Note: "critical hits" mean shots hitting the weakspot of the target.

As a general strategy you'll want to shoot your Minigun in short burst to set things on fire and stun them. Get close enough to set enemies on fire, or use Hot Bullets to set them on fire from afar (way less ammo efficient). Don't hesitate to spray all creatures in a horde to stun as many as possible to create space. Let the fire do its work to save ammo.

You should always set big targets on fire before shooting them with your Revolver. At the exception of Web Spitters, you should probably only use your revolver on burning creatures.

This list details breackpoints on hazard 5 difficulty. This is not an in-depth guide on how to fight each enemy but rather a list of interesting breakpoints and ways to engage each of them if you want to be efficient.

Creature
Killing method
Glyphid Swarmer: use little salves of the Minigun to set them on fire. Require less aim considering that the Burning Hell OC will burn creatures in a cone in front of you.
Glyphid Grunt: kill with the Minigun. Let them burn to death to save ammo.
Glyphid Slasher: kill with the Minigun. Let them burn to death to save ammo.
Glyphid Guard: set on fire with the Minigun, then either finish with the Minigun or with 1 Revolver shot (this depends on the ammo you currently have on each weapon).
Glyphid Warden: set on fire and stun with the Minigun, then kill with 1 critical Revolver shot.
Glyphid Praetorian: while going behind it (with Dash if needed) set on fire and stun with the Minigun, then finish with 2-3 critical Revolver shots.
Glyphid Oppressor: go behind it (with Dash if needed) then set on fire with the Minigun. Empty a full magazine of the Revolver in the weakspot (4 shots) then finish with a Pickaxe Power Attack.
Glyphid Exploder:If alone bait their detonation and move away. If threatening a dwarf or Doretta, kill with the Minigun. Killing it with a shot or pickaxe hit to the head will prevent it from exploding.
Glyphid Bulk Detonator: set on fire from afar with Hot Bullets (weak to fire) then kill with the Revolver by shooting the bulbs (only 5 bullets will suffice if you are accurate).
Glyphid Spitter: one bodyshot with the Revolver.
Glyphid Acid Spitter: kill with the Minigun to stun it in the process and save Revolver ammo.
Glyphid Menace: set on fire and stun with the Minigun, then kill with 1 critical Revolver shot.
Mactera Spawn: kill with the Minigun to stun it in the process and save Revolver ammo. Can be killed with a single critical Revolver shot if needed.
Mactera Tri-Jaw: kill with the Minigun to stun it in the process and save Revolver ammo.
Mactera Brundle: set on fire with the Minigun then finish with Revolver shots to the body (avoid shooting the armor with both weapons).
Mactera Grabber: set on fire with the Minigun, then kill with 1 critical Revolver shot.
Mactera Goo Bomber: set on fire and stun with the Minigun, then kill with 1 critical Revolver shot.
Q'ronar Youngling: kill with the Minigun. Let them burn to death to save ammo.
Q'ronar Shellback: set on fire an remove some armor with the minigun, then finish with Revolver shots.
Trawler: kill with the Minigun.
Spitterplant: set on fire with the Minigun, then kill with 1 critical Revolver shot.
Nexus: set on fire with the Minigun, then kill with 2 critical Revolver shot (on 2 different weakspots). Kill the spawns with the Minigun.
Naedocyte Breeder: set on fire with the Minigun then kill with Revolver hits. Wait for the mouth to become bright pink to shoot it if you can take the time, otherwise spam your Revolver.

Bosses


Fire will not be very useful against bosses (except Korlok) and you will overheat faster, preventing you from spamming too much. Overall your DPS against bosses won't be affected if you manage your heat correctly. Focus on playing safe, the damage will be there anyway.
Conclusion
This build is what made me love Gunner. It is extremely fun to set enemies on fire and extremely satisfying to land those massive Revolver shots. This build got buffed with update 35 which now makes it one of the most powerful builds for Gunner, making it competitive with Autocannon builds.

I hope you'll find this build as fun as me. Feel free to share your opinions and to adapt this build to your needs.

Find out my favorite Scout builds in my other guide:
https://steamproxy.net/sharedfiles/filedetails/?id=2481830928
Rock and Stone !
14 Comments
Subwoofer 25 Nov, 2021 @ 10:09pm 
the ammo upgrade in tier 1 for ziplines makes it so you get 3 lines per resupply, the "clip" of 1 zipline is added to its extra ammo, making a total of 5 ziplines, meaning resups give 3 due to rounding. while you have to give up angle of course, choosing ammo is a strong option to make aerial jungle gyms.
Voidurai 12 Aug, 2021 @ 8:34pm 
impressive guide; lots of detail and solid information
shub 9 Aug, 2021 @ 3:16pm 
this is an insanely powerful build up there with meta RoF bertha autocannon+born ready. lots of thanks
SeeingeyeDug 25 Jun, 2021 @ 5:10pm 
I prefer hot bullets to AV when using volatile bullets on the secondary. The gun heats into the red quickly and can allow you to set far away targets like goo bombers, menaces, and bulks on fire and start hitting them for 200 damage a pop with the revolver. AV is fantastic but being able to make your revolver 4x stronger at will is sometimes more useful. You can get out of sticky situations by laying down sweeping coats of suppressive fire with the stun mod chosen. At 40% stun proc on a gun shooting 15 proc possibilities per second, you’re basically going to always stun what you’re shooting for 3 seconds.
Rodoto  [author] 1 Jun, 2021 @ 9:43am 
Finally, yes AV will provide a solution when being surrounded but my main point is that you should avoid those situations in the first place. Good positioning/mobility, situation awareness and good horde management will prevent you from getting surrounded, just like you do with any other class. HB works toward reinforcing your stength while AV just offers a way to mitigate your positioning mistakes.
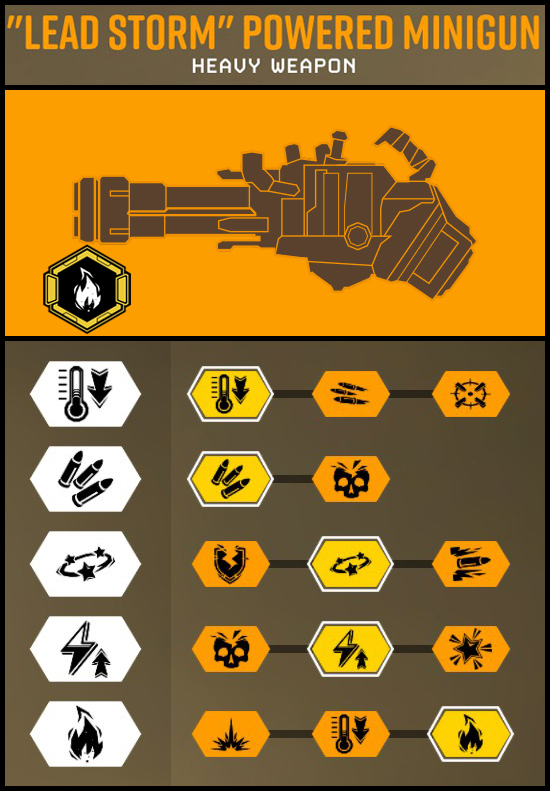
Don't get me wrong, I tried it and I'm not saying AV is bad, I'm just saying that HB is a more optimized choice IMO. If you wanna make this build closer to a support role then AV is the way to go.
Rodoto  [author] 1 Jun, 2021 @ 9:43am 
Switching weapons is a good habit to have to use both ammo pools equally. Furthermore, you switch weapons for far way targets and high HP targets, situations where AV is not useful at all so you'll still have to switch weapons anyway.
HB doesn't prevent you from shooting at distant targets. You can also take the reduced spread of the first tier if you feel comfortable with the heat management. Hot Bullets doesn't prevent you from shooting at distant targets. You won't shoot for longer with AV.
Steller 31 May, 2021 @ 6:13pm 
Aggressive Venting doesn't force anything. It provides a solution for being surrounded by swarms and is incredibly helpful against groups of Grunt variants like Guards and Elites, and the pseudo-fear effect will keep them off of you anyway. With venting, the cooldown period after overheat is so small that you can just switch to the revolver who are on fire, which, is something you'd want to do if you have Volatile Bullets. But you also don't need to force yourself to switch weapons to be useful, because if you take the reduced spread in the first tier of upgrades, you can just...keep... shooting at a distant target, no weapon switching required. You should at least try it.
Rodoto  [author] 31 May, 2021 @ 11:26am 
It requires some getting used to for sure, but after a few games I was able to never overheat for entire games without thinking about it. For explosive bullets, losing half your direct damage (and the extra damage it would deal with hollow point) for the explosive round is a lot of damage lost IMO. The minigun already does AOE damage anyway. You can take the toxin if you feel comfortable giving up the accuracy boost, but I guess the extra damage (which can't be boosted) will feel insignificant next to the burst damage on burning targets.
Candyman 31 May, 2021 @ 11:00am 
I also sometimes really feel the downside of not having the magic toxin revolver while using minigun and instead running the volatile compound, wonder if explosive bullets would still work welll with this considering the 300% extra damage to burning enemies.
Candyman 31 May, 2021 @ 10:55am 
Played around with this build a bit and its really weird not just holding down fire with the minigun. It shreds swarms but i find myself overheating quite often on Haz 5
The super fast heat build up really takes getting used to