Warhammer: Vermintide 2

Warhammer: Vermintide 2

109 ratings
Chaos Wastes - Be'lakor's Advent Included
By Adelion
Just a collection of general information concerning the new Chaos Wastes gameplay mode. Covers Holseher's map, Equipment as well as Boons, Potions, Curses etc
2
3
3
   
Award
Favorite
Favorited
Unfavorite
1. General Information - Lore, Starting Equipment & Talents, Bots
Welcome to the Chaos Wastes, Fatshark's latest addition to Vermintide 2. And welcome to this small guide covering some general information for the players.

1.1 Chaos Wastes - What are they

Lore-wise the Chaos Wastes are the area covering the northern part of the world (not to be confused with the Wastes of Chaos in the south or the Realm of Chaos) near the portal to the Warp. Due to the proximity to the chaos portal and the general harsh environmental conditions, the Chaos Wastes are not a place for the civilized man. As such, they are mostly inhabited by nomadic tribes and Beastmen. Many, many Beastmen.

Gameplay-wise the Chaos Wastes are a new rogue-lite gameplay mode for Vermintide offering 15 new locations with more randomized set-ups including the acquisition of new boons and equipment over the course of your expedition to get even more powerful for slaying your foes. A more thourough explanation on your goal during the wastes and how the usual expedition pans out, can be found in Section 2.


1.2 Chaos Wastes - Equipment, Talents, Bots, Late Joiners

Due to the rogue-lite nature of the Chaos Wastes there is more randomness involved. This means that you start rather weak and grow more and more powerful over the course of each run. The good news though is that you start with the exact equipment and talents you have chosen in the Keep.

Equipment: For your equipment traits and properties as well as power have been removed and reduced (power level depends on difficulty). You basically play with white equipment. This can be upgraded during the expedition in exchange for Pilgrim's Coins (which can be found randomly on multiple random spots on the maps as well as for slaying monsters). Depending on the reliquary you find, you can either upgrade your current equipment or trade in for a random new equipment for a cheaper price.

Talents: Situation looks better as you start with all your Keep talents and only add up on those. During the expedition you can gain several new boons/talents. This can range from the missing talents of your career you haven't chosen (yes, you can get two or even three of the talents in the same row), Charm/Trinket/Necklace traits or completely new boons exclusive to the Chaos Wastes. There are a lot of new interesting boons all together allowing really powerful combinations and gameplay not being possible before.

Bots: For the solo players depending on bots the situation looks rather mixed. While Bots start with their Keep talents they do not gain any additional boons during the run. However, bots will follow the power-level of the host: https://forums.fatsharkgames.com/t/bots-in-chaos-wastes/44715/19?u=adelion
Also, the more bots you have in the team the more coins will be gained per pick-up: https://forums.fatsharkgames.com/t/bots-in-chaos-wastes/44715/19?u=adelion . The amount of coin increase for playing with bots has increased with Patch 4.4: https://steamproxy.net/app/552500/discussions/0/3117034127813362511/
With this, they stay halfway relevant over the course of an expedition, however due to the missing CW boons they are missing out on power. As such they will always feel weaker in comparison to their adventure counter parts. Up to Champion and Legend difficulty they have their usage. Cataclysm is better doable with other human players.

Late Joiners: The good news is that in contrast to the Weaves new players can join during an already running expedition at all times. Due to the in-expedition progress nature of the Chaos Wastes it comes with issue though. Namely, the player has no boons and still white equipment while his team mates may have already gained multiple boons and more power. You are comparatively far weaker. On the bright side, map completion bonuses of all prior maps count for joining players. Potential late-joiner compensations have changed in last update. Trying to re-confirm.
As minor sidenote for late joiners: Upon joining a map in progress you can hear if the Chest of Trials has already been opened or not by its characteristic sound.
2a. Holseher's Map
Each journey into the Chaos Wastes is named an expedition. And each expedition is playing out on Holseher's Map, an everchanging map of the Wastes where you can chose your next destination following one of the multiple branches. You start at the left side and are given two choices can see the first two locations of each branch as well as the goal of your current expedition. The rest is hidden in the mist of the Chaos Wastes. By hovering over a location icon with the mouse you can get some information about the next destinations.


The information (second screenshot - can be enlarged by opening in a new tab) presented for the next location(s) covers:

  • Name of the map
  • Potential map curse (not the specific curse, only which Chaos God is cursing you)
  • Which enemy factions you are fighting
  • Combination of the two map modifiers: more/less horde, more/less specials, more Pilgrim's coins, more health items, more/less monsters, more/less elites, more/less specials etc.
  • Map Completion Bonus

The first subsequent location of each branch is also visible, having mostly the same information minus the enemy combination. Every location afterwards is hidden in the mist though until you beat more maps. Chaos Gods curses can also be seen in the form of a colored halo around the specific icon.
The information shall help you to make a decision where you want to go next by comparing which modifiers you want to have / to avoid as well as which map reward will be the most helpful for you / your team / your build. As different people might have different preferences, disagreement may be possible. As such the next to-be-played map is decided by a simple majority vote. It shall also be noted that it is possible to get / play the same location twice in succesion on Holseher's map.

As can be seen in the second screenshot, there are not only map locations on Holseher's map but also Shrines - identifiable by golden symbol atop - which function as a "store". The symbol depends on your played character. For Sienna - as in the screenshot - it is the sun of Myrmidia. In the Shrines you can buy additional boons for yourself (four to chose and all can be bought if you have enough coins) or a miracle for your team (two or three depending on the specific shrine) in exchange for Pilgrim's Coins. The shrine specific miracles will be covered in Section 4.

Independent from the route you are chosing, you will always play exactly four maps + the final arena specific for the expedition you have chosen. You will also always encounter exactly two Holseher's map shrines. The order of maps and shrines can differ, although the first station will always be a map, and the final piece will always be the expedition arena. There will also never be two shrines in succession.

2b. The Expeditions
Story-wise, the goal of the Chaos Wastes is to find three Scrolls of Eternity during the first three expeditions, unlocking the way to the Citadel of Eternity, the final expedition. There you want to communicate with the gods.
Gameplay-wise this relates to a total of four expeditions which have to be performed - each with their respective final area:

  • Expedition of Fortitude: Four random maps + Arena of Fortitude
  • Expedition of Courage: Four random maps + Arena of Courage
  • Expedition of Determination: Four random maps + Arena of Determination
  • Expedition to the Citadel of Eternity: Three random maps + Citadel of Eternity (one full map & one arena)

Four the random maps there is a pool of 11 available maps which are about half the length of most adventure maps - and with one exception completely new locations - and with multiple different paths inside the maps themselves:

  • Bel'sha'ziier's Mine
  • Cinder Peak
  • Count Mordrek's Fortress
  • Grimblood's Stronghold
  • Holseher's Tower
  • Pinnacle of Nightmares
  • Slaughter Bay
  • The Foetid Gorge
  • The Forbidden Trail
  • The lost City of Marakza
  • The Pit of Reflection

Each of the expeditions is cursed by a different Chaos God meaning that the final area of an expedition will always have a curse of this specific Chaos God. Additional, curses of other gods can be encountered on the maps inbetween based on randomness. The Chaos Gods curse per expedition are rotating each week to add more diversity.
2c. Be'lakor's Advent
With the Chaos Wastes update from the 14th of June 2022, Be'lakor - the Dark Master - has started to influence your Chaos Waste runs: https://www.vermintide.com/news/patch-47-39-13-patch-notes

Be'lakor's Influence

In contrast to the four Chaos Gods, Be'lakor does not have its own dedicated expedition to watch over. Instead he joins one of the existing four expeditions "in tandem" with one of the other chaos gods. Be'lakor's influence rotates each three hours to a new expedition going from left to right. Which expedition is currently affected can be checked in the Chaos Wastes browser:


For expeditions affected by Be'lakor, you will have at least one map guaranteed to be cursed by the Dark Master himself within the visible part of Holseher's map at the start of the expedition. While it is possible that two maps are cursed, they will be placed in a manner that you may never visit both of them. Playing these maps has two effects. The first one is that you will encounter one of the two new Be'lakor-specific curses: the Shadow Totems or the Shadow Skulls. The second effect - and the reason why you can only visit one Be'lakor cursed map on an expedition - is that somewhere on the map you can find a Shadow Locus.

The Shadow Locus and the Shadow Lieutenants

The Shadow Locus is a kind of altar worshipped usually by some Skaven Monks and some other enemies. As long as you don't attack them, they will completely ignore you and focus all their attention on praising Be'lakor. Upon interrupting their ceremony they will start attacking you. After killing them - or not - you can interact with the altar similar to a Chest of Trials. Doing so will result in the summoning of some spawns. The first two waves are just some random enemies. The third wave though consists every time of the same enemy type: a Shadow Lieutenant - a former member of the Order of the Silver Hammer now in the service of Be'lakor.


A Shadow Lieutenant is basically a slightly different looking and stronger Chaos Warrior. As an additional surprise Shadow Lieutenants can have Grudge Marks. However, they can only have very specific Grudge Mark combinations. Three potential sets are available:

Set 1: Crippling - Illusionist - Frenzy
Set 2: Regenerating - Cursed Aura - Relentless
Set 3: Shield Shatter - Rampart - Vampiric

However, it is exceedingly rare to encounter a Shadow Lieutenant with three active Grudge Marks. So most of the time you will have to deal with a single Grudge Mark or a combination of two Grudge Marks within their set - for example Crippling/Illusionist or Regenerating/Cursed Aura. Upon killing the Shadow Lieutenant you will receive an Ulgu crystal. Picking it up, you will now have the ability to overload the Shadow Locus and destroy it which triggers the appearance of the Temple of Shadow - Be'lakor's new arena map.

The Temple of Shadow

So, where do you find the Temple of Shadow? For this you simply have to finish your current map and then you can already see the Temple of Shadow on Holseher's map. The new arena map has hereby replaced one of the other existing maps, so that expeditions cursed by Be'lakor are not longer than normal expeditions. This also means even after revealing you still have to choose the right path to reach the temple or chose another path if you want to avoid it although the latter is not always possible.

The Temple of Shadow itself is typical for arena maps pretty short. After a quick walk to the actual temple you can find there a statue of your new best friend in an arena-like showdown. The statue is protected and supplied with energy from three Shadow Locuses which can - and have to - be destroyed the same way as on the first map. This means each altar has to be activated and the spawning Shadow Lieutenants have to be killed and the Ulgu Crystal to be used for destroying the Shadow Locus. And all this, while being spammed with specials and elites:


After taking care of this ordeal, the statue of Be'lakor will partially shatter and you can leave the arena.

The Temple of Shadow itself comes with some "oddities". First of all, as an arena-like map it is shorter - as mentioned - and more difficult. Also, while it does supply some Pilgrim's Coins staches, there is neither a Chest of Trials nor are there any shrines for boons or weapons. This means visiting the temple robs you of the chance to upgrade weapons and to buy boons. However, this is partially circumvented by the map completion bonus being two Veteran Boons of the highest rarity.

Also, the Temple of Shadow is not the end of the expedition. You still have finish it normally.
2d. Weekly Expeditions
Added with the update from the 23rd May 2024 are the Weekly Expeditions. These are similar to the Weekly Events from the campaign mode and offer an extra challenge. The Weekly Expedition can be accessed through a new extra tab:


Unique to the Weekly Expeditions is that you start your Chaos Wastes run already with several pre-determined boons which means you start stronger than normal. To counteract this, you also start with additional curses. The curses can be selected from the "normally" available curses in the Chaos Wastes as well as modifiers from the Weekly Event. Both the boons and the curses are active on all maps.

The boons and curses modifier stay the same for the whole week and reset each monday. By beating the Weekly Expedition, you can get one of four rewards depending on the difficulty you played on:

  • Recruit: 5000 Experience Points
  • Veteran: Weapon Skin - Bitter Dreams
  • Champion: Two Emperor's Vaults
  • Legend: Red Dust

With this, the Weekly Expedition are so far the only confirmed possibility of getting red dust, though it is hard limited by the weekly counter. Though, the really interesting part is the Bitter Dreams weapon skins which can only be acquired through the Weekly Expeditions. So far, I can not tell if the order is pre-set and if there exist skins for all weapons. I also have no clue what happens if you "skip" a week. If the skin rotates further or if it stays like this until completion.

To end on a positive note: Completing the Weekly Expedition counts for the Okri's challenge "Complete the Weekly Event."
3a. Weapons & Upgrades
In contrast to Adventure Mode, the players only have their weapons as equipment in the Chaos Wastes and no Charm, Trinket or Necklace. As mentioned in Section 1, the weapons you and your bots start with are the same as those chosen in the Keep although far weaker. Basically, you start with white equipment without any traits and properties and a reduced power level. The starting and maximum power level of the weapons in Chaos Wastes hereby depend on the difficulty. For Cataclysm for example you start with a power level of 400 and you can upgrade up to a power level of 700 (red weapons).

There are two ways for upgrading your weapons split over three different altars:


The two left altars - Soldier's and Hunter's Altar - are for melee and ranged weapons respectively while the right altar - Warrior's Altar - can be used both for melee and range depending on what you are currently holding. Soldier's and Hunter's altars provide one random weapon upon activation while Warrior's Altar improves the weapon you currently hold. Each altar can only be activated once, so especially for the Upgrade altar you should consider if you want to upgrade your melee or your ranged weapon.
Also, the altars are colour-coded. This means green altars upgrade to green weapons, blue altars to blue weapons and so on. Each upgrade does not only increase the power level but also give access to traits and properties depending on colour. Altars for weapon upgrades can only be used if your current weapon is of "weaker" colour. All of the upgrades as mentioned before cost Pilgrim's coins dependent on the weapon rarity you hold, the rarity you want to upgrade to and the type of altar - Soldier's/Hunter's or Warrior's. The increase in power level as well as the number of traits and properties per rarity are summarized in the following table

Power Level +
# Properties
# Traits
Soldier's/Hunter's Altar (Green)
50
1
0
Soldier's/Hunter's Altar (Blue)
100
2
0
Soldier's/Hunter's Altar (Orange)
150
2
1
Soldier's/Hunter's Altar (Red)
250
2
1
Warrior's Altar (Green)
50
1
0
Warrior's Altar (Blue)
100
2
0
Warrior's Altar (Orange)
150
2
1
Warrior's Altar (Red)
250
2
1

The cost of the weapon upgrades calculate as follow:
  • Upgrade Cost = (Cost of Upgrade from White to Rarity of Choice) - ((Cost of Upgrade from White to Rarity currently holding)/2)
As such, the costs for using the Soldier's/Hunter's altar summarizes as shown in the next table:

To Green
To Blue
To Orange
To Red
From White
60
120
200
300
From Green
30
90
170
270
From Blue
60
140
240
From Orange
100
200
From Red
150

This means if you continously upgrade your weapons you would end up with a cost of 490 Pilgrim's Coins. If you skip all upgrades but the red Soldier's/Hunter's Altar you end up with a cost of 300. You can save 38.78 % this way.

Subsequently, the costs for using Warrior's Altar summarizes as shown in this table (*take note that the ingame value for upgrading from orange to red is 330 instead of the calculated 325, this is a result of value rounding and only affects this specific upgrade):

To Green
To Blue
To Orange
To Red
From White
100
200
350
500
From Green
150
300
450
From Blue
250
400
From Orange
325*

Similar to the random upgrades you can save 39.39 % of Pilgrim's Coins if you skip all but the red Warrior's Altar which is still a lot. Although, regularly upgrading is not as unattractive as it has been before. So, if you want to wait for a red Warrior's Altar or invest early on is entirely your decision. However, if you want to get properties, traits and more power you should regularly improve your equipment. This is double important if you are host as the bots' power level increases with your weapon upgrades. Furthermore, if you get lucky you can roll an early + Pilgrim's Coins property on your weapon.

As for the decision between random and direct upgrades: If you want to keep control and keep the weapon you are currently using, you have to pay more Pilgrim's Coins in comparison to the random altars. Coins which can't be used for other upgrades like Boons and Miracles.

Also for clarification: the Power Level+ values are in comparison to the starting values of the white equipment you start with. So for Cataclysm, the power levels would be: 450 - 500 - 550 - 600 - 700
Additionally, it is noteworthy to mention that the Upgrade Altars are indeed "just" upgrading. This means that properties and traits you roll on lower rarities will stay the same while upgrading. If you get - for instance - + Pilgrims coins on a green weapon, the property will stay throughout the whole upgrade cycle. Same for the traits for an upgrade from orange to red rarity. Conversely, this means that if you want to change traits and properties using the random weapon altars is your only choice.

Sidenote: As runs are rather long, you might sometimes forgot what weapons (and especially properties or traits) you have. This can be easily countered by pressing the inspection button (default on "i"):


As you can see, the weapon power, rarity, traits and properties are shown both for your melee and your range weapon. In addition, you can also see what items you are carrying and what their effect is. While this is rather pointless for healing items and bombs, it will be a real help for your potions as the Chaos Wastes have several new potions with new effects (see Section 6 for information on those). Furthermore, active miracles are also shown on the inspection page.
3b. Exclusive Weapon Traits
In addition to the already known weapon traits from the adventure mode, there are a few Chaos Wastes exclusive weapon traits which I will list here. Take note that I have the german version of the game, so the translation might not be 100 % identical to the English original. Some weapon traits have restrictions, so they are only available on certain weapons. Unless I am reading this wrong, these restrictions are quite complicated for some weapons so I will mostly give a general summarization:

Depiction
Name
Available on
Description
Addaioth's Splendour
!Life Staff and Single-Projectile Ranged excluding Trollhammer Torpedo/Conflagration Staff
Every 30 s, ranged critical hits explode for 10 % of their damage in area around the target.
Anath Raema's Swiftness
!All Ranged excluding"Infinite Ammo"/Bows
Picking up ammunition grants 50% decreased reload time for 10 seconds.
Anath Raema's Talons
!Most Ranged excluding Crossbows/Shotguns/Trollhammer Torpedo/Drakegun
Increase Ranged Attack penetration by 1.
Asaph's Endless Quiver
!Drake + Black-Powder-Based Ranged excluding Trollhammer Torpedo
Ranged Critical Hits cost no ammunition.
Asuryan's Wrath
!All Melee
Melee Attacks that kill enemies have a 50 % chance to deal damage to an additional nearby enemy.
Bloodthirst
!All Melee
Increases attack speed by 2.0 % for every 5. kill (up to 5 times). Will be resetted if you don't kill for 30 seconds.
Deadeye
!All Melee + All Ranged
Every headshot increases the damage of the next attack by 10 % (up to 20 times). If you hit an enemy anywhere else than the head 1 stack will be removed.
Divine Shield
!All Shield Weapons
Damage taken is reduced to 20 damage or half of its original value, whichever is highest.
Follow Up
!Various Melee
Every 3 seconds Melee Headshots grant your next Attack a Critical Hit.
Huanchi's Fangs
!Billhook and all non-burning 1H Axes and Swords (and dual combinations of these) excluding Daggers
Melee Attacks cause Bleed.
Manann's Tempest
!Most 1H Melee
Critical strikes trigger a chain lighting that jumps to the nearest 5 enemies.
Myrmidia's Great Leveller
!Most 2H Hammers/Swords/Axes
Striking 5 enemies in one swing increases stagger power by 50 % for 3 seconds.
Quetzl's Repulsion
!2H Hammers
Increases knockback from staggering attacks and pushes.
Regrowth
!All Melee
Critical hits recover 5 Health.
Rhya's Thorns
!All Melee + All Ranged with at least one shieldbreaking attack
Breaking shields sends splinters at the nearest enemies dealing damage.
Shard Strike
!All Melee
By killing armoured enemies shards will fly away, damaging nearby enemies.
Shockwave
!Various Melee + All Ranged
Critical hits stagger nearby enemies.
Taal's Twinned Arrow
!All Non-Sienna Single Projectile Ranged
Range attacks now fire one additional projectile.
Vaul's Anvil
!All Shield Weapons
While wielding your melee weapon all attacks made against you count as being blocked. When your block is broken you lose this effect for 10 seconds.
Vaul's Tempo
!All 1H Melee (Solo or Dual Wield) excluding Sword&Dagger/Dual Axes/Fire Sword/Victor's Axe
Every Critical Hit increases your Crit chance by 5% for 10 seconds. This effect can stack 10 times.

Since the code and the restrictions are quite complicated it is possible that some errors are in the list. But for the most part, it should be correct. I'll try to refine the list over time. If you note any mistake, please post so in the comments.

Sidenote : The list of available weapon traits has increased with the Be'Lakor Update from the 14th June 2022. In addition, several boons have been transformed to weapon traits. The list can be found here: https://www.vermintide.com/news/patch-47-39-13-patch-notes
4a. Map Completion Bonus & Holseher's Map Shrines
As previously mentioned each Chaos Wastes run will start with the talents you've chosen in the Keep. In addition to this, you can gain further Boons, Miracles and other Bonuses over the course of your expedition. While they are mostly random, there are some influence possibilities.

Map Completion Bonuses

As shown in the screenshot in Section 2, completion of each map during an expedition run grants you a bonus. These bonuses are more or less equivalent to the properties currently available in adventure mode and compensate for your missing Charm, Trinket and Necklace properties:

Depiction
Description
+ 10 % Attack Speed
+ 30 % Block Cost Reduction
+ 20 % Cooldown Reduction
+ 10 % Crit Chance
+ 40 % Crit Power
+ 20 % Health
+ 5 % Movement Speed
+ 40 % Power vs Monster (Map Completion Bonus has been added with the Be'lakor Update)
+ 60 % Push/Block Angle
+ 30 % Stamina Recovery
+ 4 Stamina

So by choosing your route through the Wastes you have one tool to influence your build in your favour.

Holseher's Map Shrines

Aside of a new map/location, you can also find Shrines on Holseher's map. You will always encounter exactly two Shrines per expedition independent of which route you are going:


On the right side, you can see the boons. These will be random and have a cost depending on the rarity of the specific boons (Rare for 200 Pilgrim's Coins, Exotic for 250 Pilgrim's Coins and Veteran for 300 Pilgrim's Coins). There are four boons for choice and ALL can be bought if you have enough Pilgrim's coins. On the left side, you can see the Miracles of the Gods which functions as "group boons" and are most of the time either one-use items or one-map bonuses. These miracles are always the same per Shrine with three different Shrines existing in total:

Shrine of ...
Miracle of ...
Effect
Cost
Fortune
Smednir
Increase Pilgrim’s Coins gained by 50% for the next level at the cost of receiving an extra 20% damage for the next level.
200
Fortune
Ranald
For the next level, Elites and Special have a chance to drop pickups on death.
200
Harmony
Shallya
For the next level, temporary health is converted to permanent health.
200
Harmony
Isha
When the last member of the party is knocked down, Isha restores their hp to full and strikes down nearby enemy.
200
Harmony
Rhya
Grants a Jade Censer (Healing Item, One Use Only). When deployed, heals and strengthens your team for 120 sec.
200
Strife
Grimnir
A mighty monster waits for you in the next level. Slay it to increase max health by 20%.
200
Strife
Morgrim
Grants Morgrim’s Bomb (Bomb Item, One Use Only). A powerful explosive with a long delay.
200
Strife
Ulric
Permanently increase your current weapons’ Power by 50.
100

With the multiple available choices as well as the possibility to buy all available boons, Holseher's map shrines are your best chance in order to influence your build and experience. What boons are offered is still up to chance though.

Special Sidenote: Similar to the weapon properties, you might sometimes forget what kind of boons you have picked up on your run. Actually, for boons, this issue is even more prevalent due to the insane amount of potential boons. As such you can also inspect your boons at all times by pressing "i".


Further information can be accessed by pressing the right mouse button and hovering over the specific boon icon showing its description. In addition, current active Miracles are shown.
4b. Seer's Altar & Chest of Trials
These bonus boons can be gained during a map run, so make sure to search well. There are two different possibilities. The first one is the Seer's Altar:

Seer's Altar

The usage of the Seer's Altar will grant you one random boon of a random rarity (from Rare to Veteran) for 150 Pilgrim's Coins.

The obtained boon will be shown for a short time in the middle of the screen with a short description of its effect. As mentioned before, unused talents from the career skill tree (meaning you can have two or even all three talents of the same talent row), Charm/Trinket/Necklace traits as well as boons unique to the Wastes can be gained. Seer's Altars have a random chance of appearing during a map with multiple Seer's Altars being able to appear in a single map. So you can gain multiple boons in a single map. If you have the coins for it and are willing to spend them ......

Chest of Trials

The second possibility is the Chest of Trials:

Upon activation of a Chest of Trials, you will be provided with a randomly chosen challenge, in all cases to kill something before it kills you. These enemies will be summoned only after activation. So for better chances, it is recommended to activate the Chest after the last horde. After passing the Trial or a prolonged passage of time (about 120 seconds) - in case of enemies bugging out for example - the Chest of Trials will unlock and provide you with a choice between three different boons of which you can choose one (and ONLY one), giving you another possibility to influence your build.
So the Chests of Trials have both the advantage of not costing Pilgrim's coins (actually you can gain coins if getting a boss encounter and killing it, unless you ledged it) and giving you an actual choice for your boon upgrade. Per map exactly one Chest of Trials will spawn. Don't miss it.

It should be noted that with the update from the 28th of October 2021 (Patch 4.4.2: https://www.vermintide.com/news/patch-442-patch-notes ) Grudge Marks have been introduced to the game. More information can be found in Section 5. They are only mentioned here shortly as Grudge Marked Monsters can only appear in the final arena of the expedition OR ... Chests of Trials. This means that opening the Chests now has a higher risk than before with the more difficult to fight and kill Grudge Marked monsters.
It should also be noted that with the update from the 14th of June 2022 (Patch 4.7: https://www.vermintide.com/news/patch-47-39-13-patch-notes), additional Trials have been introduced which not solely consist of fighting a monster.
4c. Exclusive Boons - Part 1
As mentioned before the Chest of Trials, the Seer's Altar and the Holseher's Map Shrines have all the chance for providing either unused talents from the career skill tree, Charm/Trinket/Necklace traits or boons exclusive to the Chaos Wastes. As the career skill tree talents and the Charm/Trinket/Necklace traits are well known or can easily be looked up I will just provide information on the Chaos Wastes exclusive boons:

Depiction
Name
Description
Rarity
Ranald's Surprise
Powder Barrel's you ignite deal 300 % increased damage.
Exotic
Djaf's Reaping
Landing 3 Melee headshots in a row grants 15 % increased Melee Power for 10 seconds.
Rare
Drakira's Thirst
Killing a Special replenishes 10 % of your ability bar.
Rare
Dazh's Peculiar Mirth
After killing an elite with a melee attack the next enemy you kill will explode.
Exotic
Ellinill's Withering
Attacks against full health enemies deal 20 % more damage.
Exotic
Ptra's Endurance
Standing still grants you 60 % damage reduction.
Rare
Ursun's Fortitude
Max health increased by 50 %.
Exotic
Valaya's Brew
Using your Career Skill has a 50 % chance of granting you the effect of the potion you are currently carrying.
Exotic
Hekarti's Jealousy
Each time a nearby ally uses their Career Skill you replenish 10 % of your Ability Bar.
Exotic
Atharti's Malice
Damaging enemies with damage over time effects grants 0.25 health.
Exotic
Ereth Khial's Pride
Gain 100 % Power and rapid health regeneration for 10 seconds when all your allies are downed.
Exotic
Eldrazor's Deflection
Parrying an attack makes you immune to damage for the next 2 seconds.
Veteran
Esmeralda's Solace
Reviving a teammate grants both of you health regeneration for 15 seconds.
Rare
Caxuatn's Frenzy
Taking damage grants you guaranteed critical hits for 3 seconds.
Exotic
Shallya's Rejuvenation
Regenerate 1 health every 3 seconds.
Exotic
Grimnir's Implacabilitiy
Falling below 10 % health grants you 15 % Attack Speed and Movement Speed and prevents incoming damage for 10 seconds.
Exotic
Verena's Inspiration
Increases Ability Bar cooldown rate by 10 %.
Rare
Lileath's Grace
Removes the limit on dodging efficiently.
Exotic
Geheb's Brawn
Pushing increases Cleave by 50 % for 3 seconds.
Veteran
Hukon's Strength
Reduce push cost by 50 %
Exotic
Estreuth's Abstinence
Taking damage while incapacitated grants you 50 % damage reduction for 10 seconds.
Rare
Quetzl's Protection
Gain 2 stamina shields.
Rare
Khaine's Fury
While above 50 % health, you gain 25 % more melee power but deal 3 damage to yourself every swing.
Veteran

4d. Exclusive Boons - Part 2
Follow-Up due to the character limitation or whatever.

Depiction
Name
Description
Rarity
Loec's Wardance
Gain up to 20 % Attack Speed based on your missing Ability bar.
Exotic
Morgrim's Resourcefulness
Using a consumable makes range attack fire 1 additional projectile for 15 seconds.
Exotic Removed
Stromfels' Savagery
Killing 10 enemies with melee attacks in quick succession grants 20 % attack speed and movement speed for 10 seconds.
Veteran
Xokha's Duty
Using your Career Skill returns 10 % of nearby allies' Ability Bars.
Rare
Kalita's Barter
Using your Career Skill will drop a duplicate of one of your inventory items.
Veteran
Khsar's Speed
Gain 10 % Attack Speed.
Exotic
Isha's Embrace
Increase healing received by 50 %.
Exotic
Hoeth's Sword-Craft
Every block countes as a parry.
Exotic
Morr's Protection
Downed friends near you are invulnerable.
Veteran
Ladrielle's Meditation
Each 5 seconds not getting hit increases your Career Skill regeneration by 5 %. Max stacks 5.
Exotic
Salyak's Charity
Gaining temporary health while at full health will give the temporary health to the nearest ally instead.
Veteran
Gork's (or possibly Mork's) Might
Pushing an enemy makes you do a short charge forward.
Exotic
Kurnous' Precision
Increases headshot damage by 50 %. Lowers non-headshot damage by 10 %
Exotic
Ualapt's Cunning
Picking up ammunition grants 15 health.
Rare
Mork's (or possibly Gork's) Onslaught
Using your career skill grants 40 % movement speed for 5 seconds.
Exotic
The Lady of the Lake's Vigil
When you are above 75 % Health you take of the damage inflicted on nearby allies instead of them.
Exotic
Sigmar's Comet
Throwing a bomb throws one additional bomb (of the same type).
Veteran
Ulric's Grim Resolve
Your attacks cannot be interrupted.
Exotic
Asaph's Vengeful Rain
Picking up ammunition increases your range penetration by 2 for 15 seconds.
Rare Removed
Smednir's Wealth
Auto-pickup Pilgrim's Coins in a 10m radius.
Rare
Hukon's Sundering
After using your Career Skill your next 3 Melee Attacks launch a shockwave that damages and stagger enemies.
Exotic
Neru's Patience
Blocking enemy attacks reduces Career Skill Cooldown.
Exotic
Khaine's Thirst
5% Damage Reduction for every 20% Health lost. Stacks up to 5 times.
Rare
Taal's Hunt
When you kill enemies marked as Taal's quarry, you gain 30% Power for 10 seconds. The mark is visible above the enemies' head in the form of a bright flame.
Exotic
Hashut's Echo
Your grenades explode a second time (after a short delay).
Exotic
4e. Exclusive Boons - Part 3
Covering the new boons added by Be'lakor. Some Boons are currently in part 2 due to character limitation issues.

Depiction
Name
Description
Rarity
Addaioth's Embrace
A halo of fire damages enemies around as long as you are downed.
Exotic
Ranald's Explosive Surprise
When you trigger a barrel explosion, the barrel spawns smaller barrels. These explode after a short time.
Rare
Valaya's Heart
Gain 5% Melee Power for each nearby ally.
Rare
Ulric's Pack
Gain 5% bonus to Power. This is multiplied by the number of allies with the Boon.
Rare
Grimnir's Mettle
Every 10 seconds your next attack grants you Temporary Health. The amount of Temporary Health gains depends on the damage inflicted.
Exotic
Estreuth's Roar
Staggering 5 enemies at once grants 20% Power for 5 seconds.
Rare
Drakira's Malice
Taking damage deals damage to nearby enemies.
Veteran
Khaine's Might
Gain 25% Power, but 50% Curse.
Exotic
The Great Maw's Resurgence
Gain 2 Health each second if below 30% Health.
Rare
Hoeth's Method
Each Attack that doesn't causes a Critical Hit adds 5% Critical Chance to the next Attack. These bonuses stack, and reset after making a Critical Hit.
Rare
Ladrielle's Veil
Every 30 seconds, taking damage grants invisibility for 5 seconds. Attacking removes the invisibility.
Rare
Atharti's Vigour
Healing an ally with a health pack grants both of you 20% Power for 40 seconds.
Veteran
Myrmidia's Justice
You gain a stack of Justice each time you Block an Attack. Once you have 3 stacks, your next Attack is automatically a Critical Hit and all stacks are lost.
Rare
Morai-Heg's Doom
For 2 seconds after leaving invisibility, all Attacks are automatically Critical Hits.
Rare
Sigmar's Intervention
Every 45 seconds, if you are disabled a bolt of lightning knocks the disabler back.
Veteran
Stromfels' Retribution
Every 8 seconds, Parrying an Attack triggers a lightning strike against the attacking enemy.
Exotic
Khsar's Uplift
When hanging from a ledge, automatically recover.
Exotic
Isha's Gift
You revive with full Health. 120 second Cooldown.
Rare
Djaf's Rejection
You will always be downed, rather than be killed outright. (You can still bleed out.)
Veteran
Caxuatan's Boiling Blood
Spawn a Blood Orb for every 10 Health (or Temporary Health) damage taken. Each Blood Orb grants 5 Temporary Health.
Rare
Esmerelda's Generosity
On drinking a Potion spawn an Orb that grants the same effect.
Rare
Ptra's Protection
Every 5 seconds, a Perfect Parry spawns an Orb that reduces Damage taken by 50% for 10 seconds.
Rare
Nethu's Harvest
Every 3 seconds, when you inflict a headshot on an enemy, spawn an Essence Orb at their location. The Essence Orb grants increased Cooldown Regeneration for 0.5 seconds.
Rare
Mathlann's Spark
Spawns a static charge Orb every 10 kills. The Orb Damages and Staggers nearby enemies for 5 seconds.
Exotic
Eldrazor's Revenge
When your Block is broken you gain 15% Attack Speed for 15 seconds.
Rare
4f. Exclusive Boons - Part 4
Covering the new boons added by the Skull Update.

Depiction
Name
Description
Rarity
Grungni's Bombardment
Bombs have 50 % reduced range, but have 50 % more explosion radius and higher Damage.
Rare
Bomb of Alchemical Concentration
Your Bombs consecrate the ground for 10 seconds on impact. Players within the consecrated ground gain 1000 % increased Career Skill Cooldown Speed.
Rare
Bomb of Alchemical Lethality
Your Bombs consecrate the ground for 10 seconds on impact. Players within the consecrated ground gain100 % Critical Strike Chance.
Exotic
Bomb of Alchemical Rejuvenation
Your Bombs consecrate the ground for ten seconds on impact. Players within the consecrated ground will rejuvenate two health per second.
Exotic
Bomb of Alchemical Alacrity
Your Bombs consecrate the ground for 10 seconds on impact. Players within the consecrated ground gain 50 % increased Attack Speed.
Bomb of Alchemical Strength
Your Bombs consecrate the ground for 10 seconds on impact. Players within the consecrated ground gain 35 % increased Power.
Exotic
Ranald's Spiteful Plunder
When a Chest of Trials is activated, it creates consecrated ground that grants you 35 % increased Damage for a 30 seconds.
Rare
Ranald's Hearty Plunder
When a Chest of Trials is activated, it creates consecrated ground that grants you 500 % increased Cooldown reduction for 30 seconds.
Rare
Harrying Boon of Anath Raema's Precision
Headshots spawn four projectiles that seek out enemies.
Exotic
Harrying Boon of Anath Raema's Deflection
Parries spawn four projectiles that seek out enemies.
Rare
Harrying Boon of Anath Raema's Perfection
Critical Hits spawn six projectiles that seek out enemies.
Exotic
Myrmidia's Wildfire
An enemy that dies while Burning inflicts a Burning to nearby enemies, causing Damage over time.
Rare
Myrmidia's Cleansing Flame
Your Career Skill also Burns nearby enemies for damage over time.
Rare
Hekarti's Prophetic Bolt
Your Career Skill also spawns a projectile that seeks out enemies.
Rare
Drakira's Flensing
Your Career Skill also inflicts Bleed on nearby enemies.
Rare
Mathlann's Storm-Strike
Your Career Skill also calls down lightning strikes on nearby enemies.
Atharti's Venomous Affection
Your Career Skill also inflicts Poison on nearby enemies for Damage over time.
Rare
Lileath's Blessed Destiny
Increases your Career Skill maximum charges.
Veteran
Taal's Roar
Periodically send out a shockwave that staggers nearby enemies. Cooldown decreases with missing health.
Exotic
4g. Exclusive Boons - Part 5
Follow-Up due to the character limitation or whatever.

Vaul's Disruptor
You gain 100 % increased Stagger against enemies near to allies.
Rare
Valaya's Boozy Grant
Enemies close to you take 100 % increased Staggerfrom teammates.
Rare
Ulric's Valour
Enemies close to you take 15 % increased Damage from teammates.
Rare
Lileath's Favour
Gain 1 % increased Damage and Attack Speed per active Boon.
Rare
Eldrazor's Avenger
You again 20 % increased Damage against enemies near to allies.
Exotic
Ranald's Mighty Gamble
You gain 100 % increased Critical Hit Chance, decreased by 25 % per Rarity Level of your currently equipped Weapon.
Exotic
Ranald's Hasty Gamble
You gain 100 % increased Cooldown reduction, decreased by 25 % per Rarity Level of your Highest Rarity Weapon.
Rare
Anath Raema's Cruel Volley
Ranged attacks inflict 100 % increased Damage, but use 100 % more ammo / heat.
Taal’s Crippling Shot
Enemies hit with your Ranged Weapon take increased Damage from you for a few seconds.
Rare
4h. Event Boons
Added to the Chaos Wastes with the update from the 23rd May 2024 are the so-called Event Boons. These are made up of a very small list of additional boons which are only available during the event. Furthermore, their appearance chance is increased in comparison to other boons to make it far more likely getting the Event Boons over other Boons. Though, both statements so far are speculations as so far only one set of Event Boons has been released.

Skulls for the Skull Throne 2024

The Skulls for the Skull Throne Event Boons have been added temporarily for the Skulls Event 2024. They comprise of a list of five different Event Boons which have an increased appearance chance in Seer's Altars, Chest of Trials and Map Shrines. They are also quite cheap costing only 100 Pilgrim's Coins in the Map Shrines. Though, it also means you can make a "loss" at Seer's Altars by getting them while paying 150 coins.

Depiction
Name
Description
Rarity
Righteous Finesse
Parrying an enemy creates a powerful knockback and refreshes other Skull boons. 30 seconds cooldown.
Event
Righteous Strength
1 % Power per kill. After 10 kills gain another 30 % Power for 10 seconds and refresh other Skull boons.
Event
Righteous Regeneration
Attacks consume up to 3 temporary health points. After consuming a total of 30 temporary health points, gain a buff granting 30 temporary health points per second for 3 seconds and refresh other Skull boons.
Event
Righteous Frenzy
1 % more attack speed for each kill (up to 10 stacks). After 10 kills gain another 30 % power for 10 seconds and refresh other Skull boons.
Event
Righteous Smite
Charged attacks grant a stackable 10 % power buff for 2 seconds. After reaching five stacks, all stacks will be consumed and power will increase by 10 % for 20 seconds and refresh other Skull boons.
Event

Take note that I so far have only the german names and descriptions. This means I have translated them by hand and the wording may sound weird or be outright wrong. If you spot something wrong, please give me a comment so I can correct it.
5a. Grudge Marked Monsters
As mentioned in Section 4a, the Update from the 28th October 2021 (Patch 4.4.2) has introduced Grudge Marked Monsters. The information provided here mostly recaps what has been said in the Developers blog back then: https://www.vermintide.com/news/all-about-grudge-marks

Grudge Marked monsters might appear from Chests of Trials - depending on the Trial, the difficulty and the expedition's progress - and are guaranteed to appear in the final arena of the expedition. All Grudge Marked monsters are stronger than their normal counterparts by having 50 % more health, causing 20 % more damage and having 70 % less knockback distance after being staggered. And each monster can have up to three Grudge Marks. Also, all Grudge Marked monsters are named and slightly differ in their appearance by having two spears poking out of their back. The potential number of marks they have is dependent on difficulty and expedition progress:

  • Recruit: 0 - 1
  • Veteran: 0 - 2
  • Champion: 0 - 3
  • Legend: 0 - 3
  • Cataclysm: 1 - 3

The first number gives the number of marks encountered on the first map while the second number indicates the number of marks for the final arena. This means that only on Cataclysm you will encounter a Grudge Marked monster on the first map. It also means that starting from Champion, the final arena will always have Grudge Marked monsters with three marks. At the moment, there exist ten different Grudge Marks with varying effects:

Grudge Mark
Description
Effect
Crippling
Mark severely cripples players it deals damage to.
Upon receiving damage, player movement will be decreased severly. The crippling effect is also applied by Troll vomit and Stormfiend flames.
Cursed Aura
Mark affects close-by players health.
Max health will decrease the longer the player stands close-by similar to the Light Weave effect and picking up Grimoires.
Frenzy
Attacking the marked monster can throw you into frenzy mode.
Striking this monster with this mark 10 times in quick succession throws the player into a frenzy, increasing attack speed and movement speed by 25% and power by 20% but attacking causes damage to the player. Attacking the monster refreshes this debuff.
Illusionist
Mark periodically summons 3 mirror images of itself.
About every 30 seconds, the monster changes position and spawns three illusions without Grudge Marks and which also can't damage you. Illusions have few health and can be killed.
Invulnerable
Mark periodically becomes immune to damage.
Indicated by a white swirling effect, the monster will be immune to all damage for a few seconds before becoming vulnerable again. Can still be staggered.
Mighty
Mark periodically deals more damage.
As description, indicated by red "flames".
Rampart
Mark is immune to ranged damage.
During all times, the monster can not be damaged by ranged attacks. This counts for ranged career skills and bombs as well. DoT damage applied by ranged attacks still damages it though.
Regenerating
Mark regenerates health over time.
If the monsters is not damaged for a few seconds it will start regenerating. This can be seen by the increase in health as well as a green effect on the monster icon (while tagged).
Relentless
Mark cannot be staggered.
As description, nothing to add here.
Shadow-Step
Mark has a chance to warp to random locations near the player when hit.
As description, the monster can randomly warp and appear in your back also while attacking. So you might receive some unfair hits.
Shield-Shatter
Mark makes monster attacks decrease your max stamina.
Blocking an attack from this boss now temporarily reduces max stamina by 1 for 8 seconds.
Vampiric
Mark heals from the damage it deals to players (and bots!).
Receiving damage will heal monsters proportionally to the damage it deals to you.
Warchief
Mark periodically spawns elite units that surrounds and protects the Warchief.
As description, nothing to add here.

Each of the five existing monsters can have any of the listed Grudge Marks in any combination of up to three different Grudge Marks with a few restrictions though. Due to community feedback and some overly unfair situations the following restrictions to monster / Grudge Marks combinations has been introduced with the Warrior Priest Update 4.5.0 from the 10th December 2021 ( https://www.vermintide.com/news/patch-450cu35-patch-notes-amp-warrior-priest-faq ):

  • Chaos Spawn and Minotaur can no longer be marked with 'Shield Shatter'.
  • Chaos Trolls can no longer be marked with 'Invulnerable'.
  • Reduced chance of getting 'Invulnerable' along with 'Regenerating'.
  • 'Crippling' and 'Shield Shatter' will no longer appear together.
  • Reduced chance of getting 'Illusionist' along with 'Shadow-Step' OR 'Invincible'

Shield-shatter restriction has been removed with the update from the 15th March 2022 and new Grudge Marks have been introduced and been tweaked: https://www.vermintide.com/news/update-46-is-live-now-on-pc
5b. Chest of Trials - Potential Trials
Here is a list of all the currently available Trials which can trigger for the Chests. For all Trials, the summons can be seen in the form of purple circles on the ground before the enemy appears. Take this time to reposition, as they can spawn in mid-attack animation.

It should be noted that the Trials are influenced by the map modifiers in two ways. The first one is determined by the enemy combination on the map. If you have Skaven/Chaos you only get Trials for Skaven and Chaos and no Beastmen Trials. If you have Skaven/Beastmen then it is vice versa. For this reason, I have separated the table in three parts. The first part is the Skaven Trials, the second part is for Chaos and the last part for Beastmen Trials.

In addition to the enemy faction, the +Elites, +Specials and +Monster modifiers also significantly decrease the pool of potential Trials. For example, if you have a +Elites modifier on the map ONLY Trials with elites in their spawn can trigger. This is especially helpful if are trying to get the Purified Skins as it may help you to find Chest of Trials with Grudge Marked monsters by visiting maps with the +Monster modifier.
A special note will be given to Khorne Maps. Due to Khorne loathing all forms of magic, the Blightstormer and Life Leech Trial will never happen and will always forcefully trigger the Skaven Specials Trials.

In contrast to initial thoughts, Minus modifiers (-Monster for example) do not have an influence on the Trials, the same as the other modifiers like +Pilgrim Coins or +Horde.

Trial Name
Enemy Spawns
Map Modifier
Clan Fester Assault Clawband
Shielded Stormvermins and Shielded Clanrats
Elites
Stormvermin Clawband
Stormvermins, no additional enemies
Elites
Clan Pestilens Congregation
Plague Monks and Clanrats
Elites
Clan Skyre Incinerator Clawband
Warpfire Throwers and Clanrats
Specials
Clan Skyre Ratling Clawband
Ratling Gunners and Clanrats
Specials
Plaguewind Clawband
Poison Wind Globadiers and Clanrats
Specials
Clan Moulder Hunting Clawband
Rat Ogre and Clanrats
Monster
Clan Moulder Incinerator Clawband
Stormfiend and Clanrats
Monster
Abonimable Duo
Two monsters at half max health within map parameters (can be both the same but neither can be a Minotaur)
Monster
Rotblood Raiding Party
Mauler's and Marauders
Elites
Rotblood Berserker Cult
Savages and Marauders
Elites
Rotblood Chosen
Chaos Warriors and Marauders
Elites
Rotblood Siege Party
Shielded Chaos Warriors
Elites
Blightstormer Coven
Blightstormers and Fanatics
Specials
Lifeleech Coven
Lifeleeches and Fanatics
Specials
Troll-Kin Harbingers
Bile-Troll and Fanatics
Monster
Fallen Champion’s Retinue
Chaos Spawn and Marauders
Monster
Raiding Bray Herd
Ungor Archers and Ungors
Elites
Pillager Bray Herd
Bestigors and Gors
Elites
Bestigor War Herd
Standard Bearers and Bestigors
Specials
Ungor War Herd
Standard Bearers and Ungors
Specials
Bloodkine Bray Herd
Minotaur and Gors
Monster
6. Potions
Potions are another big change in the Chaos Wastes. Nowhere to be found are the usual strength, speed or concentration potions. However, as replacement we got 8 new potions with new (although familiar) unique effects. Sad part, is that they are all red making them kinda hard to distinguish.
However, there are two helps for this. The first is the weapon inspection button as described in Chapter 3 which will show you which Potion you are carrying together with a description of its effect. The second one is that each potion got an unique icon attached to them, making distinction possible. Familiarization with the specific icons will help you to remember which potion you or your bots / fellow human players are carrying.

Depiction
Potion of ...
Description
Agility
Grants you the reflexes of Loec, improving your Dodge distance for 30 seconds.
Endless Bombs
For the next 10 seconds, grim Hashut grants you unlimited bombs (don't ask how).
Life Share
Empowered by the Great Maw, for the next 10 seconds, your kills restore health to other players.
Lifesteal
Khaine fills you with bloodlust. For the next 15 seconds, your kills restore health.
Poison Aegis
Atharti grants you immunity to all poison for 60 seconds.
Prophetic Strike
Morr grants knowledge of foes' weaknesses. Improves your Power for 25 seconds.
Stealth
Vengeful Drakira grants you invsibility for 5 seconds.
Wrath
Verena enhances your means to smite the guilty. Improves your damage for 20 seconds.
7. Curses
Most of the guide so far (with the exception of the potential map modifier) has been about the boons, bonuses and miracles the heroes can acquire as well as their equipment. However, these are the Chaos Wastes and the influence of the Chaos Gods is ever prevalent.
As such, each map has the chance to be cursed by one of the four Chaos Gods (Khorn, Nurgle, Slaanesh and Tzeentch) as well as the Dark Master Be'lakor, indicated by the halos around the map symbols on Holseher's map. Upon moving the mouse over the map you can also see which Chaos God is cursing it, however not which of his three potential curses is active. In addition to the random chances for a curse per map, you have one guaranteed curse at the final arena map which is identical to the "expedition curse". This one will rotate every week. The Chaos Gods' curses are summarized in the following table:

Chaos God
Curse
Description
Shadow Skulls
Vicious skulls spawn out of thin air.
Shadow Totems
Totems around the level will keep spawning enemies.
Blood God's Fury
Beware of hexed enemies. Their fury enhances those who fight at their side.
Blood Tornadoes
Blood tornadoes move randomly around the level, inflicting bleeding on those they touch.
Skulls of Wrath
On death, enemies drop an exploding skull totem.
Infested Foes
Hexed enemies deal poison damage and create poison clouds when they die.
Miasma of Pestilence
The level is covered in a poisonous miasma that inflicts the Curse effect. Stand close to the Purifying Torch to quell the curse.
Skulking Sorcerer
A malevolent spirit haunts this level. It cannot be slain, only driven off.
Baleful Empathy
A portion of damage inflicted on a player is also inflicted on other players in close proximity.
Glory to Greed!
Pickups are disabled on this map, but hexed enemies spawn items for the taking!
Unquenchable Thirst
Players suffer damage over time. Drinking potions restores health lost to Unquenchable Thirst.
Bolt of Change
Tzeentch launches arcane bolts from the skies, dealing damage to players and randomly transforming enemies.
Crystal Egg
Destroy the crystal eggs before they hatch, or face the fury of the beast within!. Activating map events or the Chest of Trials will stop the current counter of the Crystal Egg and start completely anew after completion of the event/chest.
Twin Blight
Enemies have a chance to be reborn as smaller enemies upon death.

The Khorne curses deserve a special note as they have the additional effect that no Life Leeches and Blighstormers spawn on these maps even when a Chaos Faction is present. This is due to the distaste Khorne has for magic, as described in Lore.
8. Rewards
So what are the rewards for playing the new Chaos Wastes game mode? One of the largest criticism for Weaves was that there was no reward which could be used in the Adventure Mode. This has been solved for Chaos Wastes as you get normal loot chests. You get one - after beating the first map - with increasing value depending on how much Pilgrim's Coins you collected, how many Chest or Trials and Curses you conquered. So the farer you get in the expedition the better this chest will be. You get two more Emperor Loot Boxes if you successfully finish the Expedition. So for a time frame of about one hour you can get three chests which is about equal to the acquisition rate of the Adventure Mode.

That said, there is no loot or some other kind of meta-progression for Chaos Wastes mode itself. You always start anew the same as before with the same strength. So the loot chests are kinda redundant for the Chaos Wastes mode itself.

In addition to the regular rewards there are also one-time rewards in the form of frames which can be earned for conquering an expedition for each of the four Chaos Gods and also for finishing the Citadel of Eternity with each character on Champion, Legend and Cataclysm.

With the introduction of the Grudge Marks, there have also been added new Purified Skins (mostly white) for each career which are granted for killing Grudge Marked monsters. Per career you have to kill five Grudge Marked monsters in total, one on each expedition and one of each monster type.
9. Final Remarks
Guide is mostly done and should be about 98 % finished. Looking for screenshots of missing stuff. Will add them as soon as I get a screenshot of them. Also will replace the current screenshotted boon icons with the cleaner versions.

Sadly my gif is to large to present it here. As such:

Thank you for reading.

If you have any further questions feel free to post them and I'll check if I can answer them.

Acknowledgement: Better looking (and not screenshotted-and-paint-modified) boon icons have been provided as a courtesy by Royale w/ Cheese.
English names for the potential trials have been provided by Catpuccino.
34 Comments
Adelion  [author] 27 Aug @ 4:01am 
I can't answer this for sure. I think most buffs are multiplicative. But there are also additives as far as I know.

In the past for example damage reduction was additive to a large degree but was then changed to multiplicative to avoid 100% damage reduction. On the other hand block cost reduction is still additive i think.

Overall, the system is messy. But I am not overly familiar with the source code. So no guarantee on the correctness of the information.
Sigmar 26 Aug @ 4:20pm 
@Adelion so are all buffs additive? Or are there some multiplicative buffs? I've been trying to figure this out but sometimes it feels like VT2 has it's own buffing system because the number dont add up on some instances.
Adelion  [author] 1 Nov, 2023 @ 12:01pm 
Ah, you have misunderstood that one. It is indeed multiplied but not with 5 each time but the numbers of allies with the boon:

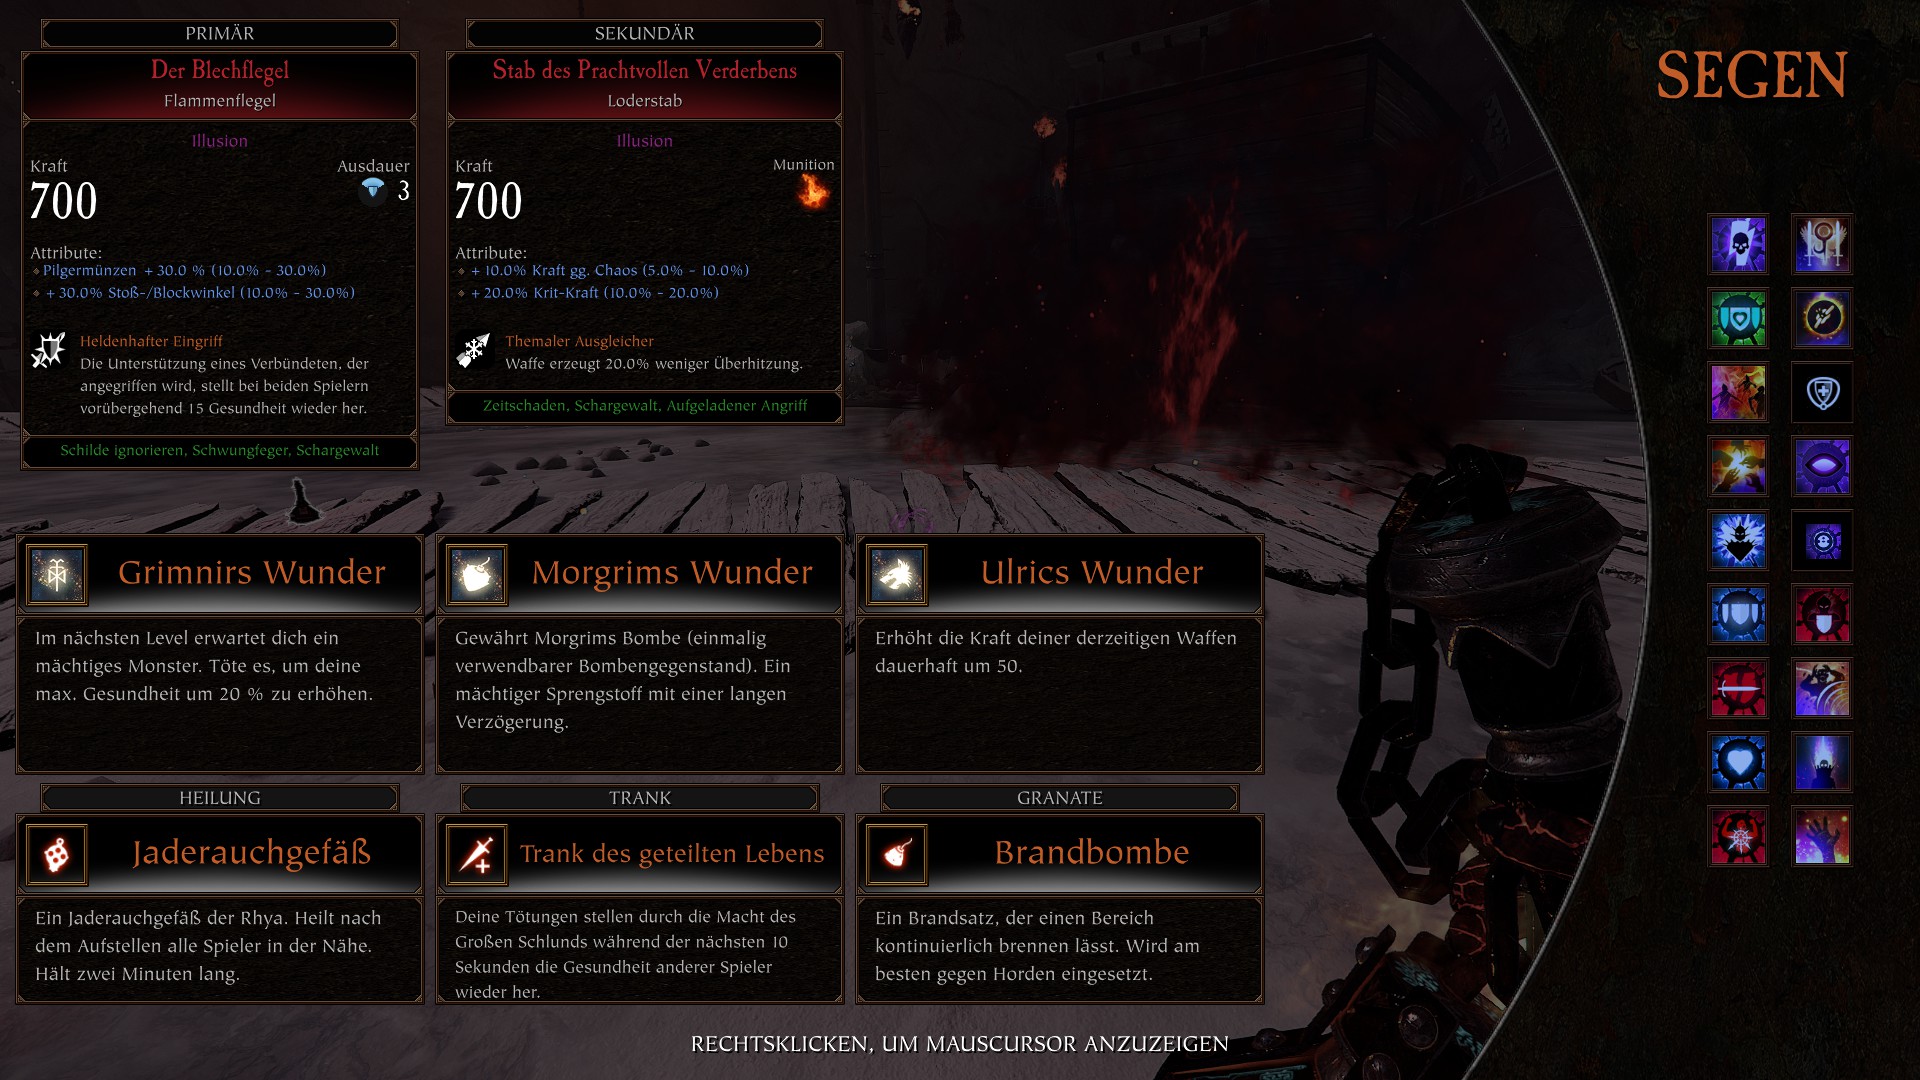
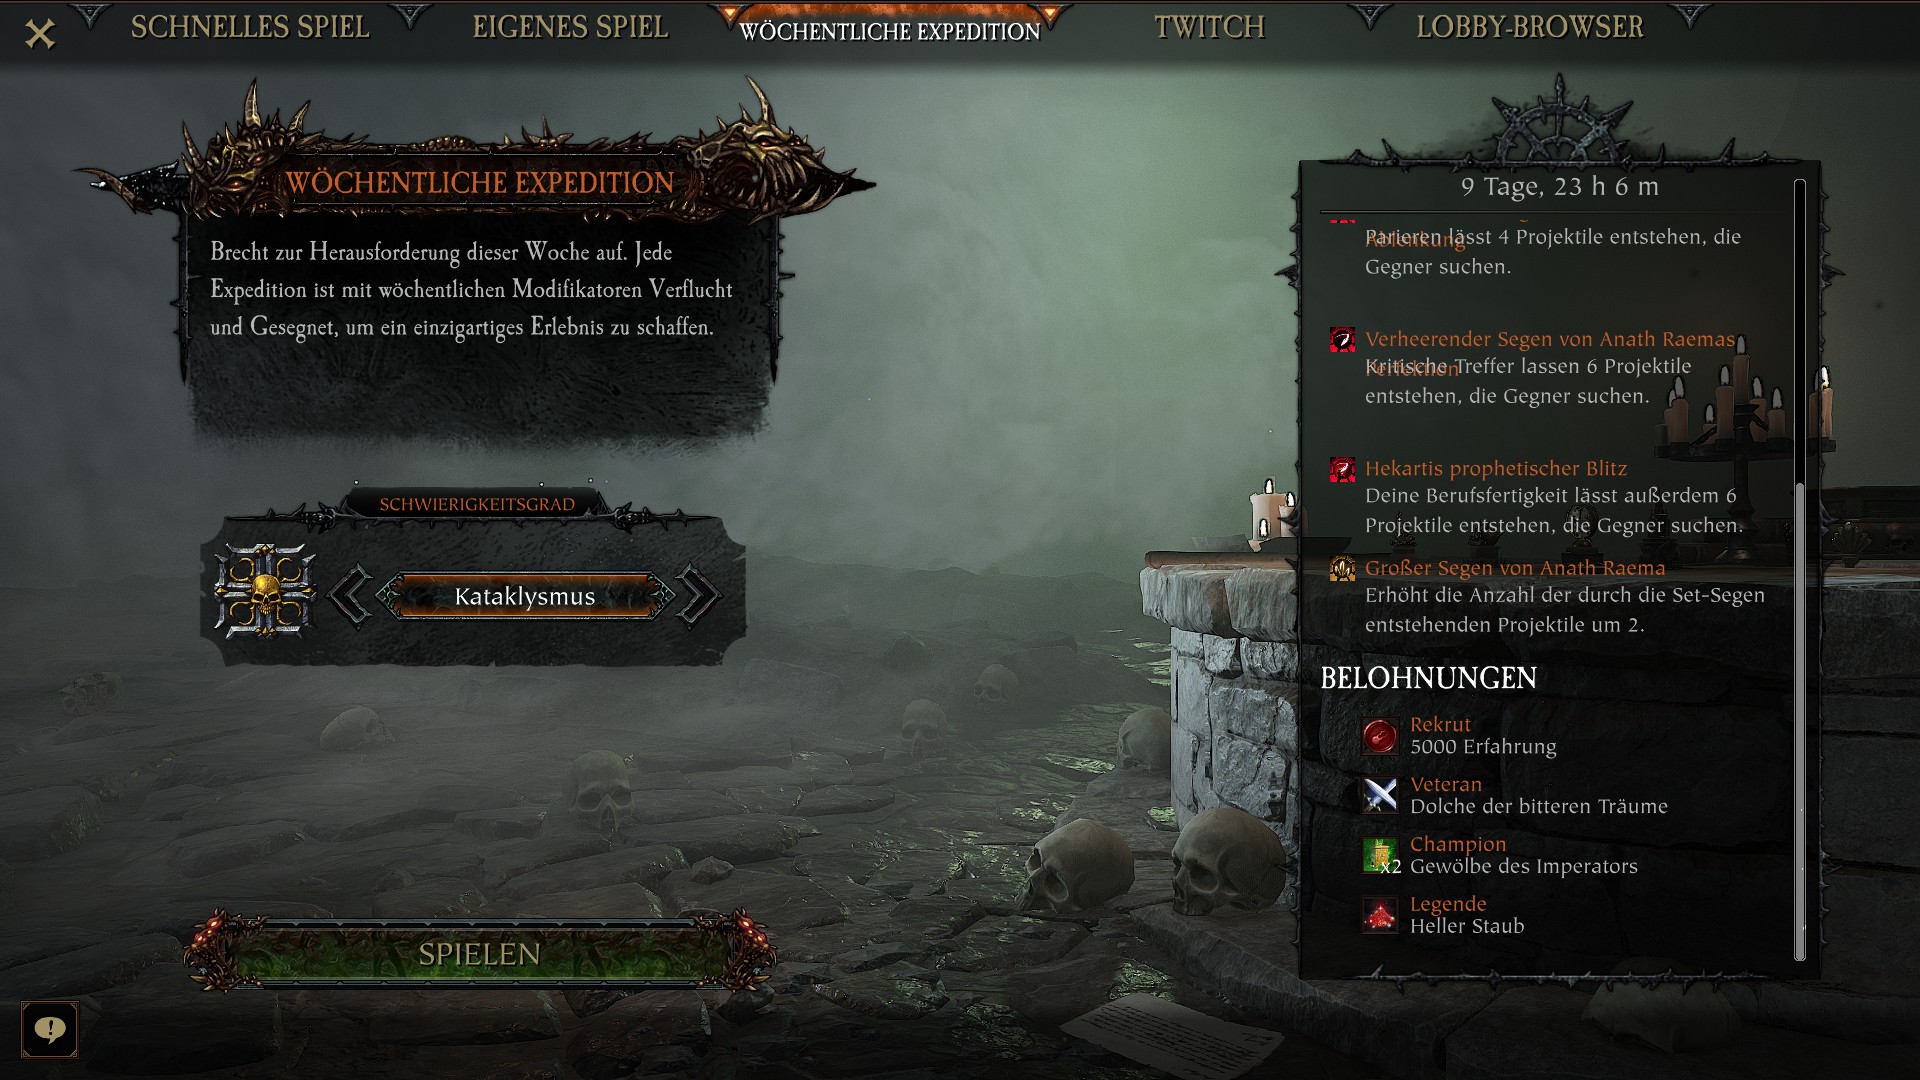
- Just you alone: 1*5 = 5 % Bonus Power
- You and another player (2 people): 2*5 = 10 % Bonus Power
- You and two other players (3 people): 3*5 = 15 % Bonus Power
- You and three other players (4 people): 4*5 = 20 % Bonus Power

I hope this clears it up. So you have at least 5 % more power and a maximum of 20 % if everyone has it. With bots it will always be just 5 % as they don't get boons.
RocksGiveMeJoy 1 Nov, 2023 @ 8:31am 
One question I've been scouring the internet for but not found is to do with Ulric's pack boon.

Does it actually multiply as in 5 * 5 * 5 * 5 or are is this a typo and is actually just 5 + 5 + 5 + 5?

I'm assuming it's multiply but wouldn't that get broken even if you get just up to 3?
Lyric 28 Dec, 2022 @ 12:30pm 
What you call 'Invulnerable' is called 'Invincible'
Adelion  [author] 30 Jun, 2022 @ 12:44am 
Thanks! Most of them have been translated quite literally. Would still have gotten them wrong ^^'
Catpuccino 29 Jun, 2022 @ 5:41pm 
Adding English names of enemies spawn from Chest of Trials for you:
- Maulers and Marauders: Rotblood Raiding Party
- Savages and Marauders: Rotblood Berserker Cult
- Chaos Warriors and Marauders: Rotblood Chosen
- Blightstormers and Fanatics: Blightstormer Coven
- Lifeleeches and Fanatics: Lifeleech Coven
- Bile-Troll and Fanatics: Troll-Kin Harbingers
- Chaos Spawn and Marauders: Fallen Champion’s Retinue
- Ungor Archers and Ungors: Raiding Bray Herd
- Bestigors and Gors: Pillager Bray Herd
- Standard Bearers and Bestigors: Bestigor War Herd
- Standard Bearers and Ungors: Ungor War Herd
- Minotaur and Gors: Bloodkine Bray Herd
Catpuccino 29 Jun, 2022 @ 5:41pm 
Adding English names of enemies spawn from Chest of Trials for you:
- Shielded Stormvermins and Shielded Clanrats: Clan Fester Assault Clawband
- Stormvermins and Clan rats: Stormvermin Clawband
- Plague Monks and Clanrats: Clan Pestilens Congregation
- Warpfire Throwers and Clanrats: Clan Skyre Incinerator Clawband
- Ratling Gunners and Clanrats: Clan Skyre Ratling Clawband
- Poison Wind Globadiers and Clanrats: Plaguewind Clawband
- Rat Ogre and Clanrats: Clan Moulder Hunting Clawband
- Stormfiend and Clanrats: Clan Moulder Incinerator Clawband
- Two monsters at half max health within map parameters: Abominable Duo
Adelion  [author] 26 Jun, 2022 @ 3:03am 
Yes, it seems these boons have been removed. Their popularity was minimal anyway.
Catpuccino 26 Jun, 2022 @ 12:25am 
I think they removed Morgrim's Resourcefulness and Asaph's Vengeful Rain. I can't find those 02 boons in 4.7 source code