Gunfire Reborn

Gunfire Reborn

180 ratings
Ao Bai Guide: Ascension Tier List and General Tips (06/18/2021) (Summer Update)
By Cartography Dee
Rating all of Ao Bai's Ascensions, along with miscellaneous gameplay tips.
This guide is focused on Reincarnation+7 difficulty and Solo Play.
Occult scrolls are not factored, as this is a general guide and you cannot rely on getting specific scrolls.
2
2
   
Award
Favorite
Favorited
Unfavorite
Impact of Talent 2.0 and Reincarnation changes
*Added new sections to the guide, and updated the ascension ratings and descriptions.

-Ao Bai's HP sustainability is now a serious issue when even the weakest enemies on Reincarnation+7 can break your shield in a single hit. It's very sluggish to recover HP after taking multiple hits.
-The burst damage protection talents in talent 2.0 are far less effective on Ao Bai because of his high HP:shield ratio.
-Ao Bai Spiritual blessings aren't that good, except for the newer 'One Dog Armor' that tries to put a band-aid over his other core issues. (see the Spiritual Blessings section for details.)
-Explosive weapons are in the worst state they've ever been in; as most lack crit scaling or elemental effects they have trouble keeping up with the high enemy HP scaling. I do not recommend Explosive specific ascensions at high Reincarnation levels because they are only viable with specific builds (such as damage gemini 'justice' or magazine gemini 'tiger cannon') that you cannot reliably expect to get.

Overall all of Ao Bai's weaknesses have become even more exaggerated and he did not get any significant benefits from the update. He's definitely a weaker choice if aiming to play Re+7. Taking the 'One Dog Army' blessing mitigates some of these downsides, though it also results in a very basic playstyle.
Why to Play Ao Bai (or why not to play)
+Powerful Dual-Wielding skill that massively improves his damage
+Easy access to fusion effects by Dual-Wielding elemental weapons
+Secondary Grenades are fast and can stagger enemies

=Gets to use a couple of HP based occult scrolls no one else wants

-Overly reliant on Dual-Wielding for his damage.
-Explosive weapon tend to have poor damage scaling ability.
-Many talents/ascensions are weaker than average or don't even do anything if not Dual-wielding.
-Spiritual Blessings are mostly on the weaker side.
-Poor shield/hp distribution. Anti-burst talents especially do not favor high HP ratios.
-Can't effectively use 2-handed weapons (they prevent dual wielding). This limits some of your gemini options.
-Dual wielding elemental weapons can make it impossible to see through all the particle effects (this can legitimately get you killed)
Important notes about Launchers
Launchers are fun to use. Many people will probably pick Ao Bai just because they want to blow everything up. While Launchers can end up being powerful, they are an inherently restrictive weapon type that needs more support to do well by the lategame. Some enemies (and anything with the 'defensive' prefix) are very annoying to deal with if you can't land criticals or fusion effects (though some launchers can land crits). Additionally, most explosive weapons have a relatively low damage output against a single target, and require specific inscriptions or occult scrolls to compensate. Since most launchers lack good element effect rates, they can't rely on fusions either (which is unfortunate because dual-wielding fusion builds are extremely strong).

Unless your build is very powerful and you know what you're doing, I recommend only taking a launcher in your second weapon slot (if taking a launcher at all). Reserve the first weapon slot for a stable automatic or semi-automatic weapon that can cover cover for its weaknesses. This is typically much more reliable than having launchers in both weapon slots (especially since some powerful ascensions require an automatic weapon to function properly). Dual-Wielding 2 heavy weapons also destroys most of your mobility, so you really need strong offence and/or defence capability for that.

For a typical launcher, you will primarily use it to clear rooms, and rely mostly on your other weapon (and Dual-Wield) to be able to handle elites and bosses. As a result it's usually better to invest in ascensions that improve the whole build, rather than the dedicated explosion ascensions that will only help your offhand weapon. Not taking dedicated explosive ascensions also retains your build adaptability; Ao Bai can use a wide variety of weapons and there's a very high chance you will be offered some especially powerful non-explosive weapons. Your build will be worse if you want to swap to a new weapon and you have a bunch of explosion ascensions that end up doing nothing.

However sometimes you find an especially powerful launcher; either through strong inscriptions or a good combination of scrolls you end up with a 'boss viable launcher' (you'll be able to judge this after enough experience, but it typically involves bonus projectile inscriptions or being able to mitigate or avoid the reload time). After you obtain a launcher you determine to be 'boss viable' then both primary explosion ascensions become significantly higher priority, as they offer heavy benefits if you're using launcher as a primary weapon.

Unfortunately due to harsher enemy scaling, the likelihood of having a viable launcher decreases as the game difficulty increases. Since you cannot properly determine if you can get a strong one until area 2 at the earliest, it's not recommended to invest in pure explosion ascensions in Reincarnation+7.

!! Don't over-commit to explosive ascensions before you have a good launcher !!
Stagger 101 (new)
This section will explain how the stagger mechanic works, as it's very important to surviving the early game as Ao Bai, and remains effective throughout the game at preventing incoming damage. Staggering not only disables and knocks the enemy back for a short duration, but it can also interrupt enemy attacks and put them on cooldown. For example, a Longbow-Man or Bandit Retainer who has their attack interrupted will not be able to use it again until their internal cooldown is up. (These specific enemies also have an interesting property where staggering them; it also deletes all of their current airborne projectiles). Proactively using stagger with Ao Bai's grenades is a core component of his gameplay and you should do your best to make use of it.

How to stagger:
-Hitting a regular (non-elite/boss) enemy with an attack that has a 'stagger property' normally has a 100% chance to stagger the enemy.
-Attacks with the 'stagger property' include, most explosive weapons, explosive fusions, certain other weapons (ex. Argus, Goshawk, Swords), and most importantly Ao Bai's secondary explosive grenades.

When enemies can resist Stagger:
-Enemies cannot be staggered again if they were staggered within the last ~5 seconds. You cannot stagger an enemy again until this timer finishes.
-Some enemies, such as Dark-faced bandit and White Shark are permanently immune to stagger.
-Some enemies are immune to stagger only during certain animations (ex. Octopus is immune while firing, some enemies are immune during their dodge animation)
-The Resistive prefix that some enhanced enemies have creates an aura that gives all enemies within range a ~50% chance to ignore stagger.
Spiritual Blessings (new)
(These buffs are available from a vendor unique to reincarnation mode. They cost 150 soul essence each and are not permanent, so players without a maxed talent tree may want to pass on taking them.)

One Dog Army "When not Dual-Wielding, +150% weapon/skill DMG, -20% DMG taken, and +3% HP recovery per second."
The band-aid blessing. This can carry your damage for the first half of the game before you get a gemini weapon, and the survivability bonus is significant enough that it's often just not worth even bothering to Dual-Wield. Having this makes an overall run much easier, basically autopick this if you see it offered at the start of the run. Also of note is that the 'Close Call' ascension becomes significantly better with this (as you have always have a stable source of healing) and all the dual-wield related ascensions become worse. The downside is that you end up playing as a character with no real abilities or any interesting ascensions; it results in an extremely basic playstyle.

Weapon Genius "When Dual-Wielding: +100% weapon DMG if weapon types match, otherwise +50% lucky shot chance."
By 'weapon types', it's referring to the specific class of weapon, like Assault Rifle, SMG, Injector, etc. (check the in-game logbook for details). The damage bonus is decent enough regardless of if the weapons match or not, but for a blessing the numbers are a bit underwhelming for a conditional damage bonus without any other benefit. Dual-Wield restricted benefits aren't ideal since they don't do anything Ao Bai during his weak downtime state. Still, the effect isn't bad, and Ao Bai's next two blessings aren't exactly good so you'll probably pick this by default if 'One Dog Army' isn't an option.

Battle Scarred "When under 50% HP, have a 50% chance to recover 20% of max hp when taking damage."
A 'survival' talent that can only activate when you're already probably one hit away from death. The 50% HP threshold is at a mere 75 HP by default and only heals 31 HP. That's assuming it even activates and you don't just die instead. It's also not uncommon to take over 75 damage which prevents this from even having a chance to do anything. Don't bother with this.

Atomic Bomb "30% chance when throwing a grenade to throw your entire grenade stock at once."
This talent is a joke, but at least it's a funny joke. On top of an extremely unreliable activation chance, just dumping your grenade stock is actively detrimental for most builds that just reserve them for staggering enemies. Even a dedicated grenade build wouldn't want this to activate randomly and lose their stock (not that grenade builds are very worthwhile on Reincarnation+7 to begin with). You're basically relying on the 'Grenade Master' ascension's chance to not spend grenades on throw so you can get the effect for free, but that's another layer of randomness you have to deal with.
Gemini Etching (new)
This is the new core strategy for basically every character at higher reincarnation levels. It let's you setup endgame gemini weapons as early as area 2, before enemy HP starts to scale to a silly degree.

Gemini inscriptions can be etched onto any weapon for a fee at the craftsman if either one of two conditions is fulfilled:
1. The weapon already has 4 inscriptions before etching (every naturally dropped weapon starting in Area 2 qualifies for this).
2. The weapon is enhanced to +5 (This lets you bring a weapon from the first area, but is more expensive as you have to spend money to upgrade it first. Usually used for bringing a secondary weapon, though if sometimes you may have a good primary you want to bring instead).

As Ao Bai, the Gemini to aim for is usually the 'share damage type' Gemini (alternatively you can do Magazine share gemini with an automatic weapon and a Tiger Cannon, but that is generally less effective). You will have one Fire/Lightning weapon and one Corrosive Weapon. Lightning Weapons are the safer pick at the moment because Miasma is very strong at higher difficulties.

Normally for the secondary weapon (the 'gemini fodder') the only stat that matters on it is 'elemental effect chance'. This stat is directly applied to the first weapon on top of its existing elemental effect chance (ex. Lightning Blast gemini'd with Fire Tower results in Lightning Blast having a 20% chance to inflict shock AND a 50% chance to inflict burning with every bullet). However since Ao Bai can dual-wield and will often use the secondary weapon in combat as well, you can just pick a weapon that has good application rate and not necessarily a high elemental effect rate (like the Pupil or Porcupine shotguns). Also while there are Two-handed weapons with high elemental effect chance, using them as gemini fodder will still disable your dual-wield skill, so it's typically a bad idea to use those.

Most of your money should be reserved for etching and reforging the gemini's until they match. Do not waste money upgrading weapons you don't intend to use for gemini etching as the process can be expensive and the sooner you get it done the better off you will be.
Ascension Tier List
This list covers Ascensions in a vacuum. Specific ratings will shift as your build progresses in a run. Use your own judgement. (ex. defensive Ascensions may have more value if you have only found offensive occult scrolls)

Some Ascensions are also rated differently depending on how many points you have in them already.
(ex. lv3 rating assumes you already have 2 points invested).

The Tiers are divided as follows:
S: Excellent Ascension. Almost always pick if it doesn't conflict with your build,
A: Great Ascension. Can't usually go wrong with these.
B: Good Ascension. Good to have, just not as high priority.
C: Mediocre Ascension. Not necessarily 'bad' but you probably shouldn't pick these over other ones.

Gunfire
Twin Gunner "While dual-wielding, weapon DMG +100% .. +125% .. +125% and ammo consumption is doubled. At lv3 ammo consumption is not doubled"
The damage bonus for this skill is quite high even at only 1 point, but doubling ammo consumption is a significant penalty for most weapons. Even if you can manage your ammo reserves, the increased amount of reloading you'll have to do makes the overall damage gain from this skill smaller than it appears. This ascension gets better with Weapons that don't mind the penalty too much, or if you've already taken other ascensions that can help mitigate it (ex. Sharpshooter and Ammo Expert). Dual-wielding already has a natural damage bonus (on top of being able to fire two weapons at once) so it doesn't really need additional damage support from ascensions that don't help when it's on cooldown. There is also an interaction with the ascension 'Battle-Tested' where sometimes you may want to spend more ammo.

Sustained Fire "After killing an enemy or destroying an item, Weapon DMG and Explosion DMG +50% .. +75% .. +100% for 6s .. 6s .. 20s."
One of only two generic weapon DMG boosts Ao Bai has that apply outside of Dual-Wielding, and easily the better of the two. Provides a stable damage increase with a relatively easy condition (especially at level 3), 6s is plenty of time to get another kill and refresh the duration. You can also trigger this by breaking any destructible object, so most boss fights will have ways to enable this. The value of not being locked into explosive weapons for the damage bonus really can't be understated, having weapon adaptability later on in a run gives you much more consistency.

Ammo Expert "While dual-wielding, recover 5 .. 10 .. 15 reserve ammo per second. At lv3 there is a 20% chance to not consume ammo when shooting."
Even at level 1, this will probably solve most ammo problems you'd have for the run. It enables you to have two large(blue) ammo or special (orange) ammo type weapons at once without concern of running out. The ammo recovery applies once for each unique ammo type on your weapons, having 2 normal ammo weapons will give you 5 normal ammo per second but having 1 normal and 1 large ammo weapon will give you 5 of both types per second. Since the ammo drop system is rigged in your favour (you're extremely likely to get ammo drops when you're low on ammo), this ascension isn't usually necessary but Ao Bai is often incentivized to be wasteful with his ammunition; this can help compensate for that. How many levels you want in this depends on how your RoF (rate of fire) buffs and which ammo related ascensions and scrolls you have, it's up to your discretion. Also, while the ascension 'Lucky Ammo' lv3 is an alternative and way to conserve ammo, being restricted to a lv3 ascension makes it unreliable to obtain in comparison to this.

Ember Eruption "When the remaining ammo in the magazine is not more than 30% .. 40% .. 50% (or only 1), increase weapon DMG by +40% .. +80% .. +120%"
The second generic weapon DMG boost for Ao. Generic might be a misnomer because as of writing there are literally only 3 viable weapons (with 1 magazine size) for Ao that can properly benefit from this. For a 10 magazine weapon this increases overall damage by +12% .. +32% .. +60% which is pretty terrible but it's better than nothing. If you're not committing to using very specific weapons then there is little reason to take this. However, if you get the 'Advanced Depot' occult scroll you can manually lock any weapon's magazine to 1, which makes this ascension much more usable in that situation.

Lucky Ammo "While dual-wielding, +20% .. +30% .. +40% Lucky Shot Chance. At lv3 recover spent ammo whenever you hit an enemy."
While on first glance this doesn't seem very good, with the relatively low numbers and only applying during Dual-Wield. However being a lucky-shot modifier instead of a weapon damage modifier means that this will usually scale damage higher than it appears if you already have weapon DMG modifiers and are lacking lucky shot modifiers. If you get it to level 3 it also provides a massive benefit to automatic weapons where you can basically fire them as much is you want without concern for ammo. Keep in mind that since the ammo refund happens on hit, weapons with projectile travel time may trigger their reload animation before the hit registers, so they will get less benefit from this.

Unleashed Potential "During dual-wielding, gain 1 stack providing +3% weapon DMG and +1% lucky shot chance every 0.5s if continuously firing (stacking up to 20 times). Lose 5 stacks (+15% weapon damage and +5% lucky shot chance) every 0.5s when not firing, until all bonuses are lost."
With a small 1 point investment, this ascension can provide a massive +60% weapon damage and +20% lucky shot chance at 20 stacks, under the condition that you're using at least 1 automatic weapon and you glue your fire button down. Firing semi-automatics with proper timing can help to prevent the stacks from decreasing but it's difficult to gain stacks with only semi-automatics. Reloading your weapon does not count as firing, so if possible try to make sure you're able to fire your offhand weapon when your automatic is reloading to prevent your stacks from dropping (the 'Sharpshooter' ascension can also help by reducing reload times). In the first two areas this can carry your boss dps by itself, though it still helps to have other damage bonuses that aren't restricted to Dual-Wield mode for clearing rooms.
Veteran
Adrenal Rush "After killing an enemy or destroying an item, -20% .. -30% .. -40% to DMG taken and recover +1% .. +2% .. +2% Max Hp for 6s .. 6s .. 20s."
Ao's most reliable source of defence and sustainability. It has the exact same conditions as the 'Sustained Fire' Ascension. The defence bonus can get pretty significant, and the HP recovery is Ao's only way to recover HP outside of Dual-Wielding that isn't reliant on scrolls or dumplings. The uptime during combat is near permanent, and even after all enemies in the room are eliminated you can trigger this off of pots if you still need healing. This gets a bit less important if you already have a way to recover hp from scrolls, but even just the damage reduction effect usually makes this a worthwhile pick.

Close Call "When max HP decreased by 25% .. 25% .. 10%, immune to normal damage for 2s .. 3s .. 4s."
Will randomly save your life if you get caught in a crossfire, though this doesn't give you any visual/auditory feedback for when it prevents damage so it's hard to tell when this ascension is actually saving you. The damage immunity applies every time you've taken damage equal to 25% of your maximum hp; it doesn't have to be from a single hit so this will activate quite consistently. At level 3 it will activate off of pretty much every hit, but at low levels it may just activate and expire before doing anything useful. Don't forget that this skill does NOT protect you from elemental damage like fireballs or octopus gatling guns, so don't get careless around those. While not amazing by itself, this ascension becomes significantly better if you have a source of life-leech or a large amount of HP regeneration from scrolls, as you can easily refill your entire health bar during the duration of the damage immunity.

Battle-Tested "+50% .. +75% .. +100% duration to dual-wielding. At lv3 while dual-wielding, every 20 ammo consumed adds +2s to the duration."
If you see this ascension show up, it's usually an auto-pick. Ao is mostly dependent on his Dual-Wield skill for damage, so improving the uptime on it is always useful. At level 3 with an automatic weapon and a way to manage ammo (ex. 'Ammo Expert' or 'lv3 Lucky Ammo' ascensions), you are now permanently in Dual-Wield mode for the rest of the run. It should be pretty apparent how useful that is. If your weapons aren't firing quite fast enough to maintain your Dual-Wield timer, you can also take the ascensions 'Twin Gunner' or 'Overloading' to increase your ammo consumption. This ascension is also another reason double launcher set ups aren't as good, because it's harder to spend ammo fast enough to maintain the Dual-Wielding timer. Also, if you get the occult scroll 'Energy Storage' that will allow you to maintain very high Dual-Wield uptime with only one or two points in and without having to worry about ammo consumption, so adjust your priorities accordingly if you get that scroll (with 'Energy Storage', you have 9s .. 4s .. 0s of Dual-Wield downtime if 'Battle-Tested' is at lv 1/2/3).

Survival Instincts "Max HP +20 .. +40 .. +60. This bonus is doubled during Dual-Wielding. At lv3 get a 50% chance of recovering HP equivalent to DMG taken while Dual-Wielding."
Having a survivability skill being tied to Dual-Wield is not ideal, since Ao is at his weakest when Dual-Wield is not active. At least this provides a benefit outside of dual-wielding, 20 max hp a level is not a whole lot but it's enough to act as a buffer for some dangerous hits that can do over 100 damage. The bonus at level 3 increases your effective hp by 50-100% during Dual-Wielding which is actually quite decent (though it won't activate off of lethal damage).

Golden Comeback "While dual-wielding, -10% .. -20% .. -30% to DMG taken. At lv3 Dual-Wield's remaining time -3s instead of dying when receiving lethal damage."
Another survivability ascension being tied to Dual-Wield is not ideal. It's a lot worse than the ascension 'Adrenal Rush', providing both less damage reduction, uptime, and a lack of hp recovery. The dream is getting this to level 3 along with lv3 'Battle-Tested' which results in you basically becoming invincible. However it's not realistic to expect being able to get a single ascension to level 3, let alone two specific ones along with appropriate ammo support. While the theoretical potential is high, most of the time it's just a mediocre source of damage reduction.

Sharpshooter "When using Dual-wield, fill the magazine immediately for both weapons. -50% Reload Time during Dual-Wield."
Excellent general use ascension. The reload time reduction benefits almost every weapon and the magazine recharge makes it so you can always immediately activate Dual-Wield in an emergency and not have to wait on a reload first. It's especially useful if you want to use a heavy launcher in your offhand; they have terrible reload speeds and this can be a key component in making a 'boss viable launcher'. Also has good synergy with the ascension 'Unleashed Potential', reducing the risk you'll lose buff stacks. The only issue is that with some occult scroll and weapon combinations, you will never end up actually reloading your weapon, making this useless in those situations (also the throwing weapons like Prism and Glimmering do not trigger reloads either).
Detonation
Explosion Enhancement "Explosions have +2m .. +4m .. +6m AoE and deal +30% .. +45% .. +100% DMG."
A good explosive ascension, with a focus on room clearing. The damage bonus is just moderate until level 3, but the blast radius increase gets massive and really helps with clearing rooms. Keep in mind that the weapon inscription that reduces blast radius will apply after this bonus, so you will want to avoid that inscription if possible. If you don't intend to take an explosive weapon this ascension won't do much, try not to invest in this if you don't already have a decent launcher (it's not worth taking just to buff grenades). While this ascension is powerful, it's often not worth carrying two explosive type weapons so this usually won't increase your single-target damage output as much as other options (even if you have a 'boss viable launcher'). Unfortunately Explosive weapons also tend to have problems scaling on higher difficulties making investment in this sub-optimal if playing on higher reincarnation levels.

Mad Bomber "Explosions deal +20% .. +40% .. +60% DMG and +5% .. +7% .. +9% damage for each enemy hit by the explosion. At lv3 for each enemy hit by the explosion +9% chance to deal double DMG."
A mediocre damage increase restricted to explosives. You need to hit 3+ targets with the explosion for this ascension to provide a completely average damage bonus. A damage bonus restricted to explosives needs a lot more going for it then this, it's just not worth taking over nearly any other option.

Precise Explosion "Explosions deal 30% .. 45% .. 60% increased DMG if they hit no more than 1 .. 1 .. 3 enemies."
An important distinction about this ascension is that it is a special instance of a DMG multiplier, not a standard additive +DMG bonus. This means it scales really well with sources of +DMG (ex. if you already have a combined total of +100% weapon/explosive damage, this ascension will effectively provide +120% damage instead of +60%). This can result in a pretty major damage improvement, though before level 3 it doesn't help a lot with the normal launcher use case (clearing out rooms). However if you have a 'boss viable launcher', this will end up helping you quite a lot after you get some other damage bonuses stacked. Unlike 'Explosion Enhancement' this ascension doesn't mind the 'reduced explosion radius' inscription, and actually can benefit quite a bit from it. You should only take this if you have a 'boss viable launcher', otherwise it's just not that worthwhile if it gets stuck at level 1 or 2. Unfortunately Explosive weapons also tend to have problems scaling on higher difficulties making investment in this sub-optimal if playing on higher reincarnation levels.

Grenade Master "Grenades have +100% .. +150% .. +200% base DMG. 30% .. 45% .. 60% chance of zero consumption when tossing a grenade. At lv3 gain one grenade every 10s."
The 'Double Explosions' ascension is mandatory to take alongside this if you want to make use of grenade damage. Now that grenades have a base damage modifier, they can scale to a certain degree. However, to function on higher reincarnation levels, you also need the general soul-talent that doubles secondary damage, as well has heavy investment in this, 'Double Explosions' and preferably other sources of damage boosts as well. The payoff is just not large enough considering how rng dependant the grenade build is. A point in this can also be ok in any build since in Reincarnation+7 the enemy hp bloat is high enough that you can't kill small rushdown enemies with a single non-upgraded grenade.

Overloading "After reloading, +30% .. +45% .. +60% RoF for 3s .. 3s .. 6s."
Unlike the other ascensions in this category, this buff affects every weapon instead of just explosive weapons. RoF buffs are much less common than weapon DMG buffs and as a result stack well with them. RoF buffs have some issues though, because they also increase ammo consumption and overall time spent reloading, which reduces the damage benefits somewhat. You can still make good use of the ascension if you have ways to mitigate the drawbacks (ex. Sharpshooter and Ammo Expert ascensions) or if you're using weapons that aren't bothered by it as much. The increased ammo usage can also be useful if you already have the ascension 'Battle-Tested' at level 3. Also since the base duration is not very good, this can benefit from being in dual-wield mode, since having 2 weapons to reload will increase the uptime of this. Like the ascension 'Sharpshooter' you can run into situations where you never need to reload which will make this ascension useless, so be aware of that.

Double Explosions "Toss 2 grenades instead of 1 with no additional consumption."
Every grenade throw now throws a second freebie grenade, functionally making each grenade throw do double damage. Mandatory if you're investing in grenade damage through 'Grenade Master' and worthless otherwise. See the 'Grenade Master' ascension description for more details. A point in this can also be ok in any build since in Reincarnation+7 the enemy hp bloat is high enough that you can't kill small rushdown enemies with a single non-upgraded grenade.
General Tips
About Dual-Wield
-Since his generic damage boosting ascensions are very limited, Ao Bai's damage is often mediocre when Dual-Wield is on cooldown. It's important to hold onto it for the start of waves or potential elite spawns if possible. Don't use it as soon as its cooldown ends if you don't need to.
-The 1%/s HP recovery while Dual-Wield is active is the only kind of sustain Ao has early on past his tiny shield (if he doesn't have 'Adrenal Rush' or certain scrolls yet). You can wait out the cooldown on it and keep casting Dual-Wield to fully restore your health, if you can endure how tedious this process is.
-When Dual-Wielding, the weapon in your offhand has perfect stability. Having a stable weapon in the mainhand can entirely negate the poor stability of a normally unstable weapon in the offhand.
-If you don't need to make use of the HP regen (or ammo recovery from 'Ammo Expert') you have during Dual-Wield, you can cancel it by switching to your Foundry pistol (or pressing the cancel skill /charge button) when after you clear a room to start the cooldown earlier.

About your Weapons
-Ao's weapon selection is extra important because he can use both of them at once, and he is less restricted than the other characters for his options. It's good for both your weapons not to have drastically different aiming patterns, otherwise they can be hard to use at the same time.
-2-Handed weapons completely disable Dual-Wielding if they're in your inventory, so there's very little reason to consider picking them up.
-Deciding on your elemental combination is important. I'll briefly explain the benefits of each setup here:
---Normal (no element): Most launchers don't have a natural element, and even if they do their elemental chance is usually poor. If you're using a normal launcher as one of your weapons, pairing it with another neutral weapon is perfectly fine. If you're using a combination of automatic or semi auto weapons, then picking an elemental combo is more ideal, though a double normal setup can still work.
---Manipulation (fire+lightning): The most defensive combination, immediately renders enemies harmless as they completely ignore you and only attack other enemies for the duration of the effect. However, this may indirectly reduce your damage as the erratic enemy movement can make it harder to land critical hits on them (though if there's no other enemies near, they'll stand completely still and become free kills). Decent option if you already have strong damage output, and less reliant on having a high elemental chance than the other two fusions.
---Explosion (fire+corrosive): The middle ground combination that offers some offence and some defence, each trigger causes a small explosive aoe immediately around the target. This explosion effect can stagger, and the damage is based off of the shot that triggers it. This is a nice option if your damage output is already solid, and there are many good fire based automatics you can pair with a corrosive secondary weapon. However since the explosion damage is based on the damage of the shot, you can't use this effect to compensate for a low damage output.
---Miasma (corrosive+lightning): The purely offensive option, causes a stackable damage over time effect that deals bonus damage to 'red' HP (not shield or armour). This damage is independent of the shot used to trigger it, so it is the best way to compensate for weak damage output. This is a very effective fusion to help Ao kill tough enemies while Dual-Wield is on cooldown. This also scales very well at higher difficulties since the damage is a percentage based on enemy hp. In the current game state at Reincarnation+7, it's typically easiest just to go Miasma most of the time as the damage it provides is massive.

About Enemies
-Ao Bai is one of the slower characters, especially when wielding heavier weapons. Because of this you can have difficulty sidestepping homing projectiles from bandit retainers and longbow-men, and may have to rely on cover more.
-Be careful about walking too far forward in rooms and triggering the second set of enemy spawns if your Dual-Wield cooldown is not ready. Having a big enemy pile (or an elite spawn) can quickly lead to getting overwhelmed.
-Make use of your grenades (or explosive weapons) to stagger annoying enemies like arsonists and bandit retainers and interrupt their attacks. Just be aware that stagger doesn't work consecutively and some enemies (ex. octopus/white shark) are immune during their skills.
Closing Words
Check out my other guides here:
https://steamproxy.net/sharedfiles/filedetails/?id=2448428883
https://steamproxy.net/sharedfiles/filedetails/?id=2387633898
https://steamproxy.net/sharedfiles/filedetails/?id=2390092673
Good things about Dog:
+Dual-wield[[/strike] one dog army
+Hotdog shaped

Bad things:
-Everything else

Most issues inherit to Dog have remained mostly the same, maybe one day dog will get the love he deserves :(

Credits to the Wiki contributors for providing the skill icons and descriptions.

If you have a different perspective on something in this guide, feel free to leave a comment.
20 Comments
Tedd 13 Apr, 2023 @ 12:58pm 
Atomic Bomb doesn't consume all the grenades. It'll throw the amount you have at no extra cost. Upgrade your grenades enough, and your weapons become meaningless. Toss on a Double Exhilaration and the double explosion, and you can toss 32 grenades at once at the cost of one.
LunaticHippy .MurdocK 3 Feb, 2023 @ 2:31pm 
Just a correction for you on Twin Gunner. The "increased amount of reloading you'll have to do makes the overall damage gain from this skill smaller than it appears" statement is wrong, it actually works the opposite:

Without Twin Gunner:
6 seconds to fire entire magazine (100% damage)
2 seconds to reload
Result: 100% damage in 6 seconds

With Twin Gunner:
3 seconds to fire entire magazine (100% damage)
2 seconds to reload
1 seconds firing (33% damage)
Result: 133% damage in 6 seconds

With Twin Gunner, in this example, you deal 33% more damage in the 6 seconds you would spend without it. This will change a bit depending on how long you can fire without reloading, but the longer you can fire, the more beneficial Twin Gunner is.
Ezzekiel 21 Jul, 2022 @ 2:34am 
As a dog main, he's a good boy :3

Excellent guide (though some stuff has changed and should be updated here)
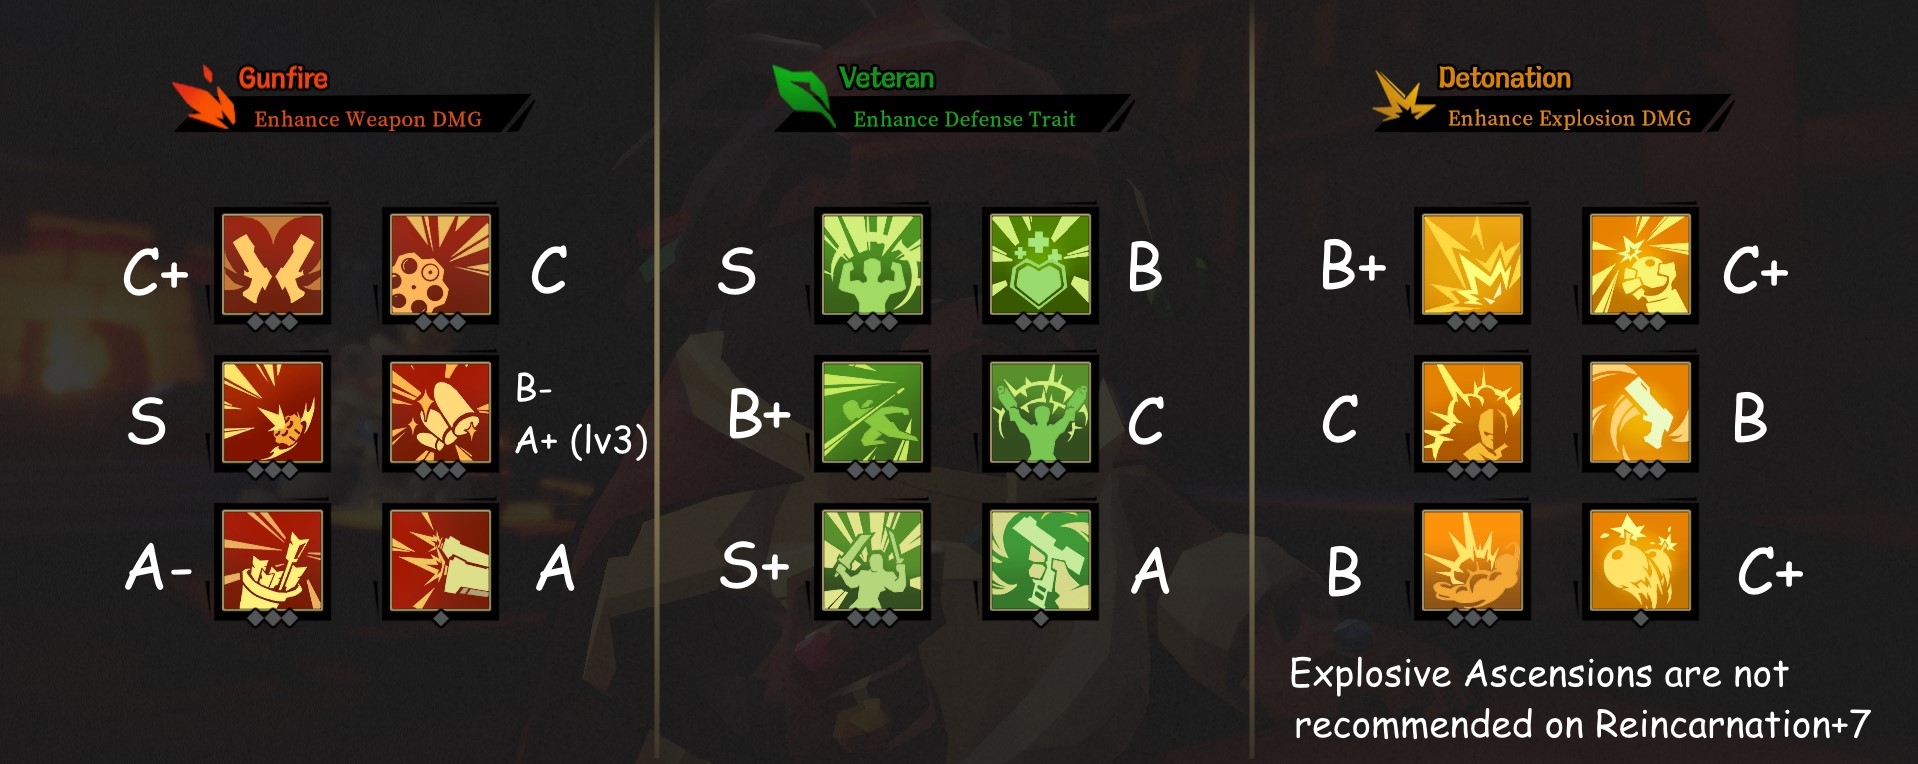
Snowmen Friend 2 Jul, 2022 @ 4:28pm 
As a dog main, I can confirm that this guide is pretty much perfectly accurate on how to upgrade him, as well as which ascensions you should pick. Great guide! :steamthumbsup:
Mr. Lobster 25 Dec, 2021 @ 12:37pm 
I always play with my friend and choose Ao Bai. I always refresh the spiritual blessing until i can get battle-scarred the combination of that + bloody ammo (Which you can get quite consistently) is broken as hell (if you can get flesh and bones all the better). You can take 2 illusions and just shoot forever while self-healing any damage you get except for these 1-shots you get once in a while from scarier enemies. Even then, if you can get good ascensions you can manage even these.
Atelier iZUN's Bunny 4 Dec, 2021 @ 5:07pm 
Cartography Dee  [author] 21 Oct, 2021 @ 7:26am 
@OrAngelicBlitz
Yea some stuff has changed since, Atomic bomb especially is pretty silly atm.
Dog's balance is just whacky in general since rather than fix some cores issues with him they are just compensating by giving him overpowered blessings instead.
I'll probably get around to updating the guides sometime after 1.0 comes out, and hopefully will have motivation to do one for Tao and the new character then.
OrAngelicBlitz 21 Oct, 2021 @ 7:15am 
I want to mention that the Spiritual Blessing "Atomic Bomb" got a big buff. Instead of depleting all of your remaining grenades, it instead throws X amount of grenades at the cost of 1, where X is the number of grenades left. This makes it even more fun and funny and viable. Very strong too when building for skill damage.
Sartaël 21 Sep, 2021 @ 2:53pm 
Thank you for these guides!
Are you going to do the rabbit as a guide soon? :)
ShaoXiao 16 Sep, 2021 @ 1:38am 
May I recommend a dual-fire build? Once you get fire attunement, your life steal is ridiculous with dual auto weapons. As long as you dont get one shot and you have something to shoot, you are immortal. Perhaps its enough having fire with x but idk... the tankiness is very satisfying.