Creeper World 3: Arc Eternal

Creeper World 3: Arc Eternal

236 ratings
Creeper World 3: Basic Info
By pawel_stopa
Some basic information about the gameplay of Creeper World 3, along with a UI explanation and units description.
3
   
Award
Favorite
Favorited
Unfavorite
Gameplay modes


This is what you see as you enter the game. Some of the sections might be locked, they can be unlocked by playing the campaign. The DMD and colonial space unlock after first 5 maps, the tormented space and prospector zone after 20 missions. They all are before the infamous Farbor mission so you don't have to worry about unlocking them.


1. Arc Eternal
The campaign and the tutorial of the game. Here you will learn how to play, and why are you killing all that creeper. The maps here are progressively harder, but the learning curve is ok for most players. It's a good idea to play through the campaign at least to the point where you unlock all of your units as each map is designed to teach you the use of a new unit.


2. Prospector Zone
This is a large zone with procedurally generated maps. Your goal here is to collect as many Artifacts of Odin as you can. As long as you picked them up, they will count to your total, even if you used them. You still need to finish the mission to get the credit for picking them up. The missions are of moderate difficulty, a good training before some of the harder missions in CW3.

3. Tormented Space
This is a large zone filled with hard, very hard, nearly impossible, and impossible maps. As the maps here are procedurally generated, some of them are impossible to win. But most are simply really hard. You need to have good micromanagement skills and pause, pause pause the game all the time. Also save the game all the time. Also you will rage quit a lot when in this sector. There is a list of currently found impossible maps on the forums.[knucklecracker.com]

4. Alpha Sector
These are some of the maps created by alpha and beta testers of the game, often featured in beta videos. The maps are of varied difficulty, a good place to try some custom maps. Also this is a whole sector, so you can warp to different areas by clicking on the sun.

5. Dial Map Device
An automatic mapmaking tool. If you want to play a map with specified parameters but you don't have the time to make it form scratch in the editor, just set the parameters and search trough the random seeds till you find a map that satisfies you. Once you have beaten a map that no one had beaten before you may name it, and it will appear for other players to see. You can also browse the maps generated by other players. You can also export the DMD map to the editor.

6. Colonial Space
Here you can find custom maps created by other players. There are a number of filtering options. The maps here can be almost anything. Also many of them have some CRPL(custom programming language to make events, units, enemies and more) so the gameplay can be very different. You can also create your own maps in Projects and then upload it to Colonial Space. You need to post a score on your map before uploading it to prove it can be beaten. I will try to make a short tutorial about mapmaking and CRPL programming but for now read the forum and the wiki to know more.
The UI

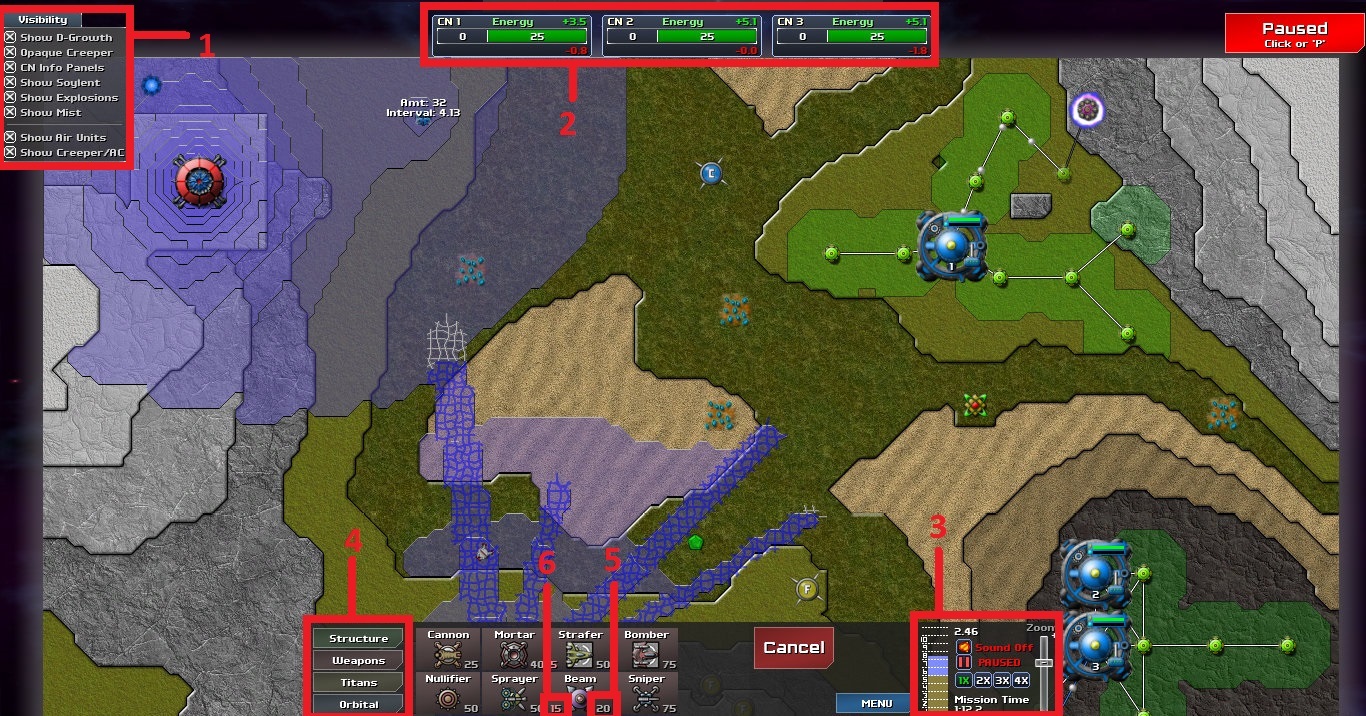
Here you can see a screenshot of the game. I will proceed to explain what is where.


1. The Visibility menu - allows you to toggle on and off different options that modify the information shown on screen. This can be important since you can sometimes have a hard time seeing what happens during an assault or mistakenly turn off the show creeper option(default hotkey shift-C) and wonder what's wrong with the game.
The options are following:
Show D-growth - toggles on and off the viewing of the digitals growth area, it's the small white lines that show which paths can digitalis grow on. Usually you want it on, but sometimes when you already neutralized the sources of digitalis it might be useful to turn off. (default hotkey shift-D)
Opaque Creeper- Turning this option of will make the creeper more transparent which can be useful when there is so much creeper on the map that you can't see the ground underneath. (default hotkey shift-O)
CN Info Panels- Toggles the energy and AC info panels. (2) (default hotkey shift-I)
Show Solyent - Toggles green area around collectors that makes energy. (default hotkey shift-G)
Show Explosions - Toggles explosion animations, useful to turn off during big assaults to see what is happening. (default hotkey shift-E)
Show Mist - Toggles mist animation when creeper is killed, useful to turn off during big assaults to see what is happening. (default hotkey shift-M)
Show Air Units - Toggles the transparency of air units (Strafers and Bombers), again useful to turn off in a big assault to manage the ground units. (default hotkey shift-F)
Show Creeper/AC - Toggles the visibility of creeper/anti-creeper. Be careful with this one, invisible creeper still kills. (default hotkey shift-C)

2. Command Node Info panels:


This panel is one of the most important elements of the game. The small green +x.x numbers are your energy production per sec. The red ones are energy consumption. Likewise for anti-creeper. The bar with numbers on it tells you your reserve. If the bar is red it tells you how much demand per sec is not supplied. So CN 1 needs to produce 1 AC per sec to satisfy the demand off all structures and weapons connected to it.The total production for CN that are connected is merged, and the energy reserve is also merged. The AC production is merged but the reserve is not. The consumption is not merged and will tell exactly how many packets leave trough the CN.

3. The time flow control panel


Here you can pause, unpause, and choose the zoom and speed of the game,(You can press Tab to view the fps rate in a box above this panel) as well as turn off the volume. More volume options are in the menu. The bar on the left shows the ground level under the mouse, as well as the creeper/anticreeper levels(the 0 above the toggle sound button). You can also see the in game time you spent on this mission. That's important as time spent corresponds directly to score (faster time=better score). When paused you can press N to advance the game one frame at a time. Holding N will cause the game to run unpaused.


4. The Units Menu
Here you can choose what units to build. Each unit has a different function and a different cost(5). The cost corresponds to the time it will take to build the unit, so how long will this strain your economy. All units cost 1 energy per sec to build by default, it can increase using forge upgrades. 6 is the maximum amount of units of that type you can place at a time. Usually there are no limits, but on some maps, especially custom maps there can be some severe unit limits.
Basic gameplay mechanic and economy explanation
Commonly used terms:
CN-Command Node
AC-Anticreeper
PC-Pulse Cannon
PZ-Power Zone


As you launch a mission you see a top-down view of the map, sometimes also with a dialogue explaining some things about the mission.

First thing you want to do is to pause(usually the game starts paused but sometimes it will run after reading the dialogue) and look around the map for suitable landing spots and easily targeted enemies. Usually you want to land on high ground as it's easier to defend but it depends on the map. Also look for proximity of resources like totems and ore deposits. The third thing to pay attention to is the enemies, especially the weaker ones. If there is a spore tower or a runner nest or an AA(anti air) tower that is a distance from the emitters and there is a high chance to nullify it early on, try to do it as it will make your life easier and also give you a power zone that is incredibly useful at the beginning.

Then you land your CN's(best to land down all possible CN's) and start building your network. The first 2 minutes are the most important. Start by building a few collectors, one at a time i you have only 1 CN, basically never build more things at the same time than the integer part of your energy production. A good idea it to hold off with building weapons as long as you can manage. The attritional energy you can generate while building a single PC can make a huge difference in the long run.

Basic Economy guidelines

In Creeper World 3 there are 3 types of resources, Energy, Ore/AC and Aether.

Aether is the upgrade points, produced by totems that need energy to work, the aether packets are automatically sent to your forge.

Ore is mined by mines on the ore deposits and sent to CN where it's changed to AntiCreeper, without upgrades each mine produces 0.9 AC per sec. You use AC with sprayers and bombers. The sprayer works in a similar way to PC but it shoots AC instead. AC is very useful to deal with large patches of thin creeper.

Energy is the most important resource in Creeper World 3. You can live without the other two (through they make your life easier) but without energy creeper will get you instantly. You use energy to build everything, and to power up most of your weapons. Energy is produced by Solyent field made by Collectors and by Rectors. A single Collector can make up to 0.2 energy and a single reactor makes 0.4. What you want to look at is the energy per sec production and depiction. A singe structure building will take up 1 build packet per sec(so will cost you -1 energy per sec) regardless of cost. The cost only determines how long will it build (cost 25; 1 packet per sec=25 sec). This can increase with the build speed upgrade. In the same way weapons will request packets(remember 1packet=1energy) whenever their ammo reserves are not full (they have at least empty space for 1 packets), and they can request packets at the speed 1 per 0.5 sec.

Overbuilding
You overbuild when there are more packets requested per sec than you can produce. That will show as a red bar on your energy reserves, it's value is how many packets requested didn't get sent. It's a very bad thing, as it increases the time to build anything causing longer wait before you get your energy production up, leading to more energy starvation. In order to avoid this build things one at a time at the beginning and in groups of few later on. Energy production of let's say +5.6 means you can build 5 things at the same time. But you also have to remember about energy for weapons. So energy production of 5.6 and 3 PC and a Mortar up, would mean that you can only build a single structure at a time, maybe 2 but then you would be at the limit. It's ok to have about 10% energy starvation for a while depending on how much you produce. So if you make +8.0 energy and build to much so that you have a starvation of around 1 it's ok. But a starvation of 4 can kill your base.

How to expand your energy network
While each map is different some general guidelines can be given. If you have a lot of space to expand, build collectors. In the early game(first 1~2 minutes) always use collectors. When you have around 10 collectors(about 3~4 energy generation) you can start making reactors. Overall collectors are a much cheaper source of energy as they cost only 5 packets and can generate up to 0.2 energy if none of their field overlap. Usually it's less about 0.1~0.15. When at ~5 energy production start making weapons. On most maps you will have enough time. In favorable conditions(a nice large plain) you can easily have 7 energy production in a minute.


The Basics of Combat

Pulse Canons - used to clear thin creeper and keep creeper away from your other weapons. They are affected by LOS meaning they can't shoot at elevation higher than themselves. Also used to clear away digitalis, use the digitalis priority mode for that.

Mortar - used to clear away deeper pools of creeper. They are not affected by LOS. Use them whenever creeper is deeper than 2. Also use then when assaulting an emitter to destroy creeper that flows out.

Sprayer- AC version of PC very useful as AC creates a sort of buffer zone that kills creeper and causes it to spread slower. You need about 2~3 ore mines to supply a single sprayer without ore efficiency upgrades.

Strafer - An airborne weapon that can shoot at creeper and digitalis. you can either send it to shoot at an area around a set point, or to fly in a set line. Best works in groups, 5~7 strafers set to shoot at an emitter can completely cut of digitalis form that emitter. Blocked by AA towers.

Bomber - An airborne weapons that drops bombs of AC. Best used to quickly deliver AC to chosen locations or as a "panic button" to deliver AC to a place your front is in danger of collapsing. Also useful when building a nullifier to protect it with AC. Blocked by AA towers.

Beam - Used to shoot down spores. A single beam has enough ammo to take down 2 standard spores. Usually it's advised to use more beams as if the spore targets something near the edge of beams range it might not have enough time to take it down. A beam can sometimes target CRPL cores(custom units available in the editor as enemies or allies).

Sniper - Used to shoot down runners. Affected by LOS. Can sometimes target CRPL cores, also sometimes can target CRPL cores regardless of LOS (depends on CRPL core).

Nullifier - Destroys an enemy. Needs to be build near the enemy (range 8). Sometimes can destroy CRPL cores.

Shield - Pushes away the creeper form the center of the shield. The field gets weaker at the edges. Also blocks spores that hit it, but it causes damage to the shield. Consumes a lot of energy and takes a long time to build. But it's a powerful tool, so it's often worth it. Use to shield your nullifier form creeper. Also you can go with the tactic "Build a line of shields and drop a nullifier on the end" (quote from Clean0nion on the forums) but it's a cost ineffective method.


The Units
This section is still in the works I will add all the units and write a longer explanation to them. For now I advise to seek info on the wiki.[knucklecracker.com]

It's strongly advised to play all the campaign as a large portion of it serves as a tutorial. You will get new unit every map and the maps will be designed to show you the capabilities of each unit.

!!You click and drag units to build more of them. It's especially useful for collectors and relays, as they will automatically build at the longest possible distance from each other.!!

Structures

Collector
Cost:5
Energy Production: 0.2 max depending on the size of the field
Connection range: 10

Collector is one of your most important structures. It can connect to any other structure or connectable object on the map within 10 spaces. It also makes a field around it that generates energy. It's important to remember that it's the field that generates the energy not the collectors themselves. So placing a collector where it won't make more of the field is pointless.

Relay
Cost:10
Connection range: 10/19

Relay does not generate energy. It can connect to any other structure within 10 spaces and to other relays within 19 spaces. Connection to other relays send packets at double speed so it's useful as in CW3 there are large maps and sometimes faster packed delivery can save lives.


Reactor
Cost:50
Energy Production 0.4

The reactors generate energy. Unlike the collector that generates a field that generates energy, the reactors generate energy by themselves. They are very useful because of that as you can build any number of them as long as you have space. They have a large cost, 10 times that of a collector, so it's better to start with collectors and build reactors later on. Never build too many reactors at once, it's better to finish one fast. If you build multiple reactors and then start starving for energy, disconnect a few of than to allow others to build faster and start providing you with energy.

Ore Mine
Cost: 25

Build on Ore deposits to produce AC. A single mine produces 0.9 AC per sec. You can harvest far of ore deposits using guppies to carry ore. Send a packet carrying guppy and build an ore mine and a guppy and set it to ore transport. Build a single collector to connect the new mine and guppy and order the guppy back to base.

Siphon
Cost: 5

Used to gain resources form resource packs.

Guppy
Cost: 25

Used to transport resources. Can transport packets, ore and AC. Very usefull as it alows you to operate without your energy network, and on large maps, especialy on space island sort of map, you can't live without it. Be carefull when building guppies since after they get build they strain your network while they gather their cargo. Also changing guppy type destroys all cargo in it and on the pad.

Terp
Cost: 60
Ammo: 30
Range: 18
Ammo usage: 2/square*level
Fire Rate: 30 frames/square*level

Terps can modify the terrain level. Teraforming is expensive and takes a long time. It's rarely the optimal way to assault an emitter or to beat a level. However it's often an effective and easy way to increase the size of your outpost. It's handy to have at least one terp built to even the terrain under a PZ to build a bertha.


More to come.

Weapons

Pulse Cannon
Basic stats:
Cost:25
Fire Rate: 1 shot per 8 frames
Ammo Capacity: 10
Ammo per shot: 0.25
Health: 1.5 (about 12 seconds in creeper)
Damage per shot: 1 creeper in 8 closest squares.

The basic weapon against the creeper and one that you will use all game. It has 3 target modes, creeper first, digitalis first and runners first. The default is creeper first, and on maps without digitalis it's the only one to use. On maps with digitalis you want to have a few PC set to digitalis to keep it away. PC need at least the basic fire range and one or to fire rate upgrades to be really effective against digitalis, without the upgrades you might want to have more canons firing at the same area. PC attack against the runners is very bad so there is no point in using the last option, unless there is a map with digitalis and without runners then setting priority to runners will cause the PC to treat both digitalis and creeper the same and fire at closest threat first. Use PC at creeper no more than 1 deep, they are not really effective against deeper creeper.
PC has some health to survive in creeper, about 12 seconds but as it will clear the creeper away you can land a few PC in thin(less than 1) creeper to clear it away. Remember about supplying them with ammo!!


Mortar
Basic stats:
Cost:40
Fire Rate: 1 shot per 3 sec (120 frames)
Ammo Capacity: 15
Ammo per shot: 3
Health: 2
Damage per shot: 161 in a 7x7 square about 4 levels of creeper in each

Mortar is your second main weapon when fighting creeper. It kills a lot of creeper in a single shot and is far more effective than PC in destroying large quantities of creeper. With a few mortars you can hold of your high ground position almost infinitely. Also it's not affected by LOS so it can fire over walls to keep pools of creeper form spilling.


More to come. You can read some short descriptions in other sections.
A few useful tips
The basics of energy management:
CW3 is all about energy management. Most of the maps don't have unit limits so you can build as much as you can power. The first few minutes are especially important. Here I will try to give a few basic tips how to do this effectively.
1. Each structure that is building requires 1 energy per sec. Therefore build no more than you generate.
2. At the beginning of the game build collectors, reactors take a much longer time to build.
3.You can disconnect some buildings to pause their energy consumption. You can plan out your network and then gradually connect different parts of it as you have enough energy.
4. Sometimes on large maps you might have a problem with packets arriving on time build relays to speed up the packets. You can also move your CN closer to the frontline.

The basic gameplay tips:
1. You can pause the game at any time and give out orders. Use this feature often to plan and to manage your units!!!
2. You have a wide range of possible weapons each with a different area of expertise. Use PC to clear thin creeper and mortars for deeper(2 or more). There is a scale near the time flow controls that shows the terrain height and the amount of creeper under the mouse.
3.Always drop all available CN at the beginning. Each one produces 1.5 energy which is a lot at the beginning.
Forge upgrades
Forge upgrades:

Usually it's best to start with a few energy efficiency and/or fire rate and range upgrades. However this is highly situational so choose these upgrades that suit you the best. Some time ago there was a vote on the forums to decide the "best" upgrade and these are the results:
1. Energy efficiency
2. Fire range
3. Fire rate
4. Build speed
5. Packet speed
6. Ore efficiency
7. Move speed
8. Energy storage
9. AC storage


Energy Storage
Starting cost: 10
Increment: +10
Max: Unlimited
Effect: Increases energy storage of all CN's by 50. Note that if those CN's are connected they share the storage so it increased by 50 not by 3x50.

AC Storage
Starting Cost:10
Increment: +10
Max: Unlimited
Effect: Increases AC storage of all CN's by 100. As AC is not shared by CN's you actually get 300 storage if you have 3 CN.

Packet speed
Starting Cost:10
Increment: +10
Max: Unlimited
Effect: Increases packet speed by 1 square/frame. Effects relay connections as well.


Energy efficiency
Starting Cost:20
Increment: +20
Max: 10
Effect: Each level increases your energy production by 20%. Second upgrade gives you 40% bonus and so on. So with one upgrade all of your reactors and collectors (and CN's) have 120% output. At max this becomes 300% output.

Ore efficiency
Starting Cost:20
Increment: +20
Max: 10
Effect: Each level increases your AC production by 20%. Like with energy at max all mines work at 300% output.

Build speed
Starting Cost:20
Increment: +20
Max: 10
Effect: Each level increases the rate at which your buildings request packets ~20%. Be careful with this upgrade as it increases the strain on your network.

Movement Speed
Starting Cost:25
Increment: x2
Max: 5
Effect: See below.

Fire Rate
Starting Cost:50
Increment: x2
Max: 5
Effect: See below.

Fire Range
Starting Cost:50
Increment: x2
Max: 5
Effect: See below.

[/tr]
Movement speed(cells/sec)[/th][/tr]
Upgrade Level
[/b]
0
1
2
3
4
5
[/tr]
Command Node
2.25
3.00
3.75
4.50
5.25
6.00
Moveable ground units
2.25
3.00
3.75
4.50
5.25
6.00
Guppy
5.63
7.50
9.38
11.25
13.13
15.00
Strafer
7.50
8.63
9.75
10.88
12.00
13.13
Bomber
3.00
4.13
5.25
6.38
7.50
8.63
[/table]


Fire rate(shots/sec)[/th] [/tr]
Upgrade Level
[/b]
0
1
2
3
4
5
Pulse Cannon
3.75
4.29
5.00
6.00
7.50
10.00
Mortar
0.33
0.38
0.43
0.50
0.60
0.75
Strafer
3.75
4.29
5.00
6.00
7.50
10.00
Bomber
0.60
0.67
0.75
0.86
1.00
1.20
Sprayer
3.00
3.33
3.75
4.29
5.00
6.00
Sniper
0.50
0.54
0.58
0.63
0.68
0.75
[/table]


Range (cells)
[/tr]
Upgrade Level
[/b]
0
1
2
3
4
5
Shield
9
9
9
9
9
9
Terp
17.9
19.9
21.9
23.9
25.9
27.9
Pulse Cannon
9
11
13
15
17
19
Mortar
13
15
17
19
21
23
Nullifier
9.9
9.9
9.9
9.9
9.9
9.9
Sprayer
13
15
17
19
21
23
Beam
22.9
24.9
26.9
28.9
30.9
32.9
Sniper
20
22
24
26
28
30
Forge (radius black hole)
25
25
25
25
25
25
[/table]
PZ bonuses and how to use them
A Power Zone is the glowing thing left behind after destroying an enemy. Most of your structures gain some kind of bonus form PZ.

Collector
x3 Range, x3 Connection range to all structures, x1.5 energy per cell generation

The energy increase form collector on PZ is rather small, so it's better to use the PZ in other ways. But the x3 connection range to all structures can have some tactical usefulness, especially on maps with void and little building space.

Relay
x2 Connection range to other relays

Useful to connect otherwise separated parts of the map. Usually used on space island kind of maps.

Reactor
x10 energy production

Very useful bonus especially in the beginning. If you can destroy a lone spore tower or AA tower early in the game, build a reactor on the PZ to give you a large energy production increase. In late part of the game you usually don't have to worry about energy so you can destroy and place a Bertha or a Strafer.

Terp
x3 "fire" rate x2 Range 1/3 energy per cell

Increases the range rate and decreases energy consumption. If you have pushed back the creeper and want to flatten the area for construction it might be useful.

Guppy
x2 cargo size x2 packet request rate x3 speed

Or you can build 3~4 guppies and use the PZ for something else :P

Shield
x2 Range x2 Force

A nice increase of the protective dome. If the enemies are packet close together but not close enough for a nullifier, a shield on PZ might clear enough area to build a nullifier.

Pulse Cannon
x4 Rate x2 Range x0.4 Ammo per shot

Just after destroying an emitter place a PC on the PZ to clear away remaining creeper. Also very useful to keep away the digitalis.

Mortar
x3 Rate x2 Range x1/3 Ammo per shot

Mortar on PZ is incredible at destroying creeper. It's sometimes better than a bertha. A fully range upgrades mortar on a PZ has enough range to cover nearly a 1/4 of the map on medium sized maps.

Beam
x2 Range ~3xRate 1/4 ammo per shot

A beam on a PZ is incredible at killing spores. If the map features a lot of spore towers, one or two PZ beams will keep the skies clean. Especially useful at the beginning as PZ beams require very little energy to operate, and will kill spores very fast while regular un-upgraded beams might fail to kill the spore before it lands.

Strafer
x2 Rate, Double shot, x1/2 ammo per shot

If you have a PZ far from the frontline and can't build a bertha a strafer is probably the best option. It's quite good at clearing away creeper and digitalis. It's worth around 4~5 regular strafers.

Bomber
x2 Rate, x4 Storage, x2 move speed, double shot, x4 ammo per shot

A PZ bomber delivers AC to the target area quickly and effectively. The only problem with it is that you need to have the AC for it to deliver. Because of this PZ strafers are generally a better option.

Sprayer
x2 Range x2 Rate, ammo request rate increased

Again a great weapon if you have the AC for it. You usually don't have, so it's good for certain situations till your AC stockpile ends.

Sniper
x2 Range x2 Rate, x1/3 ammo per shot

Rather than killing runners it's better to place a PC on the PZ and clear away the digitalis. A sniper on a PZ is useful on custom maps if there are a lot of custom units that can be taken down only by snipers.

Nullifier
x2 Range

Great for destroing enemies that are packed close togheder. The range of a PZ nulifier is the same as a standard relay, so you can check if it will be usefull before starting your assault. If The range is almost there but not close enough, consider placing a shield on the PZ it should push back enough creeper to place a regular nullifier.

Bertha
x2 Rate, x1/2 ammo per shot, Triple shot

A PZ bertha is like 6 Berthas!!! And it uses energy like only one. One of the best things to place on a PZ. Regular berthas are almost useless in comparison.

Command node
x2 Connection range to all structures

You rarely have enough place for a CN, and even if then what's the point?

Other structures do not receive any bonus from PZ so don't build them there

Generally speaking if the PZ in question is on the frontline it's usually best to place a PZ or a Mortar on it for a while to clear away the creeper. But the differences between movable units are slim so just place whatever is the best, depending on the situation.

As for PZ in the back, at the beginning it's best to place a reactor for the additional energy, or a relay to link another island. A beam is the other useful option if you are not confident about your anti-air defense. Later in the game it's highly recommended to place a Bertha on such a PZ as a it's firepower is exceptional. If you can't place a bertha, use it for a strafer or a bomber if you have a ton of AC. Strafers are better in destroying digitalis and deep creeper, bombers are better to aid an assault or to clear a large area of thin creeper.
25 Comments
Egil 29 Aug, 2023 @ 4:10pm 
Lûte the Goblin if you're still dealing with them my solution was trapping them at the spawner with terps then spamming relays and nullifiers until they died
Lûte the Goblin 31 Mar, 2023 @ 1:11pm 
How do I destroy these things?
https://i.imgur.com/Zw5Kcr5.png
oldnewby 22 May, 2019 @ 3:48pm 
Looked for... but did not find training info in the CW 3 basic manuals on Artifacts of Odin... how to fire them... how best to use them... Until I found a comment in Colonial Space - author:yum234 - Map 135 - Forum - Reply #8 - to a question yum234 answered back on on May 16, 2016
shopt 9 Jun, 2017 @ 7:50pm 
You drop a lot of acronyms, often before they are explained. You should probably add an acronym list up front, or use the full name the first time (with the acronym in brackets).
Enty 20 Feb, 2017 @ 11:34pm 
Great starting guide, but you'r spelling from as form. Just copy everything into word, find/replace form -> from, and enjoy my comment being invalid
pawel_stopa  [author] 24 Dec, 2016 @ 1:18am 
Yes anti creeper moves along live digitalis
Kefka 17 Dec, 2016 @ 11:11pm 
Can digitalis move anti creeper along it?? I'm on a planet where the only thing i can think of is needing to move the anti creeper along the digitalis to attack the creeper but I don't know how??
Miczu555 8 Apr, 2016 @ 2:24pm 
1.+Prees "O" to select every single unit of single type u selected.
2. Correction: Those towers're called AE Towers not AA. Air Exclusion Towers. AET in short.
Asayake 25 Aug, 2015 @ 6:08am 
This guide is really helpful. thank you for taking the time to make it!
pawel_stopa  [author] 23 Jun, 2015 @ 1:43am 
Select it and then you can either press the destroy button in the building options or use the shortcut shift+X, it will destroy all selected buildings.