Oxygen Not Included

Oxygen Not Included

920 ratings
Colony 101: from shipwrecked to livable colony (early game)
By fradow
Learn about the pitfall and hidden mechanisms in Oxygen Not Included, from shipwrecked on a strange asteroid to rocket science.
This part focus on early game to reach a livable colony that can run tens of cycles unattended.
25
16
36
2
6
3
5
8
5
5
4
2
2
   
Award
Favorite
Favorited
Unfavorite
Introduction
Warning: the last time I played was in June 2022. This guide was up-to-date to the best of my knowledge at that time, but updates may have rendered part of it obsolete or flat out wrong. I will not be updating this guide anymore or answering to comments.

Before you start reading this guide, if you didn't already, I advise you to play a few times, to get a basic feel of the mechanics and discover the game a bit.

Done already? You probably noticed you have many options and that there are many mechanisms; it’s really hard to wrap your head around how everything works. If you didn’t, maybe you should play some more and get back here later.


This guide is going to help you from the very beginning to the endgame content in a four-part series, in a specific way: sustainably and using simple structures. The goal is not to have a super-optimized colony or rush through the game (though I paid close attention to the build order), but rather to understand the game and get through comfortably. You'll find all sorts of crazy optimized designs over the internet and very different strategies. It's up to you to experiment with what you like.

This guide applies for the Vanilla version of the game (with DLC disabled). Most of it is valid for Spaced Out!, but Vanilla and Spaced Out are different enough to be considered two separate games that shares some mechanisms.

Note that you have two main paths during the early and mid-game:
  • Farming/Industry: this path uses farming for food, and on conventional industrial buildings to produce the main mid-game resources (Refined metals and Plastic). It's generally faster, but less sustainable because of high electricity requirements and heat production. It's also the more popular way to play the game.
  • Ranching: this path uses Critters for food as much as possible and also uses Critters to produce the main mid-game resources. It's generally slower because of required evolutions and suffers from less scalable production and worst throughput. However it's more sustainable because of the almost nonexistent electricity requirement and heat production. It's also considered unconventional because many people ignore Critters for a while or focus a lot on efficiency.

This guide focuses on the second approach as much as possible because of the aforementioned focus on sustainability. As such, although I focus on reaching the mid and late game efficiently, there is very little time pressure in executing the build order.

Before starting, I can't recommend you enough the guide that served me when I started: the four parts guide from Jahws, starting with the first one:

I still chose to write this guide, because I think as a new player you need simpler structures, more explanations on game mechanisms, especially the tricky parts, and I think a slightly different plan is better for sustainability and reaching the end-game faster.
Mods
The game support mods, and a lot of very useful improvments that didn't make it in the game have been developped as mods by the community. Head on the Workshop to browse them.

A few Quality of Life mods (mods that don't change gameplay but make it more user-friendly), will be recommended at key parts of the guide, but before you begin, there are two must-have mods that I heavily recommend you install: Mod Updater and Stock Bug Fix.

Mod Updater is a mod that allows updating other mods manually. It's a workaround for the notorious unreliability of Steam Workshop to provide up-to-date version of mods.


Stock Bug Fix fixes a lot of bug in the game that Klei didn't fix yet. It's especially important at the time of writing since the list of un-fixed bugs is quite long.


There are a lot of great other mods to be found in the Workshop. If you want to get into modding, get started with Cairath's modding guide,[github.com] and join the Unofficial ONI Discord[discord.gg] to talk with fellow modders!


Common pitfalls
As you start playing, you'll encounter many issues. I compiled a list of the ones I've encountered, which is not exhaustive.

The first one is not actually in the game anymore: the game had a lengthy early access and has changed a lot since then. One very notable change occurred on game release, during July 2019, when there was a big change about buildings that output heat. Designs focused on heat management posted before August 2019 should be ignored, and any old design should be taken with a grain of salt: a few rely on mechanisms that have changed since then.

This specific guide was written during January 2021, on version Cloud Save (CS) before the Spaced Out DLC release. If you read this much later, be warned: some parts may well be outdated too and I might not update it.

Onto the actual pitfalls roughly in the expected order as you encounter them:
  • Not exploring enough: you need resources to build your base. To collect them, you need to know what's near your base, which means exploring outside your starting biome. Don't be too afraid to venture into other biomes: it's not as dangerous as you think. Worst case, your Dupes get a disease, which slows them down and heals by itself in a few cycles or they need to hold their breath for a bit when in a non-breathable atmosphere.

  • Researching everything right away: research ties a Dupe and consumes electricity, both of which could be better used early. You should only research things that you will need shortly. Research also consumes a bit of dirt and water, and while it's not a big issue on Terra, you should not pick that bad habit.

  • Using every building as soon as unlocked: while you should try out things to get a handle about how it works, the game is not designed to let you do that, and some buildings are straight-up traps.

  • Fast expansion: again, this is a survival game, if you want to make it to the end, you are going to take it slow to avoid straining your colony, otherwise you'll experience shortages soon enough, before you can get to the end-game sustainability.

  • Not re-rolling Dupes (short for Duplicants): you should pay attention to their skills when selecting them. You'll only take a handful of them, you'd better maximize their usefulness.

  • Overpopulation: you don't have to take a Dupe every time you have new printables, and you actually shouldn't. Instead, you should determine a Dupe limit for your colony and stick with it. I advocate for 8, and common other limits are 12 or 16. You advise against going above 16 until you know what you are going. On the other hand, don't go too low: at least 6 Dupes is recommended.

  • Optimizing for space: while resources are scarce, space is plentiful. Plan for the long term and leave some empty space for later right from the beginning, or you won't be able to improve your base. This sort of optimization comes later when you have a better sense of the game and want to experiment.

  • Over-using electricity: while it's very tempting to free Dupes time early by using unmanned electricity-powered buildings, this will lead to either tying one (or more!) Dupe to a Manual Generator, hindering your progress, Coal shortage if you switched to Coal Generator already, or the more insidious base cooking because of the Coal generator and other building's heat output. Keeping your electricity usage as low as possible lets you avoid all these pitfalls.

  • Wasting electricity: similar to the previous, some buildings use electricity even when not actually doing anything useful. Disable them via Power Shutoff, via Automation, don't build them in the first place, or deconstruct them as soon as they are not useful anymore.

  • Ignoring heat: "too cold" is basically a non-issue in the game. On the other hand, "too hot" is one of your main colony-destroying enemies, especially since you won't have any cooling before mid-game, and any significant cooling before end-game. Having a good cooling system can be considered as the transition from mid-game to late-game. You'll mainly accomplish this by limiting electricity production and insulating heat sources until you have some cooling. This will be a core concept throughout this guide, as it generally goes hand-in-hand with the 2 previous pitfalls.

  • Exploring too early: there is a whole asteroid to explore, but you'll have plenty of time! Early on, focus on surviving and freeing Dupe time, so that you can efficiently explore later on. I consider the start of exploration as the start of mid-game when you need more than what your initial biome can provide.

  • Not moving water around: early on you have better things to do but enventually the initial water placement will get in your way of building and exploring. Moving it around is simple enough and only requires digging and letting gravity do the rest early on. Later, you'll want to use pumps, pipes and reservoirs to do that, but pumps use electricity, while digging does not.

  • Working in CO2 (chemical formula of Carbon Dioxide) or other non-breathable gas. Your dupes will need to catch their breath very often, greatly harming their productivity. You should move gas around before you start lengthy work in an area. Again, early on, digging is your best option: Hydrogen will get on top, Chlorine and Carbon Dioxide will sink at the bottom, with Oxygen in the middle. Dig up or down to create space that those gases will fill by themselves.

  • Being overconfident about food: when you start exploring, you'll naturally find a lot of edible Muckroot, leading to a misplaced confidence about your food supply. Then, a few cycles after you stop exploring, this will dry up, and you will starve before being able to kick up your production again. You should pause your food production when you have too much food, but watch your supply to be ready to start it up again when it'slow. The best way to do that is to disable auto-harvesting of your farms (do not uproot them). Unfortunately, there isn't a good way to pause ranches production without incurring a huge lag when starting it again.

  • Delaying ranches: while they should not be used as your main food source early, Hatch and Drecko ranches need to be built very early because they require a lot of time to evolve (50 to 100 cycles depending on your luck). Smooth Hatches allow you to have refined metal without electricity usage nor heat creation, allowing you to unlock a lot of things that is otherwise restricted by your cooling ability, and Glossy Dreckos allow you to have plastic before you reach and use an Oil biome, which requires a lot of other tech to properly do.

  • Not optimizing Wheezewort usage: there are a limited number of Wheezewort in an asteroid, and you might not discover all of them until later. Since it's your only source of cooling during the mid-game, you need to make the most out of them. They work best in Hydrogen.

  • Rushing for vents/geysers: the sweet call of renewable resources is strong, but you need a lot of tech to properly use them. Leave those sealed off until you have all the tech needed to tame them.

  • Staying on Mealwood for too long: while it's a great food source early on, at some point you'll use up all the starting Dirt. Switch to less resource-intensive sources(Dusk Cap, Bristle Blossom, Pacus...) when it's sensible to do so. I advise doing so early in the mid-game.

That's a lot to take in, but don't worry, we'll go in the specifics in a moment. You will make some mistakes regardless and have to start over. That's fine, it's the expected way to learn the game. Don't go in expecting to get everything right the first time.
Beginners Traps
Talking about mistakes, the game offers a lot of options on how to tackle challenges. Some of them are sub-optimal and should not be built or used as little as possible.
While, in the hand of an experienced player, they can be somewhat effectively used, I advise you avoid them for the time being. I won't explain all the details, you can find discussions about every single subject explaining the pros and cons.

Here is the list, ordered by their place in the menus:

  • Algae Terrarium: it seems really good in theory, being less algae intensive than Oxygen Diffuser and not requiring power. Until you realize just how much labor-intensive it is. Plus, you need a LOT of them, about 2.5 per Dupe, compared to 1 Oxygen Diffuser for 5 Dupes. That's 10 times as many. Stick to Oxygen Diffuser until you get to Electrolyzer. To compare Oxygen solutions yourself, see the Wiki Oxygen guide[oxygennotincluded.gamepedia.com].

  • Wood Burner: you might not even have any Arbor Tree to produce Lumber, plus the Coal Generator is mostly better: more heat-efficient and less CO2 emission. Apart from some niche usage, stay clear from this one.

  • Microbe Musher: the main newbie trap, which prompted me to write this section. It's your earliest food option, available right at the start. It's also terrible: you need electricity, a lot of dupe time, it creates some heat, and uses tons of resources. You are better off skipping it entirely and rushing to get a Mealwood Farm running, and only use it as an emergency if your farm is not up and running fast enough.

  • Ration Box: you will use the starting one at the start, and perhaps move it around very early, but you'll soon have the Refrigerator, which is strictly better for storing food, even unpowered. 2 Refrigerators can fit 200kg of food in the same space a Ration Box can fit 150kg of food, and it's easier to place wherever you have some space.

  • Incubator: output Heat, use Power and Dupe time, for the privilege of just having eggs hatch faster. This is a bad proposition early game, and you won't care much about speeding that process late game. Don't use a powered Incubator. There are legitimate uses of unpowered Incubators for automation purposes though.

  • Compost: this one is debatable, but if you switch over to plumbed toilets, you won't have much Polluted Dirt at all. You can skip it altogether and have one less thing to worry about.

  • Fertilizer Synthesizer: it can be useful in some niche situations, but overall you don't need a Farm Station, thus you don't need fertilizer.


  • Algae Distiller: you might have to use it if you didn't move on to algae-free Oxygen production by the time you run out of Algae, but otherwise you probably won't need it.

  • Rock Crusher: this one is pretty much unskippable, because the 2 better options can only be realistically used much later.
    You should build one, but use it as little as possible, since it destroys a lot of mass, and uses a lot of Dupe time. I advise you to avoid starting Atmo suit production with one. It should only be used for very early Refined Metal needs: a bit of automation (Smart Battery is the main one), your power plant (for Heavi-Watt) and perhaps a Canister Emptier or two.

  • Most Decor items: until the late game, you will have so much Morale from other sources you won't need to rely on Decor at all. At worse, you get a -1 to Morale from an ugly decor, which is negligible. The only exception is one +20 Decor item to get the Great Hall bonus.

  • Massage Table: stress is generally never a worry, as you get huge sources of Morale early on.

  • Power Control Station: it can be useful in some niche situation, but overall it's
    not worth the trouble, especially early game when you have very little electricity production. Power Station rooms do not provide any Morale or other advantage.

  • Farm Station: same as Fertilizer Synthesizer, since both are pretty much a combo: speeding up some plants growth at the cost of other resources don't make a lot of sense, and Greenhouse rooms do not provide any Morale or other advantage.

  • Skill Scrubber: this one seems obvious: like everything else, plan ahead and you won't need it.


  • Textile Loom: clothing options other than Atmo Suit are not worth spending time on it. You might want to build some Snazzy Suit very late in the game for Decor, but that's about it.

  • Space Heater: it's counter-productive, you want to remove heat, not create it. It's also very inefficient.


  • Liquid Tepidizer: just like the Space Heater, it's counter-productive, you want to remove heat, not create it. On the other hand, in the very niche situations you need heating, this is the most efficient heater per watt spent.


  • Ice-E Fan: they take way too much Dupe time to be operated. Unless you have a lot of Dupes, it's not worth the trouble. Use other cooling methods.


  • Ore Scrubber: germs is simply not a problem you'll encounter often, if at all, when you properly use Sinks and avoid using Germy water in food.
Long-term rooms planning
One of the pitfalls is to not plan enough. In order to have a coherent and extensible base, I'm going to propose a few sensible design constraints and a plan suggestion. You are encouraged to choose your own constraints, and build your own plan.

Let's start with constraints:
  • The base should promote more vertical than lateral movement at the beginning, since your dupes will be able to move faster vertically with Fire Poles at the beginning.
  • We want a central walking corridor in the middle of our base, for easy horizontal mobility
  • We want a central climbing shaft in the middle of our base, for easy vertical mobility
  • The first power plant will be under your base (explained later)
  • We want two main vertical maintenance shafts, on each side of your base, to route cables through over that plant, which will be the backbone of your base
  • We want 2 narrow maintenance tunnels every 2 floors (one for every floor), to route cables from the backbone to their end destination in the rooms under and over them, in order to avoid the decor penalty, and leave room for future systems
  • Every shaft should have some solid tiles every so often to catch falling items
  • We want a modular design, using the most sensible size: 16x4 rooms by default, allowing us to fit almost every building in height, and being right at the 64 tiles limit for most rooms.
  • A stack of 2 rooms can be split however necessary to fit whatever inside, for example 3 rooms of 16x3, 16x2, 16x2, or 3 rooms of 10x4, 10x4, 4x9.
  • This sizing is important inside the base, but less so outside, especially since the map's details will constrain early room placement outside the starting biome.

Those rules are heavily inspired from those Modular base design rules[forums.kleientertainment.com] from Enginator, you should check it out.

Please note that this layout is massively overblowned for experienced players! As a beginner though, this layout will avoid the embarrassing moment where you cannot fit a pipe you desperately need and have to redo everything, since it has so much space everywhere. When you get experienced, you will be able to reduce the amount of unused space.

Here is a visual representation of all those rules applied:

  • Dark grey are solid tiles
  • Light grey are doors
  • Brown are ladders
  • Yellow are fire poles

With those guidelines in place, we can start placing our rooms in a sensible way:
  • Your printing pod should stay in the middle. You'll be expanding from there, closer is the least dangerous early, as there is no troublesome gas, and the temperature is good.
  • Most used rooms should be roughly in the middle to cut on travelling time. This means toilets, barracks, mess hall and storage.
  • Heavy heat-producing buildings should be outside your base, unless they require a lot of labor, to avoid cooking your base until you get cooling.
  • Your first Coal Generator should be under your base, outside of it, both to avoid cooking it and to avoid CO2 getting in your base until you get proper cooling and gas handling.
  • Any power-hungry buildings should be close to that plant, to easily run Heavy-Watt Wire to them.
  • Any unmanned room should be just outside your base. You don't need to maintain a proper atmosphere in those.

As a suggestion, here is the plan I used during one of my guide-testing playthrough, there is a lot of empty room we will make use of in the next parts:


Notice that the water tank is temporary: its placement was determined by where the resources were located in the seed, not where I wanted them. It will be relocated later. There could also be a Polluted Water tank somewhere if you need it.

The parts about needing cooling or not will be useful in the next part as well, but you can already see we only need cooling for the Mealwood farm in the center of our base (and that's due to the hard 30°C limit for them to grow), and the Small-Scale refinement room, which will only be constructed at the very end of this part.

Important: this is just a suggestion. As a matter of fact, since I wrote that part, I iterated a few times, and my go-to plan is now different to better accommodate mid and late game, and more dependant on the map features. A lot of those empty spaces ended up never being used too, as you will see in the next parts.
Overall build order
We are going to approach the game through a specific build order. While there are other paths you can use, I found this rough order to be the best way to reach the mid-game sustainably, but fast enough, only using very simple designs. Don't be afraid to slightly or heavily alter the steps, or change their order!

You need to choose Terra: other asteroids have different challenges, and this build order is only designed for Terra expected features, and might not work on other asteroids. Other asteroids are a challenge for later, when you are experienced with the game.

This guide assumes you limit yourself to 8 Dupes. Having more dupes don't necessarily give any advantage, because you need to provide for more Dupes, which puts more strain on your resources and infrastructure, and the design constraints we fixed before work really for 8 dupes: Barracks will fit exactly 8 beds, the initial Mealwood farm will provide exactly for 8 dupes, and both the early and mid-game Oxygen producers work really well with 8 dupes as well.

But what about the 12 Dupes objective? For now, disregard those goals, and don't even look at them until you reach late game. For the early and mid-game, your real goal is to survive and build a sustainable base, so that you can work on those goals later.

You can go for more than 8 Dupes, but this will require you to adapt quite a bit of things to work with your chosen number of dupes. Having fewer Dupes make things really slow, and if you go really low you might encounter labor shortage to operate the basic infrastructure.

Here is the full build order for the early game:
    Landing priorities
  1. Basic toilet
  2. Secure clean water
  3. Barracks
  4. Research room with oxygen
  5. Mealwood farm
  6. Jumbo battery
  7. Find Mealwood and Muckroot

    Preparations and intermediary steps
  8. Super Computer
  9. Basic Hatch ranch

    Base upgrades
  10. Storage room
  11. Mess Hall
  12. Great Hall
  13. Pantry
  14. Poles

    Infrastructure: water
  15. Medium term water tank
  16. Oxygen Masks
  17. Utilities location excavation
  18. Slime containment & Toxic gas
  19. Water treatment
  20. Plumbed bathroom

    Infrastructure: electricity
  21. Small-scale refinement
  22. Base insulation
  23. Basic coal power plant
  24. Complete coal power plant
  25. Coal Auto-sweeper
  26. (Optional) CO2 Handling

I'm not going to cover Dupe selection in depth. Plenty of other resources cover that in depth. A good starting roster is a Researcher, a Rancher (which will double as a Farmer early) and a Digger/Builder, as all the 3 are useful right from the beginning. If you don't start with a Rancher, you should recruit one in the first printables in order to be able to Ranch early.

Note that I recommend at least 2 ranchers in those 8 Dupes, since you will have a lot of critters to attend starting mid-game. Since Husbandry is so hard to level up, I recommend +7 Husbandry Dupes.

Let's start directly on your first landing priorities.
[1-4] Landing priorities: Latrine, Barracks, Research and Oxygen
When landing, you have 3 priorities to survive: toilets, oxygen and food.

1. Basic toilets
  • Why: To avoid making mess
  • Duration: Less than 1 cycle
  • Prerequisite: None


This is your n°1 priority, since your dupes will start peeing themselves roughly 1 cycle in. You need to have basic toilets ready before they go to sleep, which is roughly all you are going to be able to do during that first cycle. Otherwise, you'll have polluted water to clean, which will slow down your dupes until you do so.

There is no reason to delay the Wash Basin: dupes need to clean their hands on the way out to avoid carrying germs everywhere and getting a disease.

After that first cycle, you should dig a bit on the side of it to let the CO2 and Polluted Oxygen escape from there, to retain a breathable atmosphere. This will be explained in more details during the exploration part, but for now remember that CO2 (brown) will always fall under Oxygen (blue) if the air is allowed to circulate. You don't need to care about the Polluted Oxygen (green) just yet.


2. Secure clean water
  • Why: Needed for Wash Basin and Advanced Research
  • Duration: Less than 1 cycle, during 1st or 2nd cycle
  • Prerequisite: None


The Wash Basin you just built needs some water to work. You will find one nearby: dig a bit to get there, and place a Pitcher Pump in a way that won't hinder the next few goals. Don't worry too much about this though: we will be relocating that water soon enough.


3. Barracks
  • Why: Faster sleep and avoid "Sore Back" debuff, which reduce athletics and thus productivity
  • Duration: Less than 1 cycle 4 cots without digging the full room, during 1st or 2nd cycle
  • Prerequisite: None

This is a very cheap room to build, which only requires one readily available furniture building: the Cot. Place a few of them (one for each of your Dupe, and perhaps one or two spare for the next few ones), and you get yourself a Barracks room. Don't forget to fully enclose it to get the Morale bonus, which will also make stress a non-issue as an added bonus.


4. Research room & Oxygen
  • Why: Start research needed for the following rooms, provide needed oxygen
  • Duration: Less than 1 cycle, during 1st or 2nd cycle
  • Prerequisite: None

Since you have a small food supply when landing, you should first focus on getting research off the ground, since it will take a bit of time to unlock the requirements for the next few steps.

We do not want to move the Ration Box right now, since we cannot create a new one yet, but we want to use the Light buff from the Printing Pod on the Research Station, thus it's placed just right, and the Oxygen Diffuser is a bit further to allow placing the 3 tiles Super Computer there later. At that point, the Research Station will be moved on the left and the Ration Box will get moved in another room. This is important to benefit from the lit area from the Printing Pod, the yellow rectangle on the screenshot, which will improve the work speed by 15%.

You also need a Manual Generator and a Battery is greatly advised. Since we will be upgrading it to a Jumbo Battery very soon, we will need to plan for 4 tiles nearby, and connect all those things with a single wire.

Once the room is built, you should start researching the next step requirement right away. Always start the research ahead for the next 2 or 3 steps, so that you don't get stuck waiting for research, but not more than that, so that your Researcher can help on other tasks when there is no urgent tech to research. For now, this means you should start Basic Farming research, and optionally directly queue Meal Preparation.

Here is what this room will look like in a bit, with the Jumbo Battery, moved Research Station and Ration Box, and Super Computer. Notice that both Research Station and Super Computer are in the lit area.
[5-7] Landing priorities: Food supply & Upgrade to Jumbo Battery
5. Mealwood farm
  • Why: Start growing sustainable food
  • Duration: 4 to 10 cycles to dig and build the first row
  • Prerequisite: Research Basic Farming, optionally Meal Preparation

Start digging a full row for your initial farm. You'll be adding rows later on as needed, but for now one is enough. Since you won't be cooking the resulting Meal Lice from Mealwood, as Microbe Musher is awful, you need to plan for around 5 plants per dupe.

Over the early game, since you'll find a lot of food by digging everywhere, you can get by with a lot less, but don't forget that number, which will be very important once that food supply dries up because you focus on building your base.

Also add a Storage Bin, set to accept only Dirt, so that Dupe don't have to travel everywhere to fertilize the Mealwood. I like to add a ladder inside this room, so that dupes don't need to get out to reach other floors, and you don't need to add doors everywhere either. This is useful later on if you want to convert that farm to another plant that requires a specific gas.

You need 3 rows to feed up to 8 dupes (5 Mealwood per Dupe), but you should only build new floors as needed. To fit all that in a 16x9 module, you'll need to research Meal Preparation to unlock the Farm Tile, because Planter Box takes one more tile in height, meaning you'll only be able to fit 2 rows. You have 2 options:
- wait for that research and do something in the meantime, letting you focus on the next builds and get back there once it's unlocked
- or use Planter Box right now, then later during the mid-game, replace those with Farm Tiles to get 3 rows.

For Mealwood, there is little upside to using a Planter Box, apart from being unlocked slightly earlier, so I'll advise you to wait for Meal Preparation research, which will be useful soon anyway to relocate that initial Ration Box.

When recruiting new Dupes in the Printing Pod, be careful to have enough Mealwood to feed them. If your map has few seeds, it will take a while to scale up, since you have a 10% chance to have a new seed at each harvest. So don't recruit Dupes you cannot feed: they would starve.

Why raw Meal Lice as an early food source and not something else? Let's see all the other options that early in the game, from worst to somewhat workable:
  • Muckroot you find when exploring cannot be planted, and thus are not a sustainable food source, even at the beginning. It makes a good supplement though, and you should definitely use those to stretch your food supply.
  • Mush Bars (and Mush Fry) use more dirt than Mealwood, use a lot of water, and more dupe time. It's a terrible option.
  • Cooking Lice Loaf uses water and more dupe time. Depleting your limited water supply right now is not a great idea if you can avoid it, and dupe time is better used elsewhere.
  • Bristle Berry uses water rather than dirt. Early-game, dirt is more plentiful than water. They also require lighting, which means setting up a lamp, wires, and ensuring there is always electricity. They are a viable option, especially if you deplete your dirt, but we are trying to save both water and electricity early on.
  • Hatch ranching takes a lot of time to ramp up, requires a lot of micro-management early (before automation) and quite a bit of dupe time for grooming. Early, you need to use them for other purposes, detailed later, but it's better not to use them as your main food source. It's probably a viable option if you can survive until it's ramped up though.
See ONI Food Calculator[oni-assistant.com] to get accurate numbers on all the options, and the Wiki Food guide[oxygennotincluded.gamepedia.com] to know more about this subject.

6. Jumbo Battery
  • Why: Less trips to the Manual Generator, less electricity waste
  • Duration: A fraction of a cycle to replace the Battery
  • Prerequisite: Research Power Regulation


Your next priority is to replace the initial Battery, which is pretty bad, with its upgrade, the Jumbo Battery. If you are stuck because of research, feel free to tackle the next objective first.
This is a really fast and easy upgrade, there is not much reason to delay it.

7. Find Mealwood and Muckroot
  • Why: Kickstart your farm, provide temporary food until it ramps up
  • Duration: 1 to 5 cycles depending on your calories need and seeds found
  • Prerequisite: None

Your starting food supply should already be dwindling, and you probably won't have many Mealwood Seeds to plant. You need to actively hunt for Mealwood and Muckroot to avoid starvation. Look around your base for a few of those, and try to use a path that will be useful in the close future, and dig all nearby Buried objects (broken tile effect), which are often Muckroot, Mealwood seeds, and a few Hatchs. All of those are really useful right now, until your Mealwood farm is ramped up, but try to leave the Hatchs alive for the upcoming ranch.

You should uproot any wild Mealwood that is less than 75% grown, since domestic Mealwood grows 4 times faster than wild Mealwood, and let those close to 100% finish growing, harvest them, then uproot them to place the seeds in your farm.
[8] Super Computer & Choosing what to do next
8. Super Computer
  • Why: Needed for next goals
  • Duration: A fraction of a cycle to deconstruct/construct at the right places
  • Prerequisite: Research Advanced Research


Now that our basic needs are covered, we bought enough time to start more long term projects, which will need some advanced research. It's time to finish the research room with the Super Computer, like we planned in earlier steps.
Since we don't have a Mess Hall yet, feel free to start the foundation of the room to move the Ration Box there right now, so that the Research Station and Super Computer can be built in their final locations. You can also do without a Ration Box for that short time, since it doesn't prevent Food spoil.


The next 4 big projects, until the Coal Generator, can be tackled in any order, or even part of them in parallel.

I had to choose an order (which I don't always follow), here is the reasoning after several playthroughs:
  • Hatch ranching should be started as soon as possible. You might want to delay it a bit if you don't have a Rancher yet or the research isn't ready, but otherwise it makes sense to start right now, as infrastructure projects may take a while which is best used to let Hatches evolve, especially if you use my design with utility rooms far below. Getting to Smooth Hatches is also the main bottleneck for mid-game. If you start ranching as early as possible, at cycle 15 for a second skill point and don't make any mistake, you will get your first Smooth Hatches around cycle 90/100. You cannot start mid-game until you get those.
  • Base Upgrades are nice to have, and there is no reason to wait for infrastructure to do them, since they don't use power, and it will take a while to build infrastructure. It might be a good idea to build them and start excavation at the same time
  • Water Treatment is great because basic Latrine is very labor-intensive: we want to reduce that labor first. Plumbed toilets and water treatment doesn't use much power, so it can still rely on Manual Generators.
  • Coal Generator needs to be delayed as much as possible, to save as much Coal and heat capacity for later. None of the previous projects warrant having a Coal Generator to replace Manual Generator labor anyway.
[9] Hatch Ranching
9. Hatch Ranching
  • Why: Coal supply, breed Smooth Hatches
  • Duration: 4 to 10 cycles to dig and build, then ~80 cycles to get Smooth Hatches
  • Prerequisite: Dupe with Ranching skill + Research Ranching and Smart Storage

We are starting Hatch Ranching very early, because we will need Refined Metal for a lot of things mid-game, especially automation. Because we start so early, you might not have a Dupe with Ranching skill yet. That should come soon if you took one at the start and focused on Farming => Ranching on that Dupe.

There are only 3 ways to produce Refined Metal:
  • Rock Crusher, which is very labor intensive, produces a lot of heat, uses a bit of electricity and is only 50% efficient.

  • Smooth Hatches, which are also labor intensive and take a lot of breeding, but do not produce heat or use any electricity and are 75% efficient.

  • Metal Refinery which is 100% efficient but produces a lot of heat and requires a lot of electricity.

Note that you can also mine Lead from the Oil Biome, which comes directly as Refined Metal. The issue is that the Oil Biome is very hot, which will scald your Dupes without Atmo Suits, and has a -20°C Overheat malus, making it unsuitable for a lot of uses, and cannot be used to make Atmo Suits. No matter what you'll need to produce Refined Metals. I don't advise rushing the Oil Biome before you get Atmo Suits.

You will probably have to use the Rock Crusher early because your Smooth Hatches won't be ready yet, but you should only use it sparingly.

The Metal Refinery is great late game once you get renewable sources of electricity and lots of cooling capability, but early and mid-game, you don't have either of those.

Note that if you rush for it or delay the Hatch ranch, you will be able to build a full Metal Refinery setup before you have your first Smooth Hatch. It's still a good idea to rely on Hatches first.

This means the best option is Smooth Hatches for mid-game, and to have them ready by then, you need to start breeding right now.

A word of warning: experienced players overwhelmingly consider Smooth Hatches bad and prefer to rush a sustainable Metal Refinery. I think they fit well before then and that you should rely on them until you are experienced enough to skip them. Just be careful about not letting them eat all your Ore.

First, you need to breed Hatches into Stone Hatches. You can increase the chances of getting Stone Hatches eggs by feeding them Sedimentary Rock, which will be turned into Coal, as Hatches turn 50% of the mass eaten to Coal excretions.
Sedimentary Rock is found in Swamp biomes: read up ahead to section 18 to find out how to safely go through those biomes. In the meantime, feed Hatches something else in to raise the population and get Meat out of them.

Then, you need to breed Stones Hatches into Smooth Hatches. You can increase the chances of getting Smooth Hatches eggs by feeding them any Ore (Copper/Iron/Gold), which will be turned into Coal, as they also turn 50% of the mass eaten to Coal excretions. Copper is the least useful, use it.

There is a last possibility for Hatches, breeding Hatches into Sage Hatches by feeding them Dirt to increase the chances of getting a Sage Hatch egg. Sage Hatches turn 100% of the mass eaten to Coal excretions, but they cannot eat the less useful Raw Mineral, and instead eat Organic items, that we have other uses for. That's why it's generally considered the worst Hatch variant.

A basic hatch ranch can look like that. This design optimizes the space by having small rooms of 24 tiles that can host 2 hatches, and bigger rooms of 36 tiles that can host 3 hatches: that's because each hatch requires 12 tiles of living space.

Since eggs count toward this limit, we need a Hatchery (for example on the maintenance tunnel below) to store Eggs until they hatch. For that we are going to use an Automatic Dispenser: when unpowered, it will automatically drop its content on the floor, which is exactly what we want because eggs don't mature when they are in a storage. Since we don't want Dupes to get stuck in a loop, it's set up as "Sweep-only", and it's only configured to accept Hatchling Eggs.

There is also a Critter Drop-Off, set to Auto-Wrangle Surplus and Max 0 Critters: that way, Dupes will automatically go wrangle any adult hatch in a Ranch. Note that you will need to manually kill excess Hatches since we don't have a drowning room yet.

This means from now on, you'll have to watch the Ranch and manually mark any Egg for sweeping. To avoid this micro-management you can build a more complicated room so that eggs dropped by the Automatic Dispenser cannot be reach by dupes, or later on automate this with conveyors and automation, which require Refined Metals.

This ranch is big in order to have the evolved Hatches as fast as possible. This doesn't mean you should always keep it full: once you get the evolved Hatches, you can reduce the number of basic Hatches to avoid depleting your resources too fast, once you are not using Coal Generators anymore, or switch to farming them for Meat, which involves feeding them Meat to get more Meat (but tiny amounts of Coal). As a reference, to run a single Coal Generator all the time, you would need 8.5 Hatches feeding on Raw Minerals.

Once you get some evolved Smooth Hatches, again, you do not need to fill every stable: between 3 and 5 Smooth Hatches should be more than enough for your mid-game needs. After that, we will be switching to the Metal Refinery for better efficiency.

Since we won't be using Incubators (too much heat and electricity), this process will take 2 full eggs hatching duration of 20 cycles, plus the time needed for your Hatches to lay Eggs. Added up, we are looking at a minimum of 80 cycles between the time you build your wrangle your first Hatch in the Ranch until you get Smooth Hatches ready to refine metal ore.

Check the wiki Hatch page[oxygennotincluded.gamepedia.com] for more details.

As an example, here is an optimized early-game hatch ranch, courtesy of Ishamoridin.
Water stacking is explained by !tag hopliquidlock in the Unofficial ONI Discord[discord.gg].

[10-14] Base upgrades
10. Storage
  • Why: Place to store debris
  • Duration: A fraction of a cycle to build
  • Prerequisite: None

The Hatch ranch is done and started, but we need a place to move debris that's inside the Hatch Ranch, to prevent Hatches from eating random things.

To do that, create a 2 tile height pit in a central but not too frequently used part of your base. The 2 tile height will minimize Decor impact of all that debris and also serve as a small water tank.

Inside, place a submerged Storage Bin, which will take Off-gassing materials: the water will prevent off-gassing, and the fact that it's a Storage Bin allow to force Dupe to store Off-gassing material without actively ordering them to Sweep it. We will get back to that in more details in a moment.

On top of the pit, place an Automatic Dispenser configured in Sweep-only, which will allow sweeping everything except:
  • Critter Eggs, as we already have a Hatchery, and Eggs stored their would just lose Viability
  • Off-gassing materials: Bleach Stone, Slime, Rot Pile, Polluted Dirt, Oxylite, because they are actively retrieved by the Storage Bin
  • Liquefiables, which will turn to liquid and spill everywhere. Use a dedicated Storage Bin in a Frozen Biome if the need arise

What should you order your Dupes to sweep? Only objects that you have a reason for moving out of the way. It's better not to let them store everything, because that uses a lot of time for little benefits. Here are things that are useful to store:
  • Objects you don't want critters in your ranch (or wild ones in your base) to eat.
  • Later, any debris in frequently-used paths, to have a better Decor score and improve performance (storing things in a single place have a noticeable effect on the game performance)
And that's it! All the rest can be left on the floor with no consequence!

11. Mess Hall
  • Why: +3 Morale bonus, with minimal investment
  • Duration: 1 to 5 cycles to dig and build the first few ones
  • Prerequisite: Research Meal Preparation


The research is already done if you went with the Farm Tiles earlier. Just like the Barracks, this is a very easy to build early room. Between both of those rooms, you'll have more than enough Morale to get you comfortably until the mid-game without restricting your Dupes skills, even with Morale debuffs (bad meal, ugly decor....).

This also allows you to relocate the Ration Box in this Mess Hall, which is a very sensible decision because it will lower travel time and free a lighted place next to the Printing Pod for Research Station and Super Computer final placement.

Don't forget to leave some room for your next Dupes Mess Tables.


12. Great Hall
  • Why: +6 Morale bonus, with minimal investment
  • Duration: A fraction of a cycle to build
  • Prerequisite: Research Employment and Artistic Expression


We are already upgrading the Mess Hall, with just 2 items, you get 3 more Morale! You need both a Recreational Building and a +20 Decor item.

At this stage, you only have one choice for the Recreational Building: the Water Cooler. Once built, you should disable the building to avoid using water: it will still fulfill the requirement for the Great Hall and cost nothing.

For the Decor item, the easiest is to use a Hanging Pot or Wall Pot with a Bluff Briar inside: it doesn't require a Dupe with high Decor stat, and you should easily find a Bluff Briar, which is only used for Decor. If you don't want to research Artistic Expression, use a Flower Pot instead, but you will have to make your room 1 tile larger.


13. Pantry
  • Why: Avoid food spoilage
  • Duration: Less than 1 cycle to build it, a few cycles to let it fill with CO2
  • Prerequisite: Research Agriculture


Ideally, this room should be just under the Great Hall, to cut on travel time: Dupes need to find food to eat, it's better if it's right next door. The remaining space left of the Pantry will allow fitting a Bathroom just under the Great Hall later.

This is the first room where the door is not on the side: it's because storing food in a CO2 environment helps reduce spoilage. Since CO2 is heavier than Oxygen, it falls down there and cannot escape lower or on the side: that's why the door is on top.

Right now, we do not have any way to pump CO2 in that room: it isn't required anyway, a few breaths of your dupes storing/gathering food and the falling CO2 from digging upward will fill that room soon enough without any intervention.

Start off with a single Refrigerator, and add the second one if you manage to fill the first one. Refrigerators consume 120W when cooling food down, but only 20W in Energy Saver mode when the food is already cooled down: if you can, try to synchronize your food production so that more time is spent on Energy Saver mode.

By being both in a Sterile atmosphere and Refrigerated, the shelf life of your life will be dramatically improved. It's not infinite though, so for now try not to overproduce food, or it will rot and eventually turn to Rot Pile, then to Polluted Dirt.

To reduce waste, I advise this mod, which makes Dupes eat staler food first and fixes a few other issues with food management:


Later on, if you want to be able to store food forever, you will be able to Deep Freeze it (at -18°C), which in addition to a Sterile Atmosphere (CO2, Chlorine or Vacuum for example) means it will never rot.

This won't be covered in detail in this guide, but multiple designs exist for that. An interesting one is Ishamoridin's deep freeze vacuum using a Wheezewort:

You will be able to create that during mid-game, once you find a Wheezewort, get some Refined Metal, a Mechatronics Dupe.
Ethanol, which is not present on Terra, is not essential to this design.

14. Fire Poles
  • Why: Faster vertical travel time
  • Duration: Build as you go in your shafts
  • Prerequisite: Research Refined Renovation


Since the next step is starting excavating, it's a good time to unlock and start placing Fire Poles at least in our main shaft: dupes will be able to get to work to utility rooms much faster. Don't forget to extend it when you dig.

Note: some people will advise you to dig all your starting biome to make room to build your base without feeling constrained, while others will advise you to keep most of your starting biome as-is to act as a heat shield, and only dig what you need, which also saves Dupe time.

Both approaches are valid. I am partial to the second approach, which will let you live longer without worrying about Heat, and will allow you to focus on other things first. Just remember that you shouldn't feel constrained by the natural tiles.
[15] Infrastructure: Water consolidation
15. Medium term water tank
  • Why: Move water out of the way to dig down
  • Duration: 1 to 10 cycles depending on how much digging/scaffolding there is to do
  • Prerequisite: None
Chances are, your initial water supply is in the way of your main and maintenance shafts. Before really starting the excavation for utilities rooms, we need to move it out of the way: it's time you learn how to efficiently move liquids without pumps.

Start by analyzing the terrain and how you are going to move the water. It's always going to move down, but by digging a slope, you can also move it sideways. In my examples, you can see I consolidated both water supplies as a single tank, by moving the right one to the left.


Then you need to know the required tank size: every full tile of water is 1 ton (1000kg), and you need to hover partially filled water tiles at the top to know how much liquid they have.

Once you know the width and height you want, dig your tank. There are three main ways to fill the bottom tiles:
  • If there are solid tiles under it, you can just build a ladder in it and let your dupe fill it by standing over the floor. Note that they will get Soggy Feet / Sopping Wet debuffs, which are not a big deal since we already took care of having a high Morale, which will negate any stress. It will slow down the construction a bit, but not enough to care right now.
  • If there are empty tiles under it, you might not want to use the previous technique: in that case, you must first dig under the tank location with an access tunnel, fill the floor first, then dig the tank.
  • If you want to move the water somewhere else entirely, you can first construct the tank without liquid first, then redirect the water there with a slope. I do not recommend it early, because you'll spend a lot of time and headaches dealing with water. Later on, you will have pumps to do that without the headaches.

Note: there is also the Pitcher Pump / Bottle Emptier method to manually move liquids before Liquid Pump is available. I recommend against it, as it is very labor-intensive and takes a lot of time.

Once it's done, mop up any remaining surface water that's not in the tank to avoid the Soggy Feet debuff in the future, and you are almost ready to start excavating.
[16-18] Infrastructure: Excavation to get there
16. Oxygen Masks
  • Why: Faster work in non-breathable environment
  • Duration: a few cycles to build
  • Prerequisite: Portable Gases

Before you start digging everywhere, a recommended piece of infrastructure is Oxygen Masks. They allow your Dupes to breath anywhere, which greatly speed up work in non-breathable gases, as Dupes don't have to rush for Oxygen all the time.

Oxygen Masks are optional, as Atmo Suits come soon after and offer a better protection, especially against Eye Irritation (caused by staying in Hydrogen or Chlorine) and extreme temperature. As such, experienced players tend to skip over them. I still recommend them when learning, as they offer a good stepping stone until then, without having to rush.

Choose a location at the outskirts of your base (don't worry, you can easily move that later by deconstructing and re-constructing somewhere else) which will be the "mask-up" area. At that location, place an Oxygen Mask Checkpoint with the arrow facing the outside of your base, and one or more Oxygen Mask Dock just before it.

You will need to craft as many Oxygen Masks as Docks in the Crafting Station, then Deliver them with the option on the Docks.

Last but not least, Docks need Oxygen piped in them. Place a Gas pump in a location with clean Oxygen and where your Dupes don't pass through often (to avoid having too much CO2 pumped). I don't advise using a Gas Filter just yet: for now, just let Dupe repair the Docks if a wrong gas gets in there. Low-cost filters will be explained in the mid-game part.

17. Utilities location excavation
  • Why: Reach Utilities room desired location, deal with Caustic Biome
  • Duration: Generally long
  • Prerequisite: None


This seems straightforward: dig down and construct Ladders and Fire Poles along the way.

Note: Fire Poles are missing from the screenshot because I didn't follow this order during this run, which slowed me down, and that's why you should build them before.

Along the way, you will encounter two new Biomes : the Caustic Biome and the Swamp Biome, which, contrary to the starting Temperate Biome, contains toxic gas and polluted water.

You might also encounter some Geysers along the way. If you do, leave them closed off for now and change your plans if they are in the way: you are not yet ready to handle them, that's something we will be doing during the end of the mid-game.

Let's start with the easy one: the Caustic Biome. It contains two new gases: Hydrogen (pink) and Chlorine (green), both non-breathable. It also contains Dreckos and new plants, leave them alone for now, we will use them during the mid-game.

There are two ways to tackle that:
  • The easy way: free-float them in your base
  • The hard way: capture them in Gas Reservoirs, with Airlock Doors, Pumps and maybe Gas Sieves to separate them

This is a good time to learn a bit more about gas: each gas has a density, which determines how it will interact with other gas: lighter gas, like Hydrogen, will tend to go upward, and heavier gas, like Chlorine and CO2, will tend to go downard, provided enough time and free airflow.

So for, the 4 gas we know will sort themselves in that order, from top to bottom:
  • Hydrogen, the lighter gas of the game
  • Oxygen, our only breathable gas so far
  • Chlorine
  • Carbon Dioxide

Since we are producing Oxygen, and there are only small pockets of Hydrogen/Chlorine, there isn't a huge disadvantage to letting those free-float in your base, apart from Eye Irritation if Dupes stay in it: you'll always be able to clear them later on, once you have a proper infrastructure in place, or acquire them with other untapped pockets of gas. It's still a good idea to avoid disturbing large pockets of Hydrogen/Chlorine: you will need to use a few of them before you really start dealing with the free-floating ones in your base.

Meanwhile, your living quarters should still be composed mostly of Oxygen, which is good. Don't forget to add a second Oxygen Diffuser once you recruit your 5th or 6th Dupe.

18. Slime containment & Toxic gas
  • Why: Deal with Swamp Biome
  • Duration: Variable
  • Prerequisite: Research Decontamination

The Swamp Biome introduces 3 new elements, visible on the screenshot on the right:
  • Slime, the green tiles with spots of darker green, a solid that is generally contaminated with Slimelung germs, and produce Polluted Oxygen when left out in the open
  • Polluted Oxygen, the dark grey gas that is floating there
  • Polluted Water, the green liquid

Polluted Water is the easy one: move it out of the way and avoid mixing it with clean water. You can make a medium term tank like for Clean Water, or just let it there for now. It's not a big deal if your Dupes enter it.

Polluted Oxygen is not much harder: you need to build Deodorizer here and there that will convert Polluted Oxygen in Oxygen. You can spam them anywhere there is Polluted Oxygen, and deconstruct them when the air is clean.

Polluted Oxygen is not dangerous for your Dupes. The issue is that it carries existing germs (Food Poisoning and Slimelung), while those same germs will die in clean Oxygen: that's why we want to clean it instead of circulating it in our base.


Slime needs special care: it emits Polluted Oxygen when allowed to. To prevent that, the simplest solution is to store it underwater (it will be used later to fertilize Dusk Cap, produce Algae or feed Sage Hatch) so that it stops emitting Polluted Oxygen.

The Storage Bin we built earlier must be configured to accept Slime, Polluted Dirt and Rot Pile, all of which have the same behavior of emitting Polluted Oxygen, and setting a higher priority than normal so that your Dupe actively search and store them to limit how much Polluted Oxygen they emit (and lose less mass). Also add Bleach Stone, found in Caustic Biome and emits Chlorine.

Polluted Oxygen has the same density as Oxygen, and thus can be anywhere above or under Oxygen, contrary to the other gas we encountered so far.

We now know how to handle everything that we could find in the way, it's time to start the building!
[19-20] Infrastructure: Water treatment & Plumbed Bathroom
19. Water treatment
  • Why: Prepare for plumbed bathroom
  • Duration: a few cycles to build everything
  • Prerequisite: Research Distillation

This is your very first processing loop. The game, from now on, is all about finding loops you can exploit to process resources you have into resources you need. This is one of the simplest, and if you experimented before reading this guide, you probably already found it yourself.

There isn't much going on: there is a Bottle Emptier + Liquid Pump to initiate the system by providing Polluted Water or Water, then 2 reservoirs, one for Water and one for Polluted Water, and the Water Sieve to transform Polluted Water into Water.
Note that any water can be passed through Water Sieve without damaging it, but it will only convert Polluted Water to Water.

It's important to note that the Water Sieve do the transformation without removing any germs: this means, if you use that with a Lavatory output (which produce germs), your Water will still be germy: you can use that for bathroom and Carbon Skimmer, both of which don't need disinfected water, but you should not use it for Cooking, and it might not be a great idea to use that in an Electrolyzer, since the germs will be in the created Oxygen (though they will die off given enough time, as mentioned previously).
Later on, you can close off the Reservoirs side and pump Chlorine to disinfect the Water. This will be explained in mid-game. In practice, it's not very useful to do so.

Notice that I used a manual Shutoff for the Liquid Pump and the Water Sieve: it's optional, since they do not consume electricity when not working, but it can save a tiny bit of electricity by only activating them when you have enough water to produce full packets, so that they do not handle partial amount of liquids: it will use 5 times more electricity to handle 5 blocks of 2kg of water than 1 block of 10kg of water.

That tiny bit of micromanagement could be prevented by using automation, but we didn't unlock it yet and don't have the Refined Metal to build it.

It's overkill for the Pump, which will only be used a few times at all to initiate the system and perhaps dump a bit of Polluted Water lying around. Once you have initiated the system, it's a good idea to disable both the Bottle Emptier and the Pump Power Shutoff and be done with it. Perhaps you'll start it up once or twice to dispose of mopped up Polluted Water, but that's about it.

For the Water Sieve, you can add some automation later on to link it to the Polluted Water Reservoir (I'll let you figure it out), and can also keep the Manual Shutoff to be able to leave some Polluted Water untreated, if you need it as-is before you have some automation or want to micro-manage it before you do.

The piping is nothing too complicated: there is an intake for Polluted Water that we will be using shortly. The Pump and Polluted Water Reservoir feed the Water Sieve, which outputs to the Water reservoir, then that reservoir outputs to whatever needs Water.

As an idea, you could also add a Storage Bin nearby or even in the room to store Sand nearby and the resulting Polluted Dirt. That's not mandatory though.

You are now ready to handle Polluted Water sustainably.


20. Plumbed Bathroom
  • Why: Reduce labor to handle Bathroom
  • Duration: a few cycles to build everything
  • Prerequisite: Working water treatment facility, Research Sanitation


It's finally time to build a plumbed bathroom. It uses 3 buildings :
  • The Lavatory is the centerpiece of the bathroom and replaces the Outhouse
  • The Wash Basin is optional but very strongly recommended, on the way out, because using the Lavatory creates Food Poisoning germs you don't want to carry everywhere in your base
  • The Shower is optional too, but recommended as well, it cures Soggy Feet / Sopping Wet debuffs and adds +3 Morale. Considering it's so easy to get those debuffs early game, it's a good idea to build one or two

Note that the piping shown here is far from optimal because we did not use bridges for flow priority. If you want to know more about piping, this explanation is great.[forums.kleientertainment.com]
In practice, a bathroom Water usage is so low this won't cause any problem.


How many of each do you need? There is no definitive answer. It depends on how many Dupes you have, their schedule, and your base size: when more Dupes want to use the bathroom at the same time, you need more, and if your base is big, you might want several rooms so your Dupes travel less.

For now, one single bathroom with 2 of each building is more than enough, especially if you have several schedules with different bathtime/downtime hours. You can go to the extreme and only use one of each for up to 24 Dupes if each one is on a separate schedule for their Bathroom break.

Additionally, while the Wash Basin and Shower produce the same amount of Polluted Water as Water they use as input, the Lavatory produces more Polluted Water than Water it uses as input. This means your closed Water Treatment, given enough time, will overflow, and you are going to need to use either Water or Polluted Water.

It's not a worry for right now though, the Liquid Reservoirs in the loop have quite a bit of spare storage before it starts overflowing. There are multiple possible uses later, it's up to you how you'll deal with it.

Another thing to mention is that both the Lavatory and Shower produce a small amount of Heat. Again, that's not a worry for right now, as it will take some time until it starts being an issue, but you'll have to deal with it sooner or later. This amount is so small even a single Wheezewort (we'll cover it later) would be massively oversized to negate it.

If you want to know more about, especially a way to handle excess water, please check the wiki Self Sustainable Bathrooms guide.[oxygennotincluded.gamepedia.com]

Later, when you have Atmo suits or your Dupes don't get wet anymore, keeping Showers is controversial. While the Morale buff is nice, it uses some time. Some players like to remove Showers altogether, as Dupes will work during their bathroom break after being done with Lavatories.

Another alternative that requires a bit of Refined Metals is to instead replace Sinks by Showers, credits to Angpaur for this setup. When going to the bathroom, Dupes will be locked in the room until they have finished showering. A caveat of that technique is that if the Dupe already have the "Showered" buff, it won't take another shower and will just wait until doors re-open.
[21-24] Infrastructure: Coal Generator
21. Small-scale refinement
  • Why: Required to make Smart Battery and Automation Wire
  • Duration: a fraction of a cycle to build it, a few cycles to refine the needed metal
  • Prerequisite: Research Brute-force Refinement


Chances are your Smooth Hatches won't be ready yet. If they are, good! Use their Refined Metal production and skip this part.

If they are not, you'll need to build a Rock Crusher somewhere, and use it just enough to make the Refined Metal you need for the next parts. I'll be detailing how much Refined Metal is required for each step.

Since each order produces 50kg, you'll need 5 orders to produce 250kg of Refined Metal for part 22, then 4 orders to produce 200kg of Refined Metal for part 24.

That won't be enough to significantly heat your base, but you should not continue using it much more, if at all, after that.

22. Base insulation
  • Why: Keep utilities heat out of your base
  • Duration: a few cycles, insulated tiles building is slow
  • Prerequisite: Research Temperature Modulation

Before building the Coal Power Plant, it's a good idea to start insulating the floor of your base, between your base and utilities.

This will give you a nice buffer of time before you need to worry about heat since you can leave the Coal Power plant alone until it reaches 75°C Overheat temperature (or higher depending on the material used), and will avoid heat radiating up to your Mealwood Farm (or other farms), that has a hard 30°C limit. If the temperature reaches 30°C in your Mealwood Farm before cooling is ready, you'll have a bad time.

As you can see on the temperature overlay here, after a few cycles of letting the power plant run, the heat is contained in the room.

23. Basic coal power plant
  • Why: Start replacing Manual Generator
  • Duration: a few cycles
  • Prerequisite: 250kg Refined metal & Research Sound amplifier & Smart Home

It's finally time to start your second utility room. We waited so long because of two main reasons:
  • It generates a lot of heat, as you could see on the screenshot on the previous part, that we wanted to delay
  • It requires a Smart Battery to avoid wasting power.

That second point is very important: by default, any Generator will run all the time, regardless of how much electricity your grid or batteries need. For the Manual Generator, that's not an issue because by default it has a threshold linked to batteries without automation, but other generators don't have that.

This means you absolutely need a Smart Battery linked to all power generators to tell them when to stop generating power. While thresholds are not important yet, it will also allow you to start your renewable generators first, and only if it's not enough (batteries keep getting lower), start-up non-renewable generators.

The current room is almost empty and buildings are in weird spots: that's going to make sense during the next part. The Storage Bin is there to store Coal.

Once it's done, it's time to remove your starting Manual Generator and Jumbo Battery in the Research Room: they served us well, but we won't be needing those anymore.

Please note that you can still use Manual Generators if you deplete your coal resources, run into heat issues, want to use manual labor or want to train your Dupes: if you do so, it would be a good idea to create a dedicated room near your power plant.


24. Complete coal power plant
  • Why: Plan for the future
  • Duration: less than 1 cycle to build the transformer and wires
  • Prerequisite: Research Advanced Power Regulation

Soon enough, your grid will use more than 1000W, first in bursts, and then as a baseload.

That's a problem: standard wire can only handle 1000W, but even a 600W Coal Generator hooked up to a Battery can provide bursts of electricity above 1000W.

It's time to introduce a Power Transformer to prevent that (saving you the time in reparation and downtime until it's repaired), and start using Heavy-Watt Wire inside your Power Plant.

The Power Transformer ensures your Power Plant cannot provide more than 1000W through that wire: that means both Generators and Batteries should be located before the Power Transformer.

This also means once you reach a baseload above 1000W, you will need to split your grid into several parts, each hooked up to a different Power Transformer or upgrade to Conductive Wire, which can be hooked to 2 Power Transformers for up to 2KW.

You'll need to add Coal Generators and Power Transformer as you go: that particular design can accomodate 5 Coal Generators for a total output of 3000W split into 3 1000W grids.

There is room to accommodate a Carbon Skimmer if you want to handle CO2 (we will get to that) or more Batteries, to have a higher capacity or send signals to other Generators.

If you want to add a Power Control Station, which will start making sense if you build it to full capacity, you'll need to redesign the room to fit under the 96 tiles limit. The current design is not space-efficient and uses 144 tiles, so there is room for optimization there.

Please note that you probably won't ever need that many. I personally never went above 2 Coal Generators in my play-throughs. That's the room I currently use, which is more than enough until you get other Power sources, as it can easily provide up to 1KW.

If you want to know more about Power, see the Wiki Power Circuits guide.[oxygennotincluded.gamepedia.com]
[25-26] Infrastructure: Auto-Sweeper and CO2 Handling
25. Coal Auto-sweeper
  • Why: Automate Coal refueling
  • Duration: a fraction of a cycle to build the sweeper
  • Prerequisite: 200kg Refined metal & Dupe with Mechatronics Engineering & Research Smart Storage

It might be worth waiting for Smooth Hatches for the Refined Metal, since the Coal refueling will be very infrequent at the beginning until you increase your electricity usage, but you might as well do it now and be done with it.
The other reason is that you might not yet have a Dupe with Mechatronics that allows you handling solids, in that case just queue the construction, it will be built as soon as you specialize one.

The Auto-Sweeper positioning is really important: to work, it needs to be in range of the Storage Bin and Coal Generators. More precisely, it needs to be in range of the "Tile of interest"[oxygennotincluded.gamepedia.com], which for the Coal Generator is the bottom middle tile. You can see what's in range before placing it or when clicking on it.

The 2 odd ladder tiles are there so that Dupes can access the left part, to add a Coal Generator there later.

With that, your Coal Power Plant is done and will just need small upgrades as your electricity usage increases.

26. (Optional) CO2 Handling
  • Why: Remove CO2 from atmosphere
  • Duration: None if you skip it
  • Prerequisite: Water treatment & Research Decontamination


You might have noticed my power plant doesn't handle CO2, despite producing quite a bit of it.
That's not a mistake: contrary to some other gas-emitting buildings that will stop when they detect over-pressure, the Coal Generator will happily keep burning coal even at high pressure.

Unless you start seeing issues with that pressure, there is no reason to handle that right now.

But what about your base? Unless you start seeing CO2 in places you want a breathable atmosphere, in your living quarters in the middle, there is no real reason to actively handle that now either.

The only part I'd really consider handling CO2 is if you want to explore downwards before Atmo Suits.

At this stage, CO2 handling is very simple: wire up a Carbon Skimmer, link it to the proper pipes to your water treatment room, and add a manual Shutoff or some automation to disable it when it's done.

Notice the conditional: I'm not yet convinced you should build a Carbon Skimmer at all at this stage. There are several reasons not to:
  • It loses mass without creating anything useful, unless you somehow require Polluted Water and don't mind using up Clean Water. That's not great for sustainability.
  • Later on, you have a better use for all that CO2: feeding it to Slicksters, which will produce Crude Oil in exchange.
  • In the meantime, there isn't a great argument for handling it, especially once you will get Atmo Suits. It's down to preference to speed up downward exploration right now, at the cost of a bit of heat, electricity and mass removal.
End of early-game base state
You now have a very well prepared base to take on your next challenges: you bought yourself enough time to start the mid-game without rushing because you depleted resources or cooked your base.

It should take about 50 (if you rush) to about 100 cycles (at normal speed) to reach this state, depending on your seed particular challenges, how many mistakes you had to correct and how optimal your build was. The specific cycles count is not important: what's important is the resources you saved and how little heat you created, which will give you a buffer for the next parts.

Here is a look at what your base should look like if you followed this build order and room planning:


I have circled three areas that will be of great interest for the mid-game:
  • The bottom left one is a Cool Steam Geyser. Luckily, it isn't going to be in the way of the base. If it was, I'd have to change my plans, because it cannot be moved
  • The 2 others are Frozen Biomes, both with a visible Wheezewort, and there is probably at least another hidden one in each of those Biomes. Our first cooling system will use those.

Right now, you have:
  • In blue, all the essential living rooms: Barracks, Great Hall and Bathroom
  • In green, a Mealwood Farm, the best early-game food
  • In purple, a maturing Hatch Ranch and its Hatchery, which will soon have (or already have) Smooth Hatches ready to produce Refined Metals
  • A basic supply of Oxygen with 2 Oxygen Diffusers (the first in the Research Room, and I chose to place the second one next to my farm)
  • In orange, a Storage area
  • In red, 2 utility rooms: Water Treatment and Coal Power Plant

You might have noticed that Oxygen Masks are nowhere to be found. That's because this base was done before they were introduced in the game.

At that point, your little colony is now mostly self-sufficient with food, power and oxygen, until you run out of the non-renewable resources used in the early game or cook your base. The next challenges are going to be around cooling and using renewable resources.

What about Electrolyzer / early SPOM?
If you read other guides, a few will advocate building Electrolyzer + Hydrogen Generator (the combo being called SPOM for Self Powered Oxygen Machine) in the early game, before formally entering the mid-game.

I think that's a mistake: it's too early to build a SPOM, for several reasons:
  • You should still have a healthy reserve of Algae. Until you deplete it, there is no reason to switch
  • It uses Clean Water, which is initially more limited than Algae. You start a ticking clock to get more Clean Water when you build a SPOM.
  • What about excess water from Water Treatment? While the Food Poisoning isn't an issue in Oxygen, the amount of excess is not sufficient: it will only provide enough Oxygen for 1 Dupe every 10 Dupes you have.
  • While it's self-powered if you burn the generated Hydrogen, it still generates heat. You go from 3kDTU/s for 2 Oxygen Diffusers to 5.75 kDTU/s for Electrolyzer + Hydrogen Generator + an additional Smart Battery, almost twice as much, which will force you to execute faster on the cooling part as well.

That's why I don't advise building a SPOM until later in the mid-game when you have some cooling in place and are close to tapping into a Steam Vent.
Conclusion
That's it for now, feel free to leave a comment if I made a mistake, if you think there is a better option that doesn't add complexity, or if there is something I forgot to explain.

A big thank you to Emmarald for proofreading.

Special thanks to all the super-friendly guys in the Unofficial ONI Discord[discord.gg] who helped me understand the game mechanics and suggested improvements.

Happy building!

If you enjoyed this guide, read the next part, which mainly explains how to switch to renewable options:
83 Comments
Bahamut_256 28 Sep, 2024 @ 5:18pm 
Fertiliser synthesizers are NOT traps. They are one of the best buildings in the game.
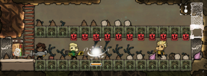
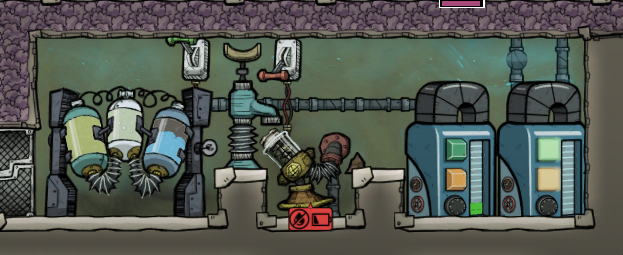
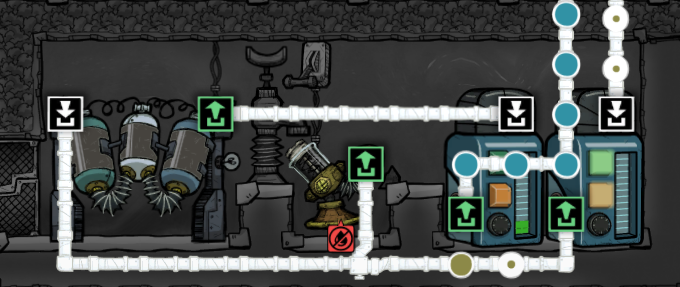
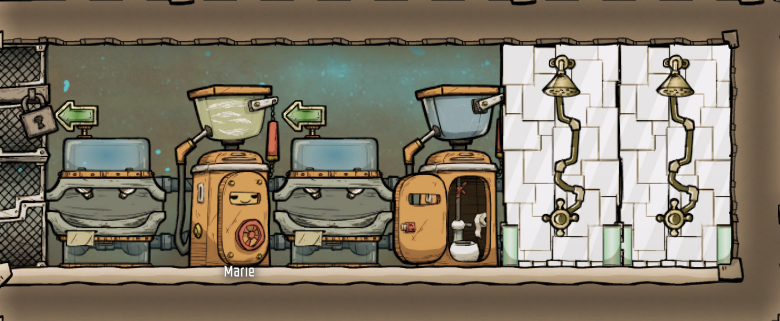
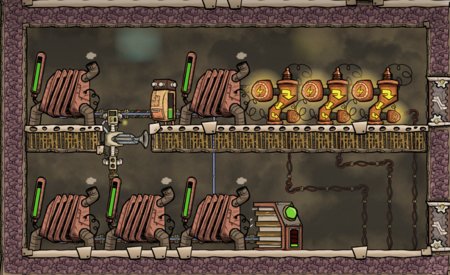
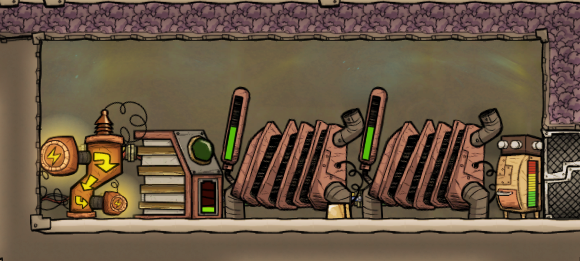
Not only do they produce enough natural gas to power themselves, one can be sustained by two dupes using toilets, and two dupes using outhouses.
The byproduct of running the Natural Gas generators off them ends up with them producing as much polluted water as was initially invested into it. with a net positive of 200 watts of power a day.
You get free power and cut in half the time it takes to grow your food, meaning you only need half as many plants, which halves farm duplicant labour, which means you get a gigantic positive feedback loop of time and polluted water. You then pump that polluted water directly into a pit with deodorisers over it and now its producing oxygen and clay as a byproduct too.

Literally one of the best machines in the game, and always has been.
fradow  [author] 18 Jan, 2024 @ 1:52pm 
Warning: the last time I played was in June 2022. This guide was up-to-date to the best of my knowledge at that time, but updates may have rendered part of it obsolete or flat out wrong. I will not be updating this guide anymore or answering to comments.
MrWattsVR 30 Oct, 2023 @ 4:09am 
Amazing work It has helped out so much
a.mcbob 17 Sep, 2023 @ 5:28am 
Thank you for such a detailed and thorough guide! I am indeed modifying it as I go to suit my needs and preferences, but it's provided an excellent foundation.

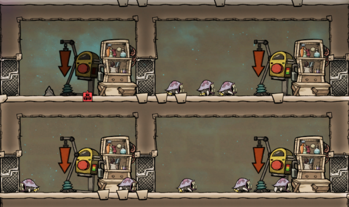
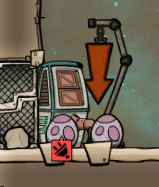
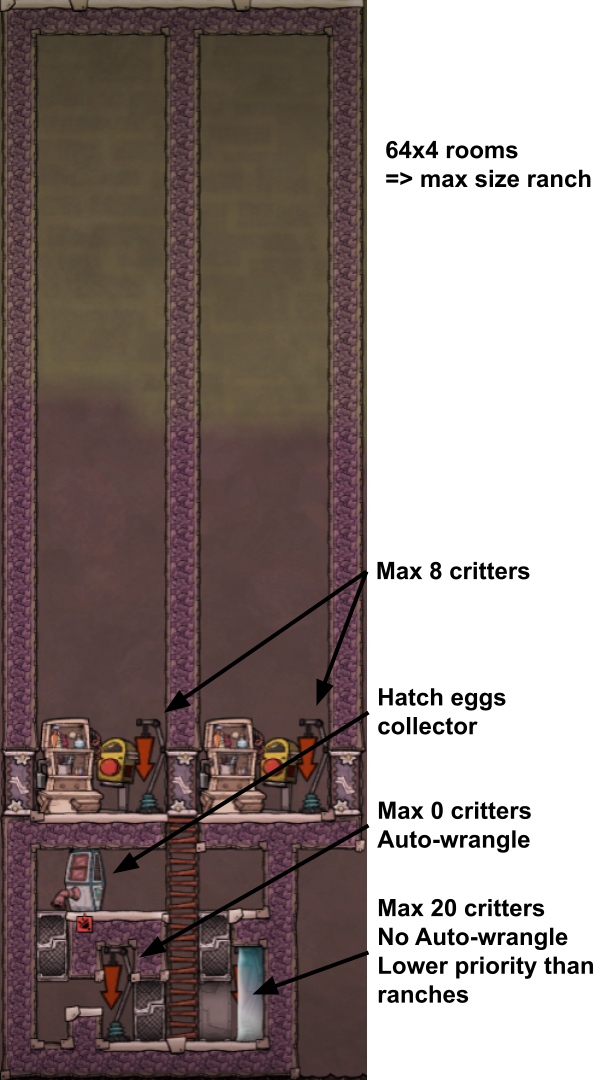
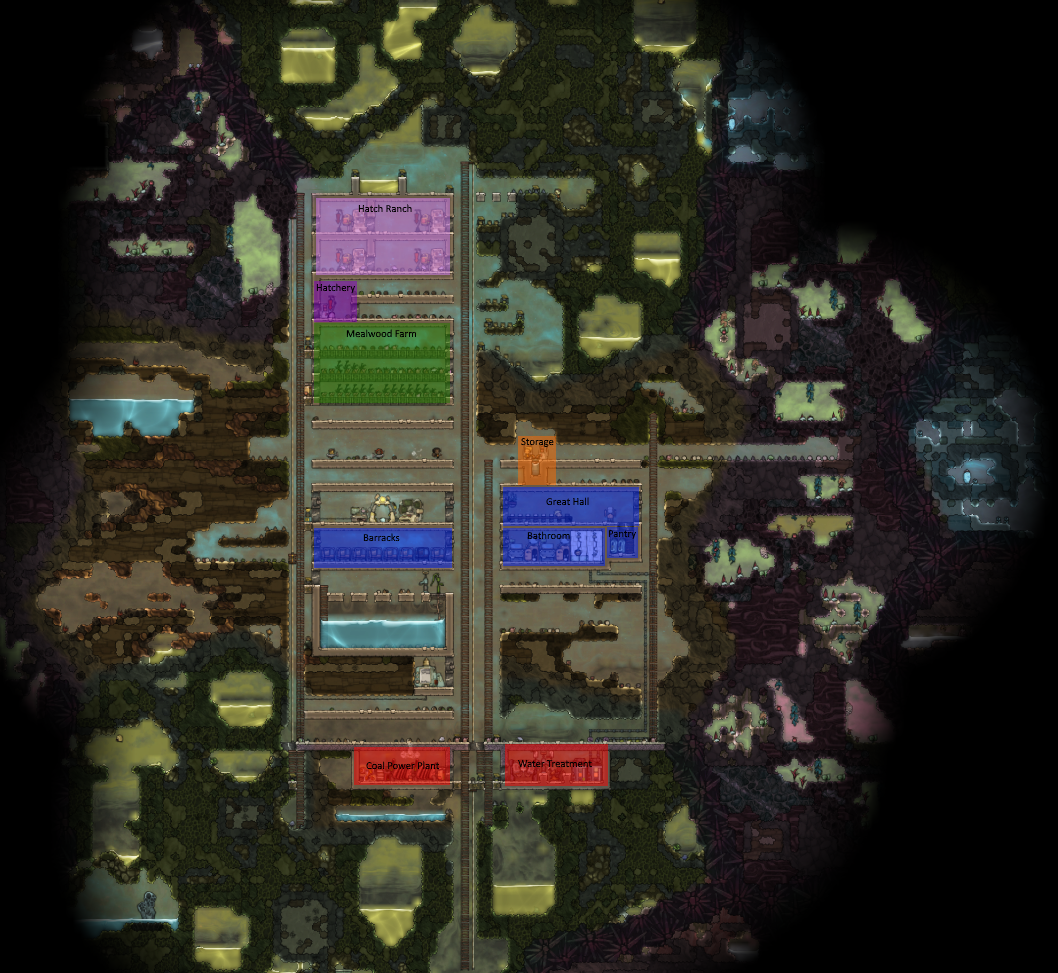
I do seem to have one issue, however. My hatchery isn't sending hatchlings to other pens, even though there's space. The hatchery is set to max 0 critters and auto-wrangle, but at 1/0 it says "Pen status OK" in the errands section. Any advice, please?
KingCaleb115 5 Jul, 2023 @ 4:33am 
good guide and whatnot but too many words.
CubitoIsHere 12 Mar, 2023 @ 8:33pm 
@Digit
Mealwood can only grow at less than 30c
Digit 21 Jan, 2023 @ 8:02pm 
why does the mealwood farm need cooling?
Digit 21 Jan, 2023 @ 7:33pm 
in the hatch ranching section how does having two rooms save space?
Avery24E 8 Dec, 2022 @ 8:41pm 
Nya~
TheGamer 4 Dec, 2022 @ 11:16pm 
i make a empty room and put 2 cells of polluted water in it and then a deodorizer and a sucker thing idk it takes the oxygen around my base